Attaching bodice to skirt
-
15 years ago LINK
phyllis_stein @phyllis_stein
Hi! Me again.
I feel so close to finishing this dress but I’m stuck! I’m attaching the skirt to the bodice. The front pieces of the bodice have that basted seam which is folded and pressed but the back pieces don’t. So how do I line them up to pin them?
Thanks in advance
Alison
15 years ago LINKanybody…?
15 years ago LINK Nicole
@motherof5
Nicole
@motherof5
I am not sure what you mean…..could you post some pictures?
Nicole
15 years ago LINKThanks Nicole. I will. I’m worried that maybe I did something wrong on the bodice.
15 years ago LINKOkay, here’s some pics…
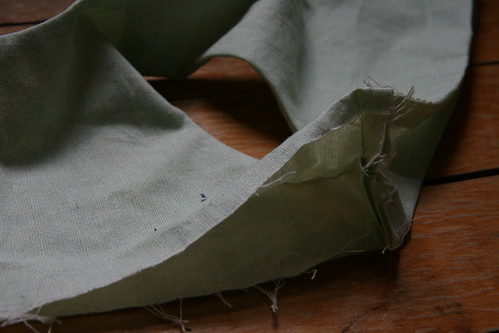
When I pin the bodice to the skirt do I match the edge of the back bodice pieces to the edge or the skirt? If so, then with the front piece of the bodice do I pin at the basted seam?
I am very confused by this step!?
15 years ago LINK Violaisabelle
@Violaisabelle
Violaisabelle
@Violaisabelle
Looking at the instructions and at your photos, I would say you might have a little oops there. The instructions say to have that basted edge on the front and back of the yoke facing pieces. If I am seeing your picture correctly, it appears you have basted a 1/2″ on the front-yoke and the front-yolk facing pieces. Only the yoke facing pieces (front and back) are to have the 1/2″ basting line. The front and back of the yoke pieces are not stitched with a 1/2 basting line. When you sewed your side seams together, you have taken up a 1/2″ on both the front yoke and the yoke facing. You will want to unpick that part of your side seam and put the yoke front piece free of a 1/2″ turn. Again, this is if I am seeing your pictures correctly.
Once you have just the front-yoke facing pieces 1/2″ basted up, and your side seams stitched, you will match up center front-yoke with center front skirt. then the side seams of the front yoke with the side seams of the skirt. Next you will match up the back edge of the yoke with the edge of the skirt. The front and back yoke facing pieces will be free as you do this. Once that is stitched you will cover over the bodice/skirt seam with the 1/2″ basted yoke facing piece.
Does that help at all?
I hope I have viewed your photos correctly.
Carol
15 years ago LINKViolaisabelle
@Violaisabelle
You know, I was finding this a bit confusing trying to type that up. I don’t know if this will help, but think of the yoke as the bodice fashion fabric and the yoke-facing pieces and the lining. You want the 1/2″ basting on the lining pieces (front and back) and no 1/2″ basting on the fashion fabric pieces. You will attach the skirt to the fashion fabric pieces, (right sides together) then cover over the seam with the lining pieces.
Carol
15 years ago LINKAhhh….. a big heartfelt THANK YOU!!!
I think* I understand now.
Y’know, as an absolute beginner I was a bit confused by the terms facing, yoke and bodice. Your explanation is helping me wrap my head around it. Now, the piece that has the interfacing on it is what…. the lining side or the fashion side?
15 years ago LINKNicole
@motherof5
Carol is your ‘man’ for this sort of thing!
15 years ago LINKViolaisabelle
@Violaisabelle
I’m glad that was a bit helpful. You know, I process information differently and find sometimes I have to read and re-read to get what the ‘author’ wants me to do. 😉 Translation, dyslexic tendencies. 😉 Put that together with studying paintings and images for the past 9 years for historical costuming and reproducing garments…well, I just see things differently. 😉
The facing will be on the ‘fashion fabric’ or outer fabric, not the lining or yoke facing piece. 😉
Aw, Nicole, I just got lucky! 😉
Carol
You must be logged in to reply to this topic.
copyright
Unless otherwise credited, all work on this blog is © Liesl + Co., Inc, 2008-2026. You are welcome to link to this blog, but please ask permission before using any text or images.