Hello and welcome! We hope you’re ready to start making your Liesl + Co. Chaval Coat. We’re glad you’re joining us for the sew-along. If you aren’t ready to get started yet, rest assured the sew-along will still be here for you when you’re ready to get going!
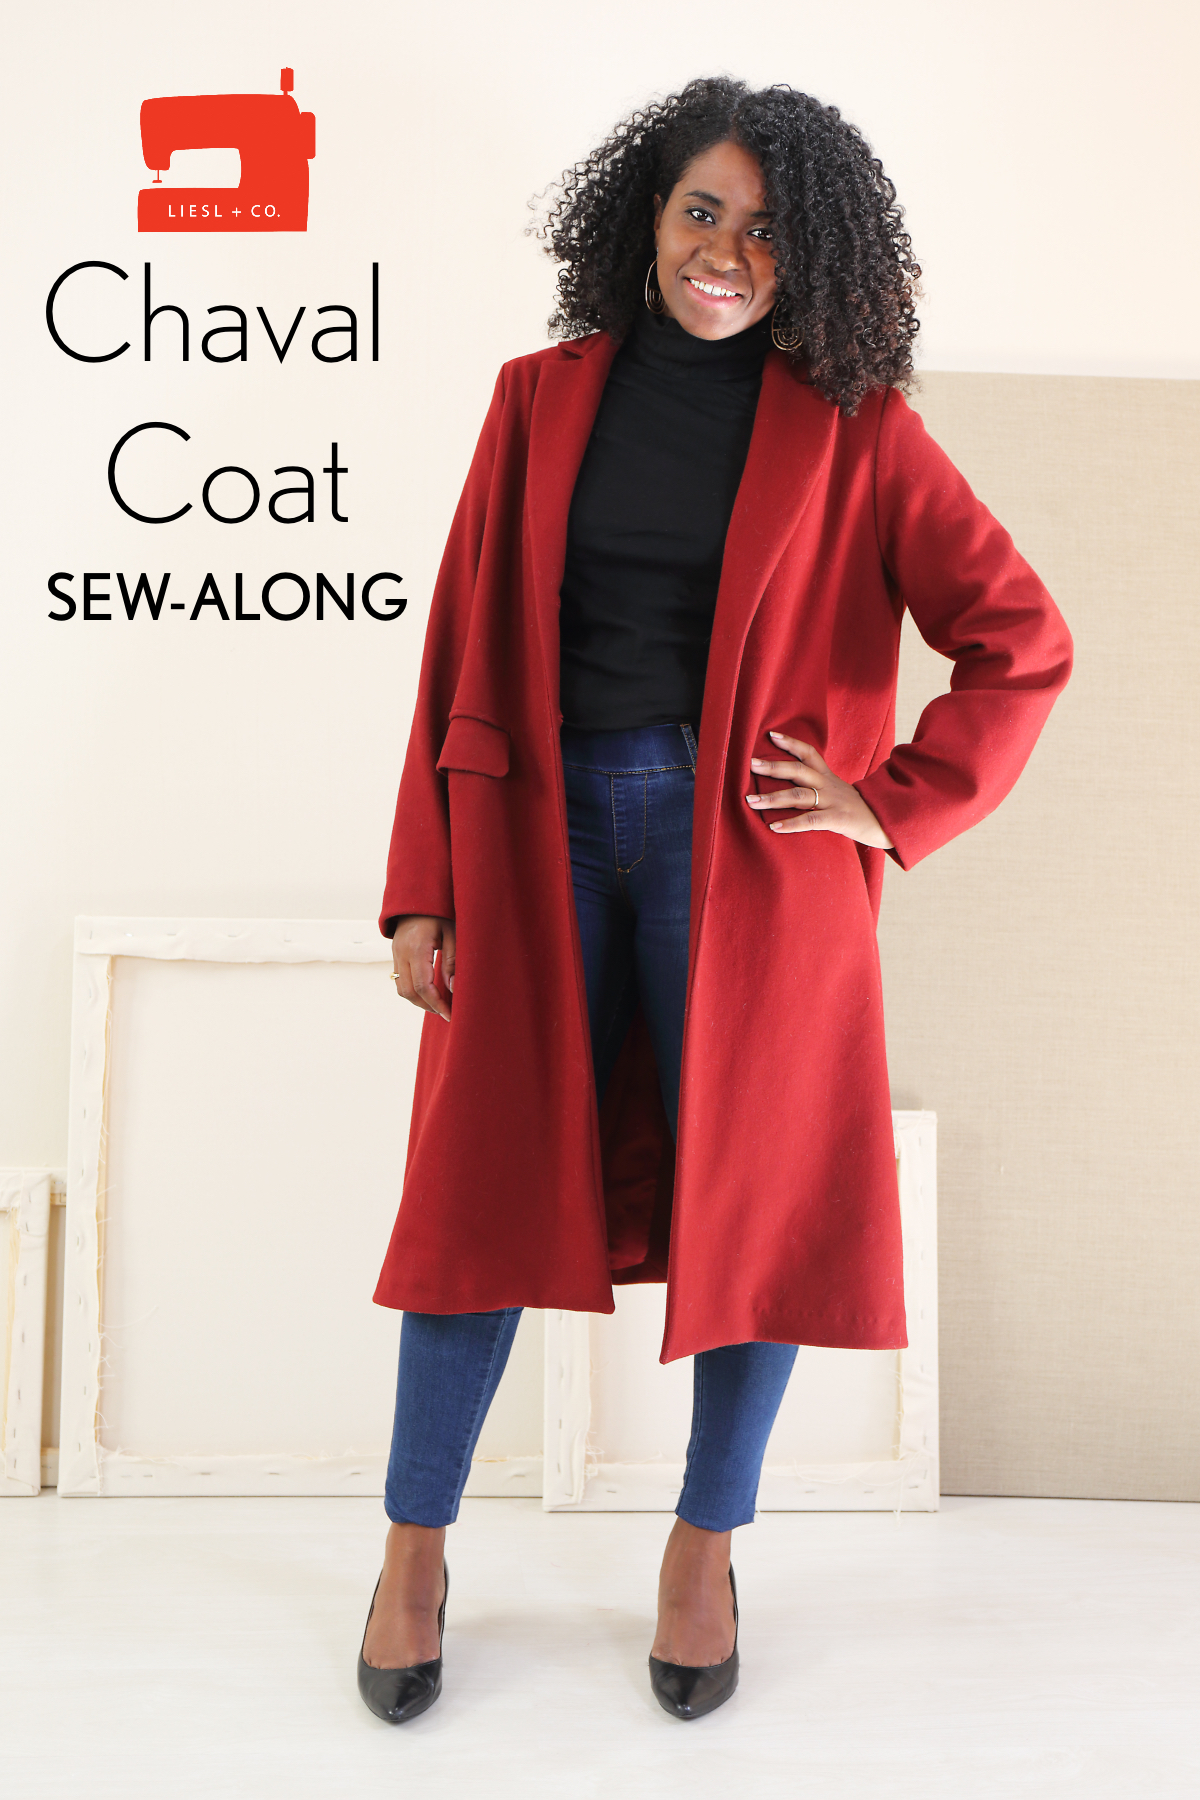
Chaval Coat Pattern Details
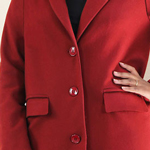
Description: This classically-inspired, fully-lined, menswear-style coat will teach you some nifty new sewing skills without overwhelming you. The pattern features a back walking vent, two-piece sleeves, a traditional notched collar with banana stand, and double-piped front pockets with flaps. You’ll reach for this coat all fall, winter, and spring since it’s a versatile, timeless, and stylish piece.
Sewing level: Intermediate: For the experienced sewer who has made a wider variety of items and feels comfortable with a new challenge.
Suggested fabrics: This pattern works best with medium- to heavy-weight woven fabrics like wool coating, tweed, canvas, denim, and twill. Lining: Rayon lining fabric (Bemberg).
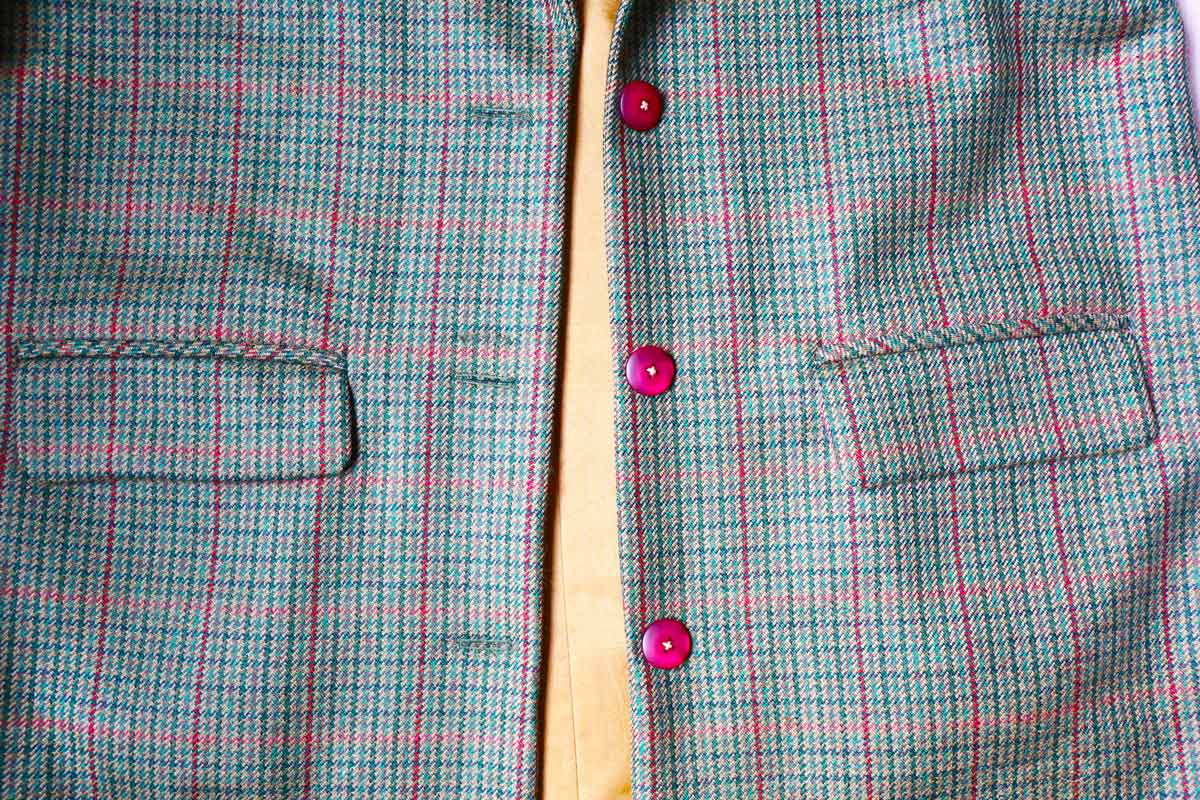
Notions: Coordinating thread, light- to medium-weight fusible interfacing, three 1″ buttons.
Get the pattern: It’s available in both paper and digital formats.
Sew-Along Schedule
We’ve broken down the planning and sewing process into a few easy steps. Here’s how we’ll be working through the process of creating your new coat together.
| Preparation Steps | Sewing Steps | ||
 |
1. Gather Your Materials Choosing fabric, gathering notions, deciding on customizations, and purchasing your pattern. |
 |
1. Getting Started, Prepare the Pocket Flaps and Sew the Pockets We begin by preparing our interfacing pieces and sewing the pockets. |
 |
2. Select Your Size, Make Pattern Adjustments Deciding on the size you will sew and making any necessary adjustments to the pattern. |
 |
2. Assemble the Back, and Prepare the Facing and Lining We assemble the back of the outer coat and work on our facings and lining. |
 |
3. Sew the Collar, Attach the Collar, and Attach the Sleeves We work on completing the collar and sleeves. |
||
 |
4. Assemble the Coat and Lining and Hem and Finish the Coat Just one day’s sewing is left to finish off the coat. |
||
Gather Your Materials
Are you excited to get started? I am! This is such a classic, workhorse piece–one that you can wear for years. I can think of few handmade wardrobe items that will be worn as frequently as a beautifully sewn coat. I showed a few ideas in this post, and there are lots more ideas in the Liesl + Co Chaval Coat Pinterest board if you need some inspiration.
Choosing your fabric
Let’s talk about fabric. You’ll want something with a little body for this style. Nothing too drapey, in other words. If you’re looking to sew a spring- or autumn-weight coat, look for twill, canvas, tweed, and denim. For a winter-weight coat, look for heavy wools. And if you’re wanting something really warm you might want to interline your fabric with (pre-washed) flannel or Thinsulate. If you’re using either of these, in my experience, it’s easiest to baste them to the lining pieces. That way, you won’t get too much bulkiness in the facings and the collar, etc. Once you’ve basted the insulation to the lining pieces, you’ll simply treat those pieces as one fabric, so there’s not much extra you need to do.
Choose your notions
Regarding notions, you don’t need much for this pattern. Just three 1″ buttons and some fusible interfacing. Be sure to match your interfacing to your fabric. In other words, look for something that adds a bit of stability to your fabric without completely changing the hand. If you’re unsure, ask for help when you’re shopping for your fabric and your salesperson should be knowledgeable enough to make suggestions.
Here’s what else you’ll need to assemble:
- Thread. All-purpose thread works great for most fabrics, but choose your thread according to your fabric.
- Any special sewing needle, depending on your fabric choices.
Other tools you’ll need:
- Sewing shears or a rotary cutter and self-healing cutting mat.
- Thread snips or a small scissors, which are nice to keep by your sewing machine so you can keep your sewing cleaned up while you’re progressing.
- I like to have a good straight-edge handy. My preference is a 6″ x 24″ quilting straight edge, which is also really convenient when cutting out.
- A small ruler. I like the 1″ x 6″ size rulers.
- Tailor’s chalk or a water-soluble fabric marking pen.
- A seam ripper (always important to have on hand).
- A measuring tape to determine your size and to help if you want to make any alterations.
- Pins (or pattern weights and fabric clips if you prefer).
Obviously you’ll want access to a good iron (your second-most important tool after your sewing machine) and an ironing board. I make use of my sleeve board a lot, too.
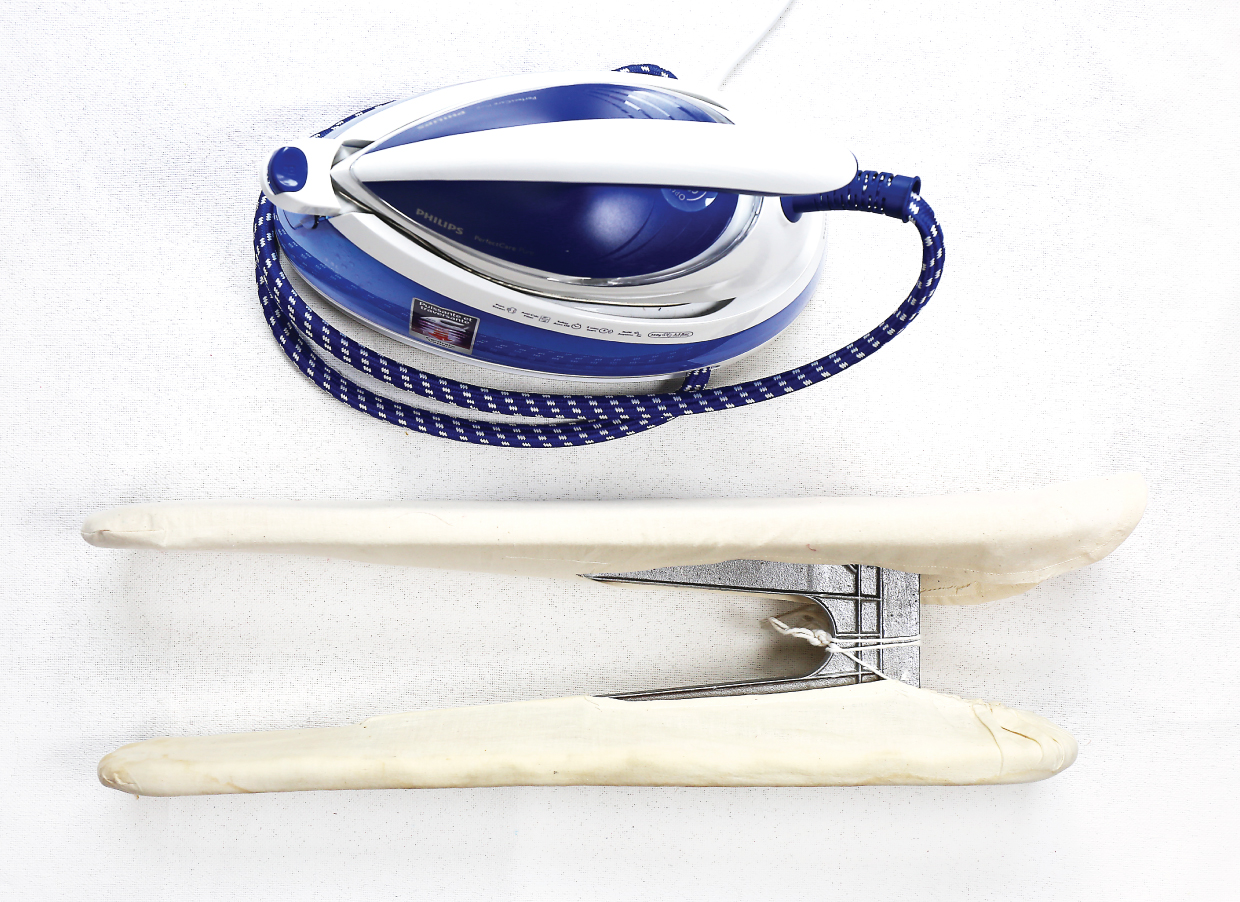
And one more suggestion for this pattern: if you have a point presser/clapper it’s a terrific tool to tame heavy wools and bulky seams, not to mention pressing edges and reaching into collar and lapel corners.

Purchasing your pattern
And of course you’ll need a copy of the pattern, which you can purchase in paper format or as a digital PDF.
Select Your Size
Next let’s talk about selecting your size. For this style (and most styles, for that matter) focus on fitting your shoulders. Keep in mind, however, that this is a coat, so it won’t fit as closely as other garments. You want a little room under this for bulky sweaters and other layers.
To get started you can use our measurement chart as a guideline, but obviously everyone is different and you’ll need to find the size that works best for you.
First take your full bust measurement. This measurement will be taken across the fullest part of your bust. Then take your upper bust measurement. This measurement is taken just under your arms, across the upper part of your chest, like in this photo.
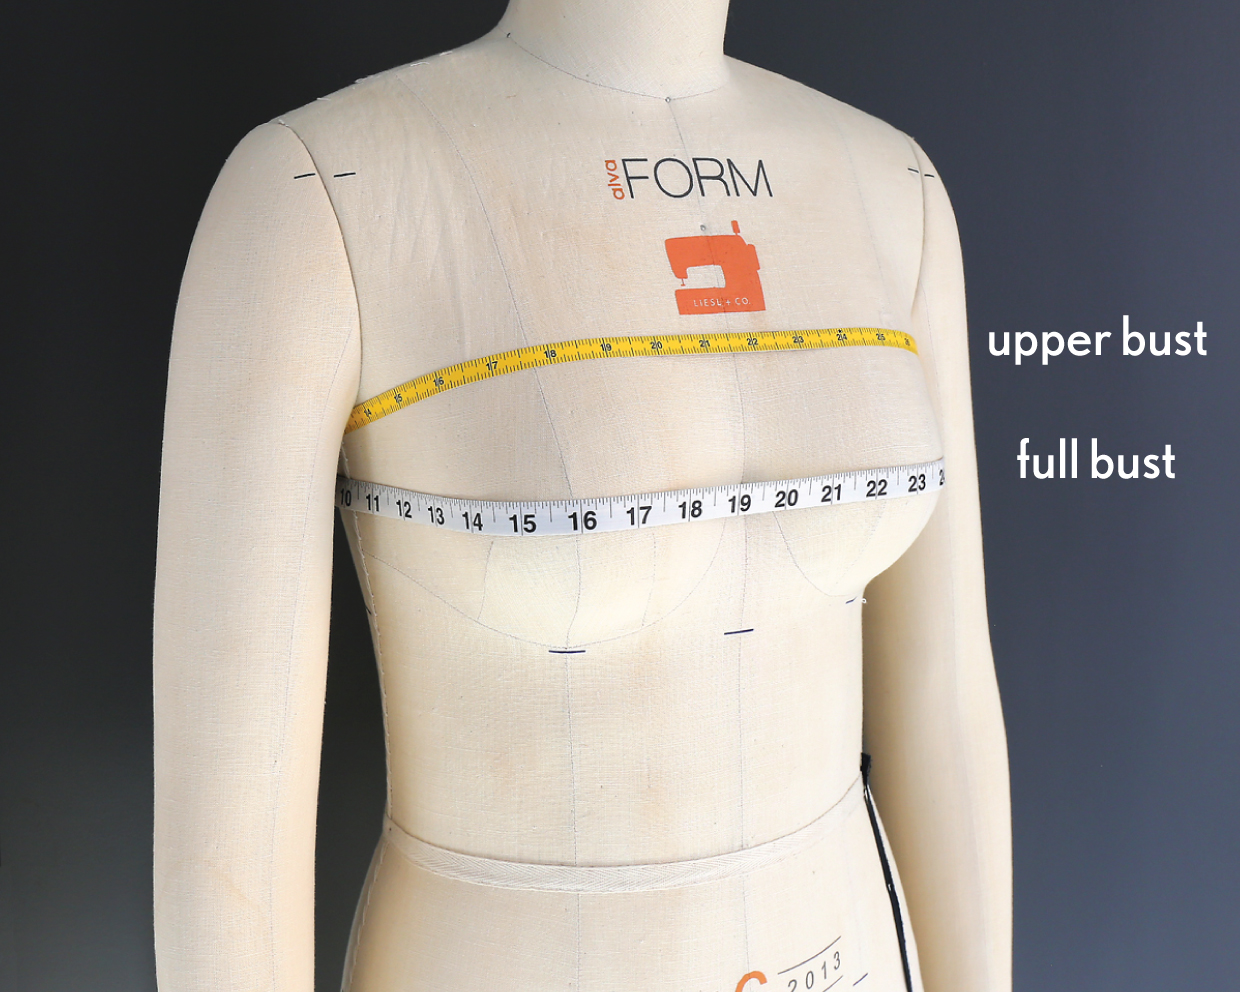
OK, now some quick and easy math:
full bust measurement – upper bust measurement = x
If x is more than 2 1/2″, use your upper bust measurement instead of your full bust measurement when looking at the measurement chart. If x is less than or equal to 2 1/2″, use your full bust measurement. I’ll tell you why in a minute. Now, choose your size by looking at the bust measurements on the size chart and using either your upper bust measurement or your full bust measurement, depending on your results from the math problem above. (You will also use the results of this exercise to determine whether to do a fully bust adjustment for this pattern.)
| Sizes 0-20 | |||
| Pattern Size |
Bust (in.) |
Waist (in.) |
Hips (in.) |
| 0 | 32 1/2″ | 25″ | 35″ |
| 2 | 33 1/2″ | 26″ | 36″ |
| 4 | 34 1/2″ | 27″ | 37″ |
| 6 | 35 1/2″ | 28″ | 38″ |
| 8 | 36 1/2″ | 29″ | 39″ |
| 10 | 37 1/2″ | 30″ | 40″ |
| 12 | 39″ | 31 1/2″ | 41 1/2″ |
| 14 | 40 1/2″ | 33″ | 43″ |
| 16 | 42″ | 34 1/2″ | 44 1/2″ |
| 18 | 44″ | 36 1/2″ | 46 1/2″ |
| 20 | 46″ | 38 1/2″ | 48 1/2″ |
I wrote a lengthy blog post about finding your correct pattern size a few years ago. You might also want to refer to that.
To summarize, basically we want to get a good fit through the upper chest and shoulders, so if your bust differential is more than 2 1/2″ you’ll probably get a better fit through the shoulders by using your upper bust measurement instead of your full bust measurement when you look at the measurement chart. If you chose your size based on your full bust measurement, you would end up with a fit that’s very oversized and too big through the neck and shoulders, which generally looks sloppy and not nice at all. (And when you shop in stores you often have to purchase this way because you can’t do a full bust adjustment, so there’s of of the many advantages of sewing for yourself!)
And keep in mind that this math is only intended to give you a size approximation. Your shoulders might be broader or narrower than average, in which case you may find that you need a larger or smaller size. That’s why it’s always a good idea to make a muslin first. Also, under the arm you’ll want more ease than usual through the bust, because this is a coat designed to be worn over other garments. Keep that in mind as you evaluate your muslin.
Are you with me so far? Next we’ll be talking about any adjustments you might want to make to your pattern.
Pattern Adjustments
If you are choosing a size based on your high bust measurement, you may want to do a full bust adjustment. This pattern has a fair amount of ease, so don’t be too hasty in making this decision. I would suggest (as always) making a muslin to confirm whether you actually need a bust dart. But if you decide that you do, don’t be afraid! Even if you’ve never added or adjusted a bust dart, it’s not difficult. I’ve written a special blog post about how to add a bust dart to help you on this or any sewing pattern, and if you want me to do it with you, I also have a class to help you! My Creativebug Bust Adjustment Class will walk you through the whys and hows of dart manipulation.
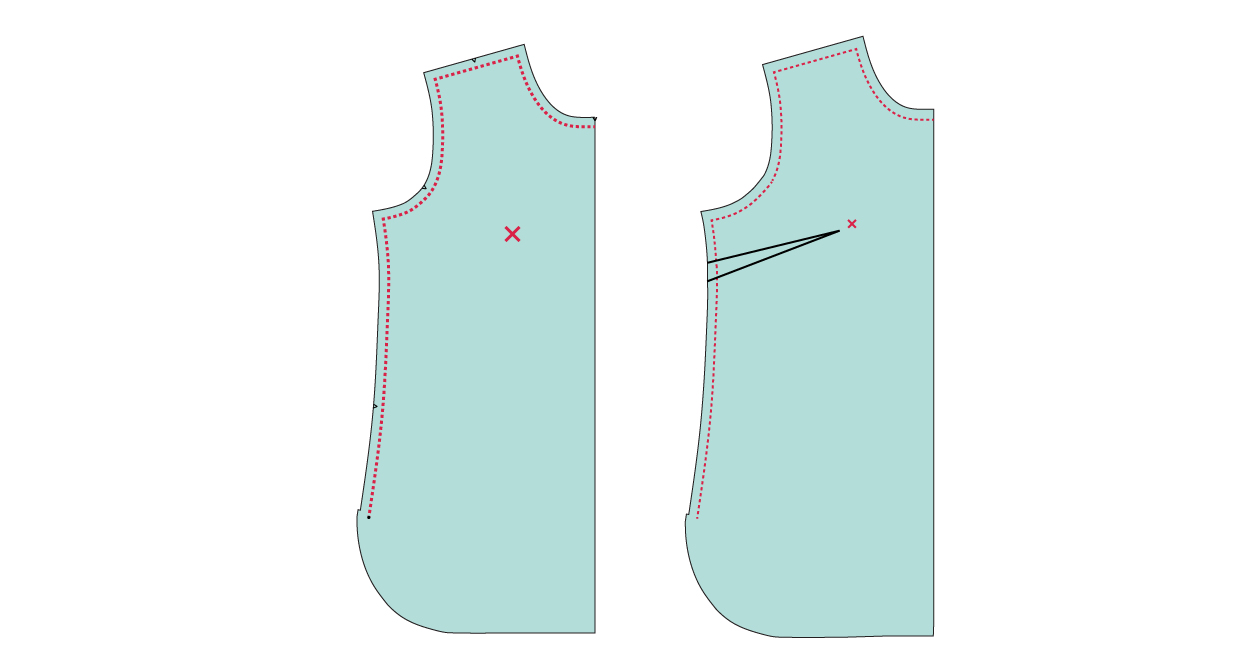
Once you’ve done the full bust adjustment, the rest of the pattern is relatively loose fitting, so you probably won’t need to make a lot of changes aside from possibly lengthening or shortening. From there it’s pretty easy. Blend to a larger size if you want extra room through the hips, and decide on any other customizations you may prefer.
And with that, I think we’re ready! Go ahead and start cutting your fabric, or make a muslin if you haven’t already, and I’ll see you back here when you’re ready to start sewing.
Sewing Day 1
From Liesl: OK friends, here we go! Let’s get to the sewing! I’ll be chiming in occasionally with little tips and tricks not included in the sewing instructions themselves to help you along. (My tips will be indented in italics like this.)
GETTING STARTED
1) Transfer the welt-pocket markings and the button and buttonhole markings from the coat-front pattern piece to the cut fabric’s right side. Transfer all other pattern markings to the wrong side of the cut fabric pieces; transfer the walking vent markings to the wrong side of all coat-back fabric and lining pieces.
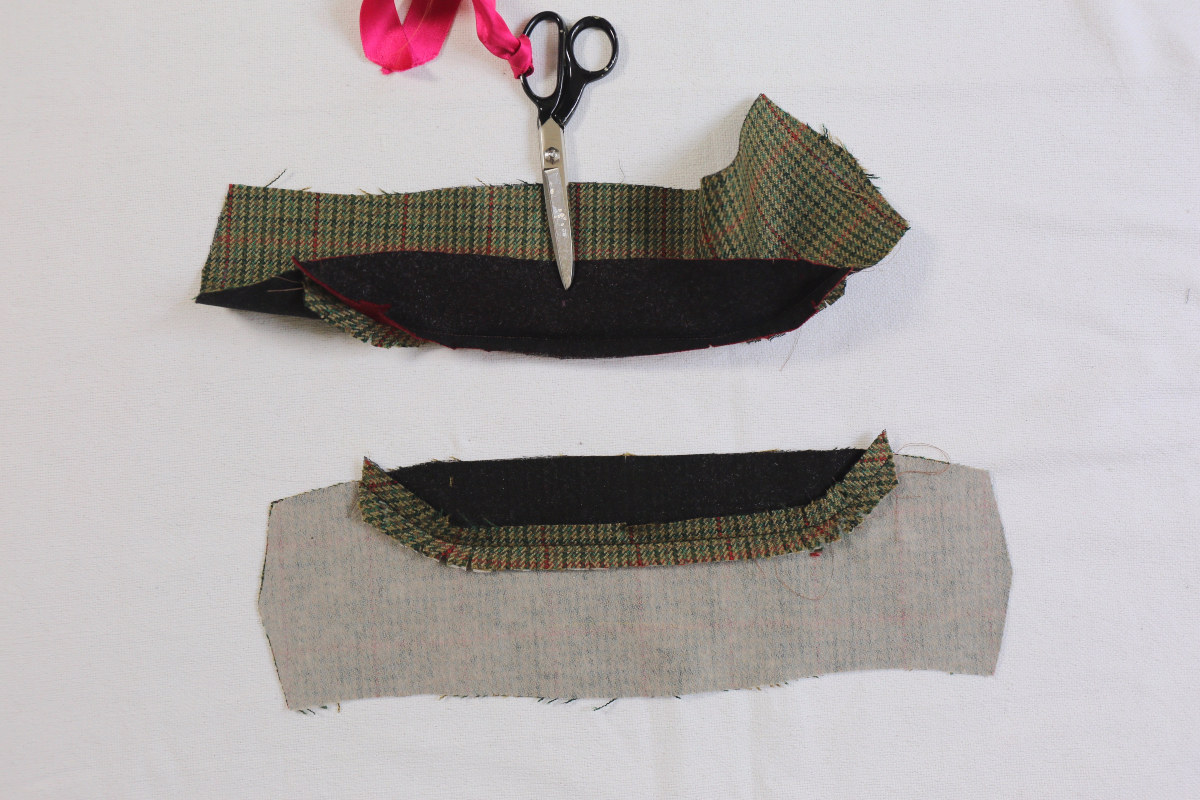
2) Following the interfacing manufacturer’s instructions, fuse the pieces cut from interfacing to the wrong side of their corresponding cut fabric pieces. You’ll interface one collar piece, both front facings, both banana stands, and both of the pocket-flap fabric pieces.
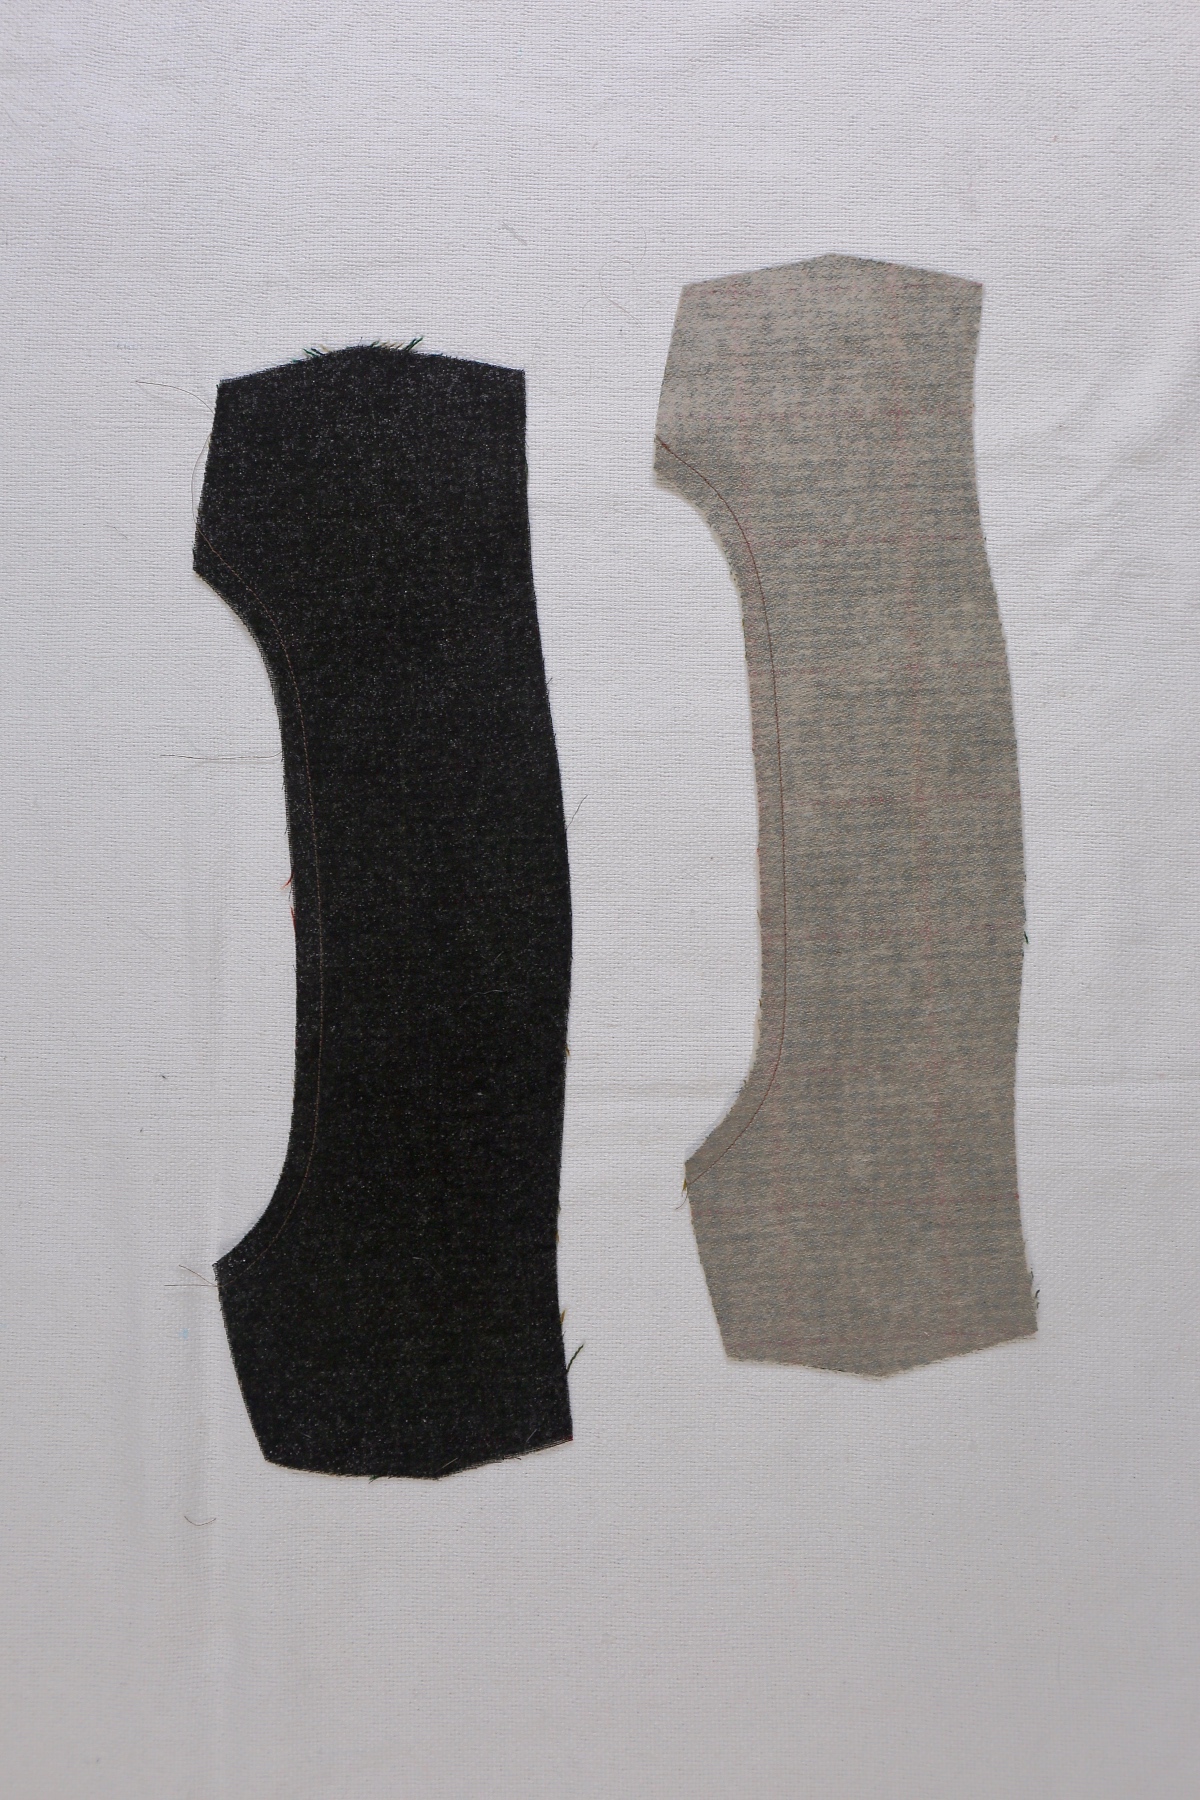
I used a woven black fusible interfacing since my fabric is dark tweed. In order to clearly define the right and wrong side on the other fabric pieces I used a very lightweight beige fusible interfacing. That way I hope you’ll be able to distinguish right side from wrong side in the photos for this sew-along.
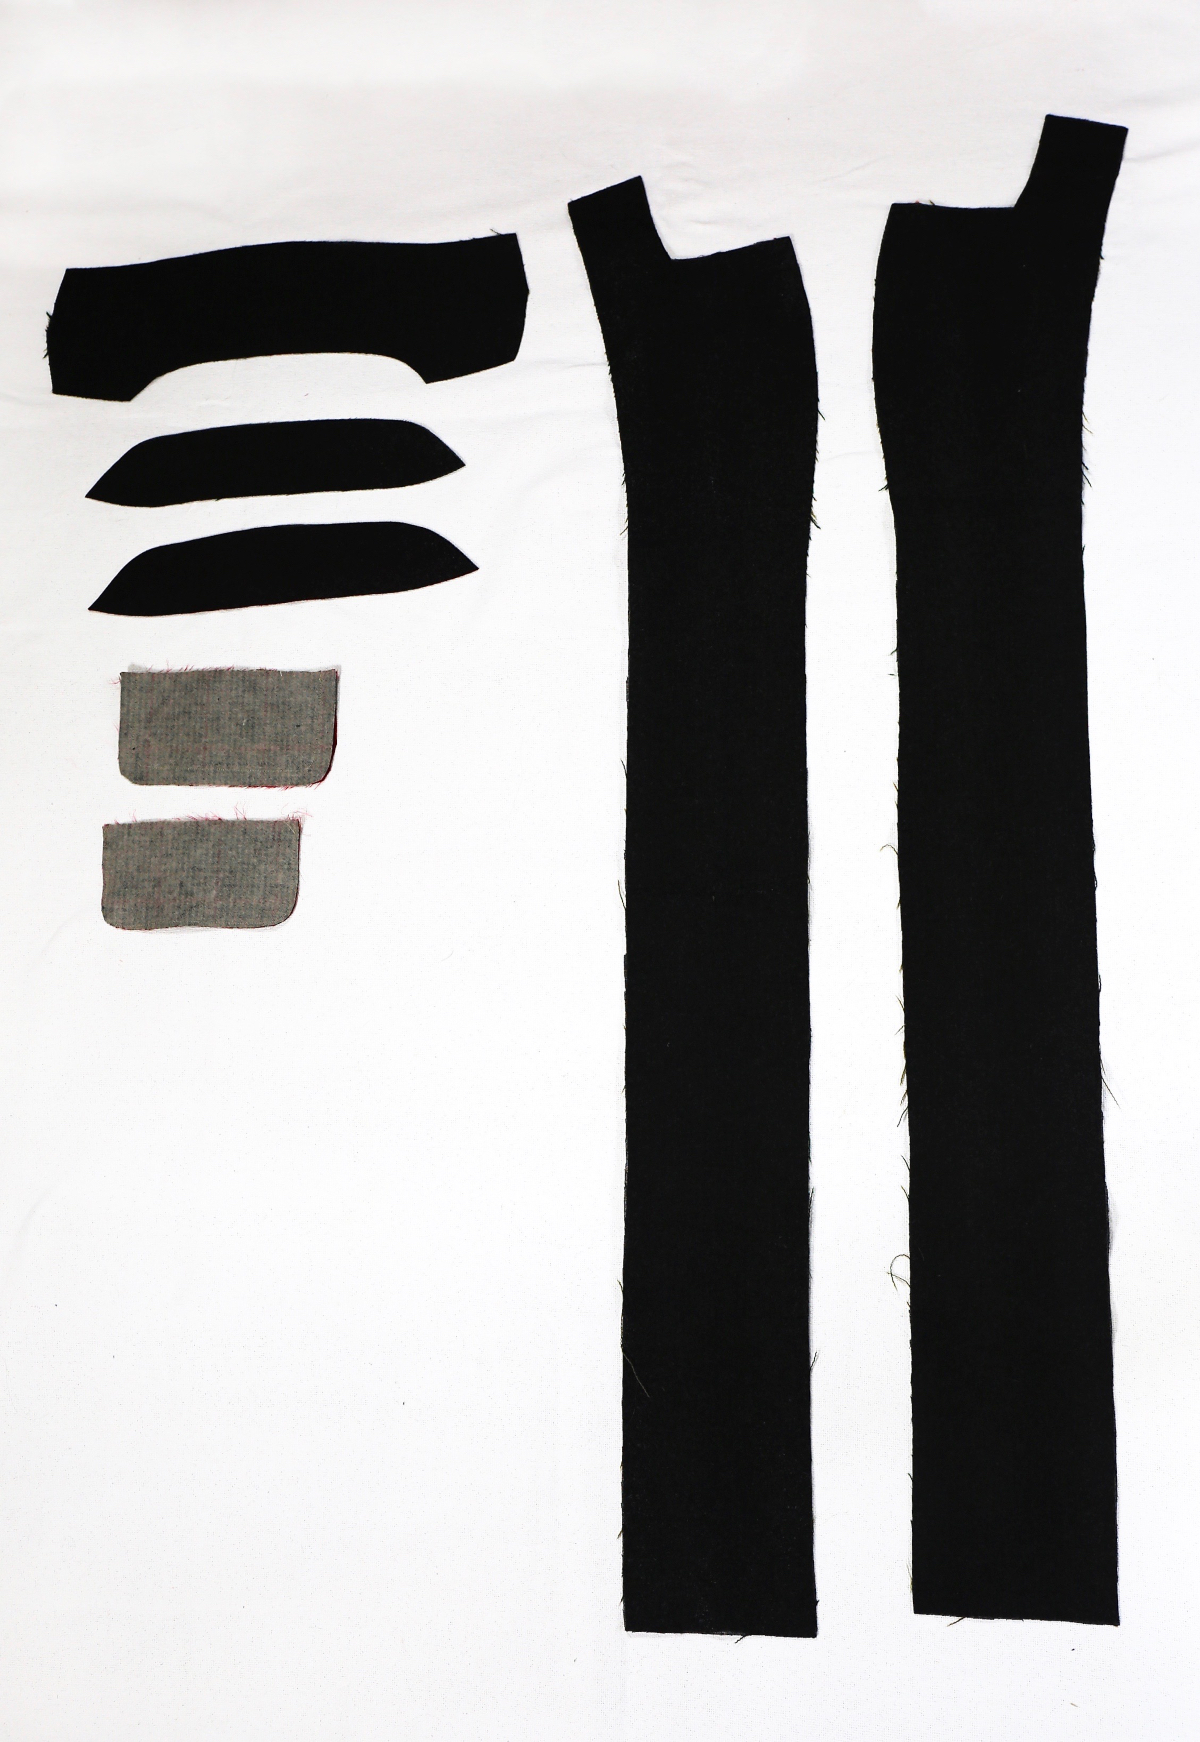
3) To stabilize the shoulders, cut two 1″ by 6 1/2″ strips of thin scrap woven fabric (be sure to cut the woven fabric on grain so it won’t stretch). From fusible interfacing, cut two 3″ by 7″ rectangles to stabilize the pockets, and cut two 1 3/4″ by 12 1/2″ strips as well as two 1″ by 1″ squares for the back vent.
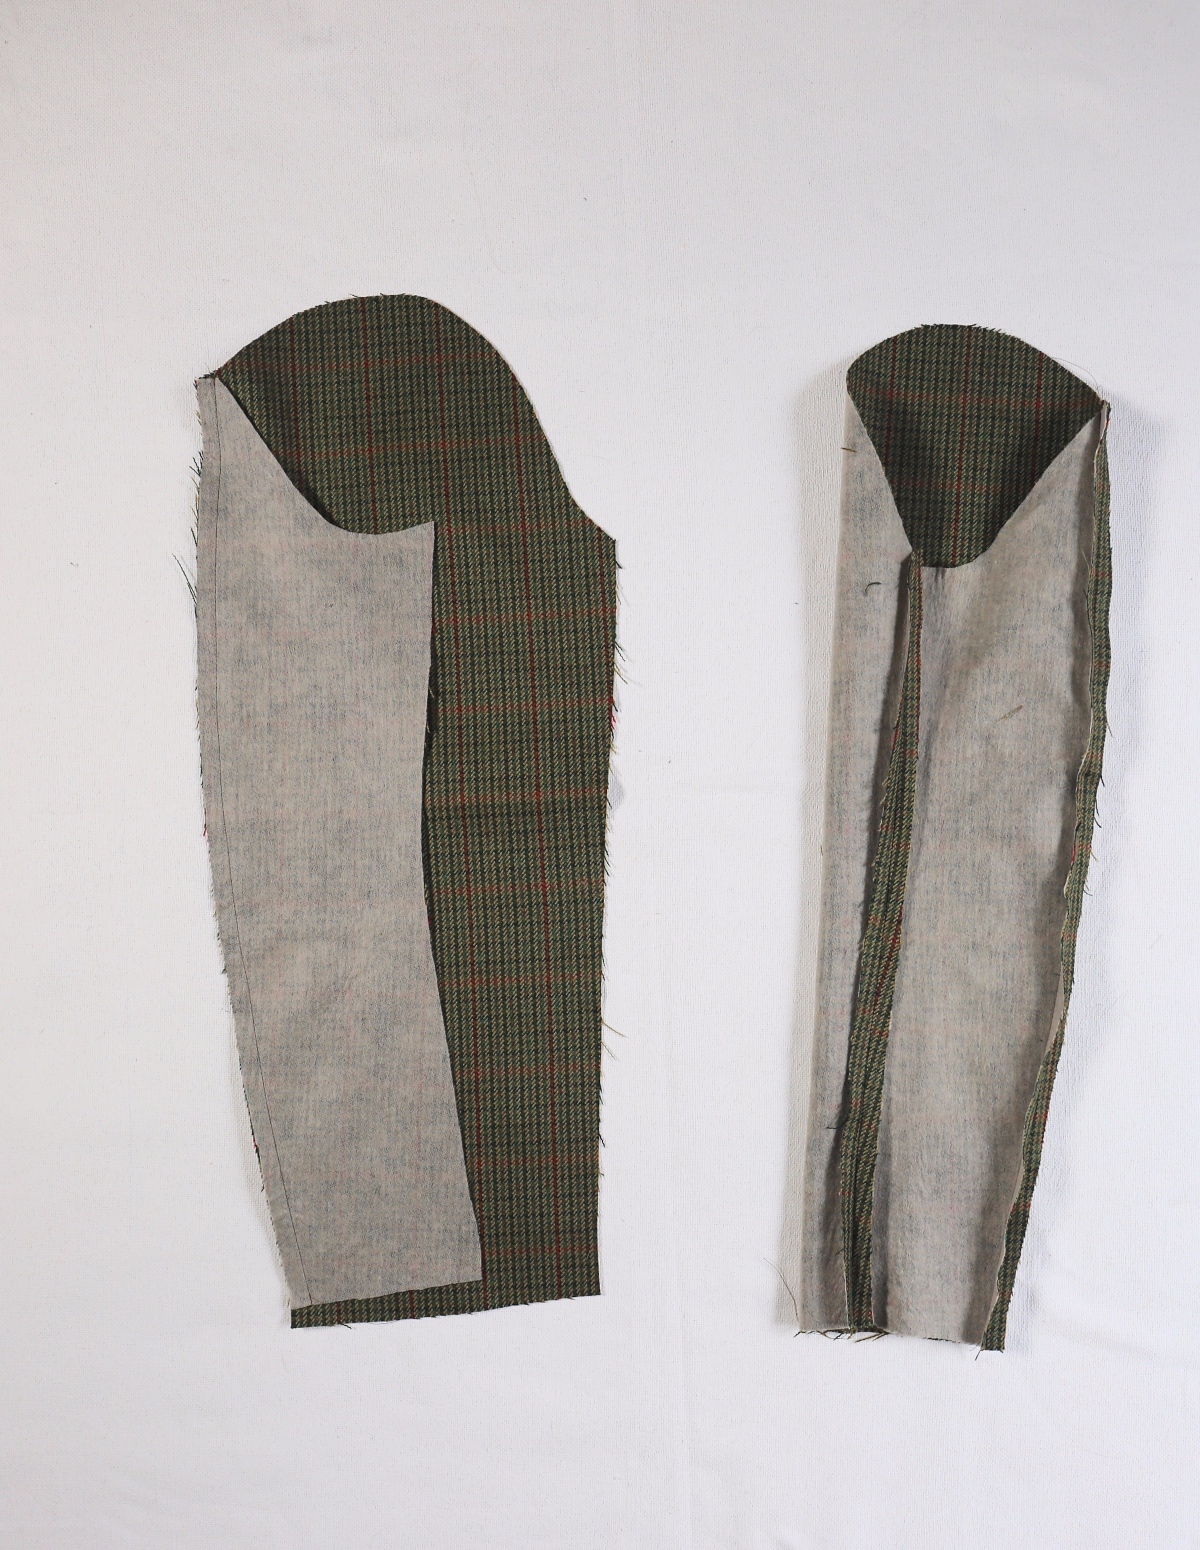
PREPARE THE POCKET FLAPS
1) Pin one pocket flap cut from fabric to one pocket flap cut from lining with right sides together. Stitch around three sides of the pocket flap with a 1/2″ seam, gently sewing around the curves and leaving the top open.
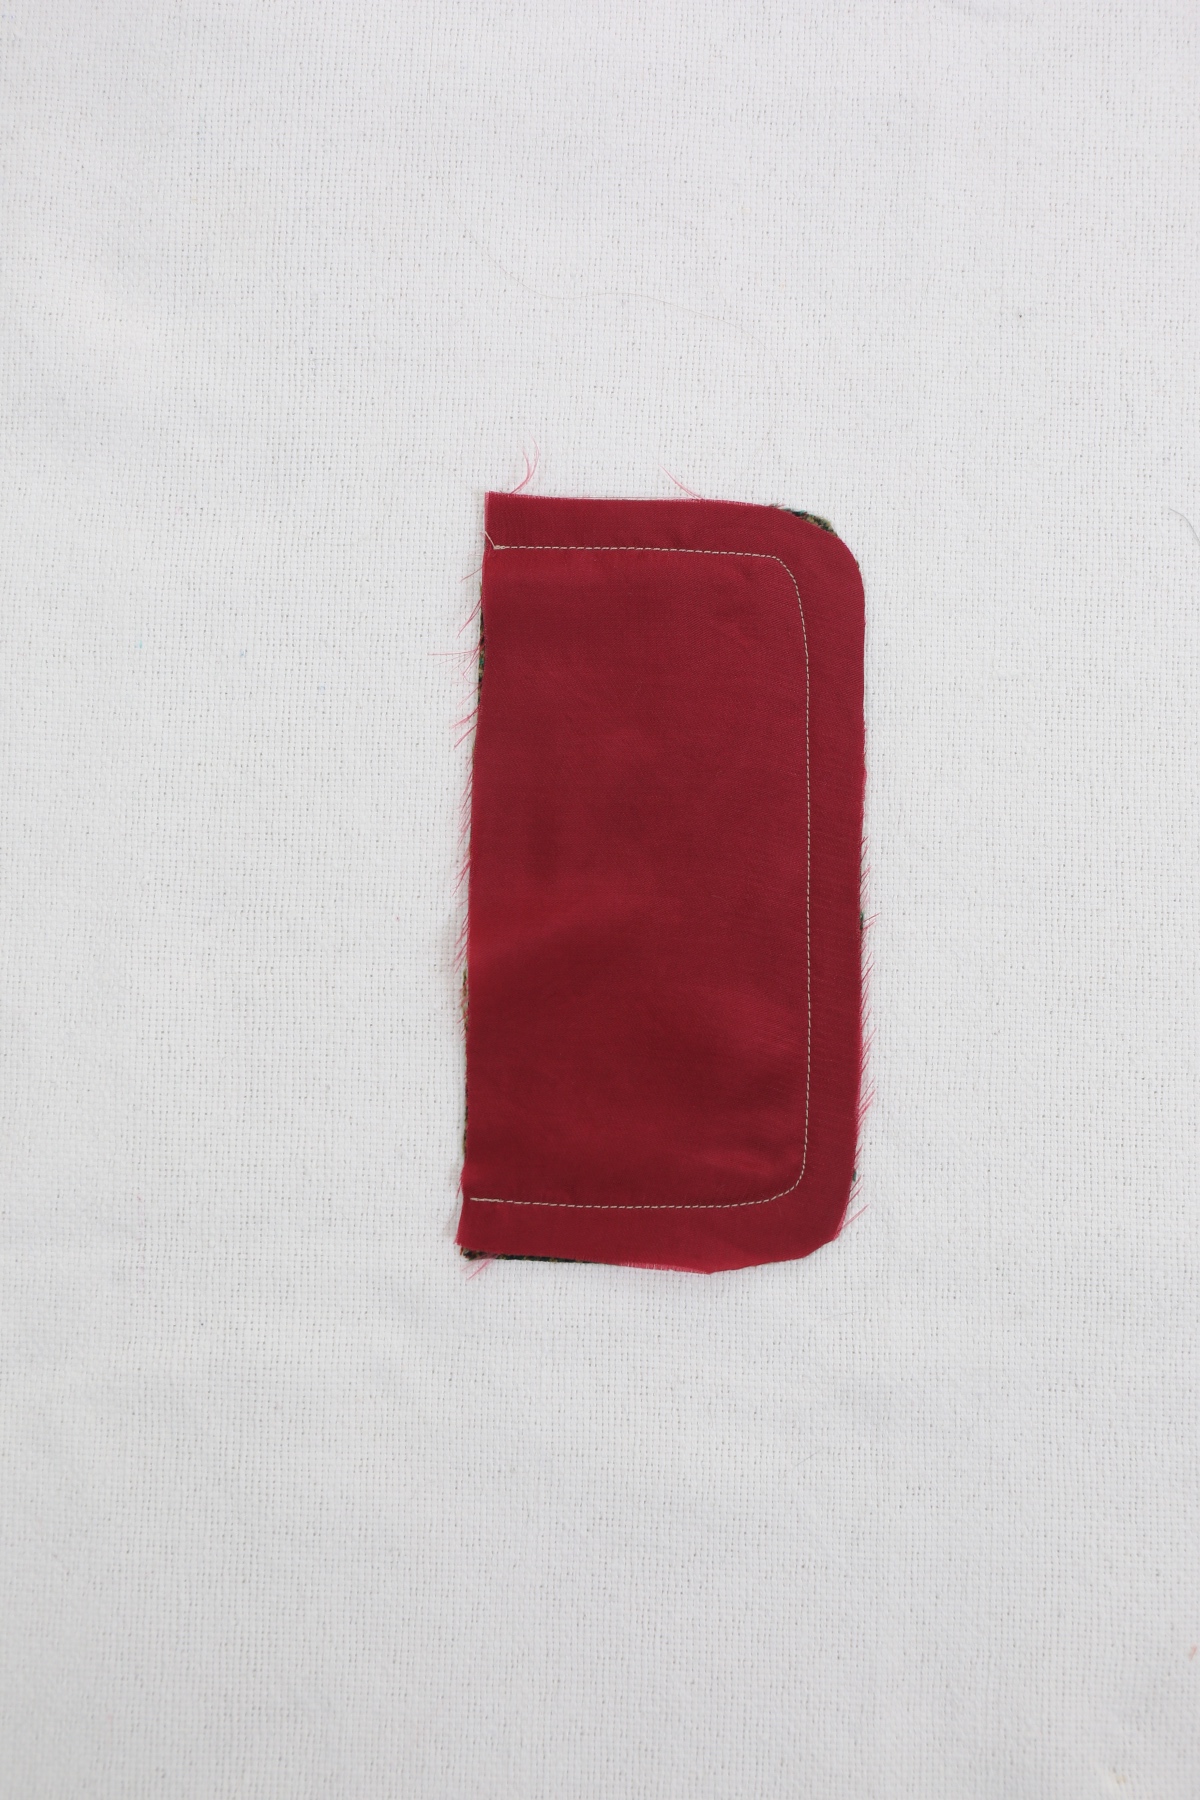
Trim the stitched seam allowances to 1/4″ or less and trim the curved edges to about 1/8″.
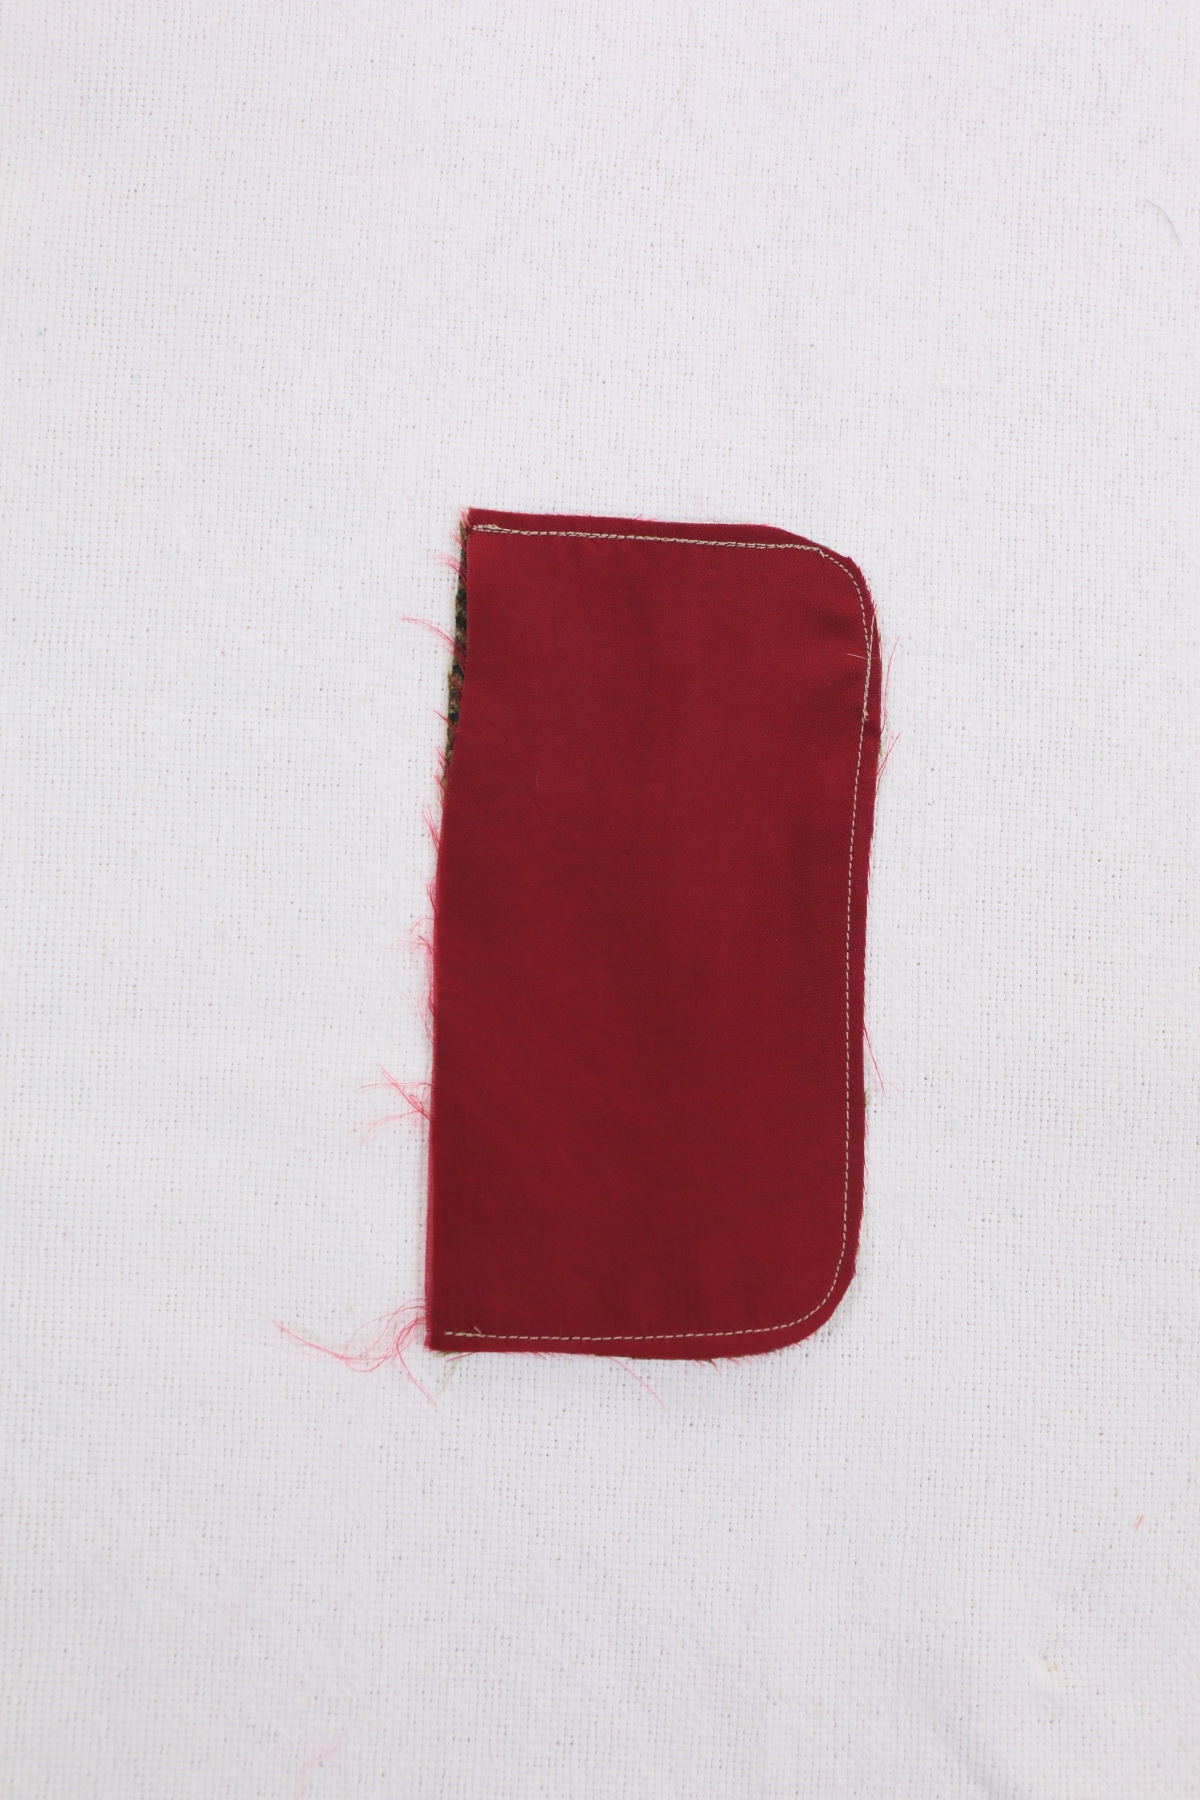
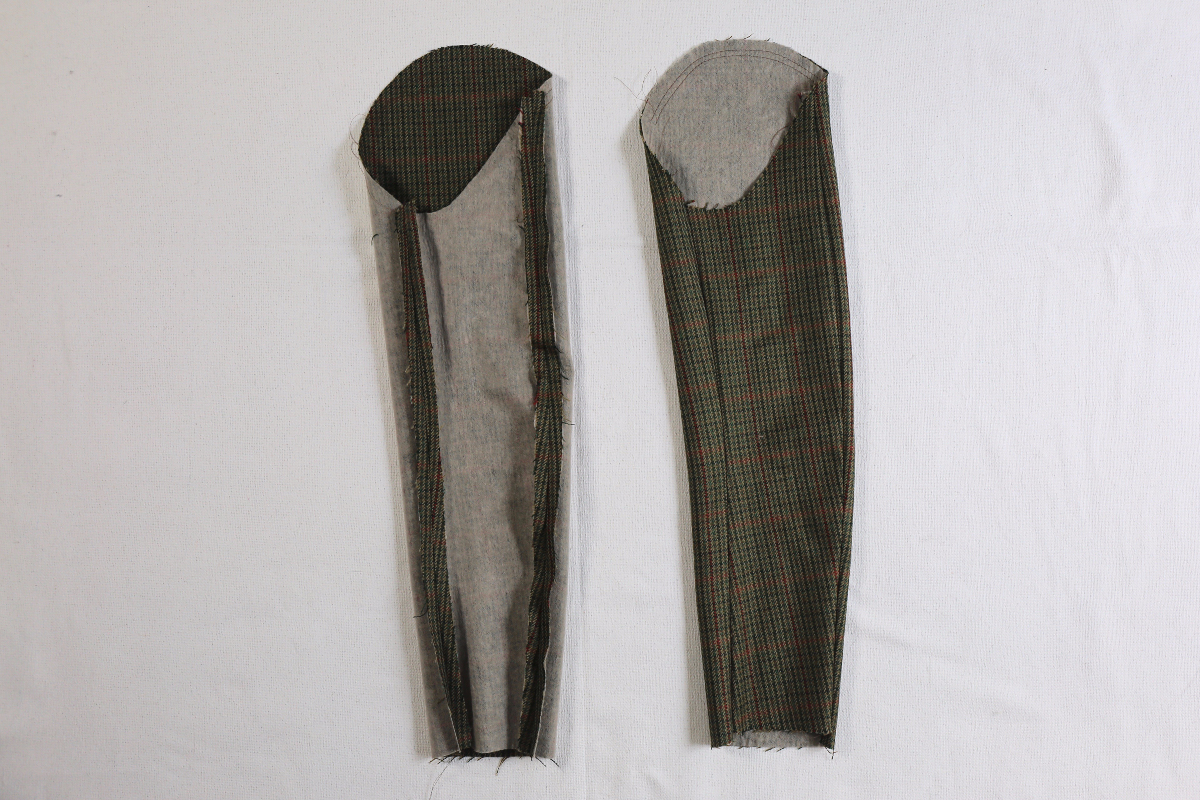
2) Turn the pocket flap open and press the edges, rolling the seam line slightly to the lining side so it doesn’t show when the garment is worn.
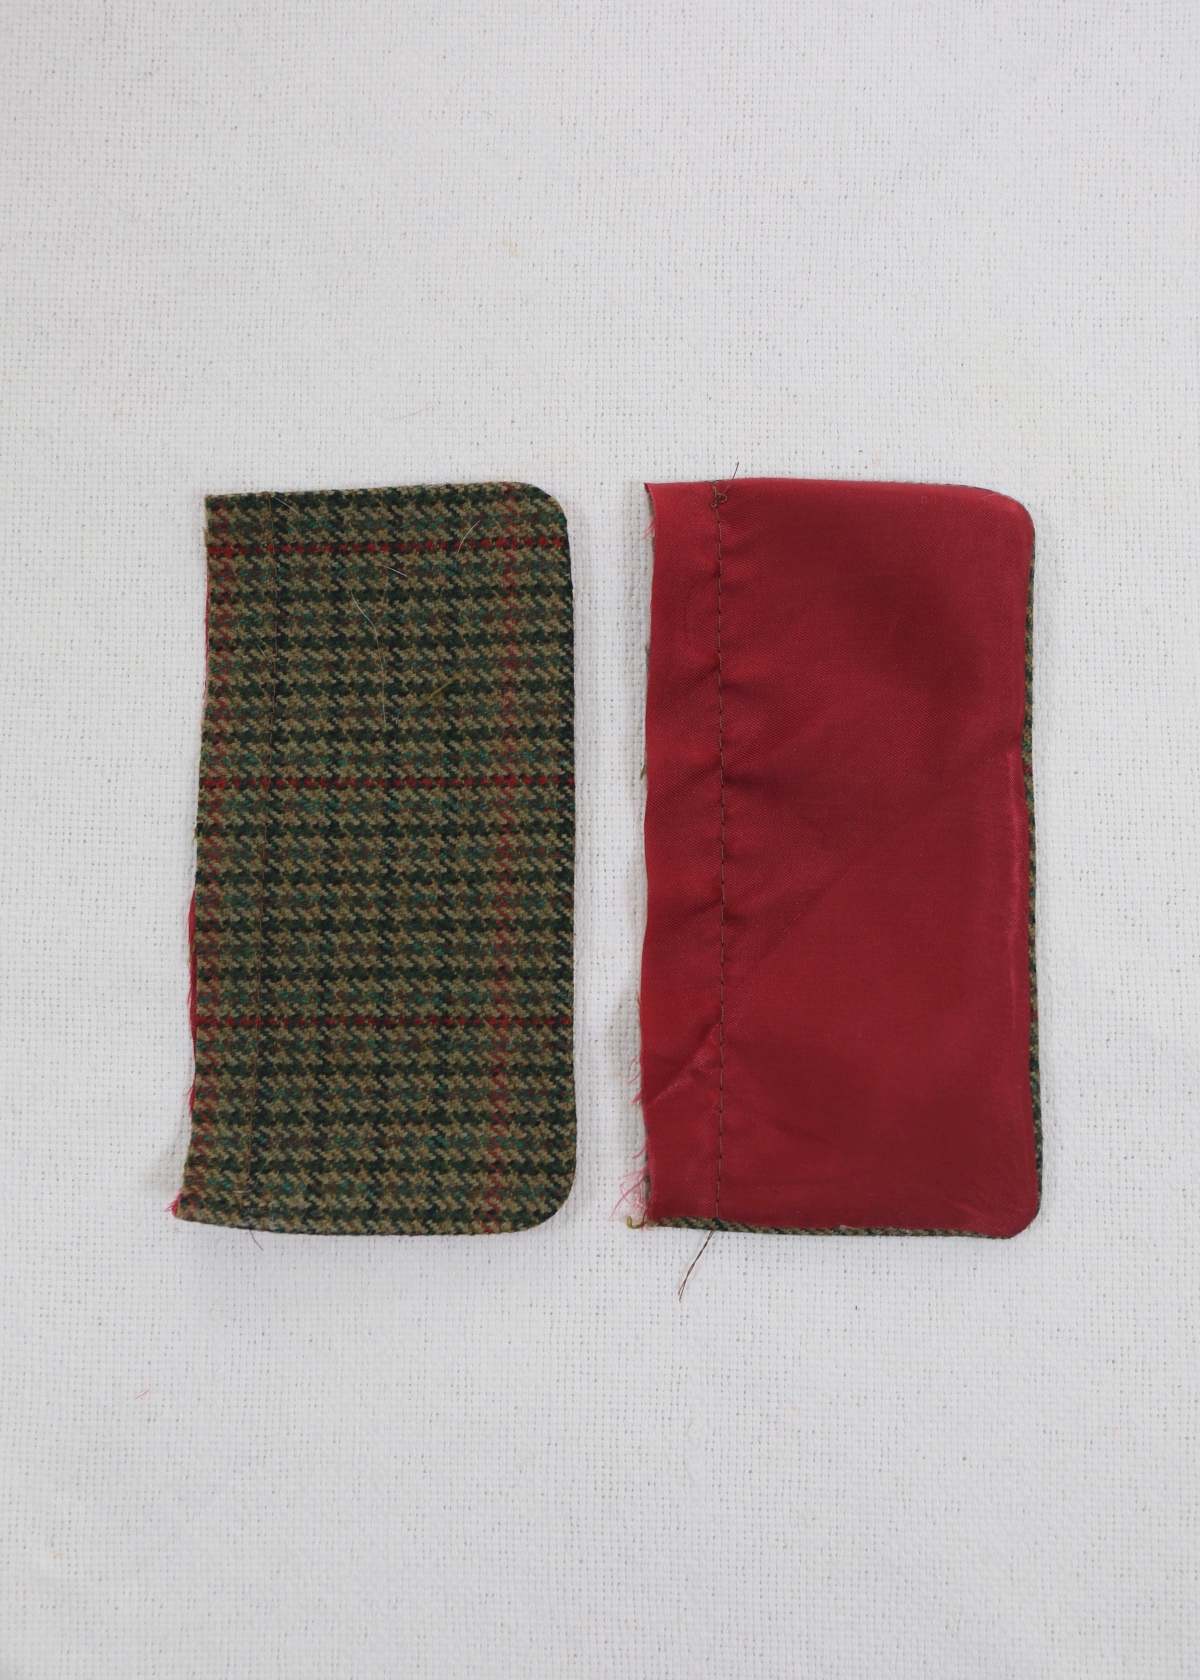
3) Baste the open top of the pocket flap closed with a 5/8″ seam. [See above.] Repeat steps 1–3 to prepare the second pocket flap.
SEW THE POCKETS
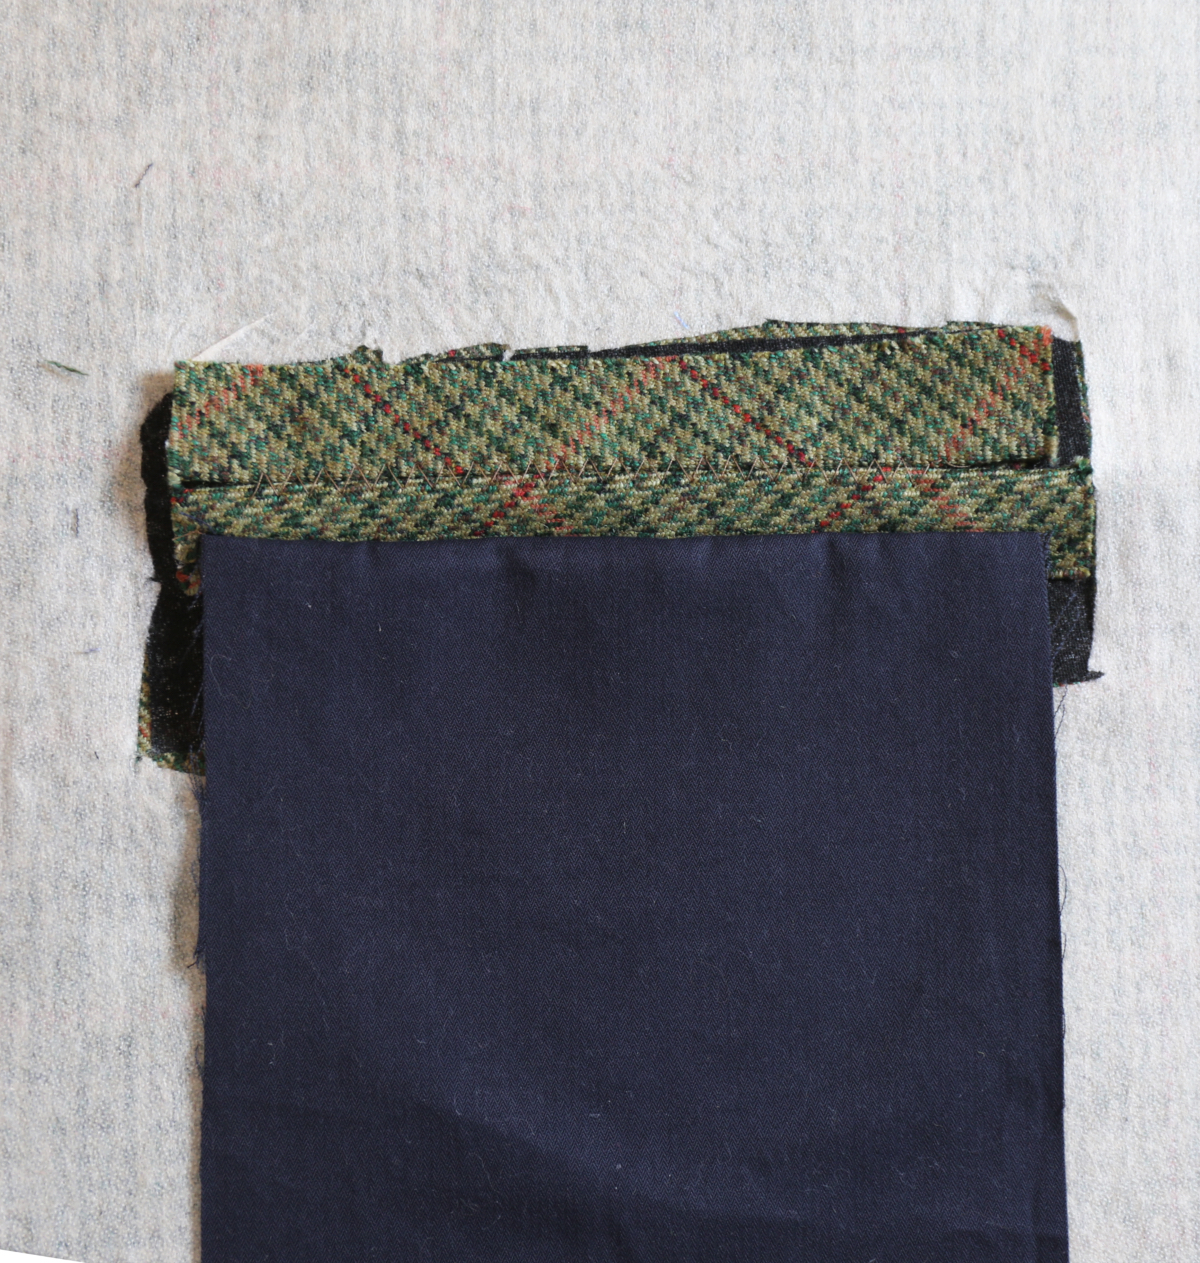
1) Fuse one 3″ by 7″ piece of interfacing to the wrong side of each coat-front piece at the location of the welt pockets.
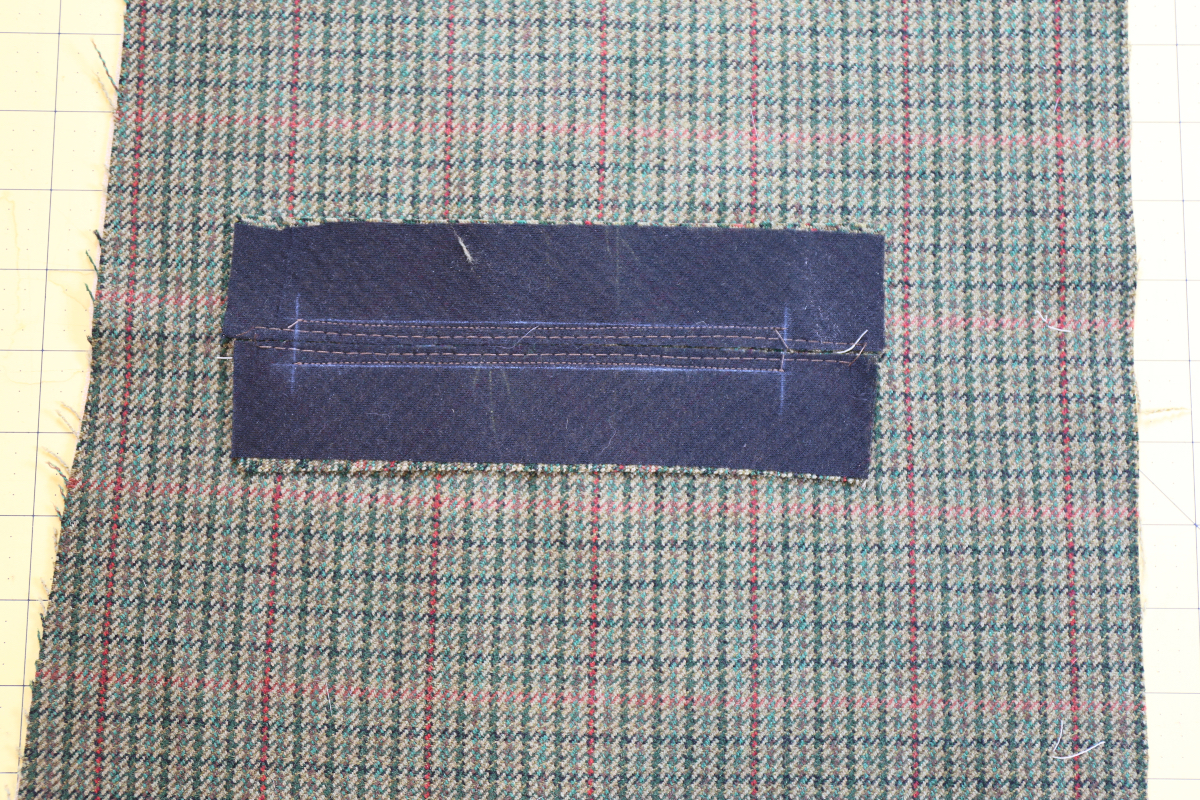
2) Align and pin two pocket-welt pieces to one coat front with right sides together, positioning the flaps so they are flush with the center pocket placement line and with the nap on the welt pieces pointing up (see the arrows in the illustration). Baste along the inside edge of each welt, stitching very close to the edge (1/8″ or 1/4″ is good), catching the welt, the coat, and the interfacing in your basting, then press.
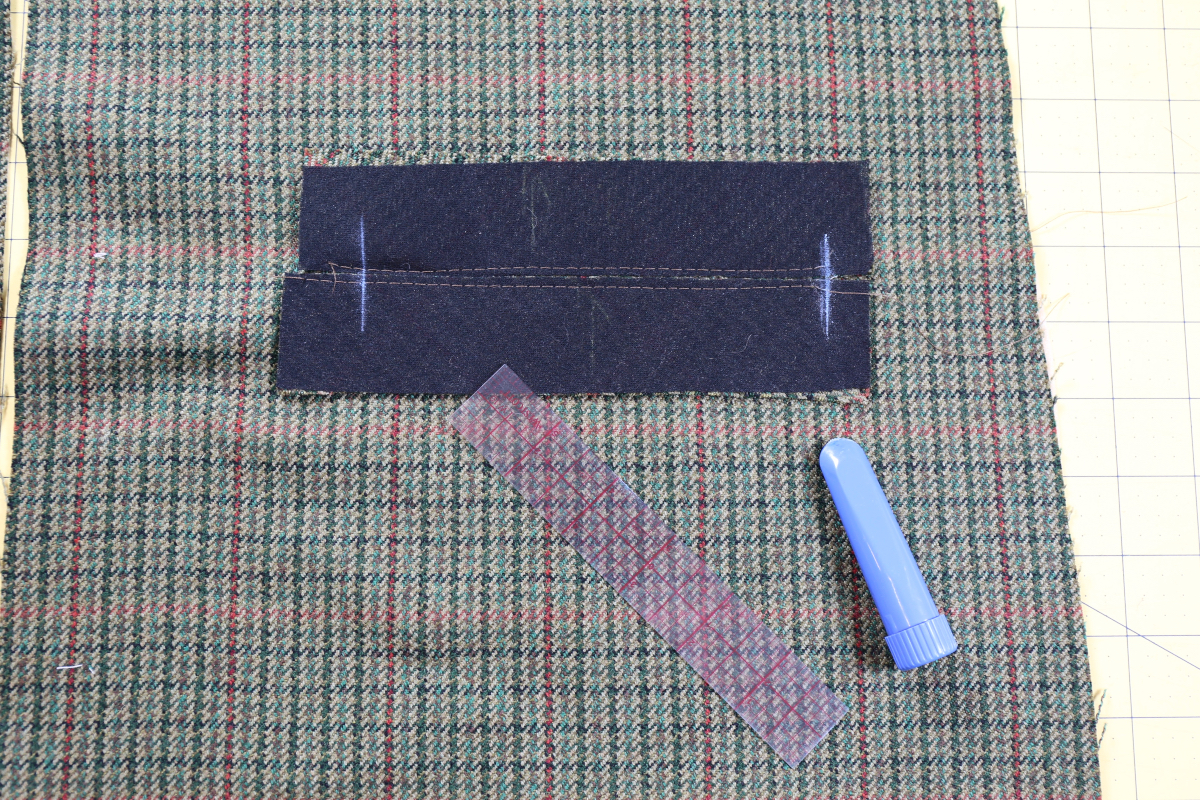
Using the pocket markings on the coat front as your guide, mark the ends of the pocket (which are just under 6″ apart) with a water-soluble fabric-marking pen or tailor’s chalk, taking care to make the lines perfectly parallel to each other.
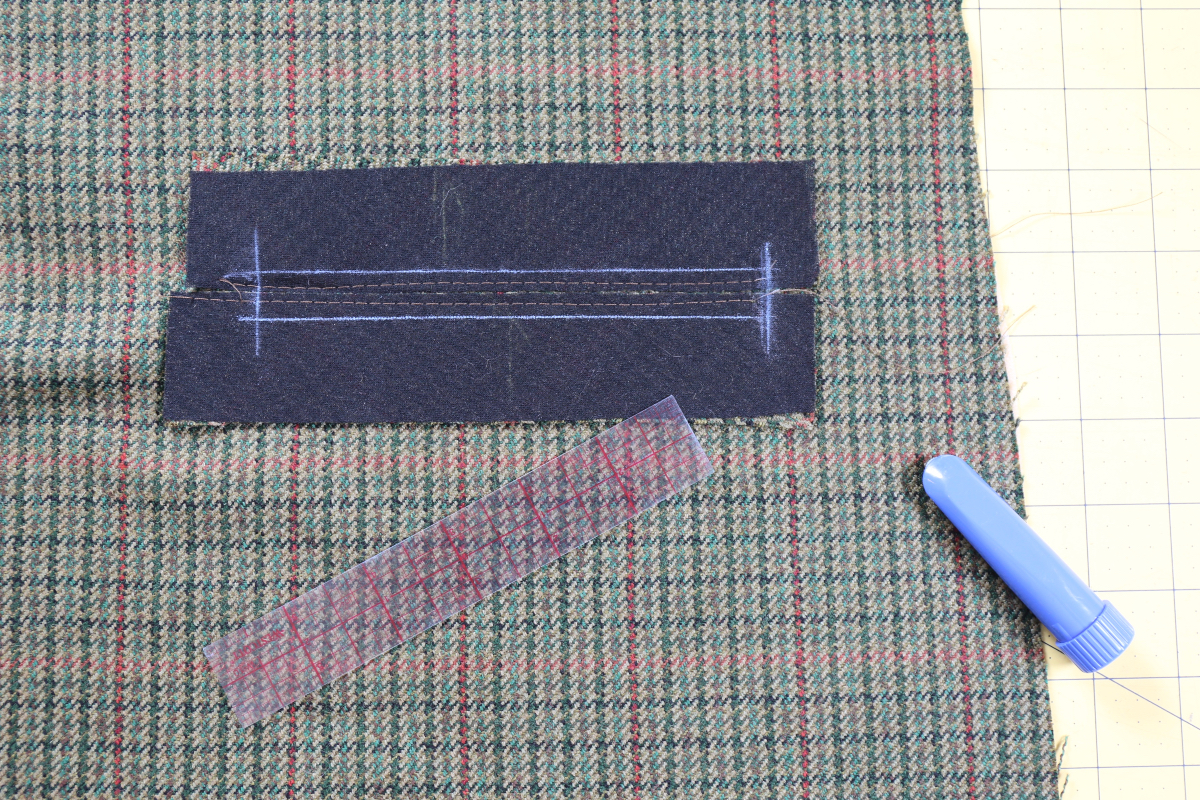
3) Machine-stitch the welts to the coat with a 1/4″ seam, curving your stitching to be a bit narrower toward the center of the pocket (this will help the welts to look more even when you’re finished.) Start and end the stitch lines precisely at the parallel lines you marked, backstitching or lockstitching at each end so the pocket will look perfectly square when finished.
I don’t know if you can see the subtle curve of the sewn lines in the photo below. The curve keeps the welts more even in appearance when they’re finished.
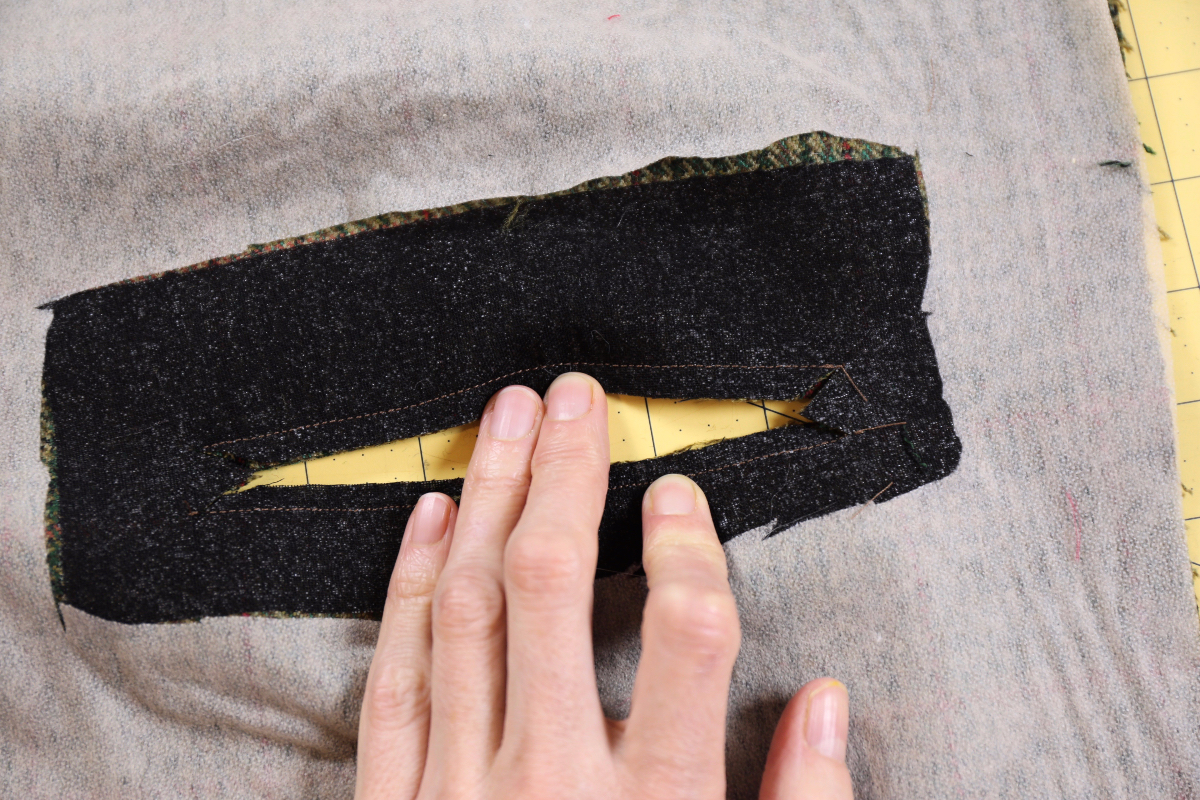
4) Remove the basting stitches, push the welts aside and cut through the coat fabric and interfacing precisely along the center pocket placement line, stopping about 1/2″–3/4″ from the ends of the pocket. At each end of the cut slit, clip to make a Y shape, ending the clips as close as possible to the last stitch in each welt stitch line, as shown. Be careful not to cut the welts themselves for this step, and take care not to cut beyond the stitching lines. From the back your cuts will look like the photo below.
5) Pull the welts through the cut opening to the wrong side and press the seam allowances open. Then, using the seam allowances as a guide, fold and press the welt fabric toward the center of the cut pocket opening to form the welts.
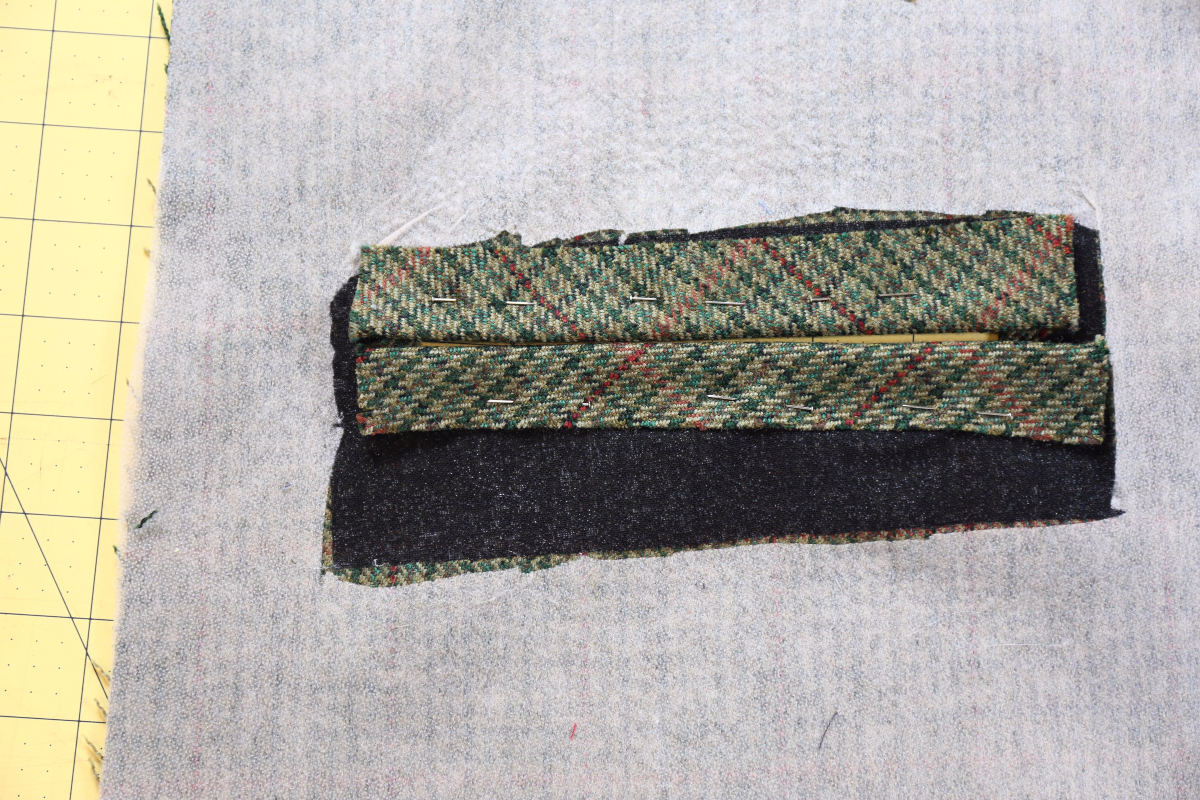
Aim for two narrow welts of the same width, with the fold running directly down the center of the cut pocket opening. When you’re happy with the welts, baste them closed with a large zigzag stitch or a hand whipstitch.

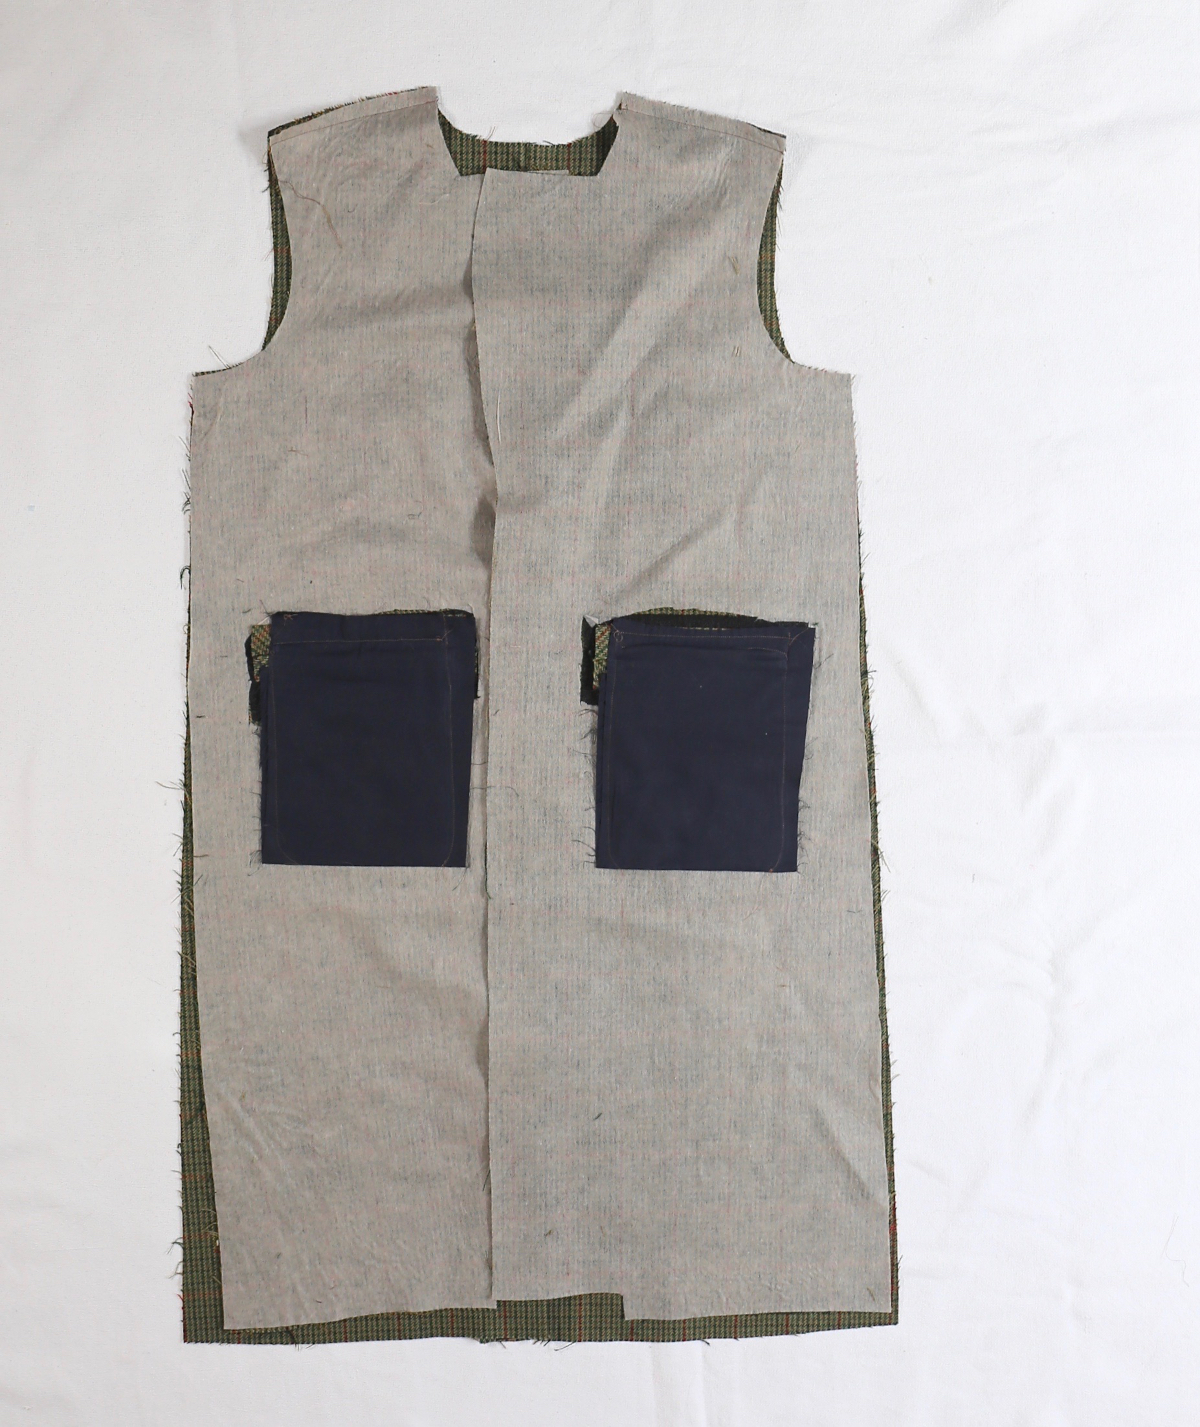
6) Fold the bottom of the coat toward the top so you can work with just the lower welt.
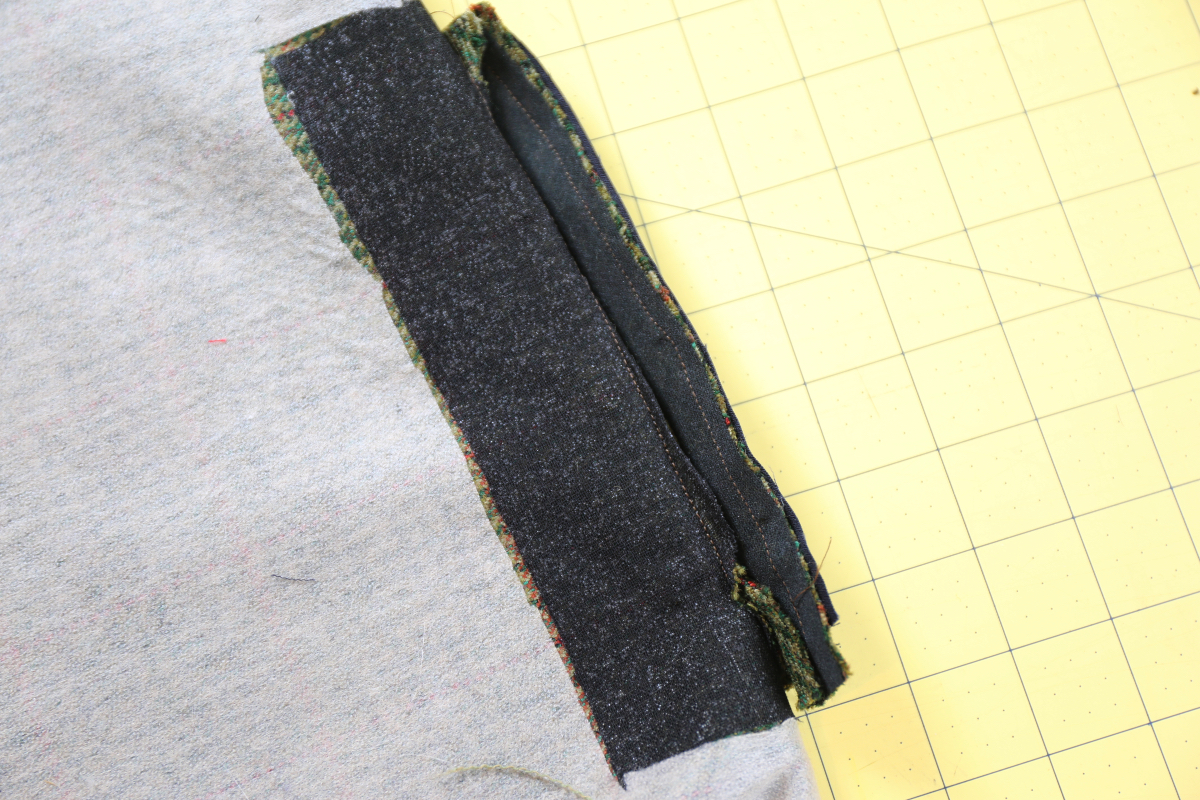
Pin one pocket bag to the innermost (unsewn) edge of the bottom welt, with right sides together and edges aligned, and stitch the pocket bag to the welt with a 1/2″ or 3/8″ seam (whatever you can manage). Press the seam allowances toward the pocket bag.
7) Stitch-in-the-ditch of the bottom welt to secure the welt itself, keeping the pocket bag out of the way and backstitching or lockstitching at both ends. Baste the upper welt near the ditch as well to hold it temporarily.
8) Remove the zigzag or whipstitch that holds the welts closed and slip one prepared pocket flap into the opening of the pocket, matching the basting line at the top of the flap to the innermost edge of the pocket welt. Pin the pocket flap into place.

9) To form the pocket, fold the pocket bag up with right sides together and align and pin the raw edge of the pocket bag with the top edge of the upper welt piece. Baste the pocket to the top welt with a 3/8″ seam. Press the pocket bag flat, forming a fold at the bottom edge.
You can see this in step 11 below the hint.
10) Stitch-in-the-ditch of the top welt to secure the welt, the flap, and the top of the pocket bag, backstitching or lockstitching at both ends. This will also secure the top of the pocket. You can remove the basting stitches from the pocket now.
You can’t really see my stitching here, but if you stitch in the ditch on your pocket you won’t be able to see the stitching either. (Be sure to use a matching thread color!)
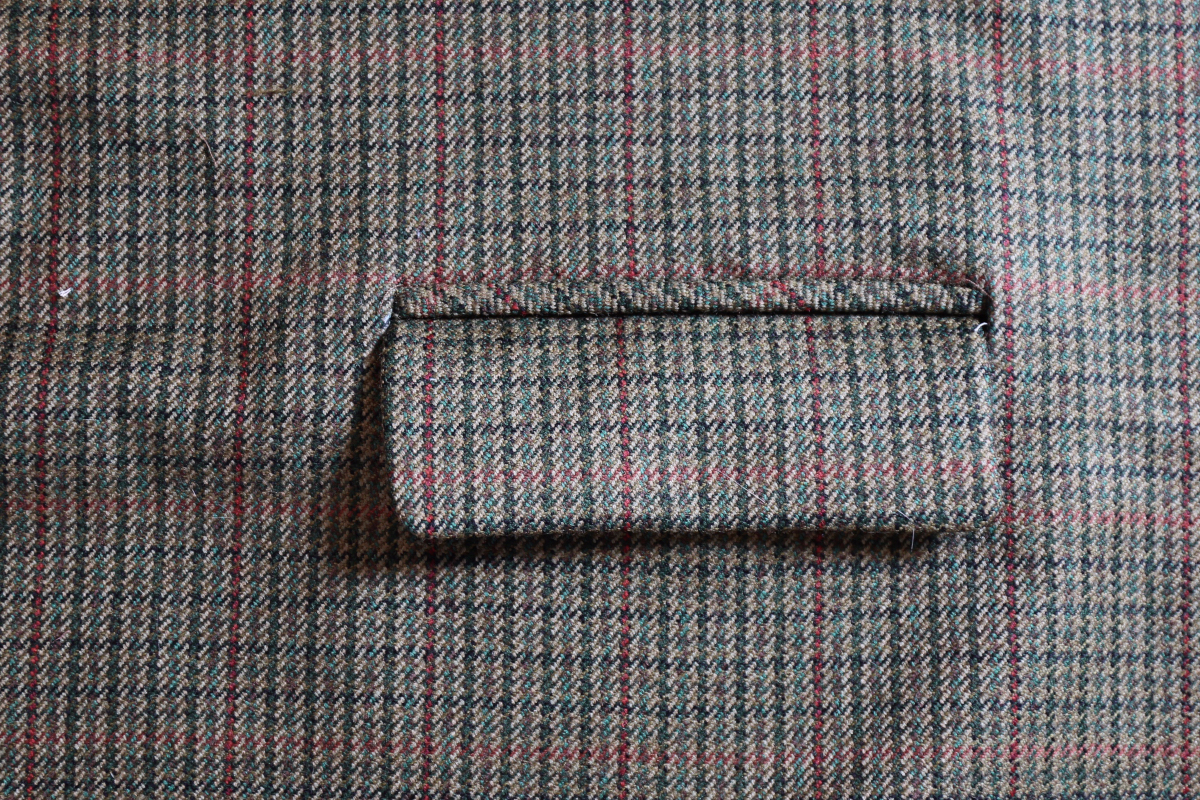
11) Working from the right side, flip the coat front out of the way so you can work with just the pocket. Starting from the top, stitch along one side of the pocket, stitching close enough that you can catch the little triangle from the end of the welts in your stitching and ending at the bottom fold, lockstitching or backstitching at both ends. Stitch the opposite edge of the pocket in the same way.
HINT: If you don’t like lint to collect in the corners of your pocket, curve your stitching a bit as you reach the bottom of the pocket bag to eliminate the sharp pocket corner where it usually collects.
12) Repeat steps 2–11 to prepare the second welt and pocket.
Sewing Day 2
ASSEMBLE THE BACK
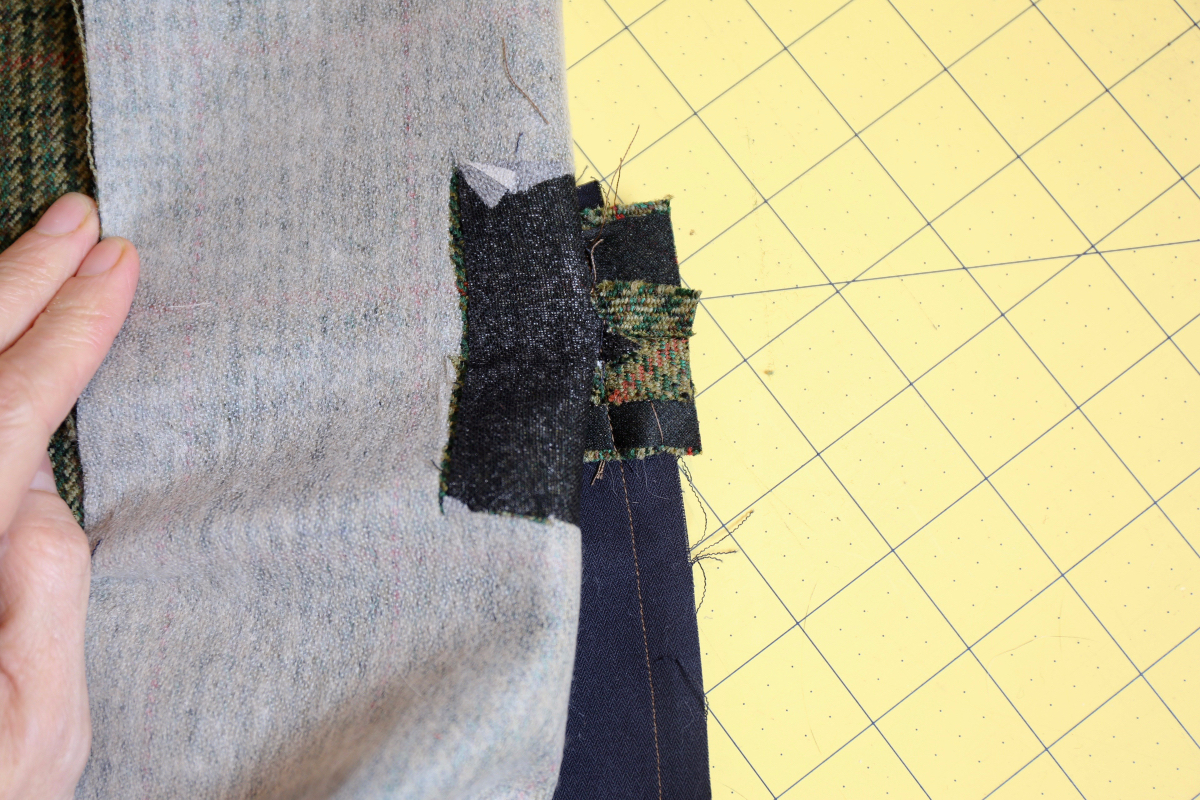
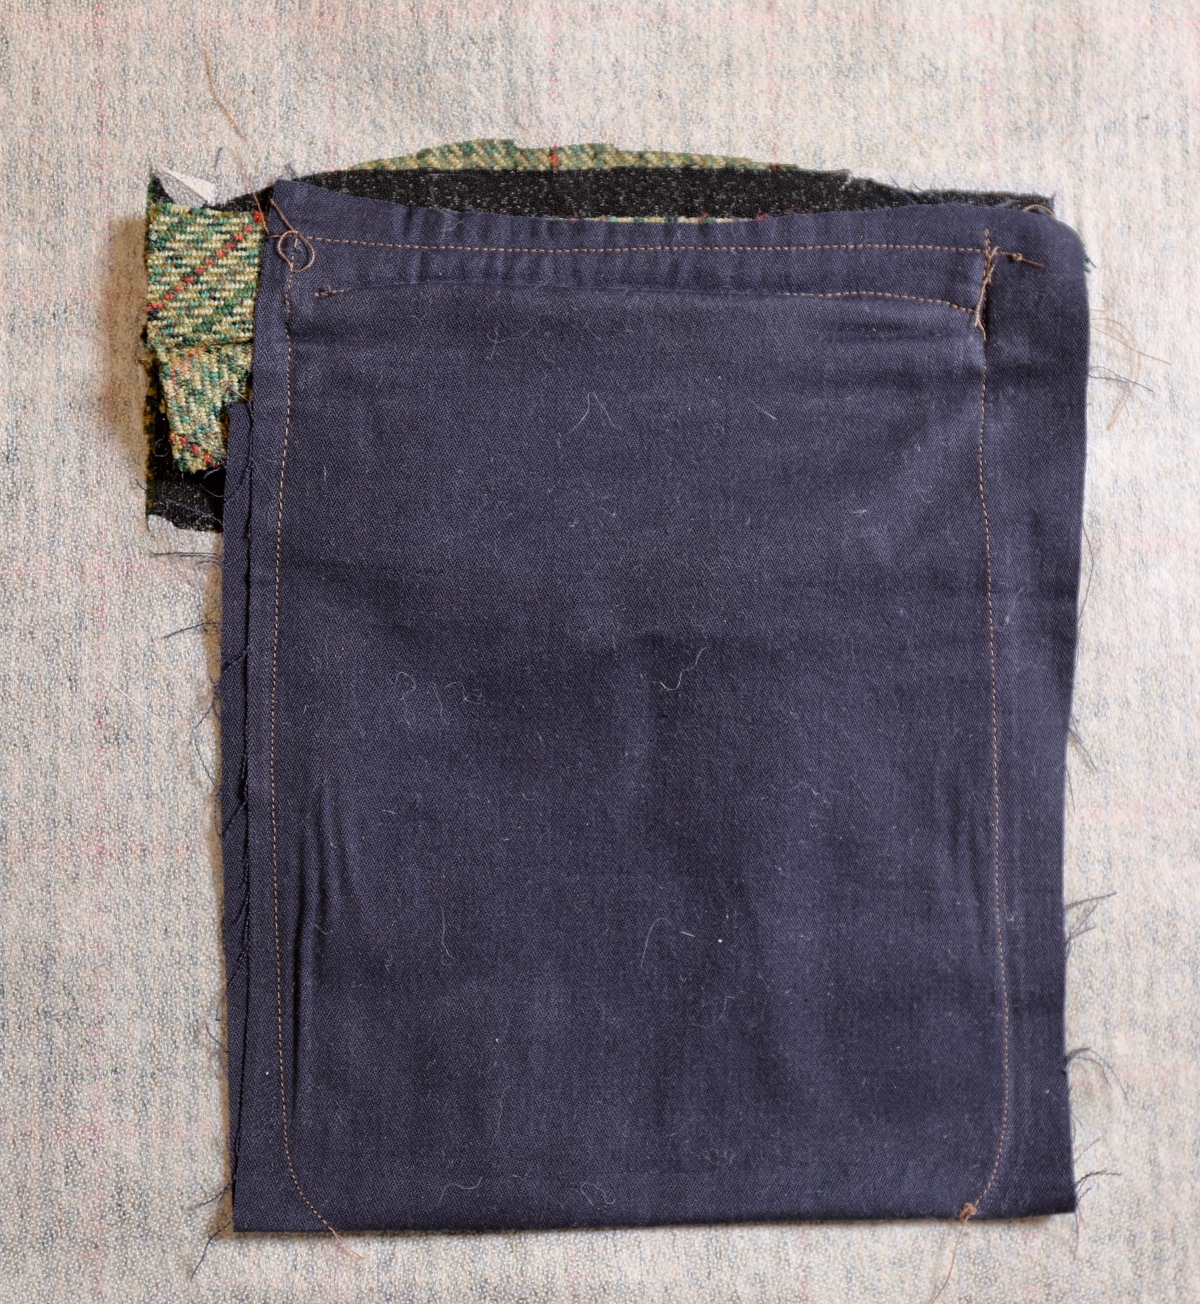
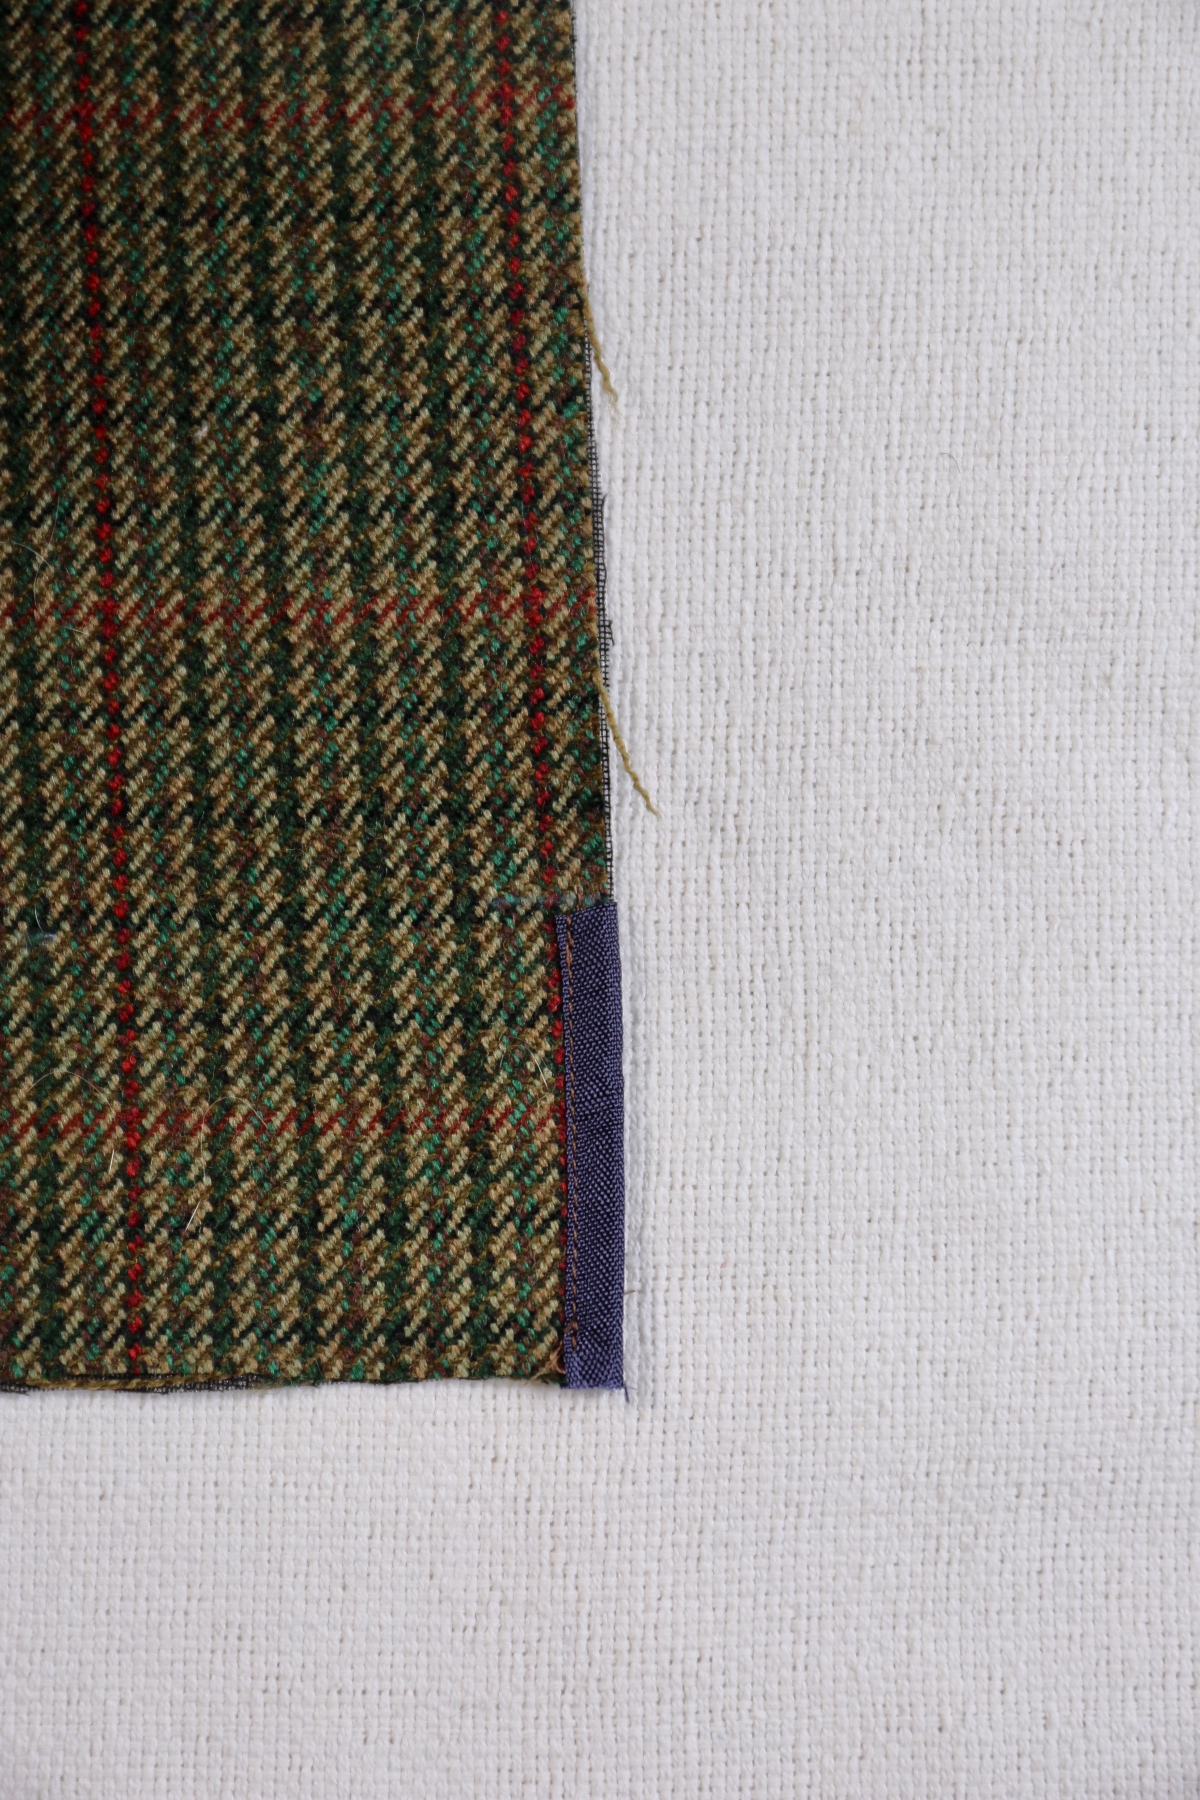
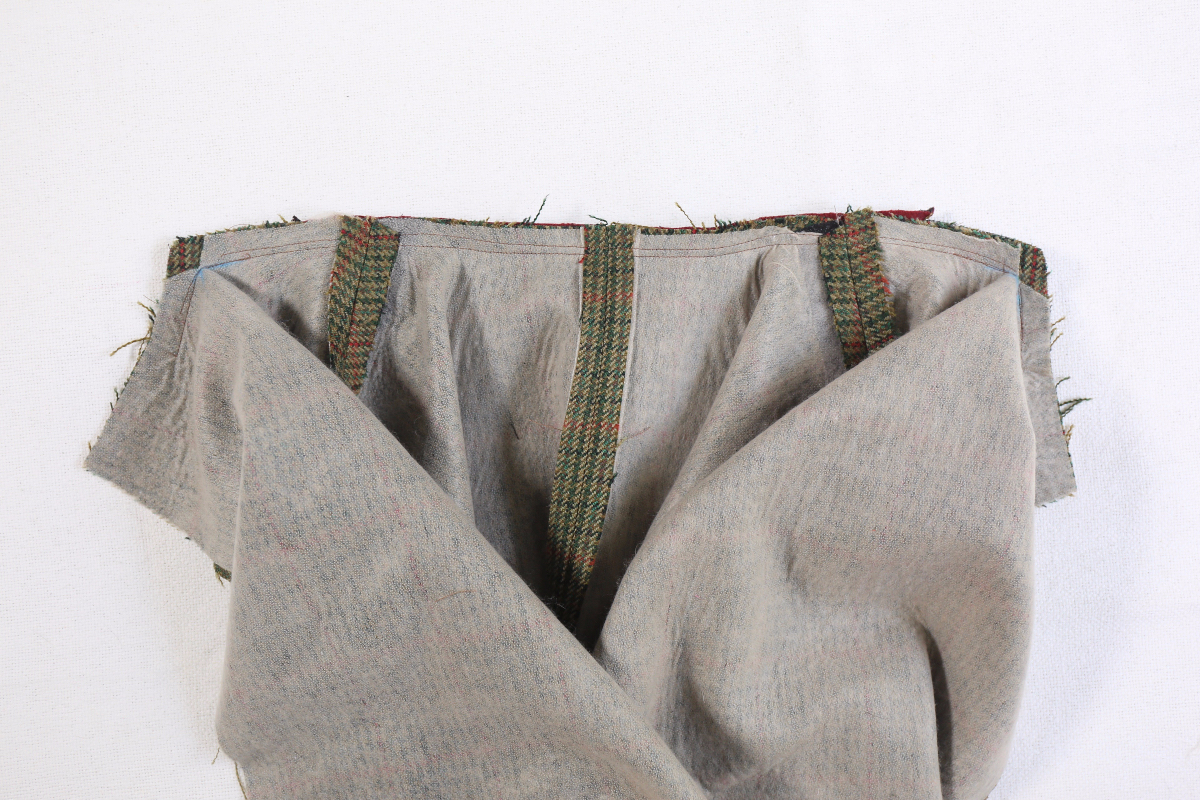
1) Place the two coat-back pieces wrong-side up. Trim 1 3/4″ from the wearer’s left coat-back piece’s vent edge, as indicated by the cut line on the pattern piece. Discard the trimmed fabric. Baste the 1″-wide strips of scrap woven fabric prepared in Step 3 of the “Getting Started” section to the shoulders with a 3/8″ seam to help stabilize the shoulders, and trim any extra fabric that extends beyond the edges. (Note that the woven scraps at the shoulders won’t be shown in illustrations following this step.)
2) Using the pieces of interfacing prepared in Step 3 of the “Getting Started” section, and following the manufacturer’s instructions, fuse a 1 3/4″ by 12 1/2″ strip of interfacing to the wrong side of the coat back on the wearer’s left side, positioning the strip so it meets the fold line. This interfacing will stabilize the vent to help it hold its shape. Fuse a 1″ by 1″ square of interfacing directly over the vent dot itself. This will reduce stress at the dot, which is the point where the vent will open. Repeat in the same manner to attach the second 1 3/4″ by 12 1/2″ strip and 1″ by 1″ square of interfacing to the coat’s back on the wearer’s right side. Trim any excess interfacing that extends beyond the coat’s hem edge.
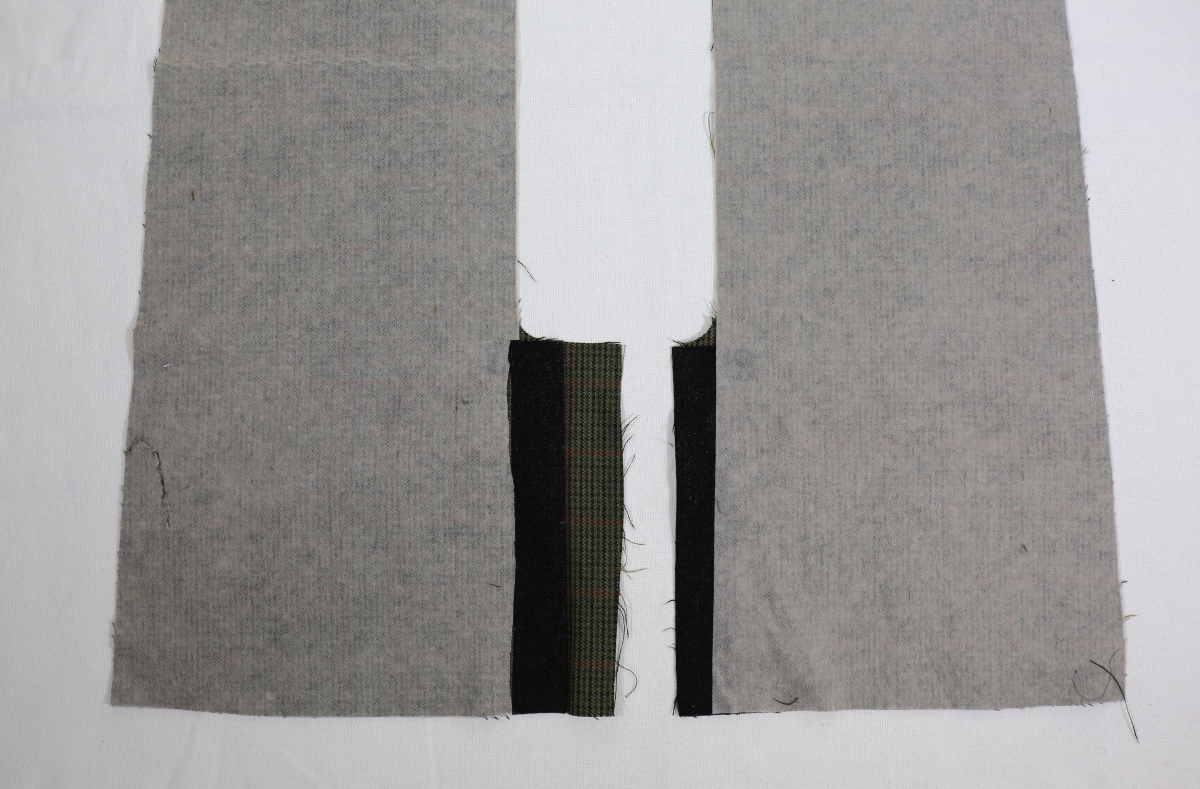
3) Fold and press each vent to the wrong side along the marked fold line (the edge of the fused interfacing). Then unfold the vents for the time being, but keep the creases for later when you come back to finish the vent.
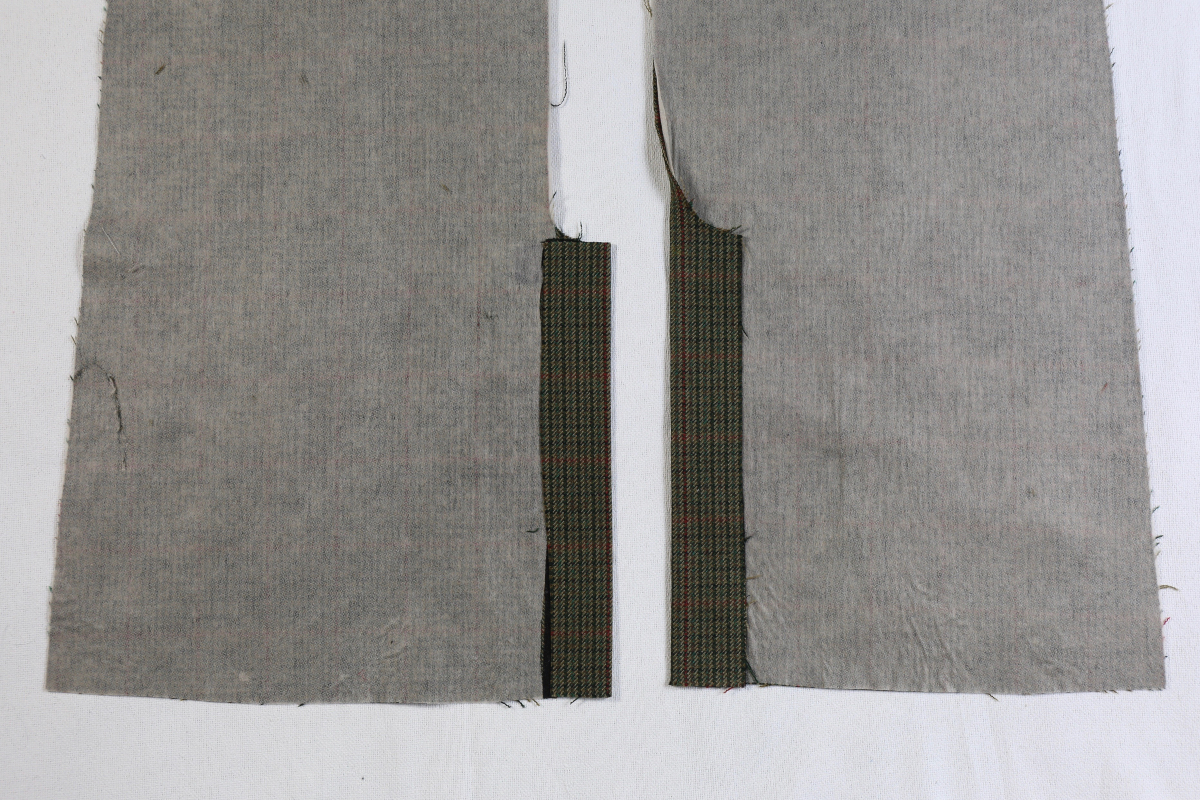
4) Pin the two coat-back pieces with right sides together, matching the edges, notches, and the walking vent dots. Stitch the center-back with a 1/2″ seam, stitching precisely to the walking vent dot and backstitching or lockstitching at both ends.
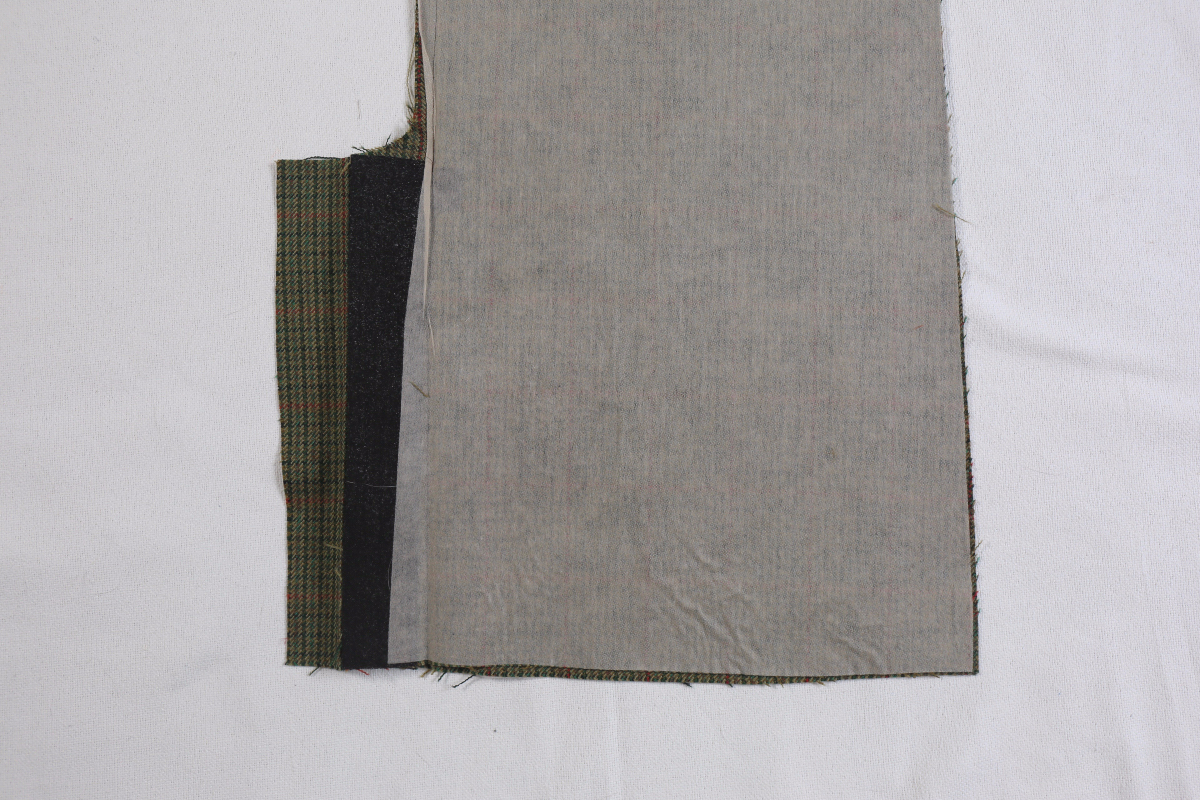
5) Refold the walking vent along the folds you pressed earlier. To finish the vent, stitch from the vent dot to the folded back edge of the vent, sewing through all the layers and following the stitch line from the pattern, as shown, backstitching or lockstitching at both ends. Clip into the center-back coat seam allowances about 2″ above the vent dot. This will allow you to press open the seam allowances from the neckline to the vent. Below the clipping, press the vent to the wearer’s left side along the previously pressed left fabric fold line.
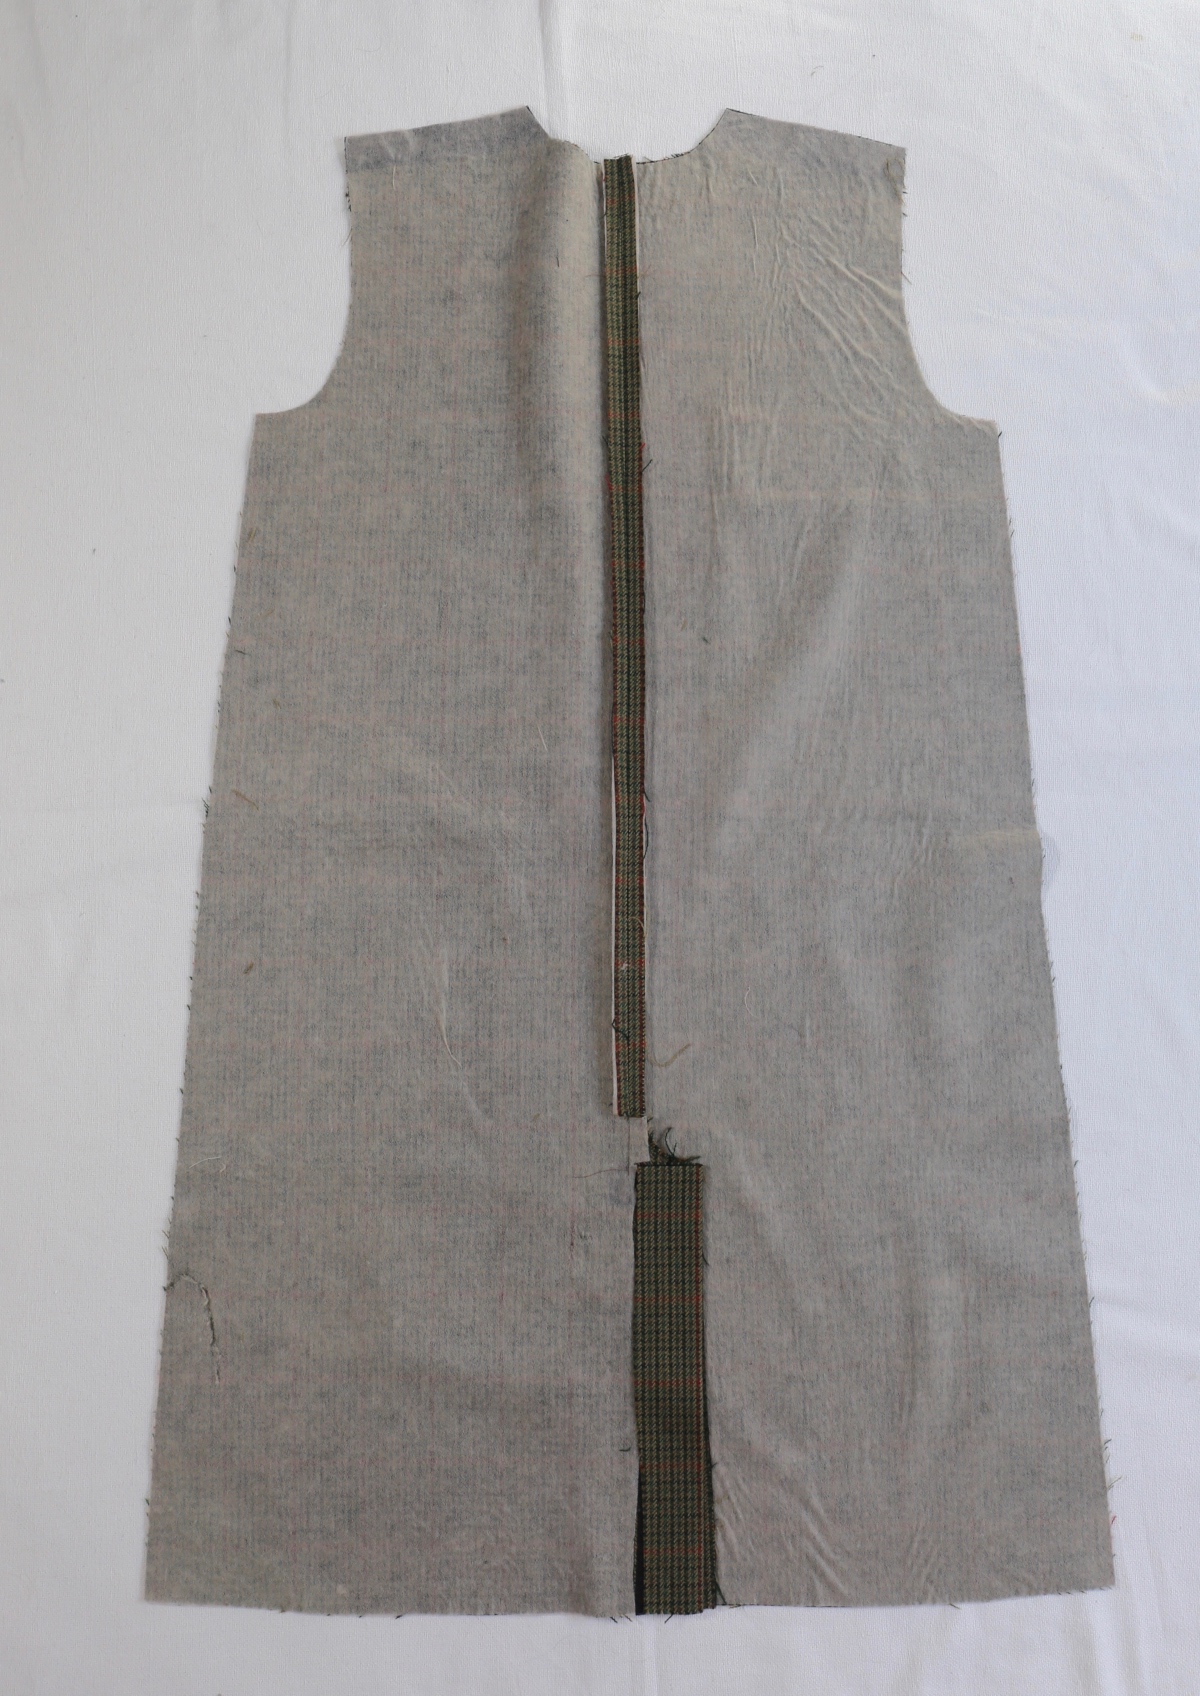
HINT: The vent stitching won’t show from the outside of the coat, and the vent itself will hang freely inside the coat to give the coat a clean finish from the outside. If you prefer the stitching to be visible and the vent to be flat against the back of the coat, you can press the vent to the side and stitch through all the layers instead.
PREPARE THE FACING AND LINING
1) Finish the side edge of the front facing pieces below the dot using your preferred method (see “Finish the seam allowances” in the Glossary). This small portion of the facing edge will show when the coat is finished.

Then pin each front facing to its corresponding coat-front lining with right sides together and notches aligned. Stitch the edge with a 1/2″ seam, stopping at the dot you transferred from the front-facing pattern piece and backstitching or lockstitching at both ends. Press the seam allowances toward the facing.
2) If you haven’t done so already, trim the coat-back lining along the vent lines provided on the pattern sheet. (Note that the wearer’s right and left are reversed for the lining, since the right side is on the inside of the coat.) Then baste the lining at the vent area, 1/2″ from the trimmed edges, pivoting at the dot for the left lining. Clip into the seam allowances to the basting/pivoting dot on the left lining/vent piece, then fold and press the left lining along the basting stitches to prepare it to be sewn to the coat vent later.
3) Pin the two coat-back lining pieces with right sides together and notches aligned. Stitch from the neckline to the walking vent dot with a 1/2″ seam, backstitching or lockstitching at both ends. Press the seam allowances open.
Sewing Day 3
SEW THE COLLAR
1) If you haven’t done so already, follow the manufacturer’s instructions to fuse the cut interfacing to one collar piece. We’ll refer to this piece, going forward, as the under collar.
My interfacing, you may recall, is black. The other fabric pieces has an almost-sheer beige interfacing to help you distinguish right side from wrong side. Also, I didn’t photograph every step since the illustrations are better for some steps than photos.
2) Staystitch the inner edge of the collar and the under collar with a 3/8″ seam. Clip into the curved sections of the collar and under collar up to the staystitching to make it easier to straighten the edge.
3) Pin the more curved edge of one interfaced banana stand to the (non-interfaced) collar, matching the dots, the notches, and the edges. Stitch the collar to the banana stand with a 1/2″ seam, stitching through the dots and backstitching or lockstitching at both ends.
See step 4 below.
4) Press the stitched seam allowances open and trim any seam allowances that extend beyond the edges.
5) Repeat steps 3–4 to sew the under collar to the other banana stand.
I chose a contrast color for my under collar band, which you can see here.

ATTACH THE COLLAR
1) Align and pin the coat fronts to the coat back at the shoulders with right sides together. Sew the shoulders with a 1/2″ seam, backstitching or lockstitching at both ends.
Sew the shoulders of the back lining and front facings/lining in the same way.
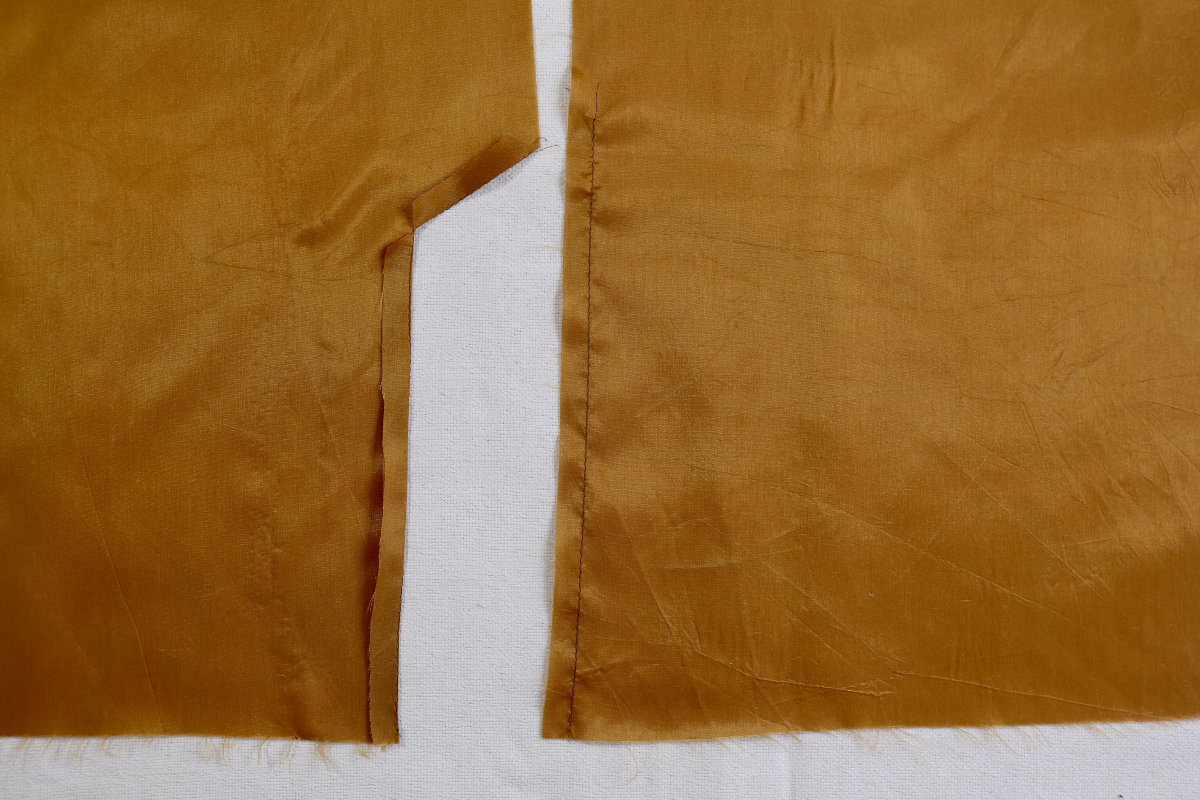
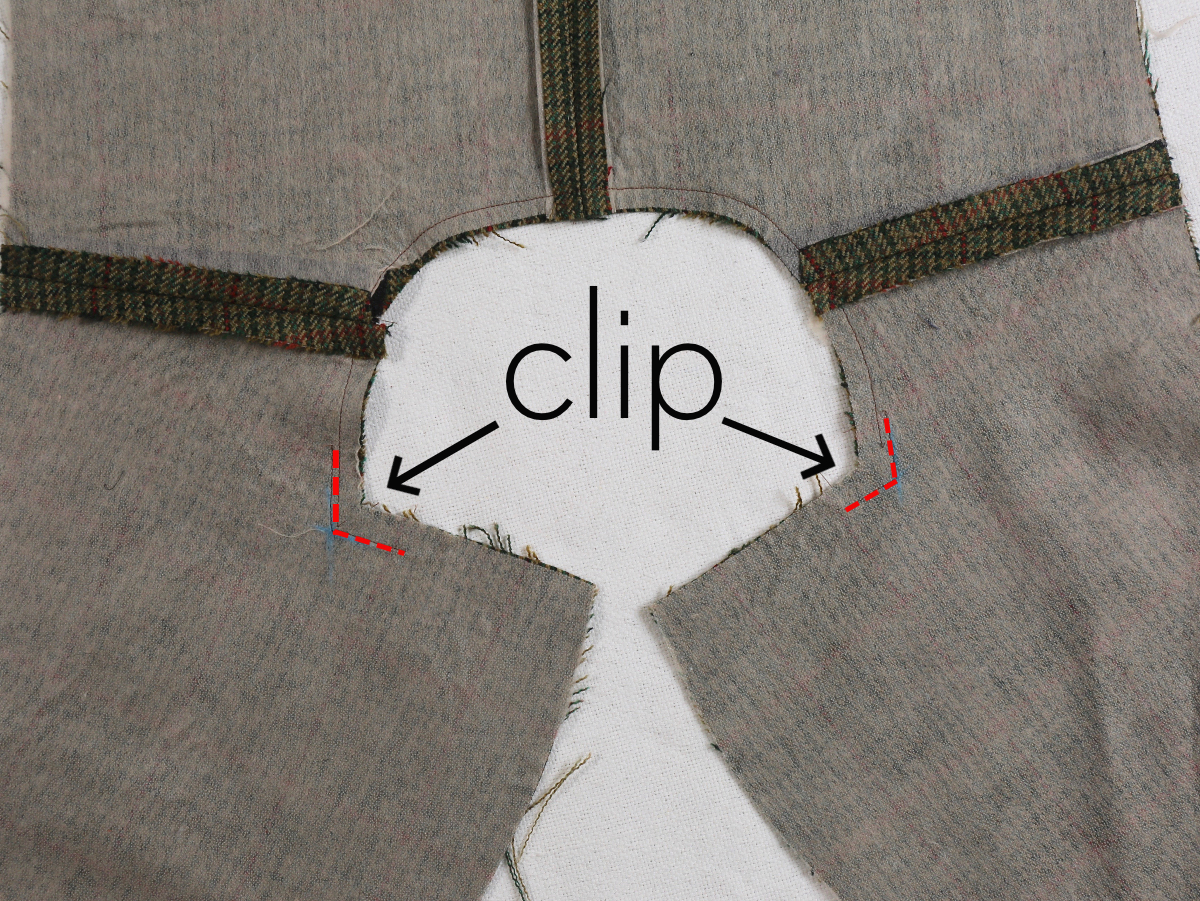
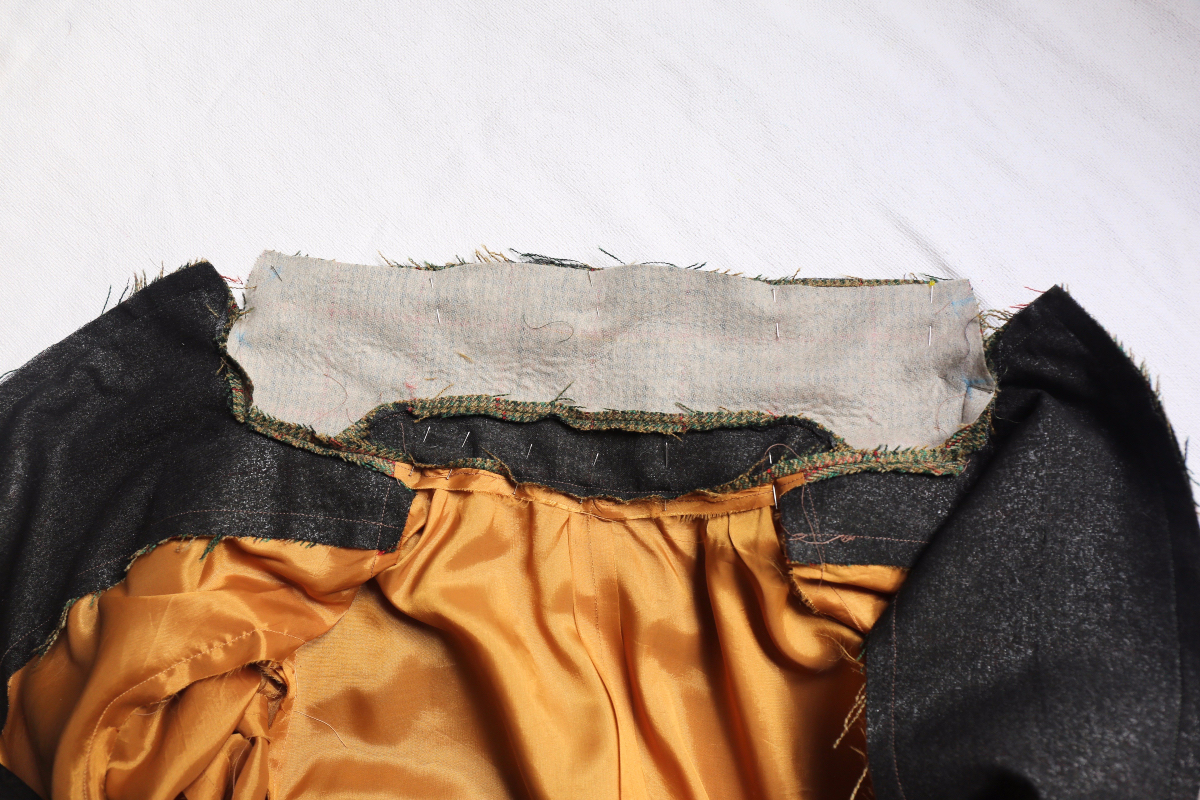
2) Staystitch the neckline of both the coat and the coat lining with a 3/8″ seam. (The staystitching is permanent and helps prevent the neckline from stretching or distorting during assembly.) Reinforce the front corners of the neckline by stitching a 1/2″ seam for about 1″ on either side of the dot and pivoting at the dot. To prepare the neckline for the next step, clip from the neck edge to the reinforced dot, cutting as close to the stitching as possible without cutting into the stitches. Repeat to reinforce the neckline at the dots on the coat-lining piece as well.
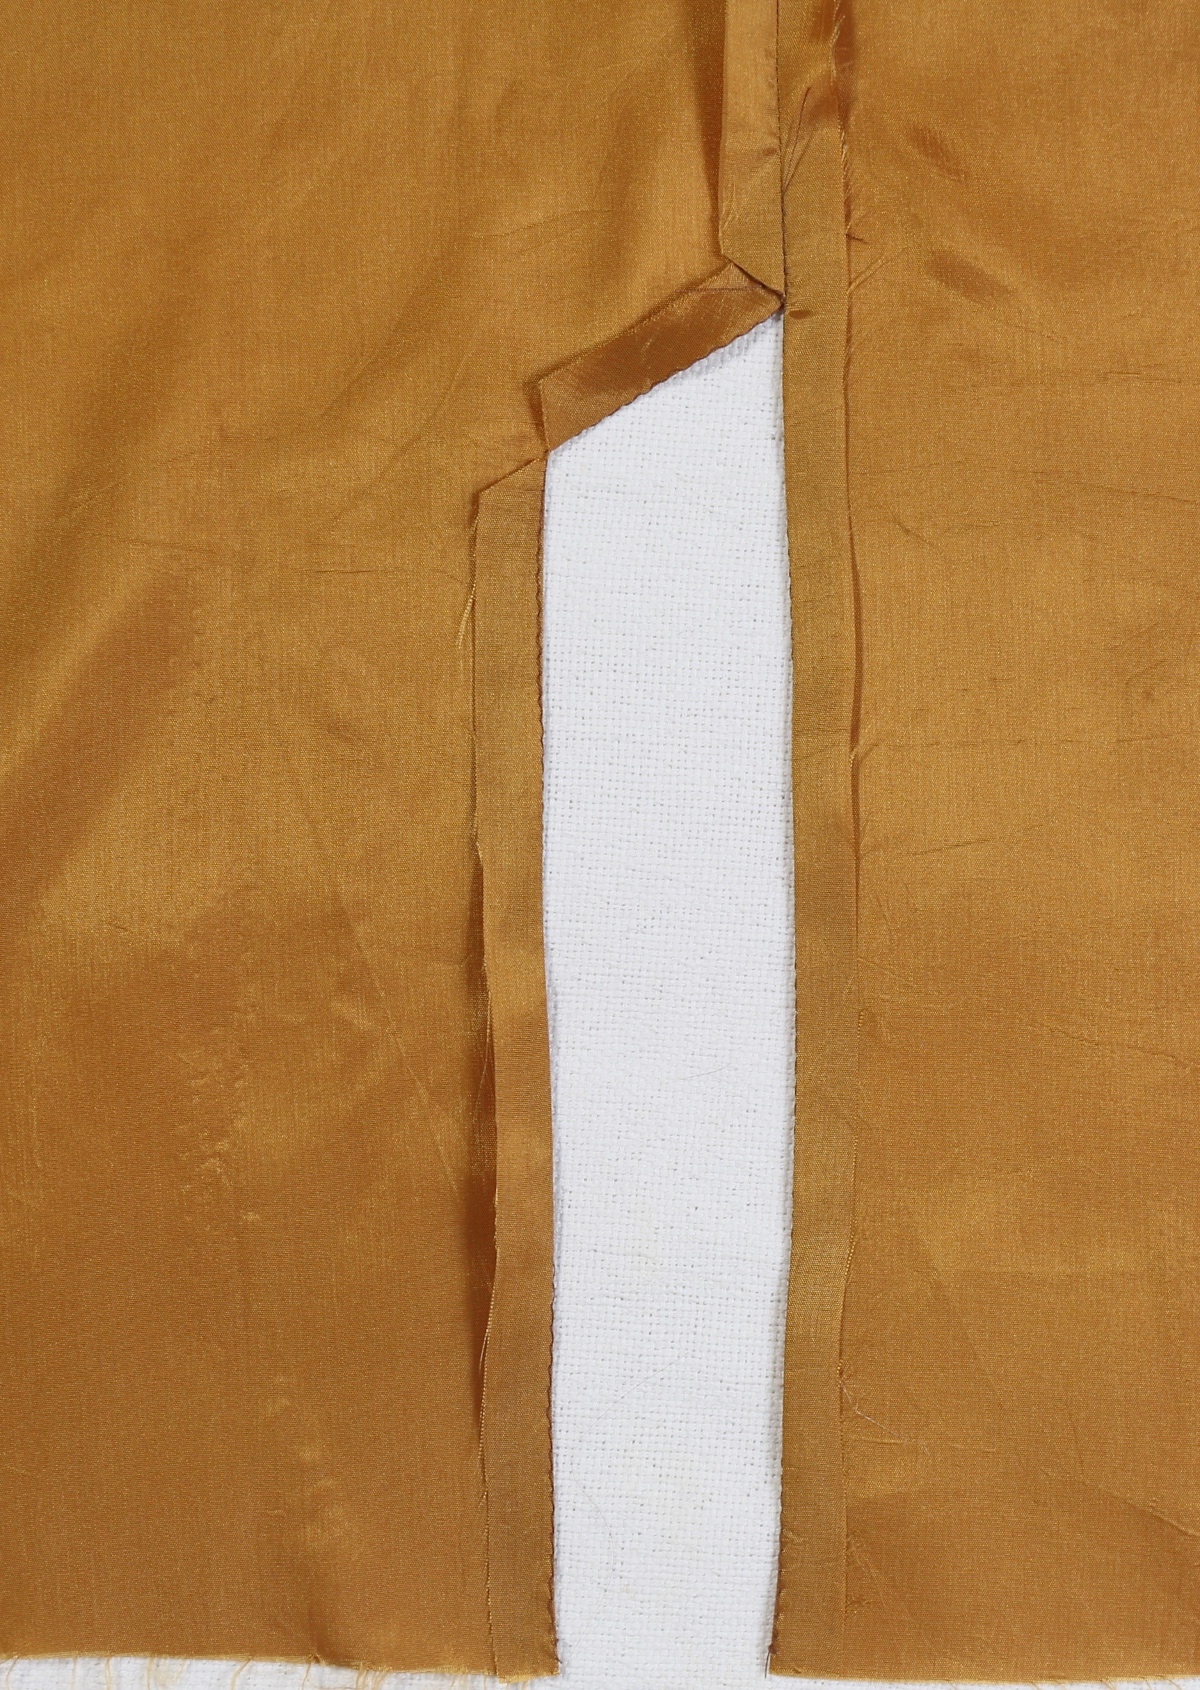
3) Pin the interfaced collar and banana stand to the coat front, with right sides together, starting by matching the center-back banana stand notch to the center-back seam on the coat, then matching the second set of notches on the banana stand to the shoulders on the coat. Match the first set of dots on the collar to the reinforced corner dots on the coat front. Pin directly through the dots so you can match them precisely.
4) Pivot the coat front so you can pin the second set of dots on the collar to the notches at the coat front. Sew the collar and banana stand to the coat, starting and stopping precisely at these dots and backstitching or lockstitching at both ends.
Can you see my stitching here? I’ve shown both sides of the coat so you can see how the clipped corners allow you to match the edges to sew these corners.
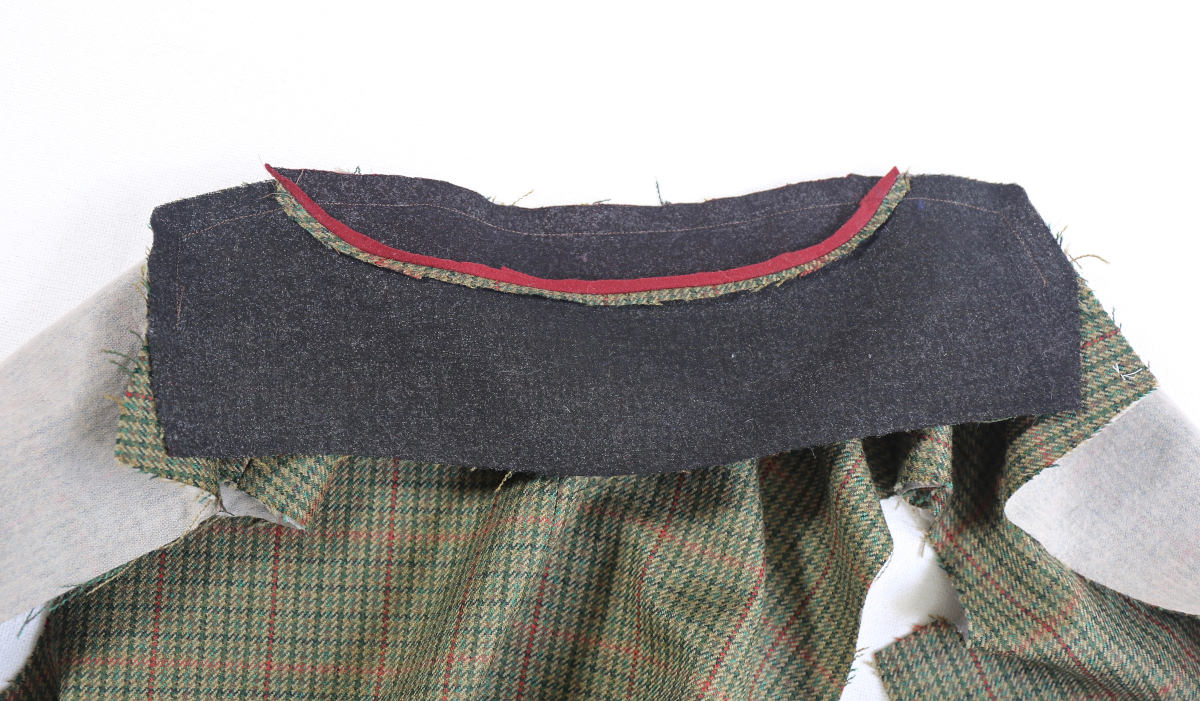
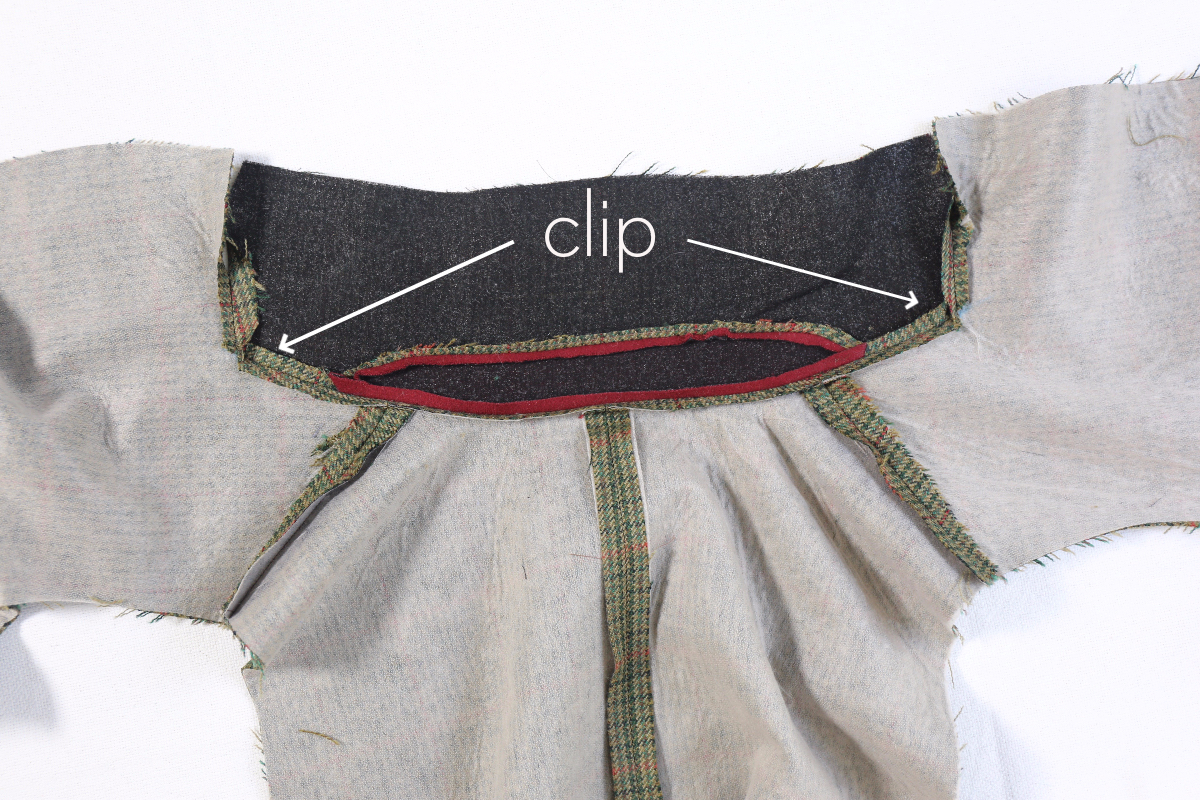
5) Press the seam allowances open and trim them to about 1/4″. Clip into the seam allowances at the corners of the collar, as shown, in order to press completely open.
6) Pin the coat front to the coat back at the side seams with right sides together and notches aligned. Stitch with a 1/2″ seam, backstitching or lockstitching at both ends. Press the seam allowances open.
Repeat steps 3–6 to attach the un-interfaced collar to the coat lining and front facings. After we sew the sleeves, we’ll finish the notched collar.

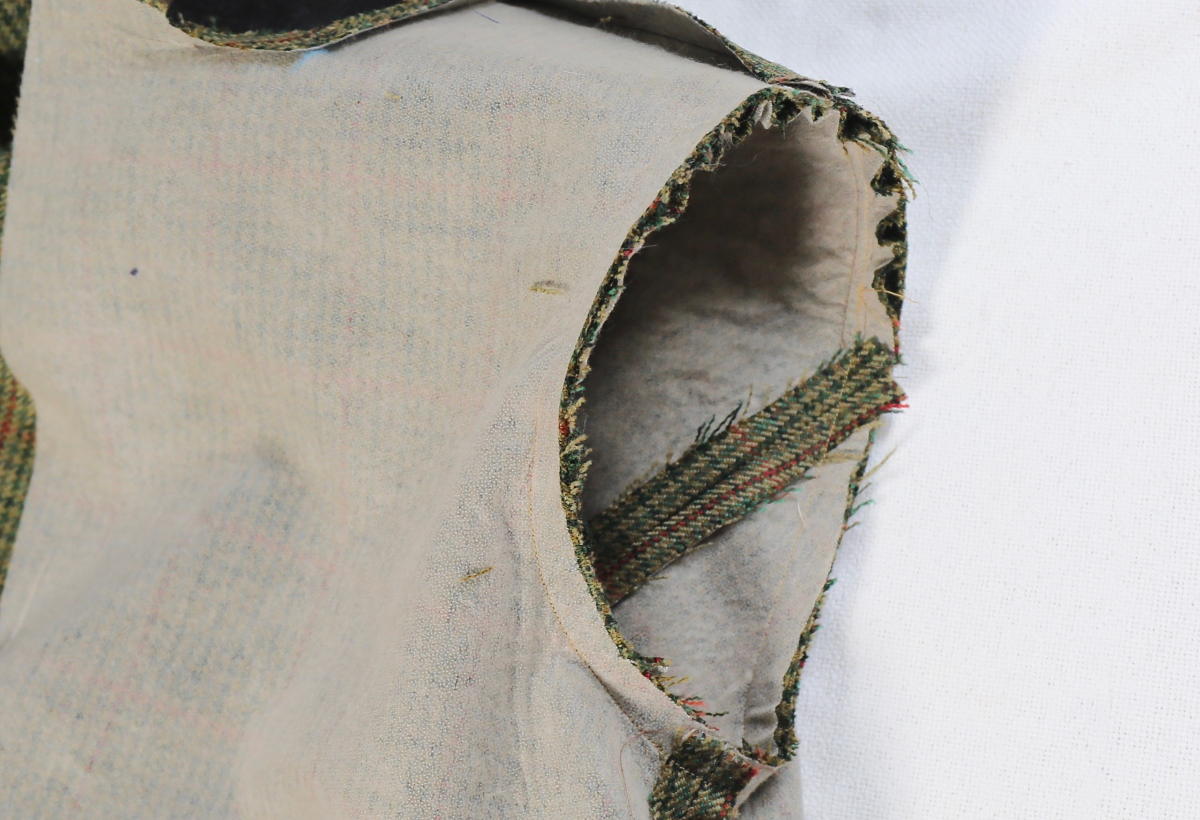
SEW THE SLEEVES
1) Pin the longer side of the under sleeve to the upper sleeve, right sides together and matching the edges and notches. Stitch with a 1/2″ seam and press the seam allowances open.
2) Align and pin the other side of the under sleeve to the upper sleeve, with right sides together and matching the edges. Sew with a 1/2″ seam. Press the seam allowances open. Sew a row of gathering stitches 3/8″ from the raw edge of the cap of the sleeve, starting and stopping at the dots and leaving thread tails several inches long on both ends of the gathering stitches. Then sew a second row of gathering stitches in the same way, this time 5/8″ from the raw edge. (Note that the sleeve cap also has an upper notch, which you’ll use later to help align the sleeve to the shoulder seam when you pin the sleeve and armhole together.)
3) Turn the sleeve right-side out and slip it inside the corresponding armhole of the inside-out coat. Note: Match and pin the single notch at the under sleeve to the coat’s side seam and the upper notch on the sleeve cap to the shoulder seam. Match the remaining notches on the sleeve to the corresponding notches on the armhole. Pull up on the gathering thread tails to ease the extra fabric at the top (cap) of the sleeve until it matches the armhole. Smooth the fabric to eliminate any puckers and finish pinning the rest of the sleeve into place. Stitch the sleeve to the armhole with a 1/2″ seam, backstitching or lockstitching at each end. Press the seam allowances toward the sleeve. Once the sleeve is sewn, you can remove any visible basting stitches from the sleeve cap.
4) Repeat steps 1–3 to sew the other sleeve and to sew the sleeve-lining pieces to the coat lining.
Sewing Day 4
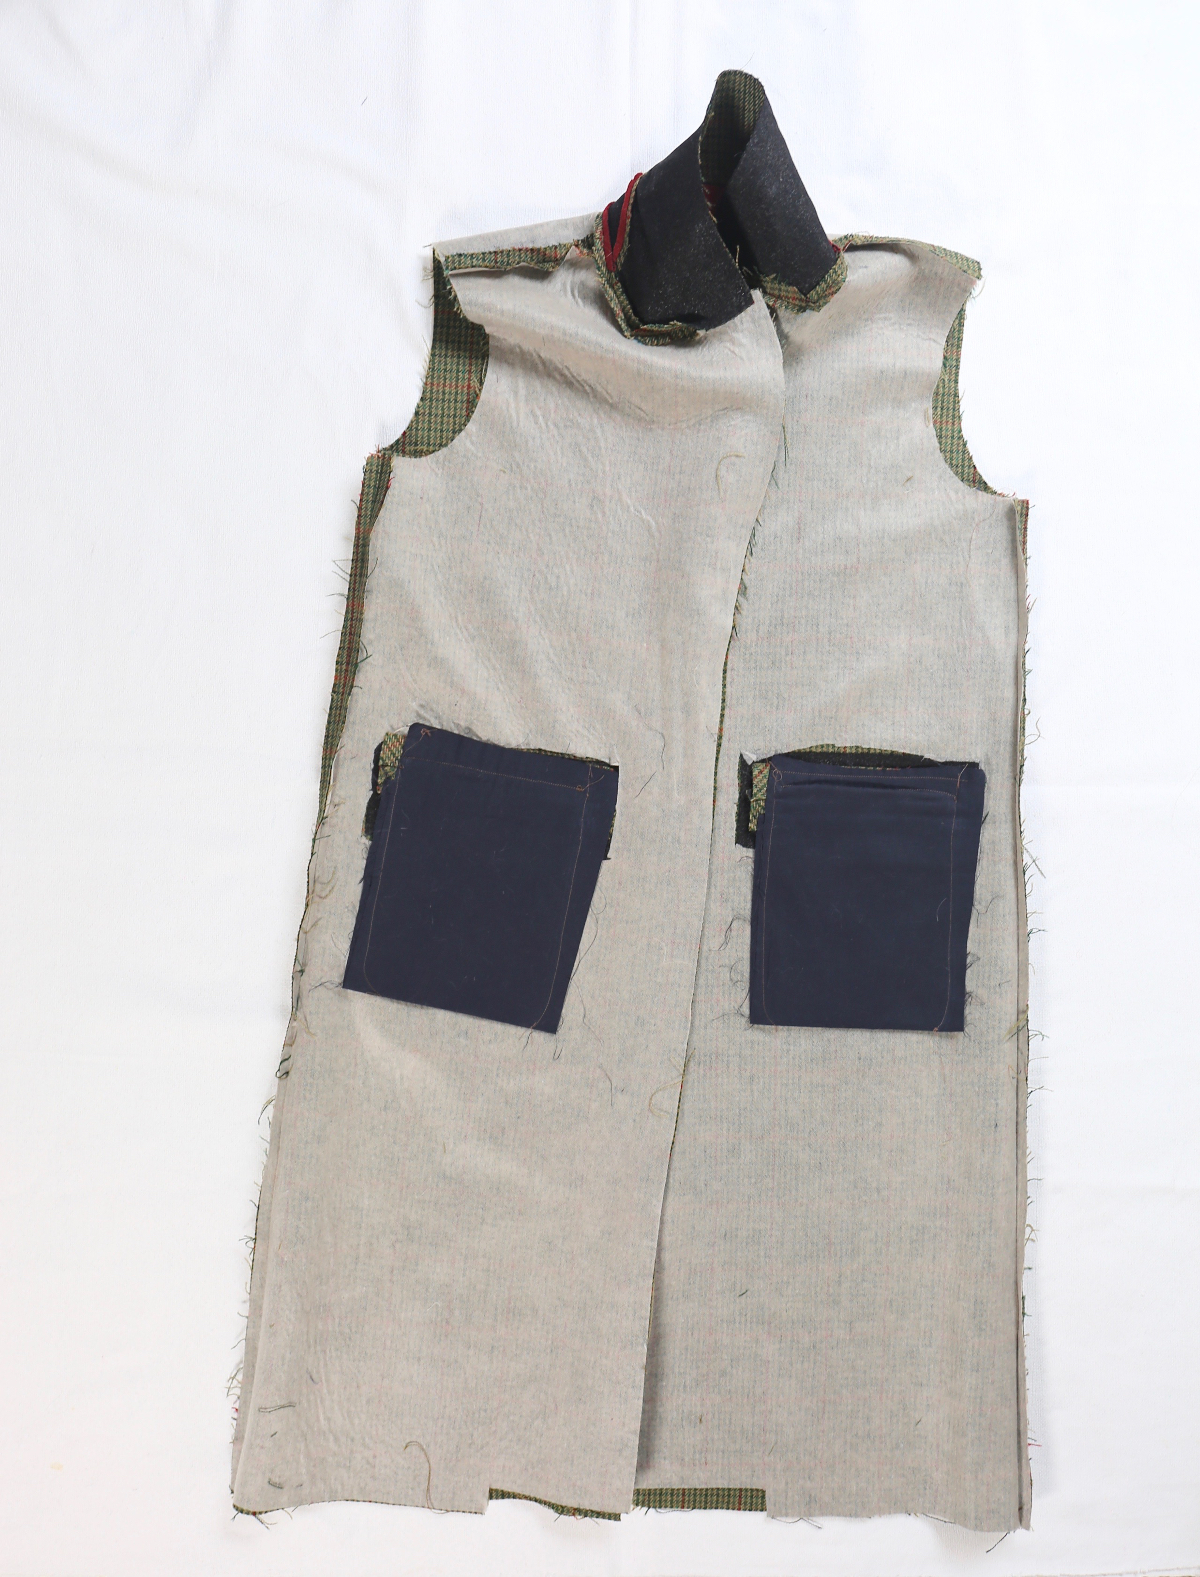
ASSEMBLE THE COAT AND LINING
1) Pin the lining to the outer coat with right sides together, matching notches, seams, and edges. Sew across the bottom of the front facing starting from the inside edge of the facing where it meets the hem, then pivot to stitch up the center-front edge, and pivot again at the outer lapel. Stop stitching precisely at the dot, lifting the seam allowances of the collar out of the way so you can match the dots precisely.
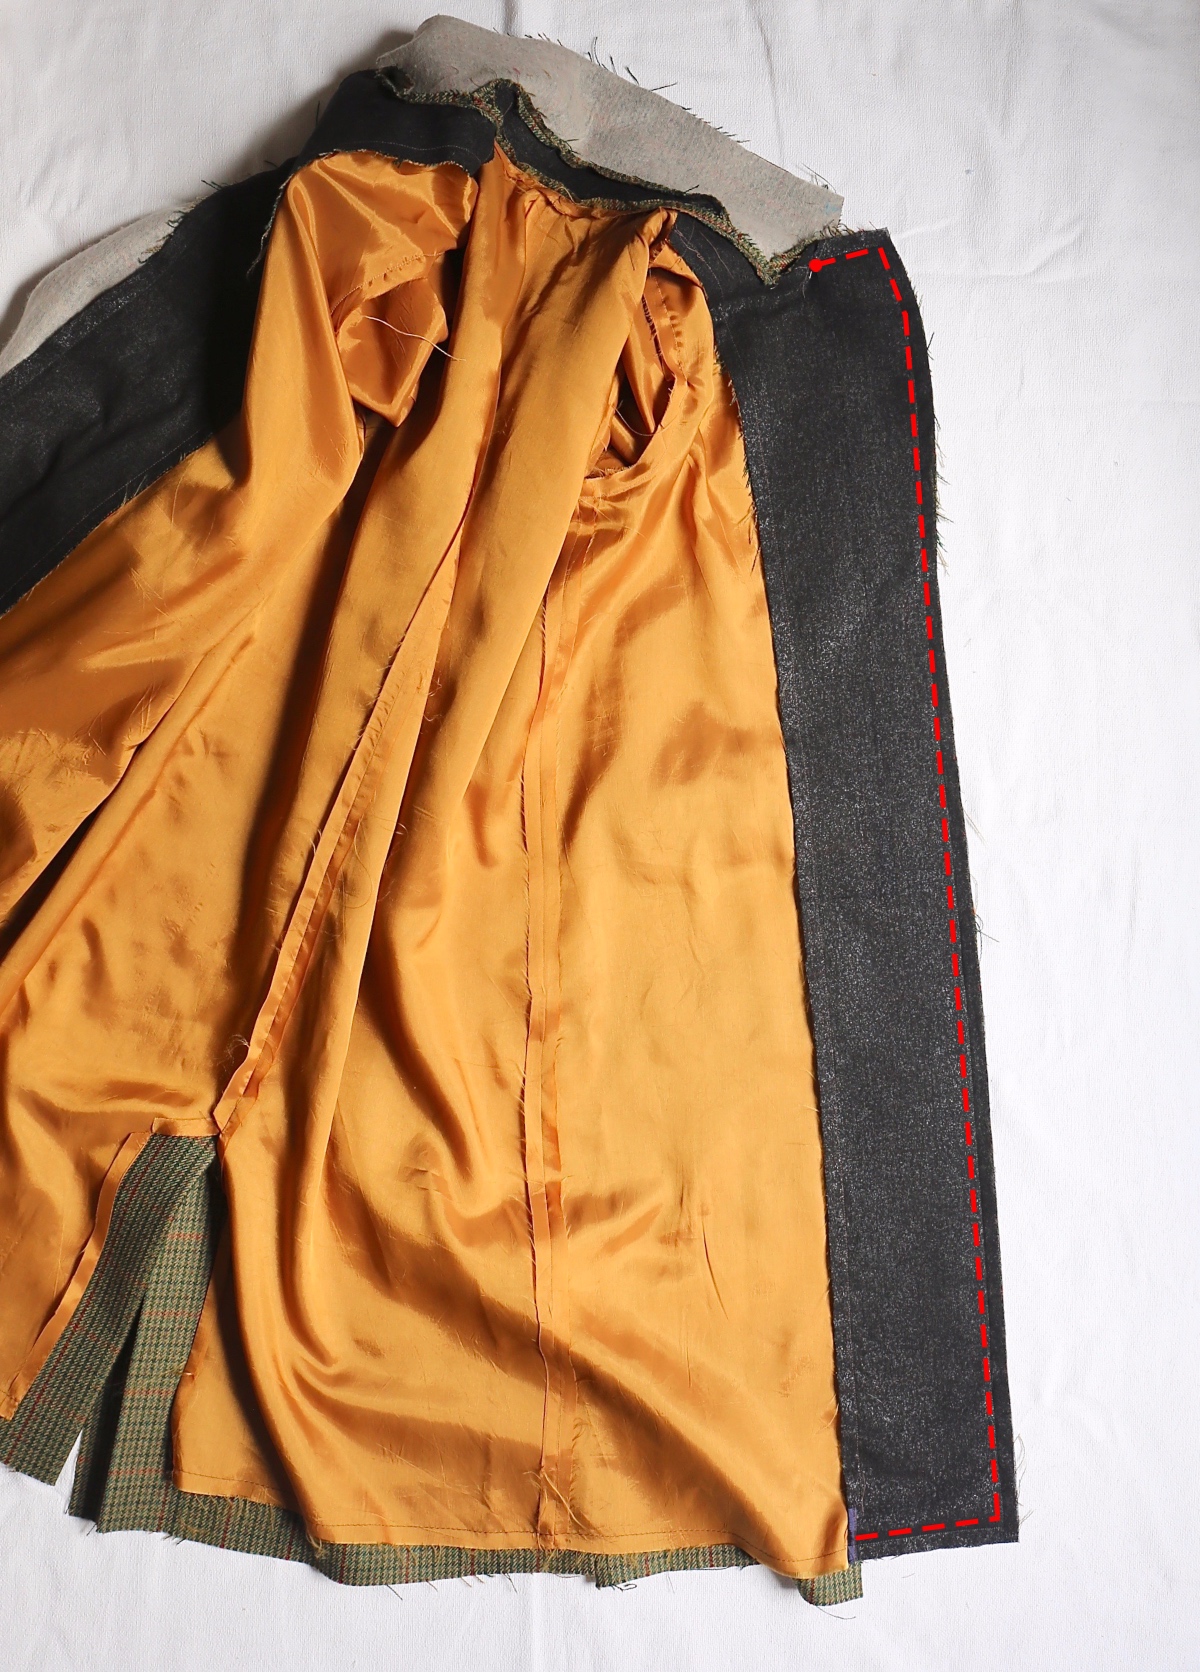
2) Now you can focus on the collar itself. Push the stitched seam allowances on the lapels to the side so you can match and pin through the dots at the ends of the collar very precisely. You might even want to hand-stitch through the two collar layers exactly at the dots to help keep them perfectly matched. Then pin the two collars together.
This is the trickiest step, in my opinion, but take your time and relax with it. If you’re really struggling, use a few hand stitching to line everything up before you use the sewing machine.
At this point I like to gently fold the collar over in the way it will be worn so that the upper collar (attached to the facing) curves over the lower collar (on the coat), taking care to match and pin through the neckline seams at the base of the banana stand first. This makes the collar facing longer than the coat collar.
The advantage to this sewing method is that you get a really nice rolled collar. It’s worth it to take a few minutes to get this right!
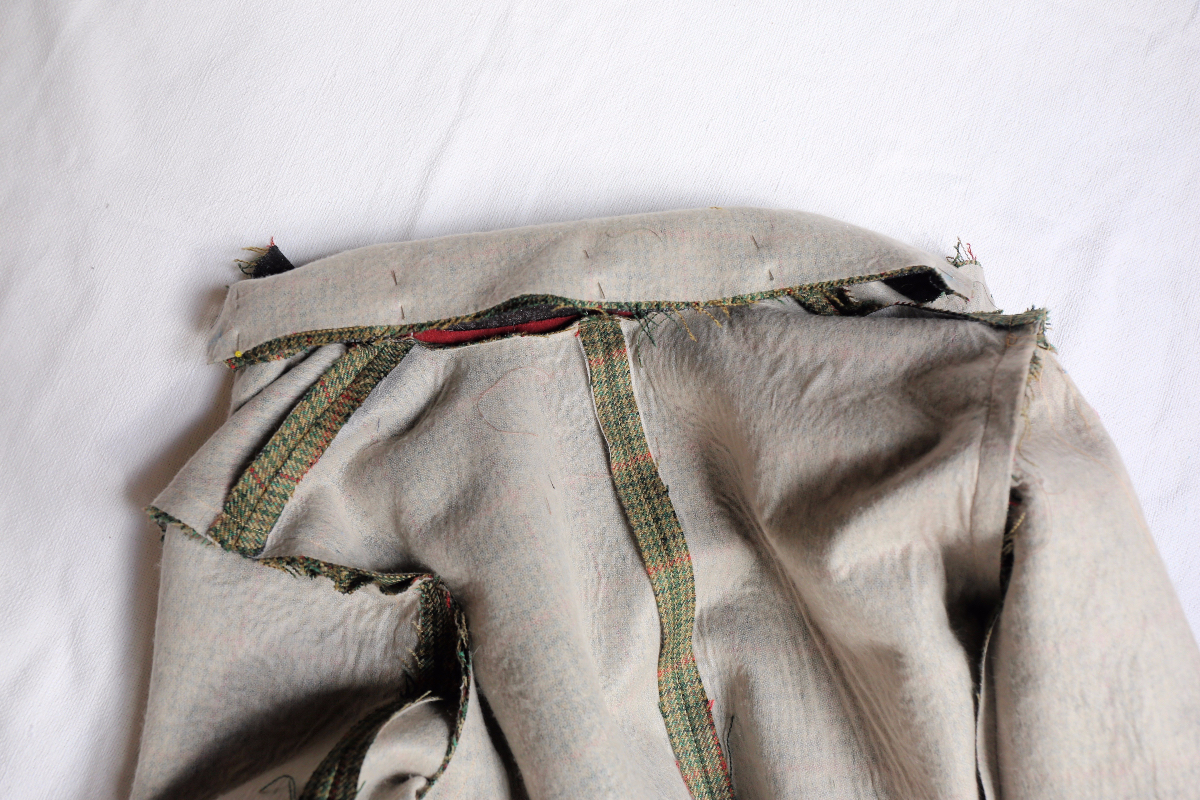

Pin and sew the collar like this and it will look better than if you match the two collar edges. Once your collar is pinned the way you want it. Sew precisely from dot to dot with a 1/2″ seam, pivoting at the dots on the corners and backstitching or lockstitching at both ends.
If it helps, trim the longer collar so the two edges are even before you start stitching. That will make the sewing a little bit easier.
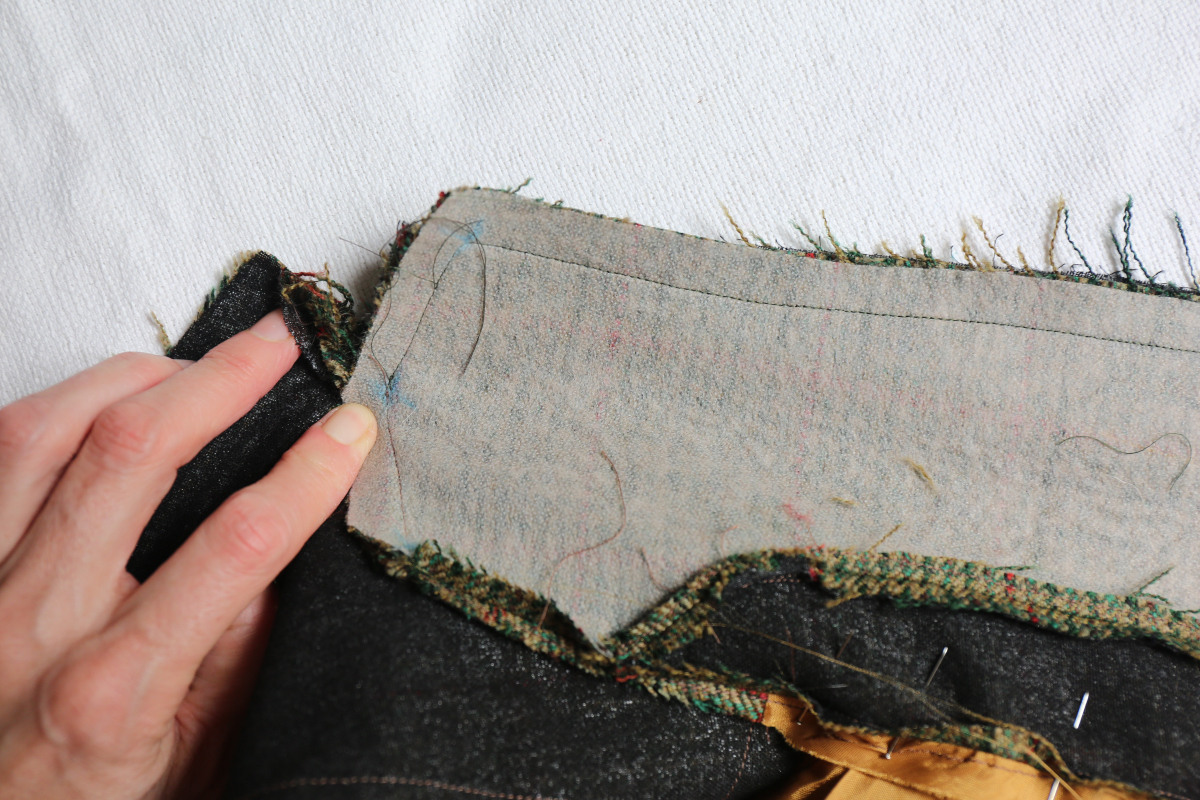
3) Trim the stitched seam allowances to 1/4″ and clip the corners, then gently turn the facing and lining right-side out and press the edges, checking to be sure the corner at the notch is matched perfectly. If you need to make any adjustments, turn the coat inside out again and check to be sure the dots are matched and sewn precisely.
HINT: If you have a wood point presser and clapper it will come in very handy for pressing at this step. A point presser can help you to press the seam allowances open at the edges and the corners, and the clapper can help you to flatten thick fabric edges, especially if you’re sewing with wool coating. Remember to use a press cloth!
4) Reach between the lining and the coat hem and turn the coat partially inside out so you can hand-stitch the neck seams together at the base of the banana stand. I like to use a whipstitch for this step, but use whatever method you prefer. If you’re feeling bold you can even attempt this step by machine. This will help the collar to keep its shape when it’s worn.
HEM AND FINISH THE COAT
NOTE: I like to cut several 1 1/2″ by 2″ strips of fusible interfacing and fuse them to the inside of the coat just above the fold of the hem. This gives the hem of the coat a little extra structure and it gives you something stable to which you can hand-stitch the hem.
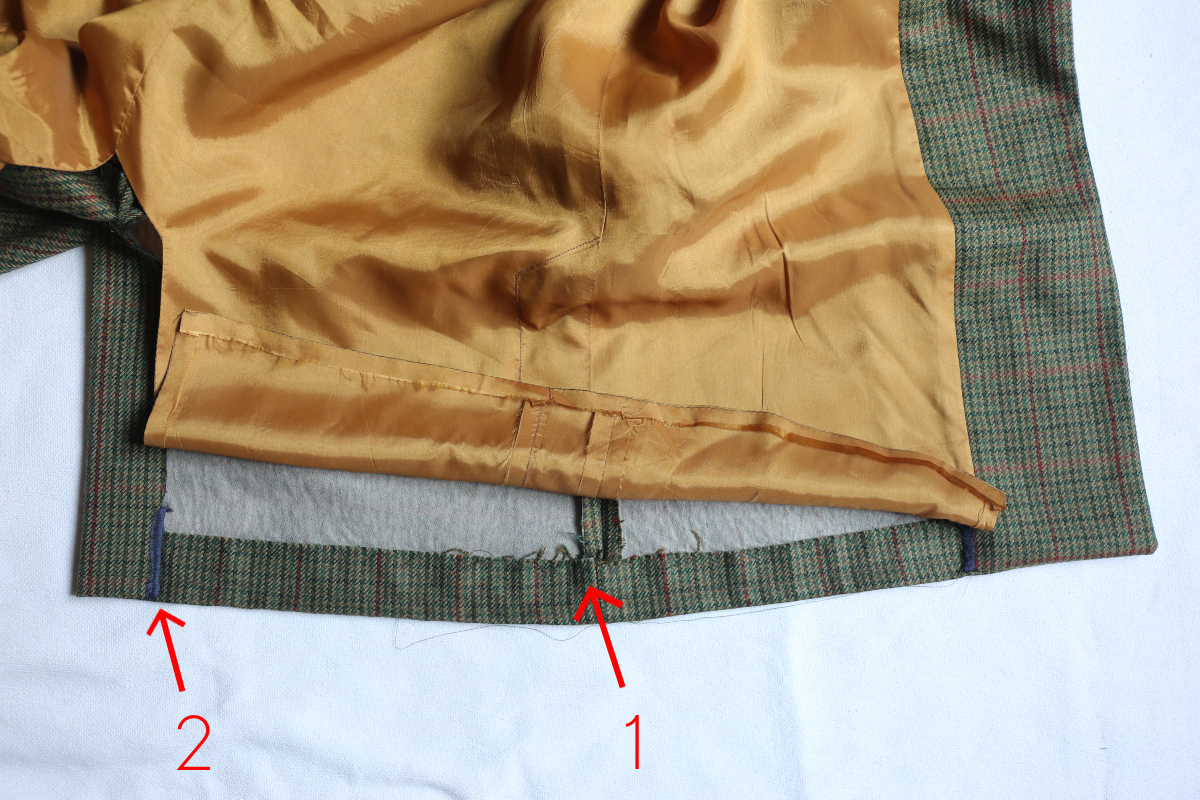
1) Using tailor’s chalk, mark and press up the coat hem by 1 1/2″. Machine- or hand-baste the hem close to the fold. Then hand-sew the hem to the coat fabric (or interfacing) with a blindstitch or catchstitch so it won’t be visible from the outside (indicated as 1, below). Unfold the edge of the vent and finish it using your favorite method (2, below), then refold the vent and hand-stitch it to the hem to finish it.
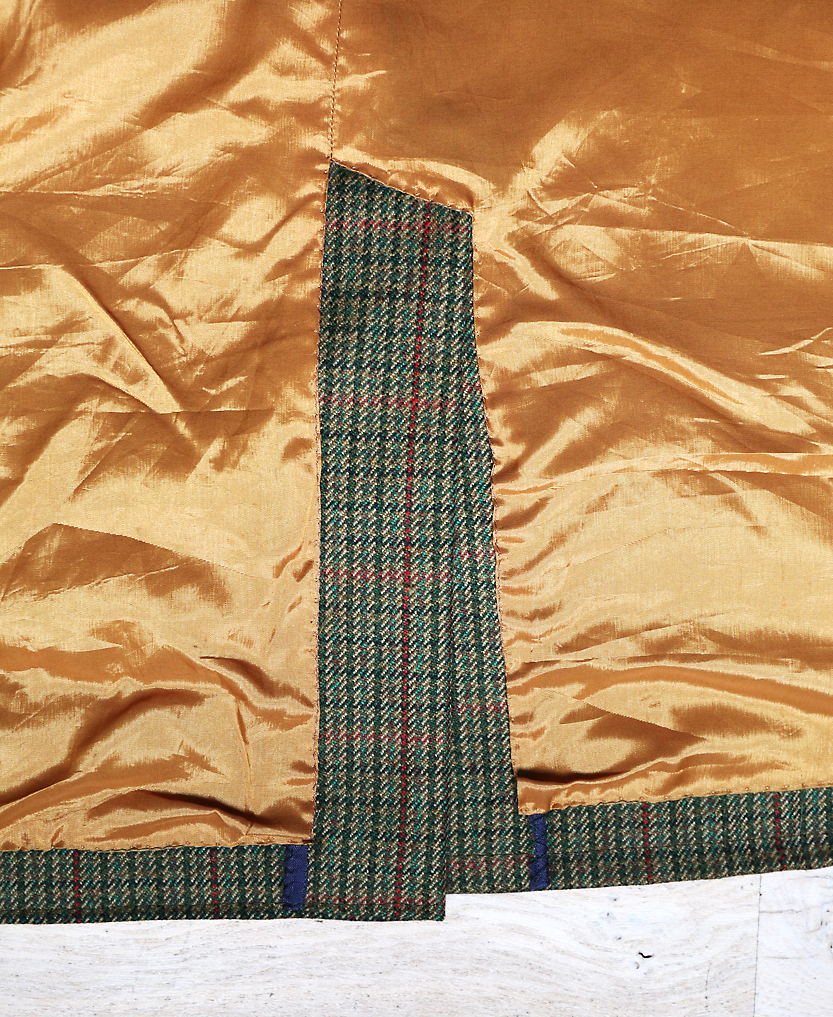
2) Sew a line of basting stitches 1/2″ from the hem edge of the coat lining. Using the basting as a guide, fold the lining to the wrong side along the basting stitches and press. Then hand-stitch the lining to the coat hem, sewing the pressed fold to the coat hem 1/2″ below the cut edge. The lining will hang below the stitching line to allow for movement when you wear the coat.
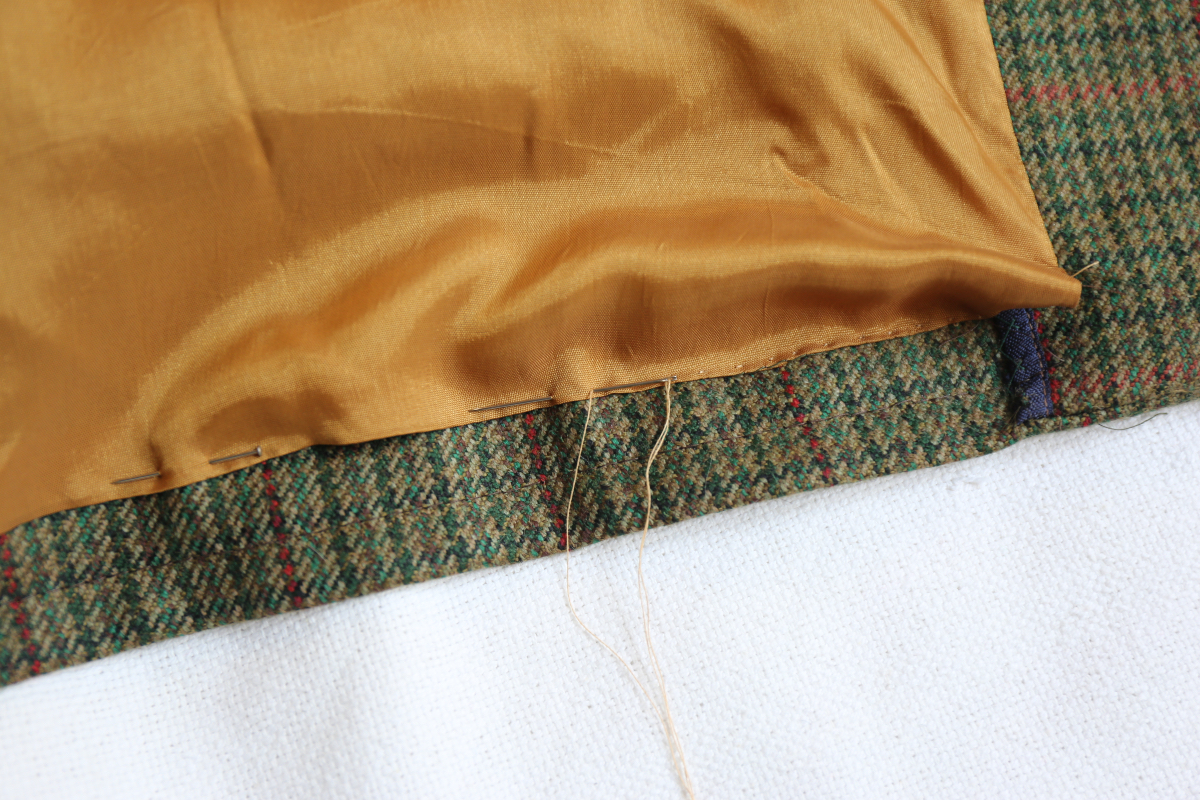
3) Hand-stitch the folded edges of the lining around the vent, 1/2″ from the coat’s vent edges to finish the vent neatly.
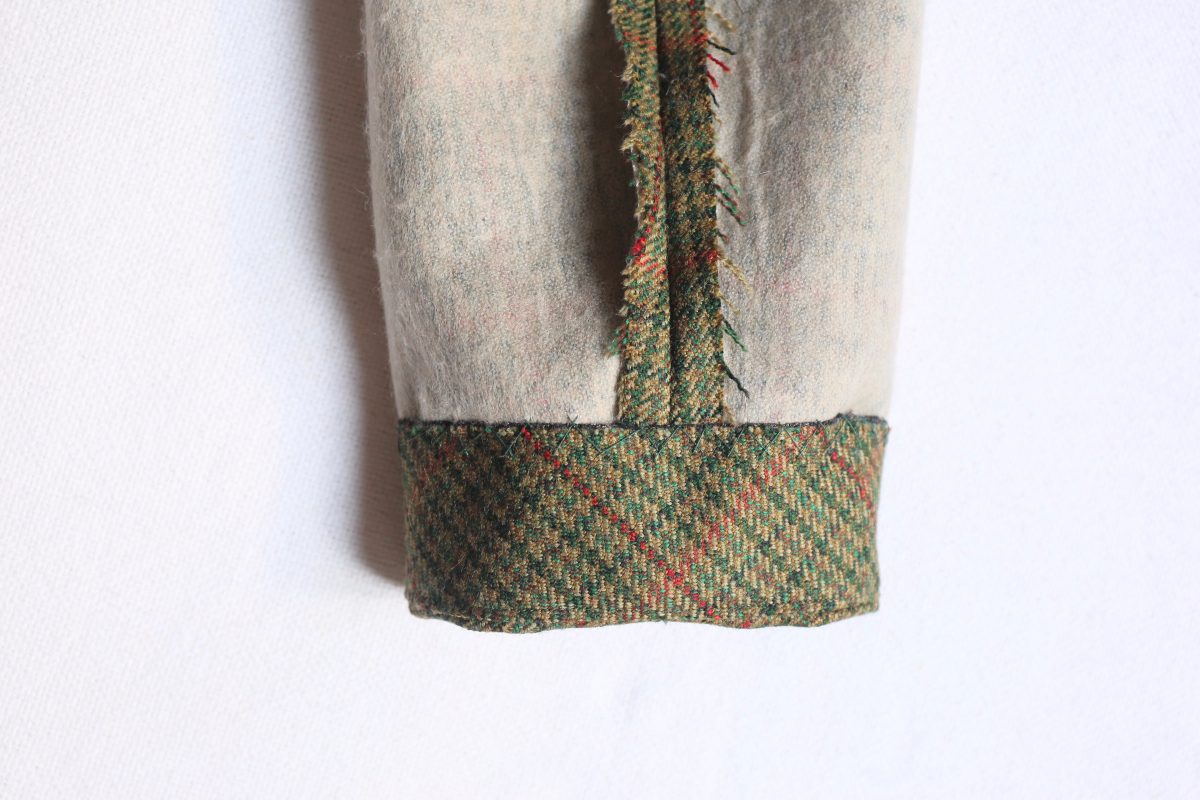
4) Mark and press up the sleeve hems by 1 1/2″ and baste the hem close to the fold. Then hand-sew the sleeve hem to the sleeve with a blindstitch or catchstitch so it won’t be visible from the outside.
You might notice that my sleeve has a bias-cut facing in this photo. I needed to add a little length, which I forgot to do when cutting my fabric, so the facing allows me more of a hem. (It also looks nice on the inside of the sleeve, but no one is going to notice except me.)
5) Sew a line of basting stitches 1/2″ from the hem edge of the sleeve lining. Using the basting as a guide, fold the lining to the wrong side along the stitches and press. Then hand-stitch the lining to the sleeve hem, sewing the pressed fold to the coat hem 1/2″ below the hemmed cut edge. The lining will hang below the stitching line to allow for movement when you wear the coat.
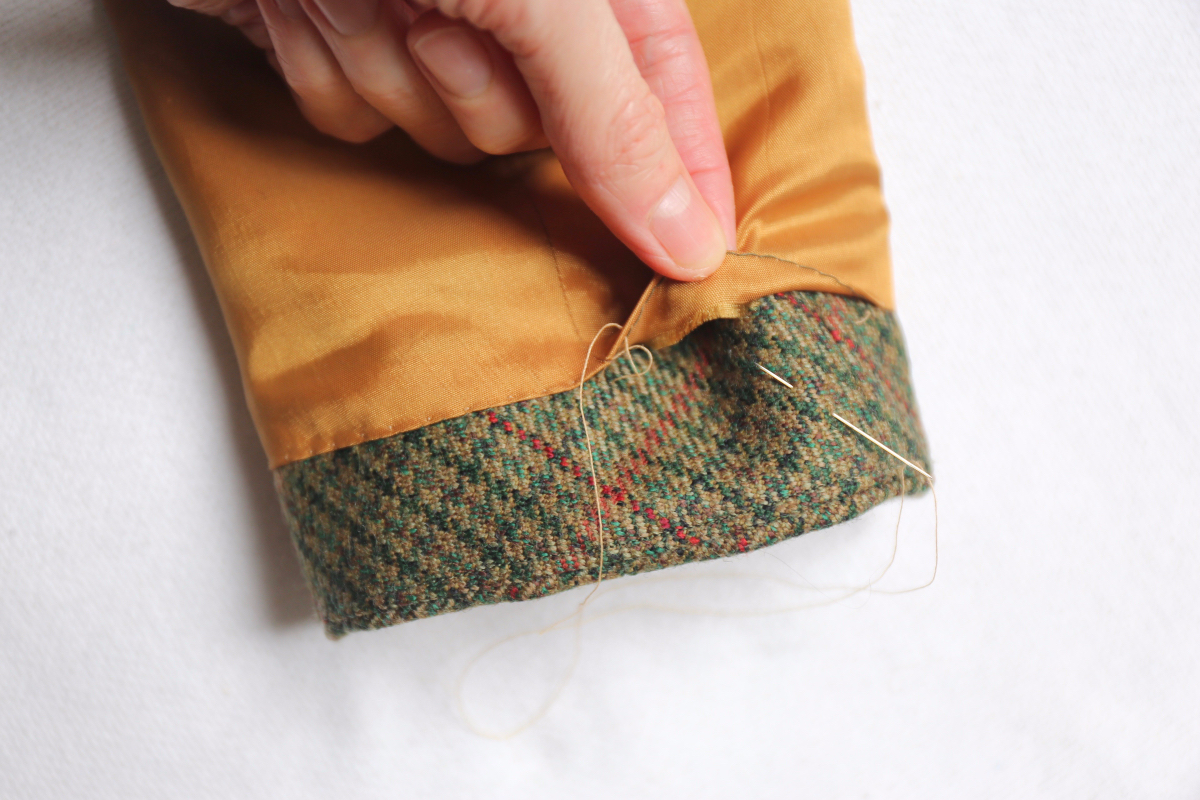
6) Use the buttonhole and button markings to sew the buttonholes of your coat on the wearer’s right side and the buttons on the wearer’s left side.
7) Remove any visible basting stitches. Your coat is finished and looking rather impressive! Well done!
I hope you had fun with this sew-along! If you joined us, please leave a comment so we know you made use of it, will you? And we’d love to see how it turned out! Tag us #lieslandco and #chavalcoat on social media, or post a photo to our Liesl + Co. Friends Facebook group!
Could you explain a bit more about stitching the vent on the back? I’m not sure how exactly what gets stitched along the sewing line after making the folds on either side. Thanks!
Dede, can you tell me more specifically where you’re getting stuck? The vent is quite a few steps, so it’s difficult to explain it further without knowing where you are confused.
Sorry, I don’t know all the terminology. I’ve sewn the back seam to the vent dot. Now I’m trying to see how to sew the vent stitch line. Are the two sides both folded? Are they turned to the right side first or or are they sewn as they lie? Or maybe each side is sewn separately? When the sides are both folded they are very different sizes unless they are turned to the side. I know this is hard to follow, but I’ve done well up to now!
Ok, so I think you mean in Step 5 of Assemble the Back? For that step, the wearer’s right vent is folded and doubled. The wearer’s left is left flat so you’re sewing through three layers across the top of the vent. The wearer’s right seam allowances will be longer than the folded vent. Does that help?
I think I’ve got it! Thank you!
So glad!
I am working with a medium weight wool coating. It has little to no drape, I guess you would say that it has body? Do I need to interface the coat-front pieces? I was planning on partially interfacing the coat at the hems and sleeve cap. I really do not want to add more weight to the wool itself, or would that be a mistake?
I’m looking forward to making the Chaval. I successfully made a muslin and it turned out great. Thank you.