So let’s just say, for the sake of discussion, that you want to sew for yourself. You look at the size chart to determine which size to sew and–gasp–your measurements don’t exactly match the chart! Believe it or not, you’re not alone. But what should you do?

As I mentioned in my last post about finding your size, when you’re making dresses and blouses you’ll get the best fit if you take your high bust measurement and make adjustments from there. If you’re making fitted skirts and pants, you’ll want to use your hip measurement–the widest part of your hips–to find your size. And for a full skirt where the hip isn’t fitted, use your waist measurement to find your size.
So what do you do if you’re making a straight or fitted dress and your bust measures size 4 while your hip measures a size 6? Or even a size 8? (I’m asking for a really good friend.) Or what about when your waist is smaller than the skirt pattern size you’ve selected?
Many of us are different sizes at different parts of our bodies. (It adds to our charm.) And it’s surprisingly easy to adjust for various proportions when you sew, especially when you have a sewing pattern with multiple sizes. (When the different sizes sit inside each other it’s called a nested pattern and multi-sized patterns are really useful for precisely this reason.) It’s simply a matter of blending between sizes. Here’s an example that I think will make this step clear. Click to enlarge.
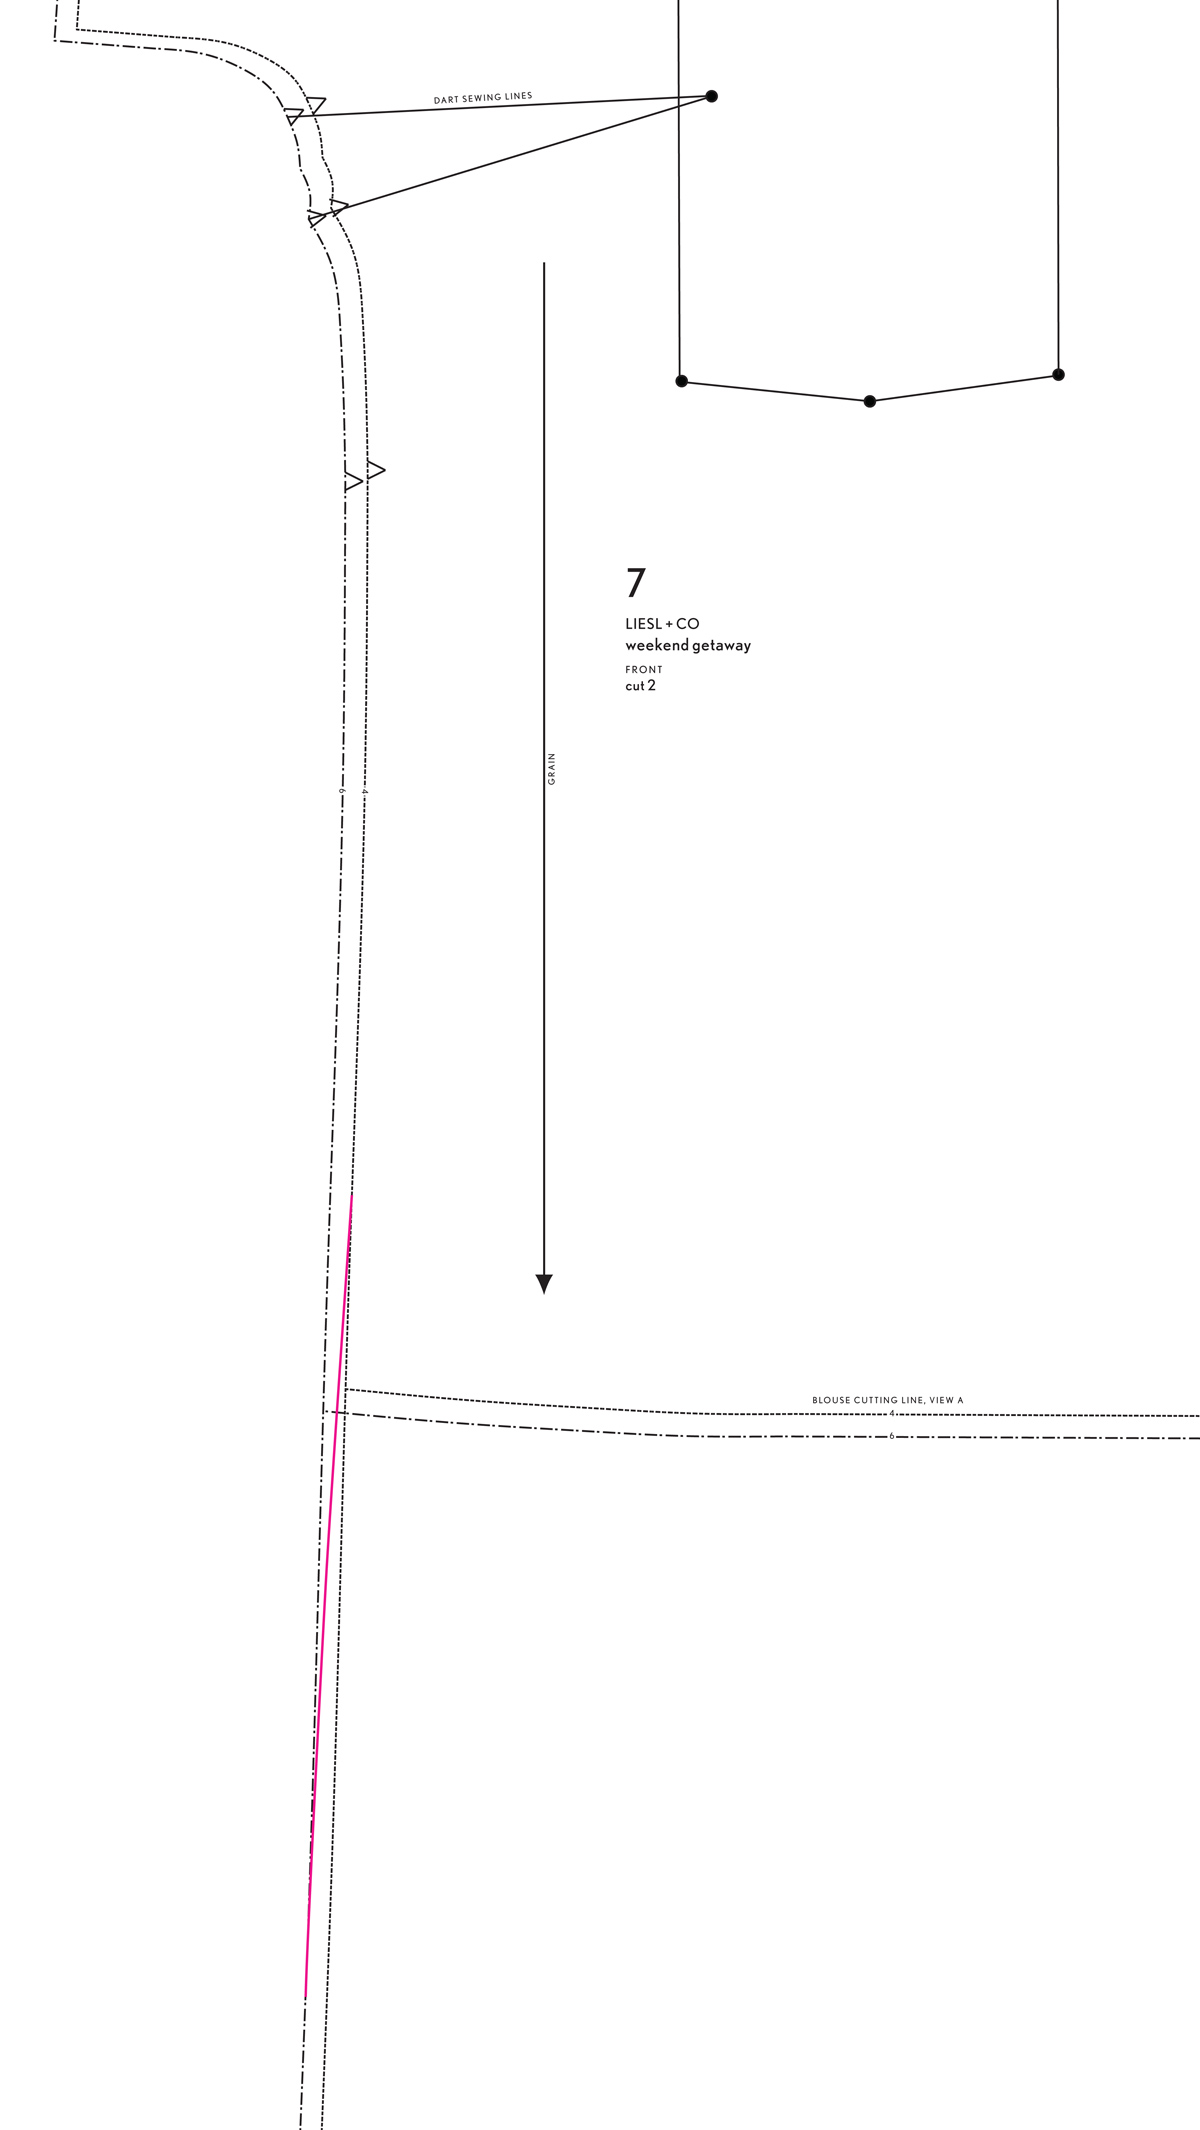
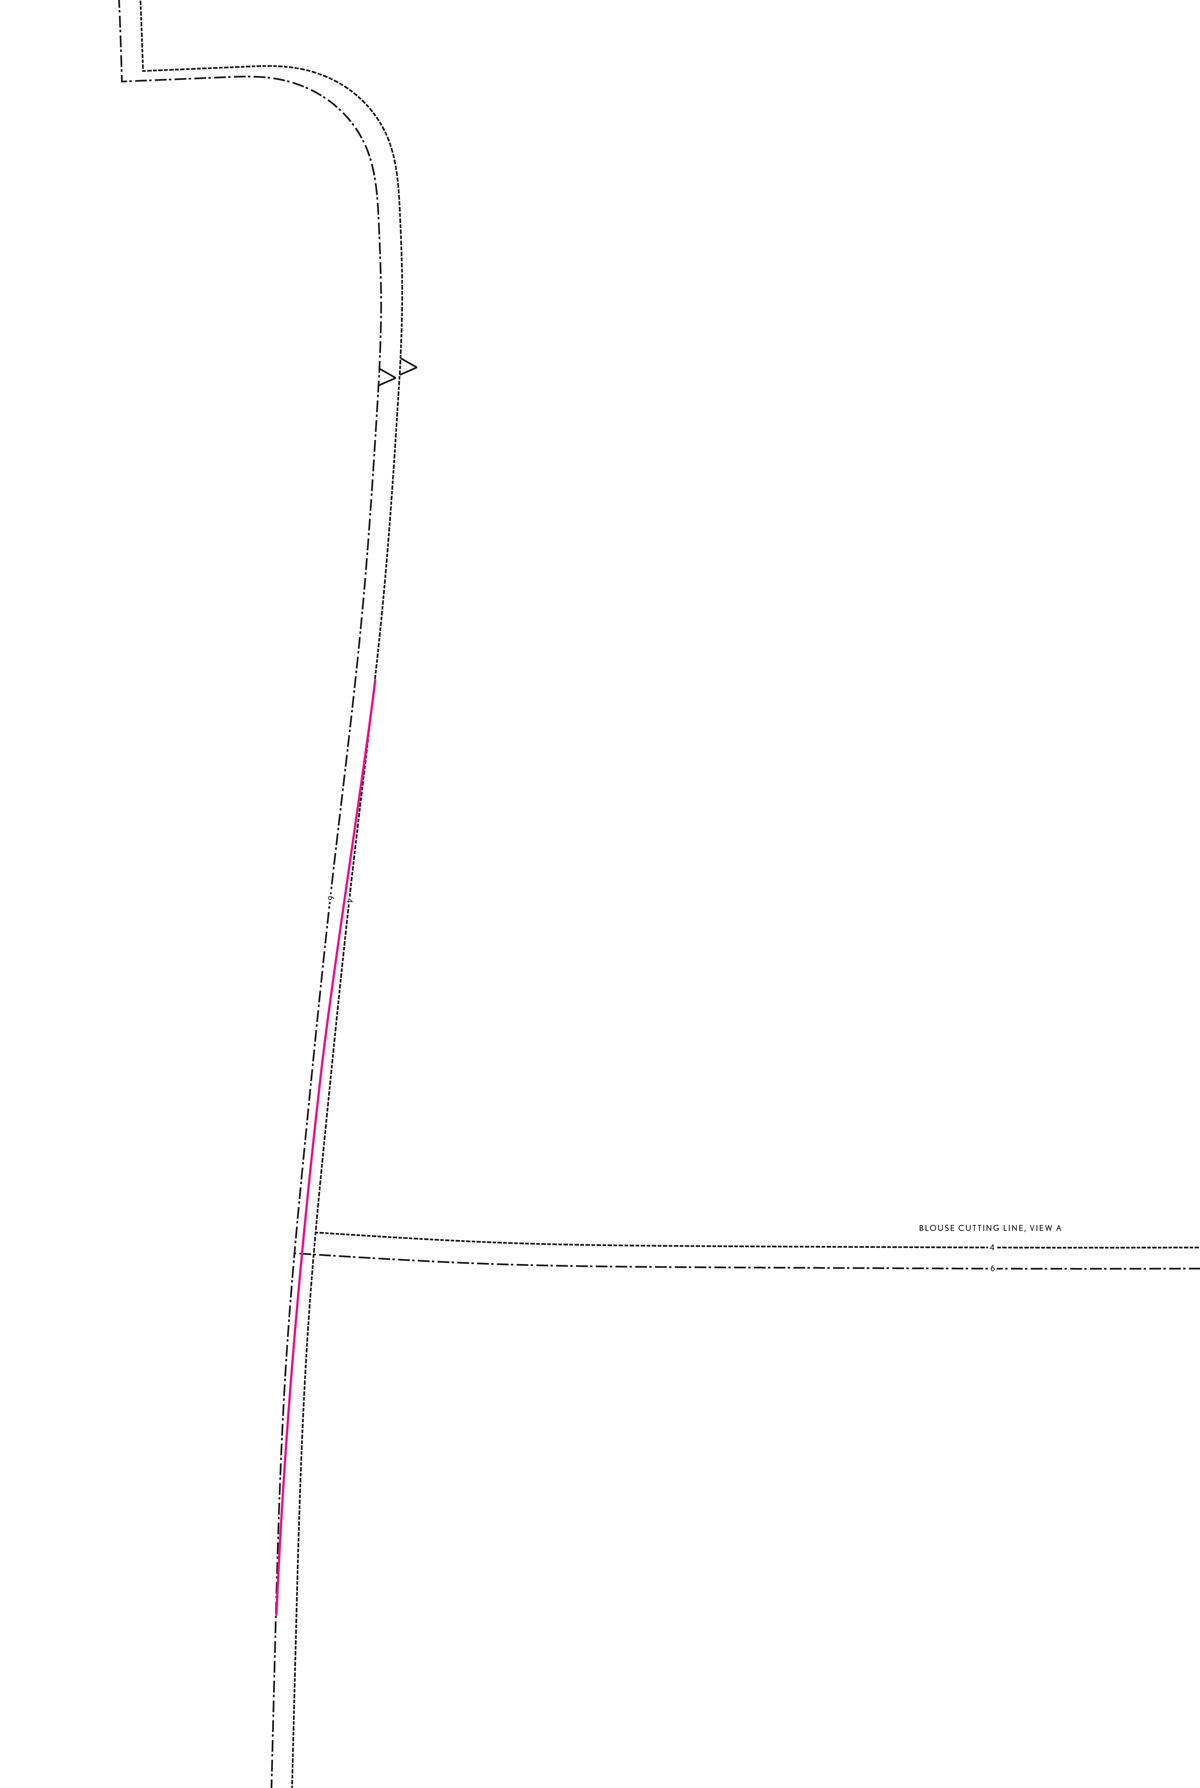
See that pink/red line on the side seam of my pattern? My friend (yeah, ok, my friend is me…) is a bit pear-shaped, and when I sew the Weekend Getaway Dress for her she needs a little extra room through the hips so the dress will hang properly and won’t cling. To give her a little extra fabric at the hips, I gently blend the side seam from the smaller size to the larger, staying true to the smooth curve of the original side seam but adding a little extra room as needed. Use a little common sense here. You don’t want a sudden increase because it will visually add width and be unflattering. On the Weekend Getaway Dress I started adding just below the waist and gradually increased until I reach the wider size 6 hip line. (I could have even been a little gentler and started blending a bit higher, now that I step back and look at it.) You’ll then make the very same change to the back pattern piece. Here it is. I did a better job of the gentle blend here, I think.
Do you see how easy that is? Then you’ll simply cut out your new pattern piece with the extra width or reduced width where it’s needed, and you’ll proceed as usual. No sweat.
Here are a few additional pointers for you:
- Any increase or decrease that you make will be doubled for each seam and then doubled again for each side of the body. In other words, if I add 1/4″ to the front hip pattern piece, that increase will be doubled to 1/2″ when I make the same change to the back hip pattern piece. And since I have two side seams, my total increase will be 1″. Does that make sense? So don’t go crazy here–a small change can make a big impact. And math can be your friend, so don’t be afraid to use it! (And just imagine what you can do with princess seams! All those extra places to add or subtract width–dreamy. That’s why I love to fit anything with princess seams.)
- Also, keep in mind that if any part of you is more than a couple of sizes different from the rest of you, you may need to make additional alterations at other points of the pattern as well. That’s what darts and pleats and all those great things are for.
- You’ll want to use your best judgement to determine where to do the blending. For really precise fitting and help with getting a gently blended seam, I will often turn a garment inside out and try it on so I can pin the side seams directly on my body until I’m pleased with the results. Then take it off, baste the seams, and try it on right side out to confirm that I’m happy with the results before stitching the seams. Don’t be afraid to try this on yourself. I often do this with clothing I’ve purchased and want to alter, too; it’s really easy, and I can control the results better than if I bring it to the tailor.
- And one final tip for you: don’t be afraid of a little extra ease in some places! If you find that you’re quite a bit wider on bottom than on top, sometimes it can be more flattering to give yourself a little extra ease on top to balance things out. I really want to talk to you in depth about this, and I’ll try to write another post about it very soon. Stay tuned.
Questions?
What about for those of us who have different (but reasonably similar) bust and waist measurements, but a much smaller hip? For example, my friend (ha ha) measures a 16 in the high bust, >16 in the waist and an 8 in the hips! How would she go about altering a skirt pattern measured for dropped waist, like the Everyday skirt?
Marlowe, that’s a really good question! For this, it really depends on what you’re making. With the skirt, I’d suggest making it to whichever size matches the point on your waist/hips where you plan to wear the skirt. You probably won’t need to make any alterations to the pattern, since it’s not fitted. For a dress, you’d want to make it based on your high bust measurement and probably do a fitting like I do, with the dress turned inside out so you can adjust the seams.
Liesl, thanks so much for this! My “friend” is very pear-y; a six on top and a ten/pushing twelve on the bottom, and now that I’ve started to sew for myself (yep, it’s me), I’ve needed a lot of guidance in getting a good fit. Thanks… I’d love more info like this. 🙂 Happy Thanksgiving!
P.s. Since I’m writing, let me just tell you I received “little things to sew” as a Christmas gift a few years ago and it’s the best sewing book I’ve ever used… Ever! I’ve made many projects from the book and each is so cute and polished. Your patterns are magnificent! Thanks!
Tristin, thanks so much for the kind words! I hope to do a whole series of posts on fitting and other sewing-for-yourself issues, so stay tuned. I’m having fun with it and hope you are, too!
So I’ve been sewing for about a year and 99% of my projects have been for my kids and family. A few months ago I got super excited because our local Joann’s had a huge pattern sale and seeing as I’m battling after baby weight thought it’d be more economical to make some things for myself. Much to my chagrin I’ve failed miserably not once or twice, but three times. I’m working with a Butterick retro pattern with an appropriate range of sizes but no matter what I do I can’t seem to get the right fit. It is a halter style dress. Every time I do the pattern, it will pucker in some places not fit with ease in others, etc. What do I do when my sizes are all over the place?? Should I adjust my bodice piece with my high bust measurement rather than the basic bust? Based on my measurement I am a size 16 bust, 22 waist, and 20 hip…please help me. I just want to wear flattering clothing while I work off this weight and I am most discouraged. Also for the sake of saying so this is a multi-size pattern.
Belle, it sounds like you’re a perfect candidate for one of my fitting workshops! The next one will be at Anna Maria Horner’s new Craft South Store in Nashville, TN, in June. Here are the details:
http://www.craft-south.com/products-workshops-classes/sewing-weekend-with-liesl-gibson
Hi Liesl! Thanks so much for the detailed info on grading between sizes. I often have to shorten skirts/dresses because I am petite. I am also pear-shaped. Which adjustment should I do first: shortening the pattern or grading between sizes?
Glad it’s helpful, Jessica! I would generally suggest shortening before grading; that way you’ll only need to blend the lines once. I hope that helps!
Hello! I am hoping you can help me. I am making a sweetheart strapless dress for my uncle’s wedding at the end of the month. I’m using McCall’s pattern M7507. Here’s my issue: I need to make a bodice that is one size smaller than the waistband and the gathered skirt. The waistband and skirt are made using size 22 and they fit great but the bodice at that size is HUGE! I have a 42″ bust, so according to the pattern I need to use the size 20 pattern. If I blend between the two sizes on the three pieces it’s not subtle at all! The bodice consists of a central piece cut on the fold, a side front piece and then the back piece. Please help!! Pattern link is included for reference.
https://mccallpattern.mccall.com/m7507
I used your tip[ for blending between sizes, and it was so helpful to me! I made the Bistro Dress and it fits perfectly! I am so pleased. I also want to tell you how much I appreciated the fine details in your instructions. So helpful! I love your patterns!
Interesting and very informative. The pattern adjustments are especially useful. How to do a waist adjustment would be really helpful. I always need to go up two sizes on the waist and then have to reduce the hips.