If your bust is larger than a B cup, you might want to make the following simple adjustments to some patterns to add a bust dart in order to help get a better fit. For this example, I’m using our Gallery Tunic and Dress, but these instructions can be applied to many patterns without a dart. For example, if you feel like you need a dart to the Chaval Coat you could easily add one using these steps.
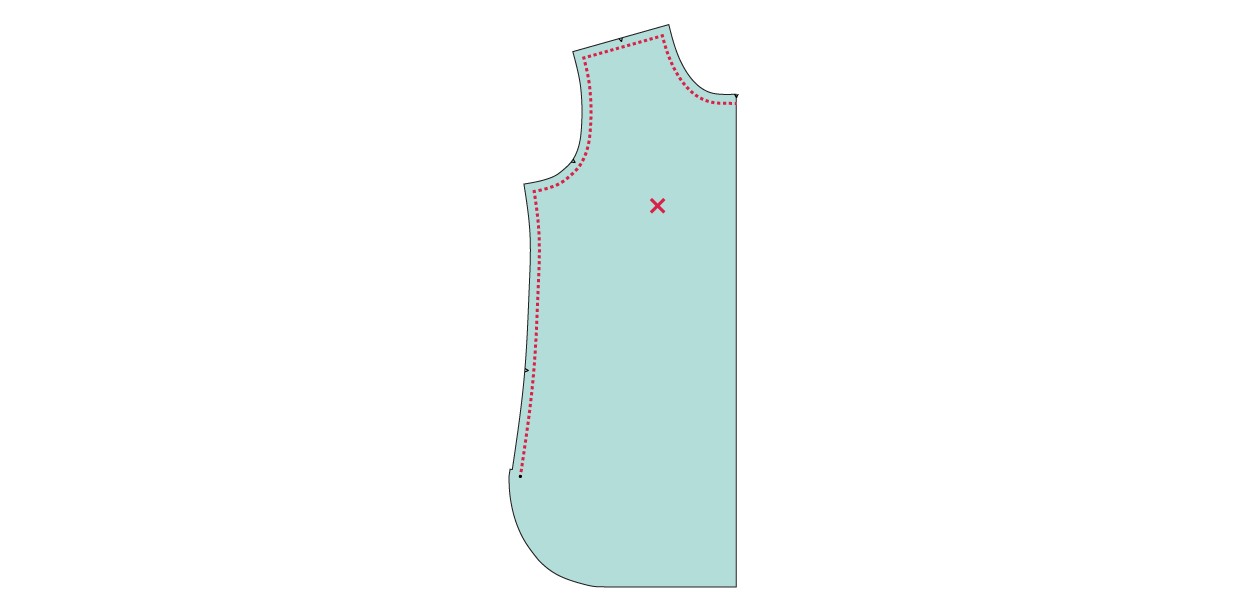
1. Draw in the 1/2” seam lines on the front pattern piece. Then hold up the pattern piece to your body, matching the center front and shoulder seam, and mark the apex on your pattern piece. The apex is the fullest part of your bust. (Be sure to wear a well-fitting bra when you do this!)
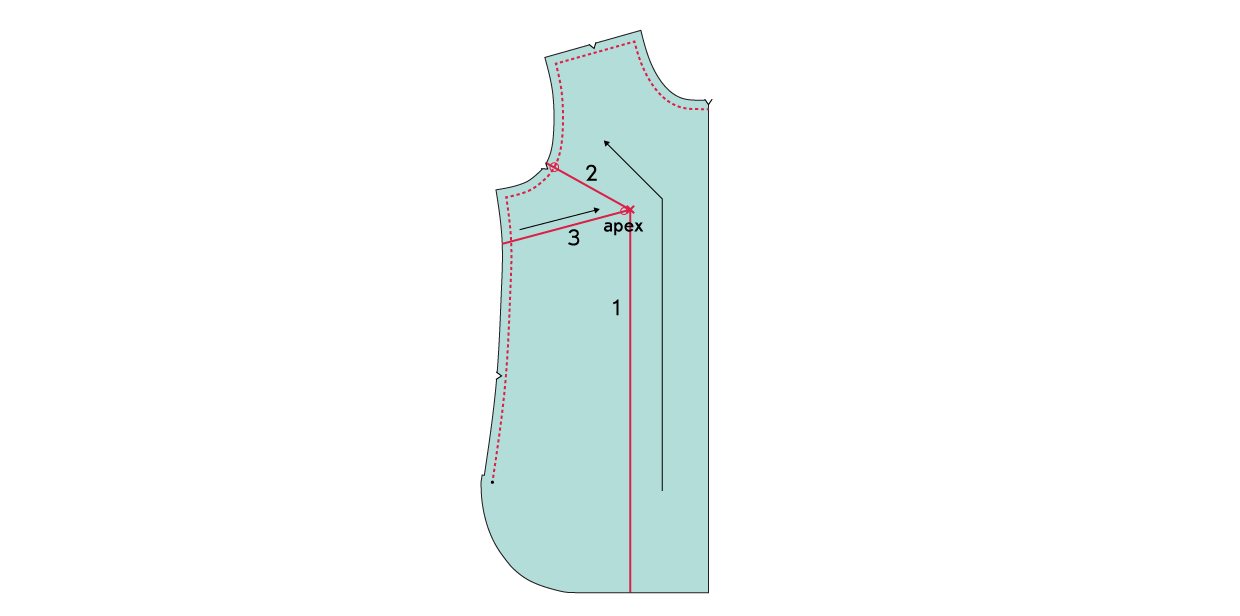
2. Next you’ll draw three lines on the pattern piece. Line #1 begins at the apex and extends to the hem, staying parallel to the center-front line. Line #2 begins at the apex and extends approximately one-third of the way up the armhole, as shown in the illustration below. Line #3 begins at the apex and extends to the side seam at the location where you’d like to position the bust dart. (In general, most bust darts angle down an inch or more below the level of the apex.)

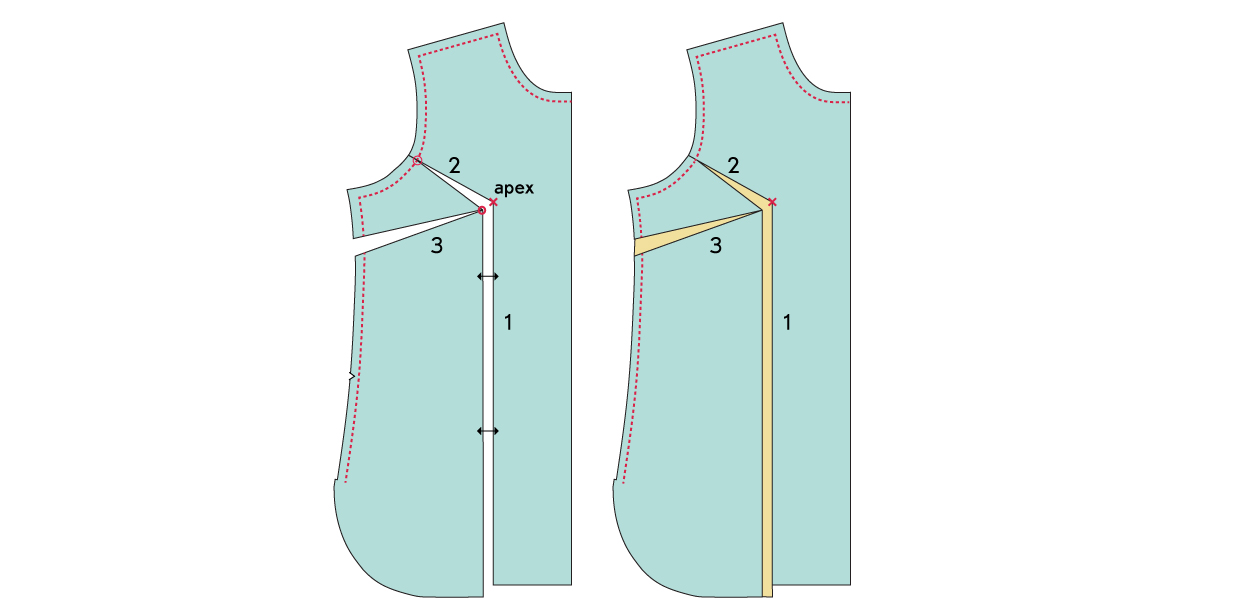
3. Cut the pattern piece along line #1, starting at the bottom edge, and pivot to continue cutting through line #2, leaving a small paper hinge just at the seam line of the armhole. (Not at the cutting edge, but at the seam line itself, which you’ll need to draw into your pattern piece.) Make a second cut along line #3 starting at the side seam, this time leaving a paper hinge at the apex. (See the circles in the illustration below for the location of the hinges, and refer to the illustration in Step 4 for further clarification of the hinge locations.)
4. Spread the pattern piece along line #1, keeping the cut edges parallel to each other while allowing the rest of the pattern piece to lie flat as you spread it. For a C cup, spread line #1 by 1/2”. For a D cup, spread line #1 by 3/4”. As you spread the cut at line #1, lines #2 and #3 will open more and a bust dart will form at line #3. The amount of extra space you add will taper to nothing at the paper hinges, so the length of the armhole at the seam line won’t change. The combination of adding extra width at the chest and creating a larger dart will allow extra room at the bust without significantly altering the rest of the pattern. Tape tissue or plain paper behind the cuts to fill the gaps produced by the spreading. (Note that the bottom edge of the pattern will no longer match up at this point, but you’ll correct it in the next step.)
5. Draw the bust dart starting at the cut edges of line #3, at the side seams, and ending approximately 1” from the original position of the marked apex. (This distance will vary from person to person and also depends on how fitted the garment is. Most garments that don’t include a bust dart won’t be too fitted, so you’re probably safe assuming 1″ from the apex. Do a test fit, or muslin, to confirm the dart before you cut into your actual fabric!) Tape tissue or plain paper to add length to the center-front bottom edge, to match the lengthened hem. This extra length doesn’t alter the length of the garment itself; it’s only allowing extra fabric over the bust, so you don’t need to change the length of the back pattern piece or anything else.

This added dart will help you to get a better fit, and further adjustments can be made as needed when you do a fitting. From here you can stitch the dart and proceed with the sewing instructions as usual.
That wasn’t so bad, was it?
Thank you for these clear and helpful instructions.
Very clear instructions. Thank you.
These simple instructions has me thinking re my back. I have to put in about 2″ across my back necessitating a dart to shoulder. I am wondering if this type of alteration would suit for my back as I need more at 1 side . I would really appreciate your comment. I made the shirt from your pattern and it is the best collar stand instructions I have used. I am very pleased.
It’s difficult to say without seeing your body, but I would definitely suggest the book Fit for Real People, which addresses lots of different ways to alter patterns.
I read that book. It does not address how to add bust darts to a dartless front bodice of a pattern.
I have an older version of the book and note there is a new one out. Thanks for the reply.
Hello! I used this tutorial to add a dart to my Chaval coat, thank you! But I did have to add length to the facing piece too! Pt. 5 of the instructions say you don’t have to alter anything else, but I think you do have to alter the facing.
Yes, sorry. I meant that you don’t have to add length to the back. But since the center front is longer you’ll have to add the same length to facings, linings, etc. I hope that clarifies.
You are right. But you can see that in the last drawing.
Perhaps you missed reading this part. “(Note that the bottom edge of the pattern will no longer match up at this point, but you’ll correct it in the next step.)”
Hello! This is a great tutorial. I have a question about lining/facing in relation to doing this adjustment: will i have to do the same adjustment on the lining/facing piece too? I am making the Ogden Cami (which suits a small C cup, whereas I am a D-DD) just to give you the fullest picture I can.
Wonderful instructions! Now I can make my boxy t’s a little more polished. Thanks!
“Now I can make my boxy t’s a little more polished.” That’s exactly my intention too!!!! Best wishes!
I tried this method on a loose fitting dart-less top and voila, it worked! The front and back side seams matched up perfectly and the hemline is just right. The top looks a little more styled while still being loose as it is intended to be. Thank you for sharing your expertise, I will use this method again I am sure!
Glad to hear that you like this!
Very helpful tutorial, indeed! Thank you.
When I use this method to add shape to a shirt it adds too much to the upper bust measurement. Is there a method to remove the extra upper bust room or to add the dart without spreading the upper bust?
Marsha, the beauty of this method is that it doesn’t add width to the upper bust. Could it be that you’re starting with the wrong size? You should start with the size that fits you best across the shoulders and upper bust. This technique adds width for the full bust, not the upper bust. I hope that helps!
It’s July 2025 and I just somehow founf this tutorial. Much appreciated, I hate baggy, shapeless clothing so I will surely try this out I love bust darts!!! Thank you.
Great clearly explained and illustrated lesson. Thank you.