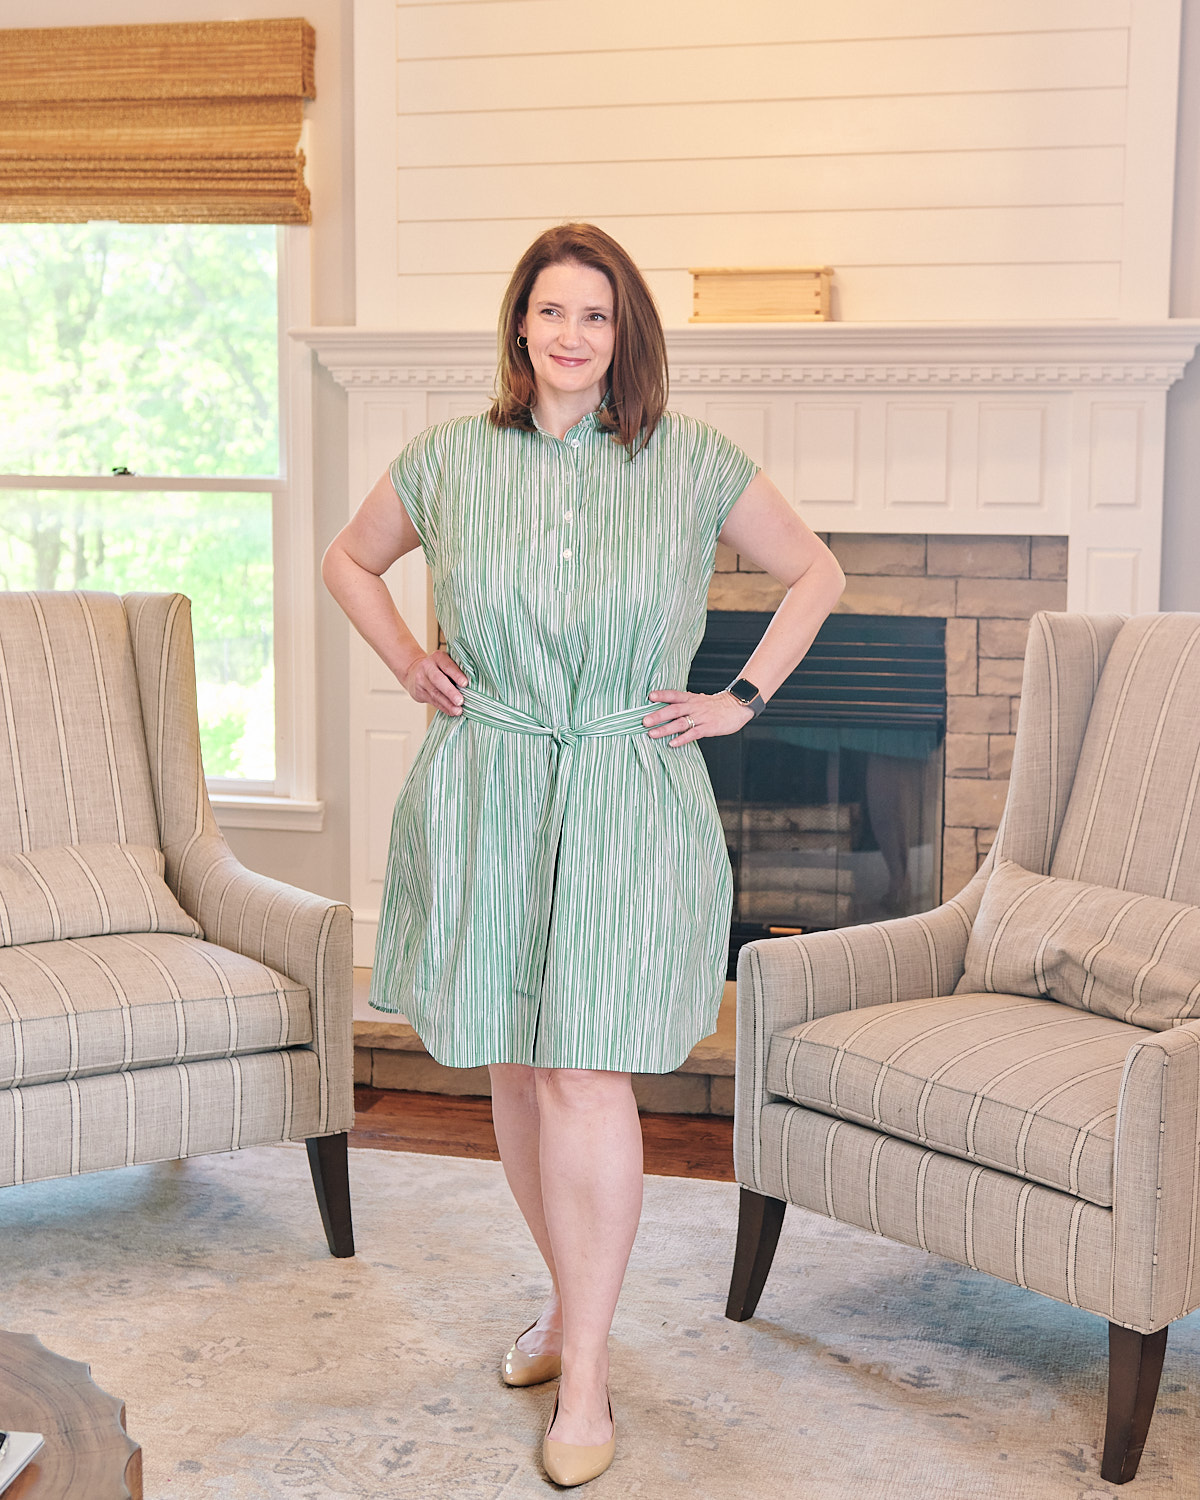
Hello, folks! I’m Lyndsey from the Advisor’s Circle. I’ve been working on a 5-piece spring capsule using the new Liesl + Co patterns. It’s exciting to see all the pieces come together! Last week I shared my pink Cannes Trousers and matching Classic Shirt. I’m back today with my new Santa Rosa Dress.

I can imagine so many versions of this pattern in my wardrobe. I will definitely be making a silk charmeuse top that would work for both the office and a night out. I am also picturing a casual linen top that would fit in at the farmers market or on a hike. For this version, I was inspired by a blue and white striped shirt dress. Shirting tends to be more crisp than the fabrics suggested for this pattern, but I wanted to try it out. I found a cotton lawn fabric that is lightweight and airy and will feel amazing when it is hot this summer.
Checking the Fit
The fitting process is my favorite part of sewing. I love having the ability to make clothes fit my body instead of worrying about my body fitting into clothes. For this dress, I selected a size 14 based on my high bust measurement (39.5″) with a D cup (because my full bust is 4″ larger than my high bust). Even though I tend to make the same adjustments with every Liesl + Co pattern, I still follow the fitting process from beginning to end.
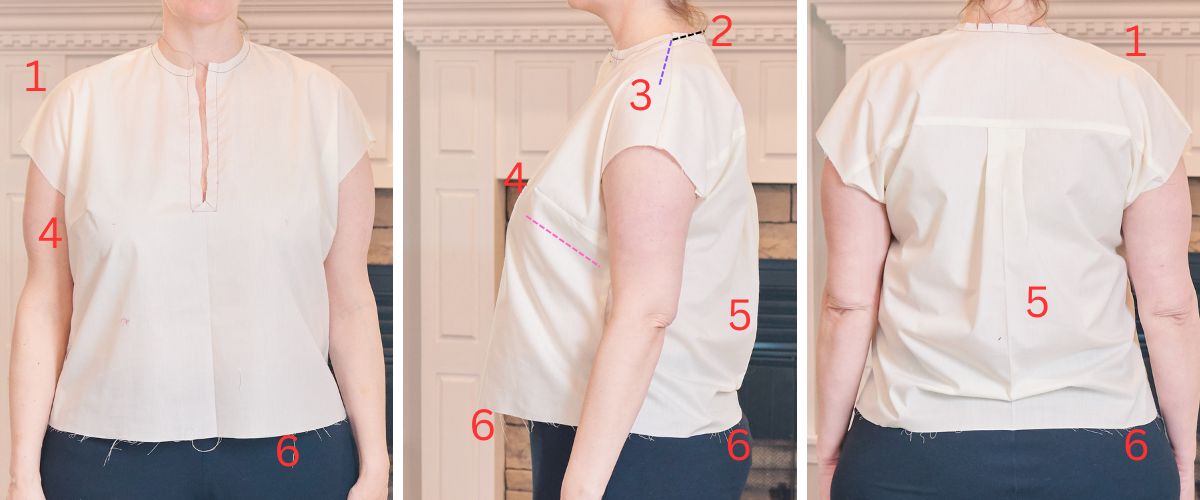
In reading my muslin, I see that I need to make all the usual changes that I usually make:
- Low right shoulder– I don’t normally do anything to adjust for this, but there is an adjustment I could make.
- High round back– Years of working on a computer and poor posture mean adjusting how a garment fits my neck and shoulders. What is happening here is that the neckline is hitting lower than it should; I need a little more fabric to get that neckline up to the proper location. I’ve marked a black line to show the proper placement. There is an excellent post on how to make this adjustment.
- Forward shoulder– Very often, if you need a high round back adjustment, you will also need a forward shoulder adjustment. Strictly speaking, you need to make the high round adjustment before determining if you need a forward shoulder, but since I make these adjustments so often, I usually make them together. In proper fit, the shoulder seam is supposed to hit the midpoint of your shoulder. However, if your shoulders are rounded forward, the shoulder seam will lie behind the midpoint of your shoulder. I’ve marked in purple the correct placement for the shoulder seam. Another way of thinking about this is that you have too much fabric on the front of your shoulder and not enough fabric on the back of your shoulder. Therefore, you need to move the seam line forward. Failing to correct this issue will often cause the shirt to fall backward on your body.
- Low bust– I’ll need to lower these bust darts. The dart should point directly at the bust apex. Here you can see that the dart points above my bust. I’ve drawn a pink line to mark the correct position of the dart. A previous post demonstrates how to raise or lower bust darts.
- Sway back– There is fullness at the small of my back. In the side view, you can see how the back actually curves away from the body. Sometimes this is handled with a sway back adjustment, and sometimes, it is caused by needing to let out the hips. I already know I need to let out the hips, so I’ll do that first and then determine if I need a sway back adjustment.
- Bodice length-There are several points to assess here. Typically, if my hemline is shorter in the front than the back, I’d assume I need a full bust adjustment. However, I have plenty of room in the bust, so I don’t think that is what is going on here. Also, the bodice is shorter than I prefer, even at the side seams. If I lower the bodice length by 1″ on both the front and the back pieces, I’ll have the proper bodice length. The bodice back will still be longer than the bodice front, but if I make a sway back adjustment, it should even out.
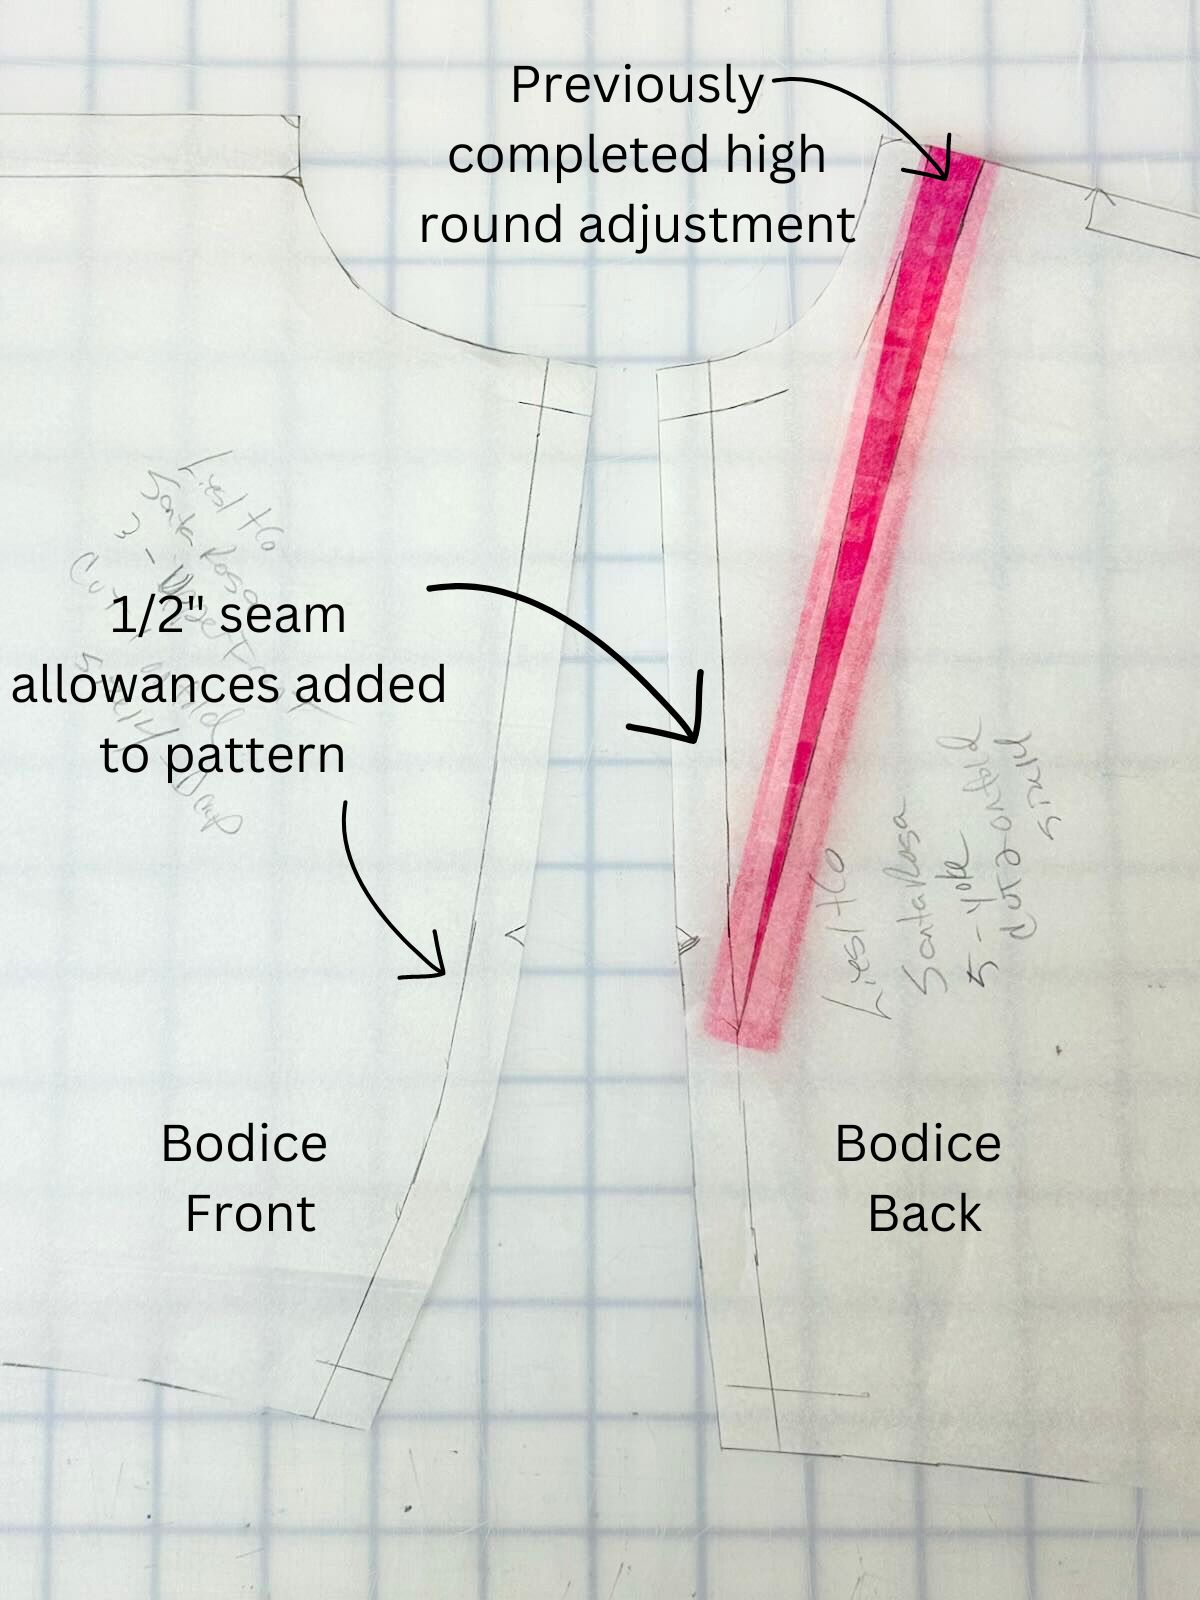
Foreward Should Adjustment
There are two important things to remember when making this adjustment
- We are only adjusting the seam at the shoulder point. The seam does not change at the neckline.
- We are removing fabric from the front bodice piece and adding fabric to the back.
First, we draw in the seam allowances on the affected pattern pieces to make any pattern adjustments. For example, in the picture below, I have added a 1/2″ seam allowance to the shoulder seam and marked wear the neckline and armscye seam allowance will intersect the should seam- on both the front and back bodice pieces. You can also see where I’ve already completed the high round back adjustment in pink.
Next, I trim along the seam allowances from the armscye to -but not through- the neckline seam. Not trimming past the neckline seam is important. This is because we are not altering the point where the shoulder and the neckline intersect. (Note: if this were a set-in sleeve shirt with a very narrow and straight shoulder seam, I would have just drawn in adjustments rather than trimming the seam allowances as I have here. However, you can see that the should seam on this pattern has a shape to it. By trimming the seam allowances to make this adjustment, I will maintain the curve as it was drafted.)
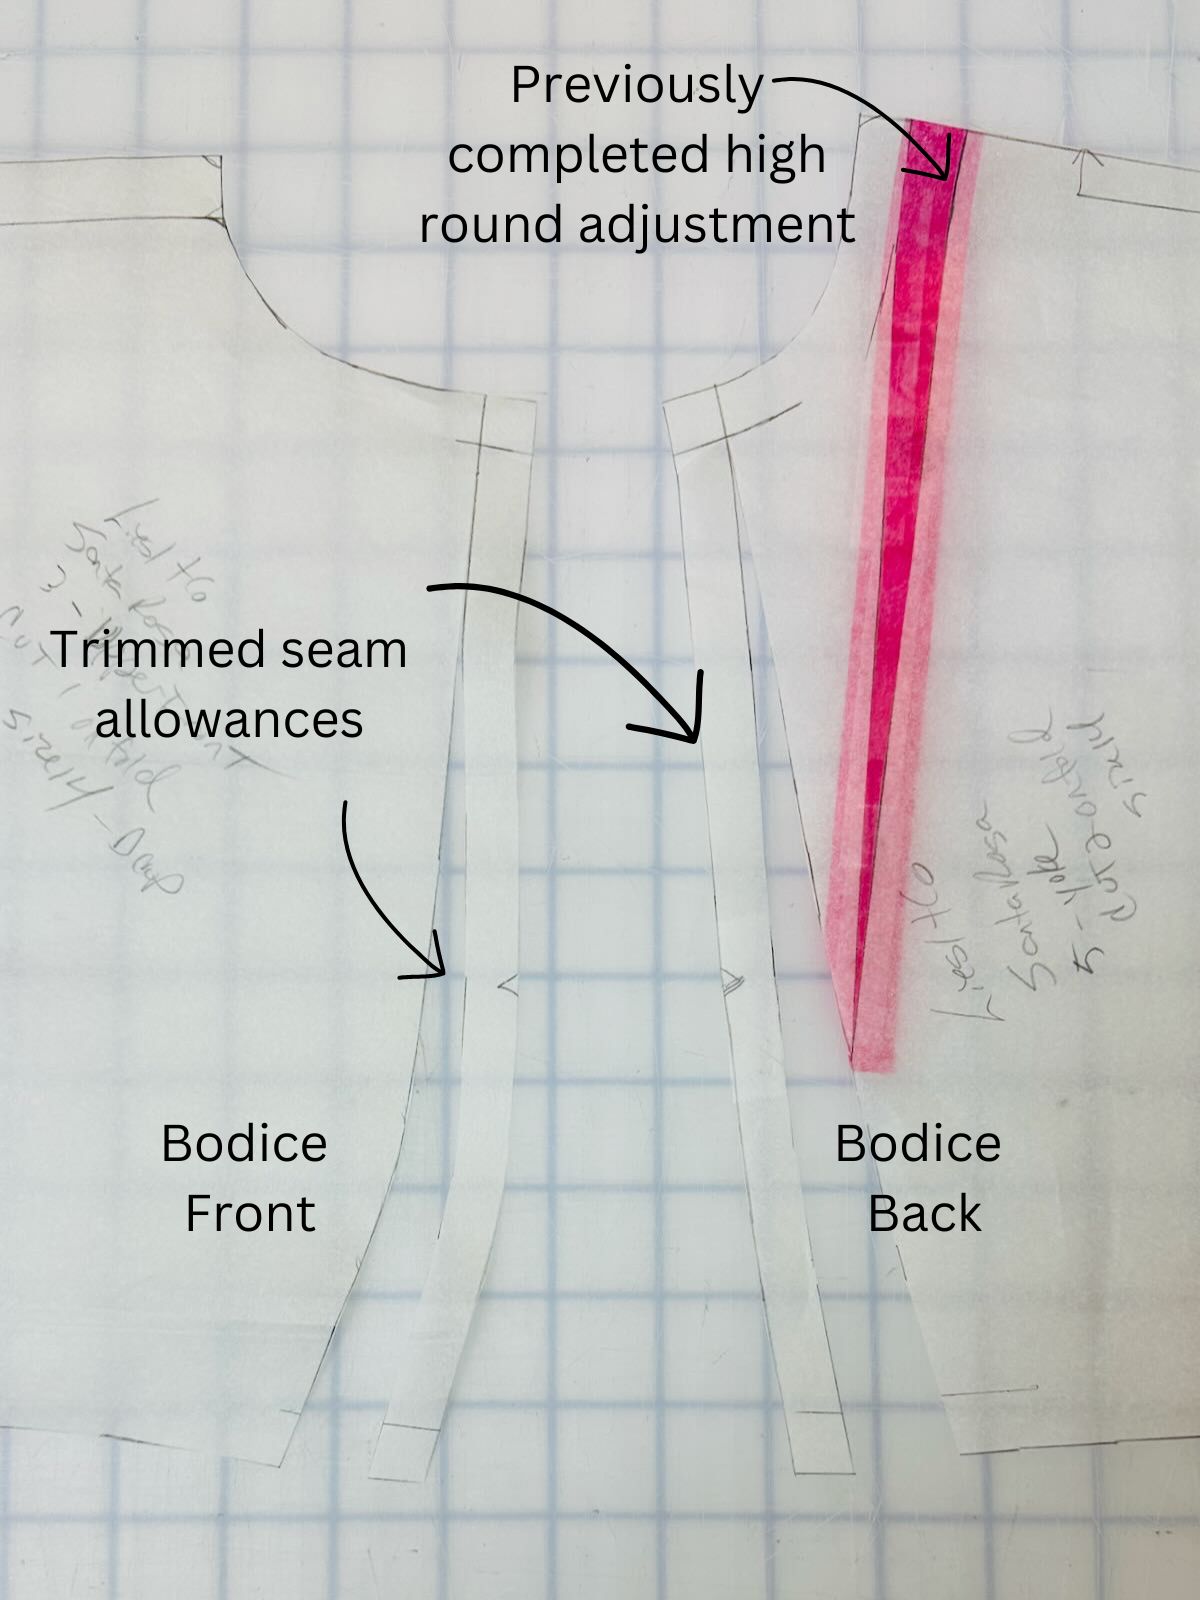
Finally, I will overlap the seam allowance on the front bodice piece by 1/2″, and I will spread the seam allowance on the back bodice piece by 1/2″. Remember, we have too much fabric in the front and not enough fabric in the back, so this adjustment essentially takes a wedge from the front bodice piece and moves it to the back bodice piece. Again, we are not changing the pattern at the neckline, so the point where the shoulder seam intersects the neckline acts as a hinge.

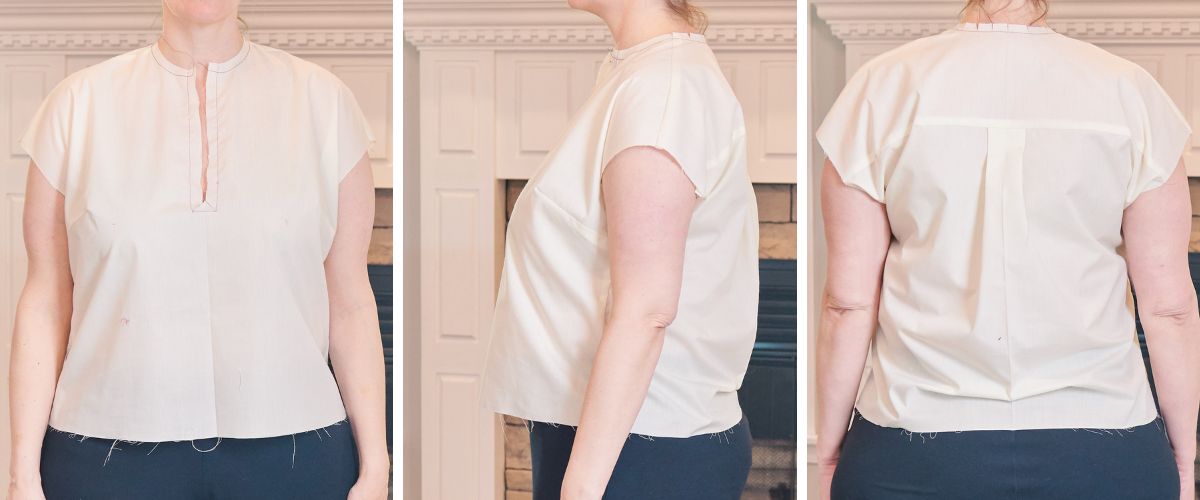
You can see in the before and after photos below that the fit is much improved with these adjustments. The muslin in the after photos is the same size 14D that I started with, just tweaked as discussed. The bust dart is in the correct position. The neckline and shoulder seams are in the proper place. The hemline is at my preferred length and even from front to back. By letting out the hips, the shirt glides over my curves better. I did take a sway back adjustment because I still had fullness at the small of the back even after I let out the hips. After making all the planned adjustments, I decided I had a slight tightness across the back, so I let out the seam just a touch under the armscye for a slight broad back adjustment. I still have some drag lines on the back, but I won’t worry about them much. The draglines behind the shoulder are typical for cut-on sleeves. The remaining draglines on the back hem are really from the stiffness of the muslin fabric I am using rather than a fit issue.

Final Version
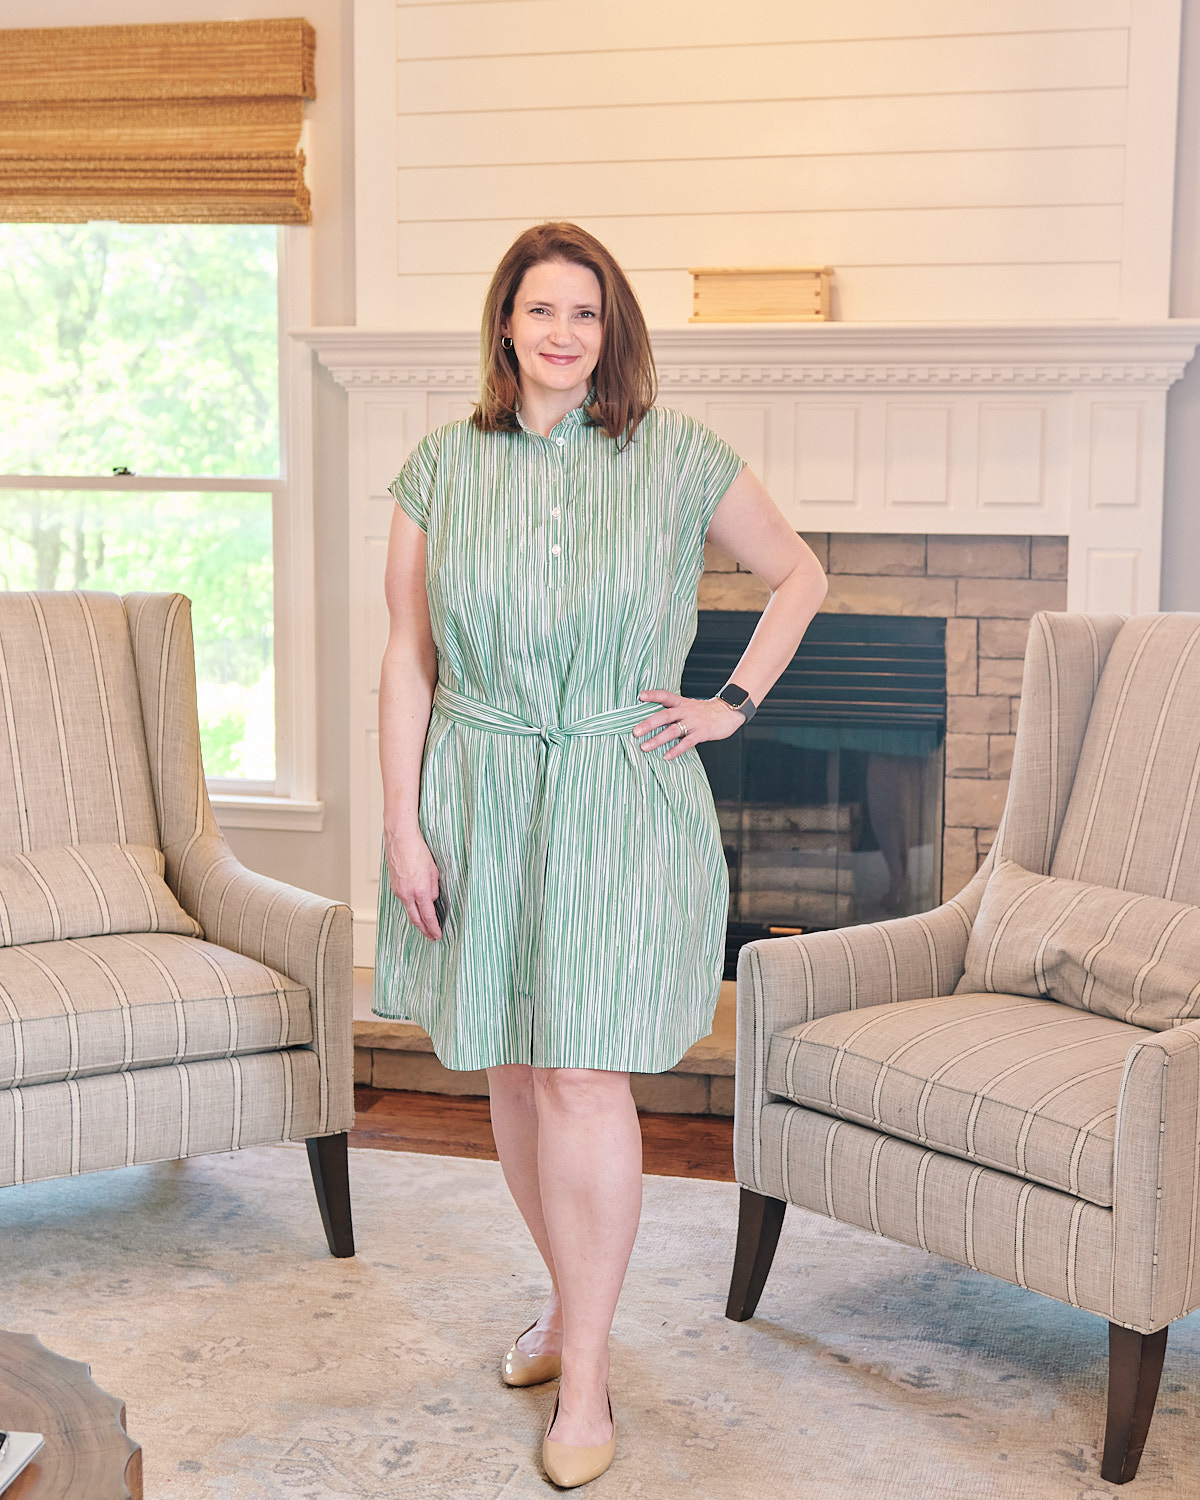
I love my new spring Santa Rosa Dress! The lightweight cotton lawn fabric will take me through the entire summer. I’m already thinking about wearing this dress while patio dining with friends.
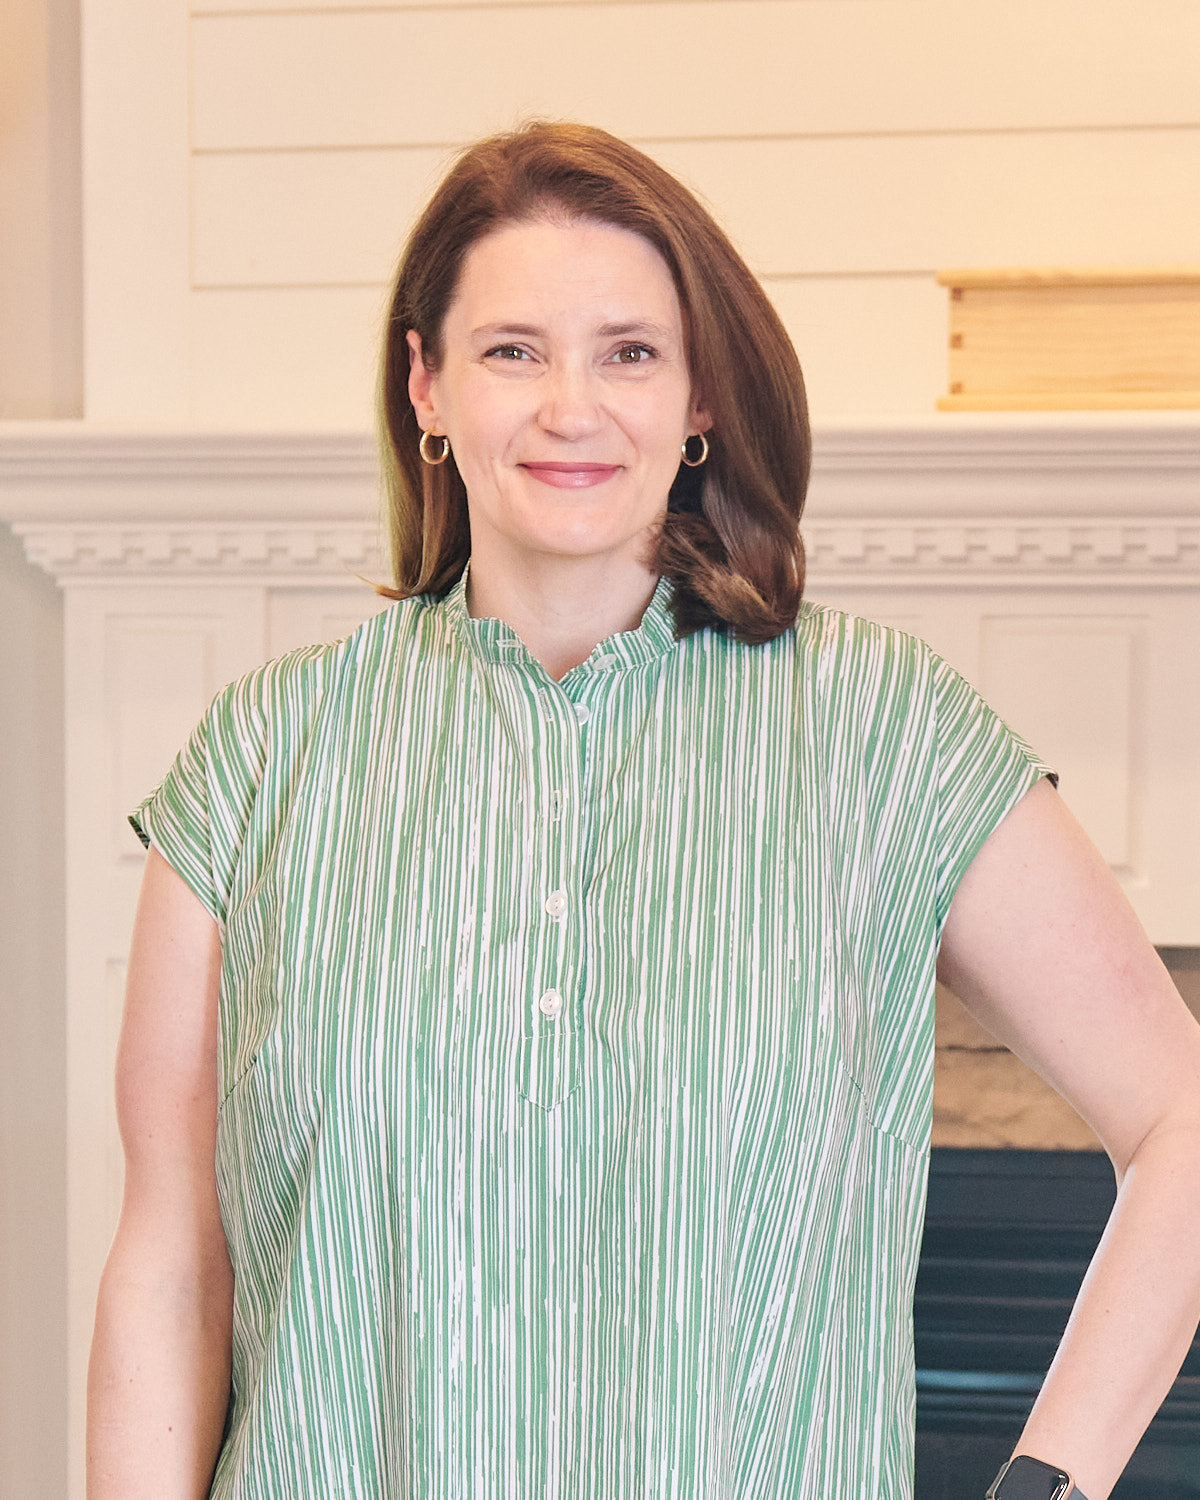
The pattern is very easy to sew. The placket and collar stand instructions are some of the best I’ve followed. My packets always turn out great on Liesl + Co patterns. The placket is hard to see with this print, but I’ve included a close-up shot.
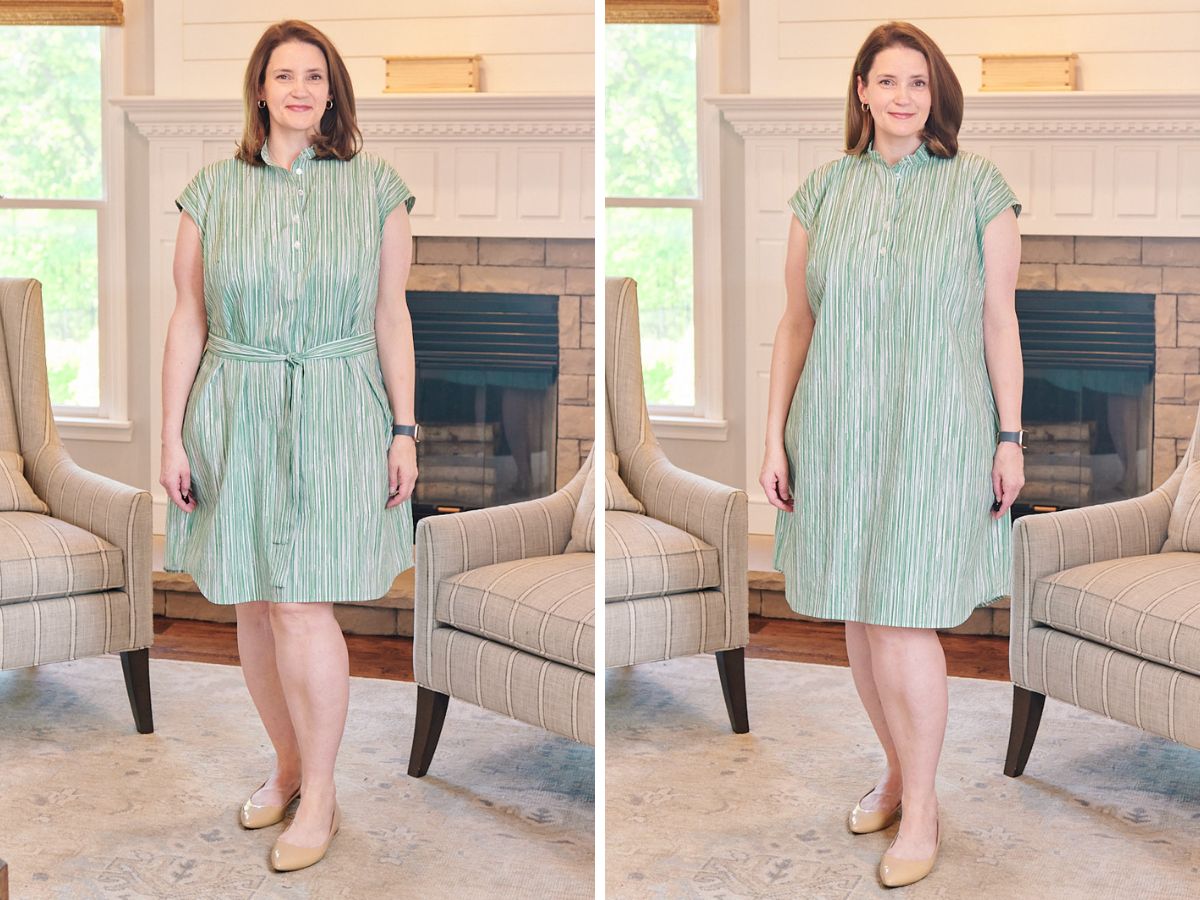
I usually prefer a shaped waistline in my dresses, so I made the optional tie. However, I grabbed a couple of pics without the tie for comparison. I think the unbelted styling is harder to pull off in a crisp fabric like the cotton lawn I used for this version, but I would absolutely wear the dress unbelted in a fabric with more drape.
Oh my how I love Lyndsay’s posts. They inspire me (shame me ?) into taking more care with my fitting ( rather than just finishing things !) … thank you so very much.
No shaming here, Joanne! It took me many years to like the fitting process as much as the sewing process. I’m glad the post inspires you!
Oh I am about to start tracing my pattern and I need to make so many of the same adjustments. Your posts are a gem Lyndsey. Thank you!
Love a fitting dissection – thank you Lyndsey!