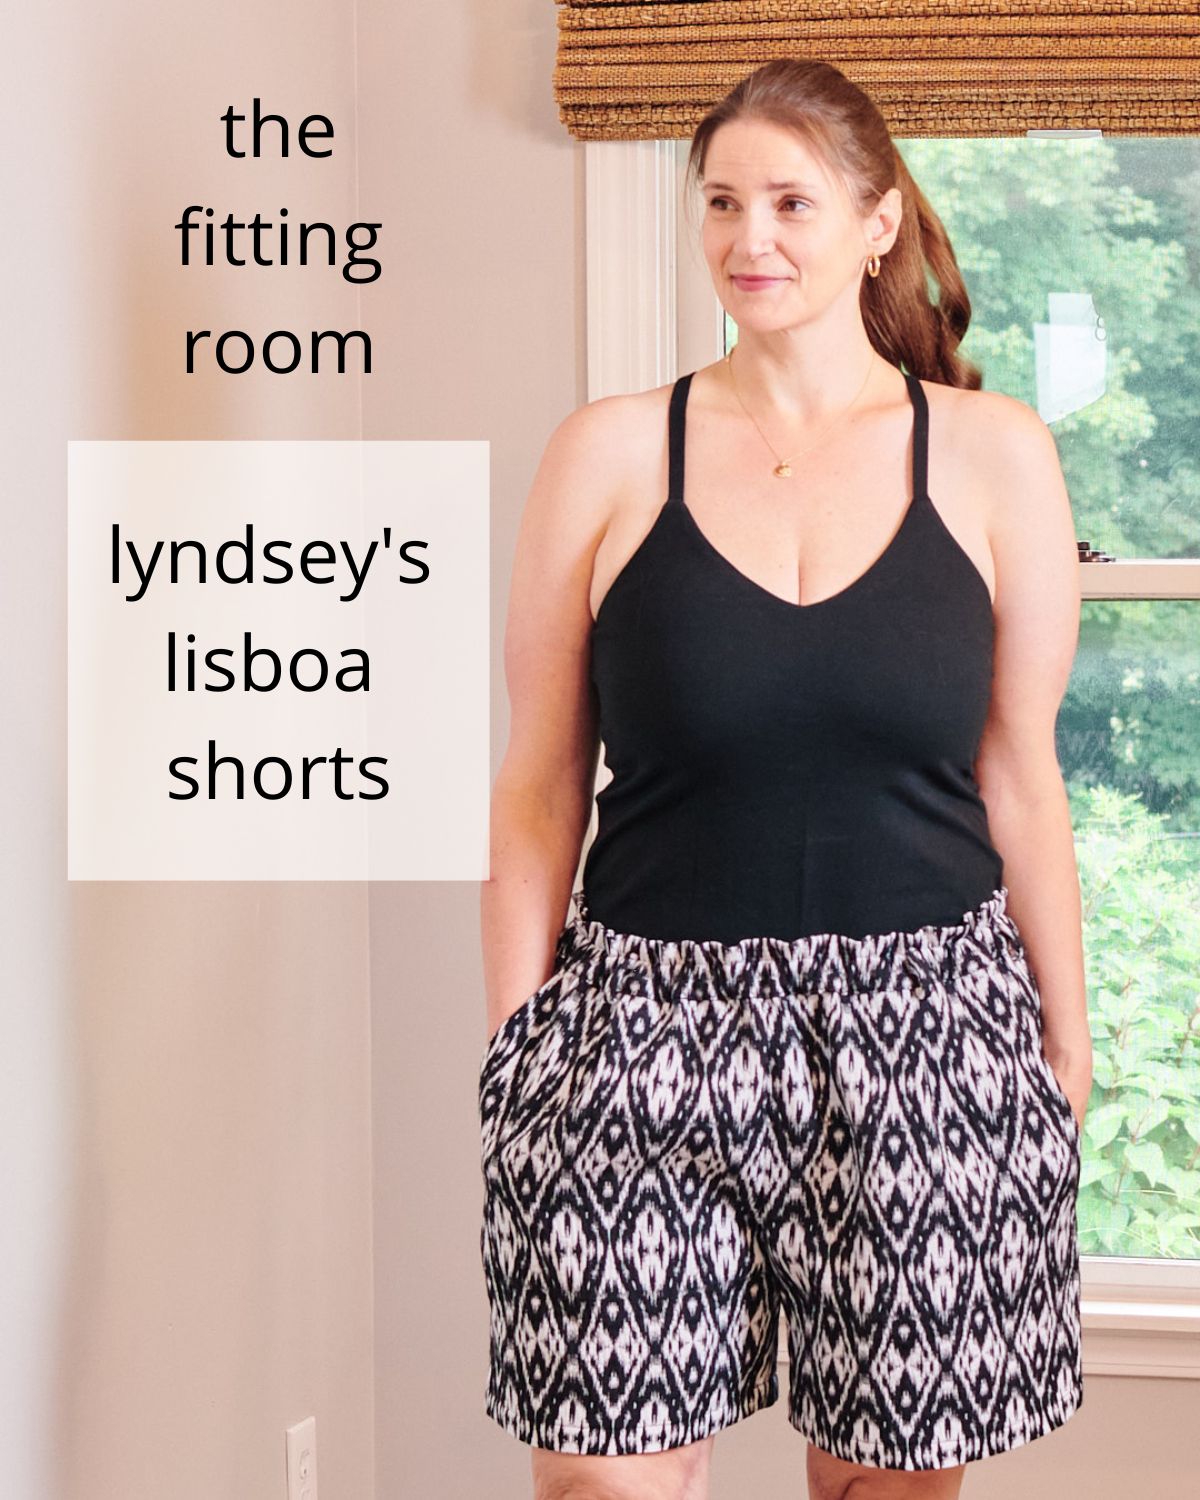
Lyndsey shares how she applied a new pants fitting method to the Lisboa Walking Shorts pattern. While several methods are available for fitting pants, stitchers still find the task challenging. The new method that Lyndsey is trying in this post gets results faster, taking the fear and frustration out of the process.
Making fit adjustments is one of my favorite steps in sewing a new pattern. I’ve always found it empowering to make clothes fit my body rather than having to make do with clothes that were “close enough” from ready-to-wear. However, fitting pants is an area that continues to challenge me. While I have high confidence that I will be able to fit a dress, skirt, or top, I shy away from pants/shorts patterns knowing that I will have to put a lot of work into fitting, and the results probably won’t meet my expectations. So when the Lisboa Walking Shorts came out, I put them in my four-piece summer capsule sewing plan, but I pushed them to the end, knowing that I would need time for fitting.
A New Method for Fitting Pants
While working on other projects in my capsule wardrobe this summer, I came across Ruth Collins on Instagram. She was posting about a new method for fitting pants, which she calls Top Down, Center Out (#TopDownCenterOut). I stopped scrolling immediately when I came across her post. Then I read every single post she had made about fitting pants. And then I scrolled through every story she had posted on fitting pants. The method was intuitive, and I knew immediately that I wanted to try it out on the Lisboa Walking Shorts. Ruth published an article for Threads (#218, Summer 2022) which provides a comprehensive discussion of the approach. This post will highlight what resonated with me about the method and then demonstrate how I used the process to fit my Lisboa Shorts.
- First, fitting pants starts at the waist. The Top Down, Center Out method begins with constructing a waistband to use for fitting. You place the waistband where you want the waistband to sit in the final garment, regardless of how the pattern is drafted. I usually prefer my pants and skirts to sit at my natural waist, so I found this approach empowering to be able to place the waistband where I prefer.
- Second, the waistband is your fitting buddy. This method was incredibly easy to perform by myself. In fact, I had the complete fitting finished from beginning to end in less than 30 minutes!
- Third, you do not alter the shape of the crotch curve (it may get altered for length and depth). If you have fit pants before using common pattern alteration techniques, a lot of focus is placed on changing the curve of the crotch. Ruth’s position is that the designer has appropriately drafted the curve and that the crotch seam doesn’t have a “shape” per se but operates like a string. Check out her stories for fantastic illustrations of this concept. Instead of altering the crotch curve, you simply raise and lower the pant leg on the muslin until you reach the height that will provide appropriate vertical ease.
- Finally, once you have found the correct height for your crotch curve, darts and pleats may need to be adjusted if your design calls for them. With the crotch length set, you may now let out or take in the side seam on your muslin to make width adjustments. No change is made on the inside seam. Length adjustments happen last.
If you’ve had difficulty fitting pants in the past, this approach may seem too good to be true. I’m going to walk you through my first time using this method so that you can see how quickly I achieved well-fitting shorts.
Fitting Lisboa Shorts Using Top Down, Center Out
A note on this example: it was far easier to fit in my underwear in front of a full-length mirror than to fit over leggings in front of a camera. For this example, I am wearing the snuggest pair of leggings that I own, but it is not the same as fitting in my underwear.
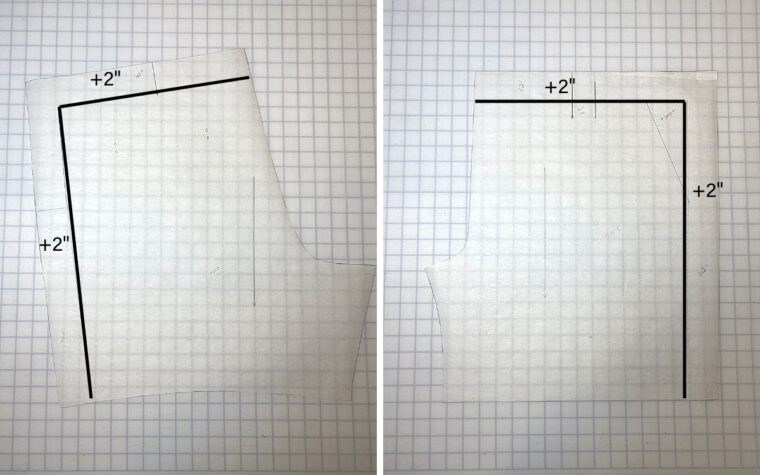
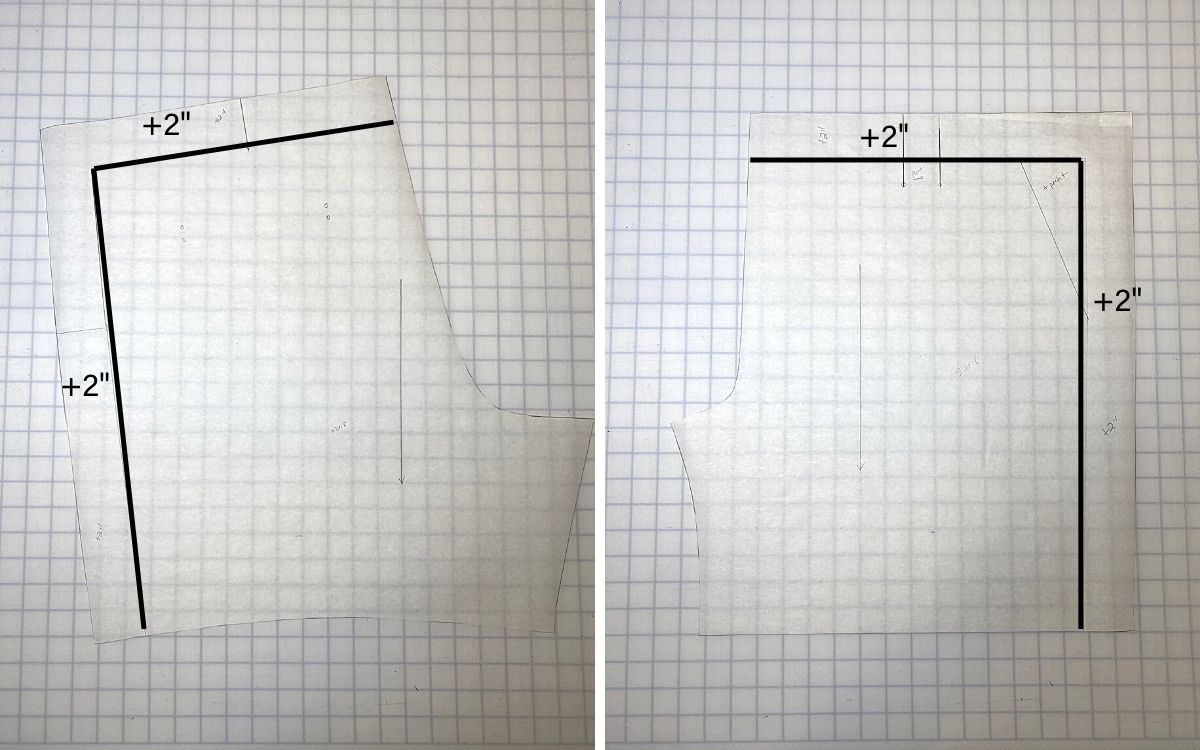
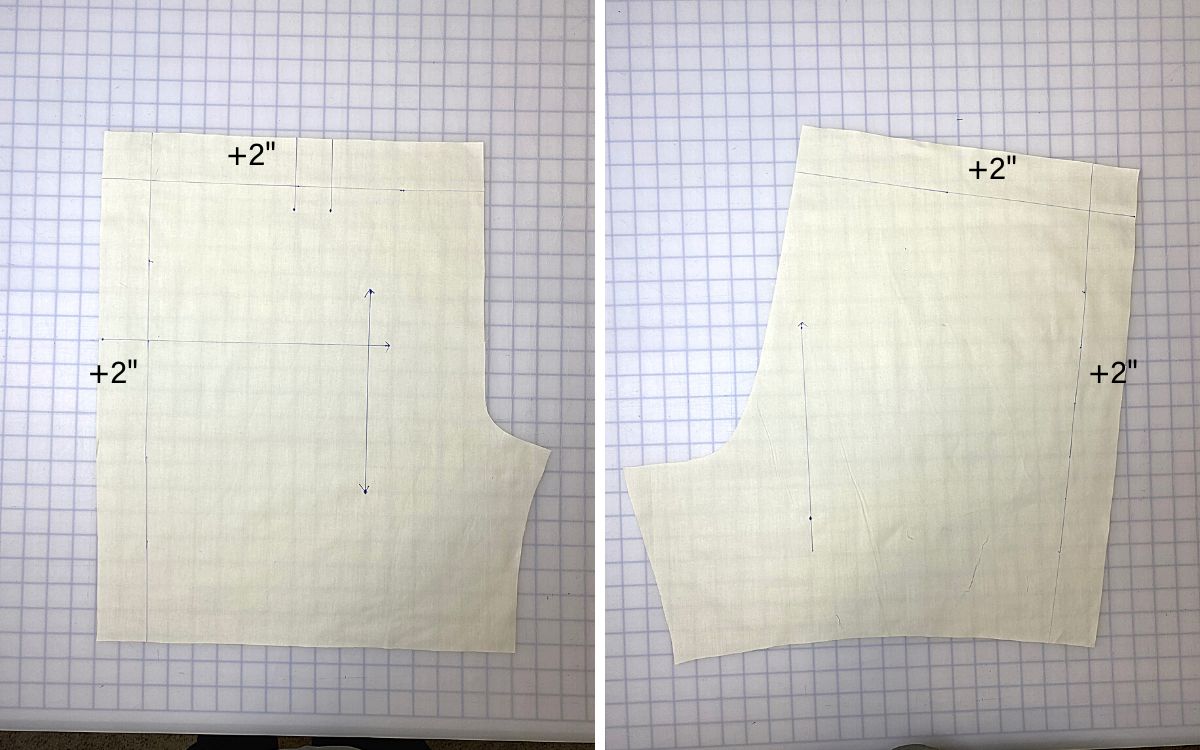
- Prepare the pattern by adding 2″ to the top and 2″ to the side seam of the shorts front and shorts back pattern pieces.
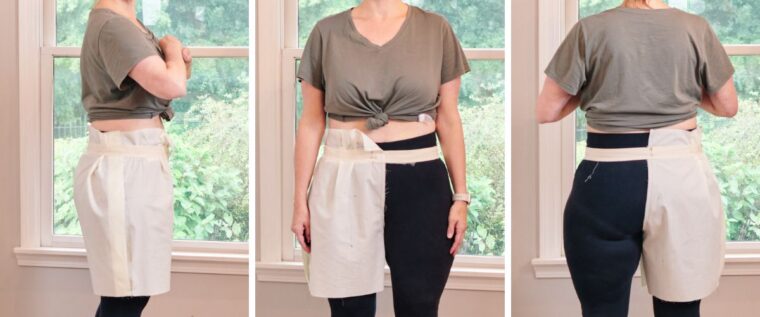
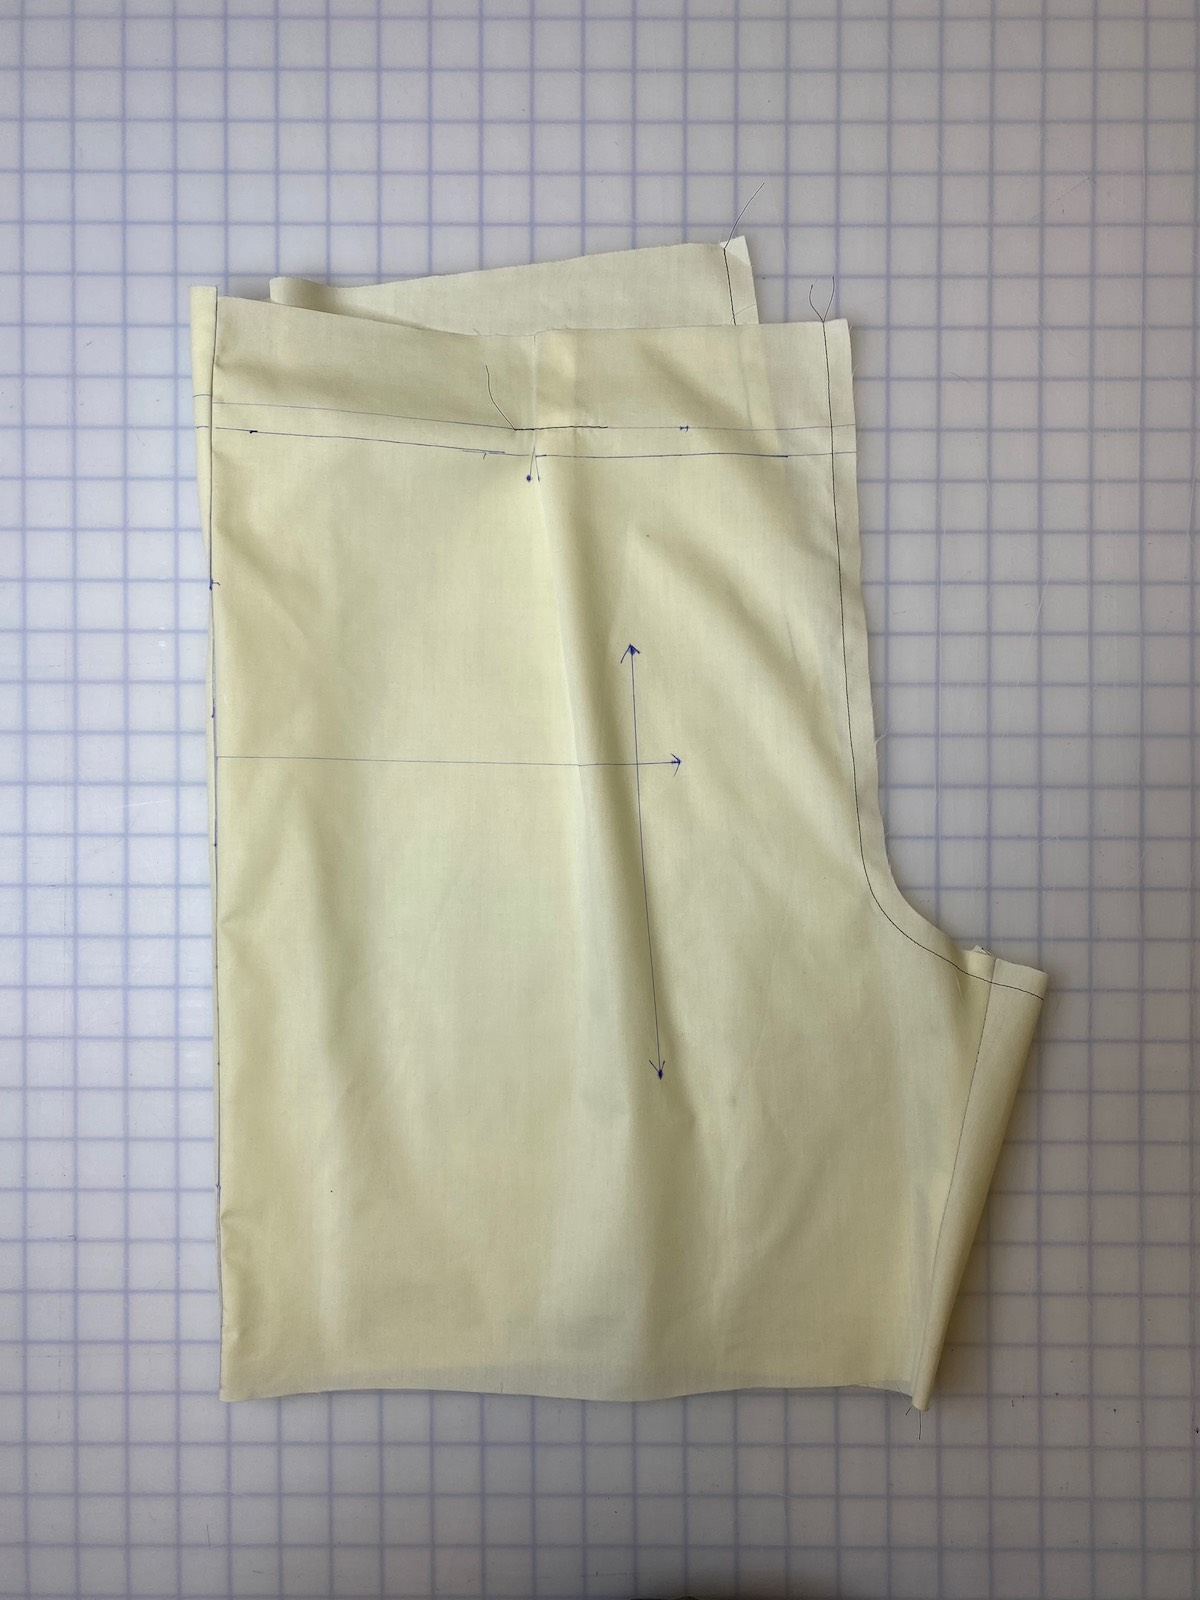
- To make a half-muslin, cut one shorts front and one shorts back, marking the original cutting line, the grainline, and a horizontal balance line at the hip level. Sew the pieces together (with the pleat closed) to make one-half of the shorts, and stay stitch the crotch seam. I’ve also marked the waistband stitching line on the muslin.


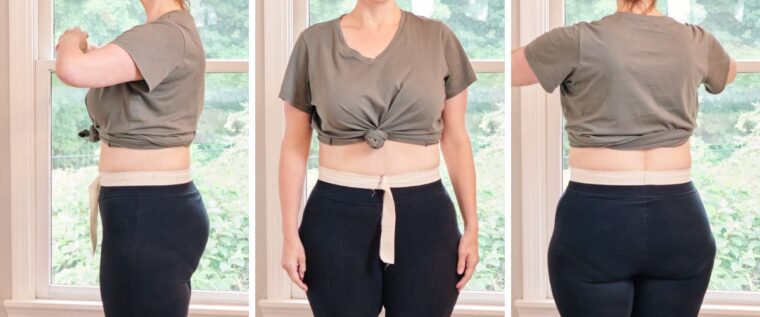
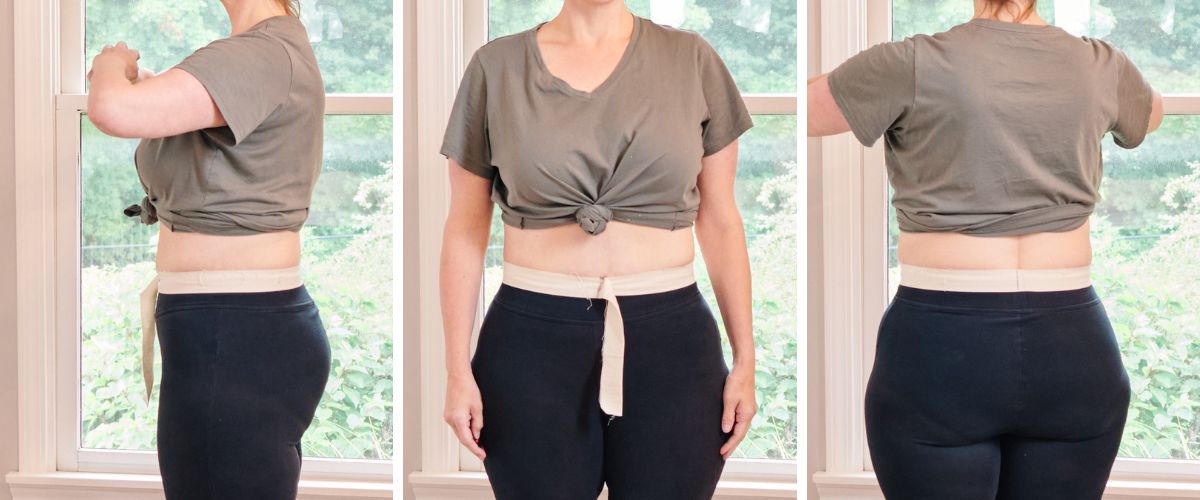
- Create a Waistband. Since the Lisboa shorts have an elastic waistband, I needed a temporary non-elastic waistband for fitting. In these photos, you can see that I am using a simple scrap of muslin 3″ wide by my waist circumference (plus several extra inches). I folded the strip in half for a 1″ waistband with a 1/2″ seam allowance. I pinned on the waistband with a safety pin and marked the center front and center back (later, I will mark the side seams as well). One of the reasons I love this method is that I am in control of where the waistband sits on my body. I prefer a waistband that sits at my natural waist for pants. Not everyone likes high-rise pants/shorts, and that is ok! You are in charge! Put the waistband where you want it.
- Slip the Version 1 half-muslin on, and pin the shorts’ center front to the waistband’s center front. Do the same for the center back. Since the Lisboa pattern has an elastic waist, there is a lot of extra fabric under the waistband-that is ok.

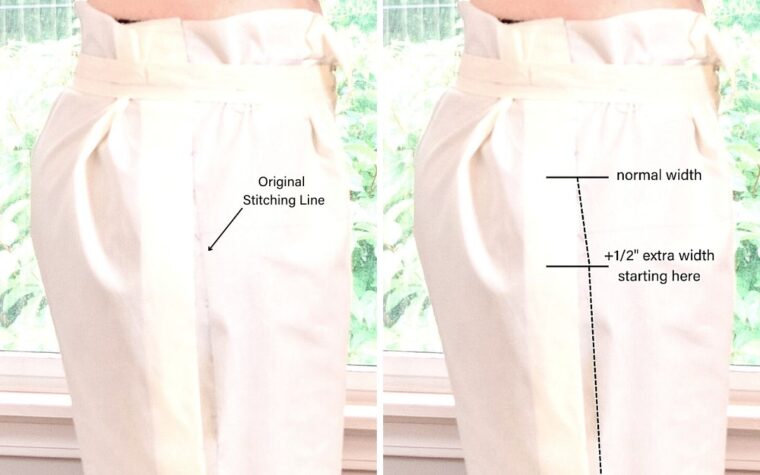
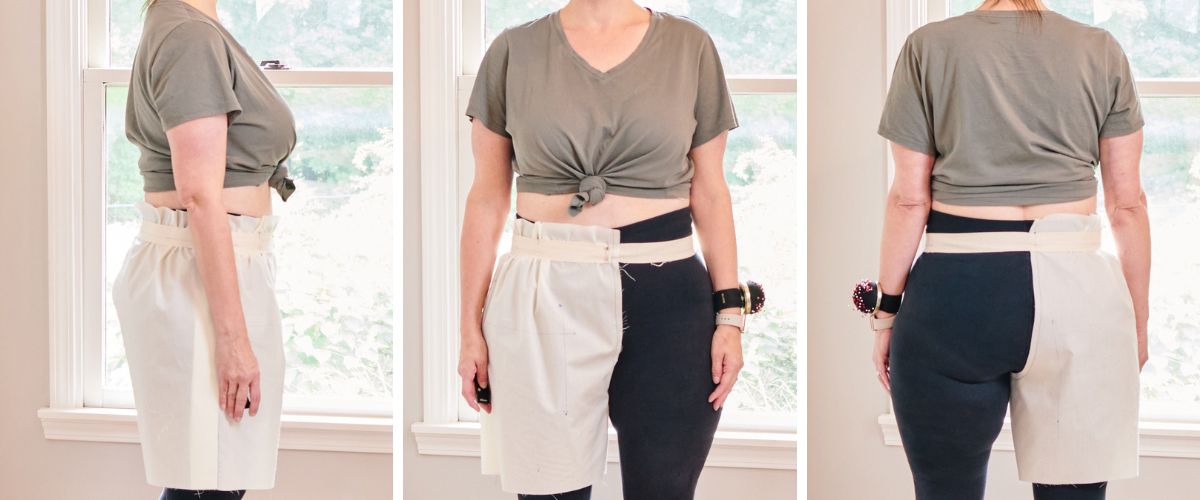
- Evaluate the Version 1 muslin to determine if you like the amount of vertical ease of the crotch curve. In the pictures in step 4, it doesn’t look too bad. However, I COULD NOT WALK in this muslin! The crotch seam was too low, hanging about 3″ underneath my anatomy. I pulled the half-muslin up until I found the vertical ease that was flattering AND comfortable to move in. To do this, I had to let out my side seams, which were too small to allow the muslin to move up and down. In the final position for Version 2, I had pulled the muslin up 1″ at the center front and 3/4″ at the center back. I also pulled the side seam up 3/8″ to keep my muslin on grain. (The back view looks a little tight, but it is because I fit over leggings.)
- Mark the location of the bottom of the waistband around the muslin from the center front to the center back. I used a Frixion pen that is heat soluble so that I could erase and start over if I needed to. Remember, the bottom of the waistband includes seam allowance, so the actual stitching line is 1/2″ above where you are marking.
- Pin fit the side seam. At this point, it almost feels like you are draping the pants on your body. The original side seam was fine until the pants hit my thighs. I needed additional ease at my thighs, adding 1/2″ to the width (which I split between the front and back pattern pieces).
- Baste the hem using the hem allowance to check for length; I selected the 7″ inseam and was happy with the length.
- Transfer the changes to your pattern. You’re done!


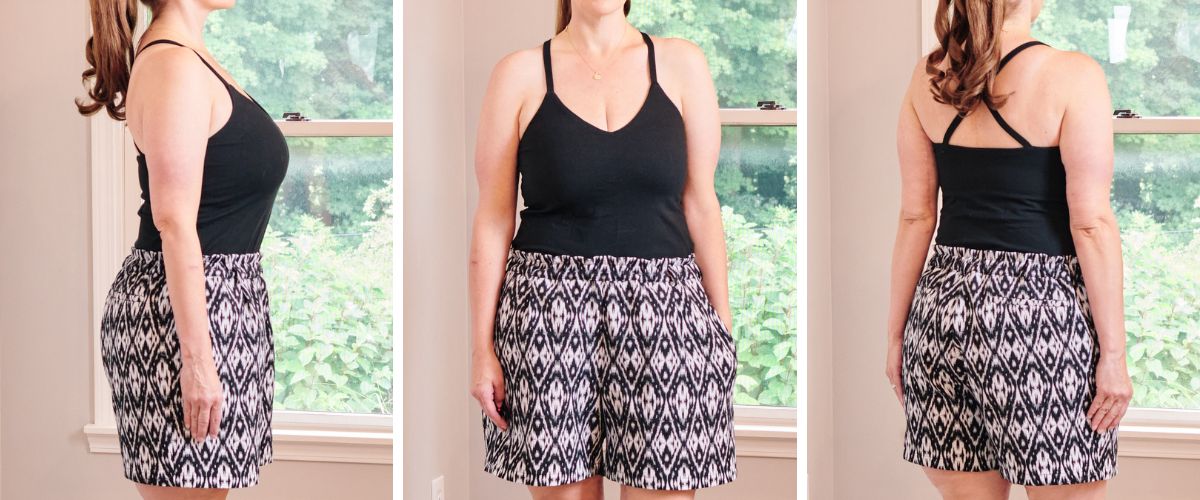
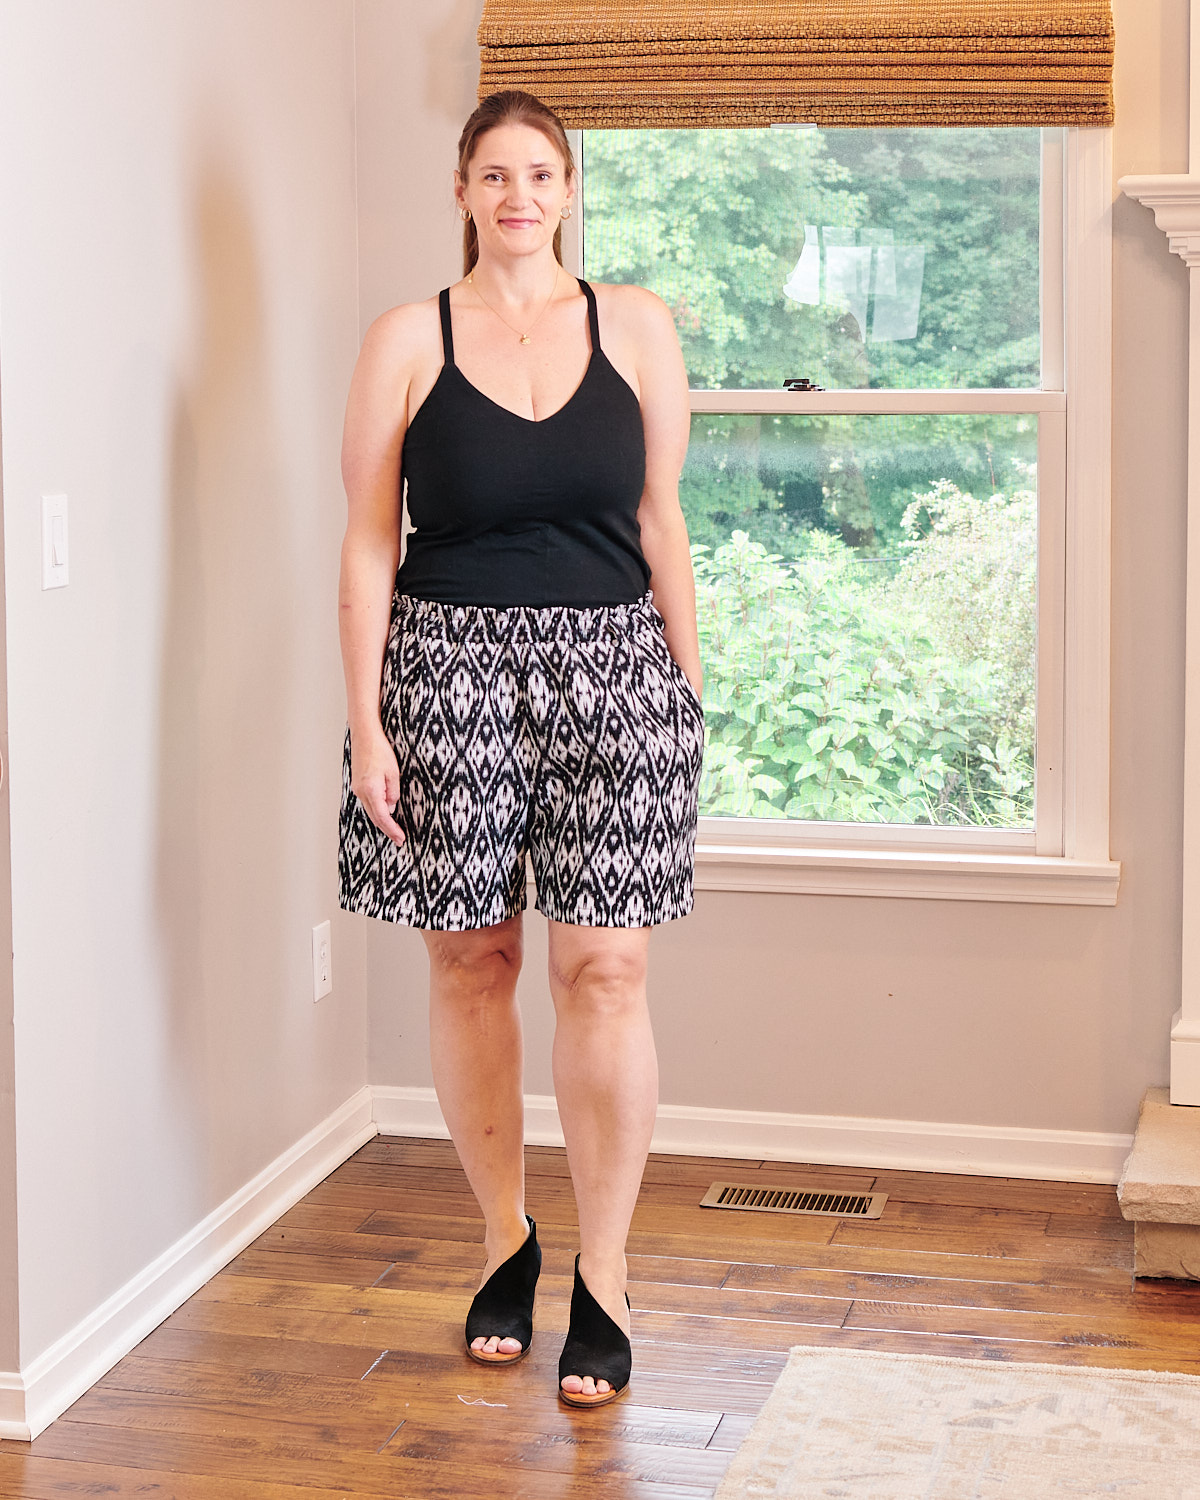
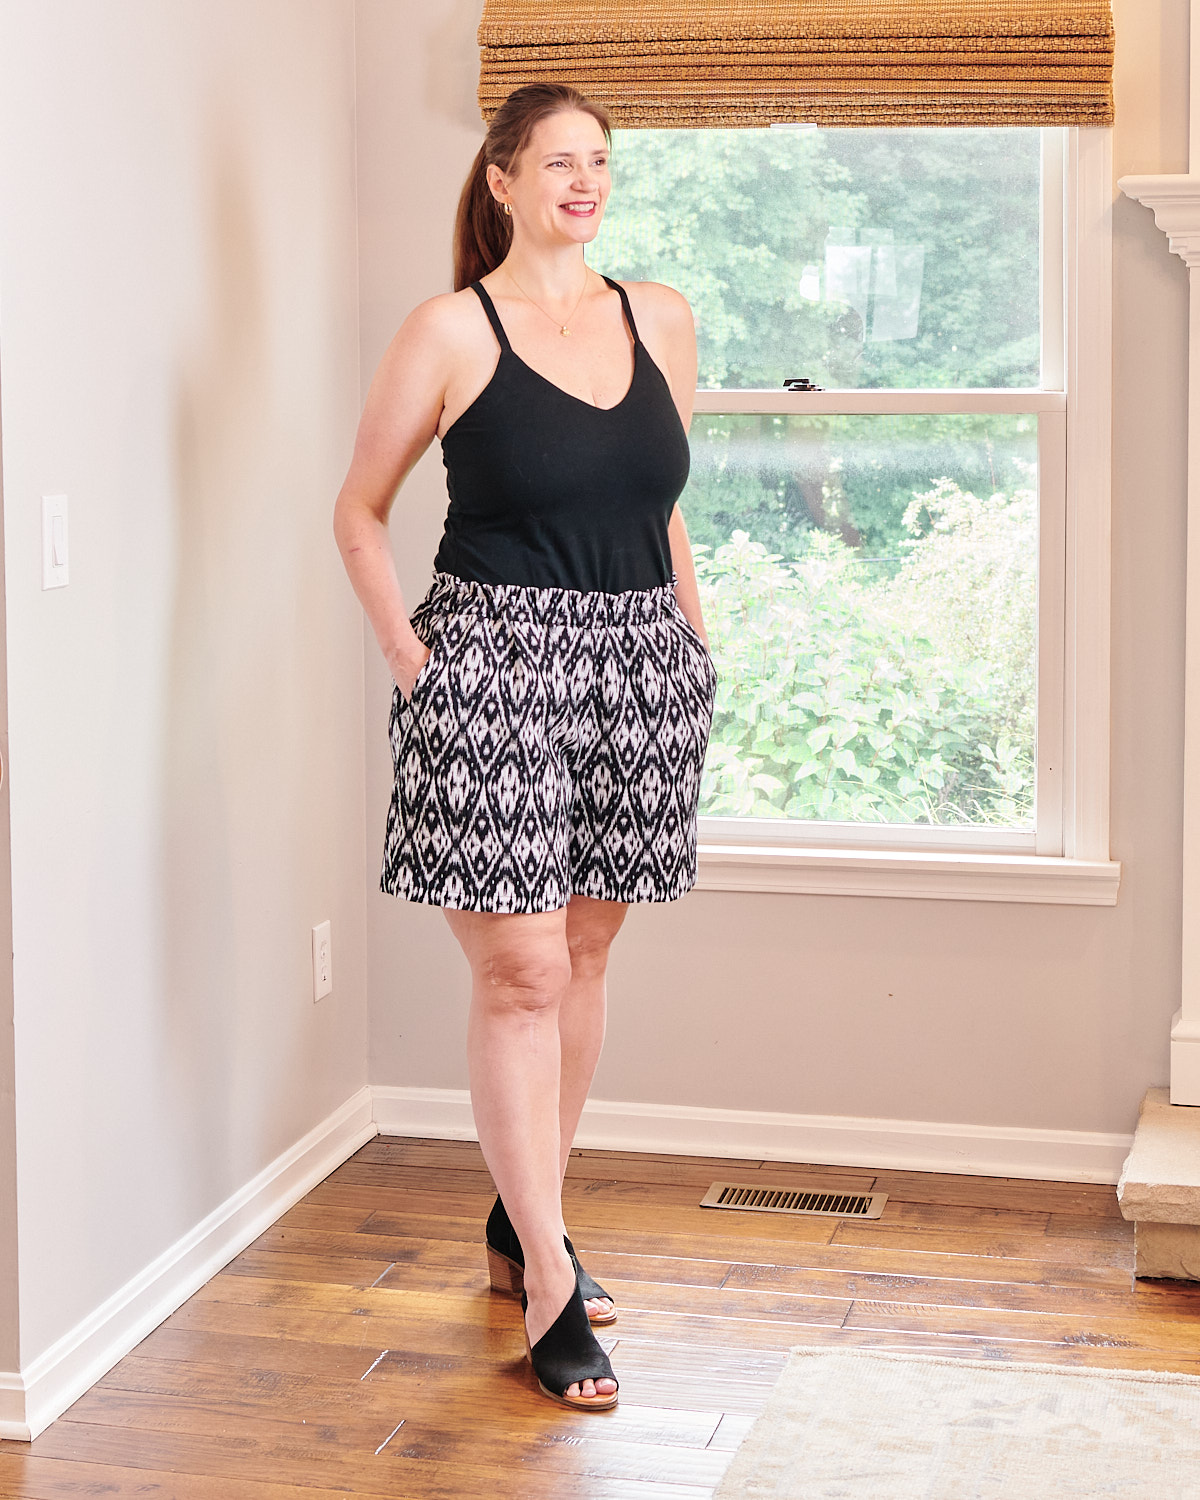
Final Lisboa Shorts
I am not a shorts person. In fact, before starting this project, I didn’t have a single pair of shorts in my wardrobe. However, I am so happy with how these shorts turned out. The fit is better than any ready-to-wear shorts I have tried on in years. And I finished these shorts just in time for end-of-summer BBQs!
Now that I’ve tried the Top Down, Center Out method for fitting pants, I want to fit all the pants patterns. With fall around the corner, the timing is perfect. I’d love to see if anyone else has success with this fitting method.
Thanks for sharing your experience with this fitting technique, Lindsey! I’ve been researching this concept with great interest as pants and shorts are the mainstay of my wardrobe. I’m hoping that this method will simplify pants sewing for me so that I can make them with more confidence.
I really liked the method in practice. I’m definitely going to use it for another project.
Thanks Lyndsey for going through this method of fitting and the photos make the explanations clearer.
I had started to look at this method but will now revisit!
Your shorts look good
Try it out! It was so easy to do!
As I was reading this post, I found myself nodding my head. Yeah, I did the exact same thing as you when I first found the tag on instagram. Took me more than a month to read &digest everything I could about it and get ready to try it. I started with the Tatjana trousers but didn’t finish it because I’d made a mistake selecting the size. I then took my learnings and tried to fit the darlow pants. It was a bit harder due to the number of seams but I did end up with my best fitting pants yet. I am currently working on the Thurlow trousers. I’m blown away by the simplicity of this method! Thank you for sharing your experience with us.
Saritha! I hear you about digesting the information over time. Some nights when I couldn’t sleep I would scroll through the posts again and think about the concept. Thank you for sharing your results so far. I think my next project will be the Hollywood Trousers. I’m so excited to try it again.
Please post that make.I too read about that method and would appreciate it seen in the trousers.
Will do!
Thank you, Lyndsey, for sharing your experience with us. You describe it very clearly. I’ve been dabbling in exploring this technique, and you make it seem very do-able! Your first pair of shorts look great on you!
Thanks Erica!
Thank you Lyndsey! I have read the threads article and wanted to give this method a try . Your photos and descriptions are very helpful, I will bookmark for future reference.
Thanks, Karen! Glad it was helpful.
Thanks Lyndsey for this detailed post on how the top down centre out version worked for you. I too have been reading about it and “processing” it. The shorts look great on you, and I bet the hollywood trousers will work out very well too.
Thank you, Asmita!