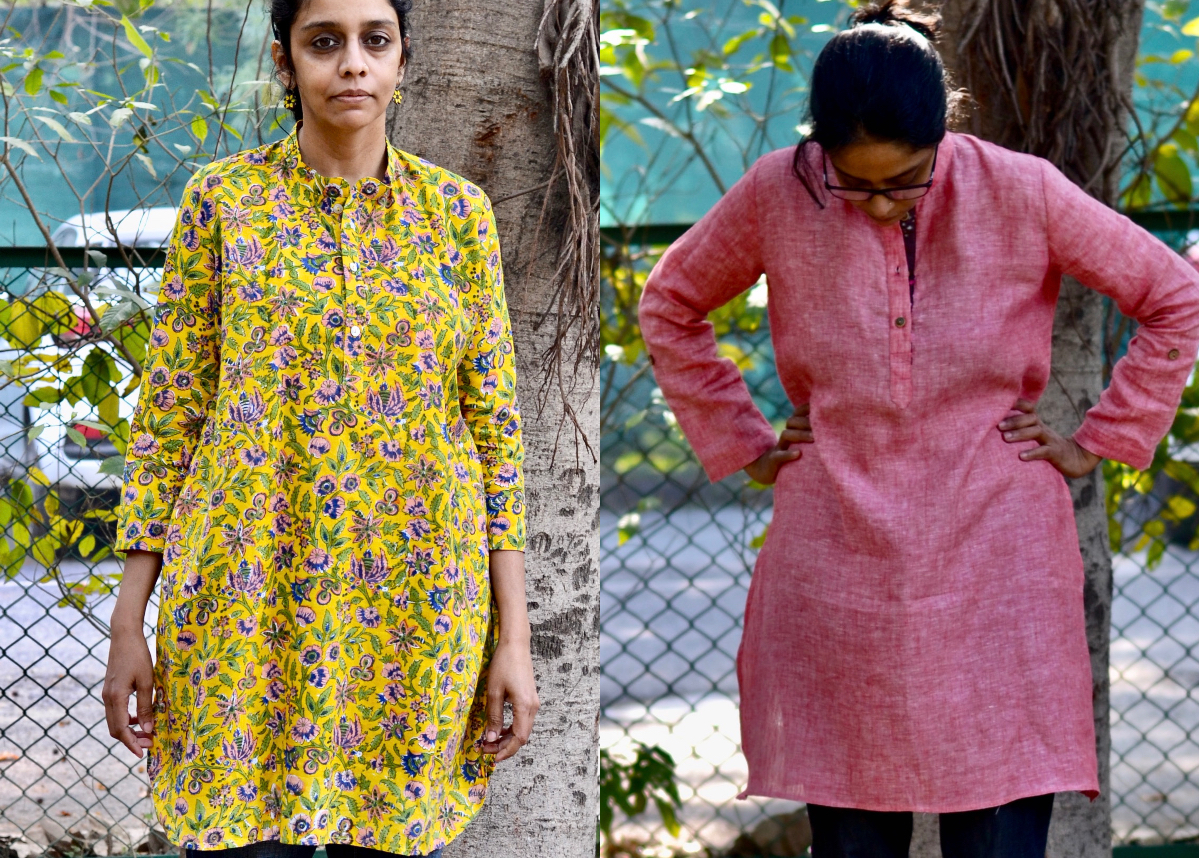
Advisors Circle member Asmita adapted the Gallery Tunic + Dress pattern to make herself two beautiful DIY kurtas. She’s here today to talk about how she did it and share a few photos.
Ever since I started sewing for myself a little over a year ago, I have been looking for a pattern to make a kurta.
A kurta is an A-line tunic usually worn over palazzos, or a salwar (a kind of loose pants). The A-line tunic can come with as many variations as any dress would, but a common style has side slits and usually hits between the lower thighs and mid-calf in length.
The Gallery Tunic makes a great DIY kurta
Last year when I made the Gallery Tunic, it suddenly dawned upon me that this was an excellent pattern to use as a base for a kurta. Both views have side slits. View B has more pronounced ones, and the basic design with its placket and stand collar was exactly the design that I was envisioning for the kurta of my dreams.
The placket with its pleated detail was great on a short tunic, but I was still looking for the kind that I had seen on kurtas here. Imagine my delight then when I found this free popover placket pattern and tutorial on the Oliver + S website. It was exactly what I needed!
Based on my measurements (upper bust 33″, bust 34 1/2″, waist 30″, hips 39 1/2″) I made a muslin in size 6, with 10 on the hips. The muslin was huge overall, and so the next time I paid a little more attention to the finished measurements and sewed up a size 4. This was better, but still a little too large on the shoulders.
So for these kurtas, I sewed a size 2 graded to a 4 at the hips. For my shoulders, which are 14 1/2” wide, this was an excellent fit. It is roomy in the hips for a kurta, but I like it that way, although I may try a size 2 overall next time. A big lesson here was “check the finished measurements!”
DIY kurta: pattern adjustments
I made two kurtas. I used View B as my base, but reduced the length by 1 1/2” for a short kind of a kurta (sometimes also called kurti) to be worn over jeans. For the yellow kurta, I kept the curved shirttail hem. Version B has a slightly longer hem for the back which didn’t suit my kurta design, so I brought it to the same length as the front pattern piece.
For the pink version, I wanted a more standard kind of hem as you see in kurtas. So I simply extended the bottom hem line and the side line until they joined to make my new pattern piece. I used the “dot” for sewing side seams in View A (instead of B), however in order to get a slightly longer slit I moved up the dot by 1”. (I should add that because I lengthened the slit, I would still have plenty of hip room in the size 2. I think in an unaltered View B I would still need to grade the hips to a size 4.) No changes were made to the back besides shortening the hem length to match the front.

Adding the placket was the exciting part. I am always slightly terrified of plackets, but Liesl’s instructions guarantee that yours will be nothing short of perfect.
To start with, I reduced the overall length of the placket by 1” because it felt too long otherwise. Still for the yellow version, I made the classic mistake of reversing the placket and ending up with the left side over the right instead of the other way around. It was too late to correct this, but to make amends on the pink version, I decided to do the under placket in a different color. This posed no problems, as I had had plenty of practice by then!
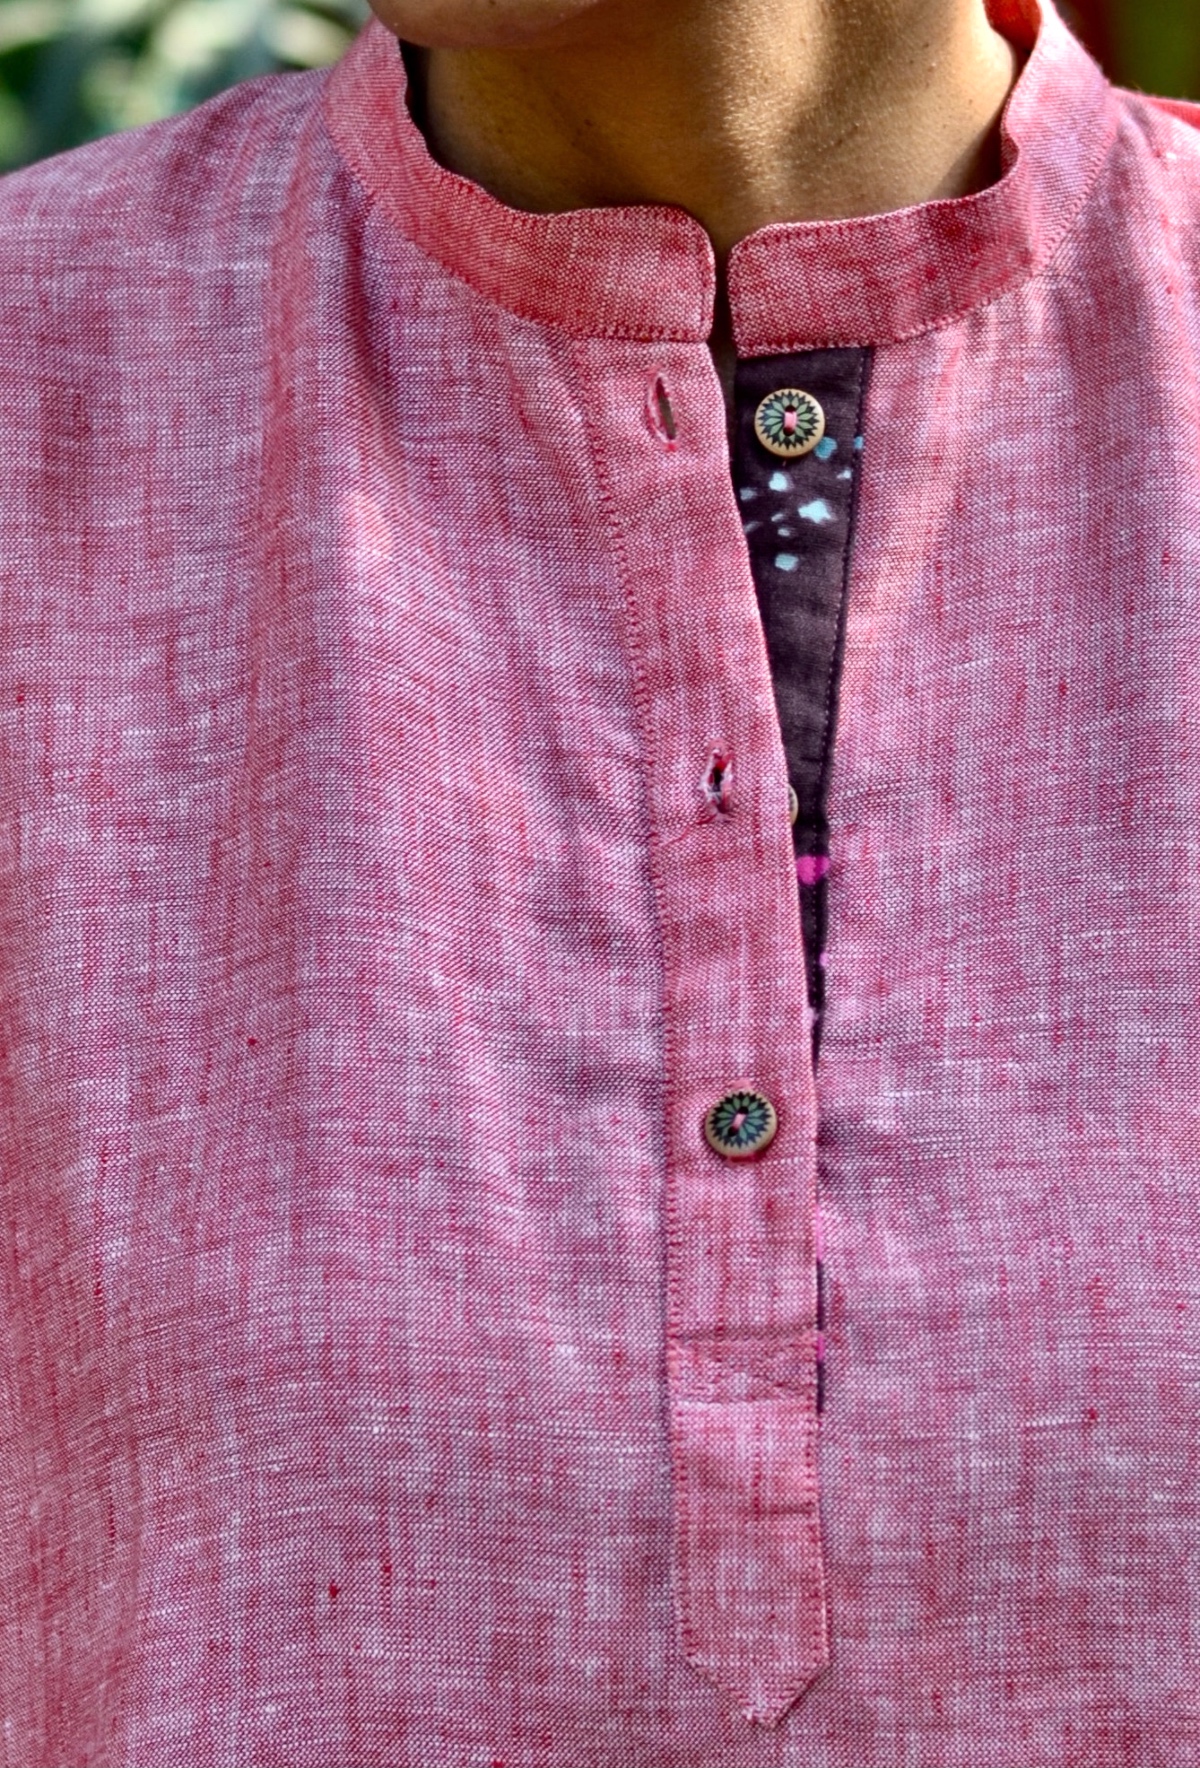
The final change made was the sleeve length. For the yellow version, I used the View A sleeve length, but for the pink kurta I extended the sleeve length by 1.5” and decided to add a tab (with the same leftover fabric from the under placket). I have never done tabs before, so this was a bit of figure-it-out-as-you-go process but I am very pleased with them. It is definitely my favorite part of the kurta.

A final note on the fabric: The pink fabric is 100% linen and a dream to wear although harder to work with. The yellow print is hand block printed cotton, and perfect for the coming long hot months. This particular fabric is not printed with vegetable dyes but it is becoming increasingly possible to get the latter, if only at a slightly higher cost. This fabric wears very well, becomes unimaginably softer with wear and is incredibly versatile (i.e. one can use it for everything from clothing to light summer blankets).
And that’s it! I now have two handmade kurtas to wear for summer, and making them myself is something that I would not even have dreamed of a year ago! Thank you, Liesl, for this wonderful, versatile pattern.
I just love the buttons on the pink kurta! Super job on both tops. I have found the Gallery Tunic to be a very versatile pattern, I’ve made 2 tunics and the longer dress length. I’m also wanting to make one in the black and white check. The photo on the pattern envelope is just so tempting!
Beautiful! I really love the pink one! I’ll have to put this one on my list
Congratulations! Beautiful finished projects.
LOVE both pieces but especially the Pink one! The contrast fabric on the tab and placket added the final lovely touch. This is the first Liesl pattern I made into the dress length and so enjoy wearing it. After seeing yours – it’s time for another one to make for spring. Thanks for the inspiration!
You have made two beautiful kurtas. I actually own what I think is a kurta, purchased because I thought it was so pretty, and I have worn it several times. I didn’t know it had a name. Thank you for educating me!
Thank you, thank you. I have been thinking this for years, “how to translate these patterns to Kurtas?” I would love if you could show more details on how you made the hem straight in the pink linen.
Hi Ava, Sorry for this very late response. The original hem is curved, so instead of allowing the curve, I drew two straight lines (one from the side seam and one from the bottom edge)–where they meet becomes a triangle and the new hem. After this I slightly curved the bottom hem line (going towards the bust, i.e. centre fold) to accommodate the rise of the bust. And that’s it. I hope that makes sense?
I love the little details that really personalize your kurtas
Sorry for a dumb question, but did you just omit the pleat in the front and if so, how did you do it?
Hi Sunita, The pleat gets eliminated when you use the popover placket instead of the one that pattern comes with. Does that make sense?
I’m so impressed with this! You inspire me to try something like this. Your kurtas are lovely! Thank you for posting this!
I love what you have done. They both look beautiful. Thankyou for the explanation of your processes. You have inspired me.