Earlier I promised you a tutorial for lightly modified Rush Hour Dress I made for myself. Don’t forget that the Rush Hour is also available in our newer expanded size range, too! If you missed that post, you can find it and more photos like this one here.
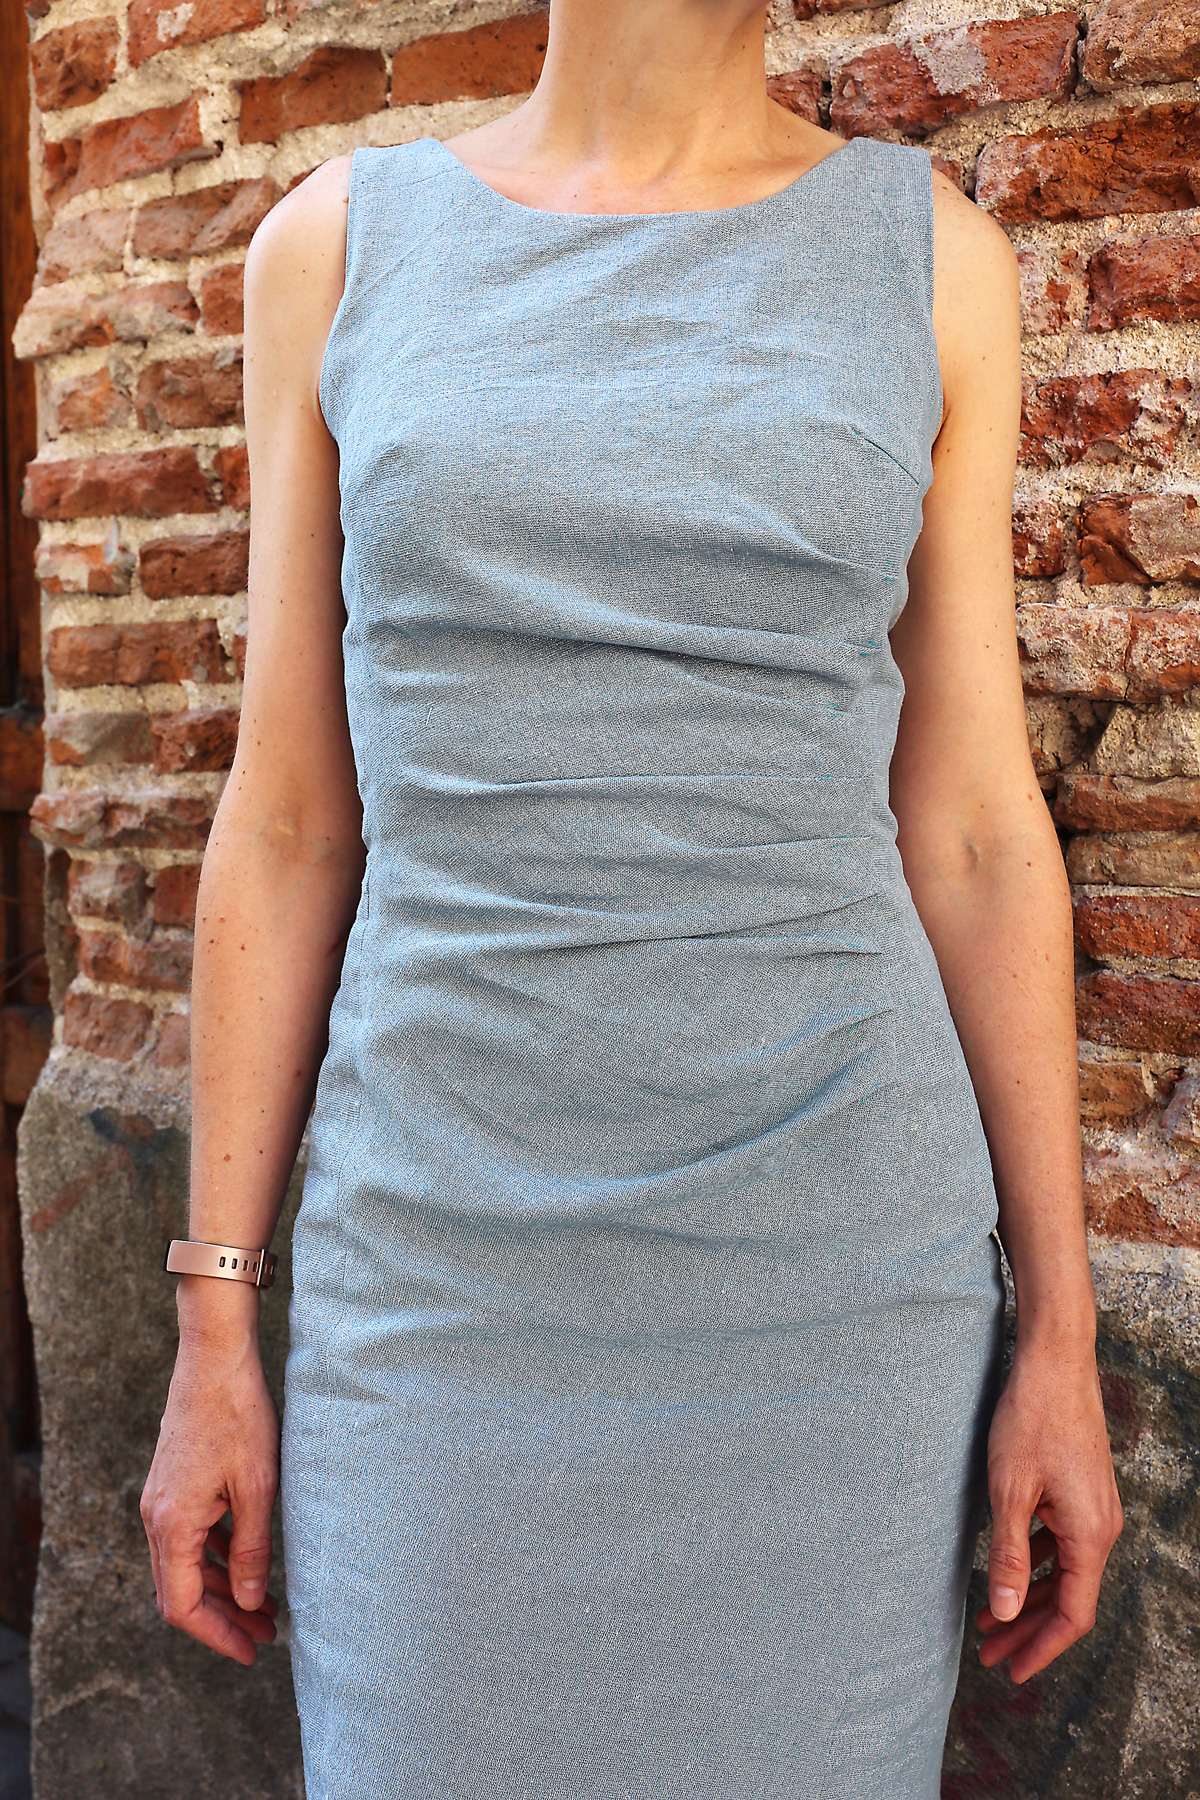
Would you like to try this center-pleated version for yourself? The center pleats are a very flattering detail, and they’re easy to add. I’ll show you how.
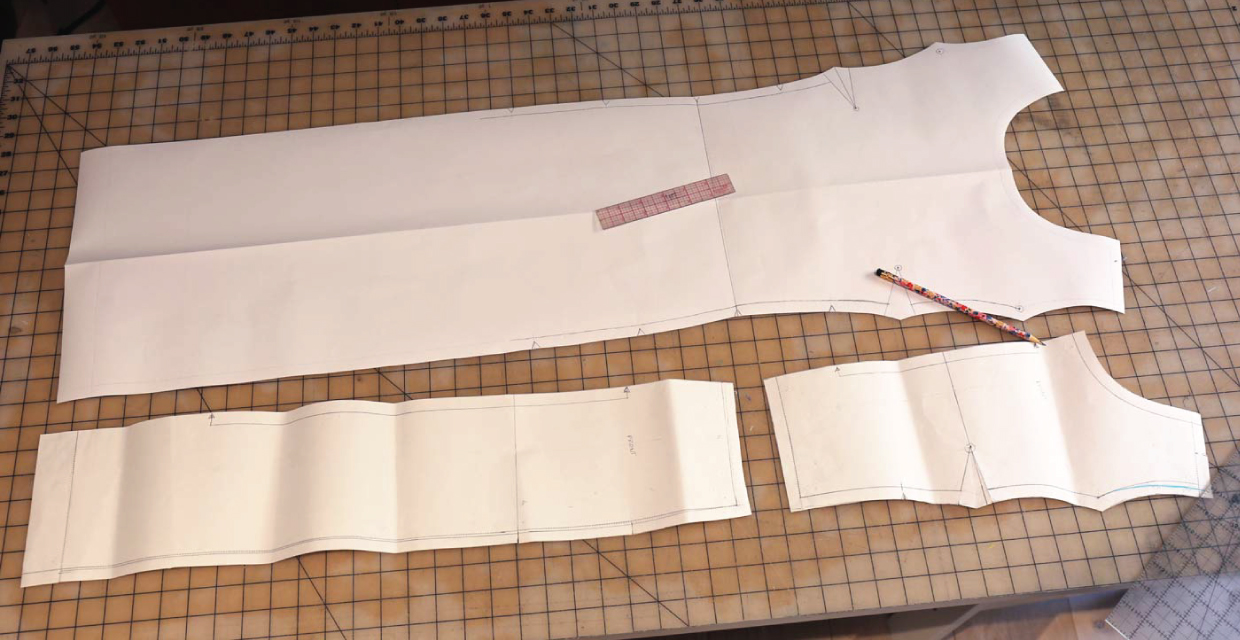
1. Start by combining and tracing the center front bodice and skirt panels and flipping them so you have one large piece, rather than a cut-on-fold piece. To join the bodice front and skirt front, match the seam lines at the side waist. The full pattern piece will allow you to add the pleats, or gathers if you prefer.
Please note that I snapped these photos in the evening as I was working on the dress, so they’re not fancy or well lighted. But I think they’re clear enough for you to follow, right?
2. Next, determine where you want to add your pleats or gathers. In my case, I wanted them to start just below my bust and end at my high hip. Then I determined where the pleats would end at the opposite edge of the front panel, just above my bust and at my low hip. I drew a line to define the top and bottom edges of these placements. One thing to keep in mind here is that it’s best if you don’t have to fuss much with the bust darts, so try to keep your pleats or gathers mostly away from the darts just to keep things simple.
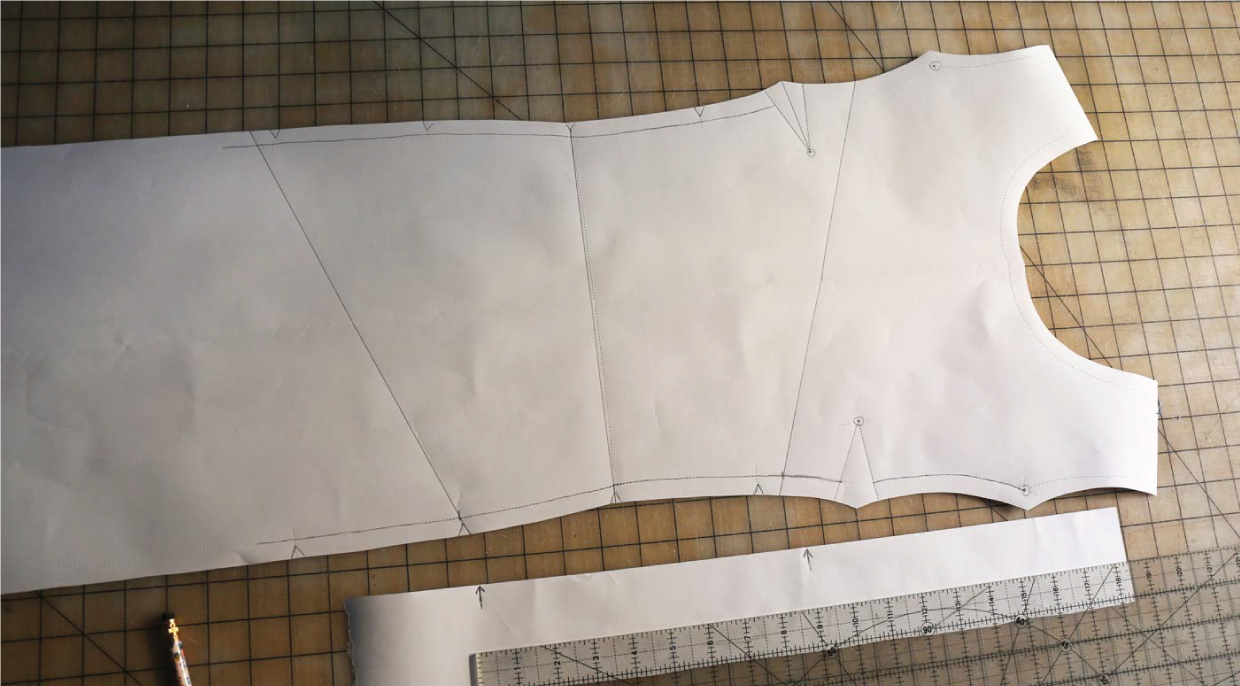
3. Design decision time! Decide how many pleats you want, and space them evenly across the your front panel. I decided on nine pleats, for no particular reason at all. (The original dress has eight pleats, so do as you like here.) I hate trying to do the weird math for these, so I usually fold a strip of paper–see it in the photo above?–until I have what I like. You could also use a buttonhole spacer gadget if you have one. Each pleat gets its own line.
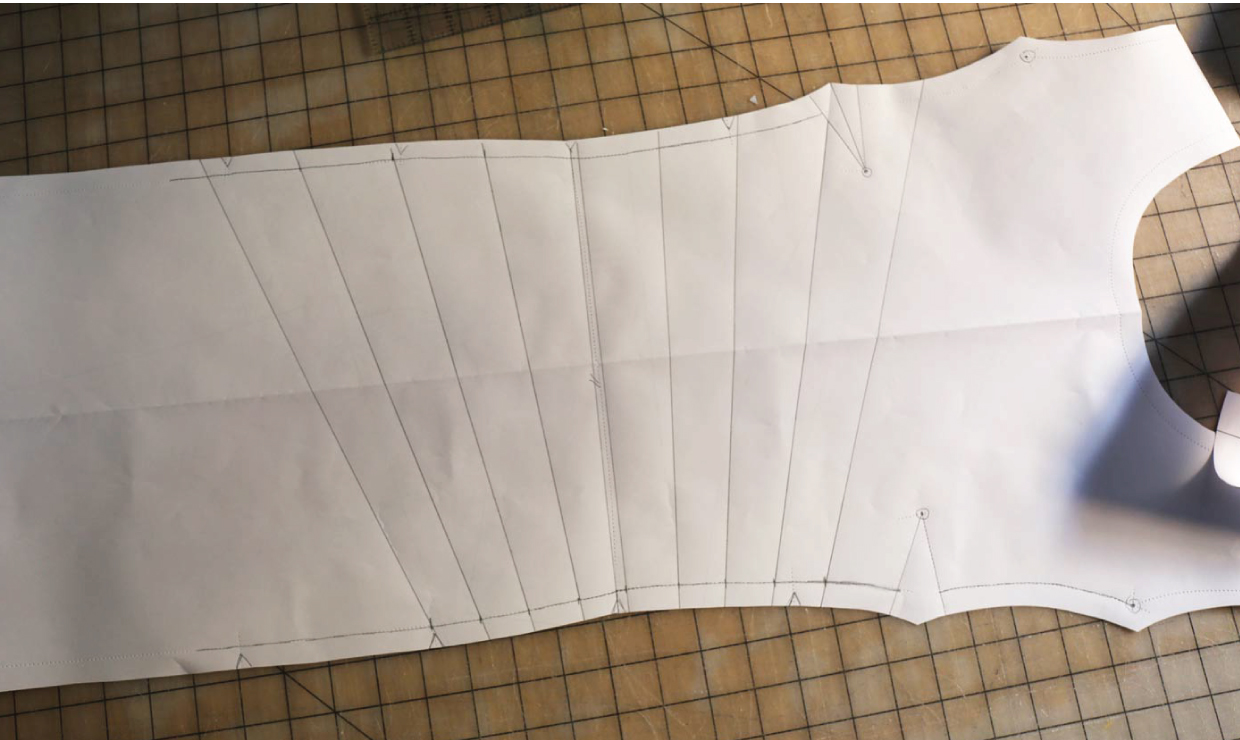
4. Now comes the fun part! Cut through your lines, leaving a paper “hinge” at the opposite seam line. (If you have our Building Block Dress book you’re familiar with this process.) Then spread the cut pattern to create each pleat, remembering that the gap will be folded in half when the pleats are sewn. I tried to keep my pleats approximately the same size, and I wanted the lower part of the skirt to end up almost perpendicular to the bodice, like the original dress for which the stripes on the fabric make it easy to determine the grain. (Here is another similar style.) As you do this, keep in mind that the gap will be folded in half once the pleat is folded, so don’t spread too much that the pleats overlap and don’t spread so little that they aren’t very visible. Once you have your pleats spread as much as you like, tape them down onto another piece of paper to keep everything in place.
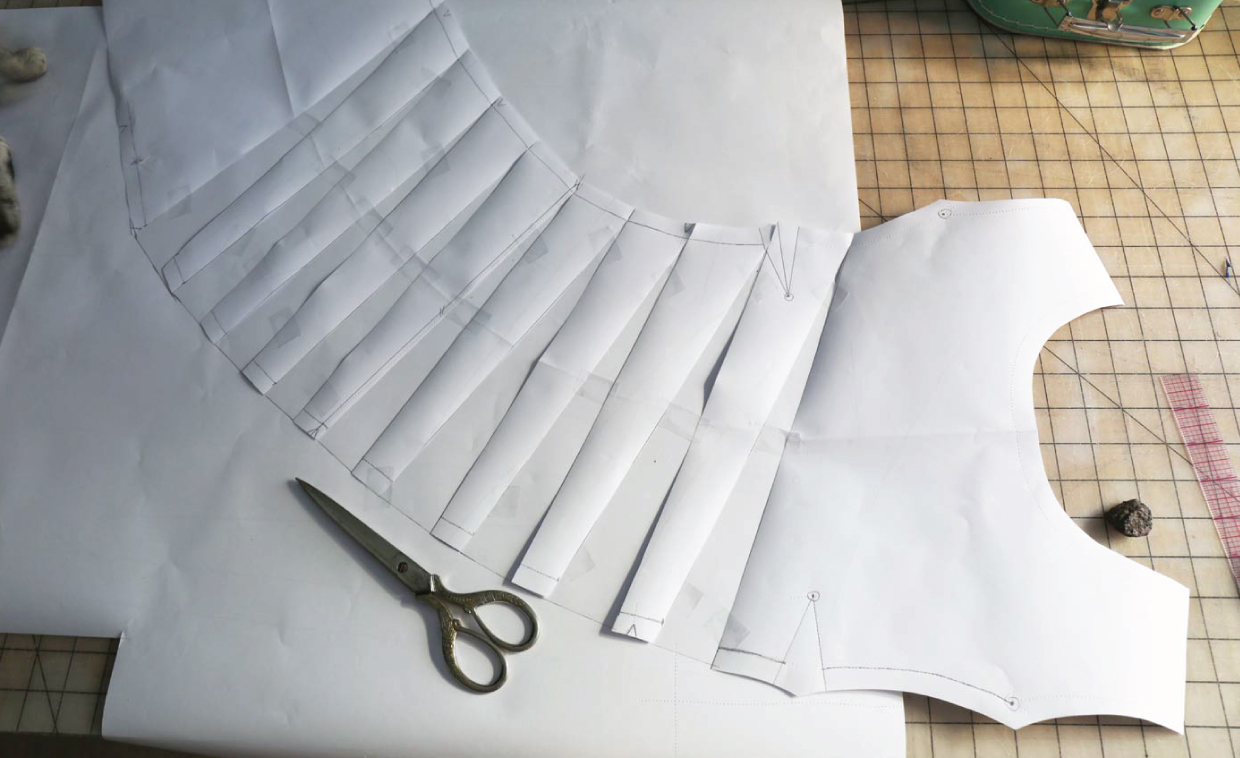
5. If you’re doing this the proper way, at this point you should really fold each paper pleat in the direction you’ll fold it when it’s sewn. (Notice that on the original dress, as well as on my dress, the pleats aren’t all folded in the same direction, but instead they change direction at the waist.) Then, once the pleats on your pattern piece are folded properly, you can trim the extra paper that extends beyond the cutting edge of the pattern piece. I didn’t do that (I was in a hurry), but I advise that you do it because it will help you to fold your pleats properly when it comes to your fabric. (If you’re planning to gather, or ruche, your fabric you can just blend the outer cut edge like I did.)
Here is my finished pattern piece. If I had folded and trimmed it correctly it would have little points like bust darts at the bottom right edge of the photo below.
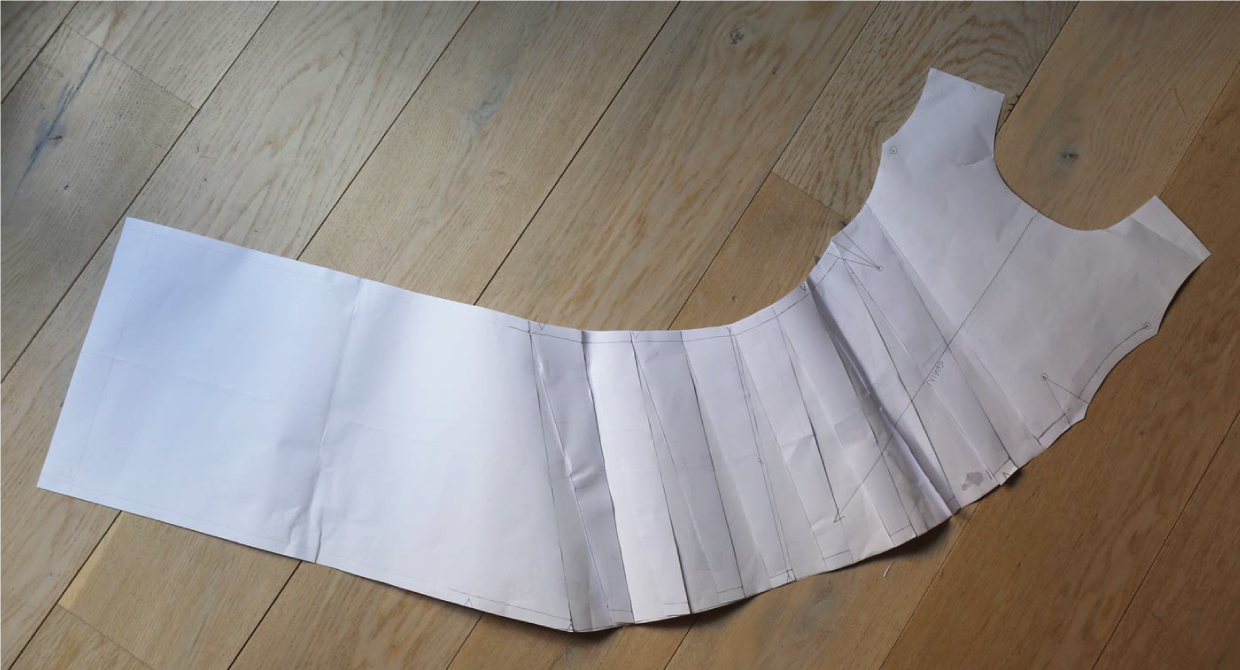
It’s a funny shape isn’t it?
When I cut my fabric I positioned the pattern piece using the original grain line at the upper bodice so the skirt is off grain, which is fine in this case. It would also be fun to spread the cuts on the pattern piece so that the hem of the skirt lands precisely on the cross grain, 90 degrees from the original grain line, which would make it easy to hem. If you want your hem to land on the cross grain it would involve pleats that are slightly larger than mine, but my pleats certainly aren’t all that large, after all. I was following the photo for the original dress, which also ended slightly off grain.
To sew this modification, simply finish the darts before making the pleats. Once you’ve folded the pleats in place, baste them in the seam allowances and proceed with the rest of the dress as normal, nothing fancy. Easy, right?

I hope you’ll try it and let us know how it works out! Don’t forget to tag us #lieslandco and #rushhourdressblouse on Instagram if you make this. I’d love to see how it goes.
I love this so much Leisl! I presume the lining is just cut flat and not pleated, is that right?
I have some grey wool with a thin metallic stripe that would look fantastic as this exact dress. Thanks for the inspiration. xx
Good question! Yes, the lining is flat. That helps the dress to maintain its shape, too. Glad you like it and it would be so cool if you made one!
I love this modification! That pattern piece is so bizzare, and thanks so much for linking the original dress with stripes – otherwise, there’s no way I would have thought that a striped fabric would work with this modification.
Now I just need an occasion that warrants a dress like this!
Oh, I think you could wear it to cook dinner. Or milk cows. Or chase kids. No? (Hope you’re well! xo)
This looks great except the bust darts look too high. A tutorial on how to change the position of those would be helpful to many folk.
I appreciate your perspective but the bust darts are in the right place in person. There is a tutorial for moving darts right here: https://oliverands.com/community/blog/2018/08/how-to-raise-or-lower-a-dart.html
I am in the process of making this right now. I have high hopes, and I will post photos when I am done, if it is as great as I expect it will be.
It would have been much easier for me if I had marked the heck out of the front panel before I cut it apart to modify it. All notches, of course (I did not even do that, for reasons that are not clear to me now). And the waistline, where I had merged the top and the skirt pieces. But even more markings to help me to line up the altered middle with the side bodice and skirt pieces would have helped me a lot. I hope that it might help others who are reading this.