The Extra-Sharp Pencil Skirt sew-along is here! As I’ve said before, I love pencil skirts because I think they flatter a wide variety of body types and can be worn in so many ways. They don’t have to be saved for fancy occasions! I wear them a lot, but especially in the summer when I don’t need to wear stockings. And they’re especially great when sewn from a sturdy fabric that doesn’t require a lining, which is how this pattern is written.
I’ll chime in here and there with a comment or hint for you, but otherwise our friend Emily will be leading you through the sewing steps. We’ve set up the sew-along over two days, since it’s quite an easy project.

Here’s our schedule:
Day 1: Getting Started, Prepare the Skirt Back and Attach the Zipper
Day 2: Finish the Walking Vent, Assemble and Fit the Skirt, Attach the Waist Facing and Finish the Skirt
So with that, let’s get started!
Cheers,
Liesl
Getting Started
1) In addition to the interfacing you’re instructed to cut from the pattern pieces, cut two 1” by 7” strips of interfacing for the invisible zipper, two 1 3/4” by 12” pieces of interfacing for the walking vent, and two 1” by 1” squares of interfacing to reinforce the top of the walking vent.
2) Staystitch the waist edge of the back yoke, side panel, and skirt front 3/8” from the top edge. The staystitching is permanent and helps stabilize the pieces so they don’t stretch or distort during assembly.
From Liesl: the staystitching also enables you to try on the skirt to fit it without stretching out the waist.
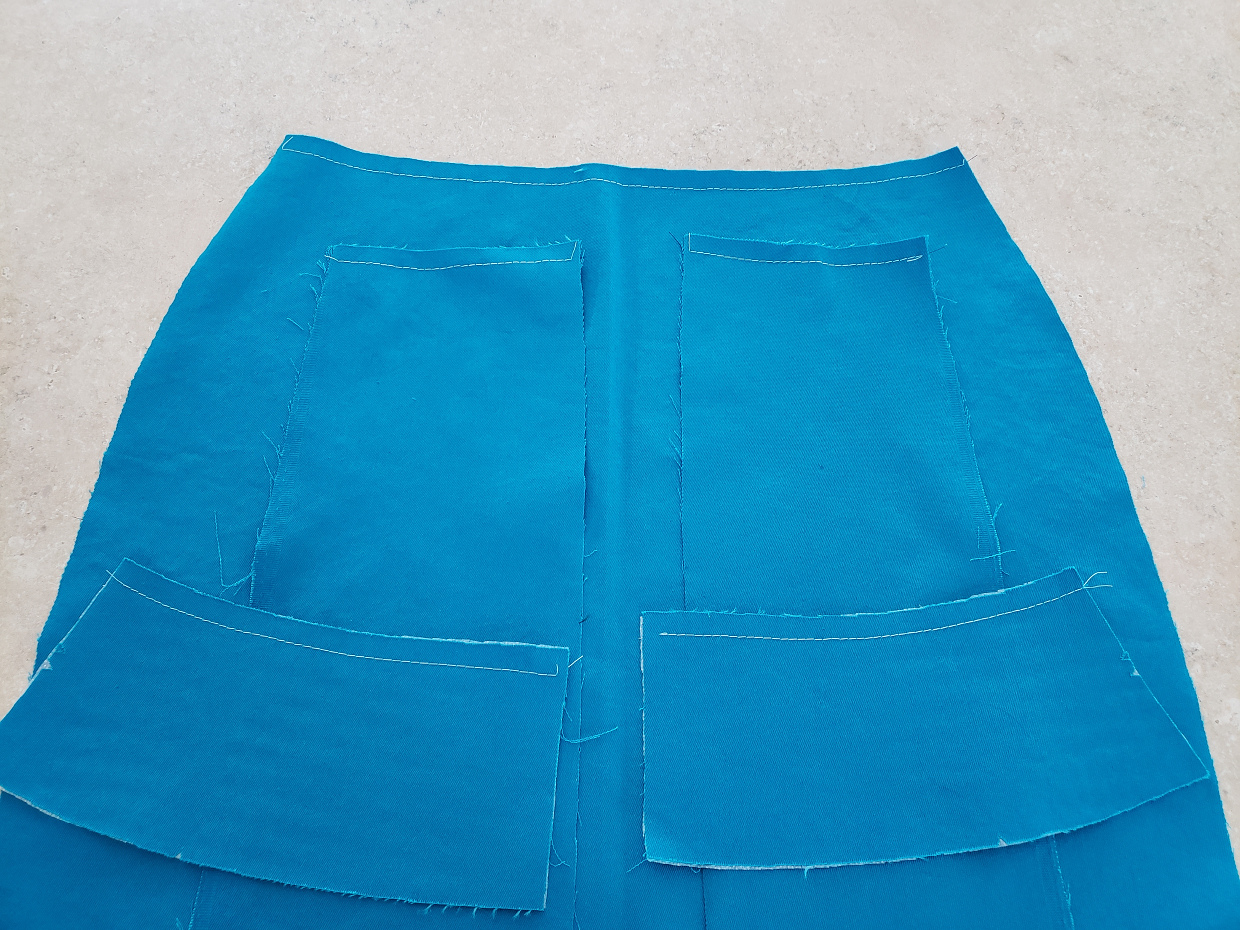
3) For View B, following the interfacing manufacturer’s instructions, fuse the cut interfacing (cut on straight grain) to the wrong side of the side panels. This will prevent the side panels from stretching and distorting since they are cut on the bias and need extra support.
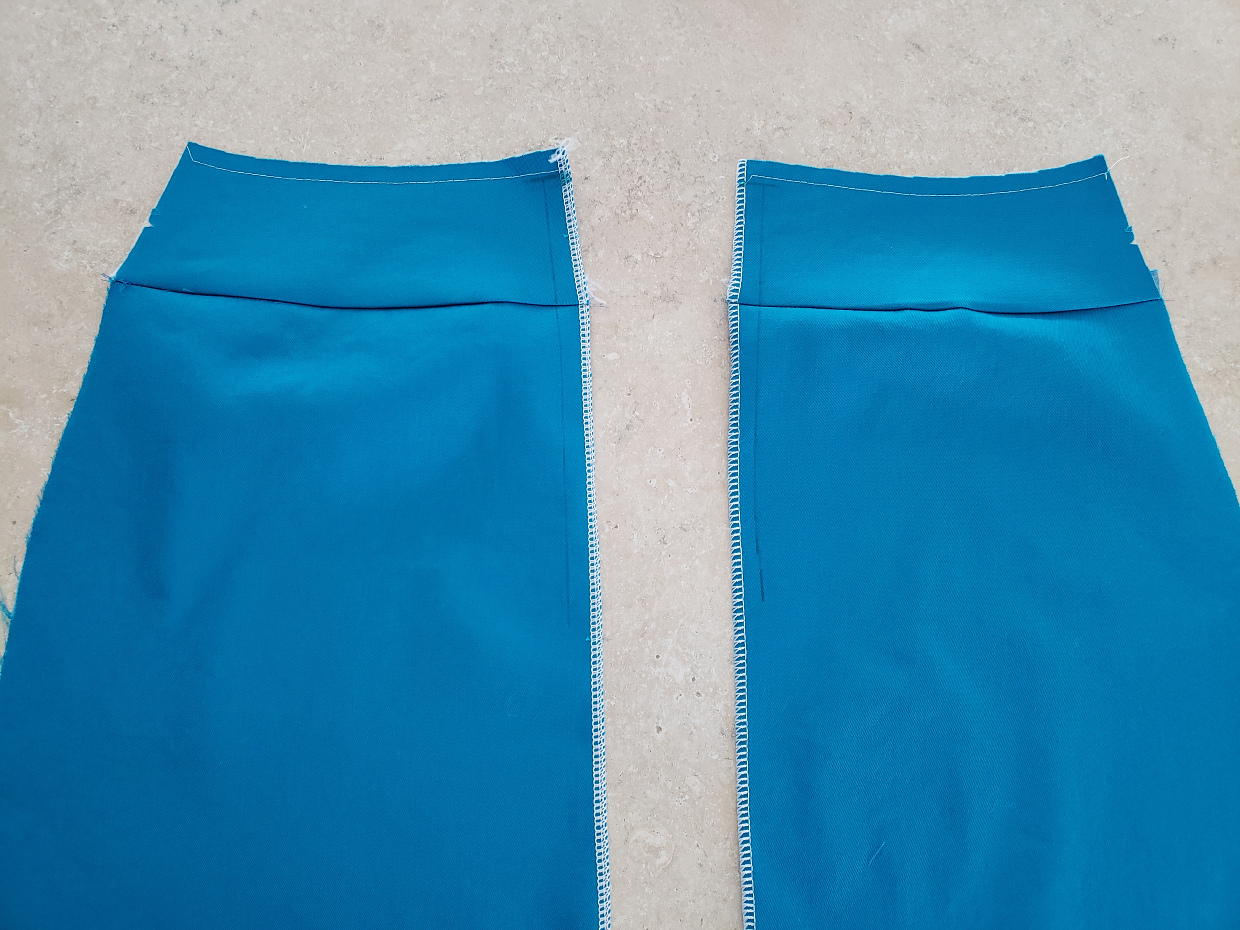
Prepare the Skirt Back
1) Using the 1” by 7” strips of interfacing prepared in Step 1 of the “Getting Started” section, and following the interfacing manufacture’s instructions, fuse one strip of interfacing to the wrong side of the skirt back, starting at the top edge of the waist and ending just below the dot you transferred from the pattern piece. Fuse the other strip to the opposite skirt back in the same manner.
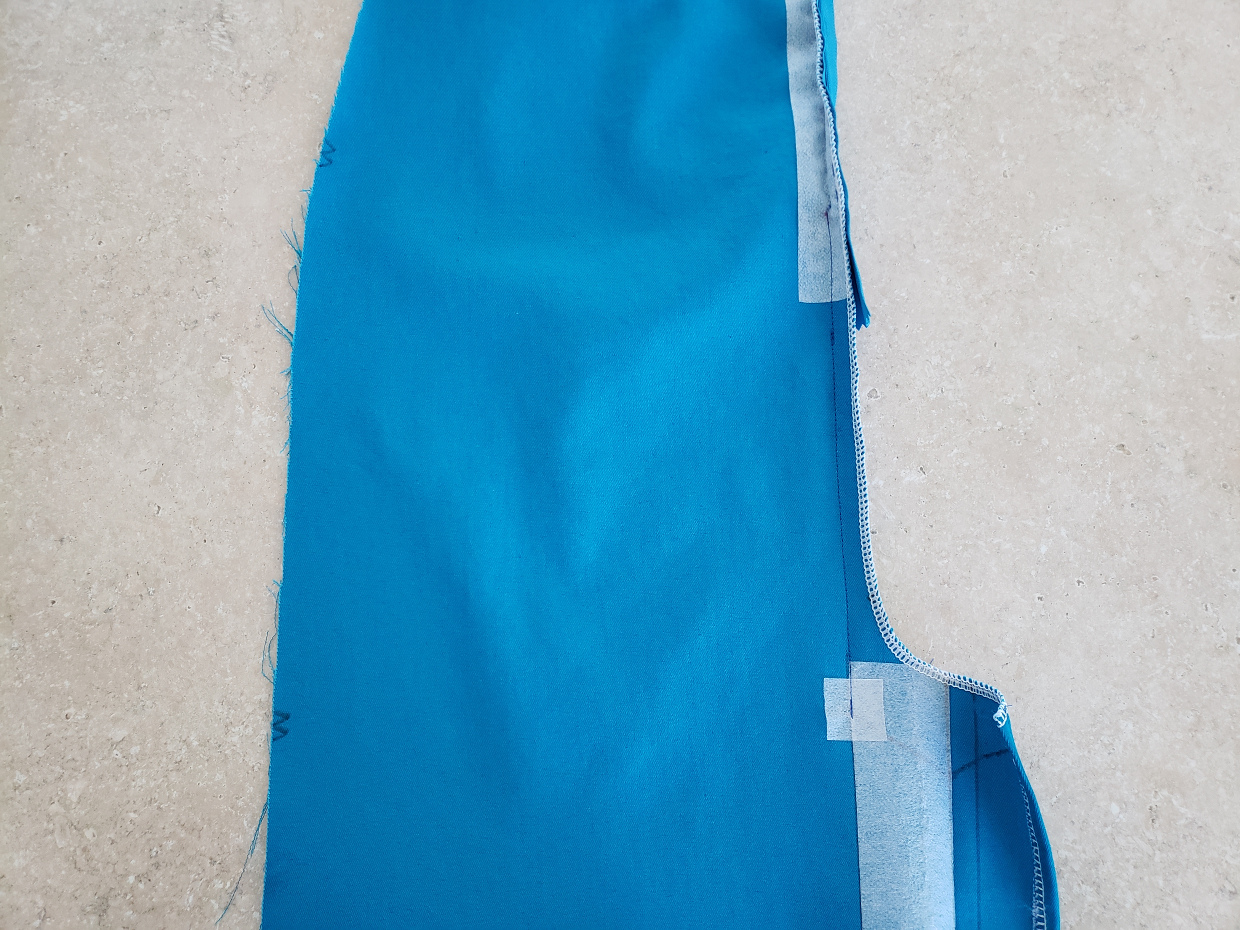
2) Place the two skirt back pieces with the wrong side up. Trim 1 3/4” from the wearer’s back left skirt-back piece’s vent edge, as indicated by the cut line on the pattern piece. Discard the trimmed fabric.

3) Using the 1 3/4” by 12” strips of interfacing prepared in Step 1 of the “Getting Started” section, and following the interfacing manufacturer’s instructions, fuse one strip of the interfacing to the wrong side of the skirt back on the wearer’s left side; position the strip so it lays between the marked fold line and covers the vent dot you transferred from the pattern piece. This interfacing will stabilize the vent to help it hold its shape. Fuse the 1” by 1” square of the interfacing directly over the vent dot itself. This will reduce stress at the dot, which is the point where the vent will open. Repeat in the same manner to attach the second 1 3/4” by 12” strip and 1” by 1” square of interfacing to the skirt’s back on the wearer’s right side. Trim any excess interfacing that extends beyond the skirt’s hem edge.

4) Finish the center-back seam allowances for the skirt’s center-back edge, the vent edge, and the center-back edge of the yoke as shown, using your preferred method. (If you use a serger to finish the seam allowances, be sure not to trim the fabric, and gently straighten the skirt’s curved center-back edge as you finish it. Reserve the back yoke interfacing for the other two back-yoke pieces, which will be used for the waist facing.)
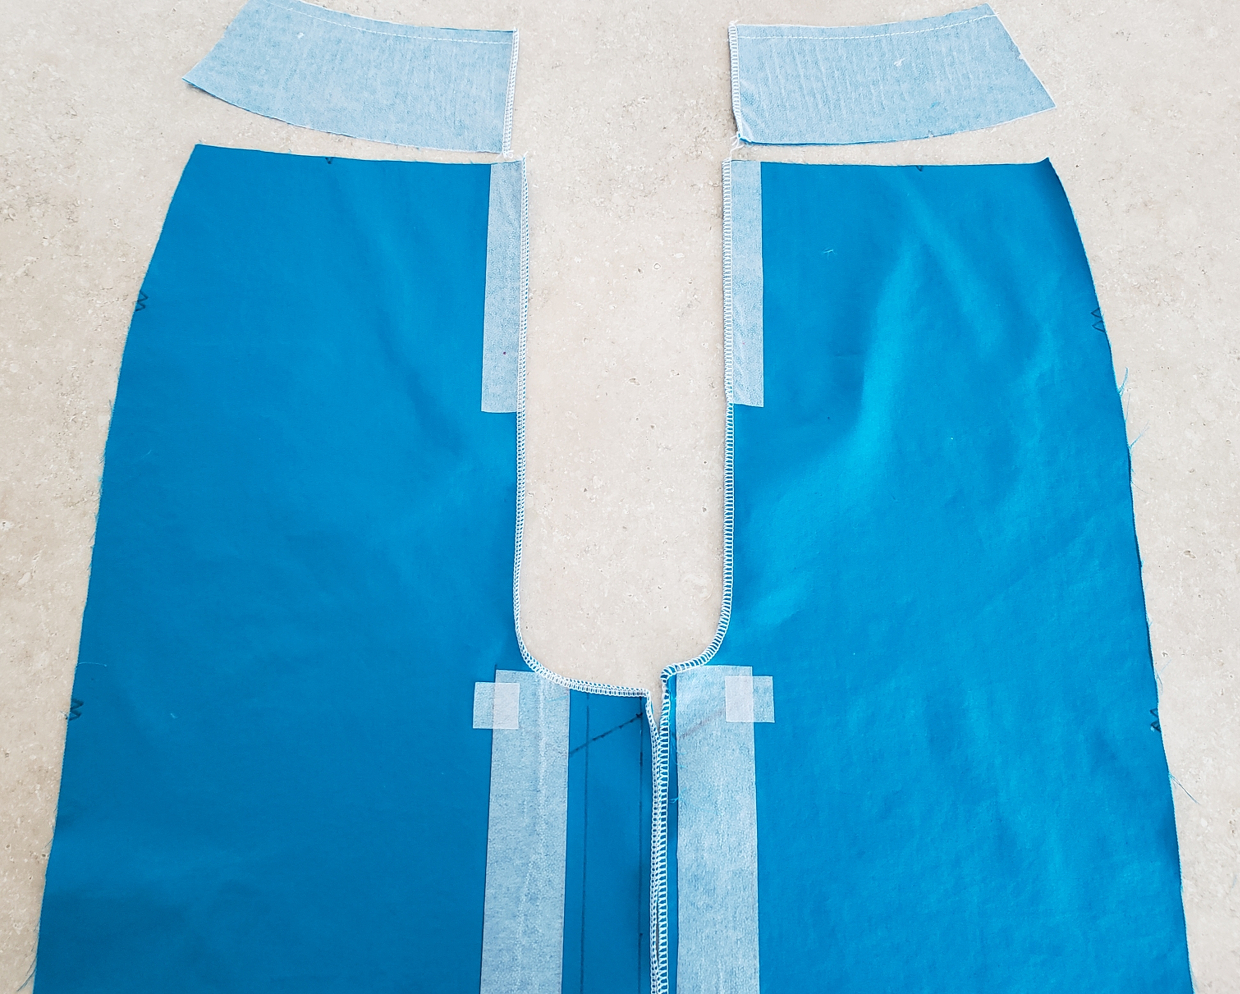
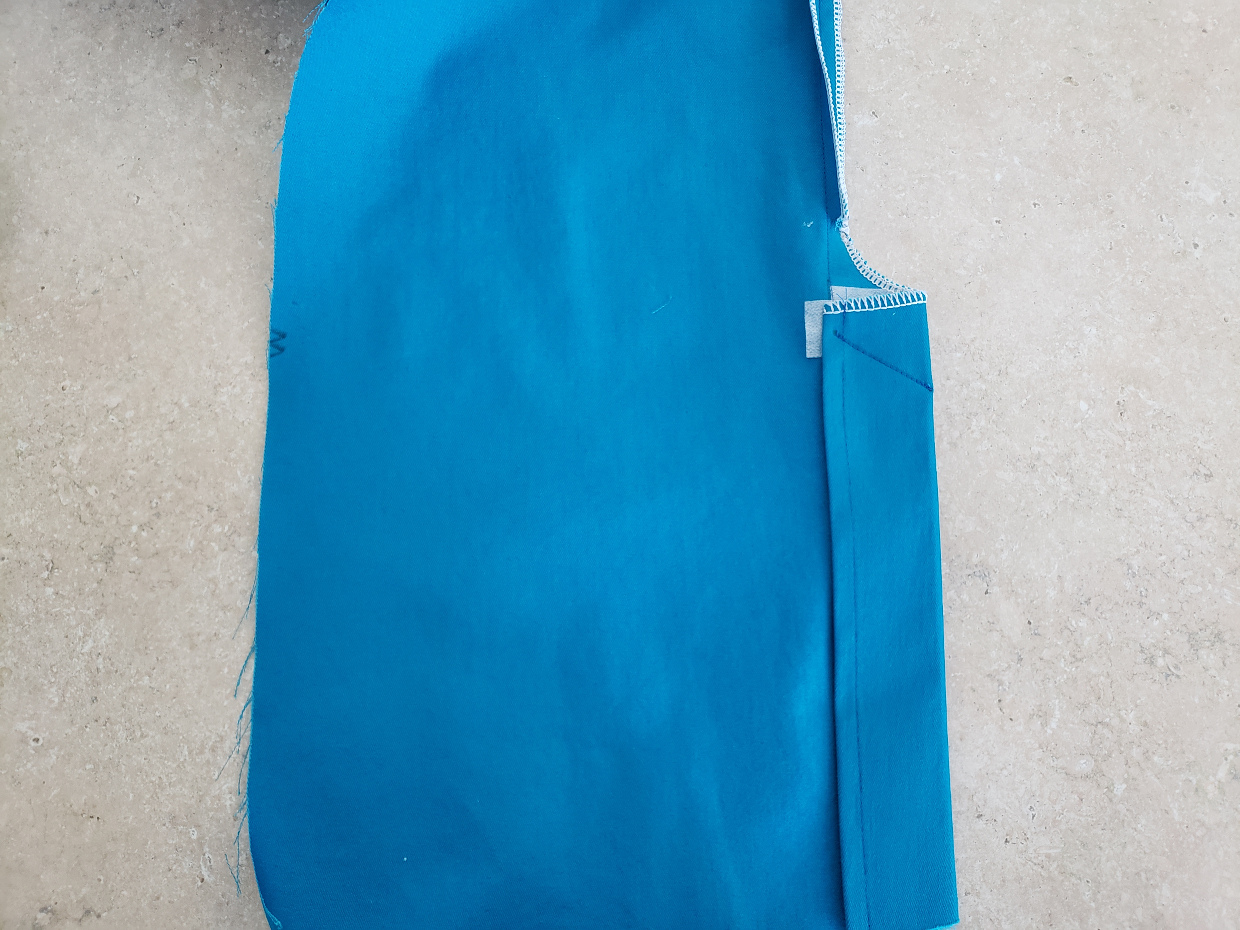
5) Fold and press the skirt vent’s finished seam allowances to the wrong side of the fabric along the outermost marked fold line (1/2” from the outer edge). Edgestitch each seam allowance 3/8” from the fold to finish it.
6) Fold and press each vent to the wrong side along the innermost marked fold line so the edgestitched back fold meets the fold line with the dot. Then unfold the vents for the time being, but keep the creases for later when you come back to finish the vent.
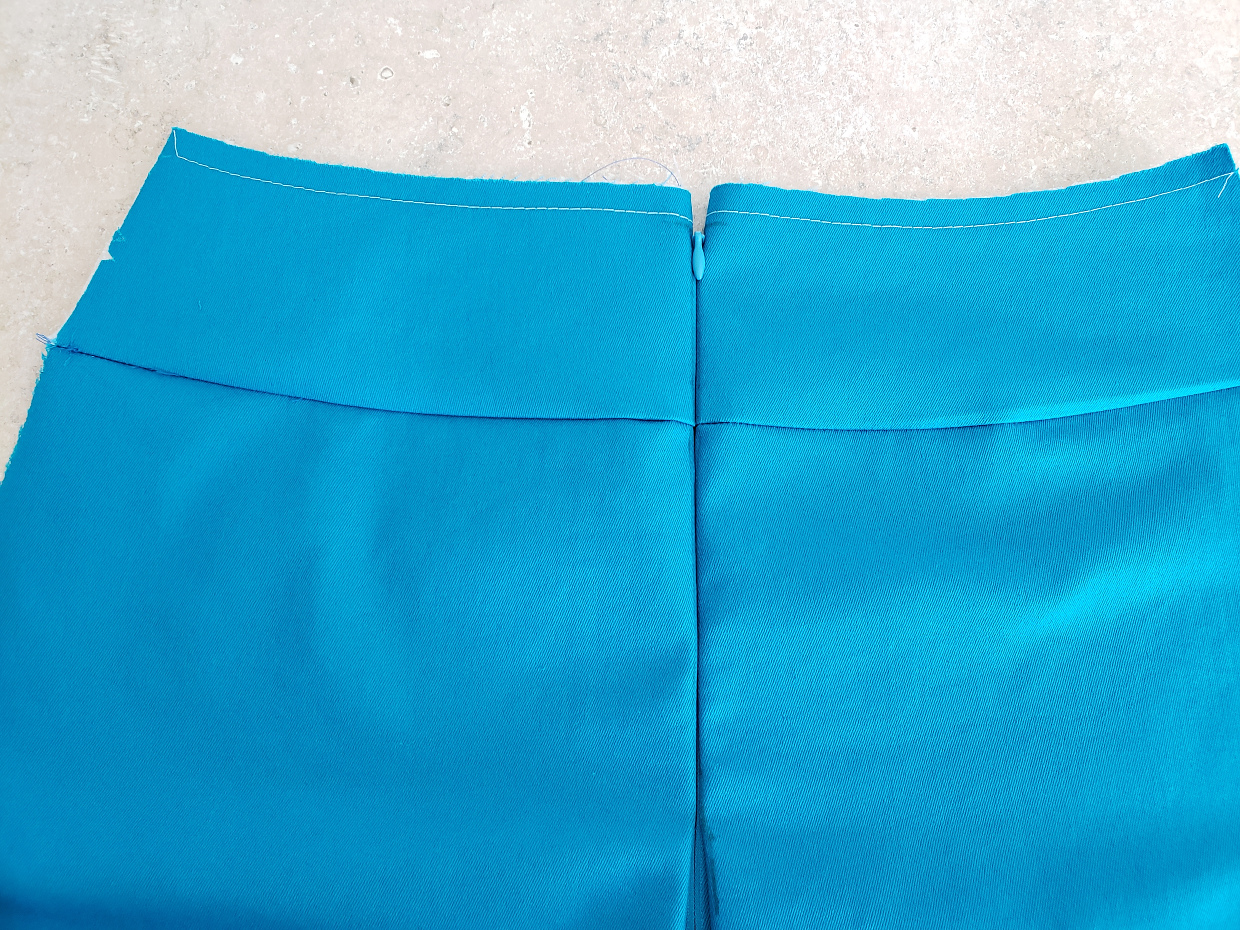
7) Pin the back yoke to the skirt back, with right sides together and notches aligned, and stitch the top edge with a 1/2” seam, backstitching or lockstitching at both ends. Press the yoke and seam allowances up, away from the skirt. Repeat for the other skirt back and back yoke. You don’t need to finish the seam allowances because they will be covered by the facing.

Attach the Zipper (Both Views)
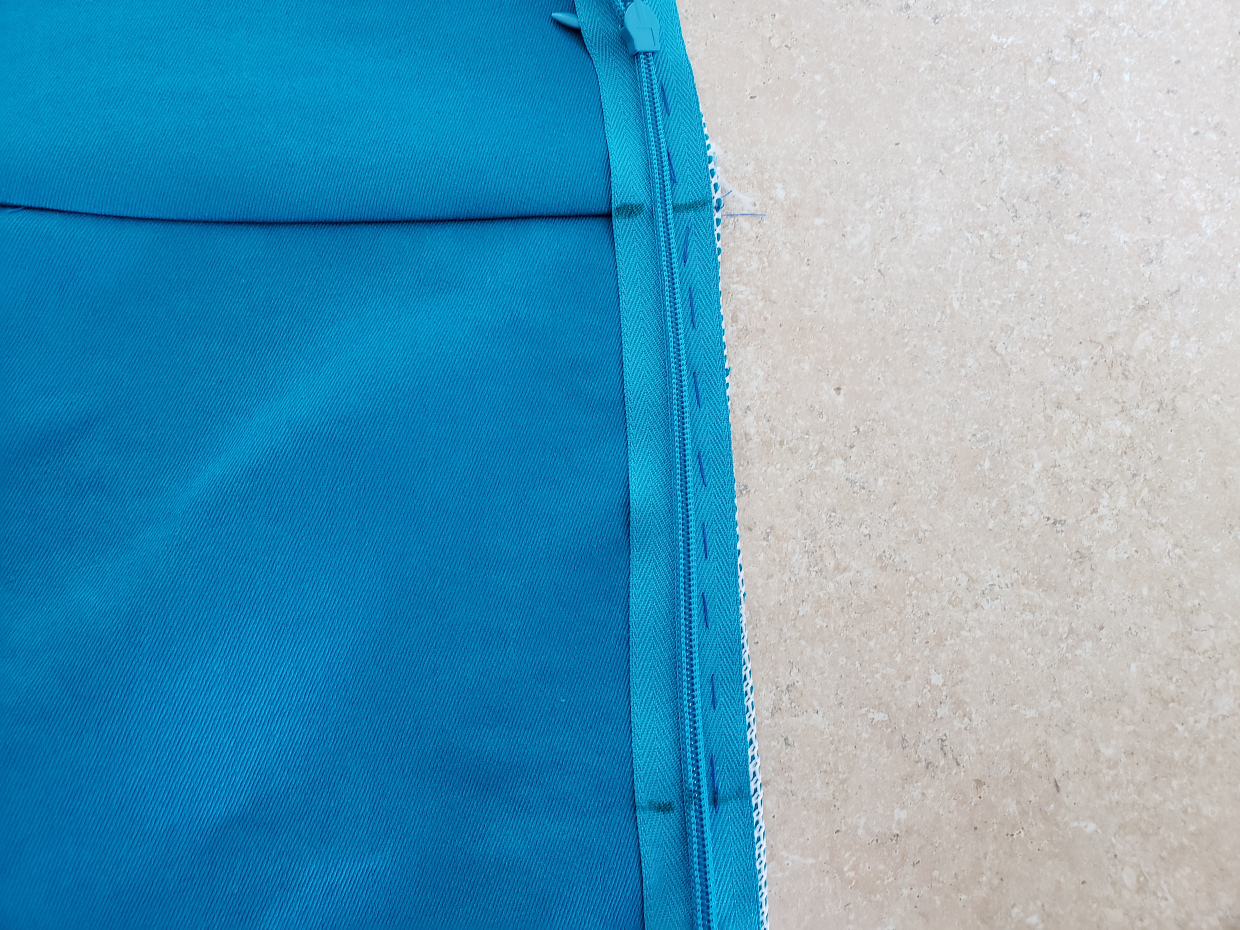
1) Close the invisible zipper and use a pencil or fabric-marking pen to mark the wrong side of the zipper tape at the top of the zipper slider (the metal part that moves up and down).

2) Unlike a regular zipper, the zipper tape on an invisible zipper “folds over” next to the coils, or teeth, so that the coils wrap to the back of the zipper. To insert the zipper, you’ll first need to iron the zipper tape flat so that your sewing machine can stitch very close to the edge of the coils. To do this, begin by setting your iron to a low setting (to keep from melting the plastic coils). Then unzip the zipper and, working from the zipper’s wrong side press the zipper tape flat, uncurling it as you press. Leave the zipper unzipped until you’ve finished inserting it so that the child stay pressed flat while you work.
3) Using a water-soluble fabric-marking pen or tailor’s chalk, draw the 1/2” center-back and waist seamlines on the right side of the fabric. This will help with aligning the zipper in the next steps.
4) Starting with the wearer’s left side of the skirt-back piece, place the zipper tape face down on the right side of the fabric. Pin the left side of the zipper tape to the fabric so the edge of the coils aligns with the 1/2” seam line, the zipper tape sits in the seam allowance, and the mark at the top of the zipper sits just below the folded top edge of the waistband (1/8” is a good distance). Hand-baste or glue (using a water-soluble glue stick) the zipper to the fabric along the center of the zipper tape to the dot you transferred from the pattern piece. If the zipper is longer than the dot, just leave the zipper’s extra length hanging for now.
If you have an invisible-zipper foot, attach the foot and line up the needle with the center mark. If you’re using a regular zipper foot, attach the zipper foot to your machine and adjust the needle to be on the left side of the foot. Stitch the zipper to the fabric close to the coils (without stitching into the coils themselves), sewing from the mark at the top of the zipper to the dot and backstitching or lockstitching at both ends of the seam. Note that the zipper will be longer than the dot, and you won’t be sewing all the way to the end of the zipper.

5) Close the zipper (for just a moment, so you don’t need to press it flat again) and mark on both sides of the zipper tape where the yoke seam hits the zipper and where the zipper hits the dot you transferred from the pattern. This will help you to line up the zipper on the back of the skirt so the waistband seam and the side seam line up when the zipper is closed. Reopen the zipper and pin the zipper to the right side of the skirt back, matching the markings on the zipper tape to the top of the yoke and the dot you transferred from the pattern.
6) Move the zipper foot (or the needle, depending on the type of zipper foot you’re using) to the opposite side so the needle sits to the right of the zipper foot. (If you’re using an invisible-zipper foot, you may not need to make any changes.) Pin the opposite side of the zipper facedown to the skirt-back panel so, again, the edge of the coils aligns with the 1/2” seam line, the zipper tape sits in the seam allowance, and the mark at the top of the zipper sits just below the folded top edge of the yoke, the same distance as you placed it in Step 4 above. The zipper tape will seem to be twisted at the bottom if you have everything pinned and stitched properly. As before, baste or glue and then machine-stitch the zipper to the fabric close to the coils, sewing from just below the mark at the top of the zipper (don’t stitch the upper zipper tape so you can move it out of the way later) and continuing down to the dot you transferred from the pattern piece, backstitching or lockstitching at both ends of the seam.
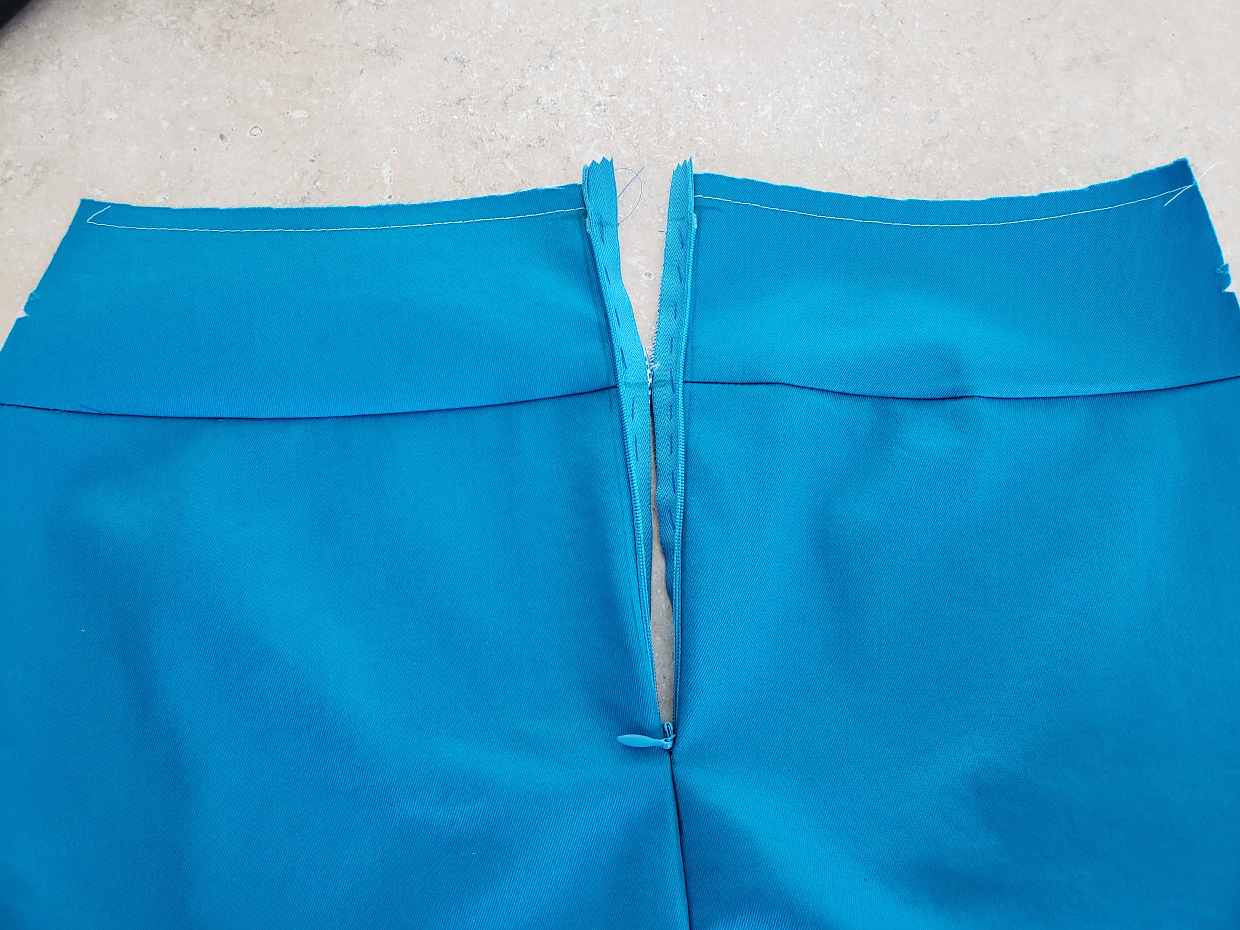
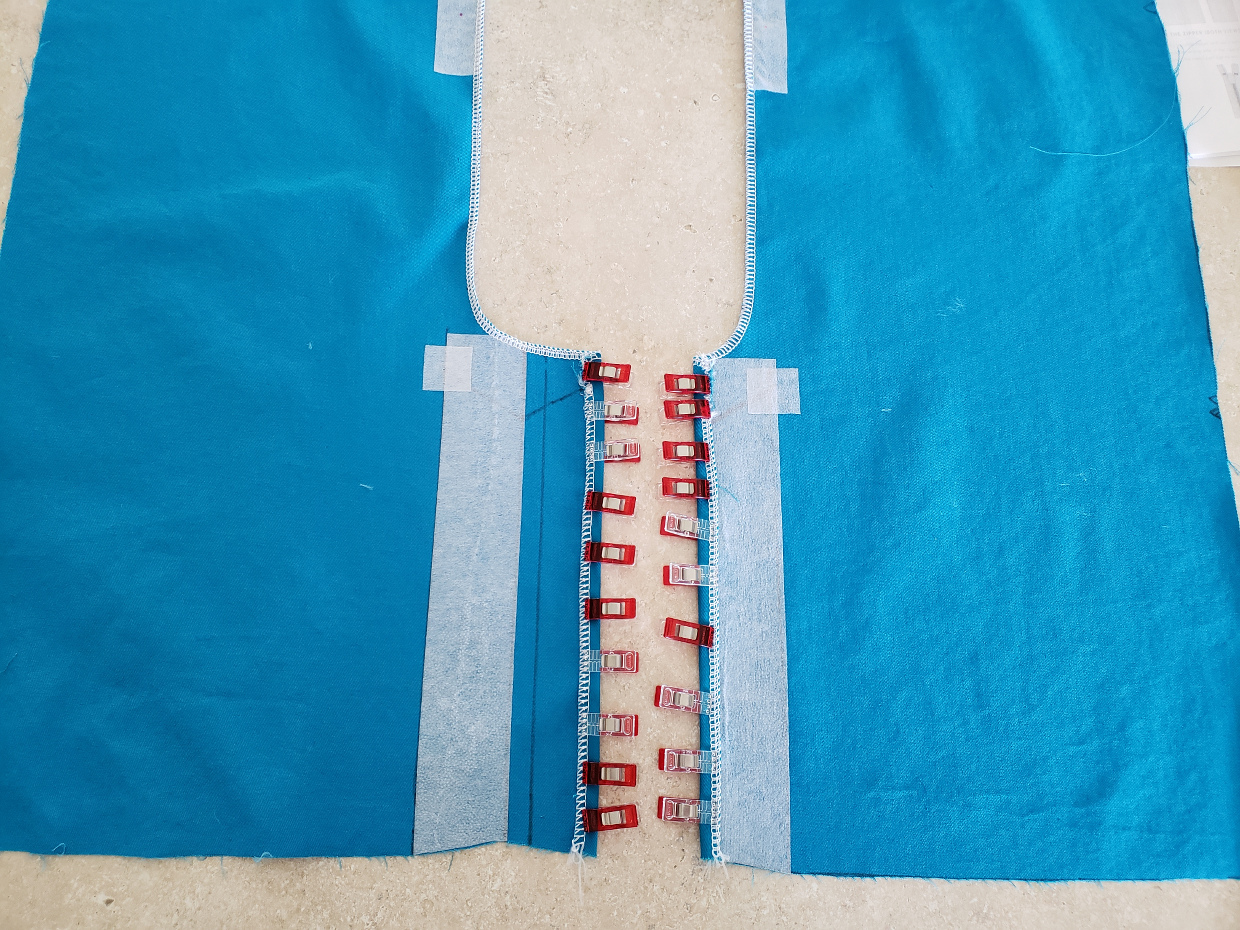
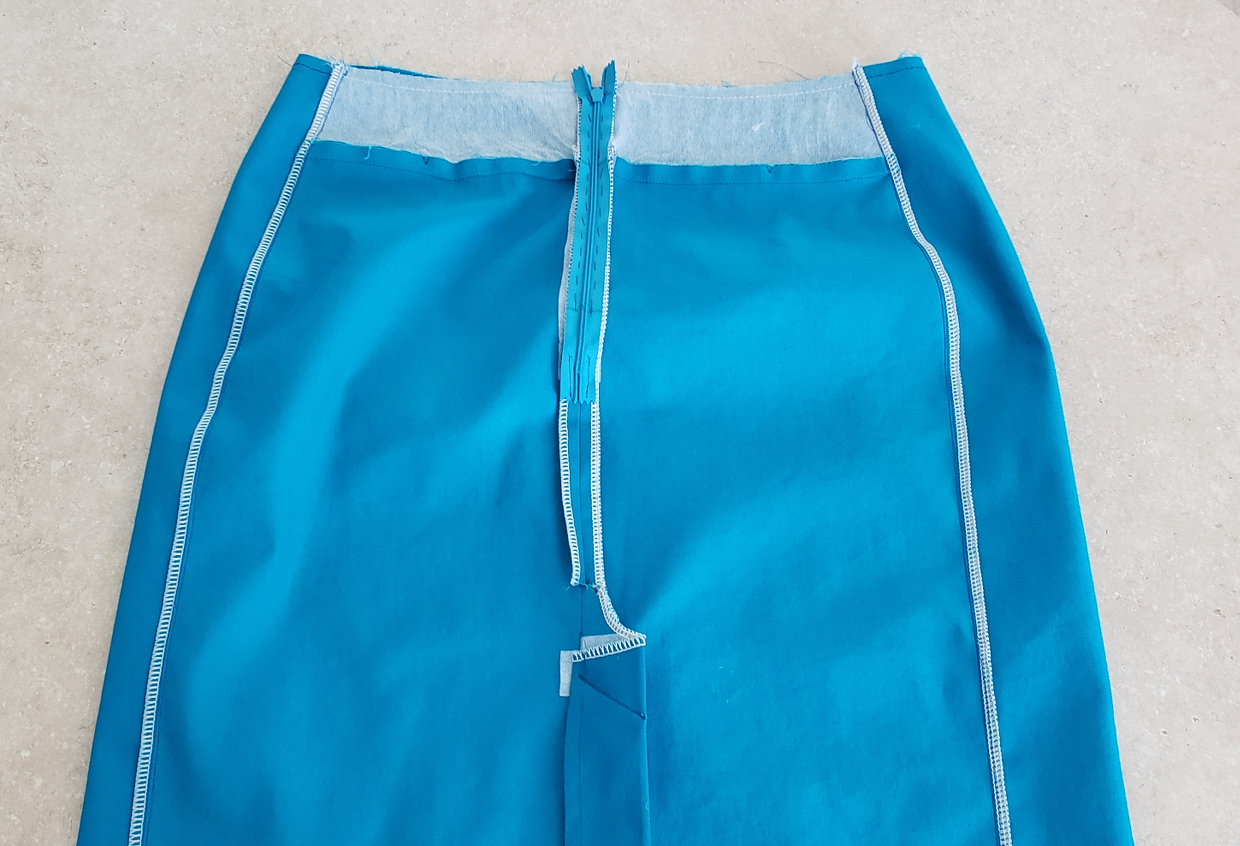
7) Close the zipper and check to be sure that it is invisible from the right side of the fabric. (If the zipper shows, you may need to stitch again closer to the coils.) Pin the skirt-back pieces together below the zipper opening, with right sides together. Fold the end of the zipper out of the way and lower the machine needle by hand about 1/8” above and just slightly to the left of the last stitches on the zipper. Note that the two seam lines will not meet but will instead be slightly offset. Stitch the seam for about 2” using the zipper foot, backstitching or lockstitching at the start of the seam. (The zipper foot will allow you to get closer to the seam line without the bulk of the zipper interfering.) Leave the rest of the center-back seam open for the moment so you can finish the walking vent.
8) Check to be sure that the center-back seam is smooth, especially at the base of the zipper. If the seam puckers or gaps, adjust it as necessary. It may take a little fiddling to get everything aligned properly.
From Liesl: Be especially sure that you leave enough room for the zipper to move over the yoke seam here. You might need to stitch a bit further from the zipper near the seam, especially if your fabric is on the heavy side.
That’s everything for Day 1. Well done everyone!
Welcome back friends! How are your skirts coming along? Today we’ll finish them up, but of course if you want to take longer you can move at your own pace. Everything will be here waiting for you when you’re ready for it. So here we go!
Finish the Walking Vent
1) Switch back to the regular sewing machine foot and pin the remaining center-back seam together, taking care to match the walking vent dots. Continue stitching the center-back seam from where you left off, stitching precisely to the walking vent dot and backstitching at both ends.
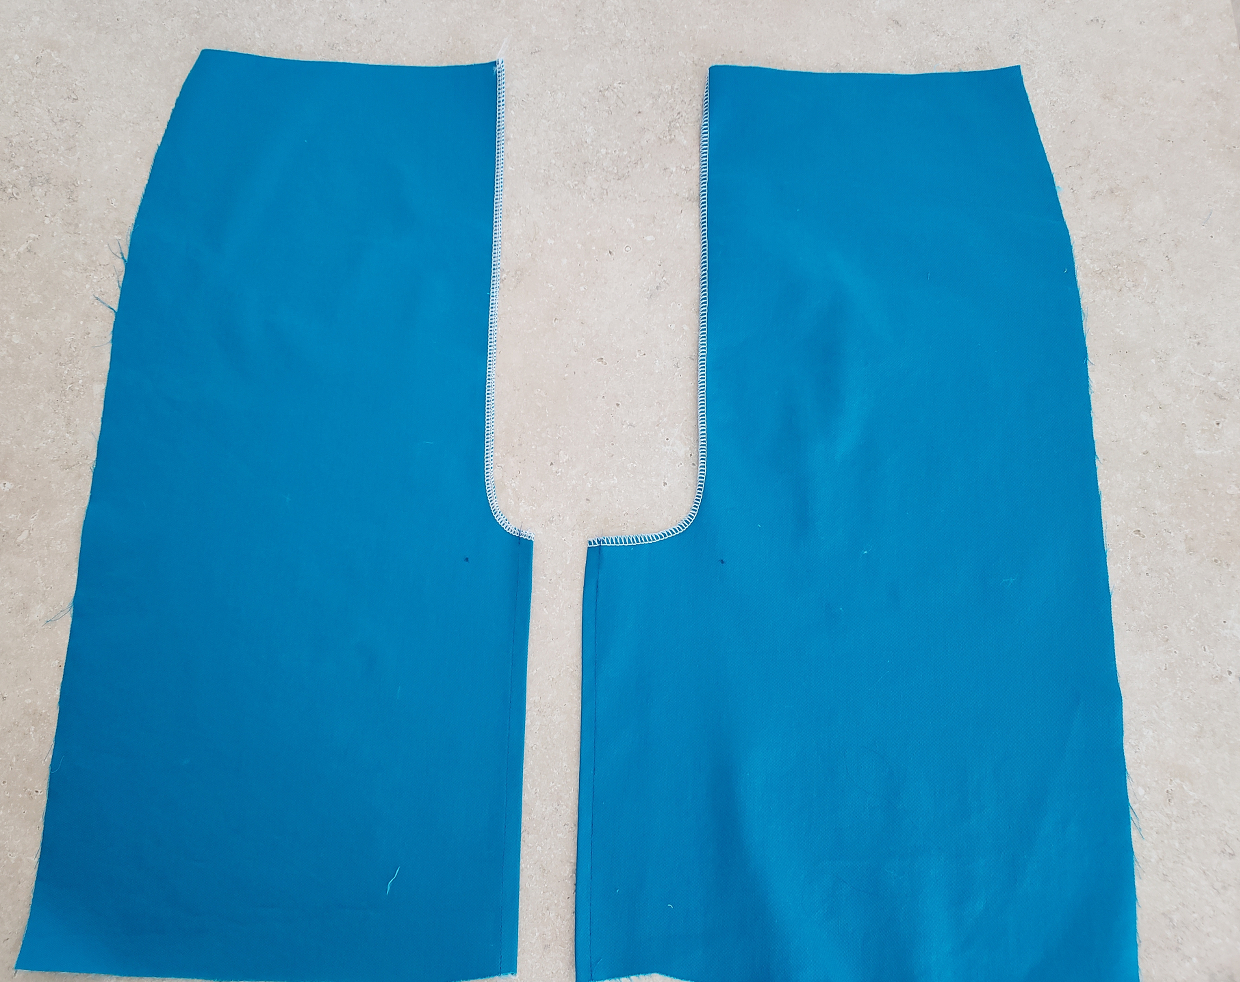
2) Refold the walking vent along the folds you pressed earlier, matching the finished outside edge of each skirt back to the seam line. To finish the vent, stitch from the vent dot to the folded back edge of the vent, sewing through all the layers and stitching at a slight angle, backstitching or lockstitching at both ends. Clip into the center-back skirt seam allowances about 2” above the vent dot. This will allow you to press open the seam allowances from the zipper to the vent. Below the clipping, press the seam allowances and vent to the wearer’s left side.

HINT: The vent stitching won’t show from the outside of the skirt, and the vent itself will hang freely inside the skirt to give the skirt a clean finish from the outside. If you prefer to stitch the vent through all the layers including the skirt back, you can press it to the side and stitch through all the layers instead.
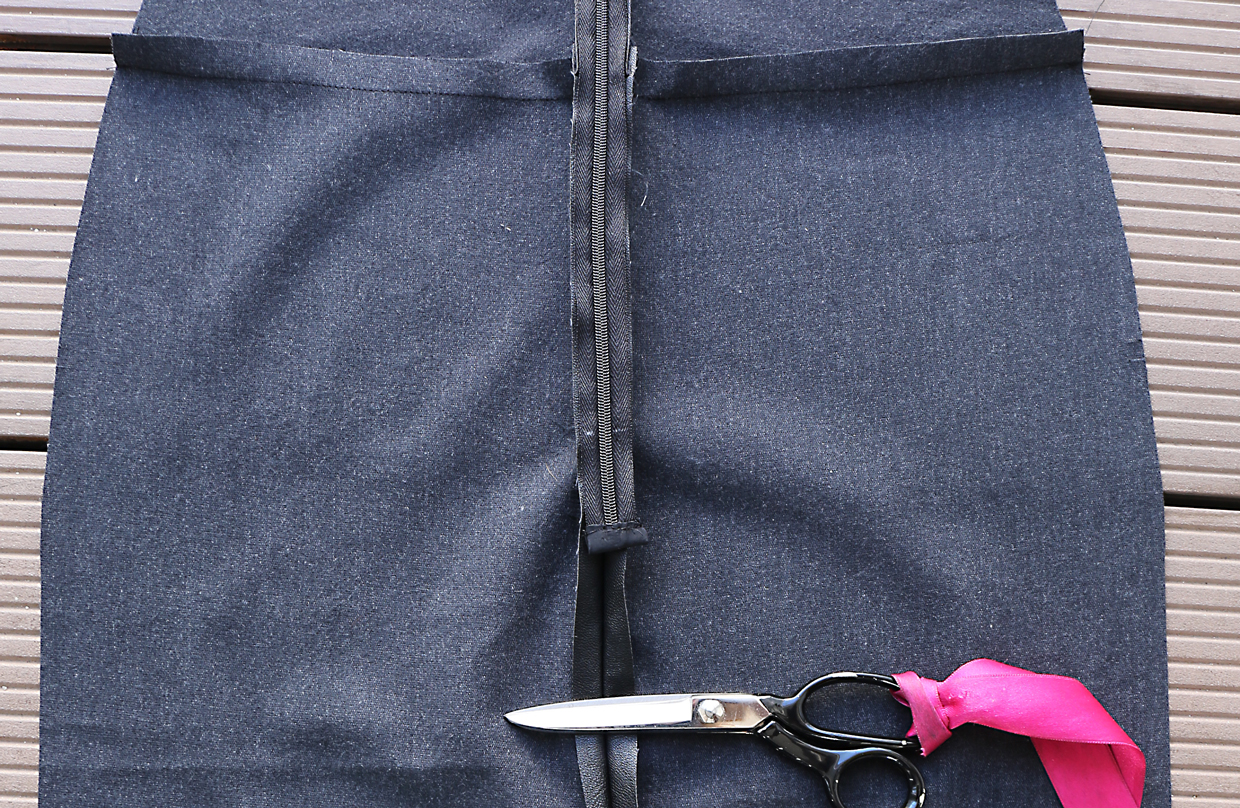
3) At the bottom end of the zipper, stitch about 1” of the zipper tape to the seam allowance to secure it. This will make it easier to close the zipper and will keep the bottom of the zipper from shifting. (Use the zipper foot for this step; it’s easier.)

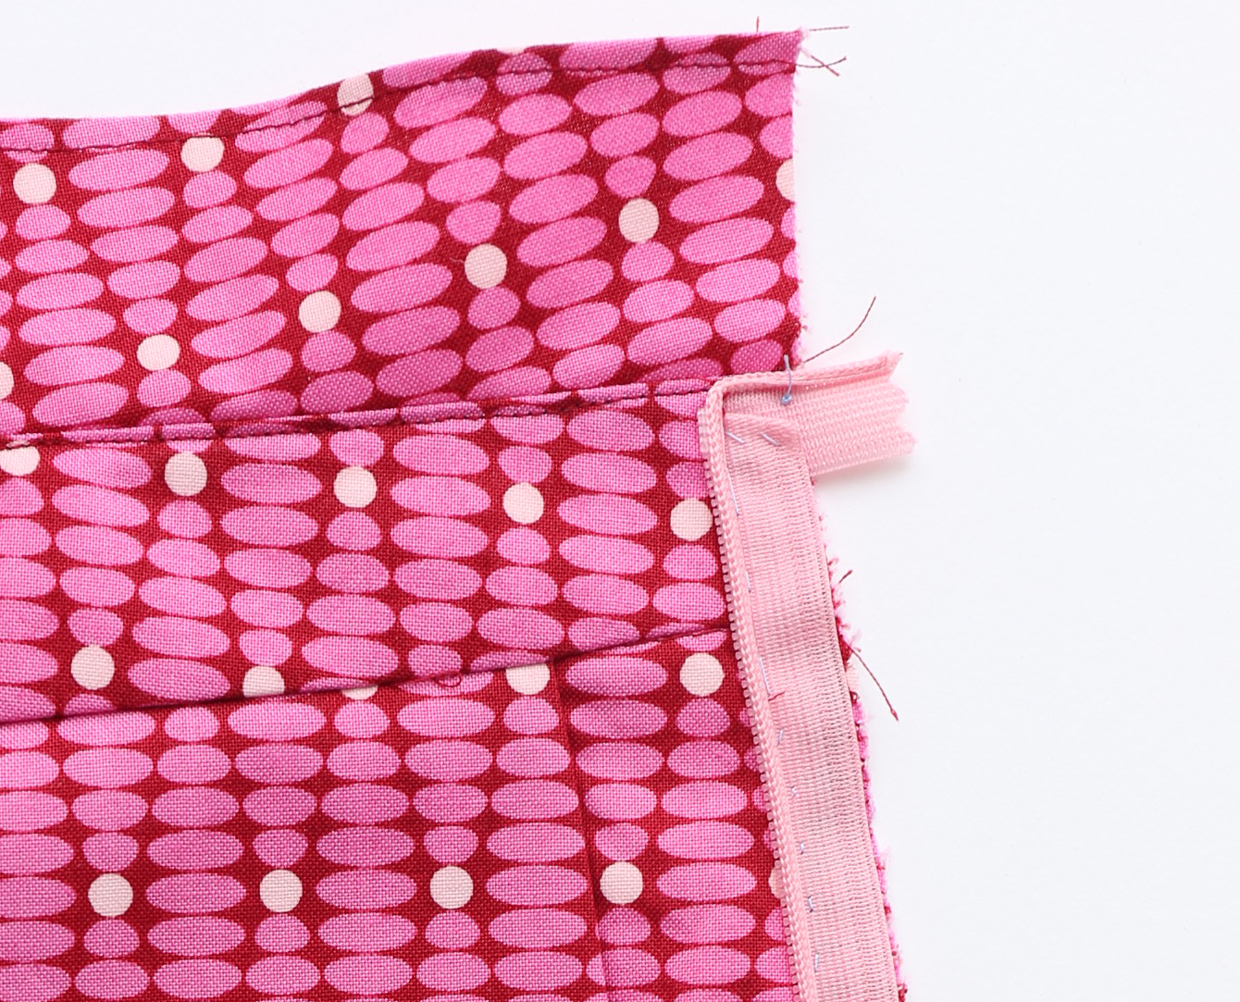
From Liesl: If you used a longer zipper you can also cut it shorter now, using a paper scissors. When I shorten a zipper I like to finish the cut end with a little scrap of fabric to make it look nice and to keep it from being scratchy. Here’s an example from an earlier pencil skirt I sewed for myself.
Assemble and Fit the Skirt
For the first two steps of this section we recommend using a basting stitch to assemble the skirt initially. This will allow you to check and adjust the fit, since each fabric will behave differently and you may want to “take in” or “let out” a bit here and there. The four seams will allow you to customize the fit to your preferences and to account for the properties of each fabric.
1) With right sides together and aligning the raw edges and notches, pin one side panel to the skirt-front panel and join them with a 1/2” row of basting. Repeat with the opposite side panel. Please note that the photo shows it sewn to the back of the skirt instead of the front of the skirt.

2) With right sides together, and aligning the raw edges and notches, pin the two outer edges of the skirt’s side panels to the assemble skirt back, and join them with a 1/2” row of basting. The four skirt panels are now joined together to form the skirt.

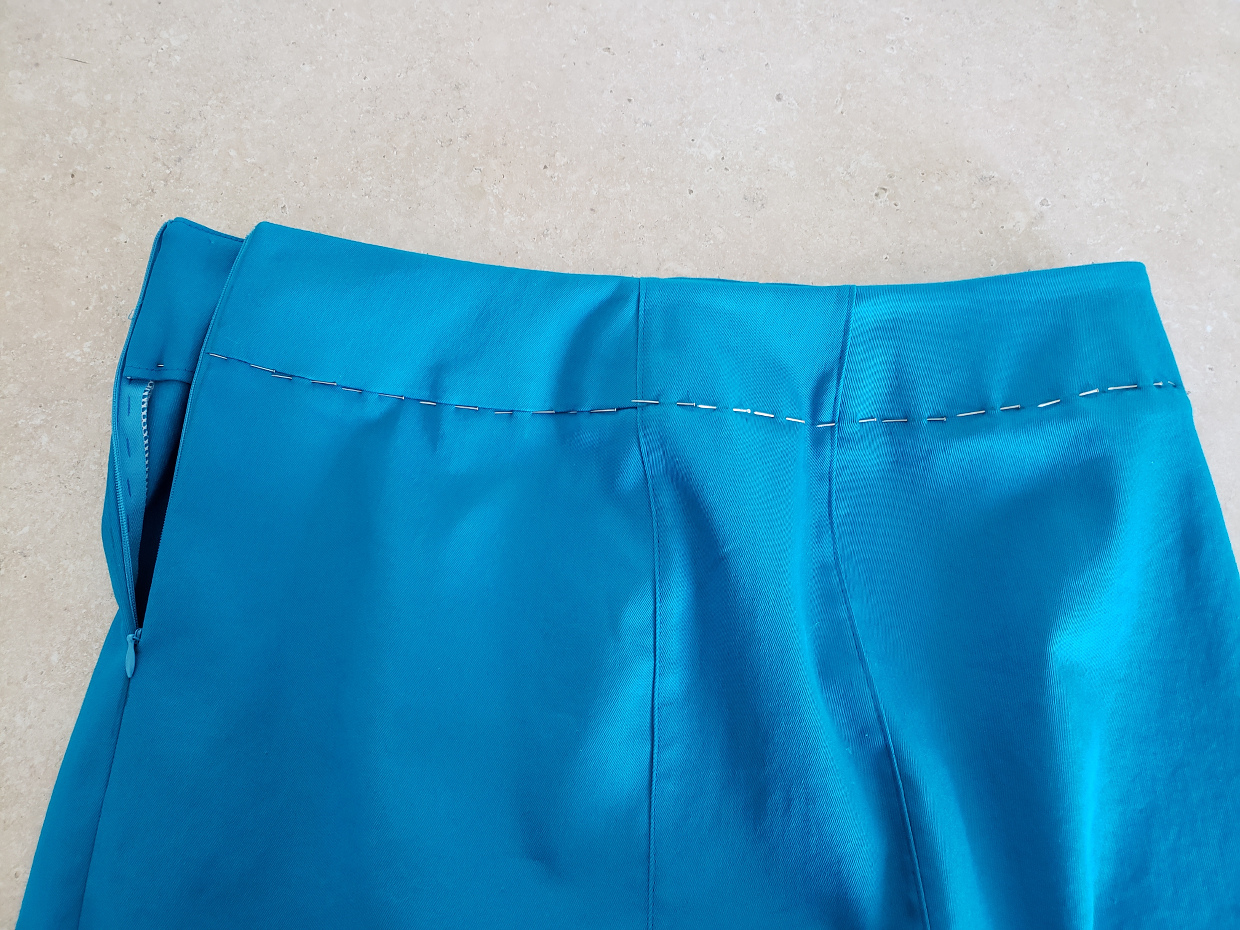
3) Try on the skirt and check the fit, adjusting as needed. Once you’re happy with the fit, stitch the seams with a normal straight stitch, then finish the seam allowances either together, pressing them toward the side panel (you might also want to consider edge stitching the seam), or separately, pressing them open.
From Liesl: Let’s talk about fitting the skirt for a minute, shall we? I am of the opinion that a pencil skirt should be quite fitted through the waist and hips, and I think it looks best if it’s fitted just below the bum as well. But please use your own best judgement here since you’re the one who will be wearing it. The skirt should fit however you feel most comfortable. Make use of those four seams to let out or take in wherever you need more or less space. Pin and re-pin until you’re happy, then baste at the placement of the pins and try it on again to double-check before you settle on the fit that’s best for you.
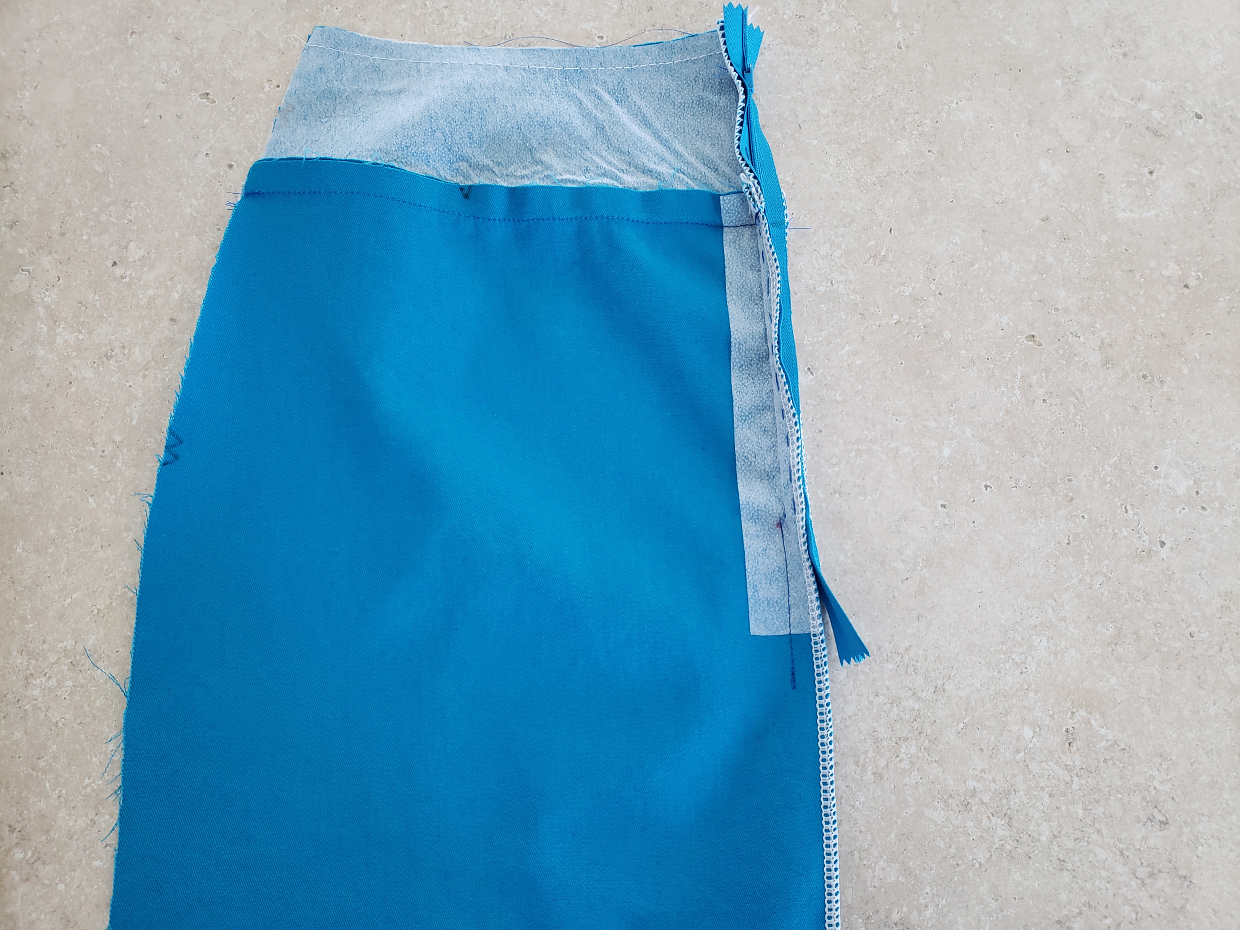
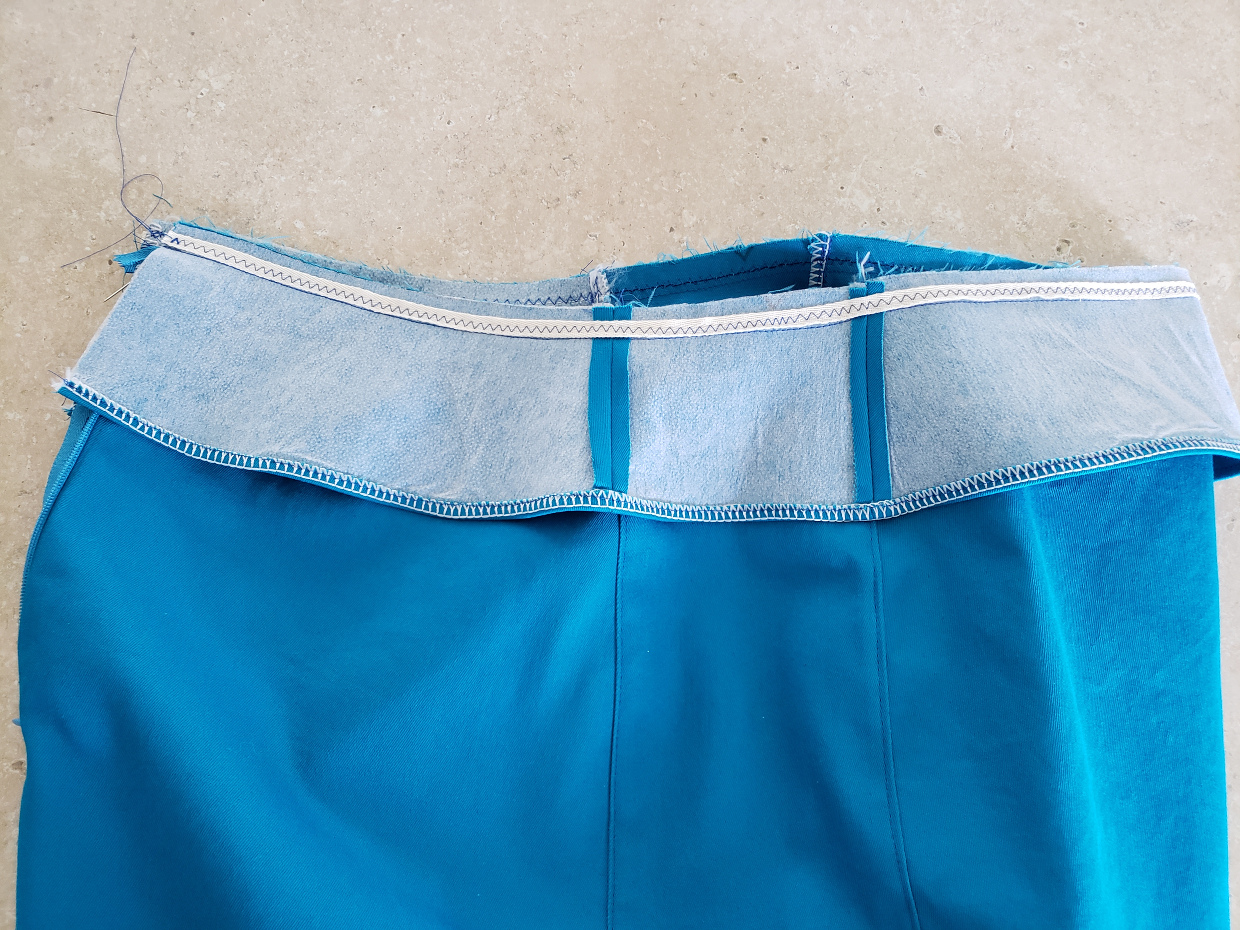
Attach the Waist Facing
Note that if you’ve made any adjustments to the top 3” of the skirt’s waist when checking the fit, you’ll need to transfer those changes to the facing pieces in order for the waistband to fit correctly.
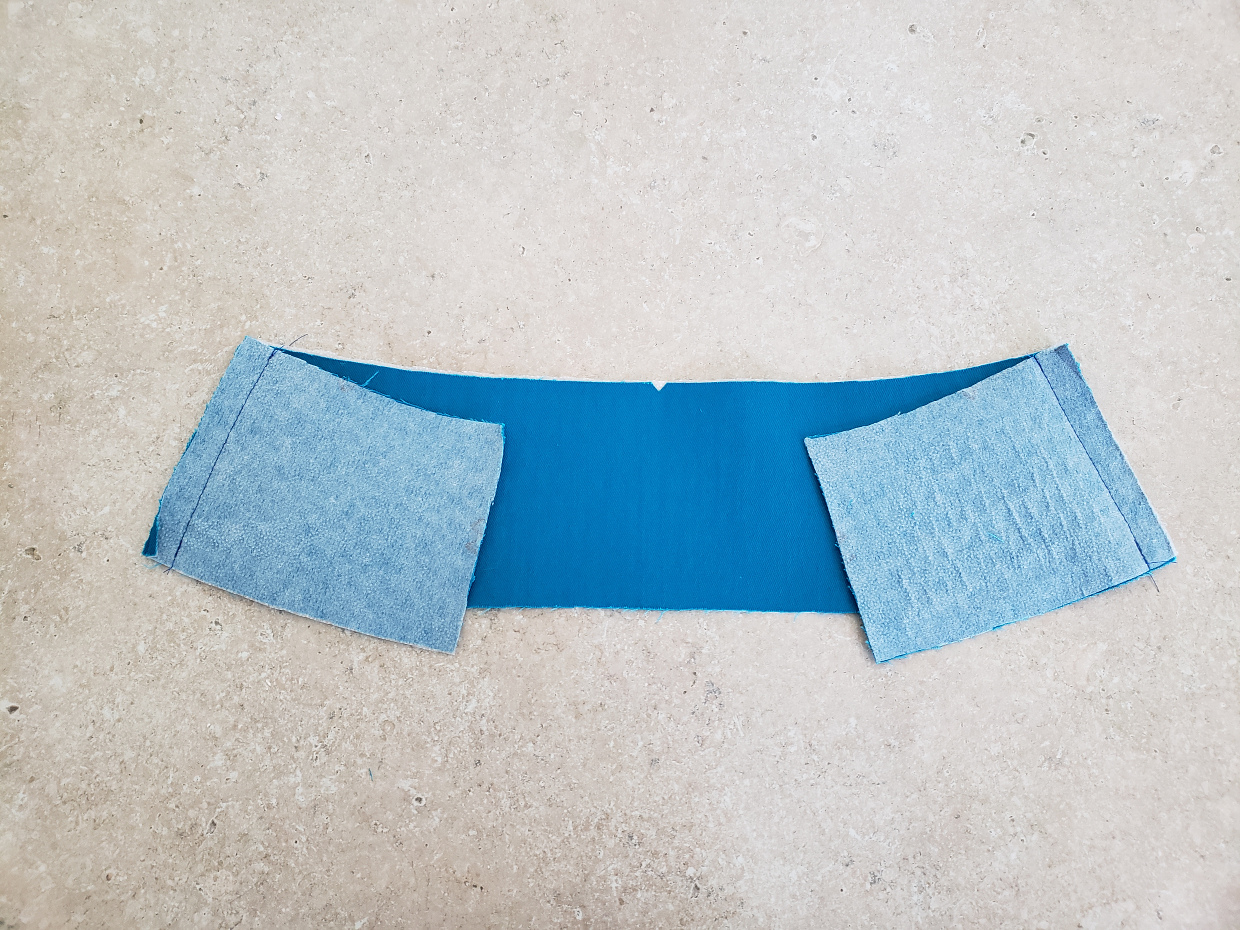
1) Following the interfacing manufacturer’s instructions, fuse the front facing, side facing, and back facing pieces cut from the interfacing to the wrong side of the corresponding pieces cut from the fabric. Pin the interfaced side facings to the interfaced front facing, with right sides together and raw short edges aligned, matching the notches. Stitch the short ends of the side facings to the front facing with a 1/2” seam. Press the seam allowances open and trim to 1/4”. Repeat to sew the back facings to the side facings, again with right sides together and matching the raw short edges and the notches.
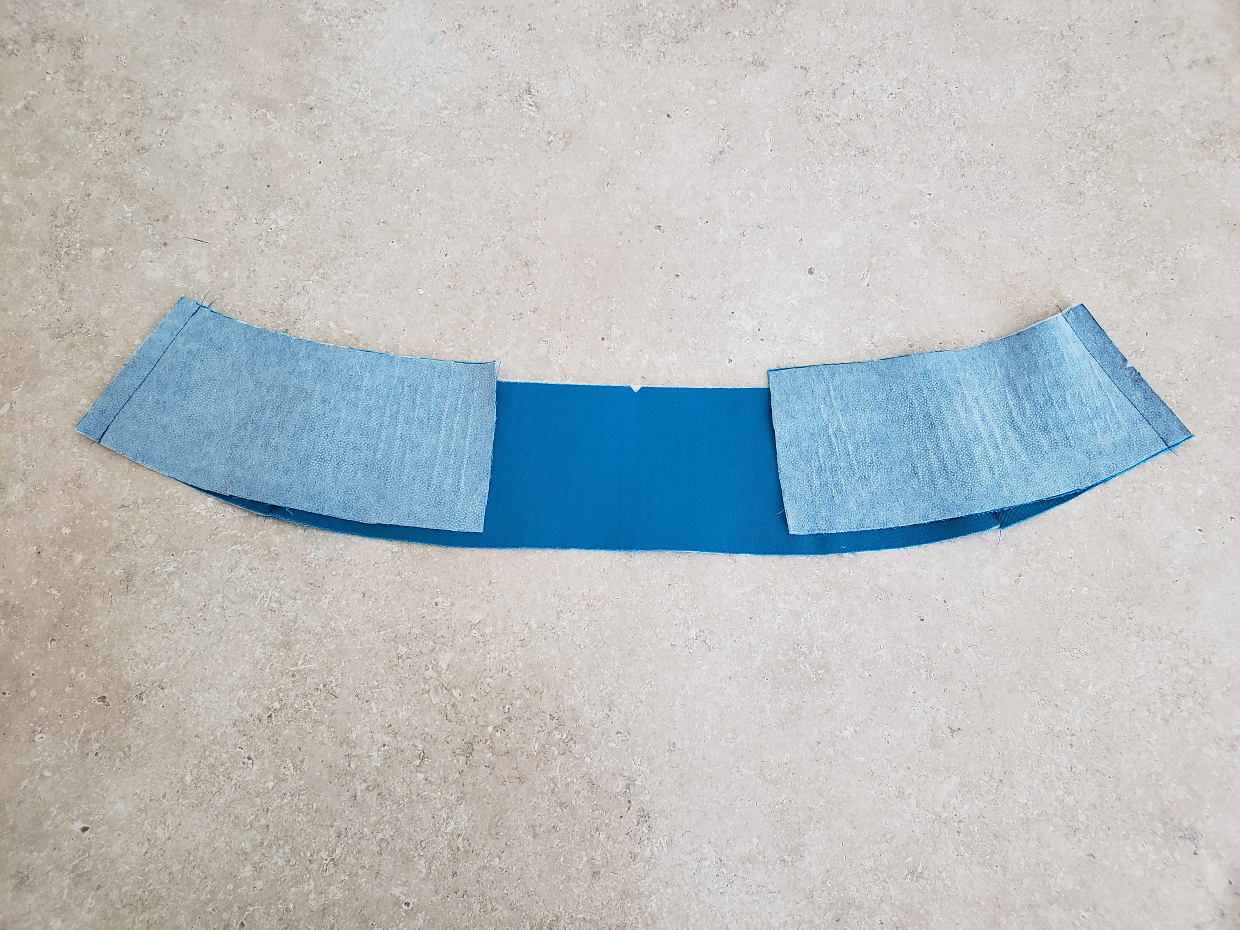
2) Finish the bottom edge of the waistband facing using your preferred method. We recommend that you zigzag-stitch or serge the edge (don’t trim if you’re using a serger), then fold and press the finished edge to the wrong side by 1/4” and edgestitch to finish.
HINT: If you prefer, you can also use a light-weight bias binding or seam binding to finish this edge. A contrasting color binding might be a fun design detail here.
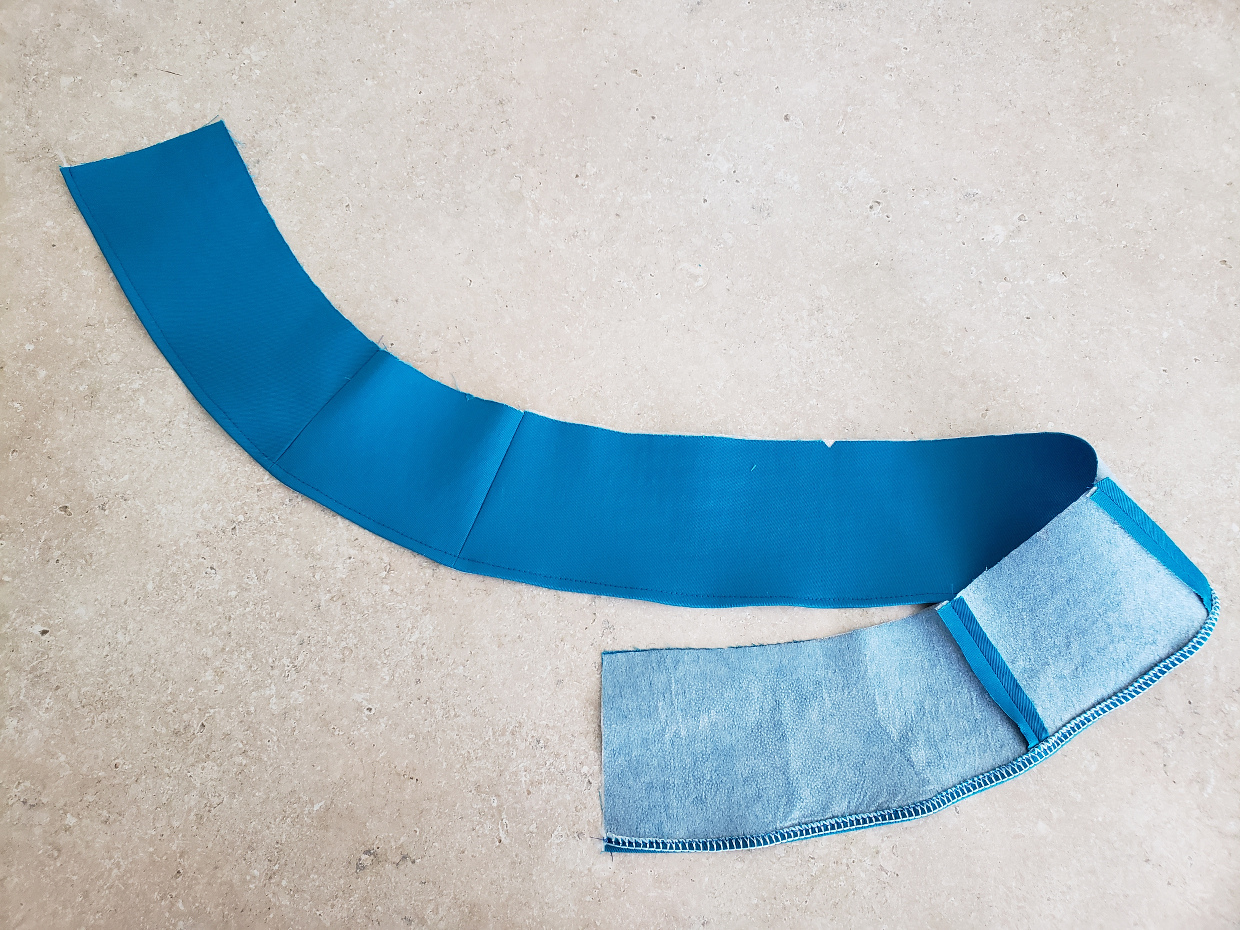
3) Pin the waistband facing to the skirt’s waist, with right sides together, matching the seams and notches. Pin the top of the zipper tape out of the way so it doesn’t get caught in the seam for now, then stitch the waist facing to the skirt’s waist with a 1/2” seam, backstitching or lockstitching at both ends.
4) Stabilize the top edge of the waistband (to prevent it from stretching during wear) by sewing a length of 1/4” twill tape to the seam allowances on the facing side of the waistband. Align the edge of the twill tape with the waistband stitching, and sew the tape to the seam allowances with a straight stitch or a zigzag stitch. Trim the remaining seam allowances to approximately 1/4” to prevent the fabric from pulling on the finished waistband.
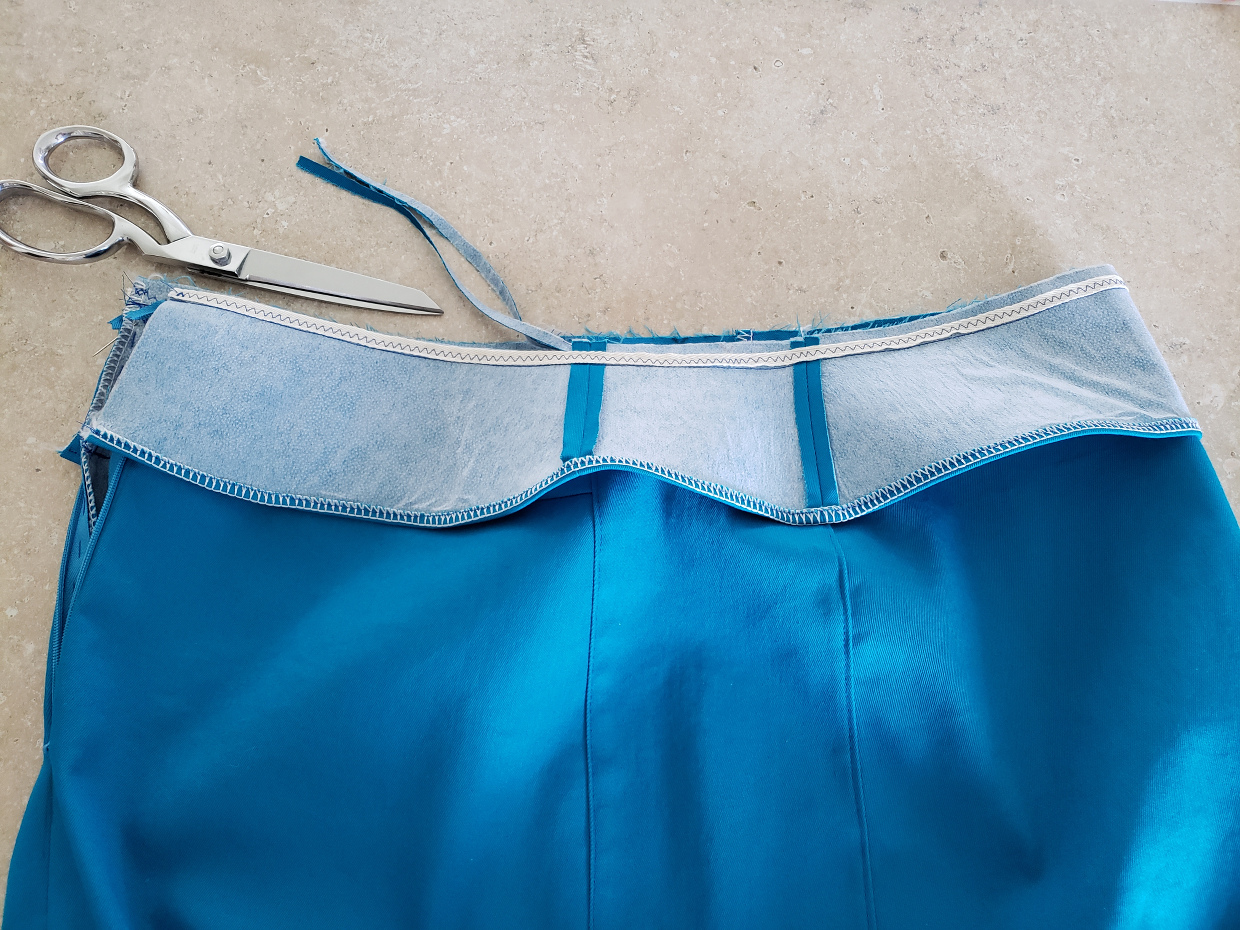
5) Press the seam allowances toward the facing side and under-stitch the waistband seam.

6) Bend and fold the top of the remaining zipper tape toward the seam allowances of the garment. Stitch the loose top ends of the tape to the seam allowances to keep the tape out of the way.
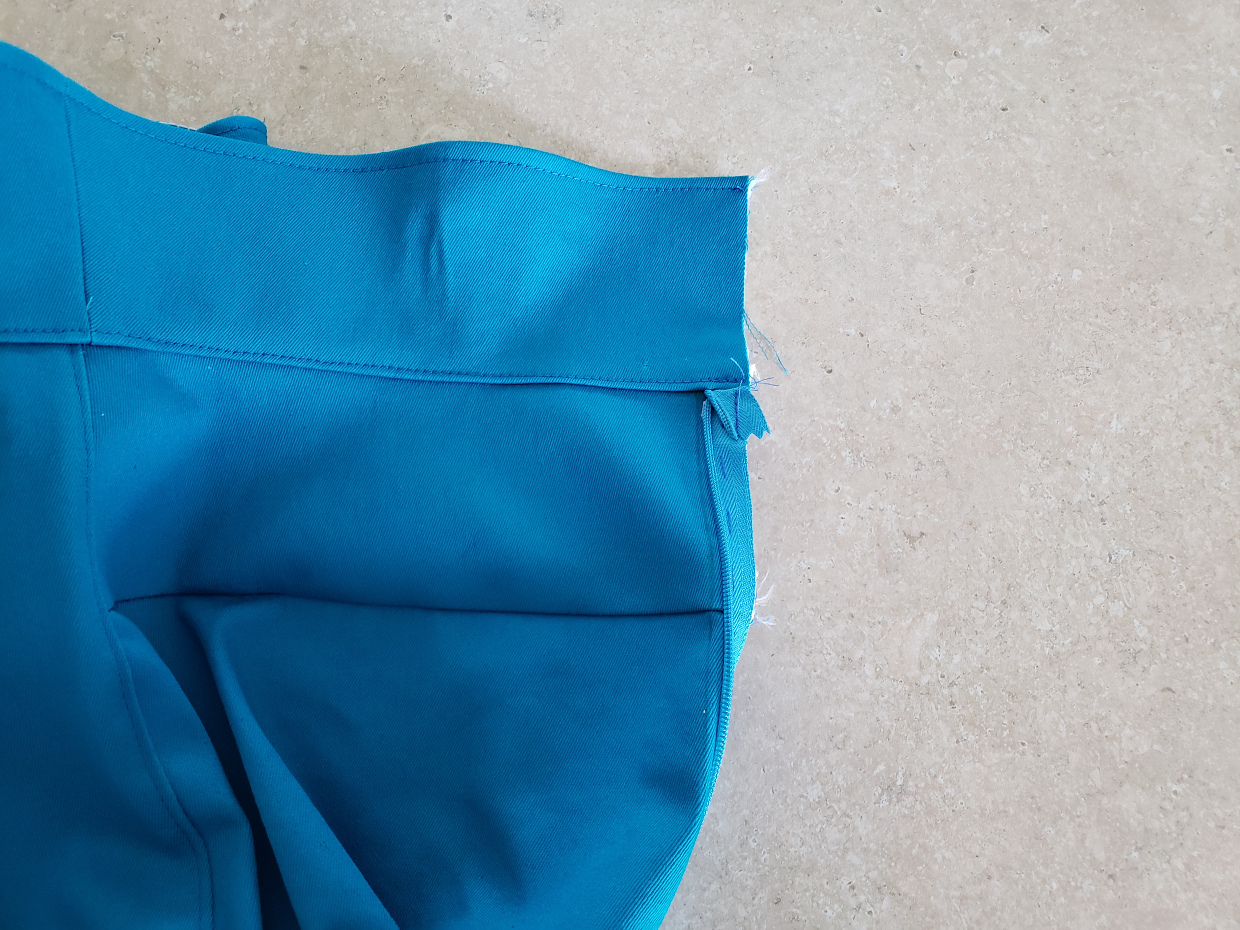
From Liesl: Here’s a close-up photo of a bent zipper tape, if that part of this step confuses you. This simply helps to get the bulk of the zipper out of the way.
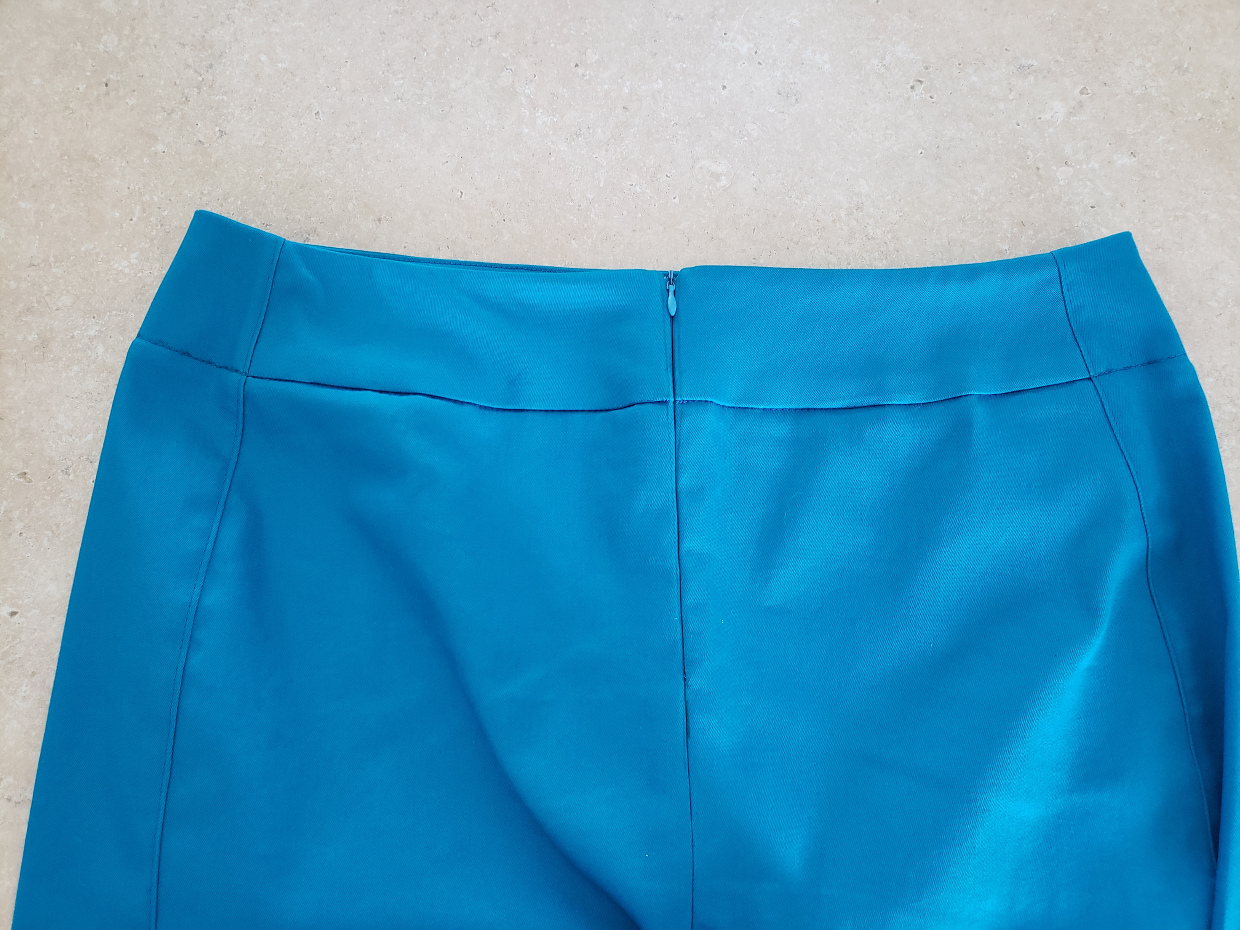
7) Fold the facing to the inside and press along the waist seam, rolling the seam slightly toward the facing side so it won’t show on the finished waistband.

8) Unfold the waistband facing and wrap it around the top of the waistband at the fold line so you can pin it to the waistband, covering the zipper, with the right side of the facing to the zipper just inside the first zipper stitch line, backstitching or lockstitching at both ends. Repeat with the other end of the waistband.
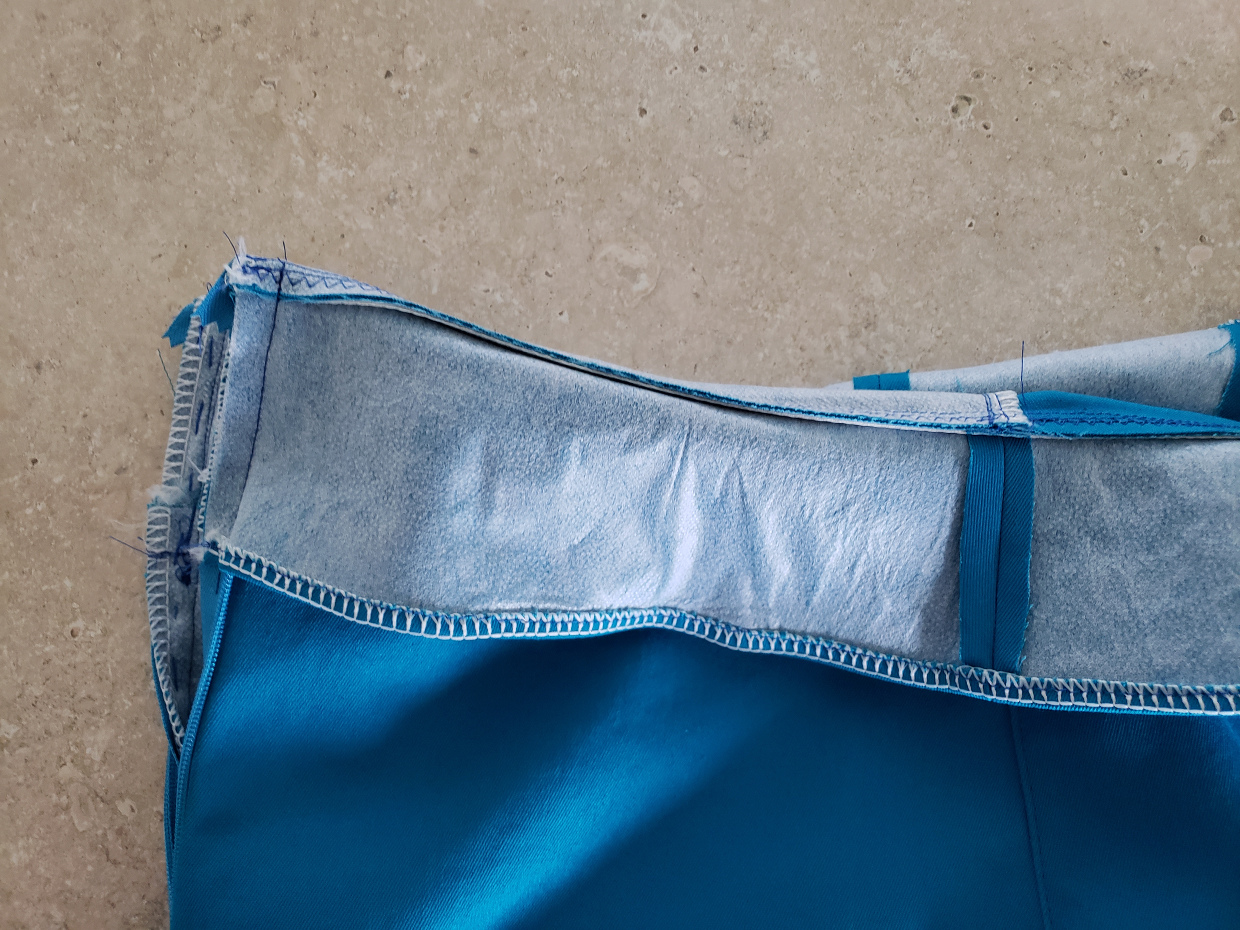
9) Turn the waistband right-side out again so the facing is inside the waistband, and check to be sure that the zipper closes. (If the zipper has trouble, you may need to sew the facing a little farther away to give the zipper room to maneuver.) Smooth the waistband facing along the inside of the waistband. Edgestitching the back yoke to finish it, catching the facing in the edge stitching, and continue to topstitch all the way around the skirt at the same level as the edgestitching. (It’s a good idea to draw a line to use as a guide using a water-soluble fabric-marking pen or tailor’s chalk.)

Finish the Skirt
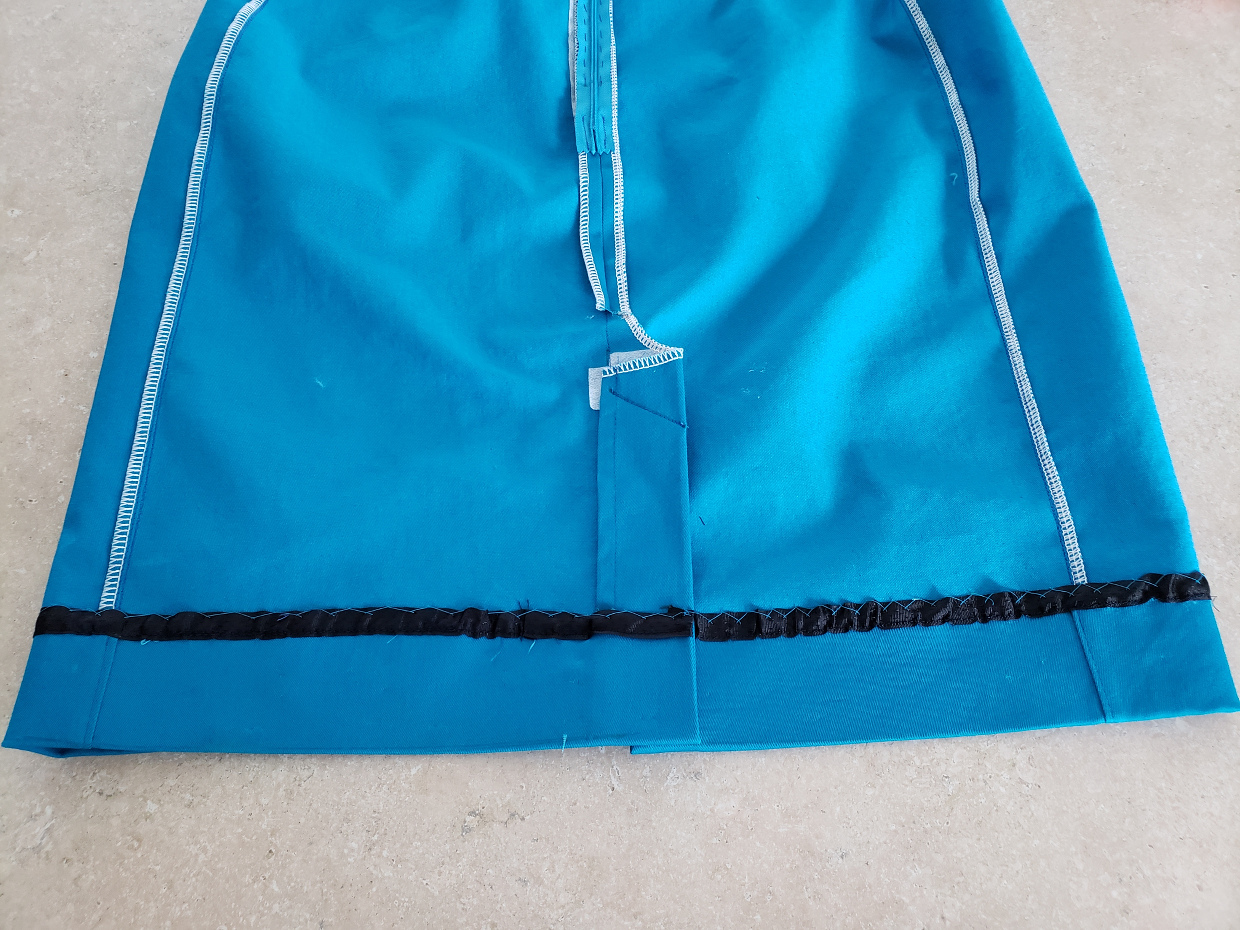
1) To hem the skirt, use a water-soluble fabric-marking pen or tailor’s chalk to mark the 2” hem. Unfold the walking vent and pin a length of hem tape or seam tape to the edge of the fabric so it overlaps by approximately 1/4”. This gives the edge of the fabric a nice finish without adding bulk by folding and pressing the raw edge underneath. Edgestitch the hem tape to the fabric edge.
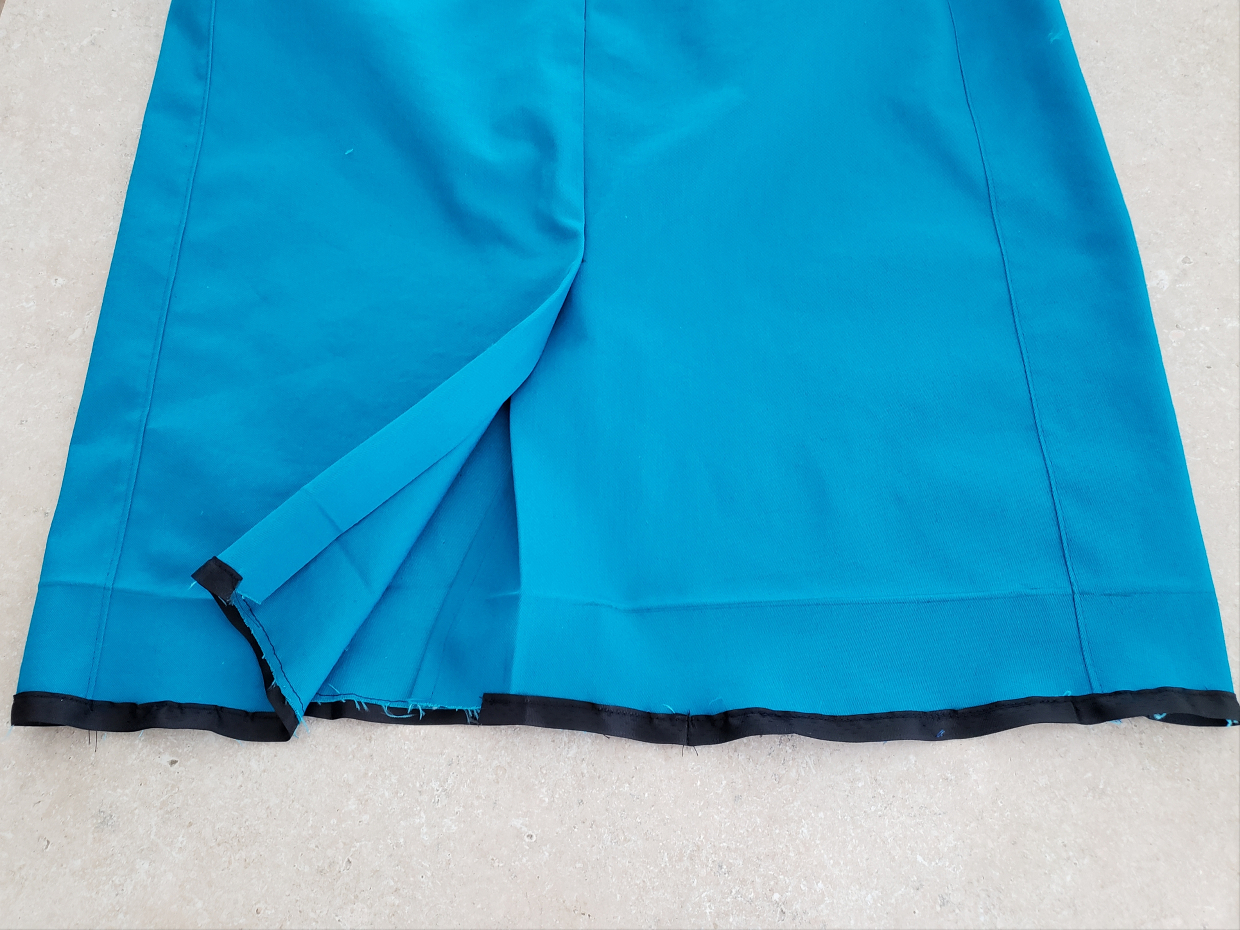
2) Fold and press the hem to the wrong side along the hem marking and pin it in place. Hand-stitch the hem with a catch-stitch. Refold the walking vent and hand-stitch it into place at the hem to hold the fold and finish the vent.


Congratulations on a sharp-looking pencil skirt! You’ve done a fabulous job with it, and we can’t wait to see how it looks!
Enter for your chance to win a great prize
Now that you’ve sewn your skirt, it’s time to enter for your chance to win a $50 gift certificate to the Oliver + S website! Post a photo of yourself wearing your new Extra-Sharp Pencil Skirt somewhere and then add a link to it using the button below. (Don’t forget to tag your Extra-Sharp Pencil Skirts with #lieslandco and #extrasharppencilskirt on Instagram so we can all see.) Any Extra-Sharp Pencil Skirts made since March 2018 can be entered, so go ahead and link in a skirt you’ve already completed. If you sew more than one, enter each one separately. All entries must be submitted by Monday July 2nd 11:59 PM ET. Our five panelists will vote for their favorite, and the winner will be announced on Thursday July 5th.
I like to use wonder tape to secure my zippers before I stitch them. It’s like narrow double sided tape that will dissolve when wet.