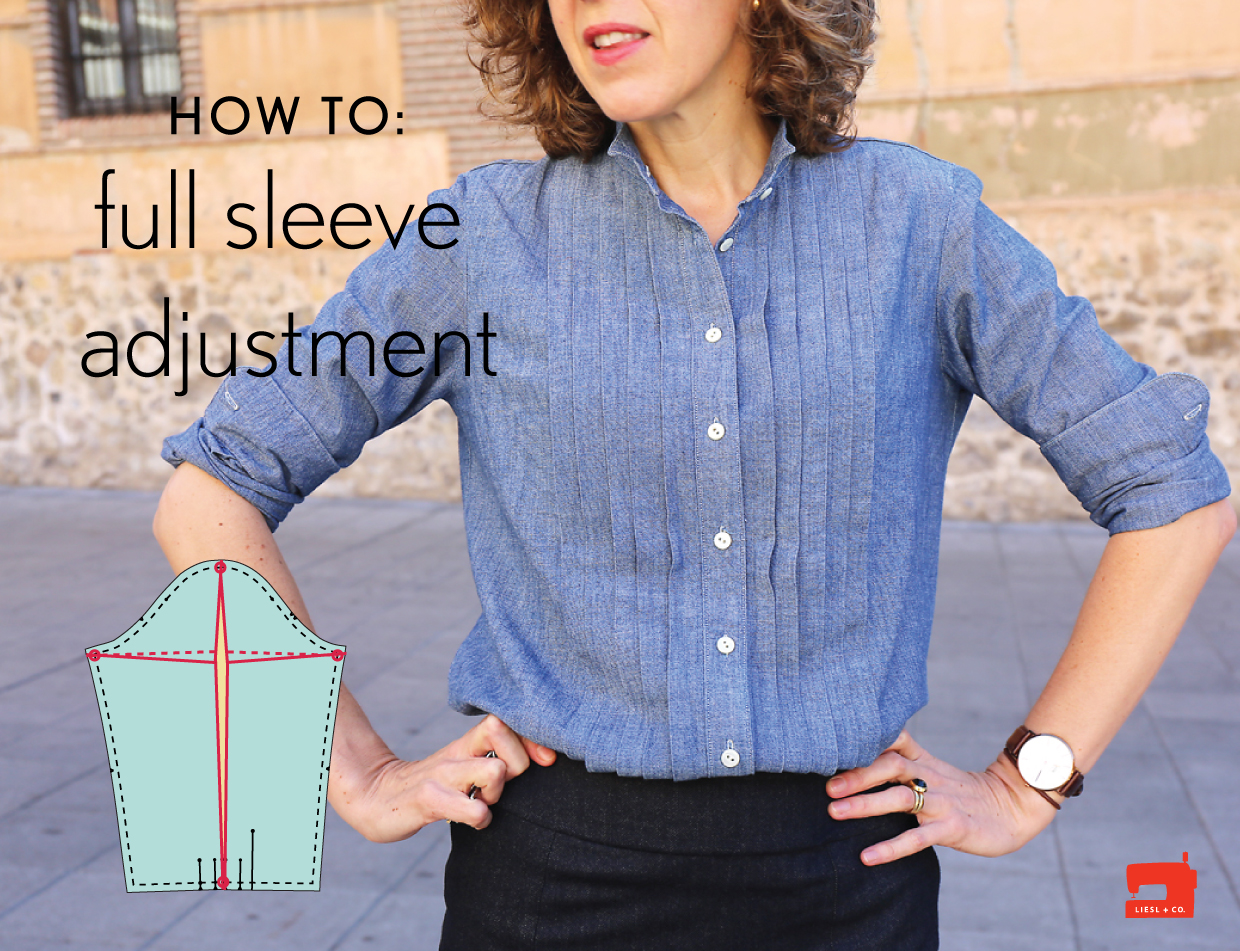
When you first try out a new pattern, there are almost always things you want to adjust to suit your own preferences or your own body. That’s why we recommend making a muslin, right? With our Liesl + Co. patterns, we try to help you with some of these alterations by offering multiple cup sizes, but there are other changes you can make to personalize a pattern as well.
Here’s a relatively common alteration. If a sleeve is a little too tight–for your arms or for your fit preferences–it’s easy to alter the pattern piece to add extra room. In this little tutorial, I’ll walk you through the alteration, which is simple and quick to do.
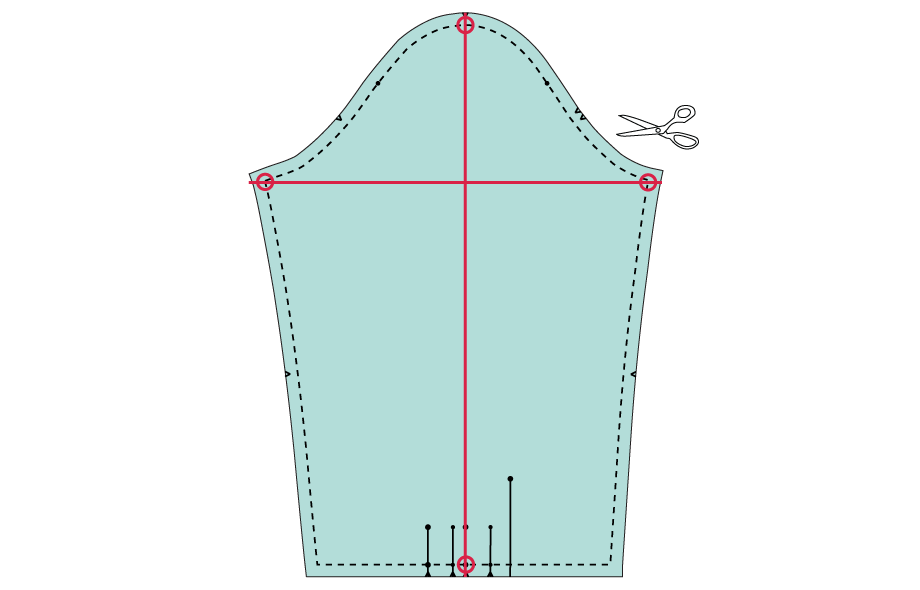
1. First, draw in the seam lines for the pattern piece you are going to modify so that you can alter the pattern piece without changing the length of the seams themselves. (You’ll see what I mean shortly.) On our Liesl + Co. patterns, the seam allowances are 1/2″, so I’ve illustrated the seamline drawn onto the pattern in red below. Once you’ve drawn the seam lines, add a horizontal line that intersects the seam lines at the underarm. Then add a perpendicular line that intersects the center of the sleeve cap. (This might not be exactly the center of the sleeve since the back of the sleeve is usually longer than the front. Make your best guess and it will be fine.)

2. Once you’ve drawn these lines, you can cut the sleeve into four sections along the two lines you drew, but leaving the pattern un-cut at the point where the lines intersect the seam lines. I’ve drawn a little circle for you to show you where you should leave the pattern un-cut. These are like little paper hinges that keep the entire pattern piece intact and allow you to alter the shape a bit.
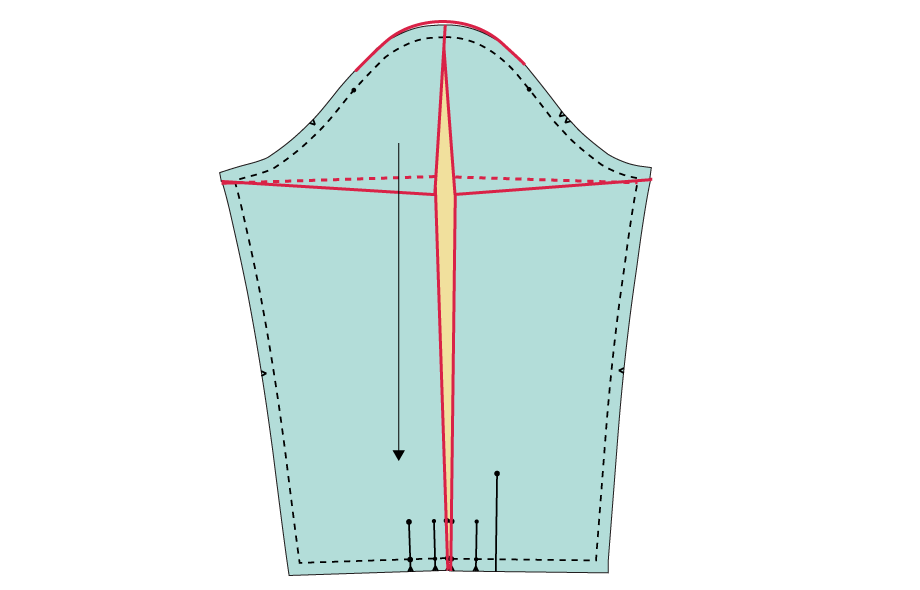
3. Now spread the sleeve to add extra width. As you open the center of the sleeve to add extra room for the arm, the vertical cut will spread open while the horizontal line will overlap the top and bottom sections a bit This is perfectly fine because the alterations are happening inside the seamlines, so it won’t affect the overall length of the seamlines, while subtly changing the shape of the sleeve to give you extra space in the width of the sleeve.

4. Once you’ve added enough extra room for your preferences or needs, tape the altered pattern piece down to another sheet of paper to fill in the gap and stabilize the pattern. You’ll probably want to re-draw the cap of the sleeve to give it a rounded curve again, too, since the alteration will have caused a bit of a corner to develop. And finally, to find the new grainline, fold the sleeve pattern piece in half. And then you’re ready to go!
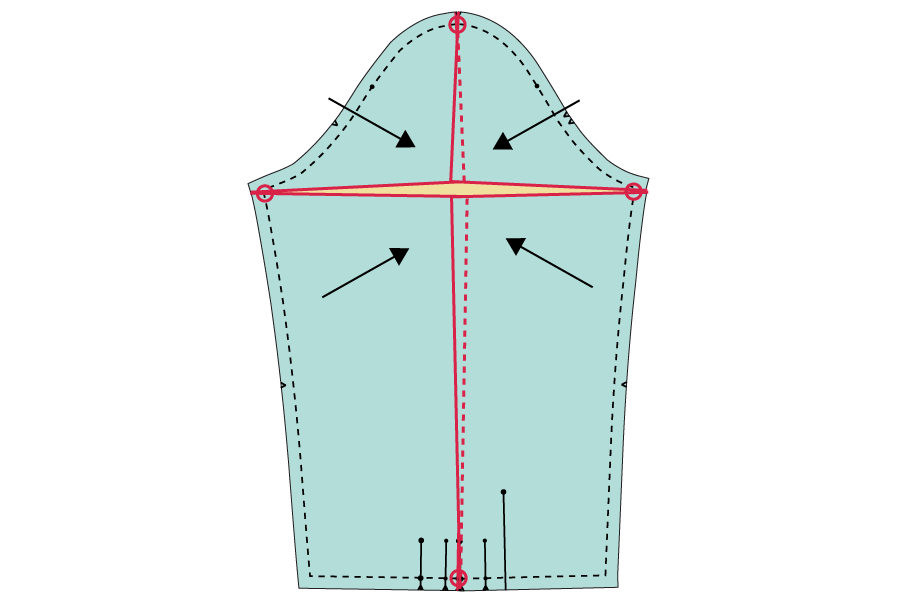
5. For those of you with very slim arms, you can make the sleeve narrower by overlapping the pieces, as shown.
I hope that helps!
P.S. If you like altering patterns and want to learn of the design possibilities this offers, you might be interested in my Building Block Dress book, which can help you to alter patterns to develop styles all your own or to simply change an existing sleeve or a neckline to suit your preferences.
What pattern is this?
That’s the Liesl + Co. Recital Shirt.
Thank you so much! My arms are larger now that I’m older. Everything would fit, but the arms.
My pleasure! Like I said, this is a really easy change to make.
Thanks, Liesl! This is the one issue that has kept me from starting a blouse from your patterns. I have had less than satisfactory results in other patterns, and I would like to get it right this time. Thanks for reading my mind.
Glad to help, Cindy!
That is useful to know. Thank you !
What if you would like to lengthen or shorten the arm?
Then you look at this post! https://oliverands.com/community/blog/2010/02/lengthening-and-shortening-a-pattern.html
It’s part of our Learn to Sew series. You can find all the posts here: https://oliverands.com/learn-to-sew/
I hope that helps!
Would it be possible to show how to do a FBA on your new dress pattern from fall? Want to make, but concerned I will mess up. Your tutorials are always helpful!
Let me see what I can do, Amy. It might take a week or two…
Thank you for considering!
Warm wishes for a Happy Thanksgiving in Espana!
Your illustrations are really clear – that makes adjustments much less daunting! I have a different problem, and wonder if you might know what the solution is: the sleeves on a dress I made fit fine, but when I raise my arms the entire dress goes with them. Carolyn (Handmade By Carolyn) has fixed that on the Inari dress by making the sleeve wider, but my dress has elbow-length sleeves and they’re not at all tight. Any suggestions?
Nina, it’s difficult to say without seeing photos, but I’m going to guess that the armholes are quite low and the sleeves are wide. This often causes the whole dress to rise when the arms are raised, and it’s one of the reasons I prefer to draft a higher armhole for our patterns. It’s not an easy fix, unfortunately, but you might be able to borrow an armhole and sleeve from another pattern to solve the problem in the most simple manner?
And then when you, say, narrow the sleeve, you just gather the armscye more? That does help, thanks. What I really want to do (always) is make a short sleeve long. But then guess there’s no quick fix because you’d have to redraft the armscye?