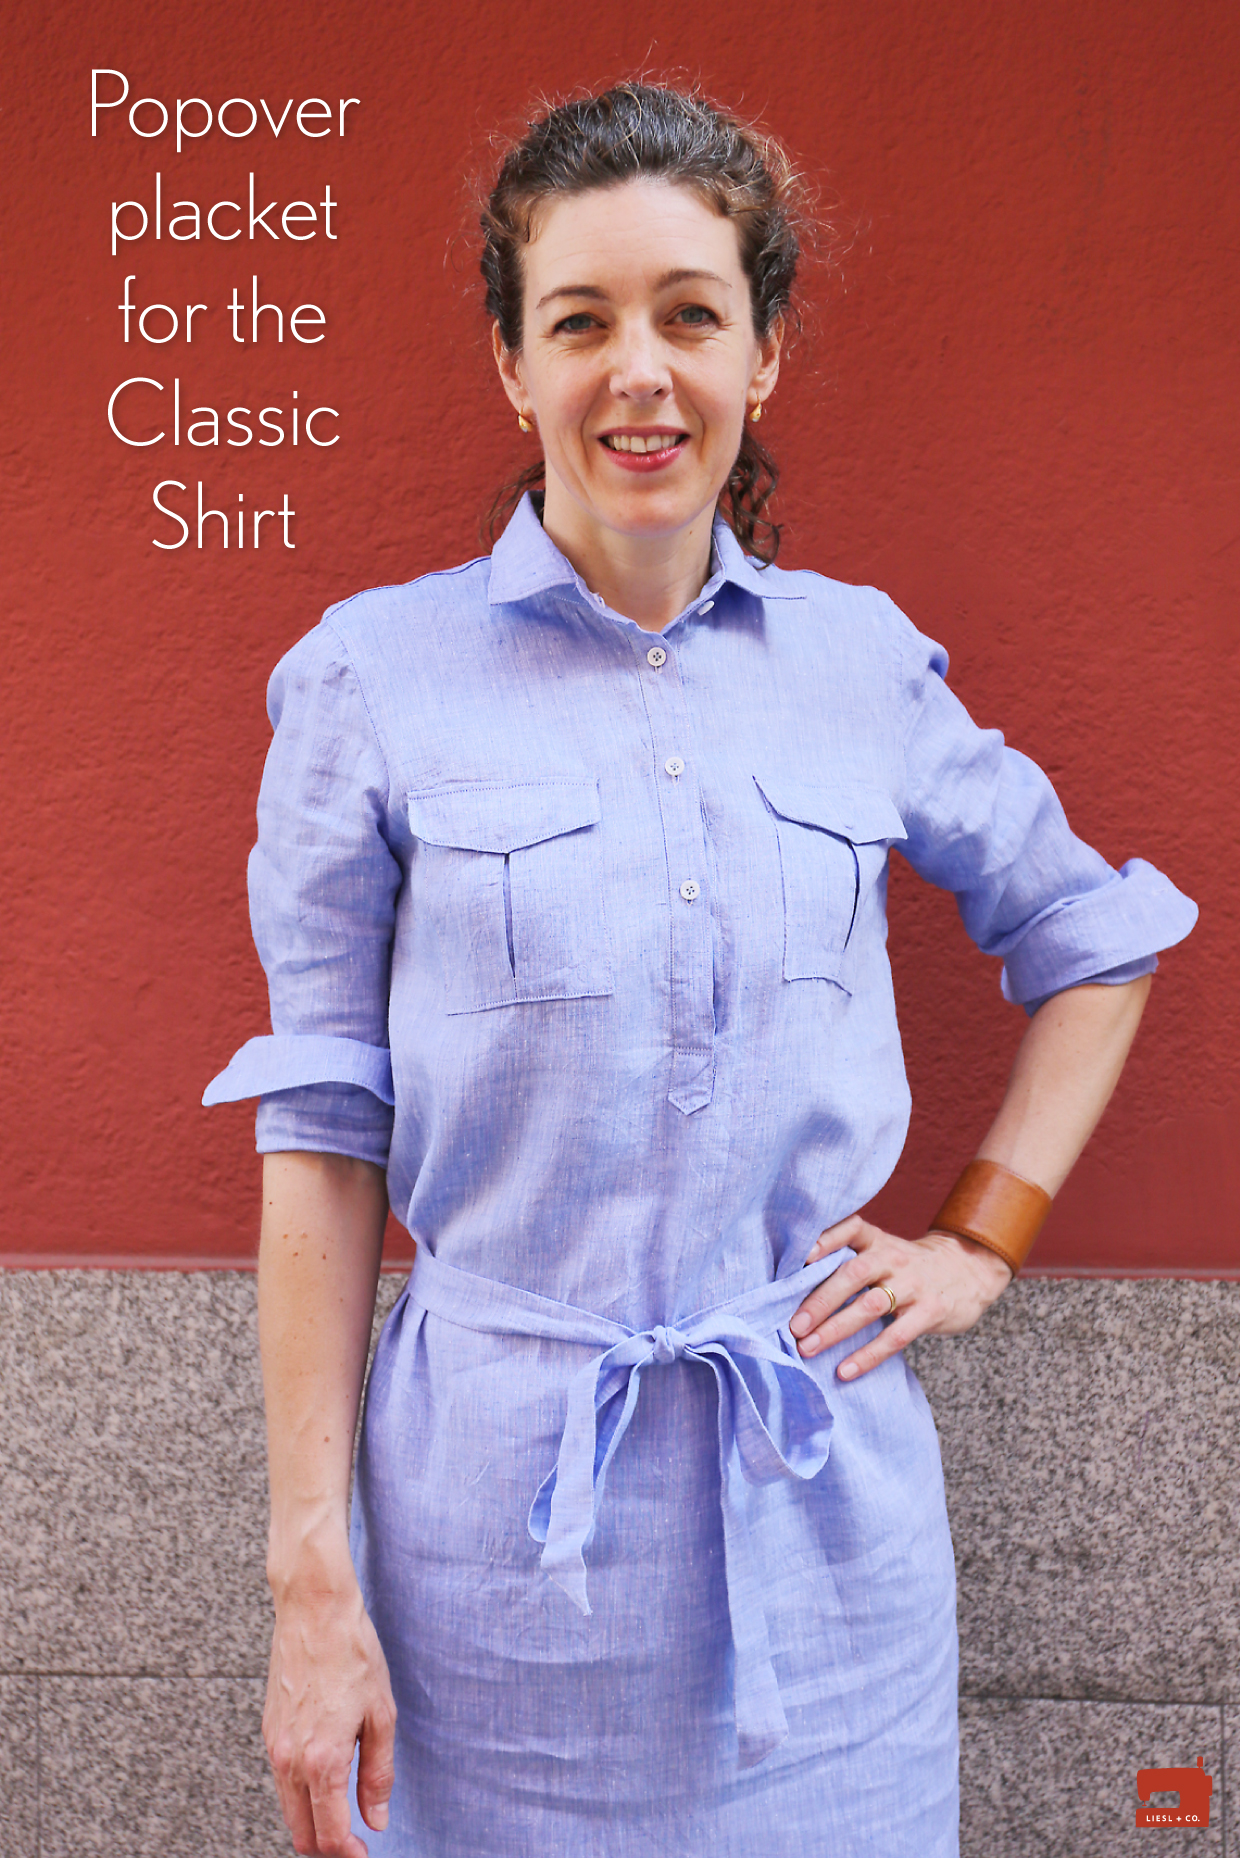
Are you ready to sew a popover placket?
This free downloadable pattern piece and tutorial can be used with our Liesl + Co. Classic Shirt to expand your options. I used it to transform the pattern into a shirt dress. (See my Classic Shirt as a Dress post for details about lengthening the Classic Shirt pattern to dress length.) The popover placket works really nicely on a dress because it eliminates any possible gaps or button pops below the waist (so annoying when you sit down and the buttonholes gape open!), and it also reduces the number of buttons and buttonholes you need to sew. (There are already plenty.)
But you can also use this free placket and tutorial to change the Classic Shirt into a popover style to give the pattern a different look and feel. We want you to get as much out of our patterns as you can!

So how do you sew a popover placket? It’s very similar to the tower placket from the sleeves on the Classic Shirt pattern. So if you’ve already sewn the pattern this is going to be very familiar. I’ll walk you through it, step by step.
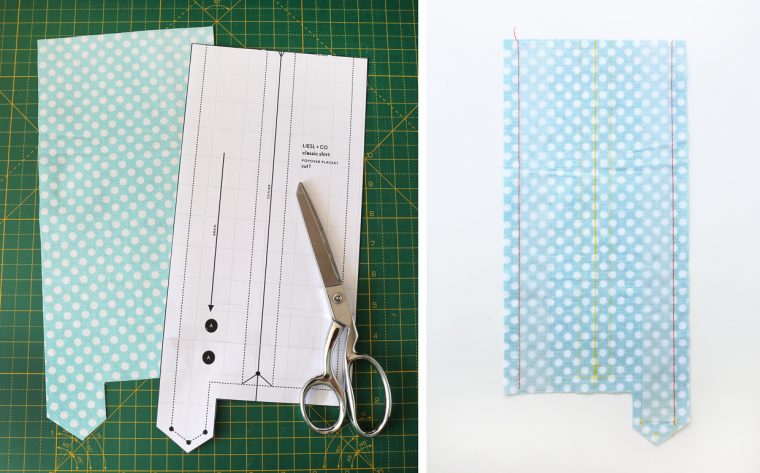
- Download, print, and assemble our free popover placket pattern piece. Cut out one popover placket with fabric right side up and transfer the pattern markings to the wrong side of the fabric. Baste the outer edge of each placket piece with a 1/2″ seam, as shown, and follow the manufacturer’s instructions to fuse or baste a 1″ strip of interfacing to the wrong side of the placket, aligning the edge of the interfacing with the basting stitches.
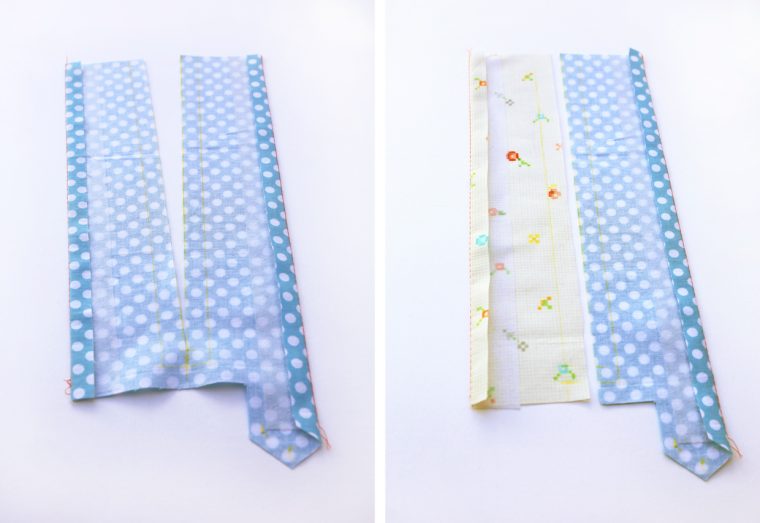
- Using the basting stitches as a folding guide, fold and press the fabric to the wrong side along the basting stitches, as shown. Hint: If you’d like the underplacket to be a different color of fabric, you can use the cut line to cut the pieces from two different fabrics. Otherwise, just cut along the cutting line to the dot.
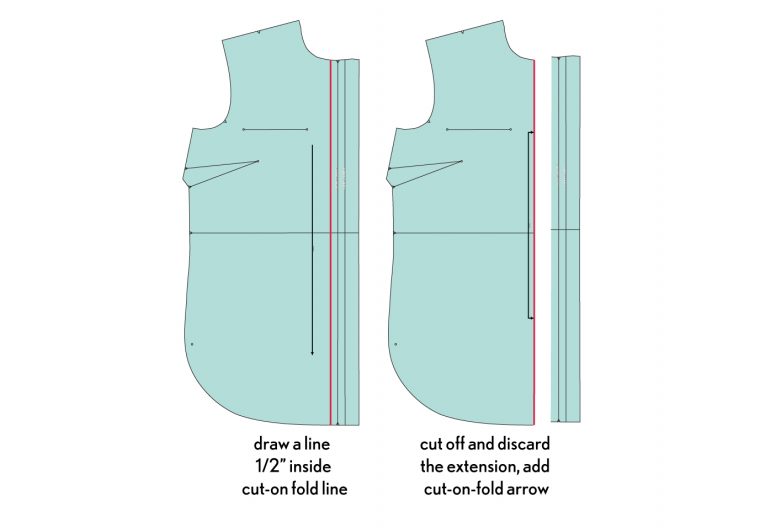
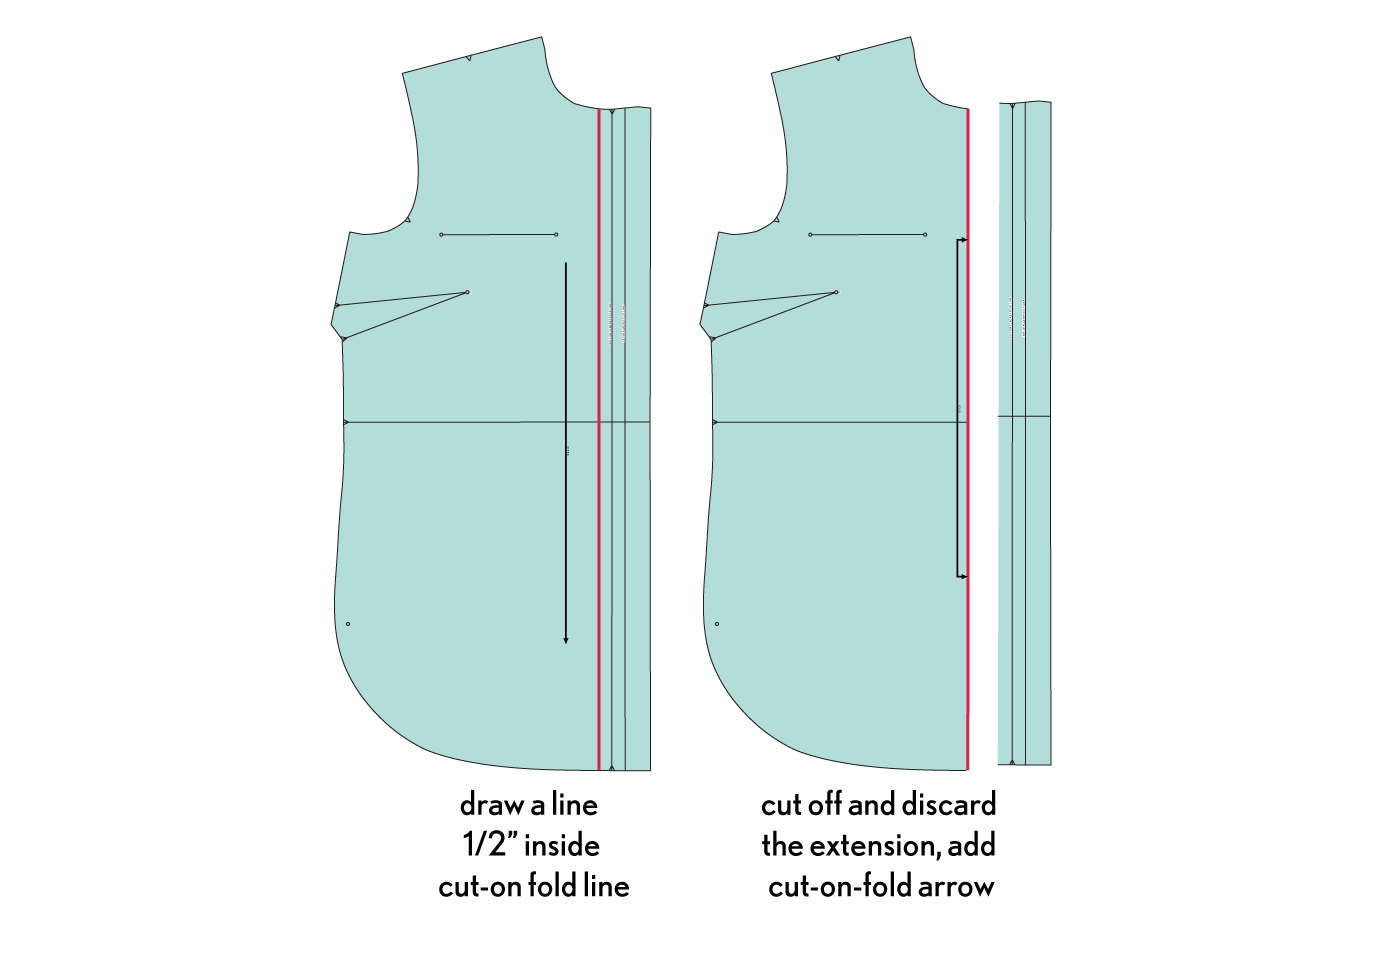
- Alter your Classic Shirt pattern to be Cut on Fold by drawing a line 1/2″ inside the Placket Fold Line for View B. This line marks the center front of the shirt/dress and can also be used to cut the pattern piece on the fold of the fabric. Trim and discard the extension of the pattern piece. Then cut out your fabric and draw the center/fold line on the wrong side of the fabric.
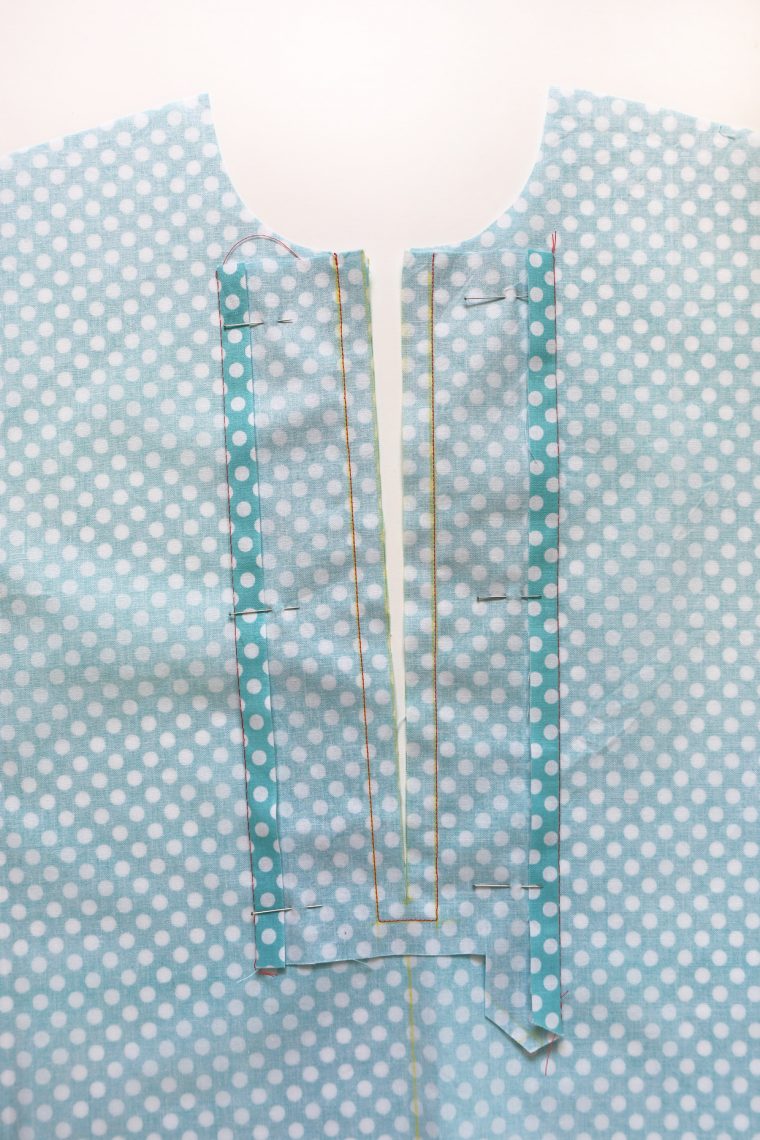
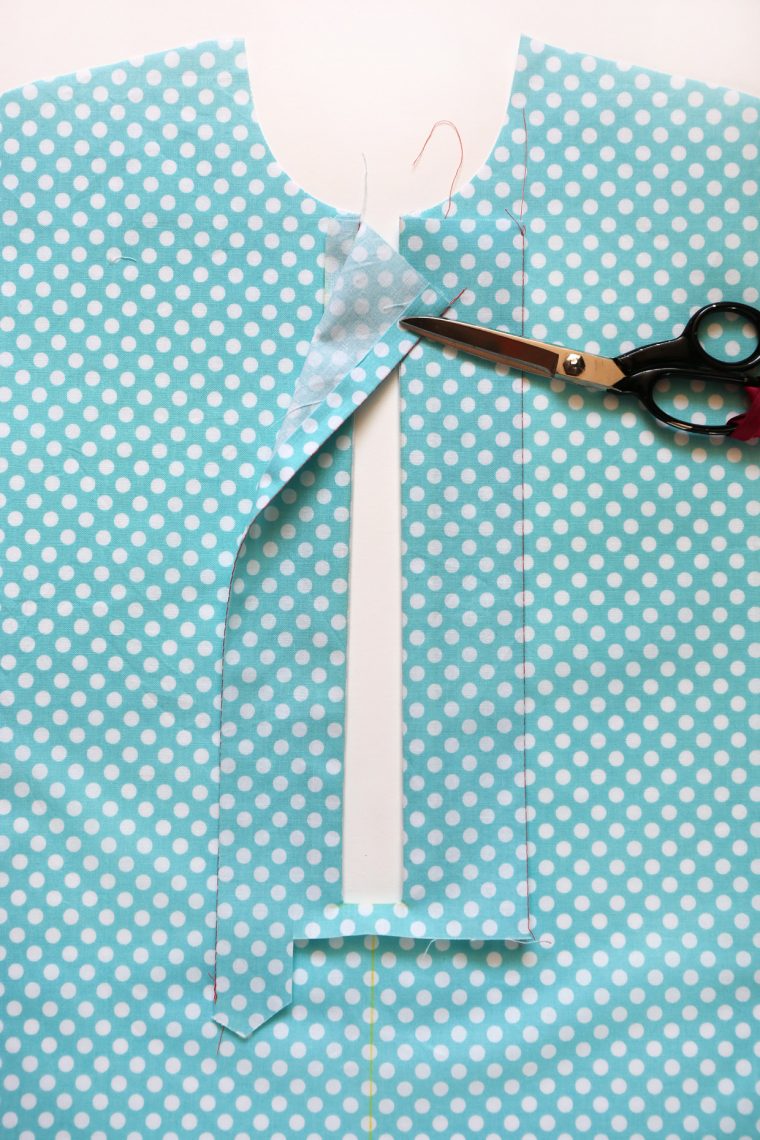
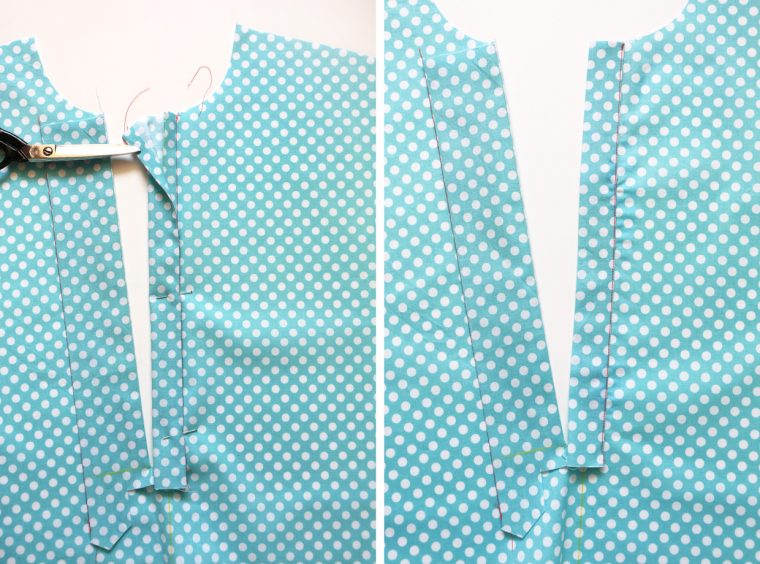
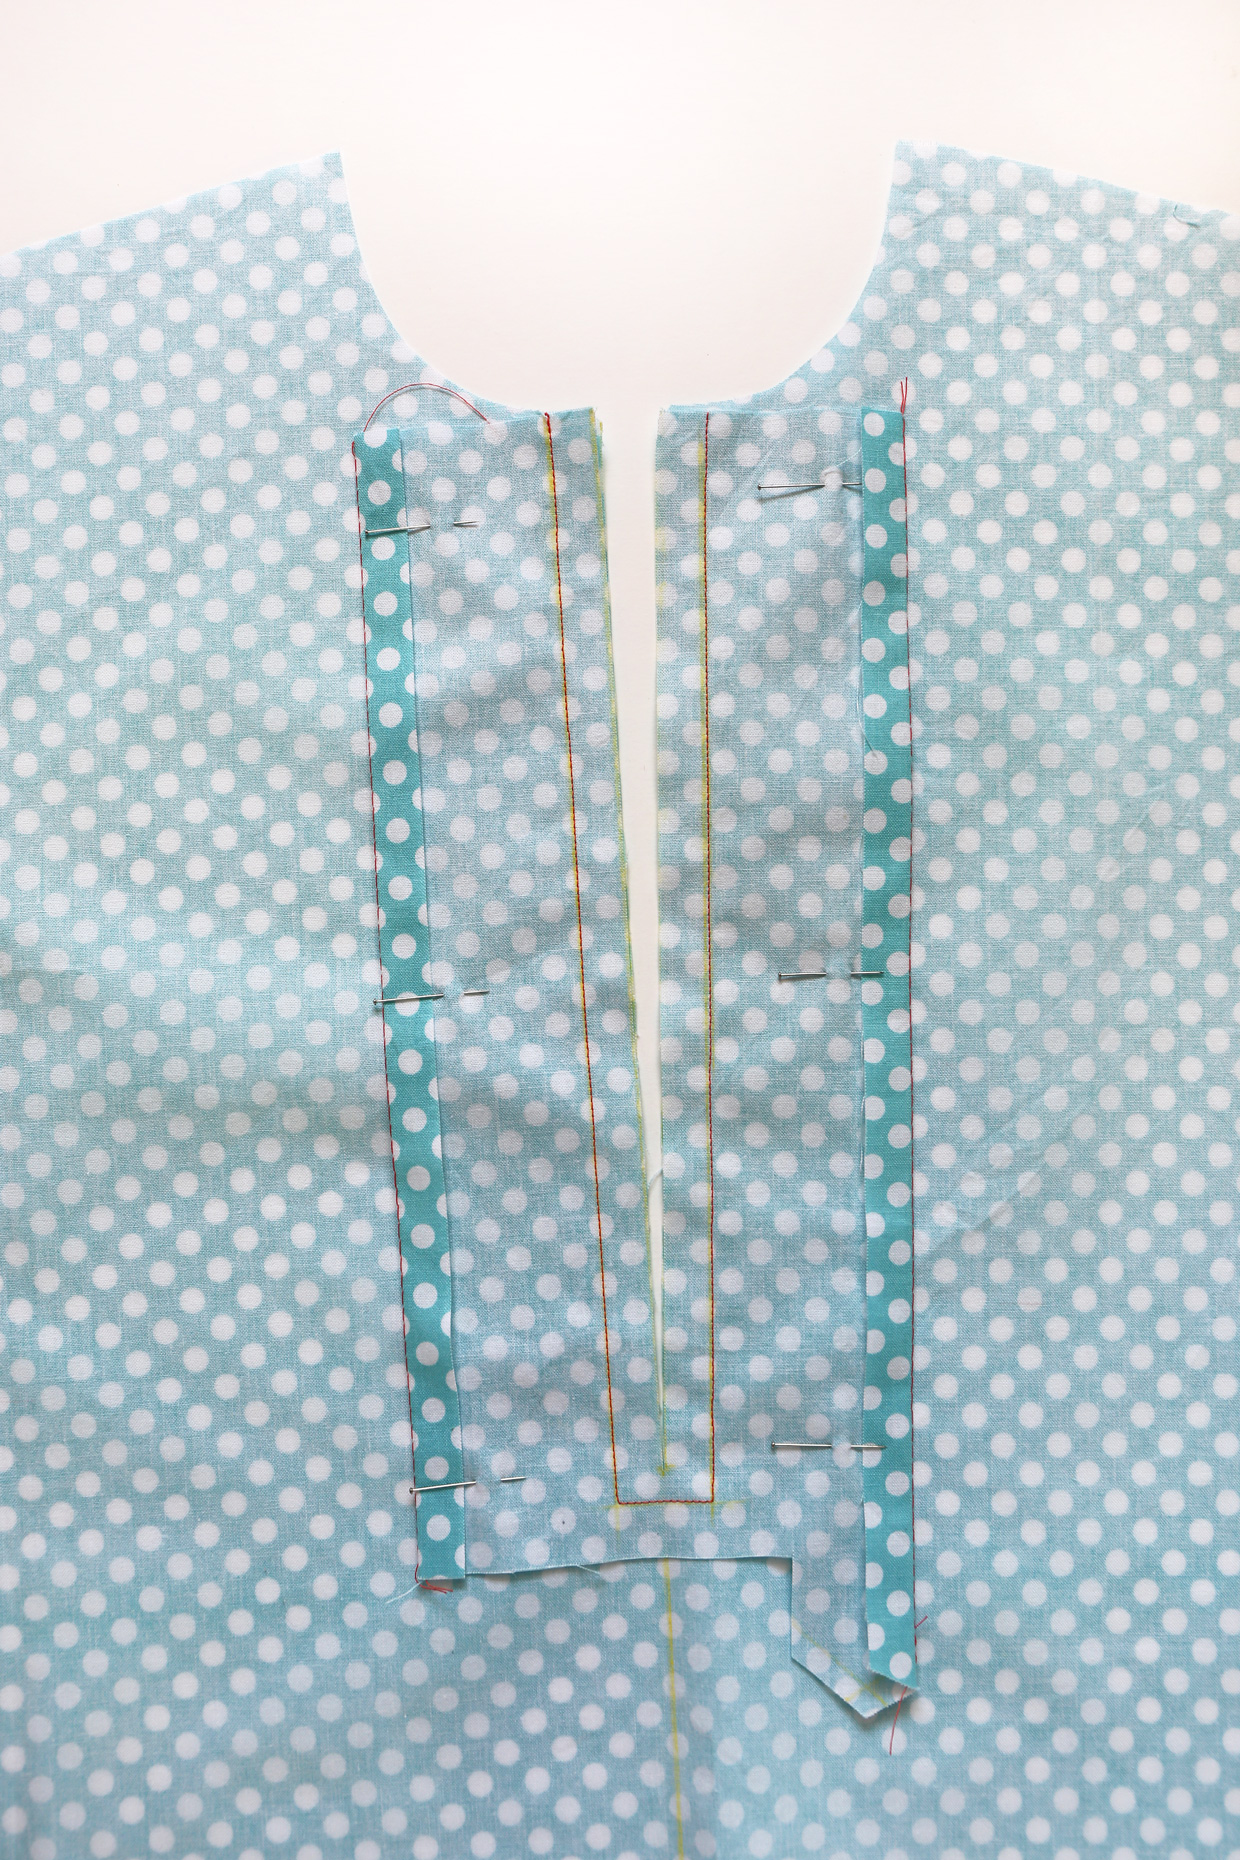
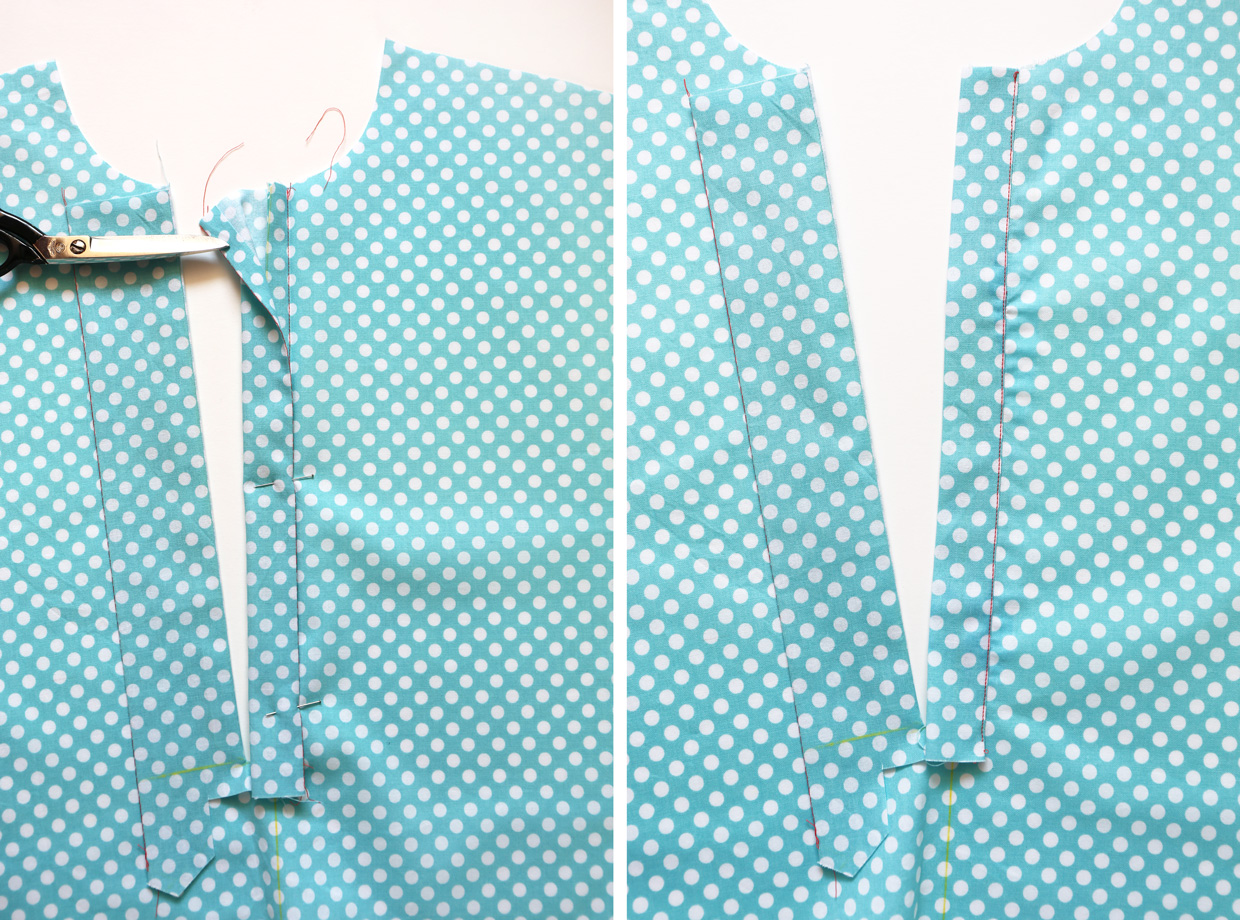
- To sew the placket, pin the right side of the prepared placket pieces to the wrong side the shirt/dress front, matching the cut line on the placket to the center-front line on the shirt/dress. Cut down the center-front line of the shirt/dress to the dot on the popover placket piece so both pieces have the same opening. Then stitch the opening with a 1/2″ seam, following the markings you transferred from the pattern pieces to pivot and stitch across and then back up the other side.
- Clip from the marked dot to the stitched corners, cutting as close to the corners as possible. Don’t be shy here; it’s better to clip very close than not close enough.
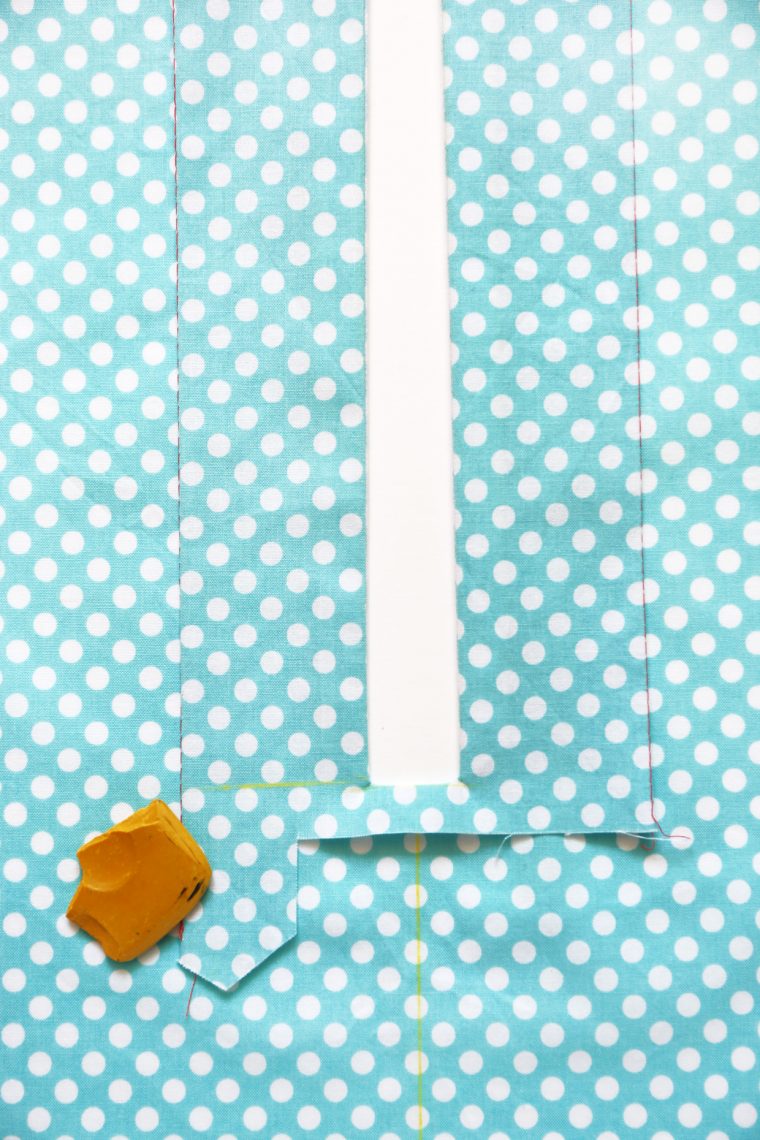
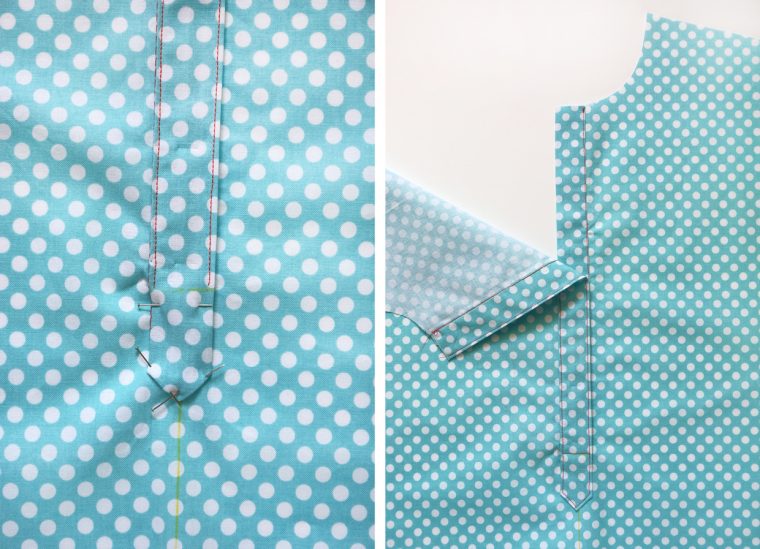
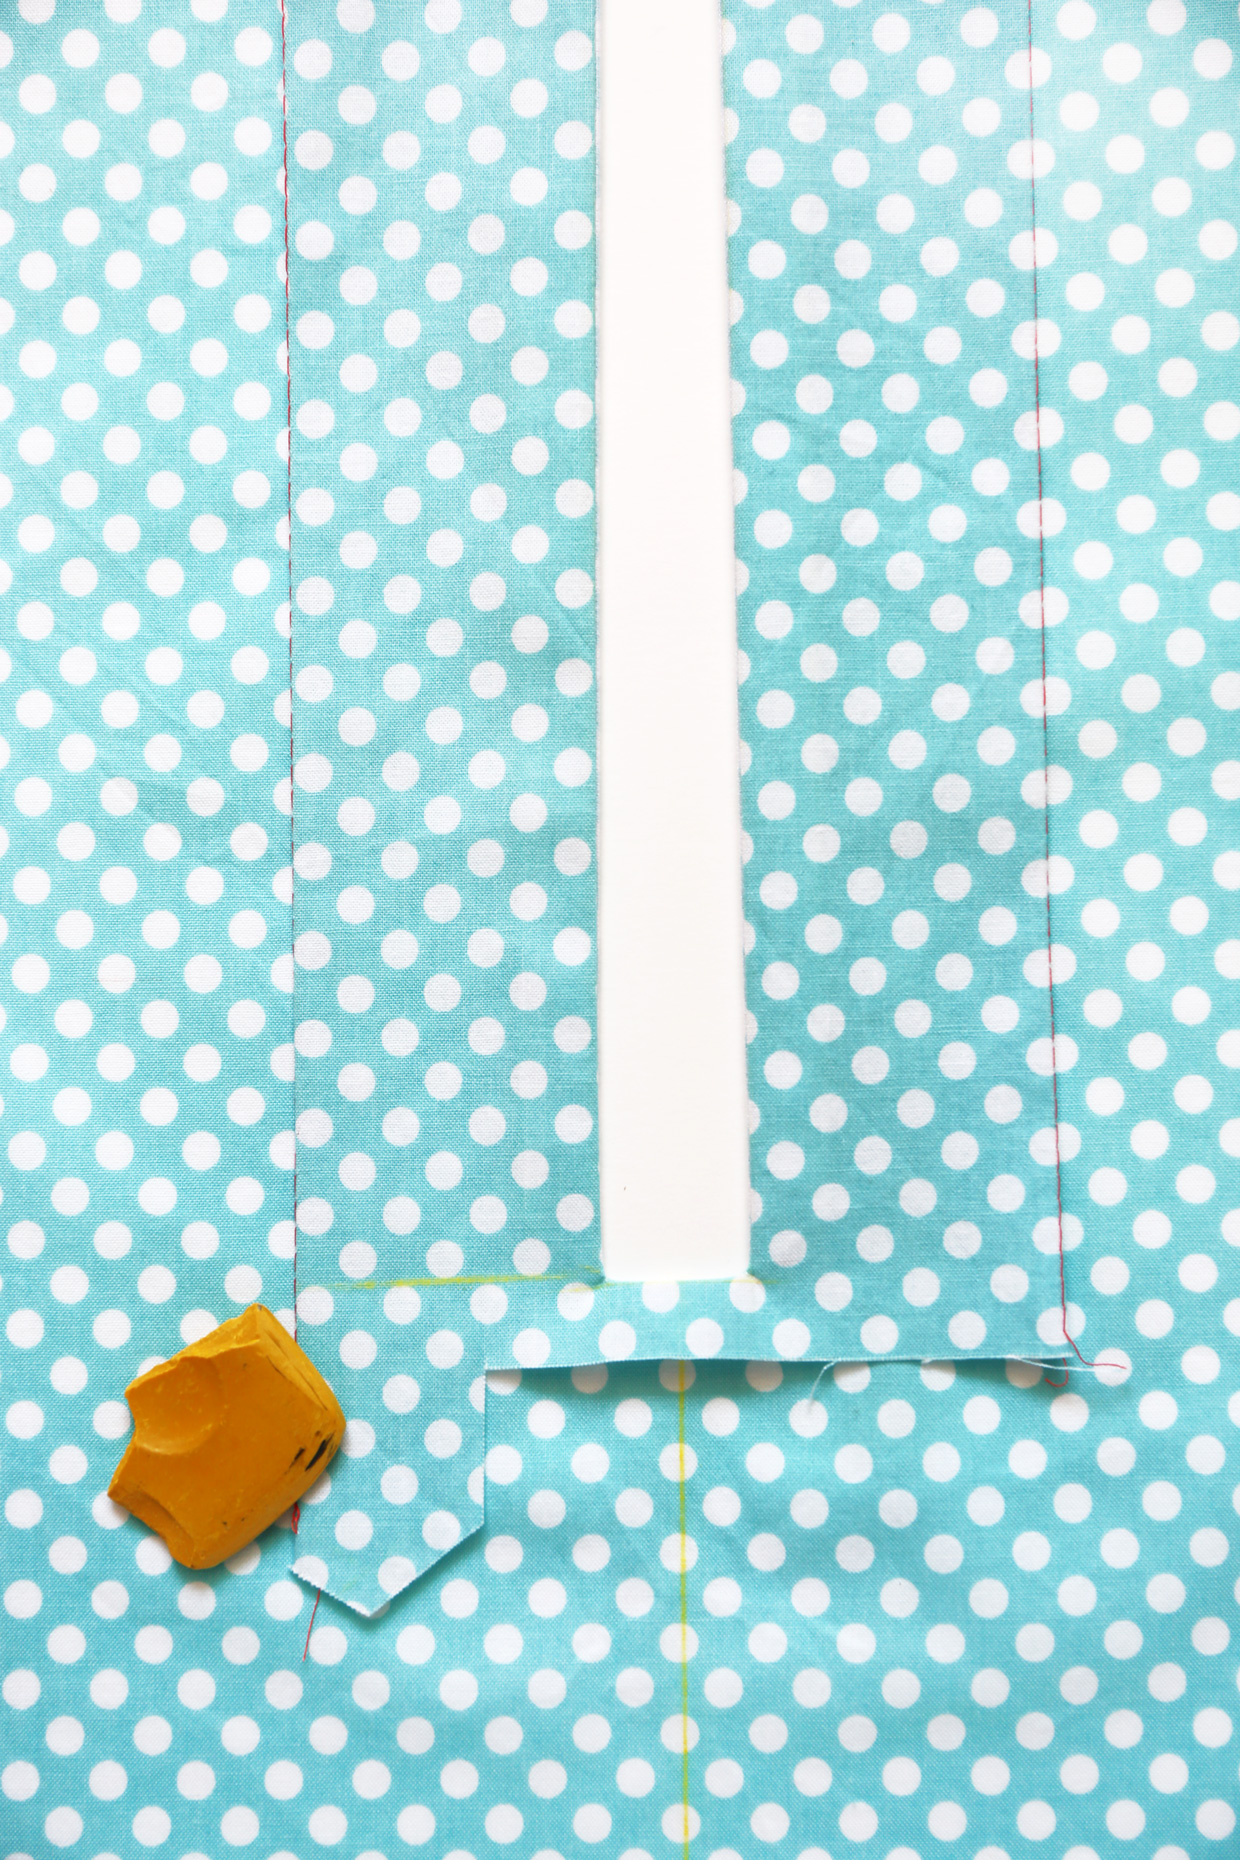
- Turn the placket through the cut to the right side of the shirt/dress to expose the rectangle-shaped opening. This opening is where the placket itself will end up. Press the narrow seam allowances at the bottom of the opening down and keep an eye on them so they stay pressed to the right side of the shirt/dress for the next few steps.
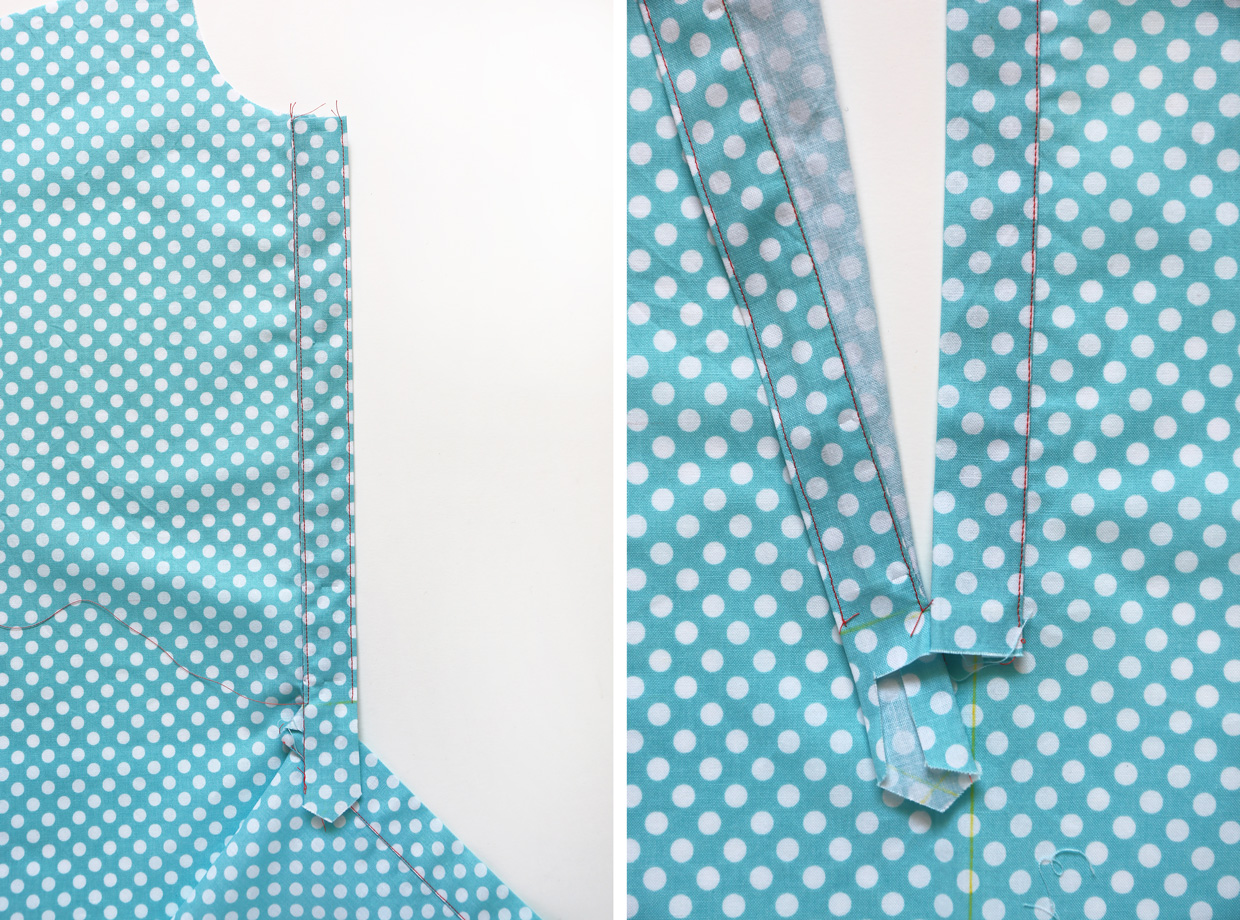
- Before going any further, use a water-soluble fabric pen or tailor’s chalk to draw a horizontal line on right side of the longer (wearer’s right) placket at the same level as the bottom of the rectangle. We’ll use this as a stitching guide later on.
- We’ll be working with the shorter (wearer’s left) side of the placket first. Fold the pre-folded outer edge of the left placket in half to cover the stitching line, taking care to keep the short edges at the top of the placket folded to the right side of the shirt/dress. Edgestitch the innermost folded edge, stopping just above the line you drew on the right side of the placket. The left half of the placket is finished!
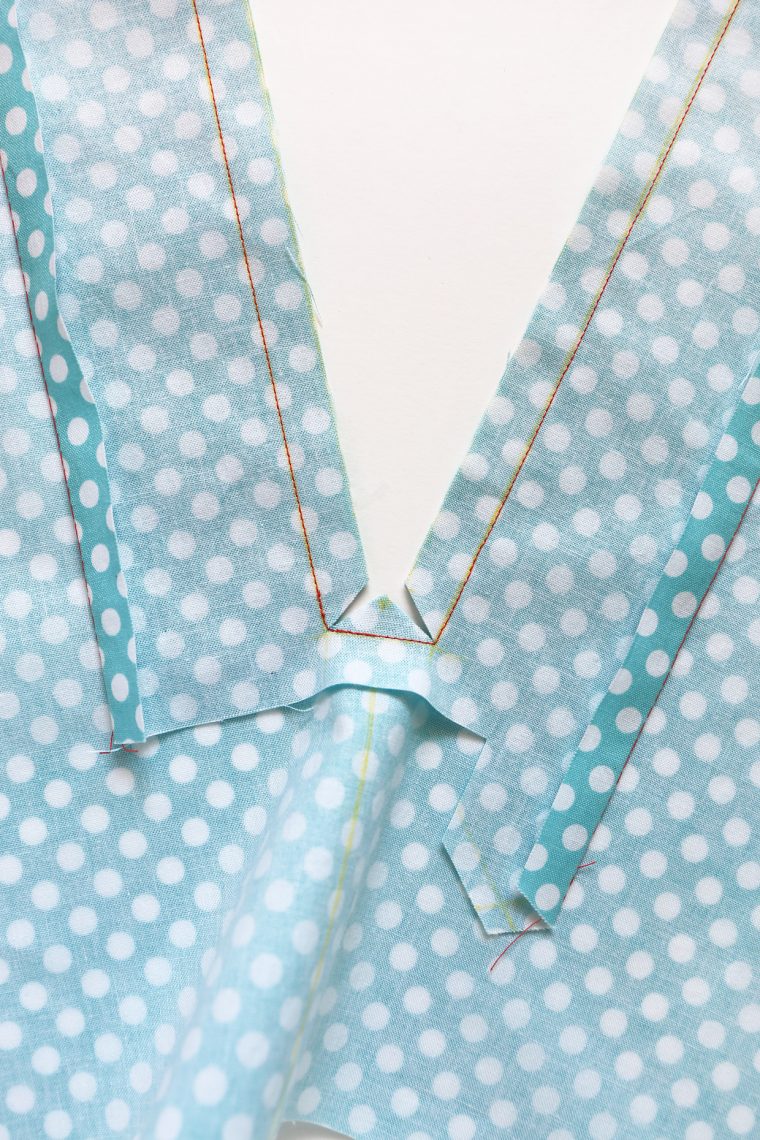
- Now working with the larger (wearer’s right) placket, fold it in the same way as the smaller placket so the pre-folded edge covers the stitching line. Fold the left side of the shirt/dress down so it’s out of the way, then edgestitch the right placket starting at the neckline and stopping at line you drew in Step 7, above. You can edgestitch both sides of the placket or just the innermost edge, as you prefer. Either way, leave long thread tails so you can draw them to the back and knot them. This will give a nice finish to the placket, since we’ll be stitching the rest of it in the next step.

- Position the two sides of the placket so they’re directly on top of each other, checking to be sure the neck edges match, and pin them to hold them in place temporarily. Finger-press the bottom of the left placket to form a sharp point, using the dots you transferred from the pattern piece or just folding it until you’re happy with the shape. Pin or glue the pointed end of the placket in place, then edgestitch beginning at the left placket’s innermost edge (opposite the placket opening) and stitching across at the level of the line you drew on the placket. Pivot and continue to edgestitch around the placket to finish it, as shown.
- That’s it! From here you’ll continue with the rest of the Classic Shirt instructions to finish your shirt/dress. That wasn’t too bad, was it?


I’ll be back again on Friday with another post to talk you through the pocket and self tie for this dress. See you then!
Thanks for the pattern, Liesl, and for making the process look easy. I’m supposing this would work with the gallery tunic as well? I really love the lines in that one.
Absolutely! I recently made a Gallery Tunic for my mum and did exactly that. Well, actually I used the Jump Rope Dress pattern placket because, while I was making my dress, Liesl was working on hers and neither of us knew what the other was doing!
Go for it!
This is perfect! I’ve been wanting a pop over style shirt from a well fitting button down. Thanks for the pattern piece and fantastic instructions!
A lovely idea. Good for the gallery tunic too.
Thank you for generously doing this for free! The tip for making a contrast underplacket is particularly exciting.
I’ve always loved this kind of placket on tunics but never attempted as it looked too hard. Now I can give this a try as your tutorial is very clear and very helpful. Thanks Leisl!
thanks for giving us a freebe! Ive made plackets several times, but it has been years. Great and clear instructions.
Muy bello.Gracias x compartir.felicitaciones
Gracias , por compartirnos este trabajo hermoso , muy explicativo , tan sencillo como ver las ilustraciones felicitaciones por su trabajo, es de gran ayuda.saludos cordiales.
Esta é uma dica muito muito interessante. Será bastante útil. Obrigada!
Such a lovely tutorial. We’ll explained. I surely will try this. Thank you. God bless.
Muy importante este tema sobre todo para mí
Muchas gracias
Excellent tutorial! Thank you so much!
very informative
I just finished making the placket from your tutorial, and it turned out amazing! Thank you!
Thanks so much for your time and I appreciate it very much
Perfect way to make a popover placket! I always enjoy using the tower placket applications on the Classic and Recital patterns, so this will be my new go to instruction for adding placket to tops and dresses! Thanks so much!
I’m so thankful you posted this guide with pictures. It is much clearer than the pattern I’m trying to sew (not yours). Explained so much!
Excelente explicación, deseo llevar un curso básico de costura, que abarque detalles generales tales como: cuellos, ribetes, diferentes dobladillos etc.
Thank you for this pattern. This is what I was looking for. Great Thanks!
Do you have printed instructions available?
This is a free tutorial available right here on the blog.
Hello.
This is a wonderful tutorial
My question is , when you remove the half inch at the front to cut on fold ,how do you adjust the neckline?
I’m glad you like it! The popover placket will replace the piece you cut off, so you don’t need to do any adjustments to the neckline.
Understood!!! Thanks for the prompt response
Hello, this is a great tute! Just wondering if I could use this for the all day shirt for men? I’m thinking I would need to reverse it…other than that would it work?
Thank you 🙂
I haven’t tried it but it should work. And if you do it, please show us! We’d love to see how it turns out.
Hi Liesl, I’ve just found your blog and easy to follow instructions for the shirt placket…so I’m excited as I have fabric to make into a shirt. Looking at other comments, there is clearly lots to explore in your blog! Thanks for taking the time to make sewing tricks so accessible.
OMG – I have made probably 12 Liesl tops over the last couple of years and never realized your blog had a popover placket hack! I made one on my own and it turned out ok….but this is great! I will be trying this next. Thanks for all the tutorials – keep them coming!
I’m glad you’re happy with it! It’s a shame that the algorithm makes it so difficult to share information about things like this online, but if you subscribe to our newsletter we’ll keep you updated on all releases and useful tutorials, etc.