The Reversible Bucket Hat is one of the most popular Oliver + S patterns. The pattern can also be found in the Little Things to Sew book. With its popularity, it’s about time we had a step-by-step photo tutorial. This is sure to make your visual heart happy.
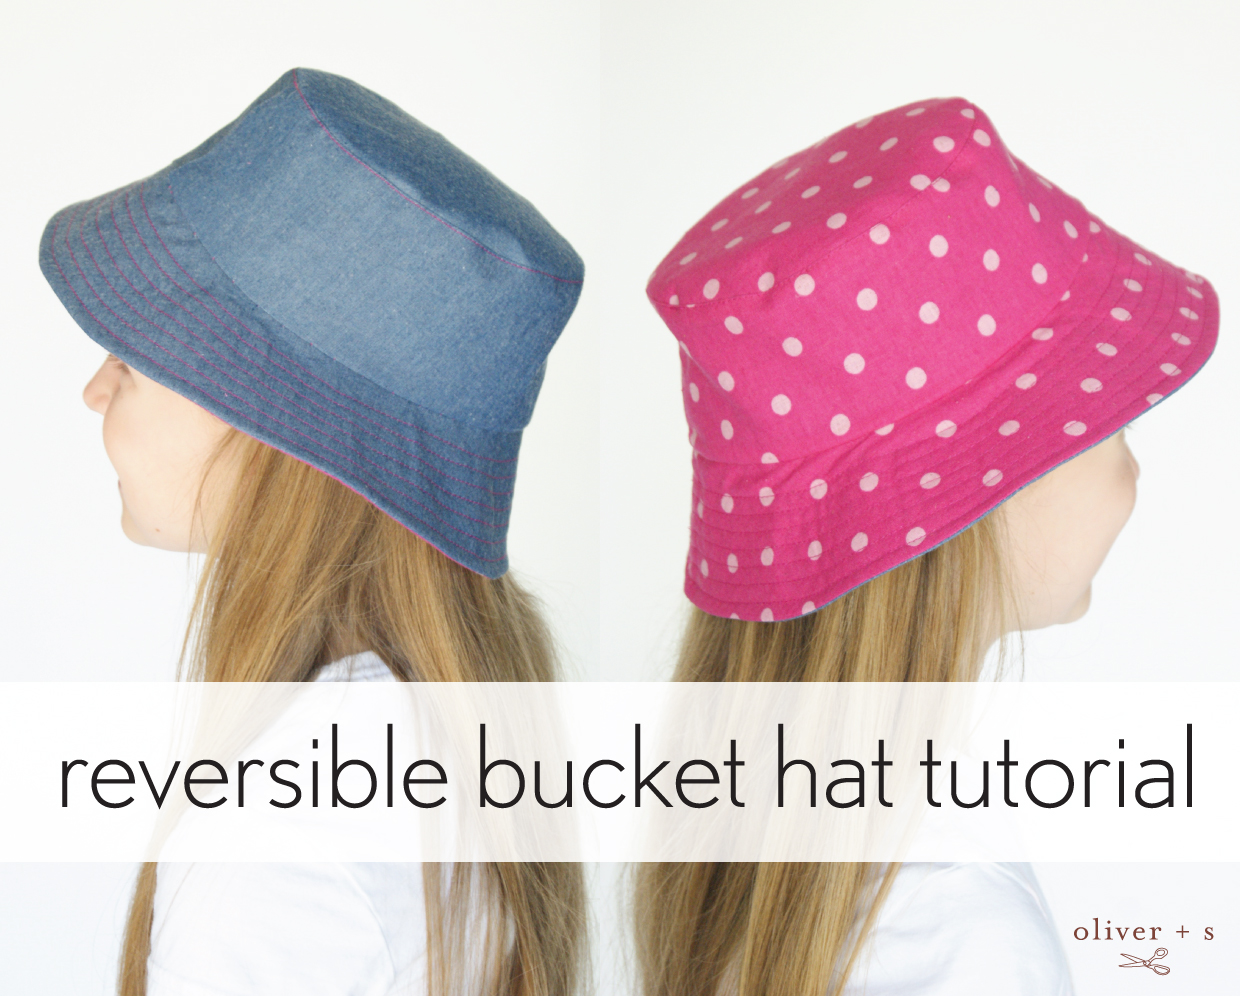
This is a pattern for both boys and girls and it comes in four different sizes. It has a difficulty level of two out of four scissors. It fits perfectly and doesn’t keep falling off. The brim is just the perfect size for keeping a child’s face from direct sun. It’s also comfortable and cute. With all of those qualities going for it, I can see why it’s so popular.
I hope everyone has their machines turned on, threaded, and ready to go.
Assemble the cap
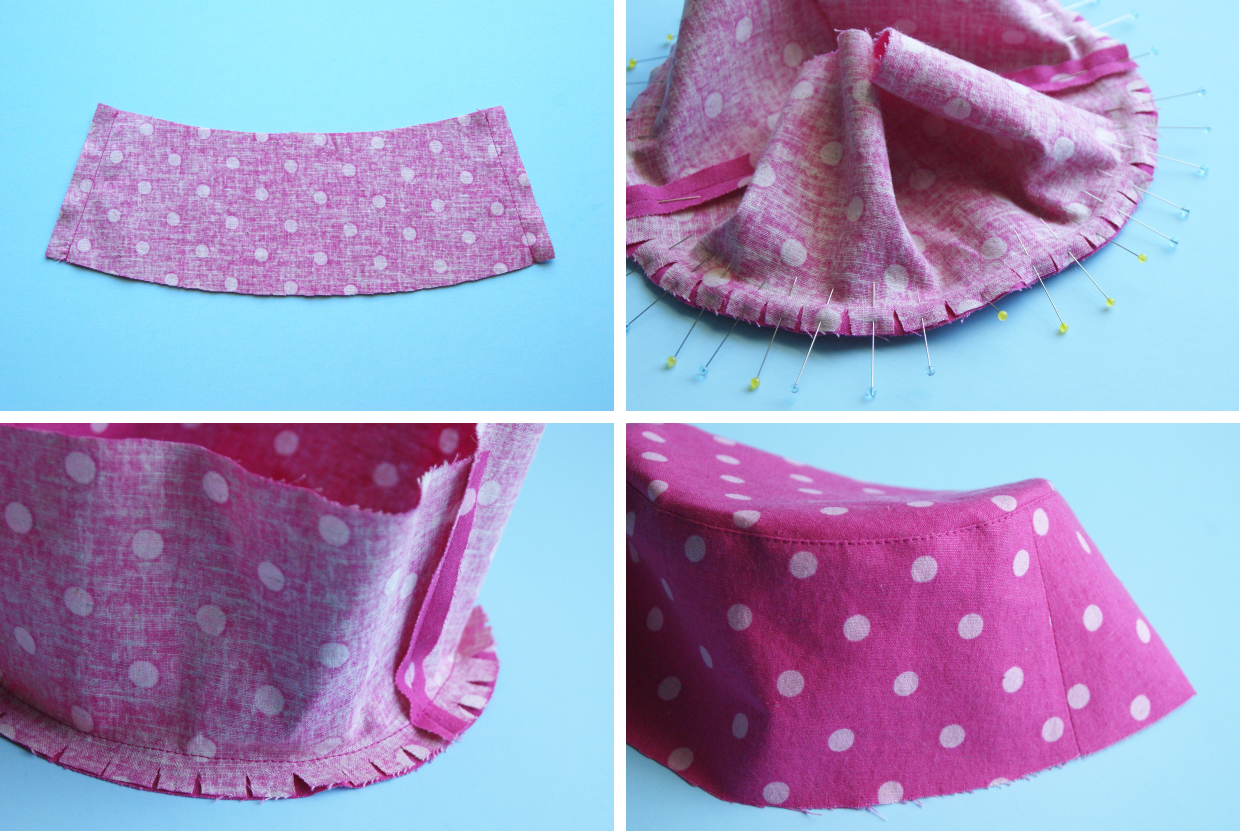
1. Starting with the cut Fabric A side panels, align and pin the two side panels, with right sides together. Stitch the side seams with a 1/2” seam; then press the seam allowances open, and trim them to 1/4”.
2. Pin the crown to the top of the side panels, matching the triple notches on the crown to those on the side panels and the crown’s single notches to the side panels’ side seams. Clip into the seam allowances of the side panels to make the side panels fit the crown; then join the sides and crown with a 1/2” seam.
Hint: Here’s a little trick that might help: Run a basting stitch just a little inside where the stitching line will be–in this case, a little smaller than 1/2″–and use that as a clipping guide for the pieces that need to be clipped. That way you’ll know how much you can cut into the fabric before you start pinning. If you clip every 1/2″ or so you’ll release the seam allowances and allow the stitching lines to match up.
3. Finger-press the seam allowances toward the side panels; then edge stitch the seam allowances to the side panels, if desired, to give the top of the hat a finished look. Trim the remaining seam allowances to 1/8”.
4. Repeat steps 1-3 to sew the second cap from Fabric B.
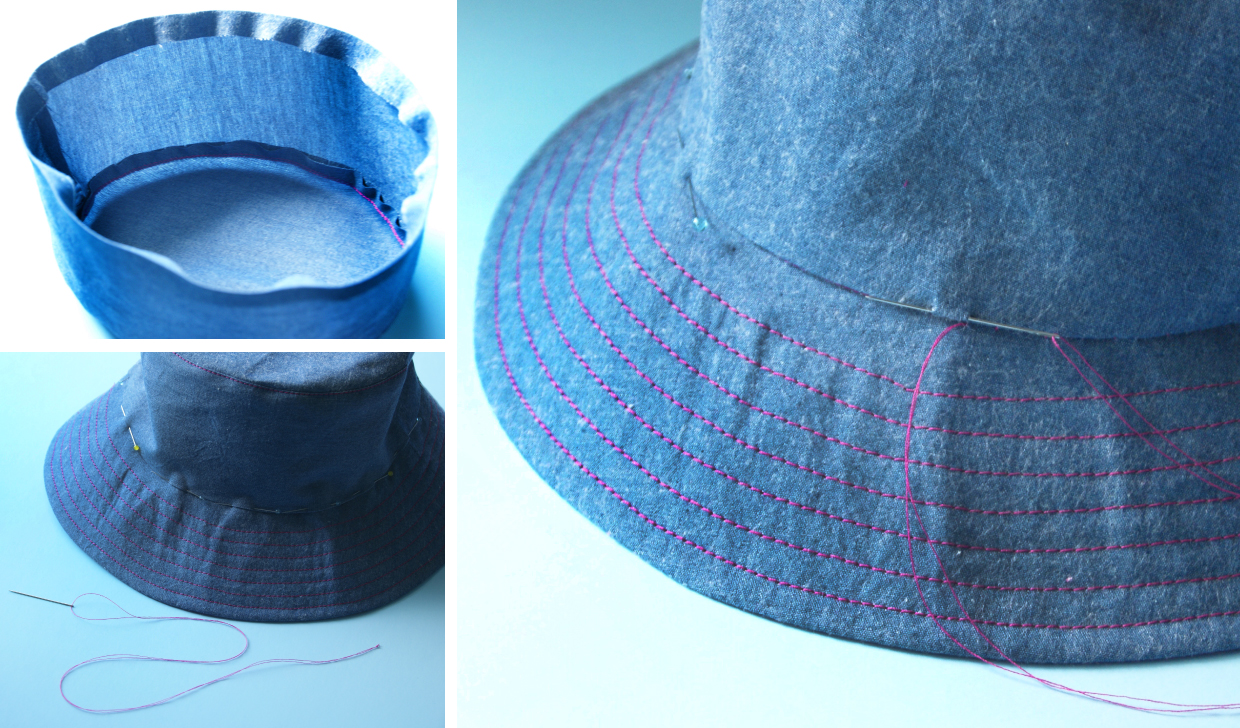
Make and attach the brim
1. Align and pin two cut Fabric A brims, with right sides together; and stitch the sides with a 1/2” seam. Press the seams open, and trim the seam allowances to 1/8”.
2. Align and pin the interfacing pieces to the wrong side of the two Fabric B brims. Then align and pin these two “interfaced” Fabric B brim pieces, with the Fabric B sides together, and join the sides with a 1/2” seam. Press the seams open, and trim them to 1/8”, as in Step 1, above.
3. Align and pin the interfaced (Fabric B) and uninterfaced (Fabric A) brims, with right sides together. Stitch the outside edges together with a 1/2” seam; then trim the seam allowances to 1/8”.
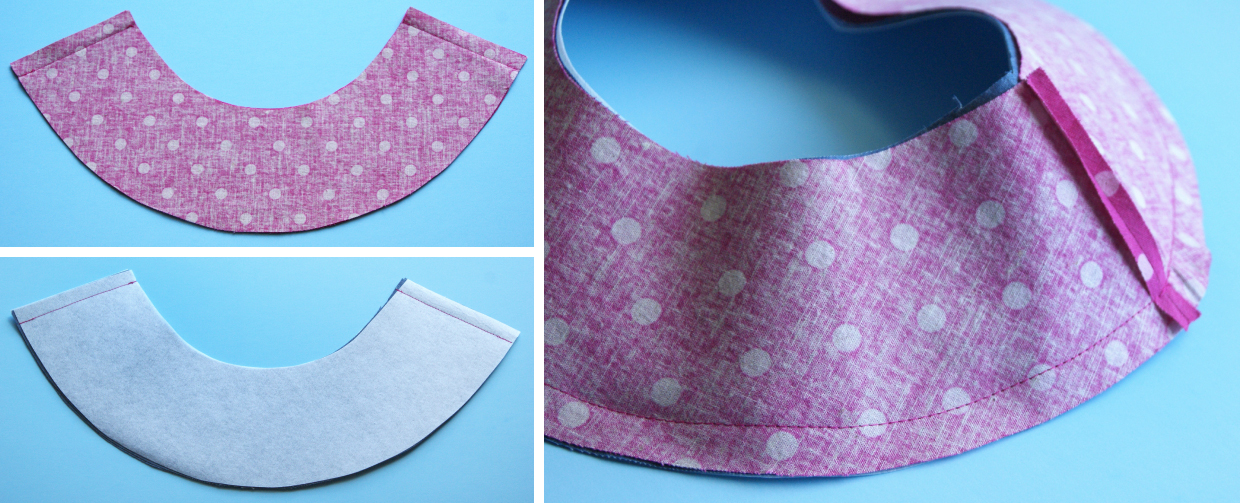
4. Turn the brim right side out, and finger-press the edges before pressing them with an iron. Edgestitch or topstitch the outside edge with a 1/4” seam. If you want, you can also topstitch a series of rows around the brim spaced 1/4” apart to give the bucket hat a sporty look and add additional stiffness to the brim.
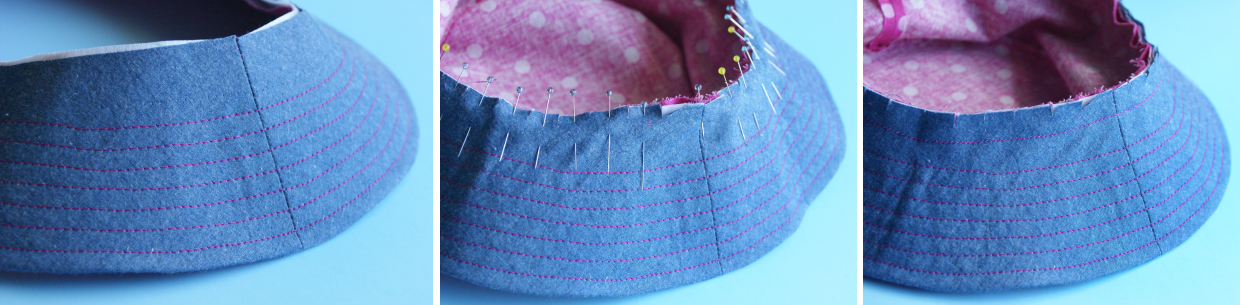
5. Align and pin the brim to the bottom edge of the Fabric A cap, with right sides together and clipping into the brim’s seam allowances to make the two edges fit. Stitch through all the layers to attach the brim to the cap with a 1/2” seam.
6. Trim the seam allowances to 1/4”; then turn the hat wrong side out.
Finish the hat
1. Fold and press the bottom edges of the Fabric B cap toward the wrong side by 1/2”.
2. Fit and pin the Fabric B cap over the Fabric A cap, with wrong sides together and the side seams aligned. Hand-stitch the Fabric B cap’s folded edge to the hat with a blind stitch, covering the seam line.
Turn the hat so that the Fabric A side is right side out again, and edge stitch the seam where the side panels and brim meet. This seam will help to secure the two sides of the hat, so they stay together.
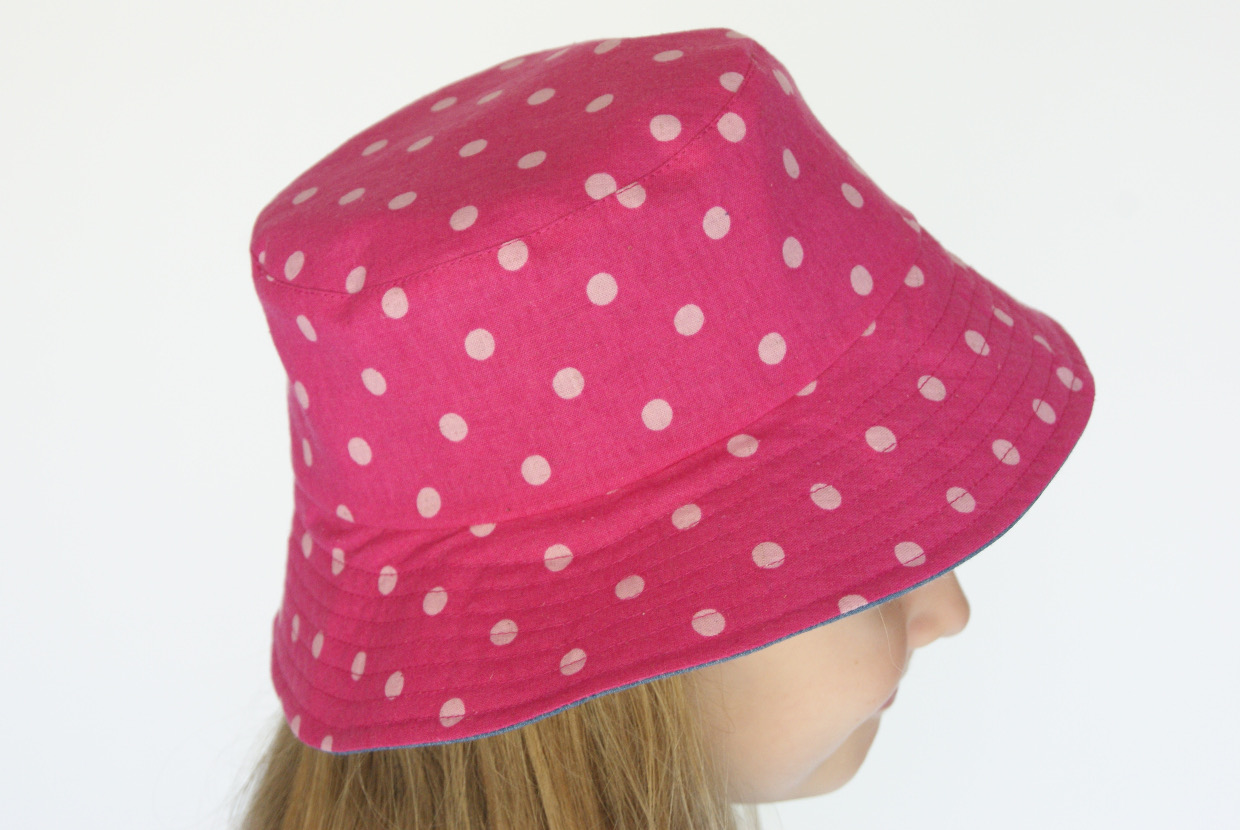
You are done!
If you are looking for more ideas for the Reversible Bucket Hat pattern, here you go:
- turn it into a “Cat in the Hat” hat
- an adjustable drawstring chin strap
- with bias trim along the outer edge of the brim (another one)
- add a chin strap (another one)
- add grommets to feed a strap through and add faux piping to the edge of the brim
- add grommets to both sides and a thin strap to tie under the chin
- with a widened brim
- with a widened brim and a pom-pom trimmed brim
- fun piping detail added
- add a strap that stays on with a button
- use one of the pattern pieces to make a doll skirt
Hi we love this pattern. I have enlarged it to all different sizes for adults. However when we Put it together we find making a whole lining and a whole outer, and then stitching together leaving a gap on the rim to turn back out. That gap is stitched up when you sew the lines on the rim. This means it is all machine sewn and A bit stronger. Thanks for sharing pattern. Xxx
Hi Sasika!
Would you be open to sharing your adult patterns? I have tried myself but failed. New to sewing, and making larger sizes of this pattern is a bit more complicated than I thought.
Please let me know!
Thanks,
Sarah
It’s really not Sarah. Here’s my cheat on up or downsizing most patterns. Just a little math and a printer. For example, my husband is a big man, well over 6’ and his head circumference is approx. 24”. Now the largest size on the pattern is 21”. Divide 21/24. You get .875. Ok, then subtract .875 from 1.00, the remainder is .125. Now print the original pattern, then set your printer to print at 113% (nearest number to .125). 100% + additional 13%. Reprint the original pattern pages. Voila, they will fit any size head you want. You may want to adjust band and brim length, but I didn’t and he loves the hat.
Hi Sasika, I would love to have a copy of the larger adult hat. We also must have kids with bigger heads.
Saskia, I’d love you to explain this as I just left a comment saying the final step of attaching the inner and outer parts does not work well for me.
Deb @ debshookandneedle.com
Hi Saskia, I was reading through all the comments hoping someone had managed to enlarge this pattern to an adult size! I’ve made them for my grandsons and now their dad wants one too, the only problem is all 3 of my attempts and enlarging the pattern have turned out really really badly! Could you tell me how you went about enlarging the pattern please?
Any help would be appreciated 🙂
I love this hat, too too cute!
We have an adult bucket hat pattern by Betz White available in the store that might work for you:
https://oliverands.com/shop/digital-reversible-bucket-hat-sewing-pattern.html
Thank you Todd, very much for the link! Ordered and about to go print now, I see many happy hats in my future 😀
I finally made my first one last week for my 3 year old daughter (my first kiddo who will wear hats). Sadly, the largest size barely fits her 🙁
Is there any chance this pattern would be available in larger sizes? Through (large) adult? It came together so nicely and would make a great gift…but as we apparently have large-head genes, I could only make it for toddlers.
Please?!?!? I am sure I am not the only one who would gladly pay for this pattern in larger sizes.
(Yes, I am certain it printed at 100%, and I sees correctly…I make big kids with big heads!)
Hi, Do you need to enlarge the pattern once printed…….. or is the pattern supplied the actual size. Looking for up 6 months 6-9 months and 9-18 months
Thanks
Hi, anybody knows if the pattern includes seam allowances?
Thanks!
Andrea, yes it does.
Hi there, thanks for this beautiful pattern which I cannot wait to sew for my 12 month old who is soon to start creche. I have a question regarding printing the pdf – I download it as a pdf then scale it to 100% as I do with other pdf patterns but for some reason the 2-inch square always doesn’t measure up to 2 inches (it is smaller). Also tried printing it to full page with no success. Help please! Thanks.
Jo, make sure you open and print the file with Adobe Reader. Third-party PDF viewers (especially the ones that come with Apple products) have a tendency to distort the scale when they print. If you print with Adobe Reader, the test square should print out spot-on for you.
Hi Todd, I just followed your instructions for printing from Adobe Reader and it still printed with a less than 2″ square! I’m wanting to make the largest hat and I think it’s going to be too small.
It has to be something locally with your computer and printer, then. I’m sorry I can’t troubleshoot more from here. Perhaps you have someone there that could look for you?
Have you tried highlighting actual size in the print options for your printer? That is what I did and it measures 2″.
I love this hat! I have made 2 of them and each time I have had difficulty with the final part of fitting the inside to the outside and sewing. It works but is not a smooth finish. I followed the instructions closely the first time and the second time I did the edge-stitch then went back to hand-stitch. Neither one looks good enough to make this a reversible hat. Any suggestions?
Deb
Deb,have you tried doing it the way Saskia mentioned in the first comment? I tend to make all reversible items like this, so make a full hat of each fabric, sew wrong sides together leaving a 2″ gap, use the gap to turn right side out and topstitch? When reading this tutorial I wondered how strong and durable handstitching would be so thought I’d follow the method mentioned above. worked really well for me 🙂
Katie,
I’m going to try this, thanks! Do you still use the interfacing? If so, in only one side or both?
Thanks!
Deb
Just had friend from local library ask me about a hat for her 12mth old grand-daughter.
Naturally, I referred her to Oliver +S, and this pattern.
Has anybody ever tried this with knit fabric? I have much in my stash but no cotton.
I have :). It is some sort of thin, not very stretchy knit, the hat does not have any interfacing or lining on top and crown (so there is only 1 knit layer), the brim has interfacing and lining like the pattern describes. I made the hat 2 years ago and it still holds and works well. But I am not sure it would work with stretchier knit.
I have just printed this pattern. Initially the 2″ square was just under measurement, but when I clicked the ‘fit to page’ option off when I set it up to print it came out true to size.
I hope this suggestion helps Deborah
Can anyone comment if this pattern fits true to size? My kids have large heads and if the Large is a 21″ circumference then it’s probably not going to work for us? Is there a larger version available? Or can I just cut it out an inch larger all around to make it bigger overall? Any ideas would be appreciated. Thanks!!!
When I made my hat a little bigger for an older child, I just added about a half an inch to the ends/seams. I did this for the side pieces and brim. Then I re-drew the top (free-handed it) and added the same amount all around. Hope this helps.
The pattern pieces say to cut interfacing for Pattern piece B but the instructions in the tutorial never mention using it. Have you all used interfacing on part B (the vertical, bucket part of the hat) ? seems like it would need it.
The interfacing goes on the brim. I think it says so but yes, I did use it.
Medium came out to be 20 1/2 inches. Too big for my granddaughter. Anyone have sizing for Small and Extra Small?
I am struggling like never before! I am going on extra small pattern. My “dome” has excess material when I’m pinning to the “side”. I have two pieces of material (7c side cut 2) this is written on both sides, so I’ve cut 2 & I’ve cut 4. 2 pieces seem to pull the dome smaller & 4 pieces is just too excessive. Brim = same deal, is it 2 pieces or 4 pieces or fabric of fabric A? Again, 4 seems excessive but the whole design gets squished & I have pleats in my sewing to make up for the overlapping material…
I’ve learnt how to sew visually, so maybe I’m just not the kind of learner that can read & understand! I wish i could share photos, does anyone have any tips?
Hi Alice..I have made a few & they turn out great..There are 2x7a &2x7c pieces..Join the 2 a pieces together in centre & tape forming 1 piece same for 7c..cut out 2x 7c pieces each of fabric & lining,,then 2 x7a pieces of fabric, lining & interfacing. I sew mine as 2 separate hats then sew together at brim right sides together leaving an opening to turn right side out then press brim well. top stitch 1st row around brim close to edge to catch in the opening. Hope this helps..Janelle
Thank you Janelle!
I’m determined to master it, I have to make sense of these things before branching out into more complicated projects! That does help, I have no idea what I was trying to do before but I was all “knees & elbows”, material everywhere with random pieces that didn’t fit 😀
Hi! I am trying to make this pattern and I cut all of the pattern pieces, but when I read the directions and the tutorial, it doesn’t mention when to use the 7c pieces? It says to use 7a twice? Am I missing something, or was there a typo somewhere? I am not sure what to sew as the crown and what to use for the brim. Thank you!
Hello – I love this bucket hat pattern and have made 3 hats now woo. But I find when I do the top stitching I have loads (like 32) of loose thread ends that I have to hand sew in to the seam. I start the top stitch on seam of the brim but usually on the underneath side these threads aren’t starting/beginning on the seam and are a few cm’s away – it’s quite time consuming and a bit messy – any tips?
I have made this bucket hat numerous times, and I assemble it a bit differently. I hope this will make sense: I make two complete hats–one lining, one outside–but don’t sew them together just yet. Then I put the two right sides together of the hats, turn the lining inside out and fit it up against the right side of the hat. Then I sew around the brim of the hat to sew them together, leaving a space for turning. Once the hat has been turned right side out, I then do the top-stitching around the brim to sew the opening closed. Doing it this way, you can do all your top stitching on only one layer at a time, and then you aren’t having trouble sewing blindly. Hope this makes sense. Good luck!
Hello thanks for the reply- Sorry I didn’t see it sooner (I didn’t tick subscribe to email notifications for reply – whoops)! Thanks for that version – I too prefer that method. I’m still having trouble with the loose threads though? I’ve linked a picture of what I mean, I still end up with lots of topstitching ends which ever way I’ve tried it?
Thanks !
Are the seam allowances included in the pattern or not?
Thanks
Yes, they are.
Hi I a, making the extra small hat and see that 7a and 7c pattern pieces are different in depth for the brim do I need to cut 7c smaller to match 7a. I have made the large size and it worked perfectly.
I’ve just made two of these. Fabulous pattern, easy to follow and turned out brilliantly. I’m a novice, so fitting the crown was a bit of a struggle, but I got there. Thank you for the excellent instructions.
Great pattern! Took me 2 days to make one and I’m so happy about how it turned out. One of my fabric has a stripe patter so it takes some thinking to match the pattern but when I saw the finishing product it definitely worth the extra effort. I used the method of first sewing the 2 caps together and then turn the right sides out. I split the seam allowance and ironed them first, before turning them right sides out which makes the last step (top stitch brim) easy and neat.
Hi there, I’m making with the brim step now but anyone please help me how can I sew with different colour of the tread from the fabric A and fabric B. thanks
I use a different color bobbin thread than the thread on the top spool. Hope this helps! Good luck.
Thanks Nancy! I’m beginner and your advise help my learning easier 🙂
Thank you so much for the free pattern. I made these for two of my grandkids and they look great. Also featured the pattern in my blog post at whatsnanamaking. I really enjoying making these.
Great pattern. Lots of fun to make this hat. I followed the pattern instructions for the first hat, Then simplified the process by sewing two separate hats put them rights together stitching around the brim leaving a 2 inch turning gap. For detailed instructions with photos please visit my blog. I also added chin straps.
Is the crown supposed to be oval, or am I reading the paper pattern wrongly?
Hi everyone, I have made a few of these hats and I’m going to try the suggestion using math (yuk) to make bigger ones….Although I would really appreciate it is someone could post bigger size patterns.
As for the loose threads from stitching around the brim, all I do is thread the start and finish threads to the ugly side of the hat , tie the corresponding threads together and snip to about 1cm
Hi
Could someone please tell me what size child the large would fit?
Thank you
Janice
Looking to make this hat for my first grandchild. Do you still offer this as a free pattern?
Hi Wendy! The bucket hat is now available in the shop as a single-pattern download.
Thank you so much! I found it and will be purchasing it. Having a granddaughter now gives me someone to sew it for. THX again for your reply! Stay safe!