Hello and welcome! We’re so glad you’re joining us for the sew-along.
Here is the daily plan for this week’s Gallery Tunic + Dress sew-along:
- Day 1 (today) Prepare the tunic/dress back
- Day 2 (Tuesday) Assemble the placket
- Day 3 (Wednesday) Prepare and attach the collar
- Day 4 (Thursday) Attach the sleeves and pockets and sew the side seams
- Day 5 (Friday) Sew the sleeve cuffs, hem the tunic/dress, and finish the sleeves cuffs
Tag your in process photos of your Gallery garments with #lieslandco on Instagram so we can all see.
We are delighted to have our good friend Brittney from Sewing for Four (Plus One!) hosting the sew-along. Take it away Brittney!

I was so excited when I was contacted about helping out with the sew along. The Gallery Tunic is one of my favorite items in my closet, the two that I made as soon as the pattern was released are still in heavy rotation. I have been meaning to make a few more, so this was perfect timing. I previously made both of mine from a lightweight gingham shirting to mimic a favorite store bought top in a similar style, so this time I chose to use a rayon challis that feels like heaven. I love that a simple change in fabric makes a difference in the pattern, you can easily dress it up or down depending on what you choose. The pattern is well written, as always, and worth the time it takes to sew. I don’t think I’ve seen a Gallery tunic or dress that I haven’t loved, don’t you feel the same?
Everything is ready, the needle is threaded, and the machine is turned on. So let’s begin, shall we?
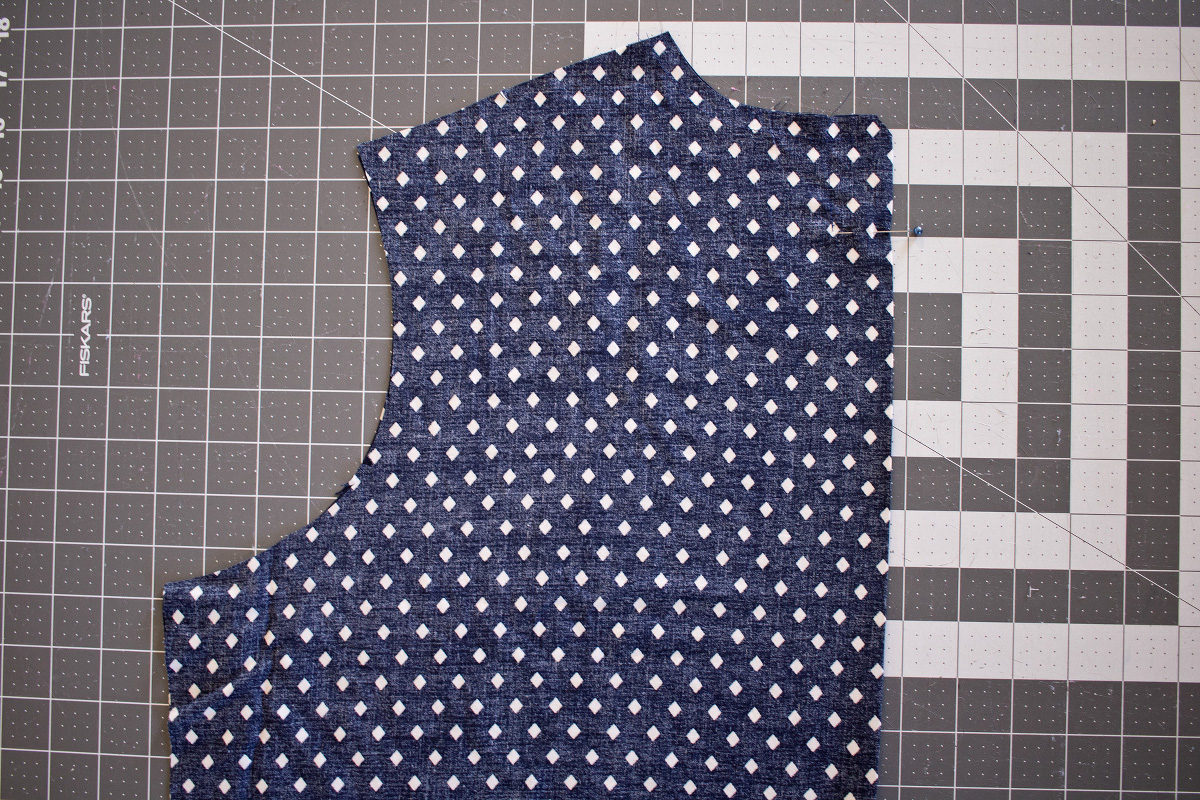
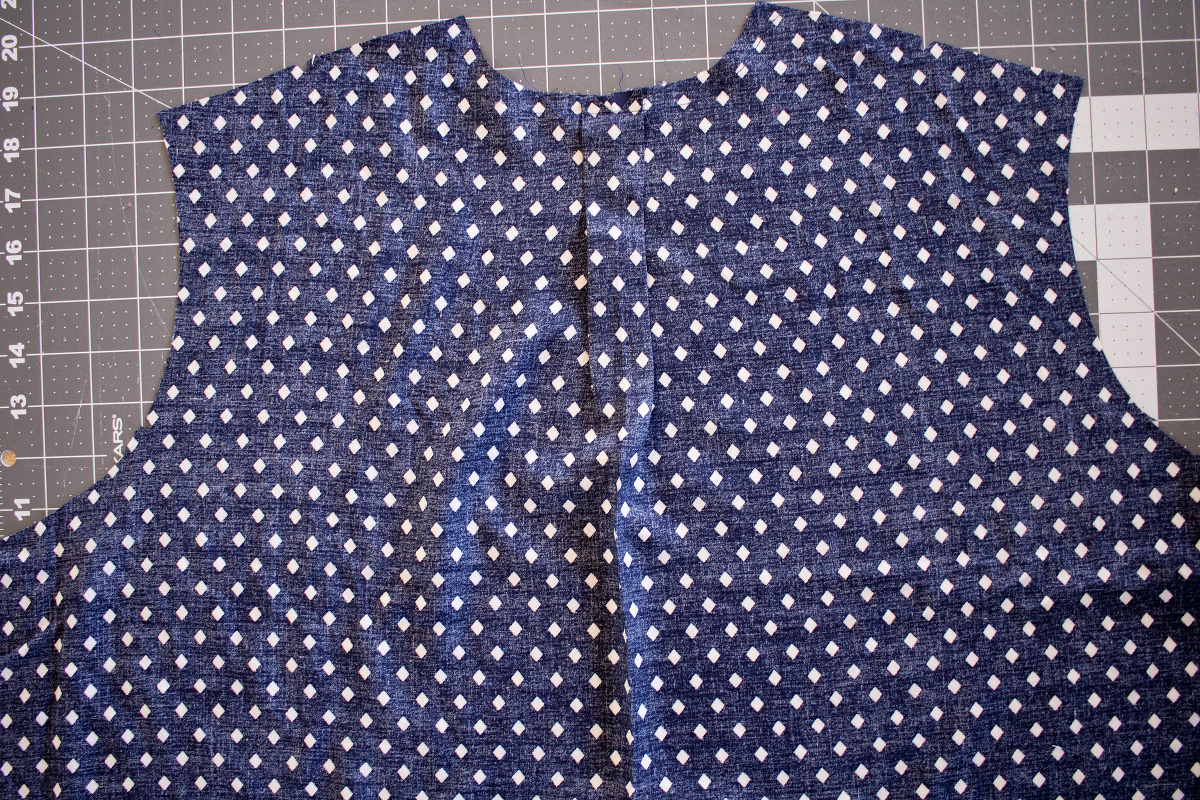
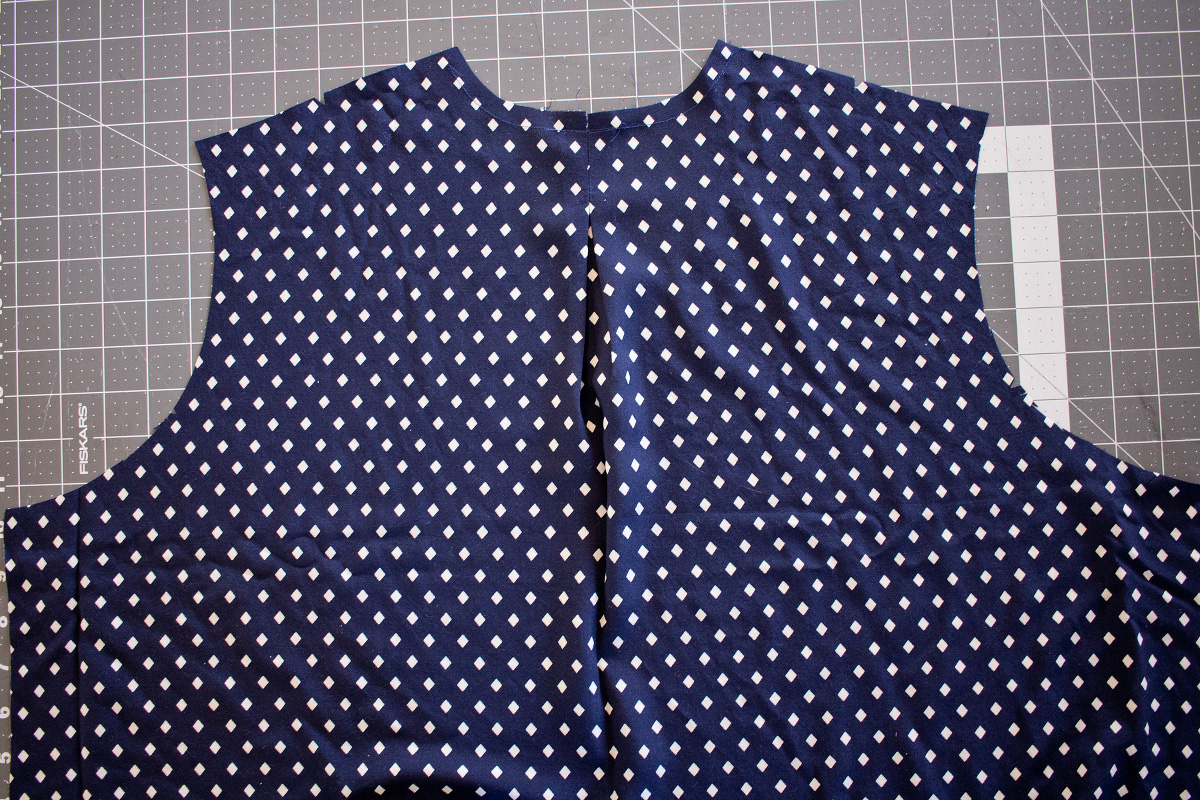
Day 1
Prepare the tunic/dress back
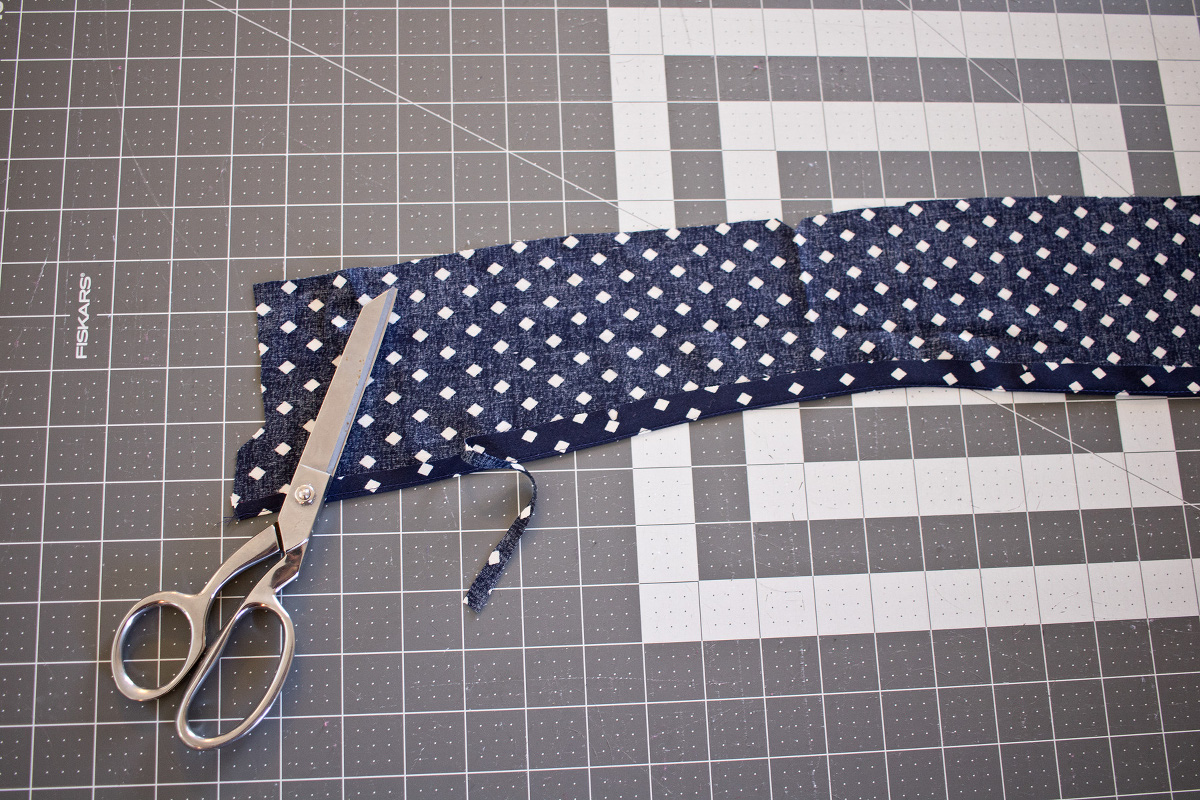
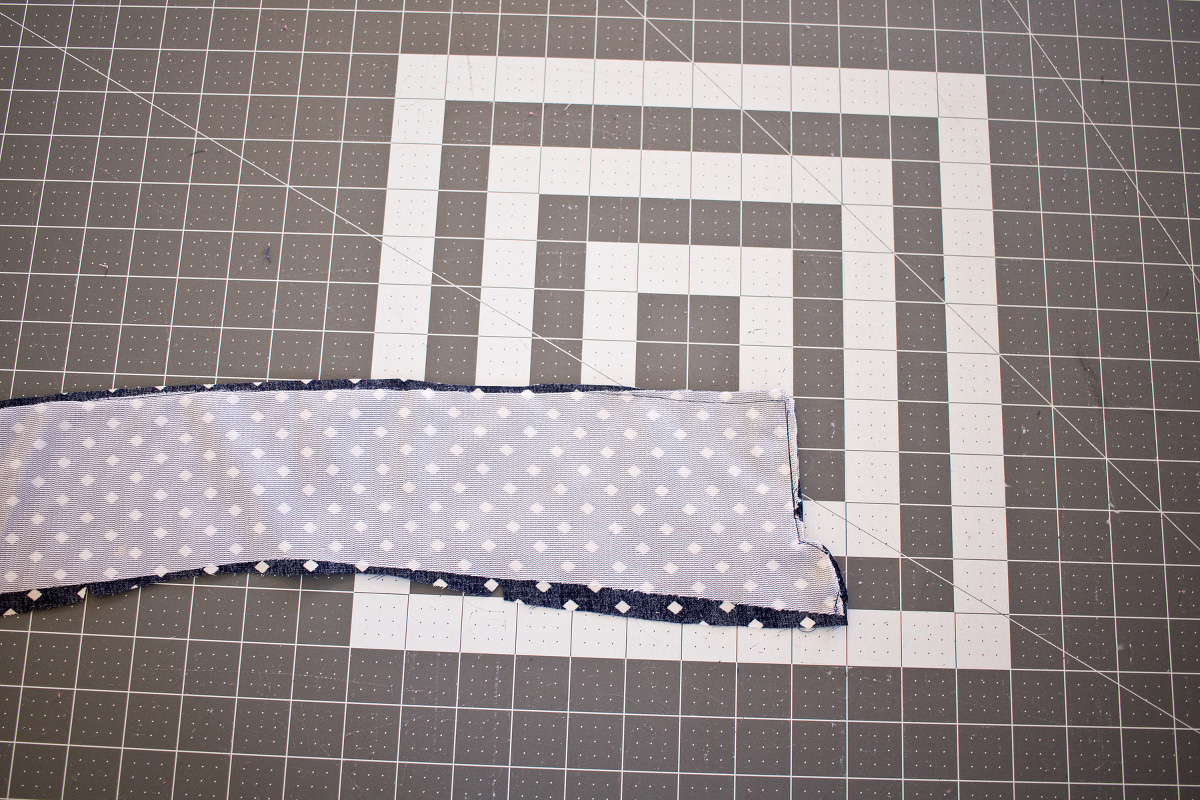
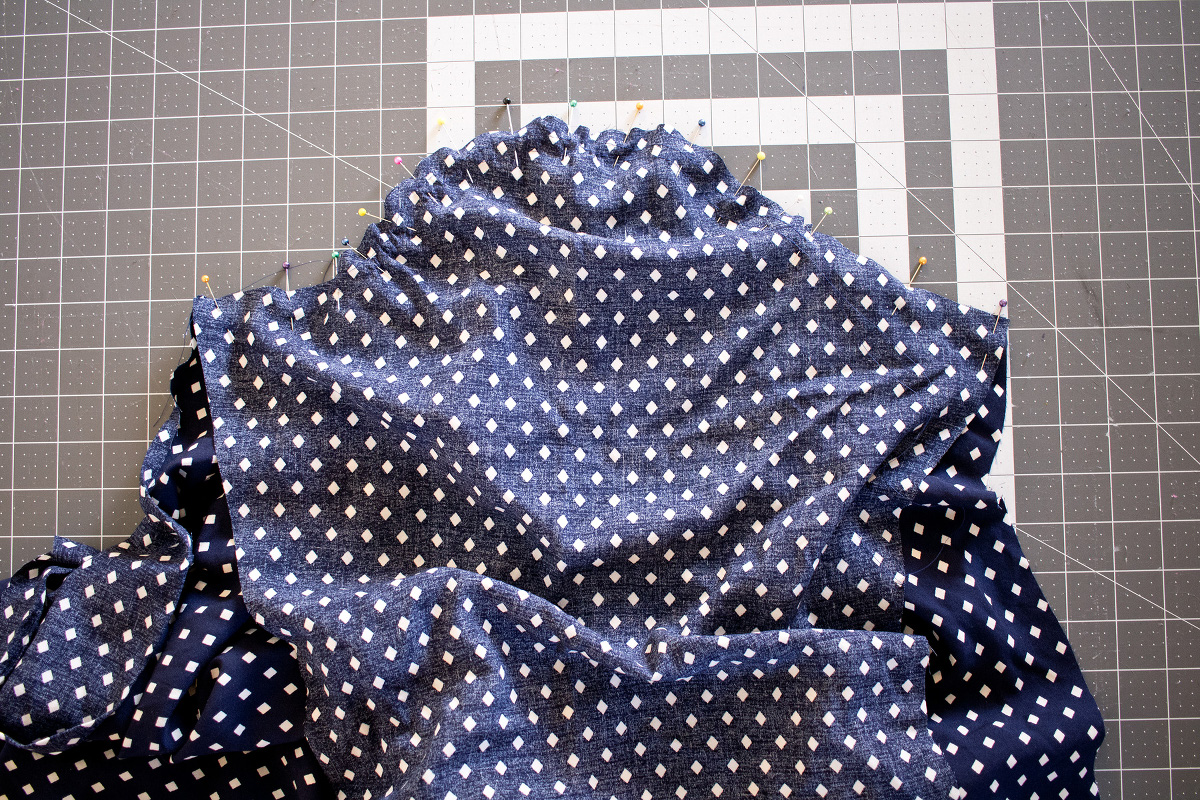
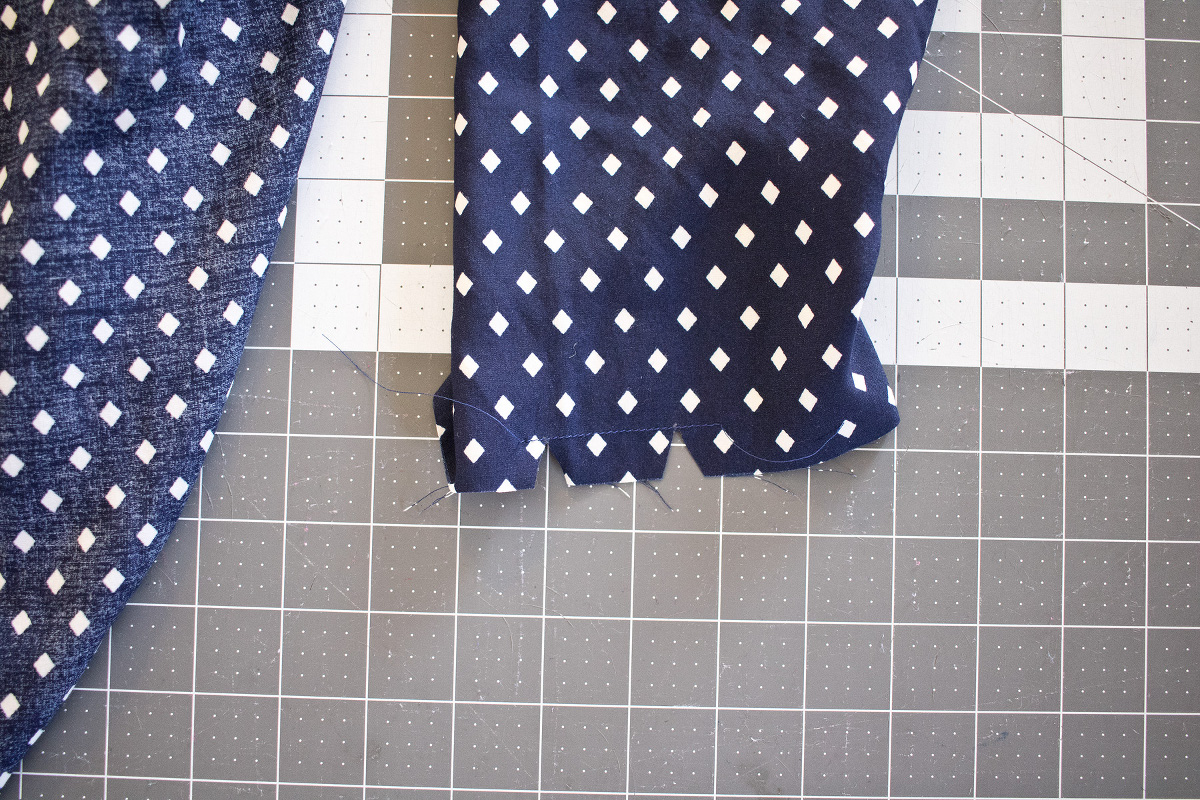
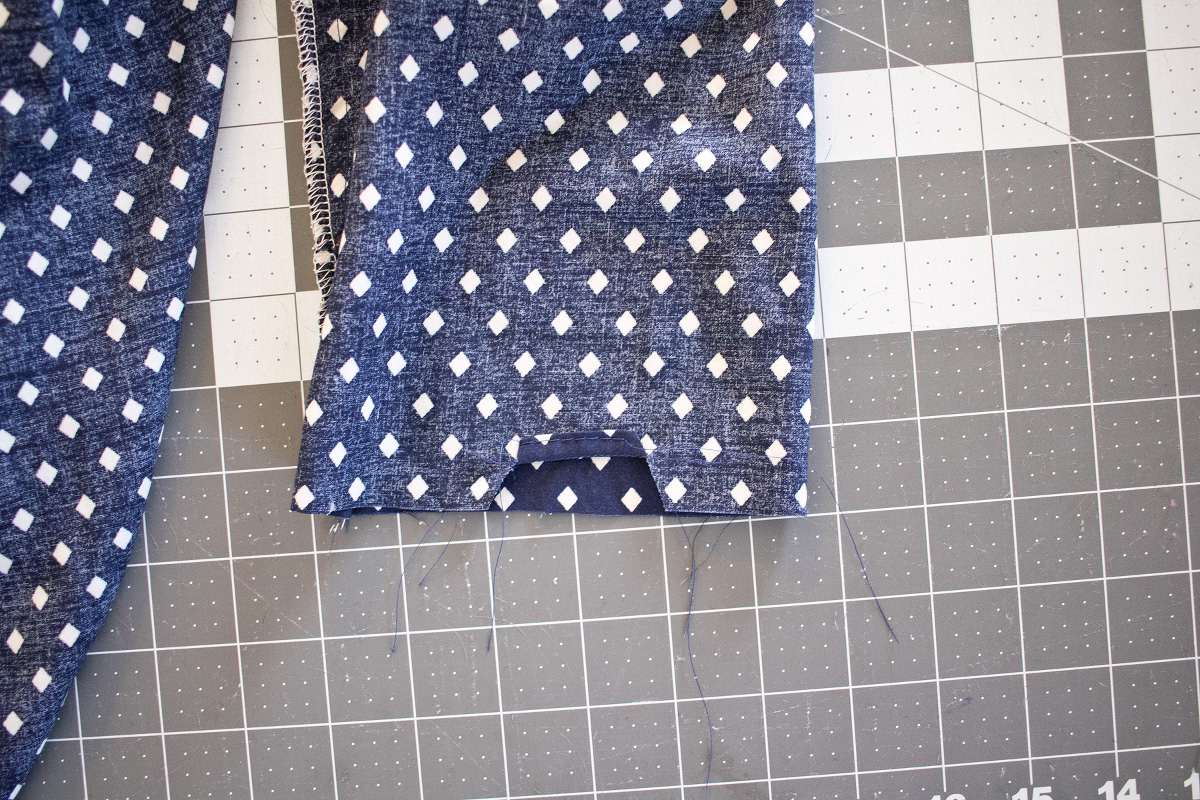
1. Fold the tunic/dress in half with right sides together, aligning the notches and raw edges. Stitch along the center-back pleat line you transferred from the pattern piece, backstitching or lockstitching at the neckline edge and at the dot.
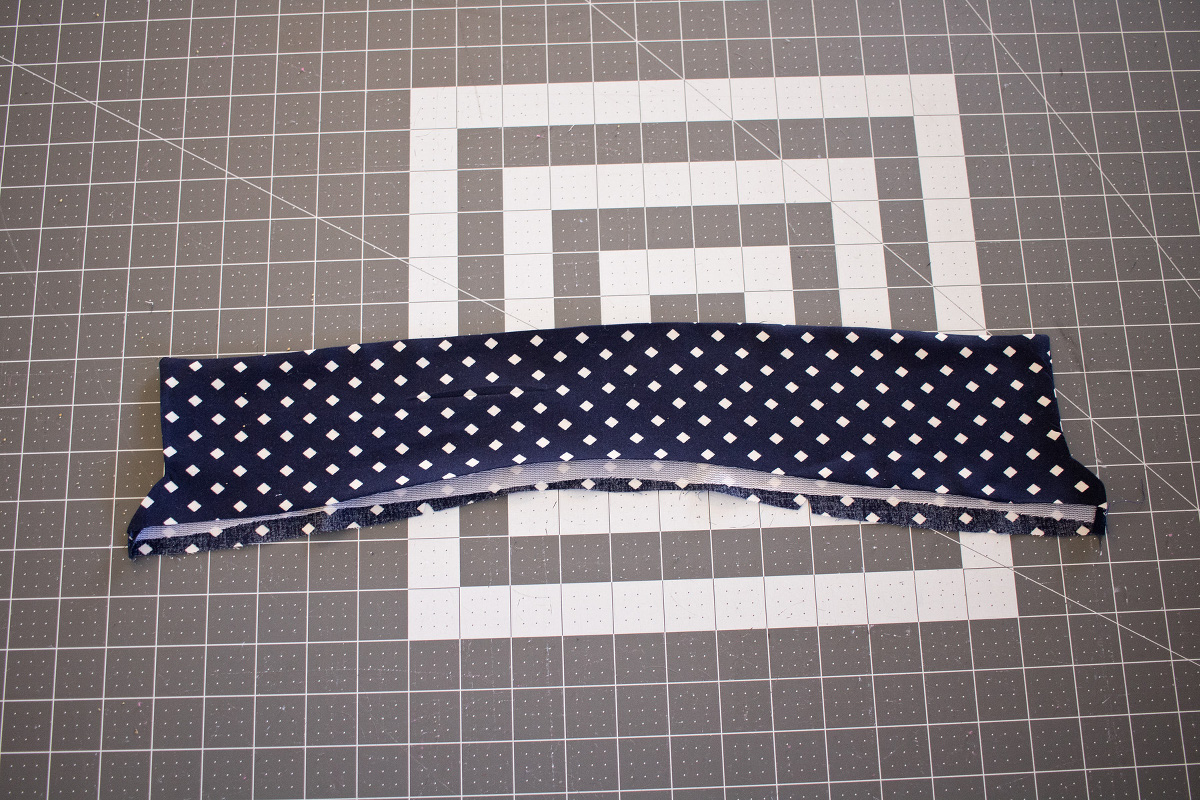
2. Press the fold; then open the tunic/dress-back piece wrong-side up. Open the stitched center-back pleat and align and pin its center fold to the seam line. (Use the center-back fold to help you center the least perfectly.) Press the pleat to form a box pleat on the fabric’s right side and baste the pleat to the tunic/dress-back’s top edge with a 3/8” seam.
All OK so far? We’ll see you back here tomorrow for Day 2, see you then!
Day 2
Good morning sew-alongers! Well, here we are at day two of the sew-along. We’ve got quite a few steps to accomplish today, so let’s get going.
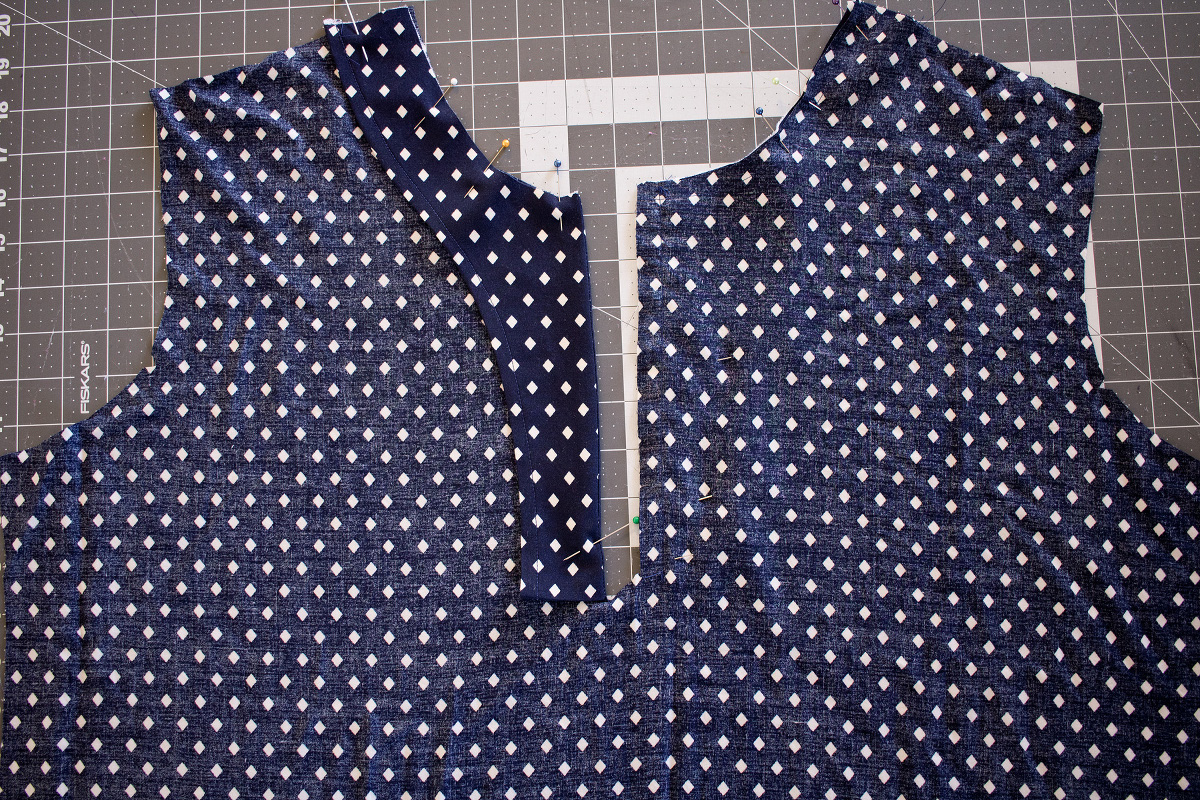
Assemble the placket
1. Finish the curved outside edges of the placket and the lower outside edge of the short side of the placket using your preferred method. (You prepared the placket and set it aside in Step 1 of the “Before You Start” section.)

HINT: For a clean finish, and to give the edges of the placket a neat appearance on the inside of the finished garment, sew the edges of the placket with a zigzag stitch or with a serger (if you use a serger, take care not to trim the edge as you finish it). Fold and press the finished curved outer edges to the wrong side by about 1/4” (if you like, you can sew a line of basting stitches to serve as a folding guide), then edge stitch close to the fold to finish it. Leave the lower edge unfolded and simply zigzag-stitch or serge the corner edge, to finish it.
2. Fold and press the cut tunic/dress-front fabric in half lengthwise to find the center-front fold line. Use tailor’s chalk or a water-soluble fabric-marking pen, mark that line on the fabric’s right side.
Next, pin the placket to the tunic/dress front, with right sides together, matching the top raw edges and the center-front lines.
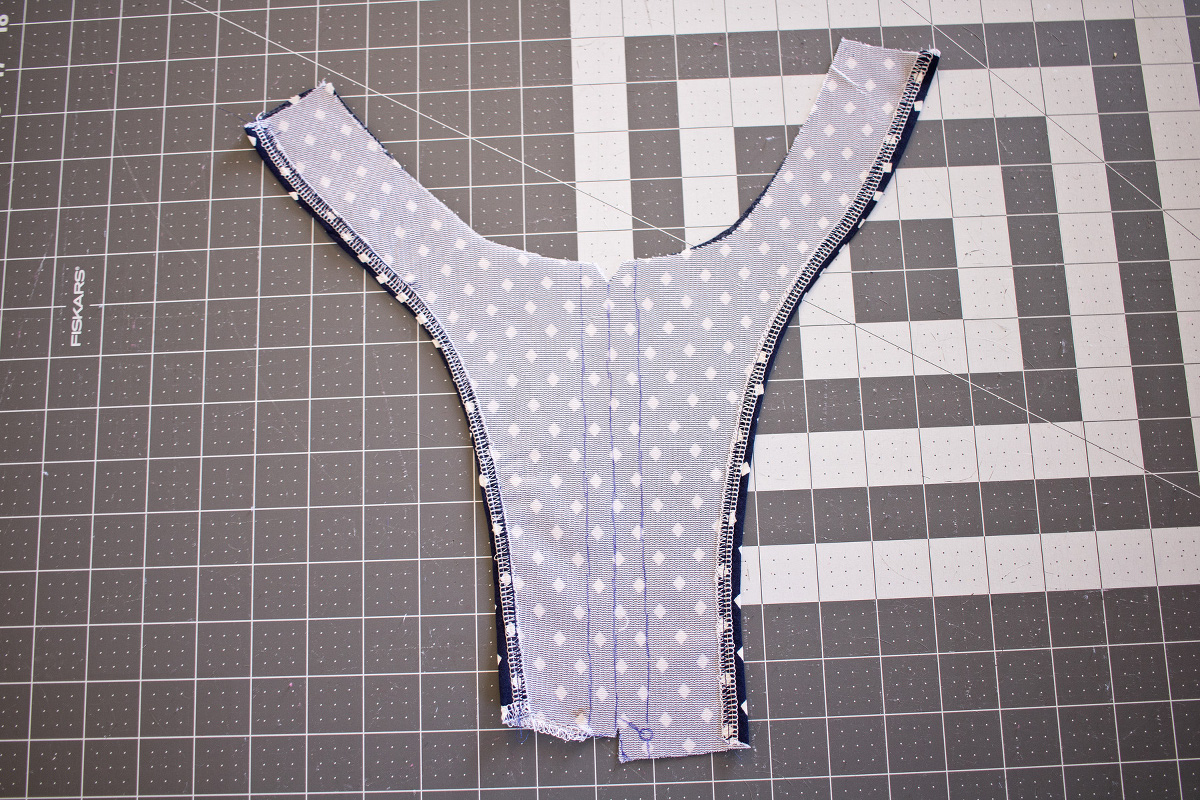
Stitch along the two marked parallel (vertical lines on either side of the center-front line, stitching from the neckline to the bottom of the placket on the left side and stitching from the decline to the dot on the right side of the placket, backstitching or lockstitching at the beginning and end of both stitch lines. The two rows of stitching will be the same length; the placket itself is longer on one side than the other.
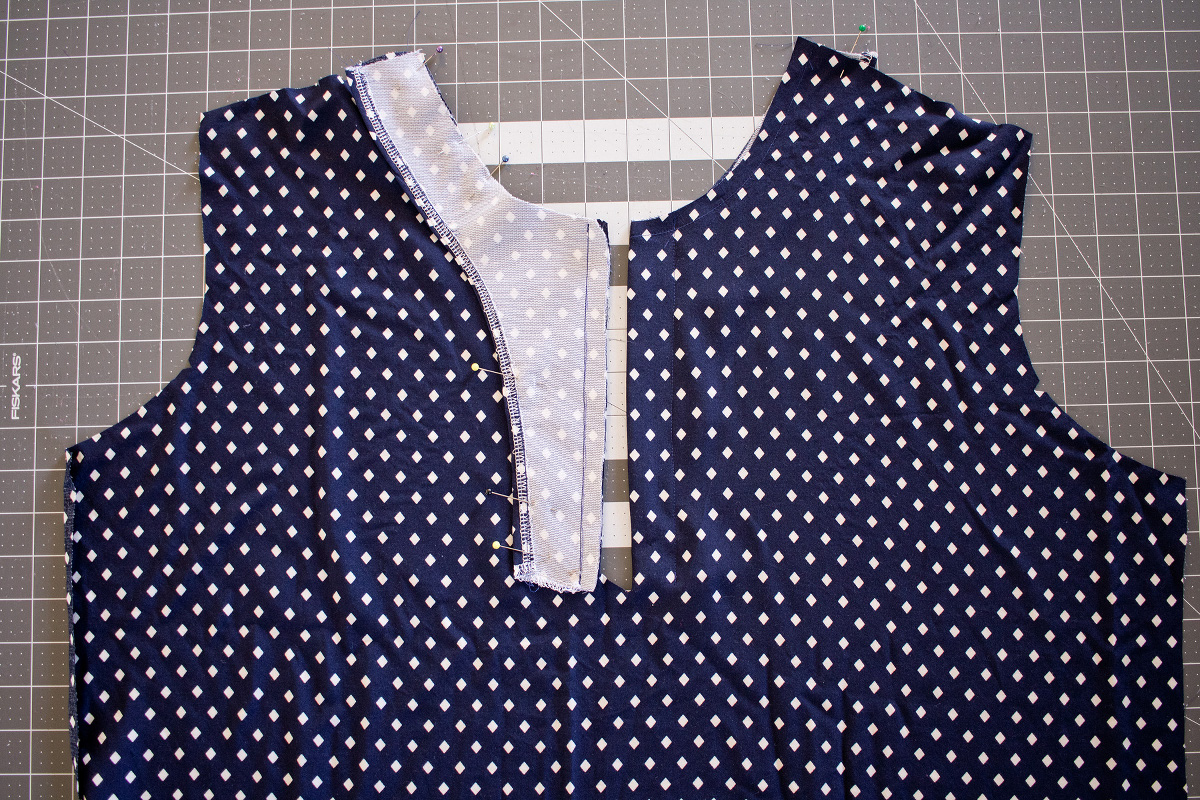
3. Cut through both the placket and tunic/dress fabric along the center-front line to about 1/4” from the placket’s bottom edge, and then cut at an angle through both layers to the dot on the right side of the placket, being careful not to cut through the stitches themselves. (The angled line you transferred from the placket template will serve as the cutting line for this step.) Finally cut through only the placket layer along the remaining center front line to completely separate the right and left placket. Trim off the little flap. Be careful not to cut the tunic/dress fabric in this part of the step!
4. Fold up and press the longer placket side’s raw bottom edge to the wrong side by 1/2” so both sides of the placket are now the same length.
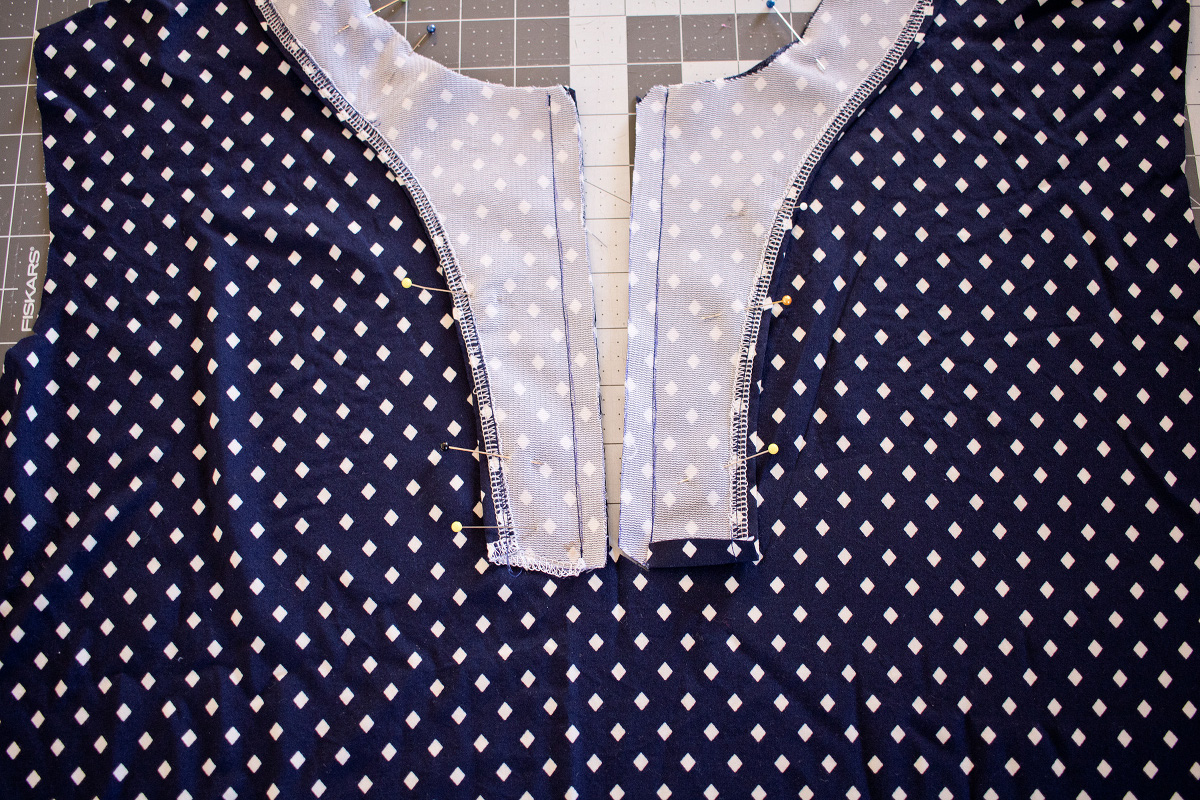
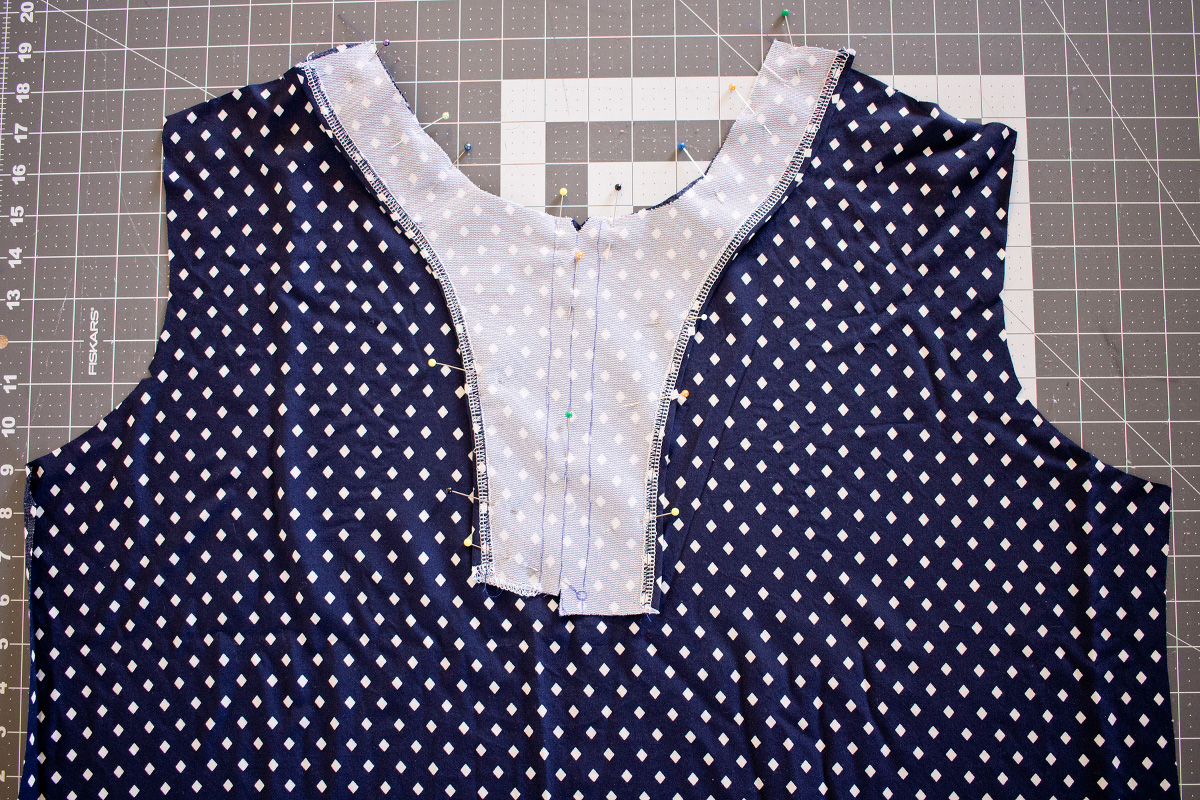
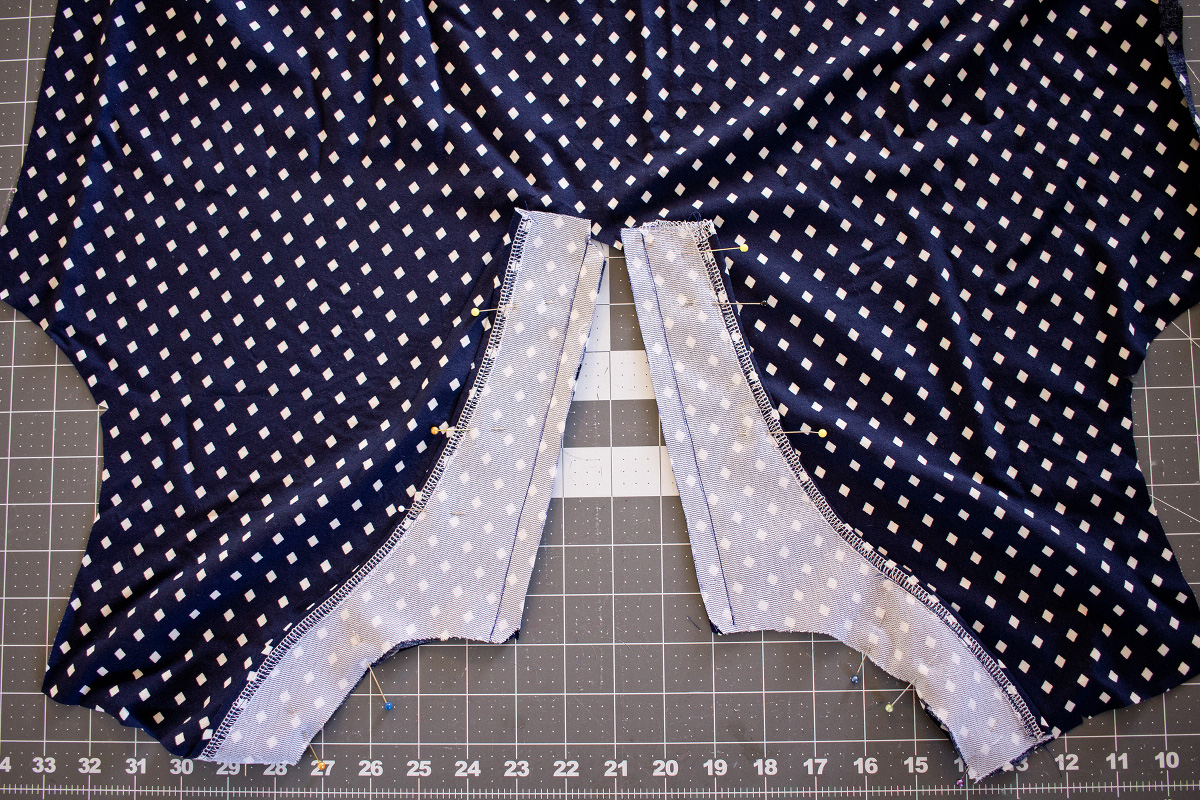
5. Fold and press the placket side with the folded bottom edge (on the wearer’s left side) toward the center-front cut, along the seam line. Then wrap this placket side around the center-front cut line, and fold and press it to the wrong side of the tunic/dress front, rolling the seam slightly toward the wrong side of the tunic/dress so the placket doesn’t show on the right side. Align and pin the placket in place, matching the neckline and shoulder of the placket to the neckline and shoulder of the tunic/dress front.
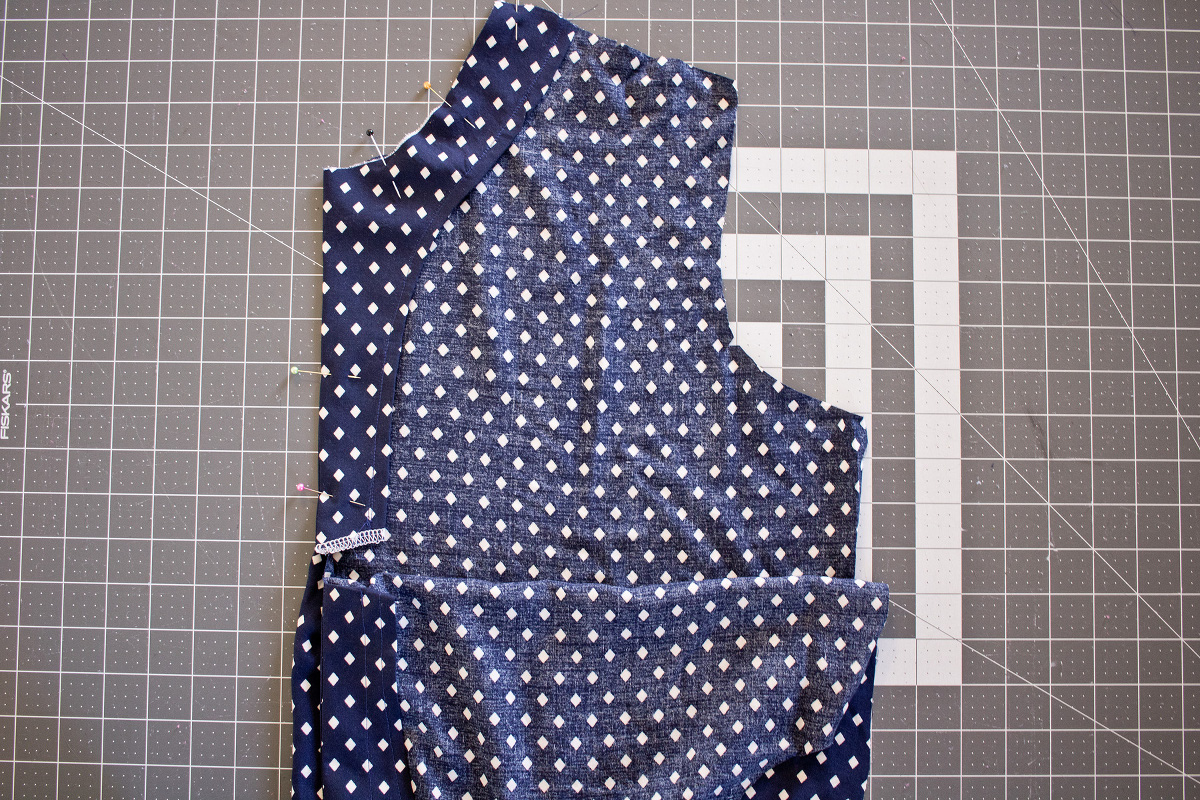
6. Turn the tunic/dress front to the right side and, using tailor’s chalk or water-soluble fabric-marking pen, draw a line 1” from the folded edge of the placket starting at the neckline and ending at the bottom edge of the placket (the drawn line will be parallel to the fold line of the placket). Topstitch along this line to finish the wearer’s left side of the placket, lockstitching or backstitching just a few stitches at both ends.
7. Repeat steps 5-6 with the opposite side of the placket (the wearer’s right side), pressing it toward the center and then around to the back. As you wrap this side of the placket around to the wrong side, fold the tunic/dress below the placket. If you fold the opposite side of the tunic/dress out of the way, the placket will wrap around to the back. Roll the sewn edge of the placket seam slightly toward the inside so the seam won’t show on the right side of the finished garment. Mark a line 1” in from the folded edge of the placket as you did with the opposite placket and topstitch along this line, lockstitching or backstitching a few stitches at both ends.
8. Working from the right side of the tunic/dress, finish the placket by pinning the wearer’s right-side placket so it overlaps the wearer’s left-side placket. A pleat will form below the placket. Pin the two placket halves together and topstitch across the bottom of the placket, begin the topstitching where your previous lockstitching or edge stitching ended. Then stitch to the edge of the placket. Stitch a second row of topstitching 1/4” above the previous on in the same way to secure the placket.
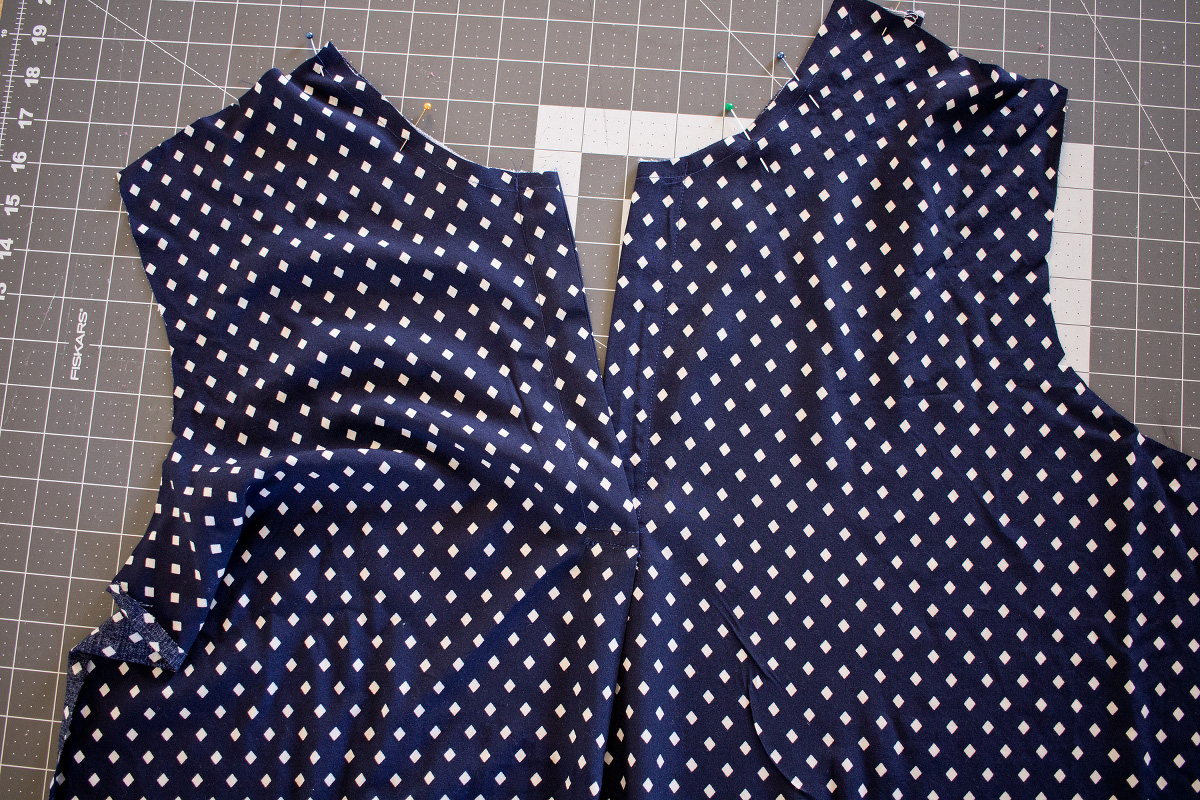
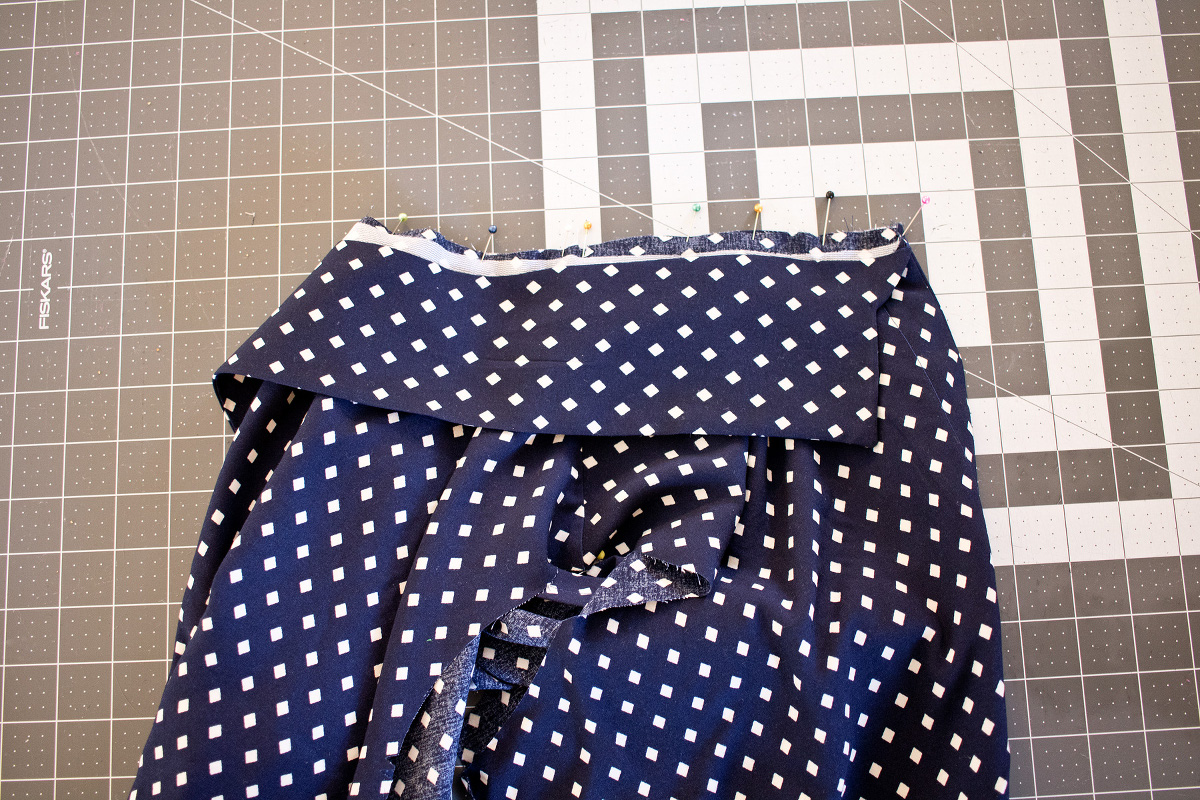
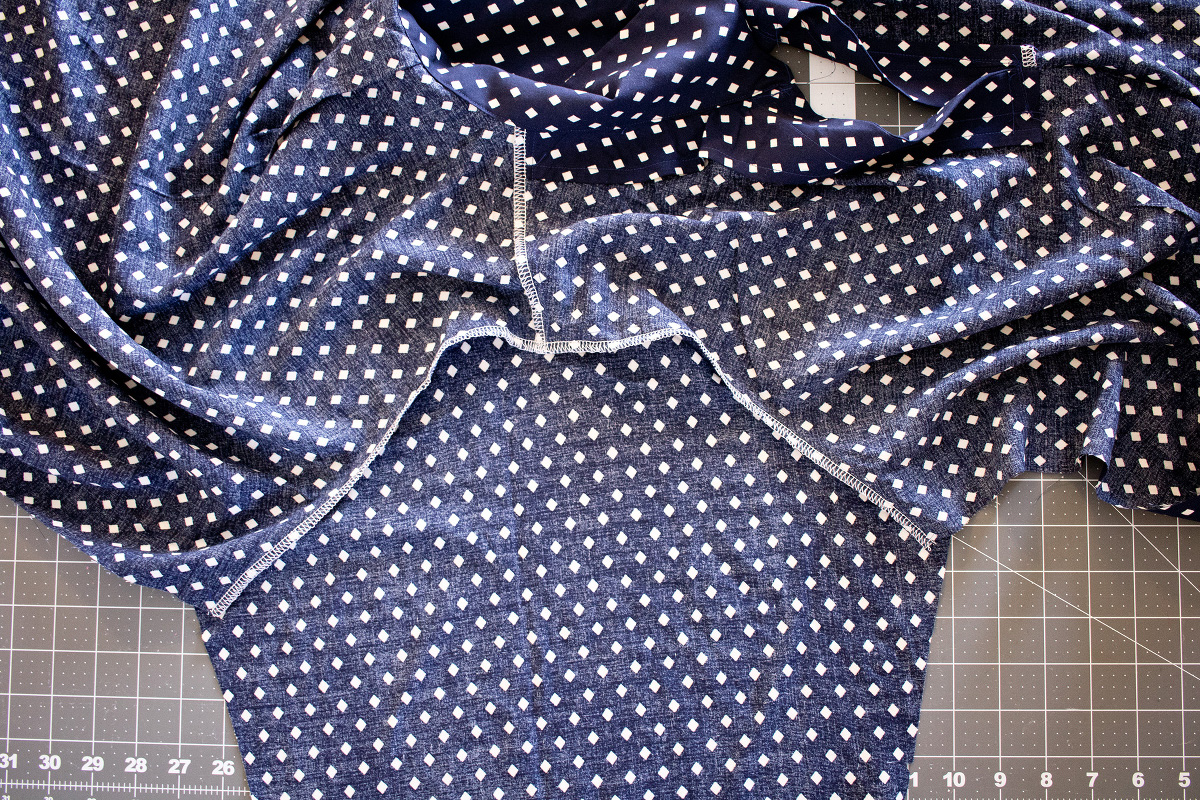
Sew the shoulder seams
1. Pin the front and back tunic/back pieces together at the shoulders, with right sides facing and the raw edges aligned. Stitch the shoulders with a 1/2” seam, backstitching or lockstitching at both ends. Press the seam allowances open and finish them using your preferred method.

So there you go for today. See you tomorrow for Day 3!
Day 3
Hello again, and welcome to Day 3. Let’s dive right in!
Prepare the collar
1. Sew a row of basting stitches 1/2” from the raw edge of the neckline (the notched edge) of the View A collar without interfacing or the View B collar with interfacing. Press the seam allowance to the wrong side along the basting line, which will serve as a folding guide. If necessary, clip into the seam allowances along the curve as you press. After folding and pressing the neckline edge, trim just the folded edge’s seam allowance to 1/4” to reduce bulk in the collar when it’s finished.
2. With right side together, align and pin the two collar pieces together. Then stitch the outside edge of the collar with a 1/2” seam, leaving only the neckline edge unsewn. As you sew the View A collar, pivot at the corners and at the dots.

HINT: For better precision, you can mark the stitching line on the wrong side of your fabric. Also note that setting your machine to a smaller stitch length will help you to achieve a smoothly sewn curve for View B.
HINT: When you reach a corner, pivot partway with needle down and take one stitch before pivoting again to sew the next side without breaking the stitching line. The single stitch you take before pivoting the second time will help produce a nice, sharply pointed corner when you turn the collar right-side out.
3. Trim the stitched seam allowances to 1/8” and clip the corners (View A) before turning the collar right-side out. Do not edgestitch the collar yet; you’ll have an opportunity to do this after attaching the collar to the tunic/dress.
4. Turn the collar right-side out and use a chopstick or point presser to gently push out the corners for View A. Press the collar, gently rolling the seam toward the under collar so it won’t show on the finished garment.
Attach the collar
1. Pin the collar to the tunic/dress’s neckline, with right sides together, matching the ends of the under collar to the edges of the unsewn (raw) neckline. Match the notches on the collar with the tunic/dress’s shoulder seams and center-back notch. Stitch the collar to the tunic/dress with a 1/2” seam, moving the opposite folded collar edge out of the way temporarily and backstitching or lockstitching at the beginning and end of the seam.
HINT: It takes a little more time, but you might find it helpful to hand-baste the under collar before stitching it in place. The basting will hold the layers together more securely and allow you to focus on stitching (rather than removing pins) when you machine-stitch.
2. Check to be sure no pleats or puckers formed in the neckline seam and adjust, if necessary, by ripping out the seam around any puckers and re-sewing it. Then trim the neckline seam allowances to about 1/8” or 1/4”, and press the seam allowances toward the collar. Use a blindstitch or slipstitch to hand-sew the collar’s opposite folded edge to the neckline, so it just covers the stitching at the neckline. If desired, edgestitch the circumference of the collar or collar band from the right side to finish it.

HINT: When edgestitching by machine, slip a little scrap of tissue paper under the collar points (View A) to prevent the points from getting pushed down into the machine by the needle.
That’s it for Day 3. See you back here tomorrow!
Day 4
And here we are at Day 4 of the sew-along. Off we go!
Attach the sleeves
1. Sew a row of gathering stitches 3/8” from the raw edge of the cap of one sleeve, starting and stopping at the sleeve cap’s side notches and leaving thread tails several inches long on both ends of the gathering stitches. Then sew a second row of gathering stitches 1/4” below the first row (5/8” from the raw edge), again stitching between the notches and leaving long thread tails. (Note that the sleeve cap also has a center notch, which you’ll use later to help align and pin the sleeves and armhole to join them.)
To prepare the View A sleeve for hemming, sew a line of basting stitches 1/2” from the sleeve’s bottom edge. Using the basting stitches as a guide, fold and press the sleeve seam allowances to the wrong side by 1/2”.

2. For View A, fold and press the bottom edge to the wrong side again, this time by 2 1/2”. (Use the notches at the sides of the sleeve as a folding guide.) Unfold the sleeve for the next steps without losing the creases, which you’ll use later for finishing the hem. Repeat step 1 to prepare the second View A sleeve.
3. For Views A and B, align and pin the raw edge of the sleeve cap to the raw edge of the tunic/dress’s armhole, with right sides together and aligning the center notches on the sleeve and the armhole. Pull on the tails of the gathering threads to cinch up the extra fabric and make the sleeve fit the armhole, adjusting the ease evenly across the top of the sleeve so there are no puckers or pleats. Then finish pinning the eased top edge of the sleeve to the armhole. Stitch the sleeve to the armhole with a 1/2” seam. Press the seam allowances toward the sleeve and finish them together using your preferred method. Attach and finish the second sleeve the same way.
Sew the side seams (View A)
1. With right sides facing and the raw edges aligned, pin the front and back of the tunic and sleeves together, matching the underarm seam and the notches. Unfold the sleeve hem (View A) and join the side seam and sleeve with one continuous 1/2” seam, starting at the dot near the bottom of the tunic and ending at the sleeve, backstitching or lockstitching at both ends. Press the seam allowances open and finish them using your preferred method. Repeat to sew up the other side of the tunic.

HINT: If you sew the side seam from the bottom edge up to the sleeves, you’ll automatically push the armhole and sleeve seam allowances toward the sleeve as you stitch.
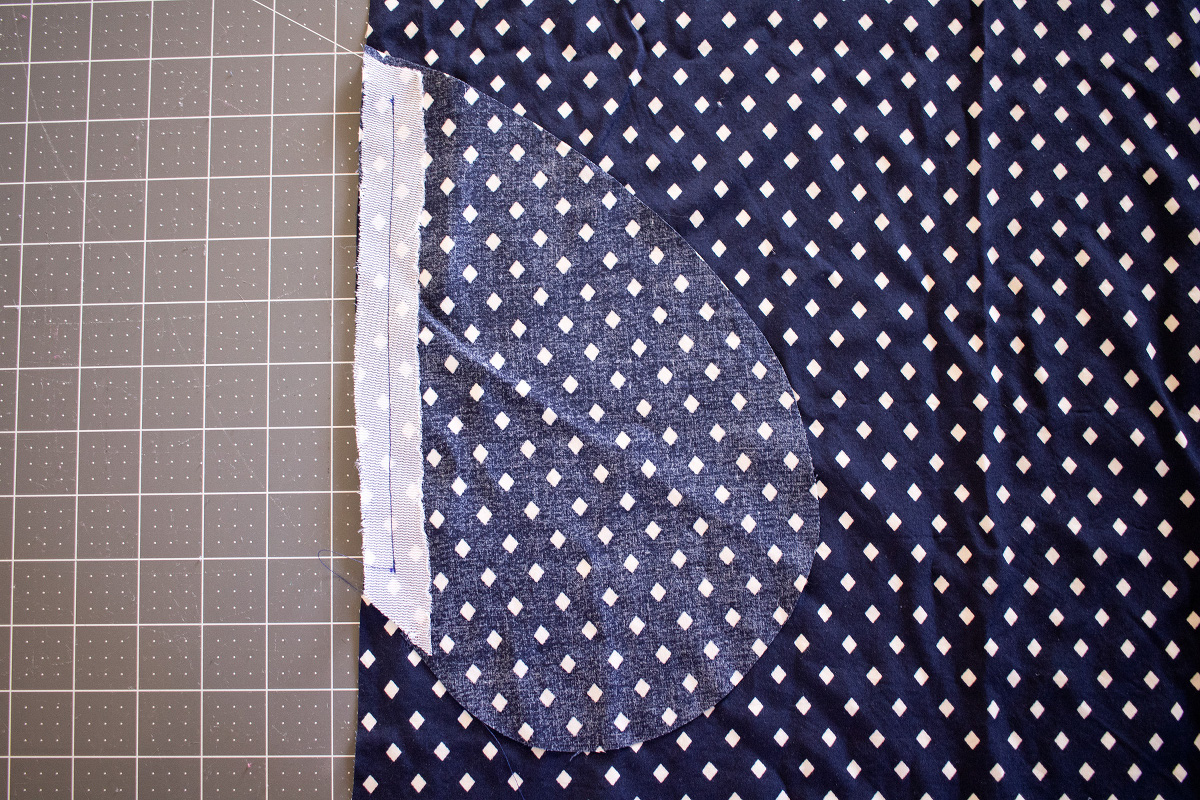
Attach the pockets and sew the side seams (View B)
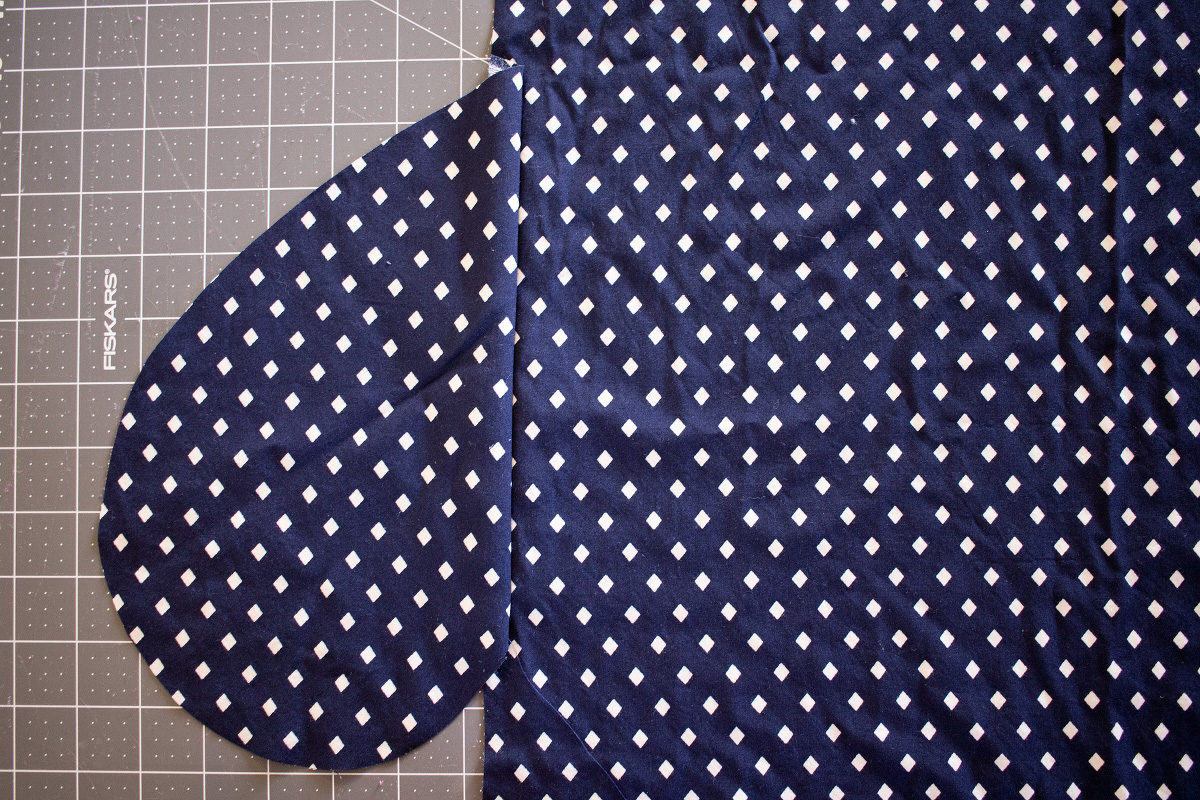
1. With right sides together, pin the front pockets (the ones you prepared with interfacing in Step 3 of the “Before You Start” section) to the side edges of the dress front, matching the pocket placement dots and the raw edges. Stitch the pockets to the dress with a 3/8” seam, stitching from the top edge of the pocket to the bottom edge and backstitching or lockstitching at both ends. (You won’t be stitching through the dots for this seam but will instead be stitching near them.) Then finish the seam allowances together and press the pockets away from the dress.
2. Pin and stitch the second pair of pockets (the pockets without interfacing) to the dress-back pieces, with right sides together and matching the pocket placement dots and the raw edges. Stitch the pockets with a 3/8” seam, as with the front pockets. Finish the seam allowances of the pocket and the dress together at the side seams where the pockets are located. Press the pockets away from the dress.
3. With right sides facing and the raw edges aligned, pin the front and back of the dress and the sleeves together, matching the underarm seams, the notches, and the pockets and join the side seam and sleeve with one continuous 1/2” seam, starting at the dot near the bottom of the dress, pivoting at the dots to stitch around the pockets, and ending at the sleeves, backstitching or lockstitching at both ends. Repeat to sew up the other side of the dress.
HINT: If you sew the side seam from the bottom edge up to the sleeves, you’ll automatically push the armhole and sleeve seam allowances toward the sleeve as you stitch.
4. Clip into the dress back’s seam allowances at the pocket dots and press the seam allowances open to finish them separately while finishing the seam allowances together at the pocket itself. Press the pockets toward the dress front.
We’re almost done! Come back tomorrow for Day 5 when we’ll be finishing the garment.
Day 5
Welcome back! It’s time to sew things up! Don’t forget to show us your finished garment to be entered in the contest. See the very end for details.
Finish the sleeves (View A)
1. To hem each sleeve, turn the tunic right-side out and refold each sleeve along the previously folded creases before stitching along the innermost fold.
HINT: It’s generally easiest to hem the sleeves with the garment turned right-side out, stitching from the inside of the sleeve and pushing the rest of the sleeve out of the way.
2. Fold the sleeve hem back by 1 1/4” to make the cuff. Tack the folded edge of the cuff to the sleeve at the underarm seam by hand or machine to hold it in place. (If desired, you can also tack the sleeve by hand in a few other spots to help keep the cuff in place when the tunic is worn. Try to take the stitches just inside the fold, so they aren’t visible when the tunic is worn.)
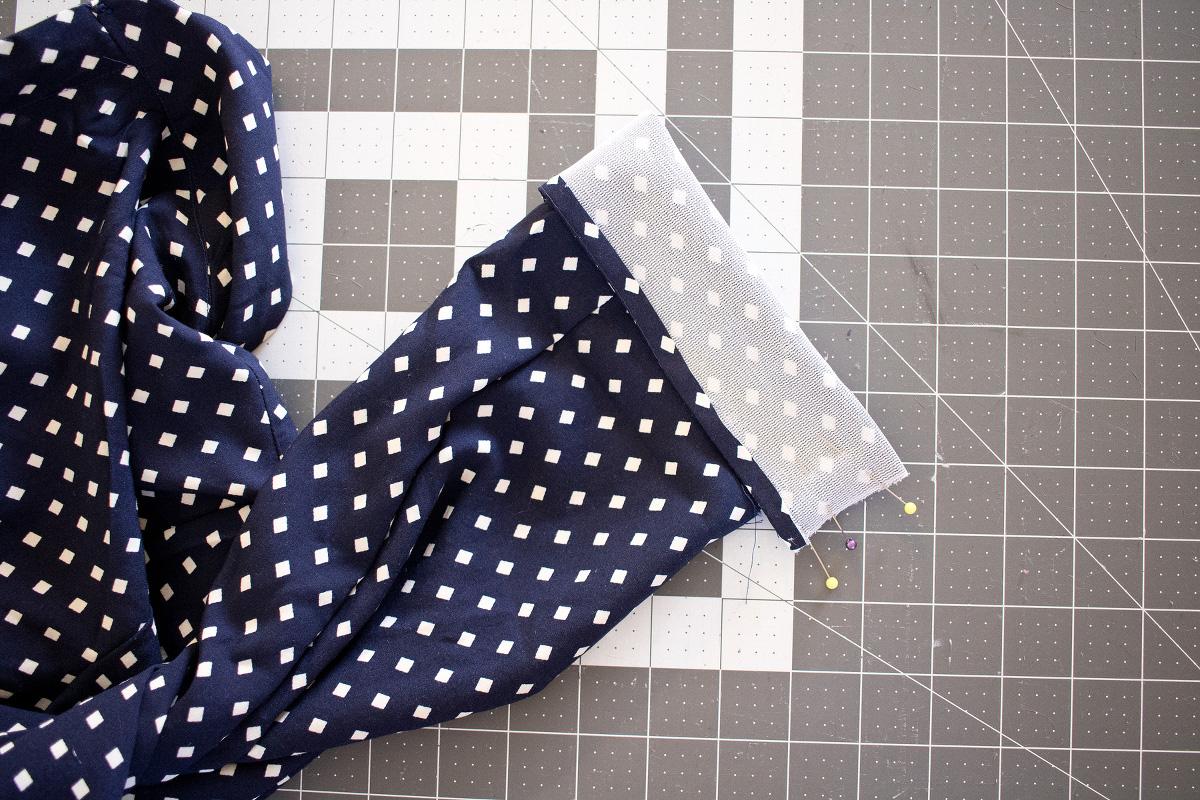
Sew the sleeve cuffs (View B)
1. Reinforce the lower edge of the sleeve by stay stitching through the two dots with a 1/2” seam, starting about 1” before the first dot and stopping about 1” after the second dot. Clip into the seam allowances up to the dots, taking care not to flip the stitching itself.
2. Fold and press the seam allowance between the two dots so the cut edge meets the staystitching. Fold and press again along the staystitching to finish the edge cleanly. Baste the innermost fold in place temporarily.
3. If you haven’t done so already, follow the interfacing manufacturer’s instructions to fuse the cute interfacing to the wrong side of the one sleeve cuff. Baste one long edge with a 1/2” seam and press the seam allowance to the wrong side using the basting stitches as a folding guide. Trim the folded seam allowances to 1/4”.
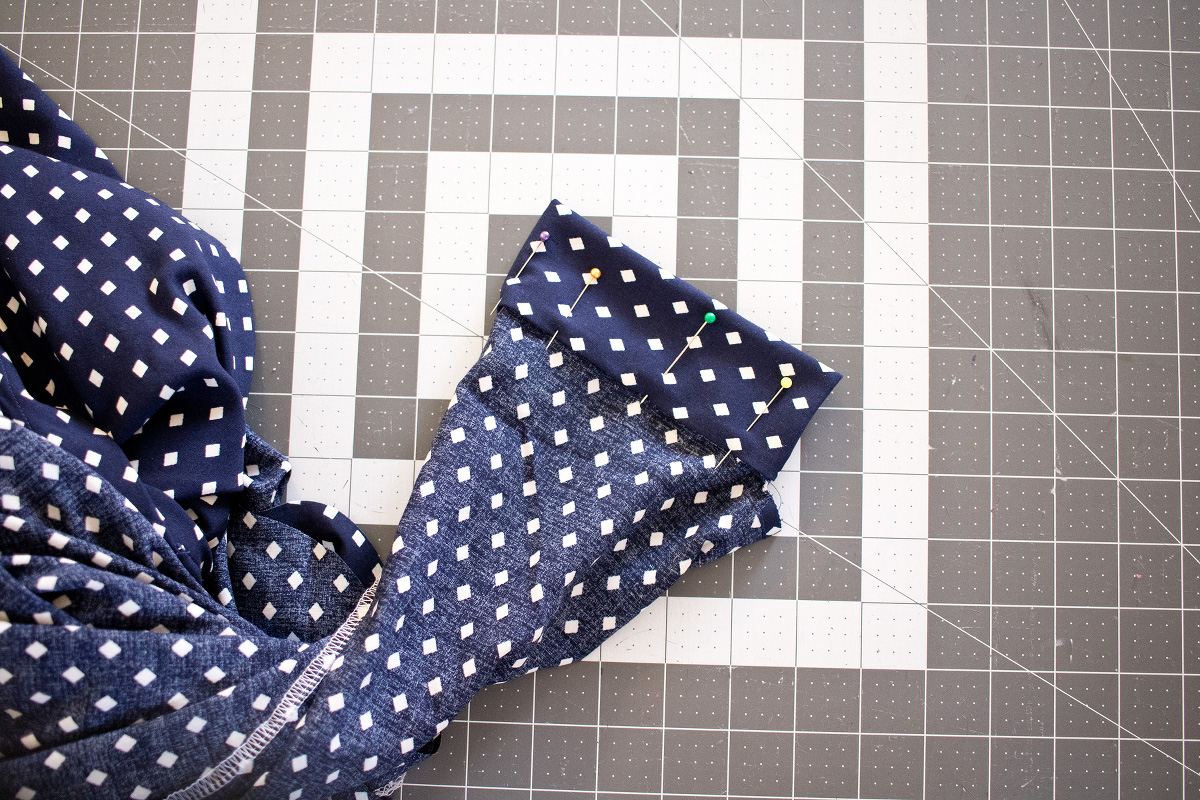
4. Pin the opposite long edge of the sleeve cuff to the sleeve with right sides together, matching the notches and dots, and stitch the cuff to the sleeve with a 1/2” seam, backstitching or lockstitching at the dots.

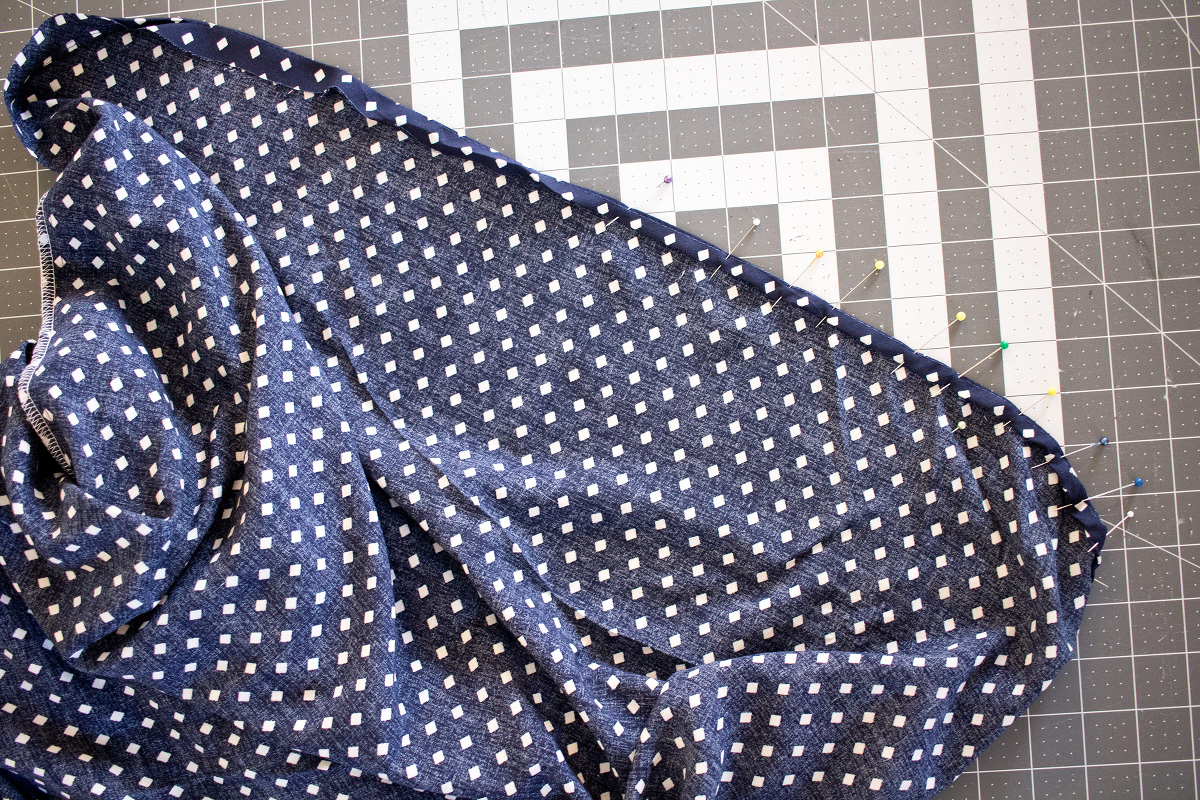
5. Press the cuff away from the sleeve and press the seam allowances toward the cuff. Trim the stitched seam allowances to 1/4”. Then fold the cuff in half, with right sides together, matching the folded edge of the cuff to the stitch line. Stitch the short ends of the cuff to the stitch line. Stitch the short ends of the cuff with a 1/2” seam. Trim the stitched seam allowances to 1/4”.
6. Turn the sleeve cuff right-side out. Pinning from the outside of the cuff, match the folded (unstitched) edge of the cuff to the seamen at the inside of the sleeve. Edgestitch the sleeve cuff to finish it, catching the folded edge in the stitching. When you come to the gap (the part of the sleeve without a cuff and also where you cut, folded, and basted the seam allowances), pivot to stitch across the seam, then pivot again to stitch the innermost folded edge of the seam allowances and pivot again to stitch back down the other side. When you’re done, remove the basting stitches.
7. Repeat step 1-6 with the second cuff and sleeve.
Hem the tunic/dress
1. For the front hem, sew a line of basting stitches 5/8” from the garment’s raw bottom edge, beginning and ending at the dots at the side seams. Repeat this process for the back hem. These basting rows will become the fold lines for the hem.
2. Fold and press the fabric’s raw edge to the basting line on the wrong side. Then fold and press again along the basting line to enclose the raw edge and create a narrow hem. It can be a little tricky to get the fabric all folded and pressed nicely, so take your time. The pliability of the bias in the curved edges will work to your advantage.
3. Edgestitch the innermost fold to finish the hem, pivoting to stitch across the side seam at the level of each dot and pivoting again to continue stitching the curved hem at the other side. Remove any visible basting stitches from the fold line.
Finish the sleeve cuffs (View B)
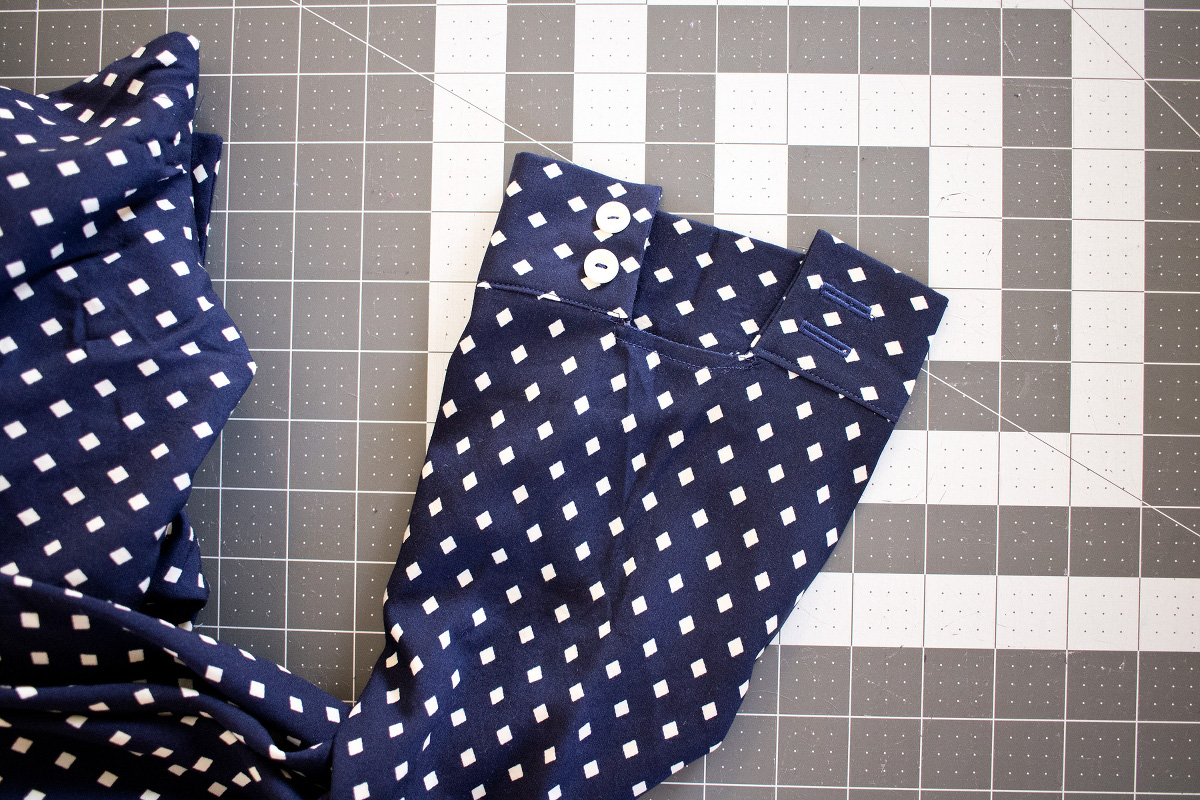
1. Transfer the button and buttonhole markings from the placement template to the sleeve cuffs. Stitch the buttonholes at the top of the sleeve cuff and the buttons on the lower sleeve cuff.

Once you’ve completed your tunic or dress, take a photo and post it somewhere, then add it to the linky party. Add it by Friday February 26th, 11:59PM to be entered in the contest to win a prize.
We cannot wait to see what you have made!
No Comments yet.