It’s very easy to add a zipper fly to a pants pattern that doesn’t include one. It takes a few additional steps and a little more time, but if you’re sewing pants for kids over the age of 5, they’ll appreciate having a zipper fly.
Since we don’t include instructions for a zipper fly in our patterns (it takes quite a bit of space on the instruction sheet and most little kids don’t want or need a zipper), here is a complete tutorial that will help you to convert any of our faux fly pants patterns (which include the Art Museum Trousers, Field Trip Cargo Pants, Class Picnic Shorts, and Sketchbook Shorts) to a zipper fly. And even our patterns that don’t include a faux fly (Sandbox Pants, After-School Pants) can be converted if you add a faux fly to the front pants pattern piece. Just use one of the aforementioned faux fly pants patterns to add the extension and pivot dot at the center front. It’s that easy!
(Note that you can click on any of the photos in this tutorial to enlarge them and to get a closer view of the details.)
There are two things to keep in mind when you’re adding a zipper to the fly: you’ll need a longer waistband (I’d suggest either waiting to cut the waistband until the very end or cutting the waistband several inches longer than needed when you cut the rest of the pieces), and the construction of the pants will proceed in a different order than we usually recommend for sewing pants. So keep both of those issues in mind and you won’t have any problems. In this tutorial I’m sewing a pair of Art Museum Trousers for a little friend, so you’ll notice that I’ve already sewn the front pockets and the back welt pocket. You’ll want to do the same with your pattern.
Supplies needed:
- A zipper that’s longer than the faux fly: any length is fine, since we’ll trim it to size
- Lightweight fusible interfacing: I prefer featherweight interfacing because it doesn’t add any bulk or stiffness to the fabric
- Zipper foot
- A button or snap for the waistband
One more thing to note: In the U.S., boys’ flies zip right-handed–wearer’s left side overlaps the right side–and that’s what I’ll be demonstrating here. If you prefer a zipper that opens on the opposite side just remember to reverse these instructions.
Don’t be intimidated by the number of steps. You know that I like to break things down so they’re understandable. This may seem like a lot, but it’s only because I don’t want you to be confused. And the more you do this, the easier and quicker it will be. You’ll be surprised! And be sure to click on any of the photos to make them larger so you can really see the details.
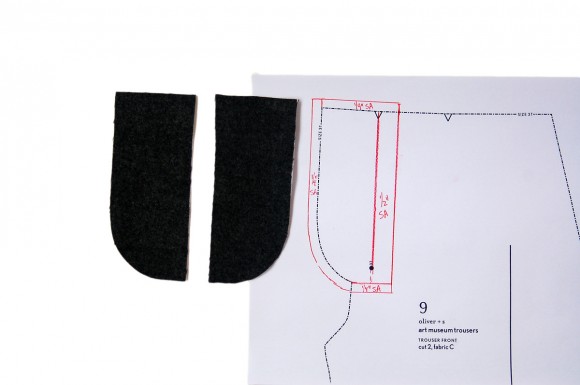
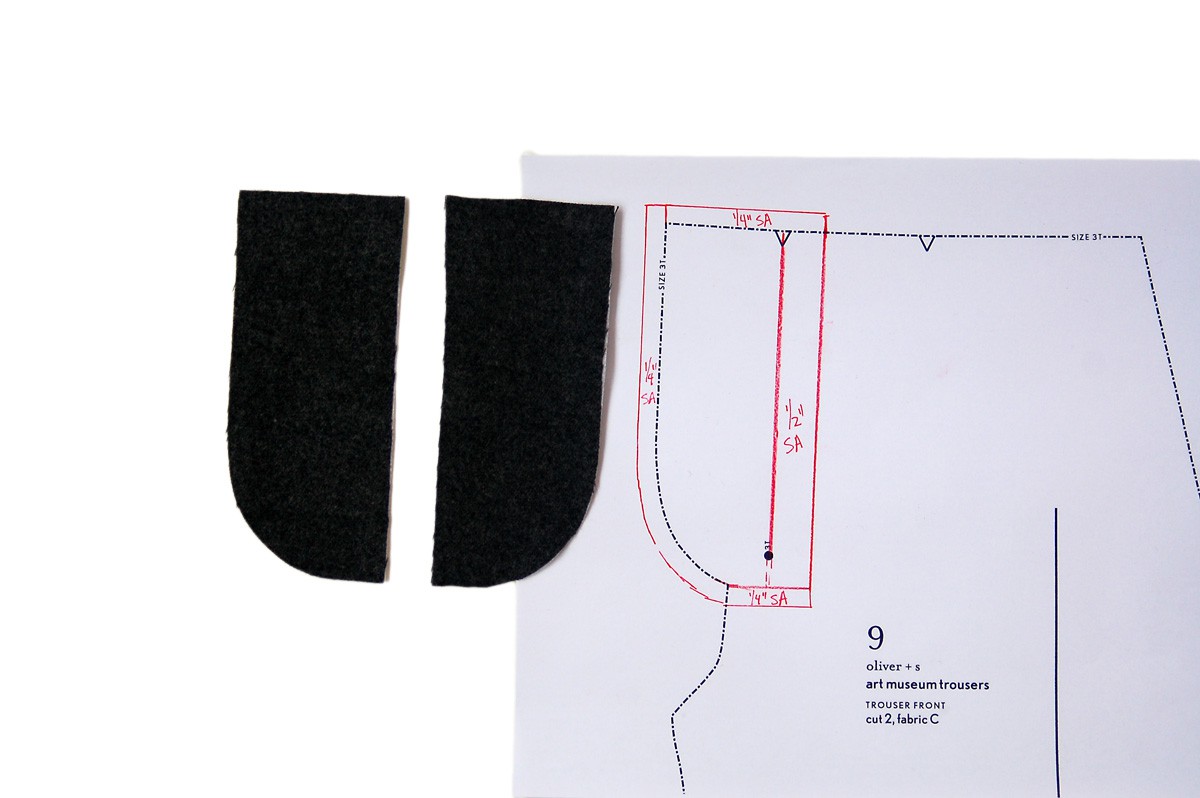
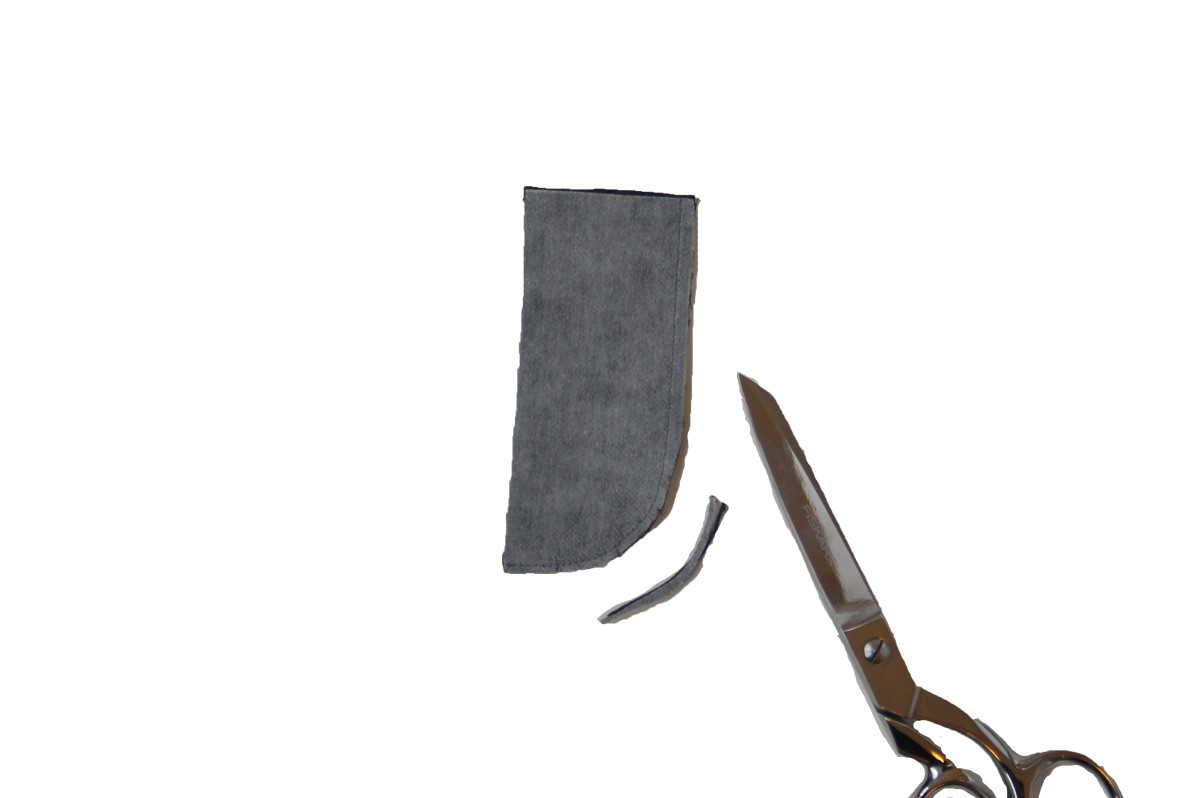
- A zipper fly includes both a facing and a fly shield, which is the piece of fabric between the zipper and the person wearing the pants. A faux fly makes a perfect zipper facing, but we still need to make a pattern piece for the fly shield. To do this, trace the faux fly for the pants you’re making and add 1/4″ seam allowance to the curved edge and the top edge. Add 1/2″ seam allowance to the straight center front edge, as shown. (On most Oliver + S patterns we include a notch at the waistband to help you locate the center front point. You’ll be drawing a line from the dot at the base of the fly to the notch at the center front waistband and then adding 1/2″ seam allowance to that edge.) Cut two of these pieces from your fabric.
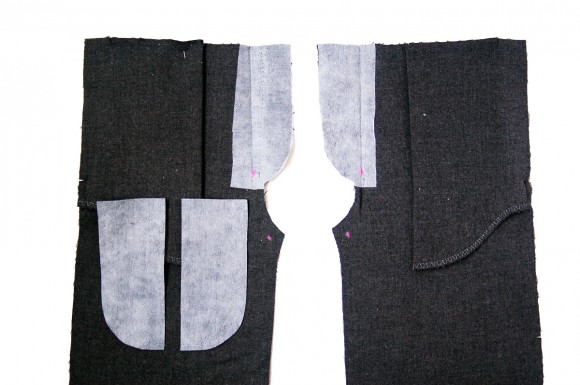
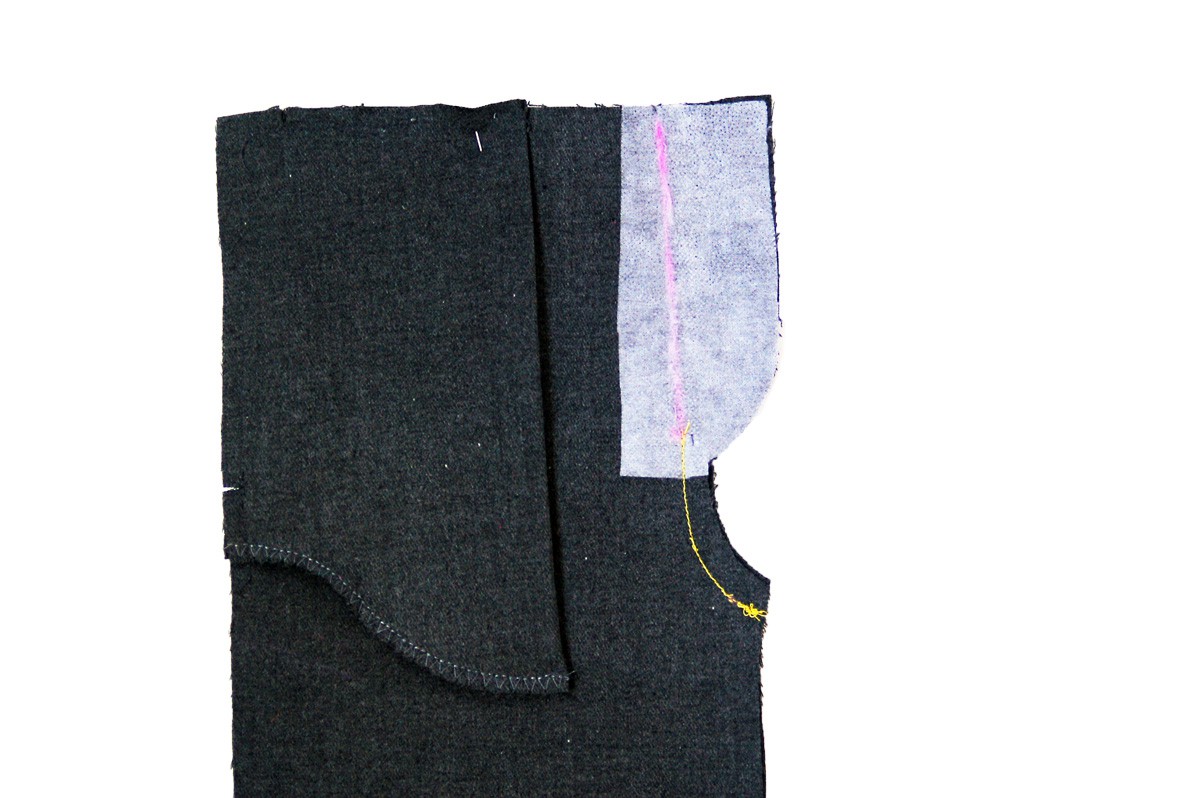
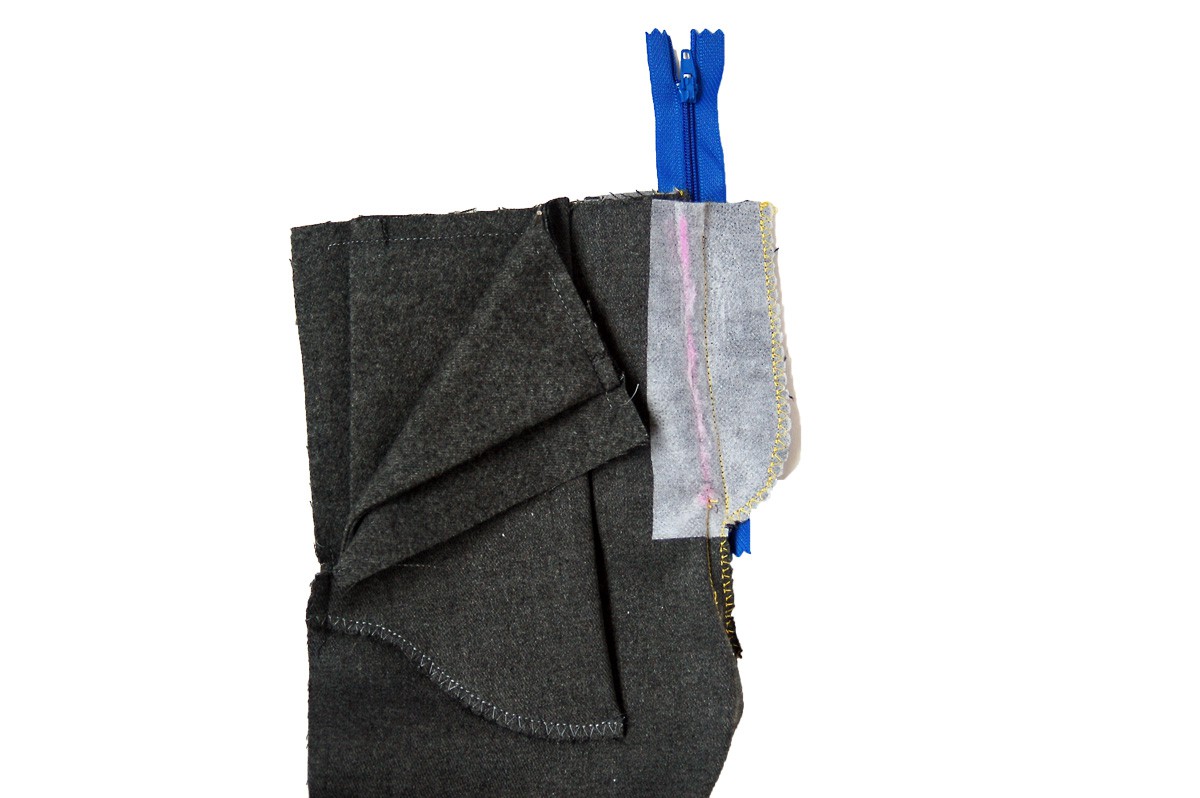
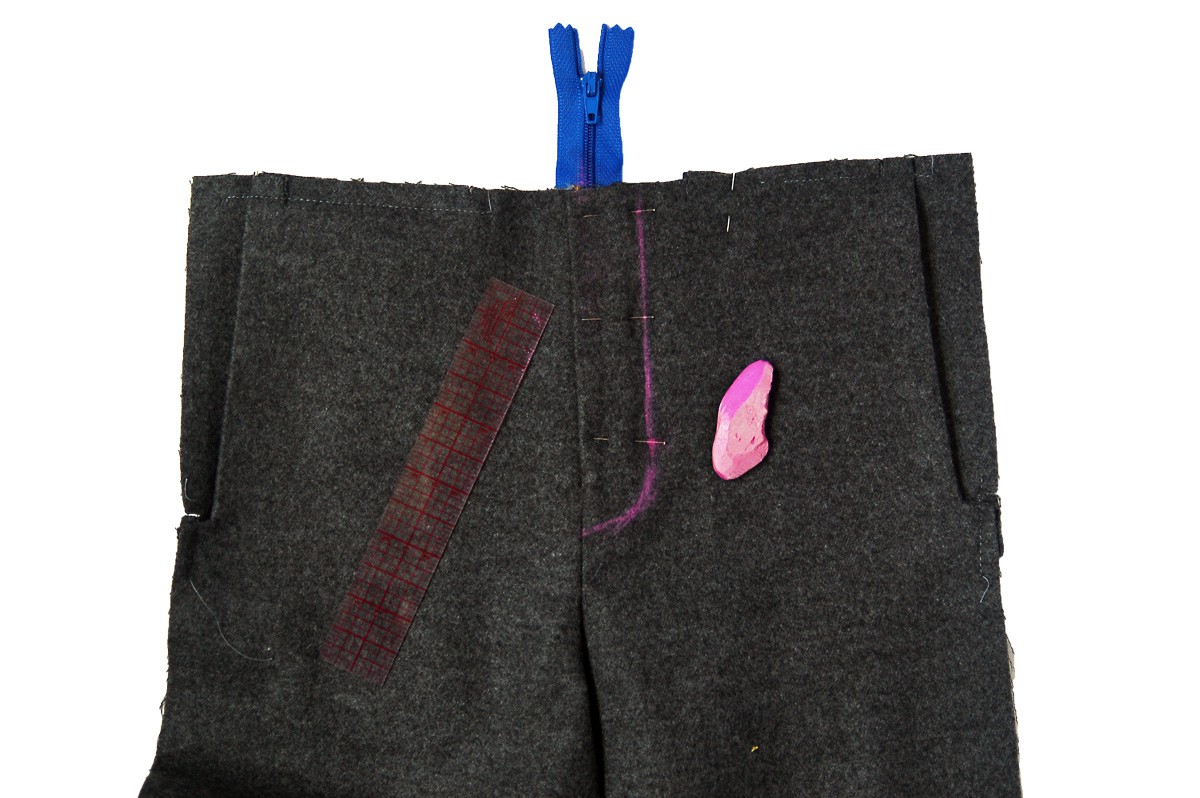
- Next, fuse a very lightweight interfacing to the wrong side of the two fly shield pieces and to both front pants pieces at the faux fly, extending about 1/2″ beyond the center front line of the pants front, as shown below. I think interfacing is the real key to a good zipper because it prevents the fabric from stretching and distorting when the zipper is stitched, so don’t skip this part!
- Pin the two fly shields with right sides together, and stitch the curved edge with a 1/4″ seam. Clip the seam allowances and turn the fly right side out, pressing the stitched edge.

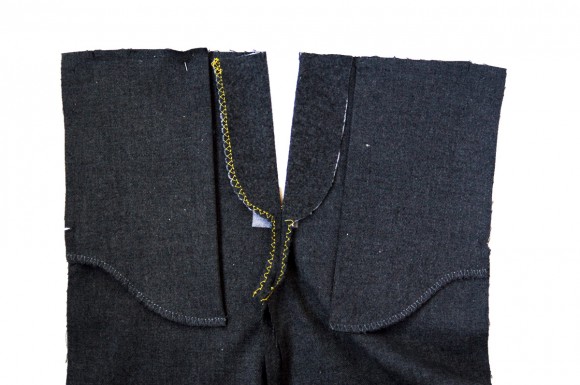
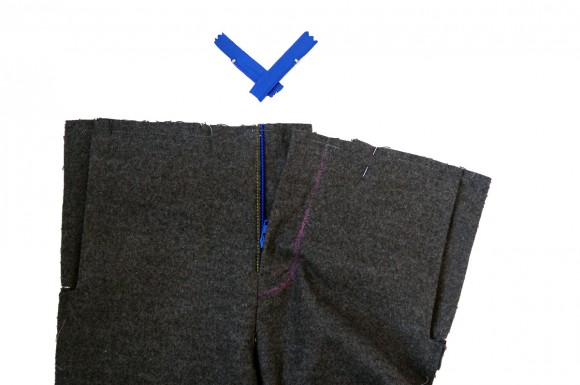
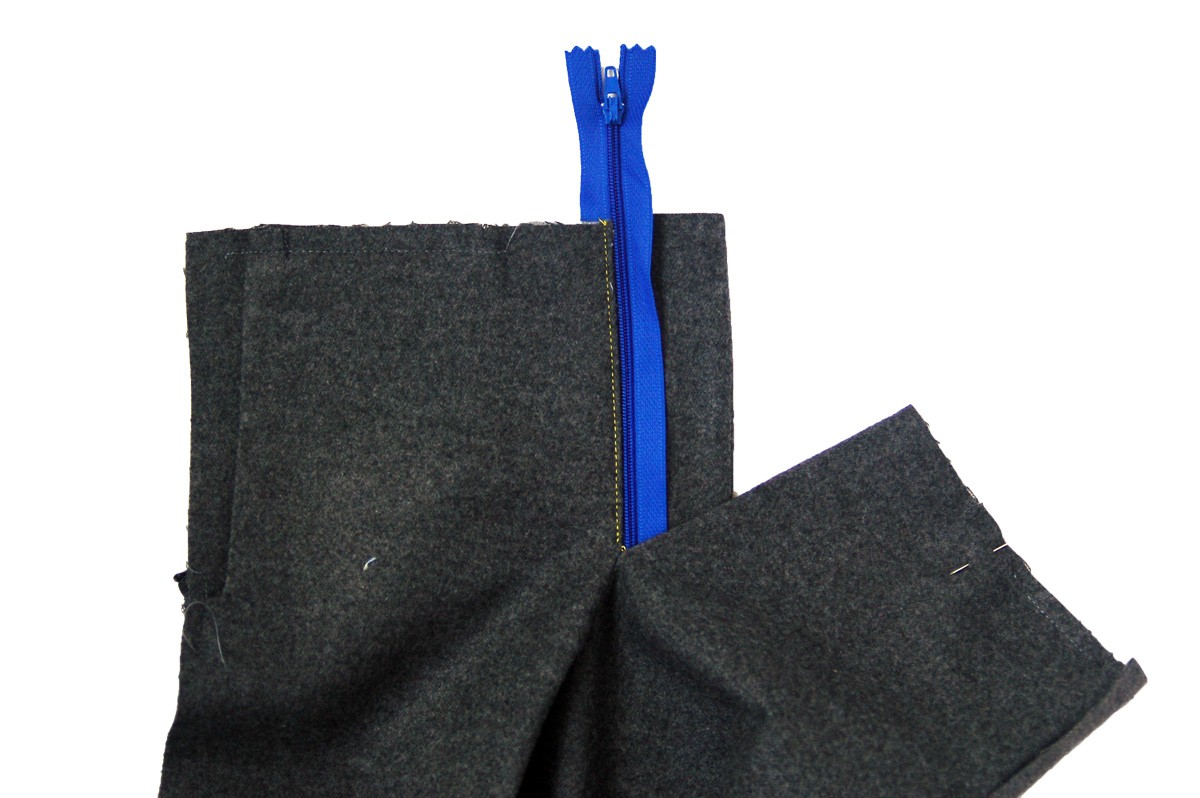
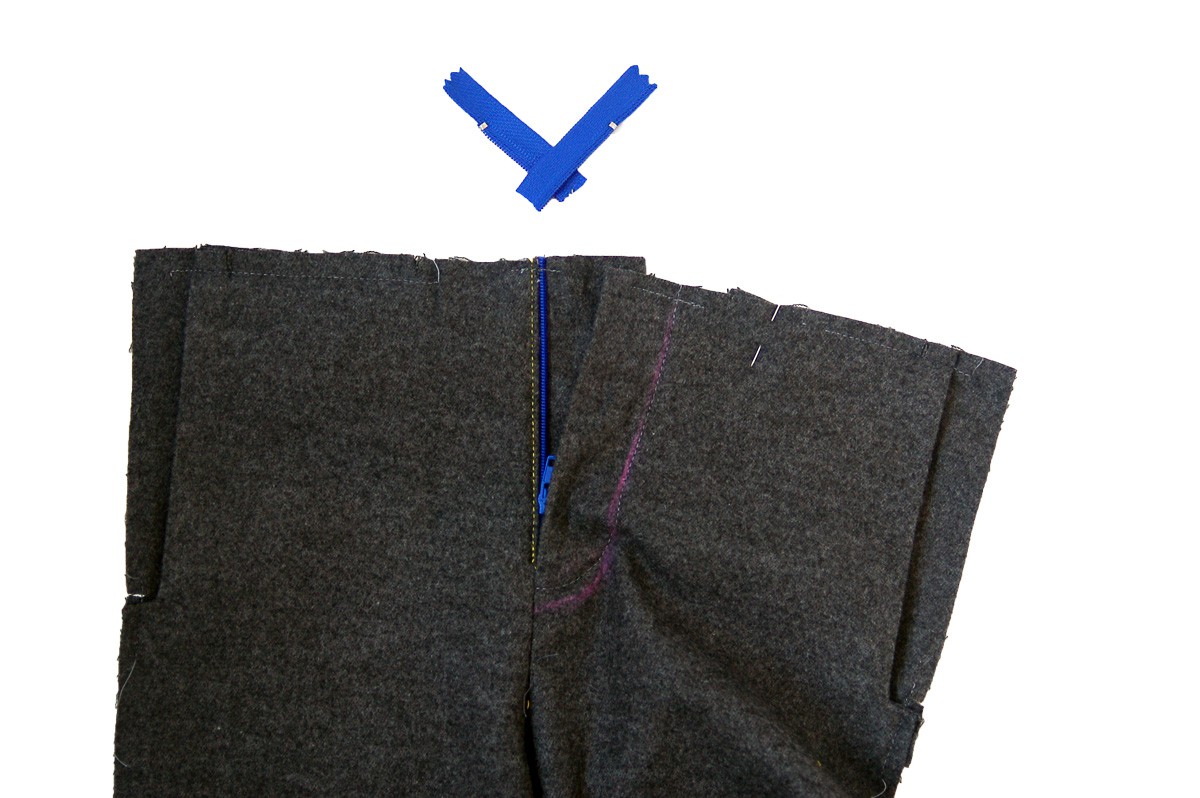
- Pin the two front pants pieces together with right sides facing and stitch the front rise (the crotch), starting at the inseam corner and ending at the pivot dot, backstitching or lockstitching at both ends.

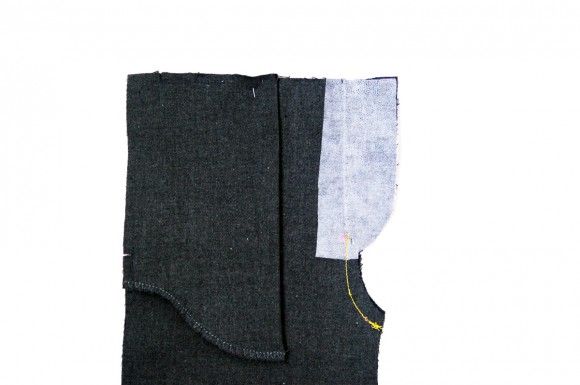
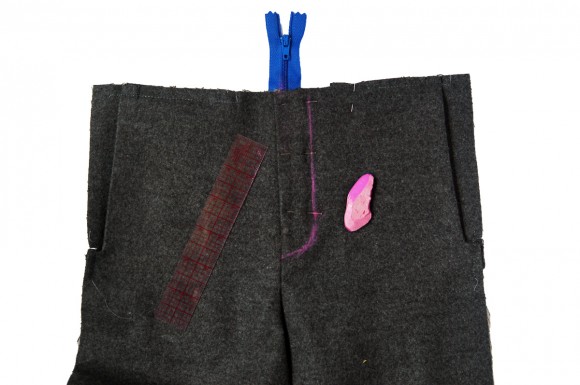
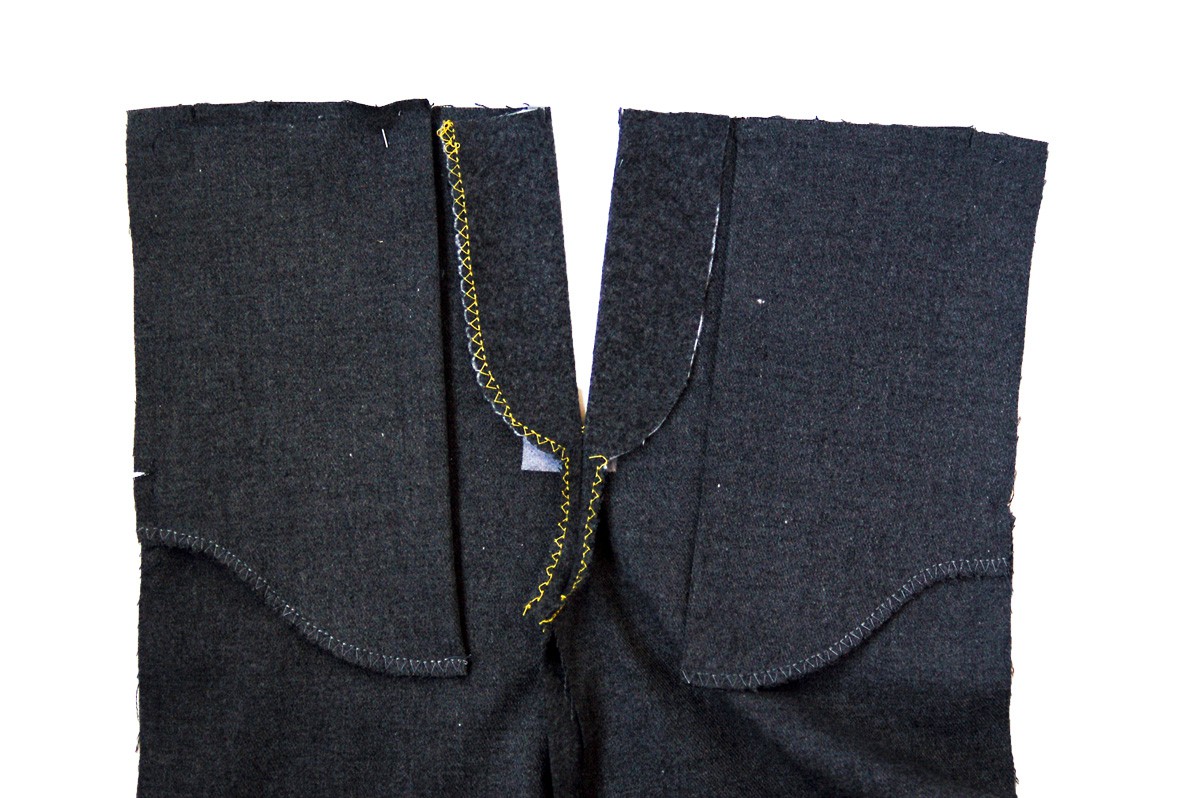
- On the right side of both pants fronts, use a water-soluble fabric pen or tailor’s chalk to draw the center front fold line from the pivot dot (the end of the seam you just sewed) to the waistband on both cut front pants pieces. (Look for the notch at the waistband to help you locate the center front point.) Fold and press the faux fly to the wrong side of the fabric along the drawn center front line on both front pants panels. Now is a good time to finish the stitched seam allowances at the rise, too, and if you like you can finish the seam allowances at the wearer’s left faux fly. (We’ll be trimming off the wearer’s right faux fly shortly, so there’s no need to finish those seam allowances.)
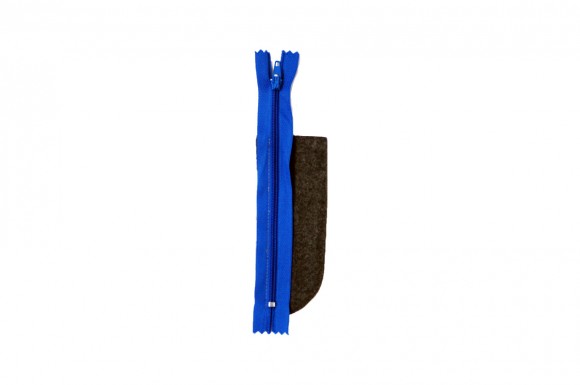
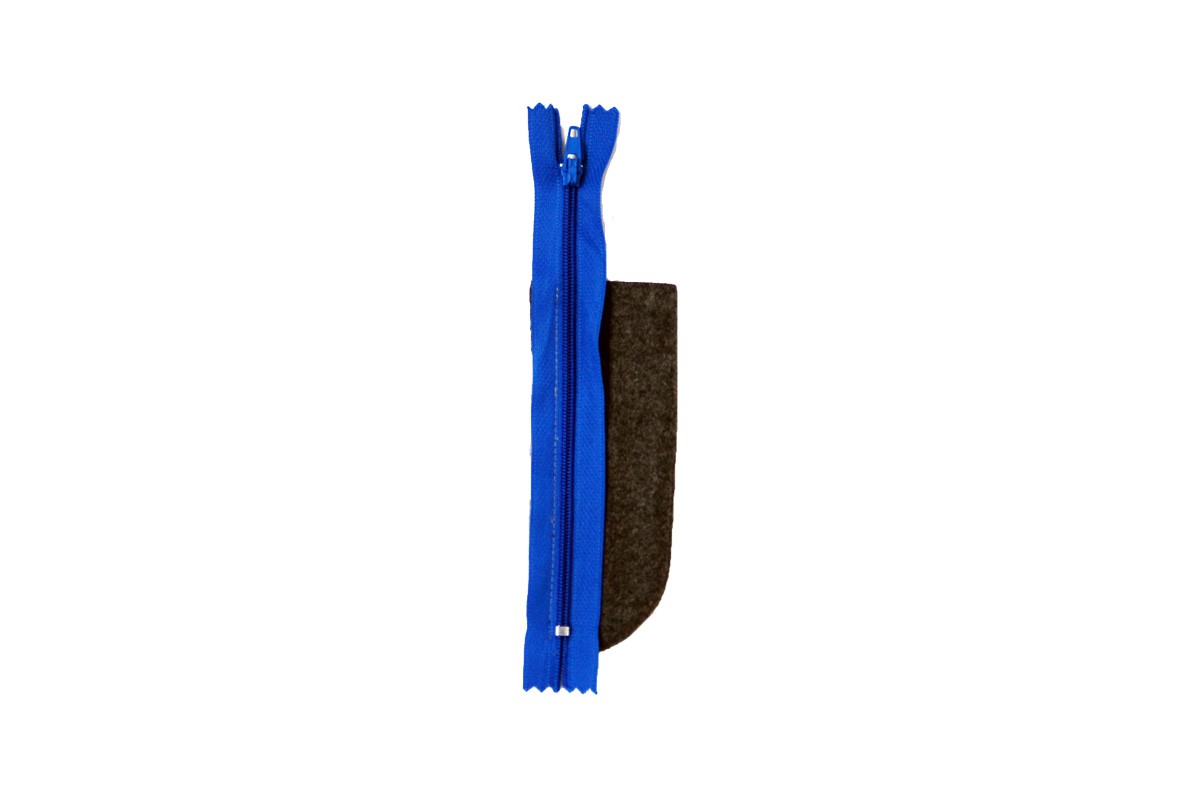
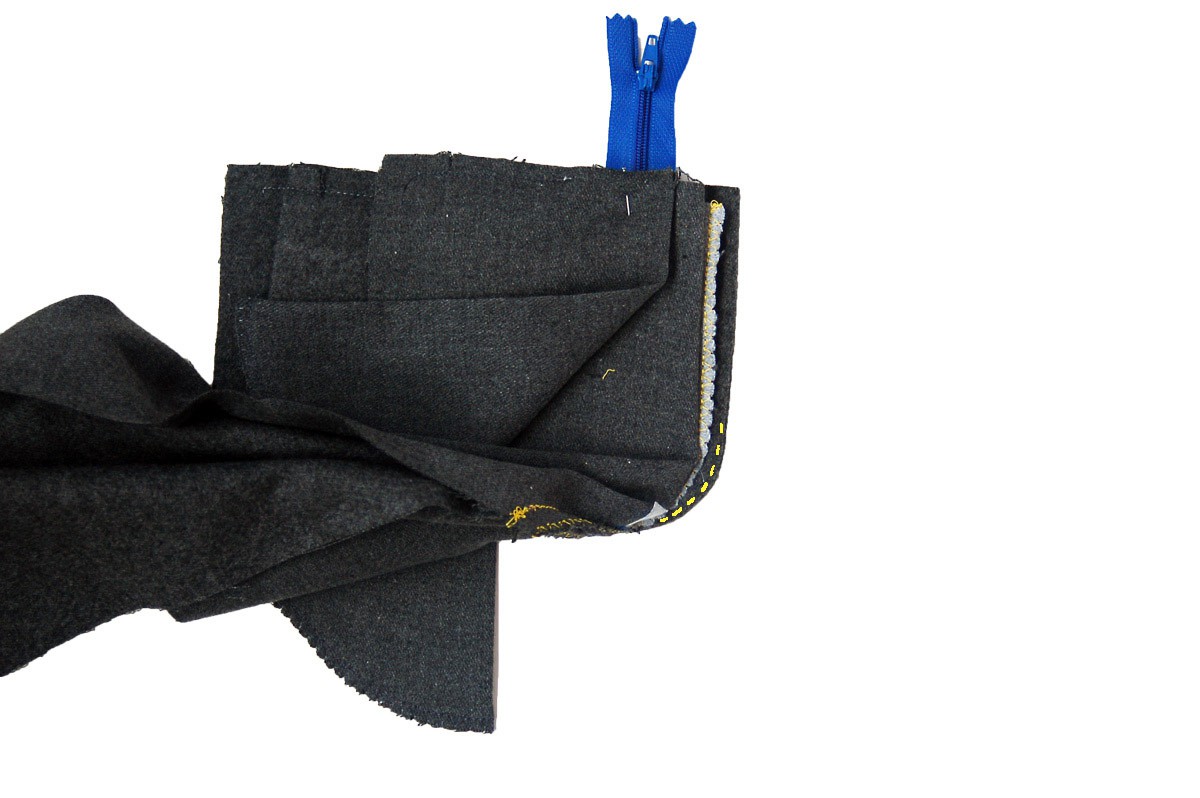
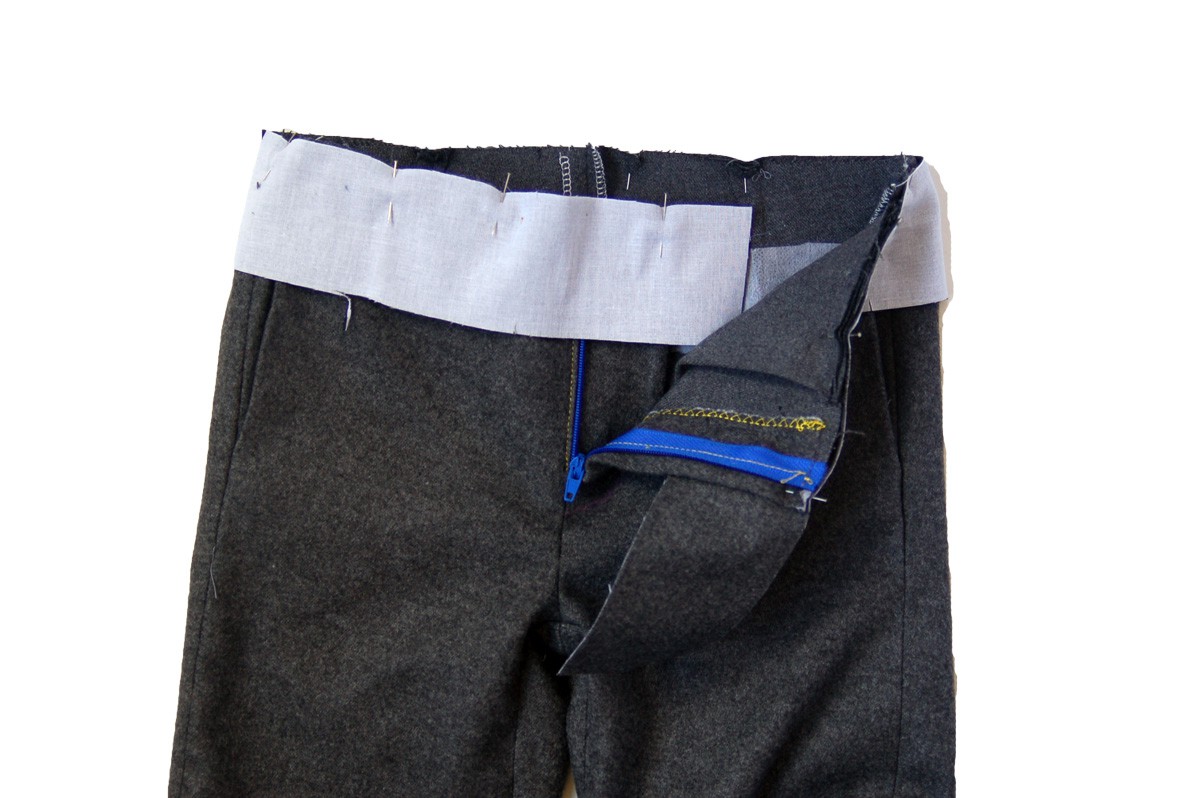
- Pin the zipper to the fly shield, right side up, and use your zipper foot to baste the zipper to the straight edge as shown, stitching very close to the zipper teeth.
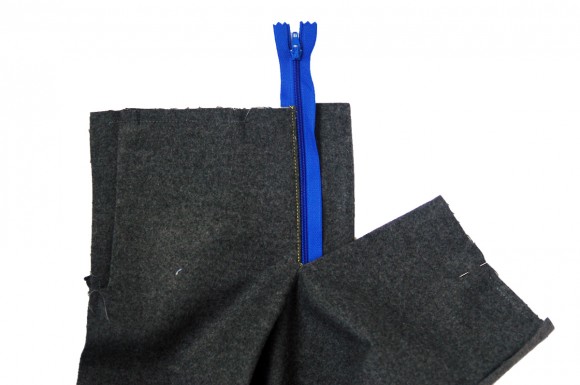
- Pin the folded edge of the wearer’s right front pants panel so the fold abuts the zipper, with the top edge of the pants and the fly shield matching. Edgestitch the pants to the zipper along the fold, stitching to just above (approximately 1/4″ above) the pivot dot. I use the regular sewing machine foot for this step, but you can also use the zipper foot if needed. The closer you can stitch to the fold, the better. (The ideal edgestitching distance here is 1/16″, if that helps.)
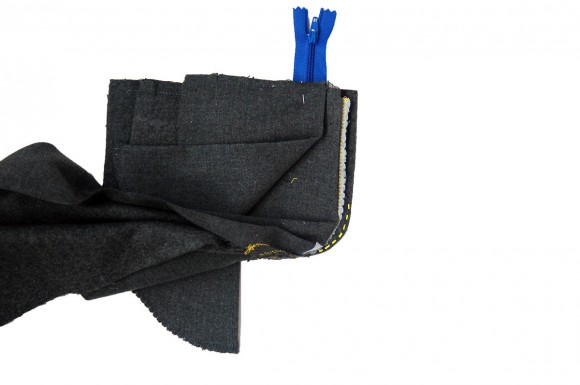
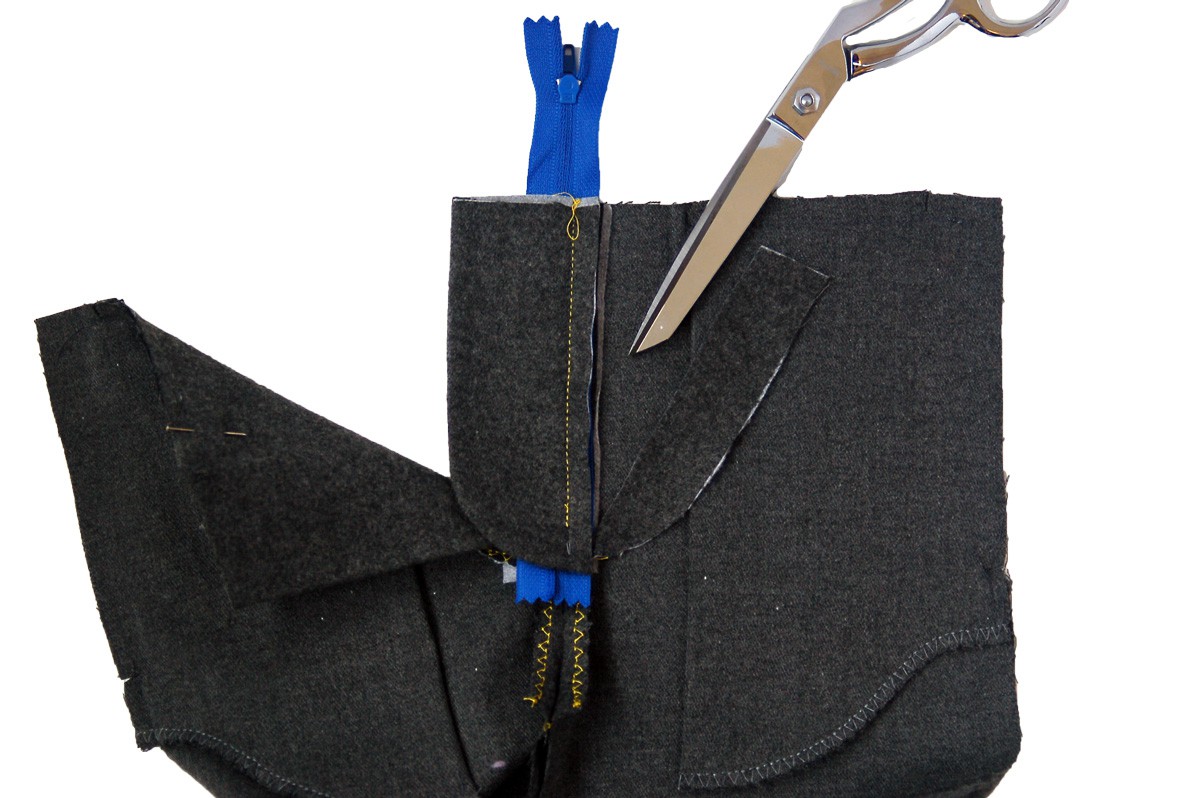
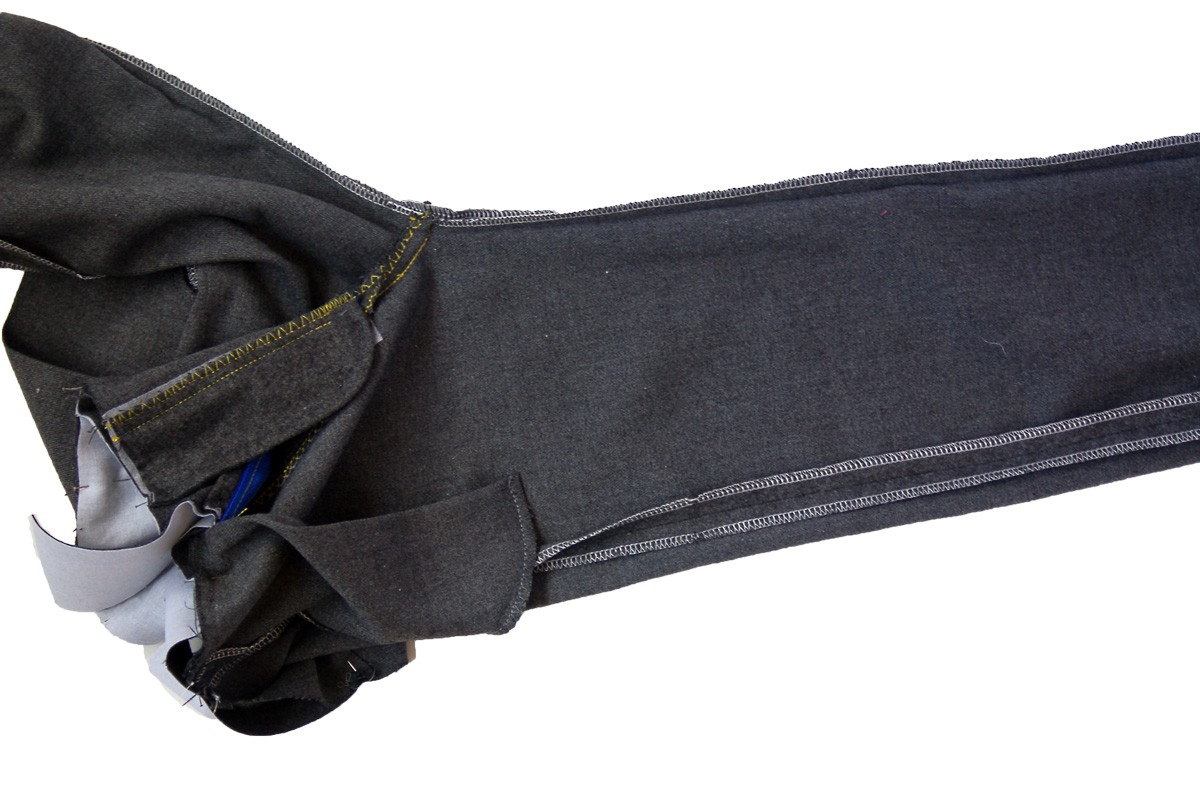
- Turn the pants to the wrong side and trim the wearer’s right faux fly so it’s even with the straight edge of the fly shield. Finish the seam allowances together. (In addition to finishing the edges, this will also hide the zipper tape edge since it’s sandwiched between the fabric layers.)


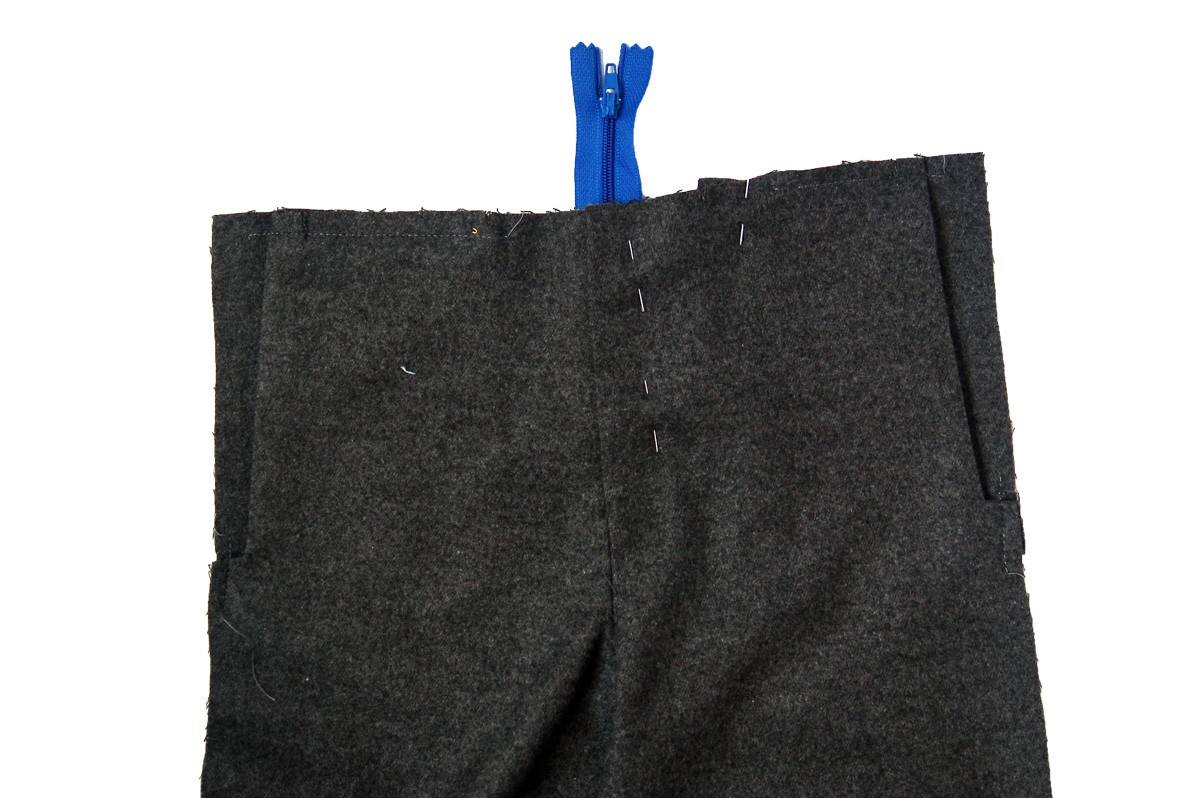
- Lay the front pants flat, right side up, and position the wearer’s folded center front left edge so it overlaps the zipper by about 1/8″. The zipper will be completely covered.

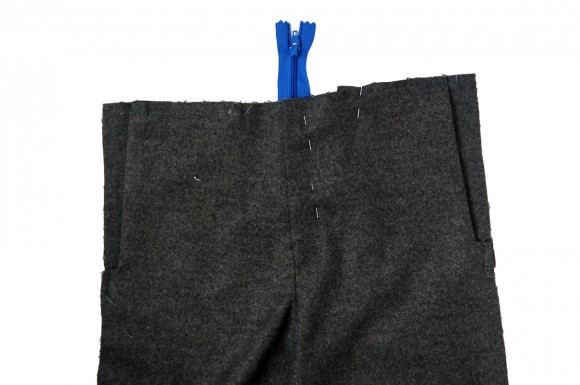
- Holding everything in place, carefully unfold the wearer’s left front so the faux fly is exposed, and pin the unsewn edge of the zipper tape to the faux fly. Avoid pinning to the fly shield; just the faux fly and zipper tape should be pinned together. Fold the fly shield back so it’s out of the way and stitch the faux fly to the zipper, just as close as you can. (You can let the zipper foot be your guide here, since you can’t actually see the zipper itself; or if it helps, use your thumbnail to crease the fabric at the edge of the zipper and use the crease as a stitching guide.) Check the zipper when you’re finished to be sure it opens and closes smoothly and to be sure you stitched relatively close to the zipper itself.

- Re-fold the left front pants at the center front so the pants are facing up again. Once again, the zipper is hidden. (When you unzip the zipper to check it, you can see that your fly is almost finished! ) Close the zipper so the zipper pull and slider are up, out of the way, and smooth and pin the front fabric to the faux fly (which can now be called the fly facing instead of the faux fly), still avoiding the fly shield. Now it’s time to draw the topstitching line: Use a water-soluble pen or tailor’s chalk to draw a line 1″ from the center front fold line, curving to meet the pivoting dot at the base of the fly. When you’re happy with the shape, stitch along the line, making sure to pull the fly shield out of the way so you’re only stitching the outside fabric and the faux fly/facing in this step. As you stitch, be very careful not to stitch over the zipper stop, especially if it’s metal, since that will break your needle and could cause injury. Just be mindful of the position of the zipper stop so you can avoid it.
- You’re nearly finished! Just a couple of final details: edgestitch the fly shield and the faux fly/facing together at the bottom curved edge for one or two inches to keep them together nicely and to keep the fly shield in place. And lastly, unzip the zipper and bartack or baste the zipper tape to the pants, approximately 3/8″ from the top edge. Then trim the excess zipper tape from the top and bottom of the zipper. The basting will prevent the zipper slider and pull from being zipped right off the zipper at the top edge before the waistband is attached. (It’s happened before, it will happen again….)


Done! Now you can continue with the rest of the pants construction, taking note that the construction itself will change a bit. Instead of sewing front to back at the side seam or inseam, you’ll stitch the two back panels together at the rise, just like you did with the front panels. Then pin the front and back together and stitch the side seams and inseam. It’s not tricky, just a different order of sewing.
For the waistband, you’ll sew it more or less as you usually do, except that you won’t sew the ends into a loop before attaching it. I think this will be pretty clear as you’re sewing it. You’ll need extra length to accommodate the fly shield, and I would suggest interfacing the waistband, especially at the button or snap placements. (I like to use a woven fusible interfacing for waistbands because it helps to keep the waistband from stretching when it’s worn.)
Need help? Don’t forget our fabulous discussion boards, where all sorts of questions and topics are discussed. The kind folks there can help you figure out almost anything.
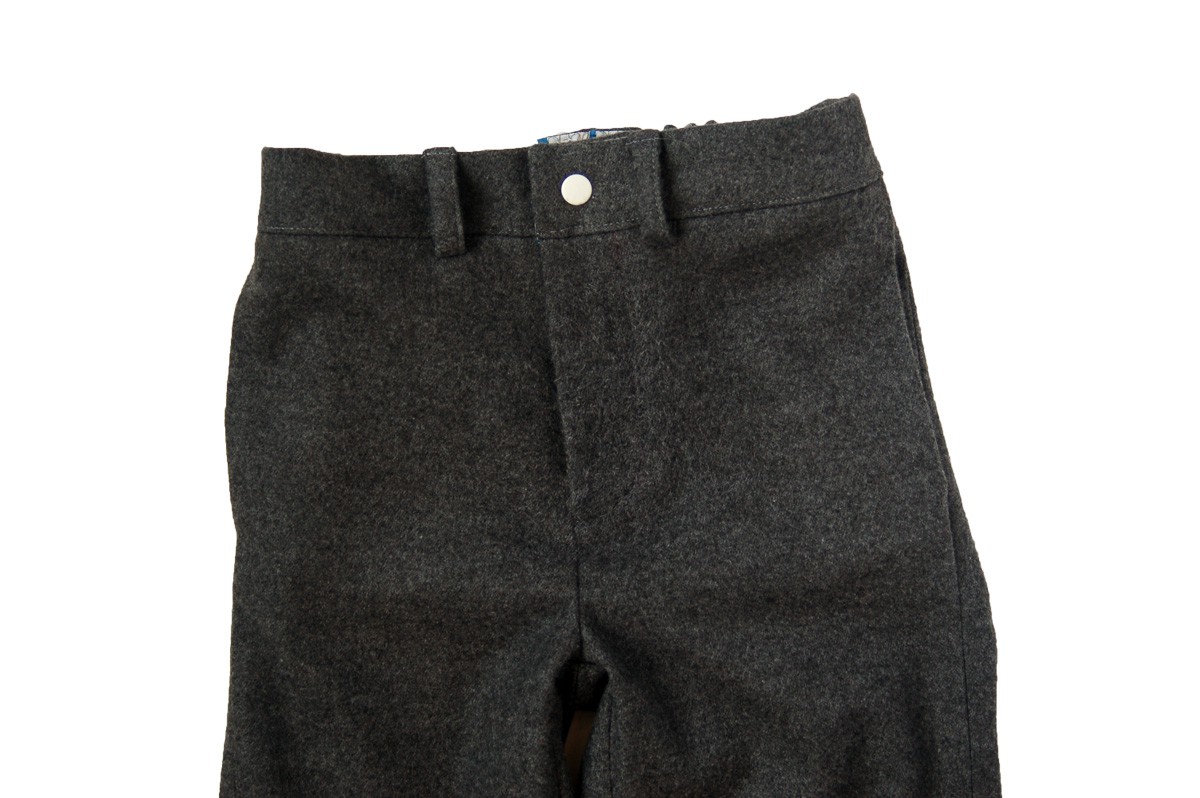
The zipper fly looks so nice when it’s finished, doesn’t it? I can’t wait to see how yours turn out!
Thank you for taking the time to write and photograph such a helpful tutorial! I look forward to the opportunity to try this!
P.S. You make it look really easy!
Not related to the zipper at all BUT is it just me or does this cape from anthro look EXACTLY like the one you designed last year??
http://www.anthropologie.com/anthro/product/clothes-jackets-outervest/29152139.jsp
Perfect. Absolutely Perfect!
Thank you so very very much!
Thank you, I can see why it would take a lot of space in the regular instructions. Thanks again.
Thank you so much for this tutorial!! This is something that has always confused me but I knew if you explained it, the method would finally click. Now I want to try it out! 🙂
Thank you, thank you, thank you!!!!
oh, nice addition to the new pattern! Thanks for this, I need to make some new uniform pants…
yay! looking forward to trying this soon
Thank you Liesl! I have always wanted to know exactly how this was done! Now that my kiddos are getting older the faux fly and full elastic waistbands are becoming a bit young and I was just thinking I needed to figure out a way to add a real zip fly…I’m so happy that you’re the one who taught me how to do it because now I know it will work great!
My husband recently said I needed to start putting real zips in pants, to which I replied, No I don’t the kids like it better with just elastic, while secretly thinking: Not until Liesl shows me how!
I look forward to trying this and know that it will work now that I know how to do it the Oliver + S way. Thanks.
This tutorial has prompted a question that I hope you can help me with.
I stitch a lot of zips into hand knitted garments and there is always a problem with stretching. I was wondering if anyone knows if there is some sort of interfacing that could be used with this type of garment to stop the stretching please?
I love your tip hints and tutorials Oliver + S, they make me look as if I know what I’m talking about. 🙂
I have DONE IT! My first zipper fly and it came out beautifully thanks to your fantastic tutorial. You are the best! Thank you so much!
Pamela
Aw, thanks for the sweet comment, Pamela! So glad to hear that it turned out for you. It’s not that hard, is it? And such a satisfying feeling.
Thank you for providing this great tutorial but some help please. I want to use these instructions with the field trip cargo pants but these pants do not have a waistband and the waist and waistband facing are shaped. Do I need to alter the pants front and back to put a straight waist band on – if so how? Or do I lower the pants front and back using the waistband facing as a guide (allowing for seam allowance). I am making these in size 12. What width do you recommend for the finished waistband?
Advice will be gratefully received. Thank you.
One problem is that you need to have a separate sew on waistband to do this.
The Field Trip cargo pants do not have that. They have a faced waist that is stitched down.
I wasn’t thinking about this and soon realized that it was not going to work with out it.
Also, they take some squaring up in the front seam because the waist is cut in a curve.
It can be figured out, but I had to backtrack to get it right. You do need a few more adjustments to the pattern for those pants in order for this to work.
Also, I would recess the zipper a little further under the fly.
I think any boy over about 6 would like to have a zipper.
Most pants can be converted to a zippered fly front. But the cargo pants need some redrawing to do it.
Yes, I forgot about the one-piece waistband on the cargo pants. You would, indeed, need to do a little fiddling to make it work for them.