Sew Alongs
Group Admins
Join us as we sew through some of your favorite Oliver + S, Liesl + Co., and Lisette patterns in the Sew Alongs group.
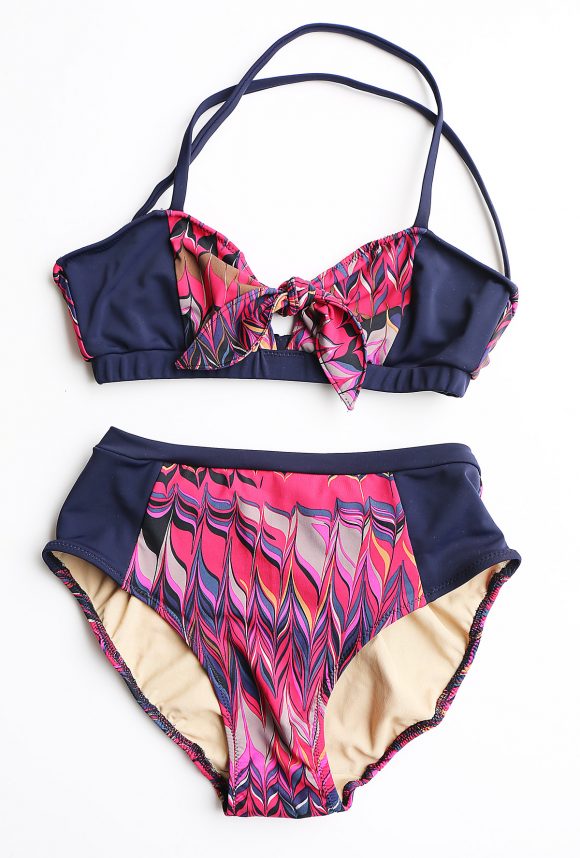
Lisette B6358 Swimsuit Sew Along
-
8 years ago LINK
Join us here starting May 23 for the Lisette B6358 sew along.
Before you begin, you might want to review Liesl’s two prefatory blog posts. Here is her post introducing the sew along, and this is her post about fabrics and trims.
8 years ago LINKHello and welcome! We’re so glad you’re joining us for the sew-along.
This is the schedule for the B6358 sew-along. Please note that I’ve changed it a bit from the original schedule:
- May 23 Day 1: Cut out your fabric and practice your sewing. Find the right stitches and techniques for your suit.
- May 25 Day 2: View A: Assemble the tie front and front facing. Finish the upper edge.
- May 27 Day 3: Finish View A, start View B.
- May 30 Day 4: Finish View B, start View C.
- May 31 Day 5: Finish View C.
Tag your in process photos of your swimsuit with #sewlisette and #B6296 or #B6360 on Instagram so we can all see.
So let’s begin, shall we?
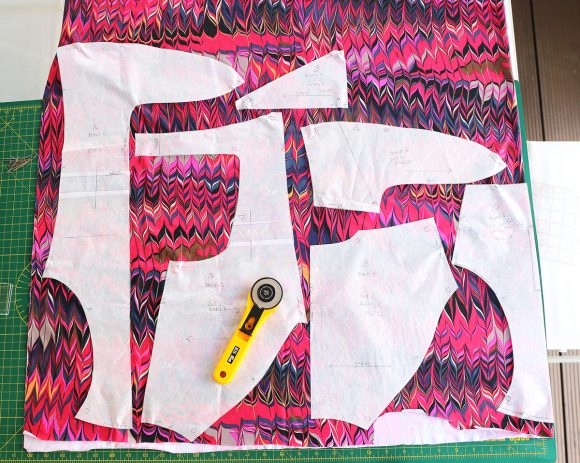
Day 1: Cut out your fabric and practice your sewing. Find the right stitches and techniques for your suit.
If you haven’t read it yet, you might want to review my blog post about selecting swimsuit fabrics and trims.
Are you ready? Today we’ll work on sewing techniques and find the best stitches to use for your suit, using the sewing equipment you have available. Then we’ll cut out our fabric so we can start sewing on Day 2.
Fabric
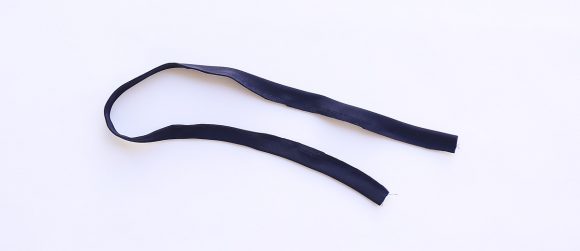
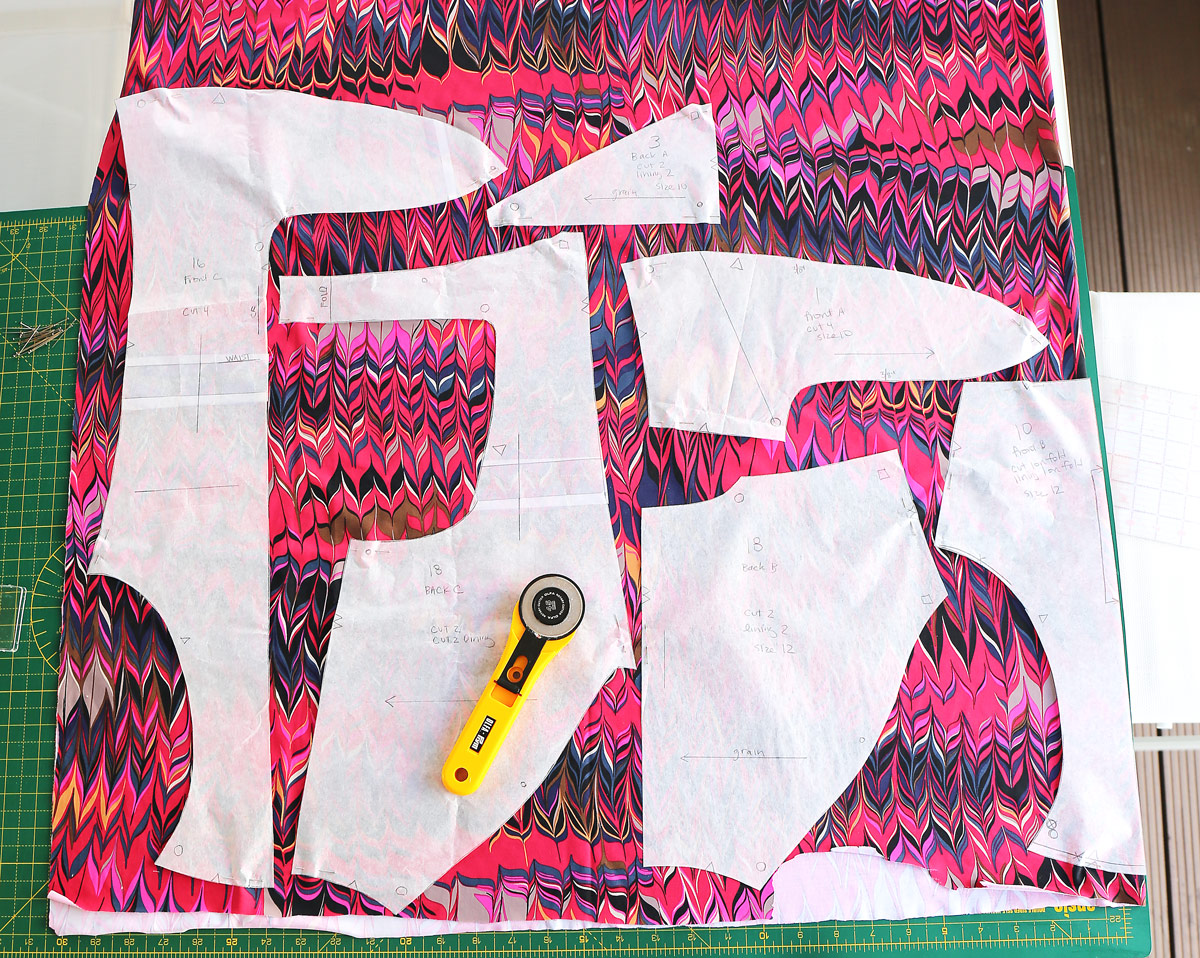
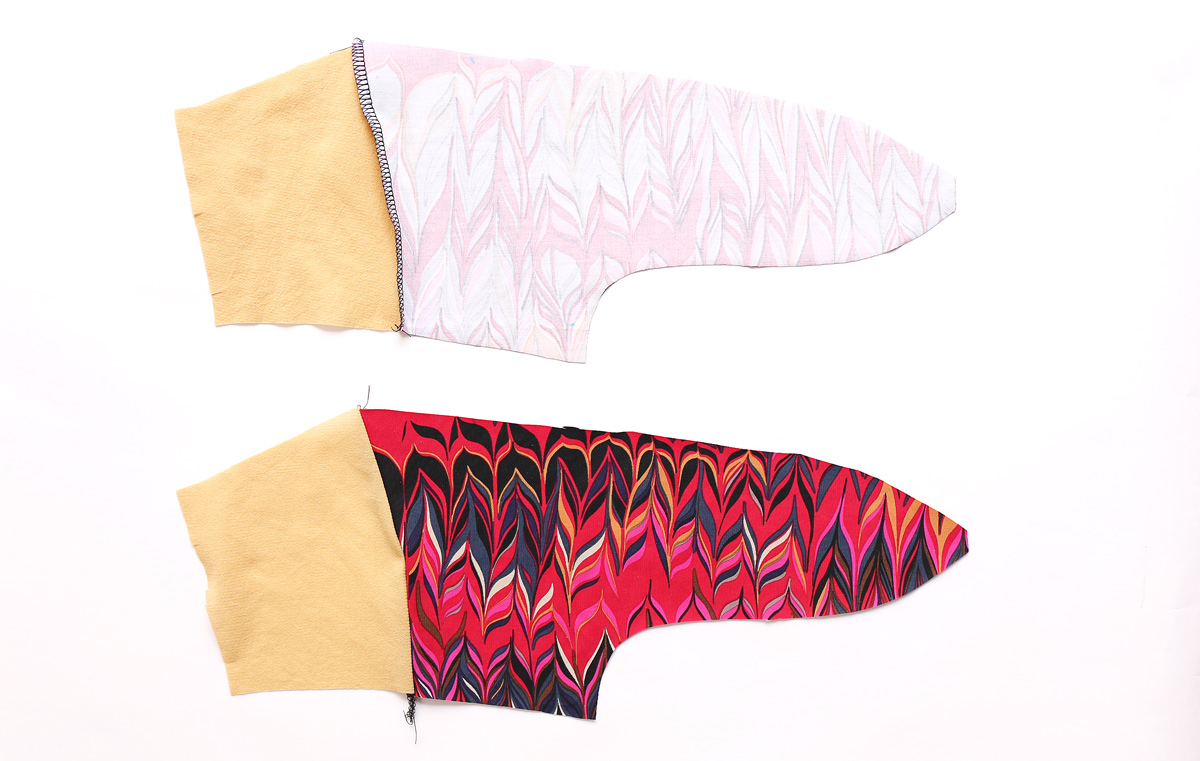
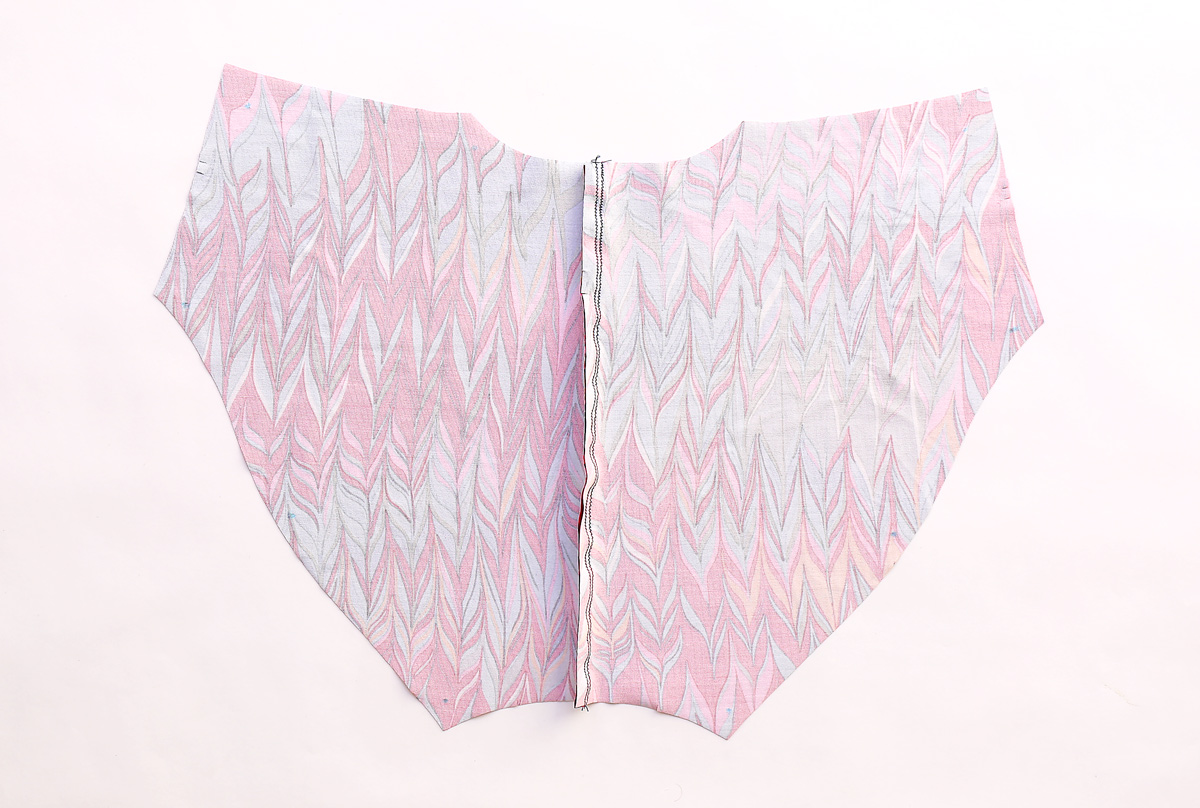
So let’s talk about fabric for a minute before we start. When you cut out your swimsuit you’ll be arranging your pieces with the grain arrows going from side to side, pointing to the selvedges, like this.
This is because swimsuit fabrics, like many knits, have the most stretch from selvedge to selvedge. We want to take advantage of that stretch.
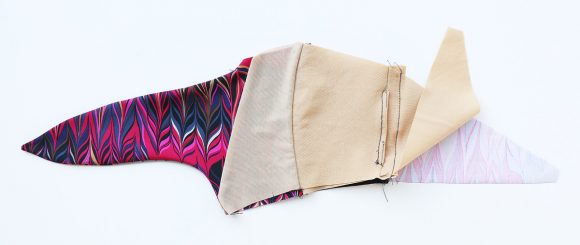
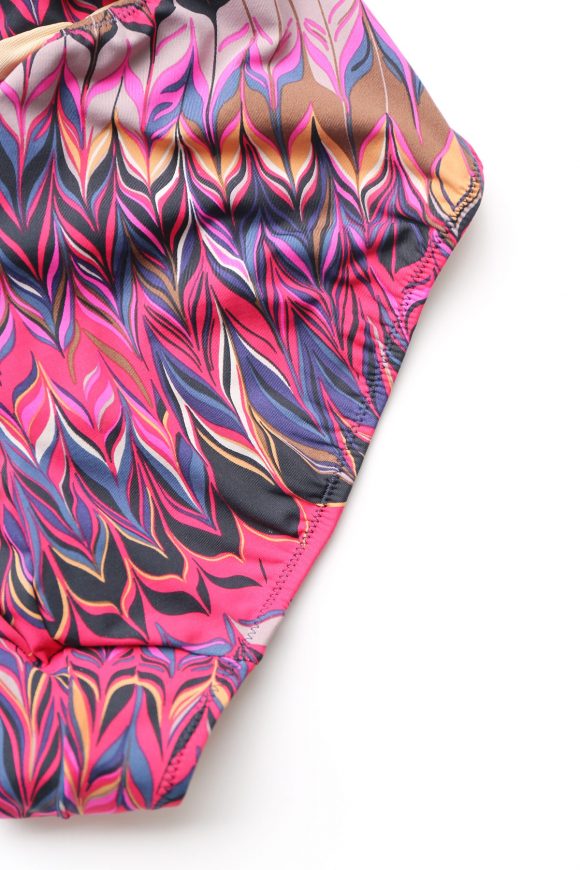
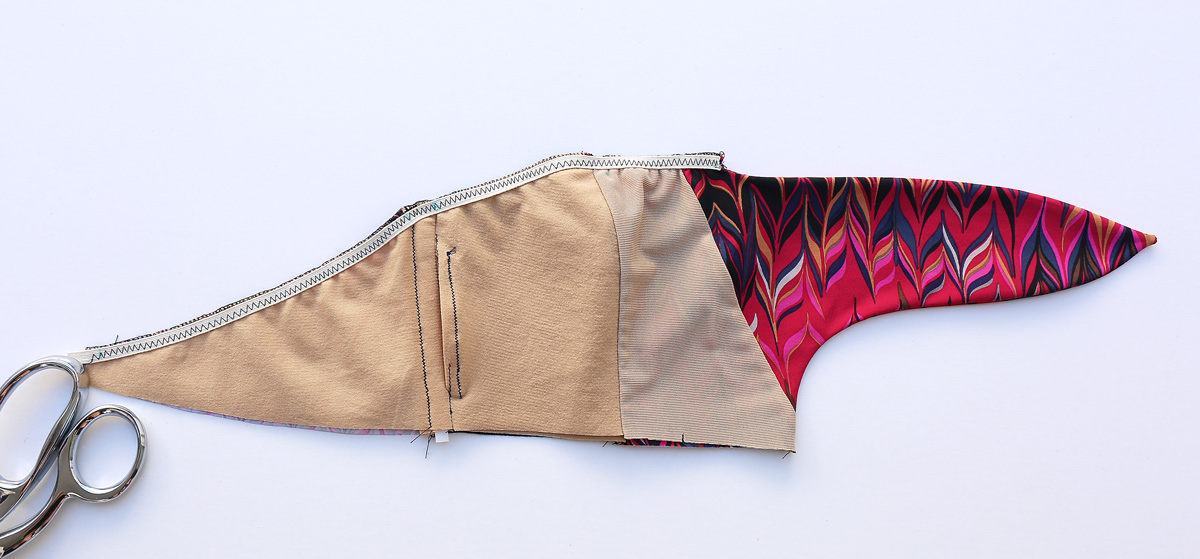
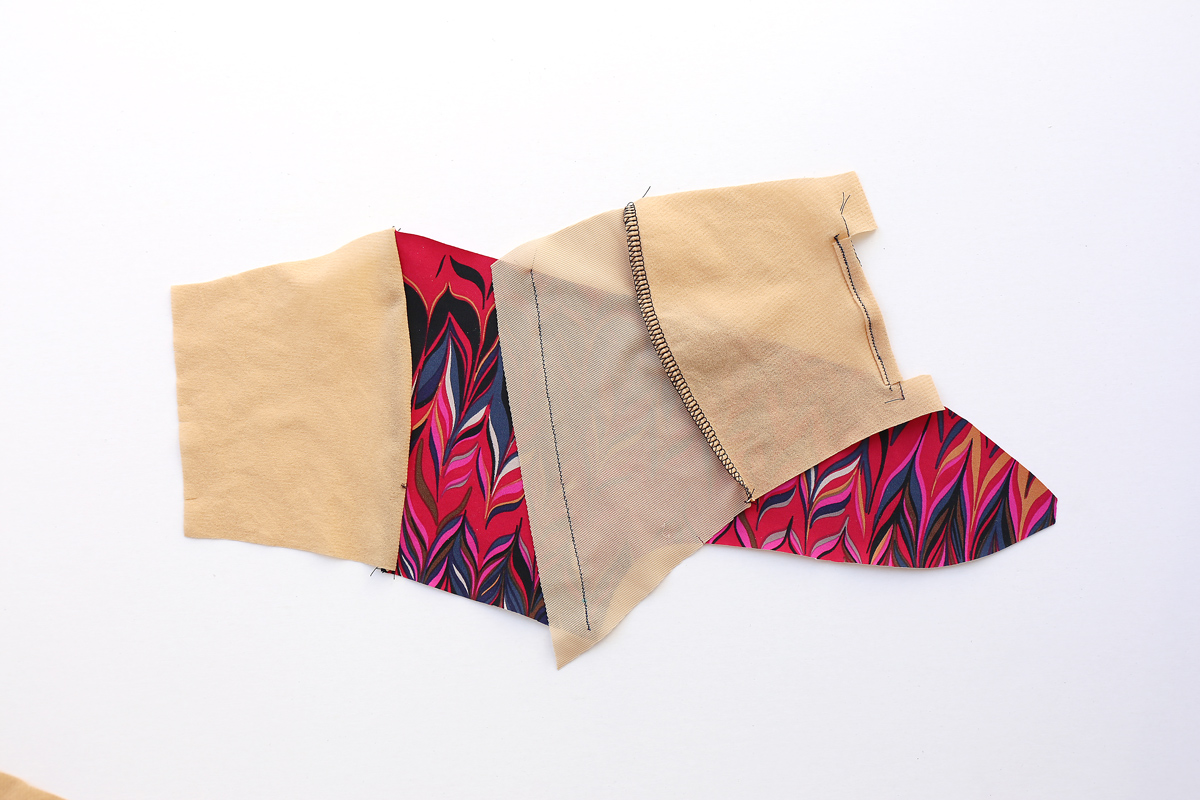
Also, be sure you check the number of pieces you need to cut. I got all confident and neglected to double-check the layout, resulting in a fabric shortage for my one-piece suit. You’ll see that I had to piece together some lining and some of my main fabric for the center front facings. (Moral of the story: don’t do what I did.)
Also, if you don’t want to include the little stays for the bra cups you can absolutely skip that part! I included them just in case I decide to use them.
Getting a good fit
One more point before we get started. There isn’t really a good way to make a muslin for knits. That’s because knits really require the same fabric, with the same amount of stretch, to check the fit. So there’s a distinct possibility that you’re going to finish your suit and want to change things about it, and that’s perfectly normal. I would encourage you to approach your first suit as a learning opportunity. Experiment, practice, and when you’re finished use what you’ve learned to adjust the pattern and your sewing techniques so you can make another, better suit. I’d love to tell you there’s another way to do it, but there just isn’t. The good news, however, is that your second suit will go much faster and you’ll feel much more confident in your sewing skills, so look at it as a great learning experience and it will all be worthwhile. Ok?
Sewing
Let’s talk about sewing.
Obviously it’s nice to have a serger when you sew knits, but it’s not absolutely necessary. I sewed part of all of these suits without a serger, and if your sewing machine has a mock serger stitch you’ll be in really great shape! If it doesn’t, a simple zigzag works wonders. I would suggest trying different methods with some fabric scraps to see what works best for you.
Here’s the general run-down from Butterick about the different stitches you can use for sewing swimwear. (Whenever I’m using instructions directly from Butterick I’ll add my notes in italics so you can tell what’s what.)
GENERAL INSTRUCTIONS FOR TWO-WAY STRETCH KNITS
Use one of the following methods to stitch seams in two-way stretch knits. These seams will help prevent stitches from breaking when garment is worn.
STRAIGHT STITCH:
Use straight stitch, 8-9 stitches per inch (3mm stitch length). Stretch fabric evenly in front and back of needle while stitching.
Stitch again 1/8″ (3mm) from first stitching, stretching fabric while stitching. Trim seam allowances close to second stitching.
This is the stretch-and-sew method. You literally stretch the fabric and you stitch it with a regular straight machine stitch. Easy peasy. While I didn’t construct the entire suit this way, I did use it in several places, like to edgestitch the ties on View A.

ZIG ZAG STITCH:
Use narrow zig zag stitch, 12-15 stitches per inch (2mm stitch length). Stretch fabric evenly in front and back of needle while stitching.no number
Stitch again 1/8″ (3mm) from first stitching, stretching fabric while stitching. Trim seam allowances close to second stitching.
Many newer machines have a stretch stitch that mimics this setting, which is what the instructions refer to below. I used this knit stitch quite a bit on the suits I sewed. It’s easy and quick and not as bulks as a serger stitch, but it can be tricky to get it started since the fabric tends to get sucked down into the machine. In order to avoid that, cut small squares of tracing paper or tissue paper and place them under the fabric when you start each seam. You can also chain-stitch seams like quilters do, sewing directly off one seam and onto another one. This helps to prevent the fabric from getting pushed down into the needle plate because the thread chain is supported by the fabric and stitching directly behind it.
SPECIAL KNIT STITCH:
Use the stitch on your machine designed for sewing knits. Follow instructions in your machine manual for specific information about stitching knit seams.
Like I said, the special knit stitch is more or less the same as a small zigzag. For either of these stitches, you’ll want to hold the fabric taut as you stitch, which means you’ll be stretching is a little bit but not a lot. This just helps with sewing and makes the stitches more even. Plus, it helps to prevent your fabric from getting pushed down into the throat plate. If you have trouble with this–and I did, especially when sewing the lining fabric–place a small square of tissue paper under the fabric to stabilize it.
OVERLOCK STITCH:
Use your overlock machine. Follow instructions in your machine manual for specific information about stitching knit seams.
If you have a serger, lucky you! Construction will be fast and easy. But you’ll still want the sewing machine for some stitches, so I would suggest that you practice with some scraps before you get started.
NOTE: Where DOUBLE-STITCHED seams are indicated, seams will be illustrated in double straight-stitched seams.
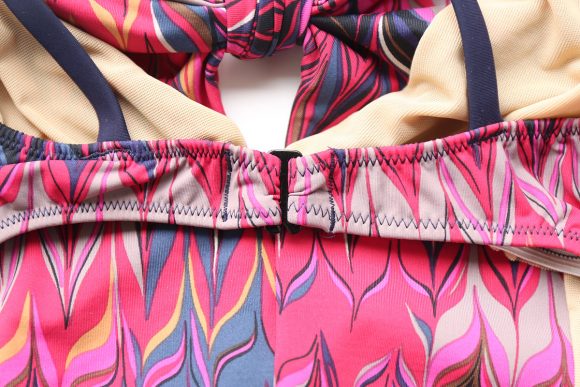
SEWING THE ELASTIC
And here’s another technique to practice before we get started. When you sew elastic to finish the edges of the suit, there are several steps to the process.
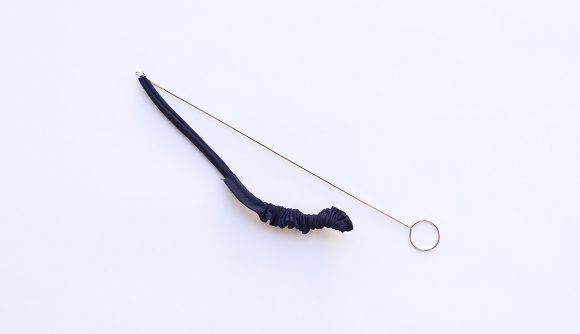
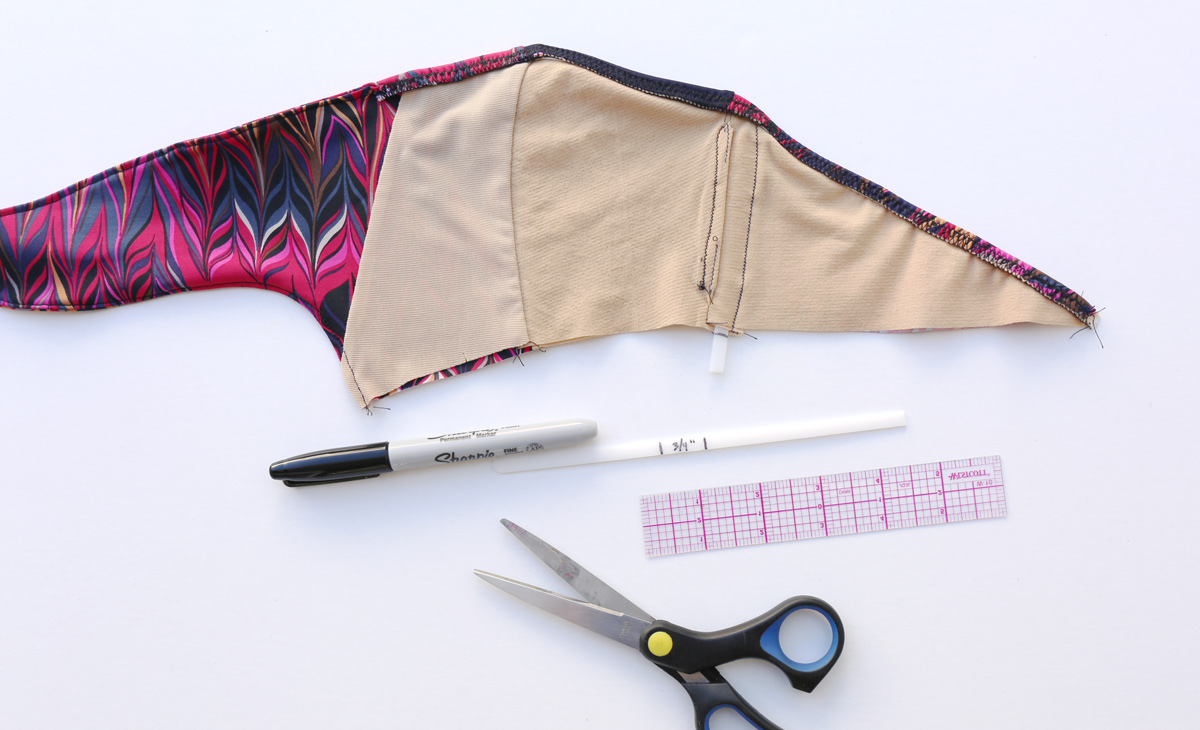
First, you’ll be sewing the elastic to the inside of the suit. Line up the edge of the elastic just inside the edge of the fabric and use a large-ish zigzag to attach it, stretching the elastic as you sew. It will look like this after you’ve sewn the first step.
For our swimsuits we’ll be attaching elastic both flat and in a loop, like this:
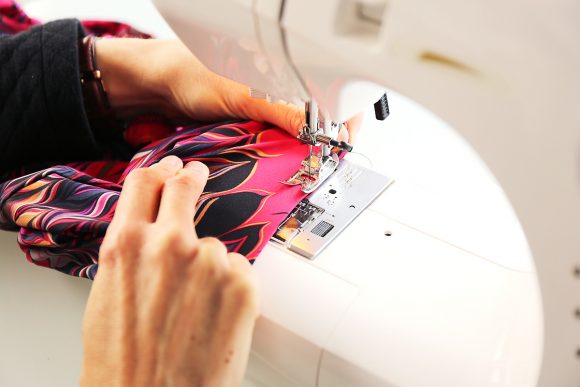
Next, we’ll turn the elastic and stitch it again from the outside of the suit to finish it. The Like any finishing technique, this method takes a little practice to get it just right. All my favorite (very expensive) swimsuits have a zigzag to finish the elastic, so rather than mess with either a straight stitch or a double-needle stitch (which some people prefer because they think it looks more professional), I prefer to stick with the tried and true. I always wish I had three hands when I’m sewing the elastic edge, but it looks great when it’s done. You’ll simply stretch the elastic as you sew the zigzag stitch, and while you’re stretching the elastic you’re also stretching the fabric away the elastic at a 90-degree angle to keep it tight around the elastic and to keep the stitches and fabric even. It’s a good idea to practice with scraps before you sew your swimsuit. Here’s a quick video to show you what it looks like in action.
With a little practice you’re edges will look nice and smooth when they’re finished. I’ll talk more about this technique during the sew-along, but it’s a good idea to practice with some scraps before you get started. This will give you a chance to find the stitches and techniques that work best for you.
So with that, let’s get started! I’ll see you back here for Day 2 on May 25.
May 25: Day 2: View A: Assemble the tie front and front facing. Finish the upper edge
Good morning sew-alongers! Well, here we are at day two of the sew-along. We’ve got quite a few steps to accomplish today, so let’s get going.
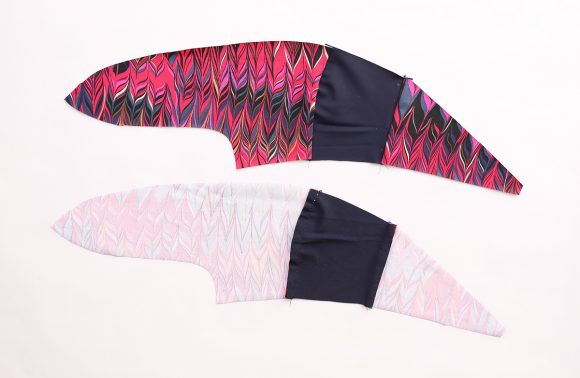
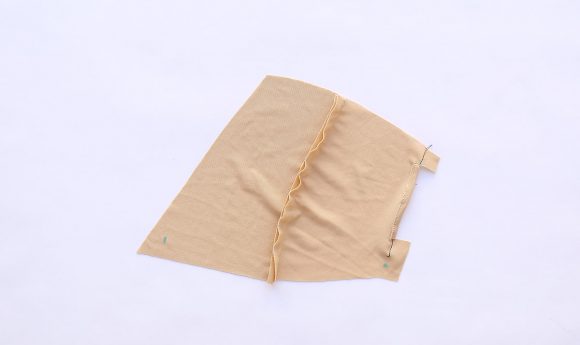
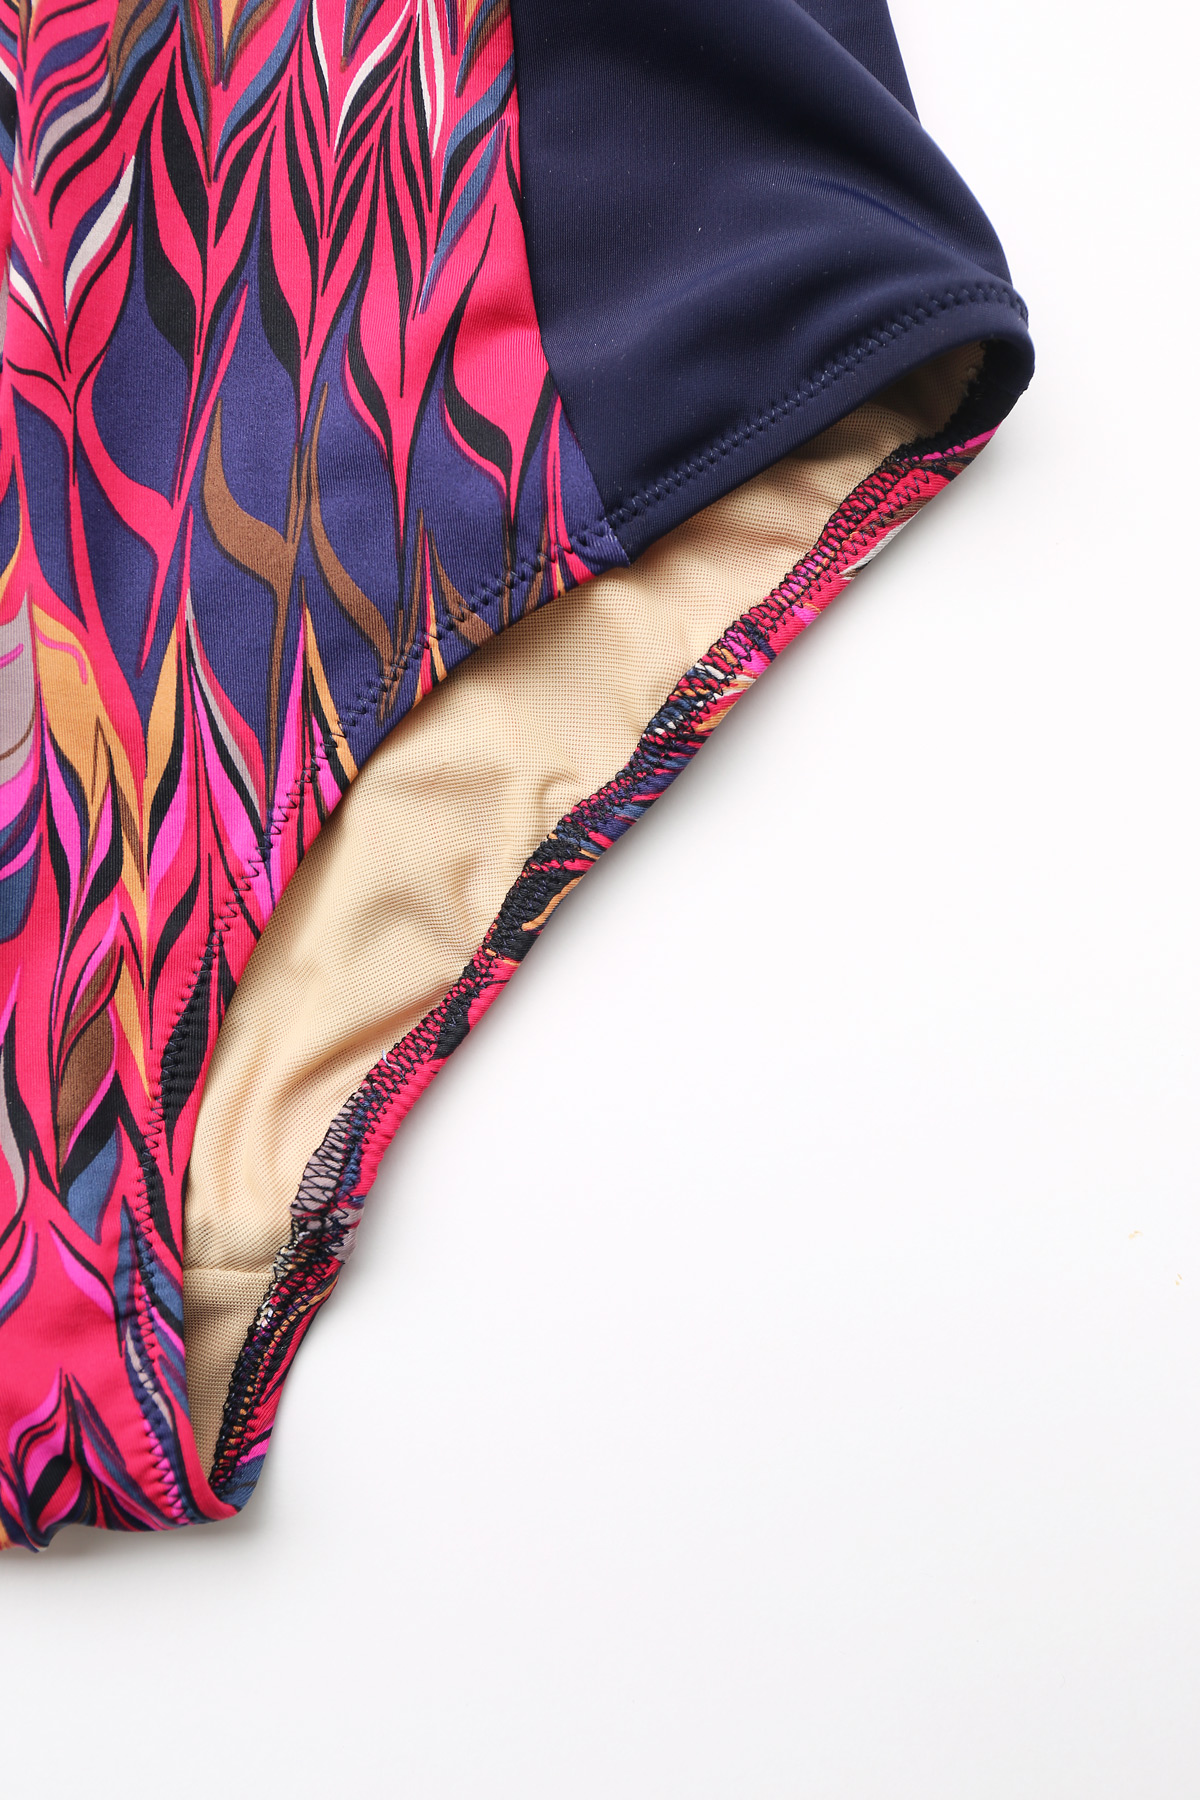
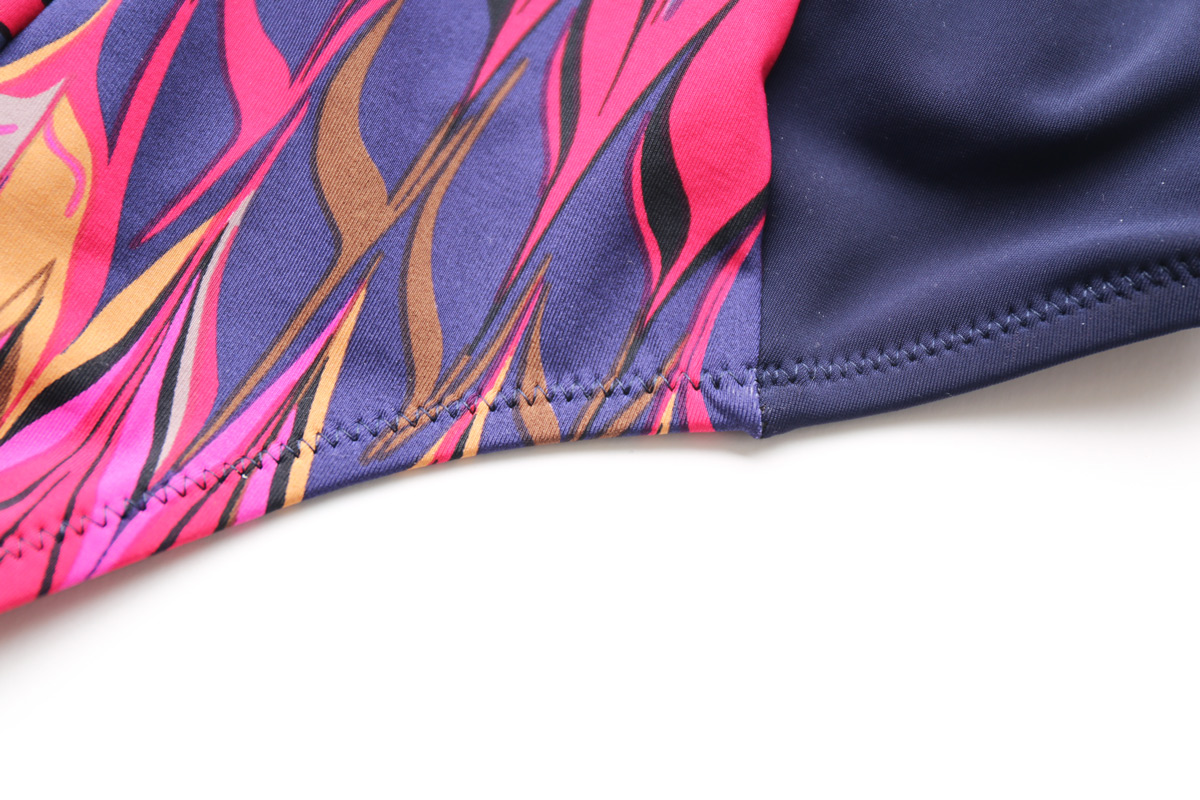
First of all, I want to be sure you’re clear, because I wasn’t at first: All the seams on these patterns are 5/8″ EXCEPT for the outside edges. Ok? So if you’re using a serger, you’ll be trimming off seam allowances as you stitch. And if you’re not using a serger, you may also want to trim seam allowances to reduce bulk. But watch this carefully because I’m also going to show you how to include boning at the side seams, in which case you WON’T want to trim the seam allowances on those pieces. Ok?
TOP A
I should also warn you that I didn’t photograph every step, but instead I combined steps on occasion. (These sew-alongs take an enormous amount of time, and I have fall patterns to develop!) I think you’ll still be able to follow along, and if you get confused refer to the illustrations in the instructions, which are very thorough.
NOTE: Stretch fabric evenly in front and back of needle while stitching.
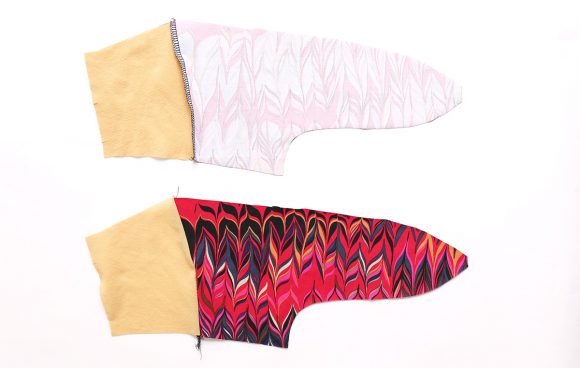
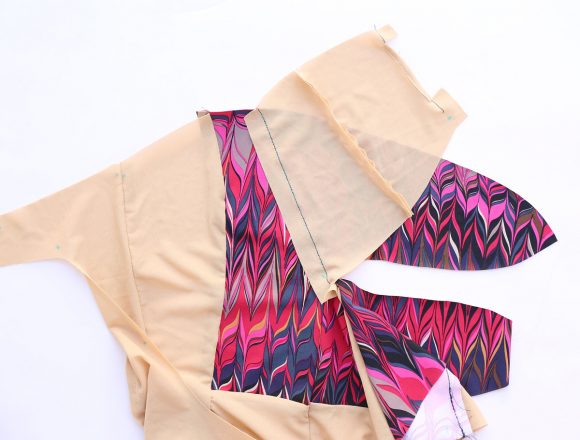
Front and Back
NOTE: Right and left front sections of Top are stitched separately. Instructions are given for the right front.
1. Stitch one SIDE FRONT (2) section to one \FRONT| (1) section at side front, matching notches. (Save remaining front and side front sections.)(Two remaining front sections will be used as facing.)
2. Stitch one BACK (3) section to side front at sides.
So far our suits look like this.
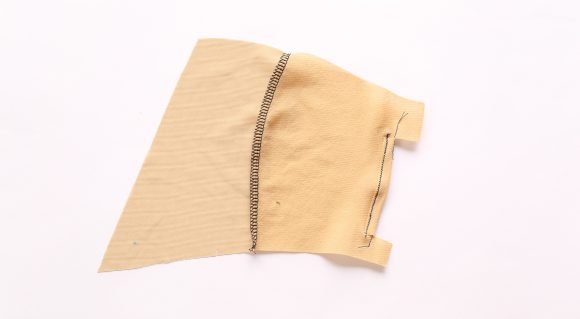
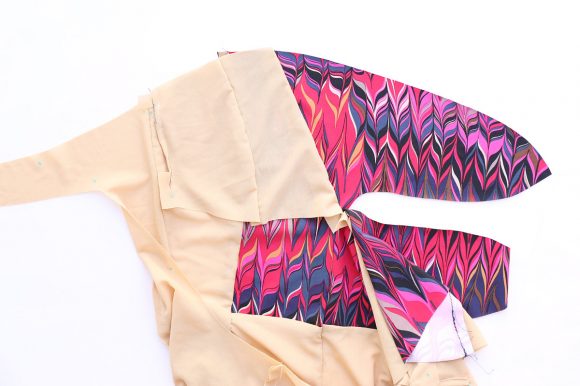
Lining, Facing and Stay
3. Stitch one side front LINING section to one front FACING section at side front, matching notches. (Save remaining front facing and side front lining sections.)
4. REINFORCE side edge of one side front LINING section through small circles, disregarding notches. Clip to circles.
5. Finish side edge of side front LINING with a 5/8″ (1.5cm) NARROW HEM between circles.
I found it much easier to finish this edge AFTER stitching the stay to the front section in the next step so I didn’t accidentally fold and finish it in the wrong direction. It’s difficult to tell right and wrong sides of the lining, so either mark the wrong side of the lining pieces so you can tell which is which or you might also want to wait until you’ve sewn the pieces together so it’s clear and you’re sure you have two mirroring sets, one for each side.
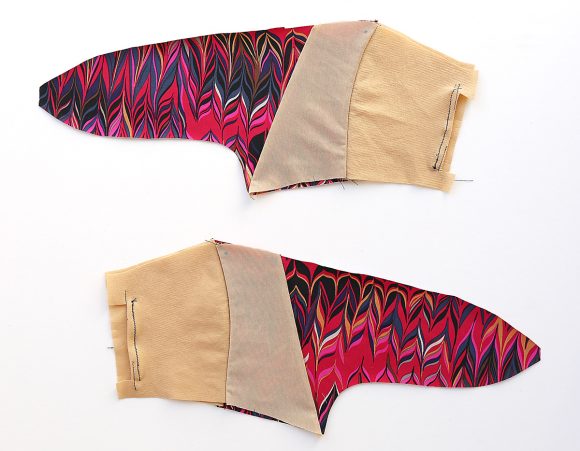
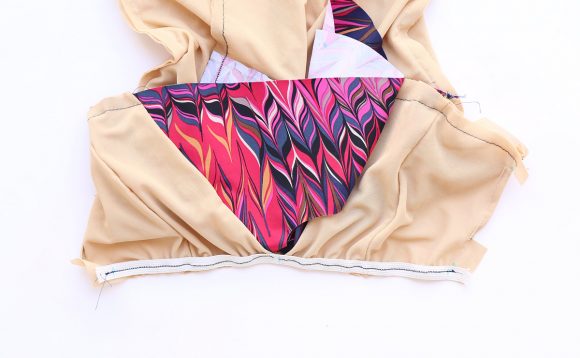
6. Stitch one STAY (4) section to side front section, matching notches.
This is the bra cup “pocket,” so if you’ve decided not to include this detail you can skip steps 6-8, but it’s a fun little detail and probably worth including.
7. Pin stay to front lining, right sides together, having slanted edge 5/8″ (1.5cm) over placement line toward side, matching large circles. Stitch 5/8″ (1.5cm) from raw edge. Trim seam allowance to 1/4″ (6mm) from stitching.
You’ll want to refer to the pattern pieces or to your markings to be sure you’re matching everything up correctly here, but once you’ve stitched the pieces together along this line the edges should match when the stay is folded back on the lining. You can see in the next step how the pieces all line up at the edges when the facing is folded into place.


8. Turn stay toward side (covering raw edges). Baste raw edges together, matching side front seams.
9. Stitch back LINING to side front lining at sides, right sides together, matching notches and squares, keeping side front lining free between circles.
You might need to do a little fiddling to be sure the hemmed edge stays free here. The hem forms the opening for the bra cup “pocket,” so you don’t want to stitch it closed. Try sewing the seam in sections so you can push the hemmed portion out of the way. And if you’re interested in adding boning, this is where you won’t want to trim your seam allowances, so if you’re serging the seams, switch to a zigzag or straight stitch here!
Let’s take a little detour now and make a casing for the boning! This part is really easy. You’ll simply topstitch the seam allowances to the lining to form the casing. Be sure you’re stitching far enough from the side seam that the boning will be able to slip into the casing. Check to be sure it fits after you’ve stitched, but we won’t insert the boning until a little later.

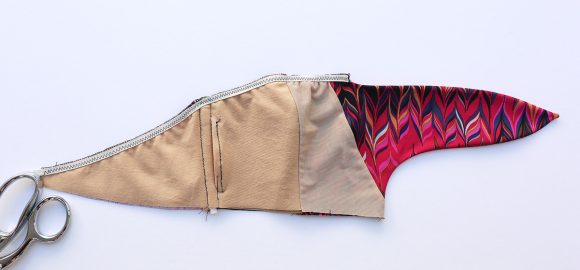
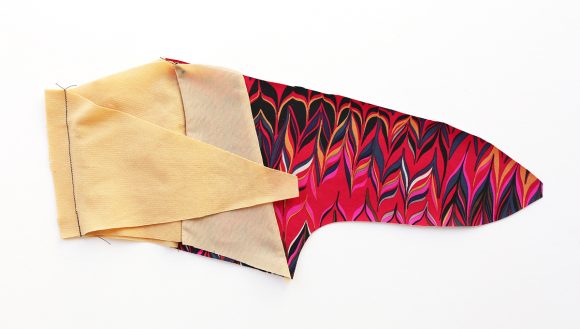
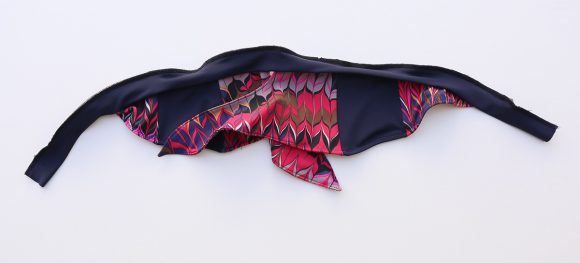
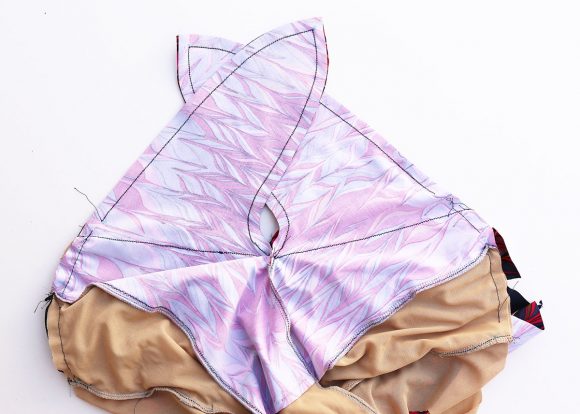
10. Pin lining to front and back, right sides together, matching notches, seams, circles and squares. Stitch front tie section, from lower edge to triangle, taking up a 3/8″ (1cm) seam allowance, pivoting at small circle and across seam allowance at triangle. Clip diagonally to triangle, as shown. Trim seam allowances.
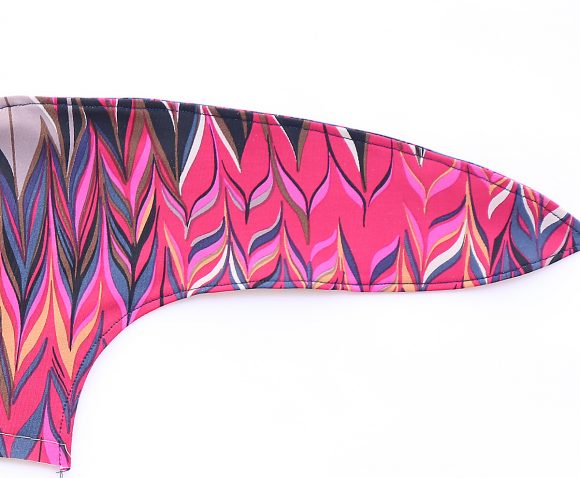
I preferred to use the stretch stitch on my machine for this section. A serger stitch just felt too bulky. Be sure to pivot at that circle so you get a nice point to the tie! And also note where to stop stitching. The remainder of the seam will have elastic attached, so we’ll need the seam allowances intact at the top edge. And the clip allows us to turn just the stitched section right side out while leaving the seam allowances free for the elastic.
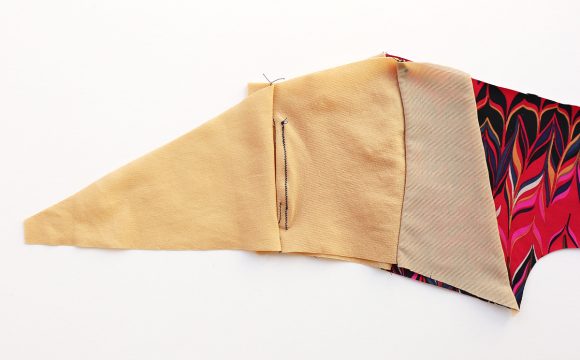
11. Turn front tie right side out. Press.
Yes, I know. It’s no fun to press swimsuit fabric. Do your best, and it will help to finger-press the edges first. I chose to edgestitch the tie, which I’ll mention again when we get to that step.
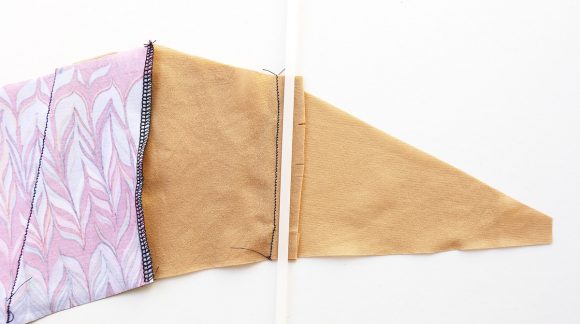
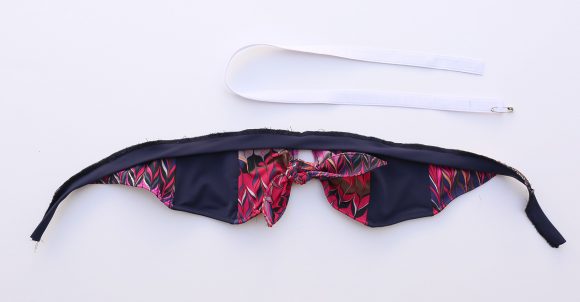
Pin lining to front and back, wrong sides together, matching notches, seams, circles and squares. Baste raw edges together.
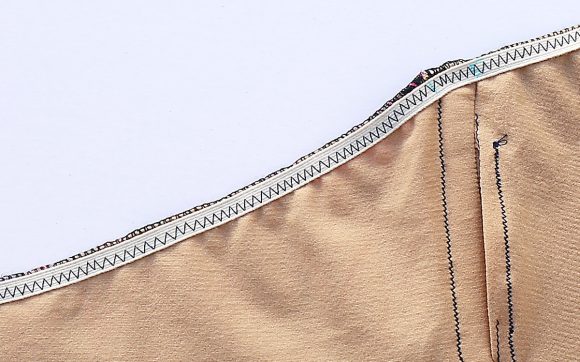
If you included a casing for the boning, don’t baste the bottom edges together yet. If you have a serger, this is a great time to serge that top edge to give it a nice finish. Be careful not to trim the edge as you serge it because you’ll need it for the elastic. If you don’t have a serger, try a mock serger stitch or a three-stitch zigzag to finish the edges together and make them look nice. They’ll show on the inside of the finished suit.
Finishing Upper Edge
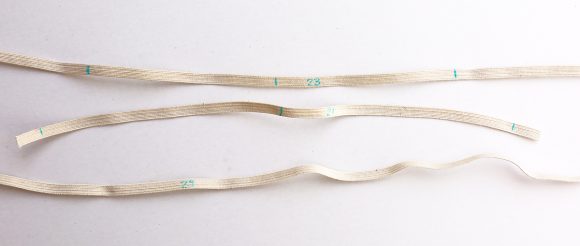
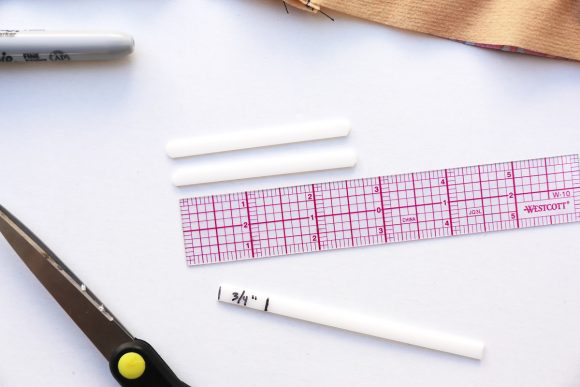
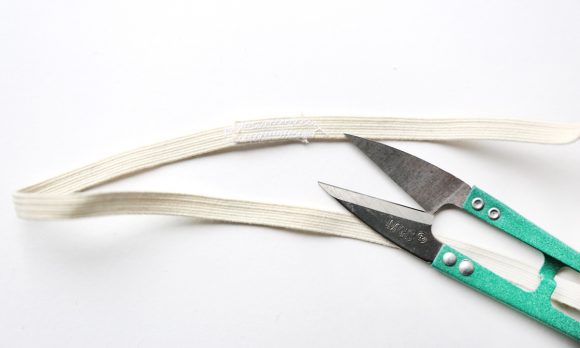
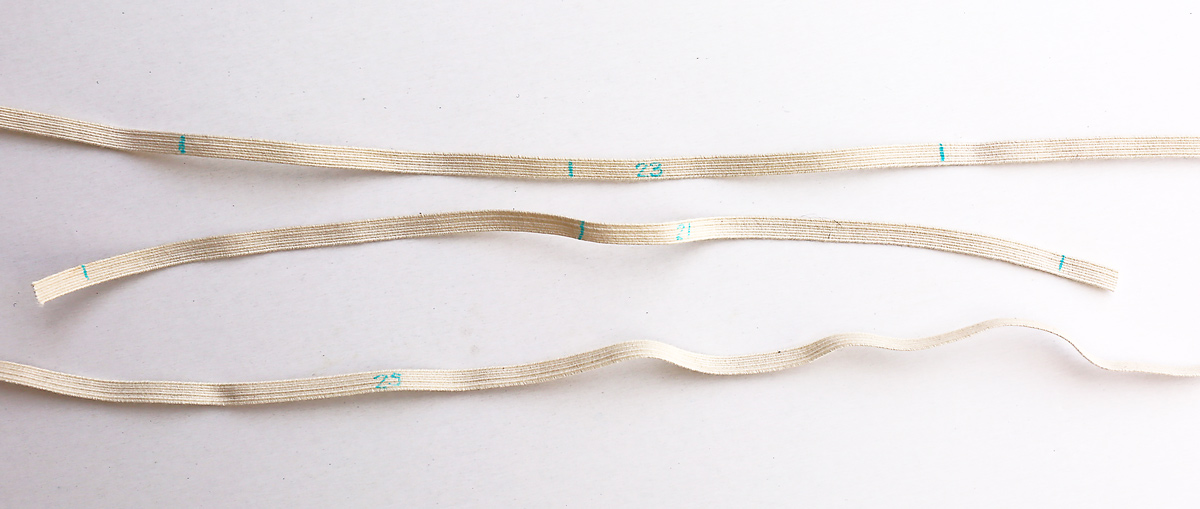
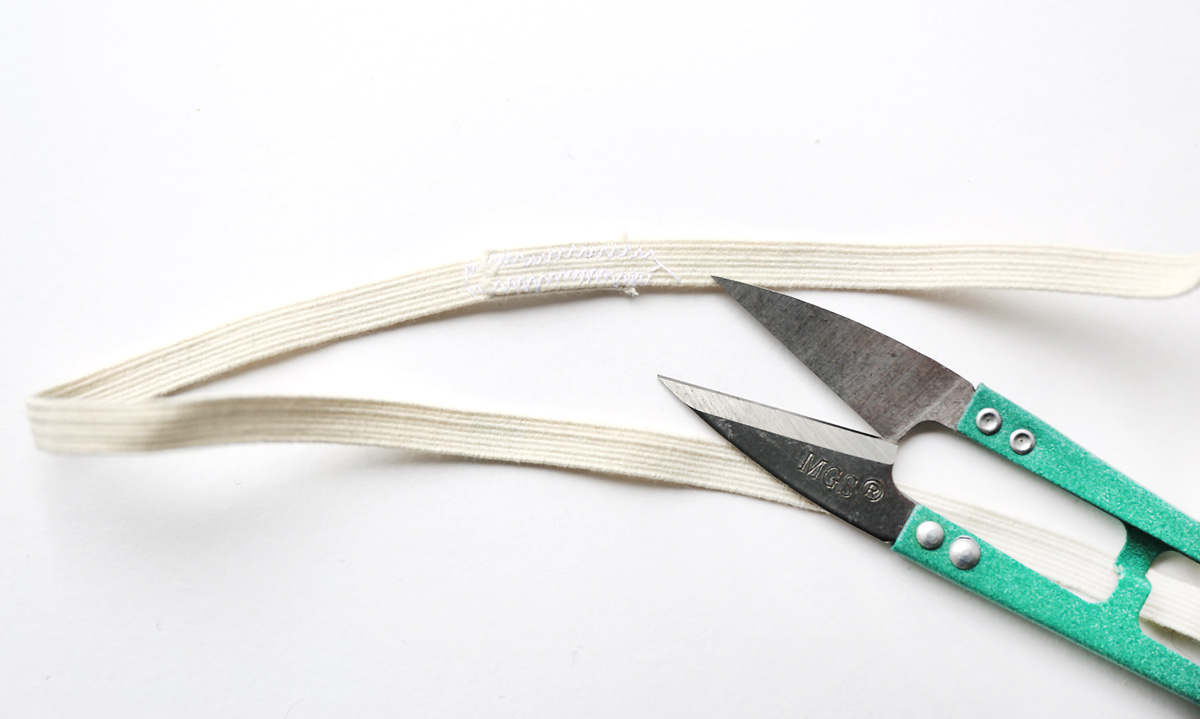
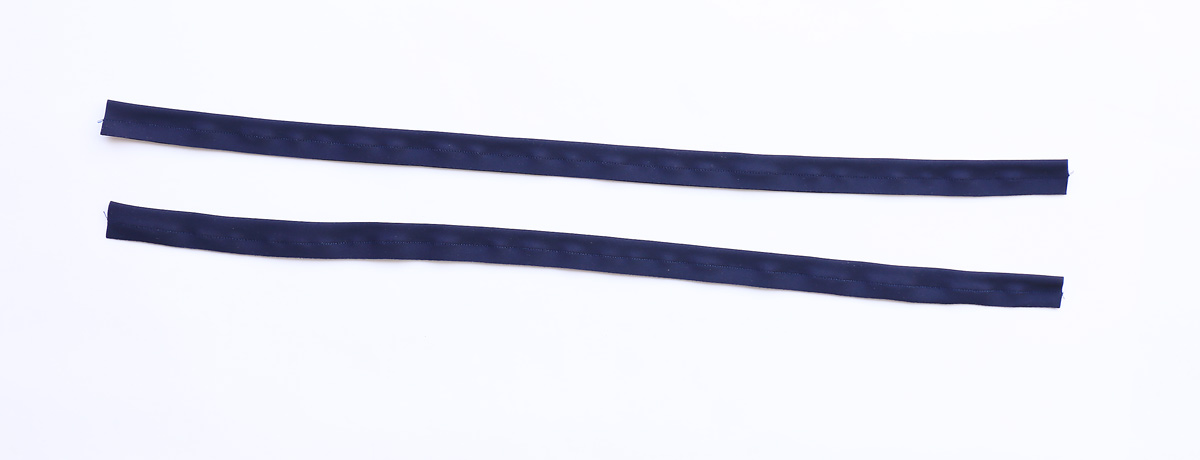
12. Cut two pieces of elastic using GUIDE FOR ELASTIC (5) pattern piece. Transfer markings.
Here’s a little tip for you: For my swimsuits I cut all my elastic at the same time and marked each of the cut pieces with a water-soluble fabric pen, including the piece number and all the markings. It saved me time so I didn’t need to repeatedly refer to the elastic guides. Just be sure to identify each piece clearly!
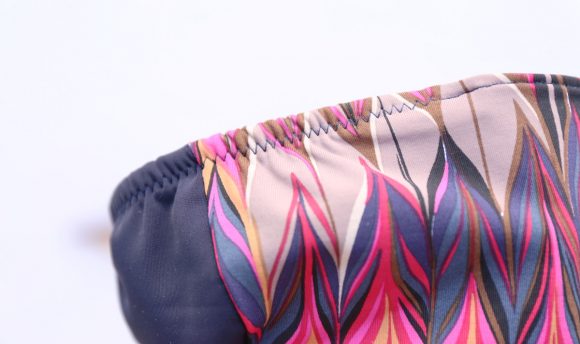
13. On inside, pin one elastic piece to upper edge of Top, matching large circles, squares and triangles, having one long edge even with the 3/8″ (1cm) seam allowance. (Front end of elastic extend 5/8″ (1.5cm) beyond triangle). Stitch across ends, catching in elastic. Trim front end of elastic close to stitching. Stitch close to inner edge of elastic, stretching elastic to fit.
As I mentioned on Day 1 of the sew-along, I like to use a zigzag stitch for elastic. Pin it to the edge, matching the markings, and stretch the elastic as you line it up with the edge of the fabric, continuing to stretch as you stitch. It’s relatively easy to control when you do it this way and very easy to turn the elastic in the next step.
14. Turn 3/8″ (1cm) seam allowance and elastic to inside. Press.
(I confess, I don’t press–it seems pointless with swimsuit fabric.)
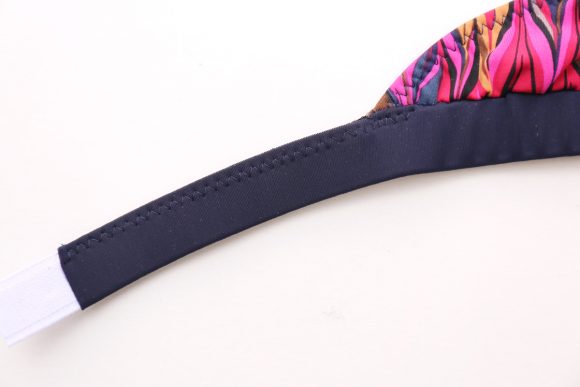
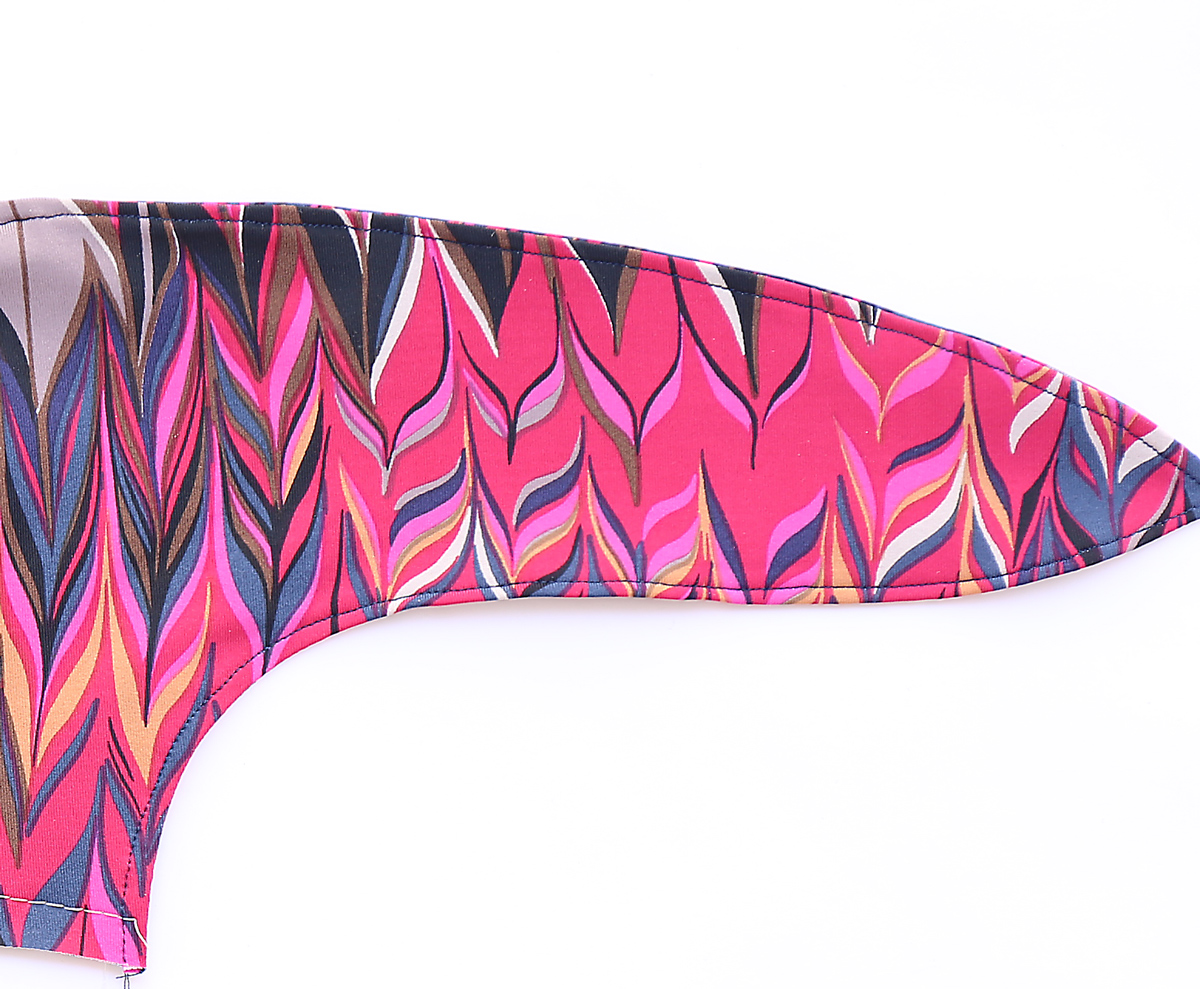
Stitch a scant 3/8″ (1cm) from folded edge, stretching elastic while stitching, continuing stitching along upper edge and tie end. Keep fabric pulled taut over edge of elastic.
Like I said on Day 1, all my favorite (and very expensive) swimsuits have a zigzag to finish the elastic, so rather than mess with either a straight stitch or a double-needle stitch (which some people prefer because they think it looks more professional), I stuck with the tried and true. Like any finishing technique, this method takes a little practice. I always wish I had three hands when I’m sewing the elastic edge, but it looks great when it’s done. You’ll simply stretch the elastic as you sew the zigzag stitch, and while you’re stretching the elastic you’re also stretching the fabric away the elastic to keep it tight and even. Keep stretching at a 90-degree angle and with a little experience you’ll get a really nice-looking edge.
I also switched to a straight stitch once I got past the elastic and continue to sew around the ties, stretching the fabric as I stitched it. This gave the ties a nice finish and keeps them flat, since pressing the edges doesn’t really last. I’m happy with how it turned out.
Prepare and stitch left side of Top in the same manner as described for right side.
At this point it’s time to cut the boning to the correct length, insert it, and baste the bottom edge closed. It’s better to cut the boning a little short than too long, so insert the boning, mark the end, and subtract 3/4″ (5/8″ for the seam allowances at the bottom edge and 1/8″ to be safe). Use a scissors (not your fabric scissors!) to trim the boning to the correct length. Trim the corners and maybe even use a little sandpaper to eliminate any sharp edges before you re-insert the boning and baste the bottom edges closed.
Well, that seems like enough for one day, doesn’t it? We’ve made good progress! May 27 we’ll finish the top (View A) and start on the bottom (View B).
May 27: Day 3: Finish View A, start View B: Assemble the two-piece bottom and lining.
Hello again, and welcome to Day 3. Let’s dive right in!
Let’s get the difficult part of sewing View A out of the way first, and then we can do the fun parts!
Lower Band
I’ll confess, this is my least favorite part of sewing these swimsuits. Be patient and take your time and it will be ok!
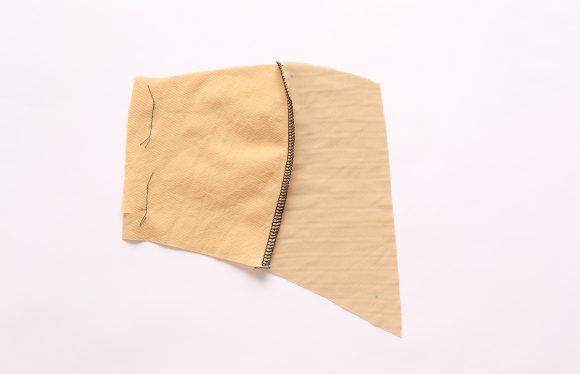
15. Fold LOWER BAND (6) on foldline, wrong sides together, matching notches and circles. Baste long edges together.

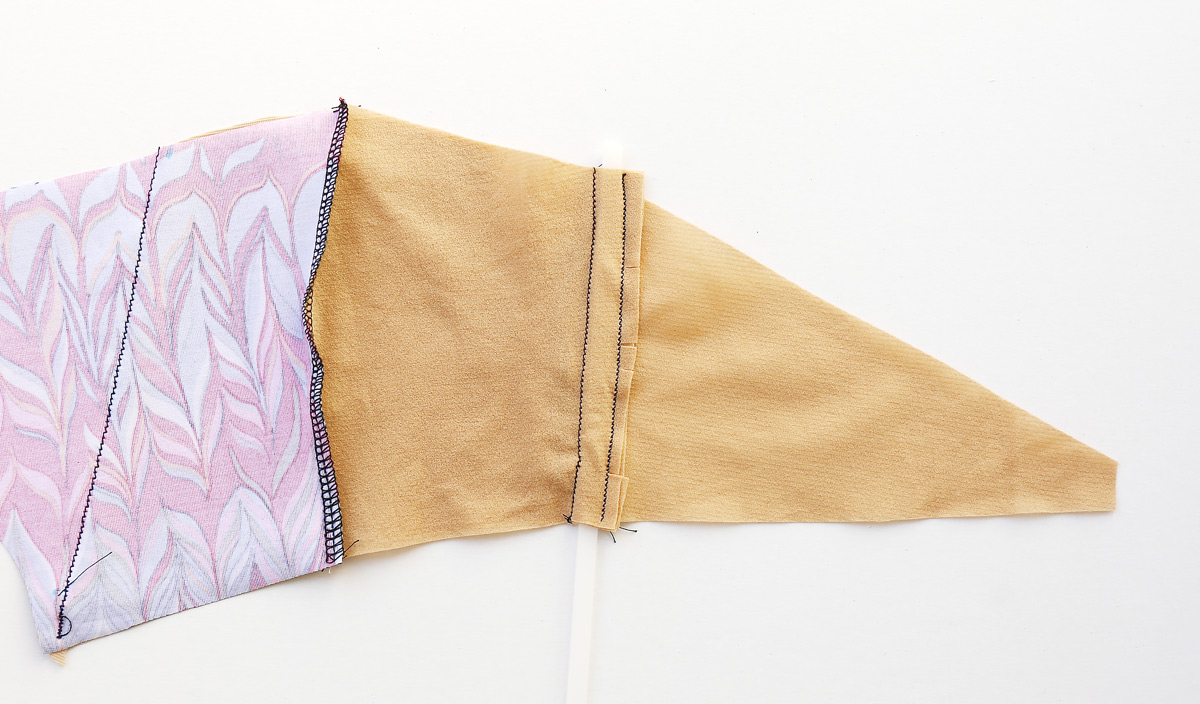
16. Pin band to lower edge of Top, matching notches and circles, stretching band to fit. Stitch entire seam. Stitch again 1/4″ (6mm) away in seam allowances. Trim close to second stitching. OR, finish seam allowances using a serger or a wide, close-set zigzag stitch. Press seam allowances toward band.
I serged my seam allowances, and that worked pretty well. Later I stitched the seam allowances to the band so they stayed in place, but I didn’t do it until after the elastic was inserted — see my note after step 18 below.
17. Cut a piece of elastic using GUIDE FOR ELASTIC (7) pattern piece.
Insert elastic through band, having ends even. Stitch across ends of band, stitching through elastic.
18. Tack front seam allowances to band.
Like I mentioned above, to keep the seam allowances from showing on the finished band, especially on the back of the strap, I zigzag stitched along the top of the band, right through the elastic. The holds the seam allowances in place and flattens the band. If you want, you could stitch the entire length of the band this way. I stitched only the center front and the bands where they weren’t attached to the suit itself, since that’s where the seam allowances had the greatest tendency to turn and show.
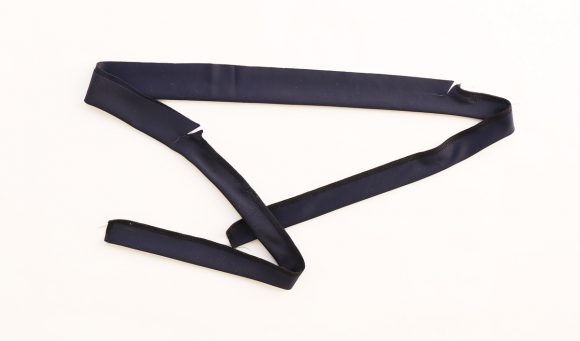
Shoulder Straps:
Personally, this is my favorite part of sewing swimwear. The straps just look so nice when they’re finished! And it’s really easy to make them.
19. Fold SHOULDER STRAP (8) on foldline, right sides together. Stitch long edges, taking up a 3/8″ (1cm) seam allowance. Trim seam allowances to a scant 1/4″ (6mm).
20. Turn strap right side out. Press.
You can use a safety pin for this step, too, but a loop turner is very easy and convenient.
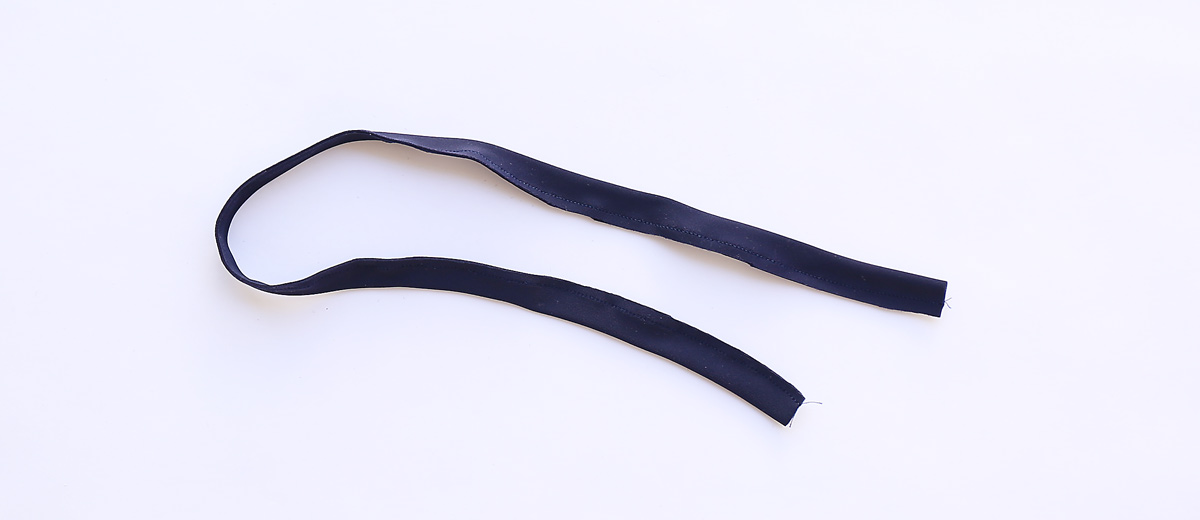
21. Cut two pieces of elastic, each using GUIDE FOR ELASTIC (9) pattern piece.
Insert one elastic piece through each shoulder strap, having ends even. Stitch ends of strap, stretching elastic while stitching.
Since I was making both the one-piece and the two-piece suits, I made my straps assembly-line fashion and fed a single length of elastic through all the straps pieces. This allowed me to adjust the elastic to my preferences once I tried on the suit, but if you cut the elastic to the template length and adjust it later that’s probably the safest method.

22. On inside, pin shoulder straps to upper edge of back, matching small circles. Stitch straps in place along previous stitching, stretching elastic while stitching.
My favorite suits have a bartack to secure the straps, so I did the same with mine.

Finishing
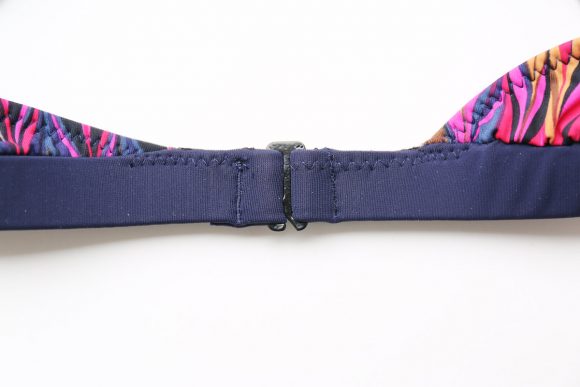
23. Slip left back through bra hook, folding back edge to inside on foldline. Stitch in place 3/4″ (2cm) from hook, using a zipper foot.
24. To form loop, fold right back to inside on foldline. Stitch in place 3/4″ (2cm from fold.
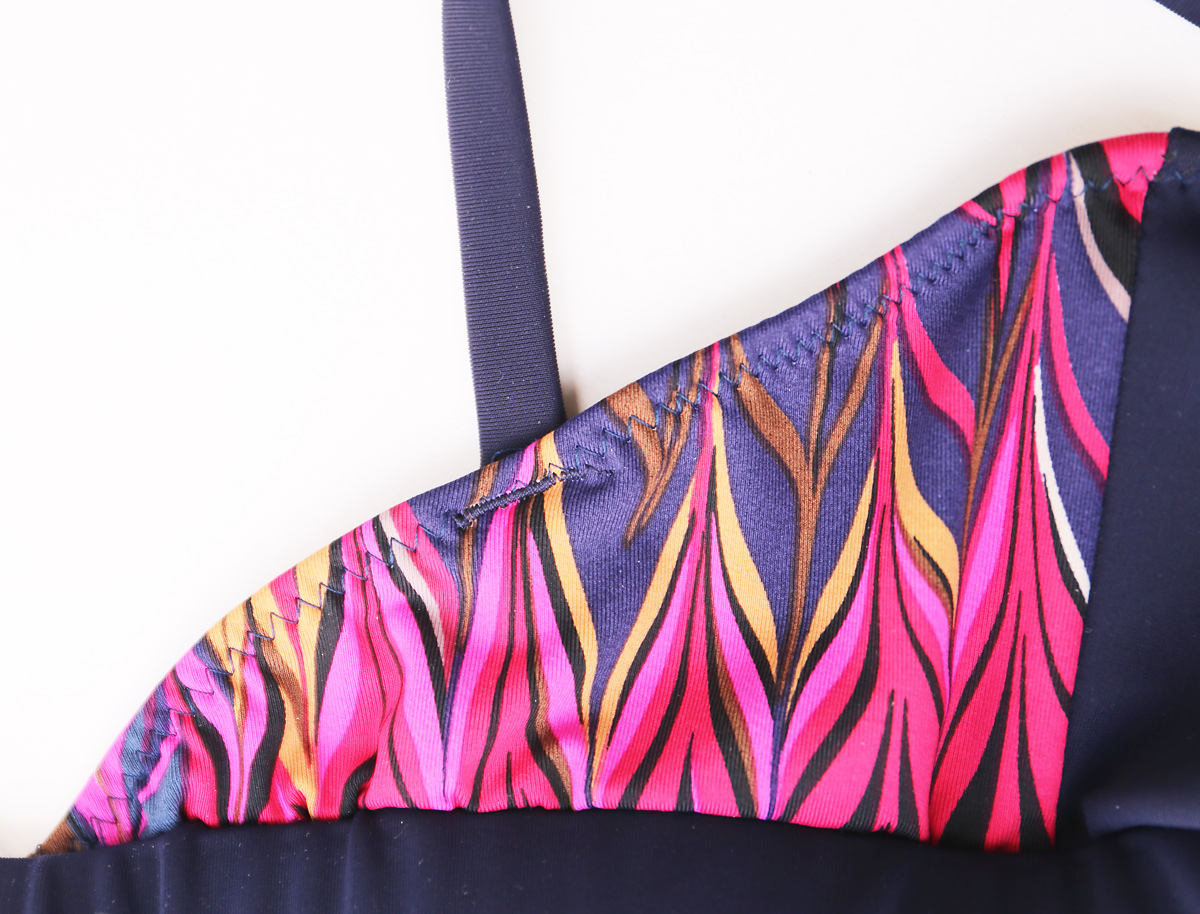
25. On inside, pin shoulder straps to upper edge of front, matching large circles, crossing left strap over right. Try on Top. Adjust straps as necessary. (Extra length is allowed for adjustment.)
EDGESTITCH upper edge of Top to strap, stretching elastic while stitching. Stitch straps in place along previous stitching. On inside, cut off excess straps if necessary.
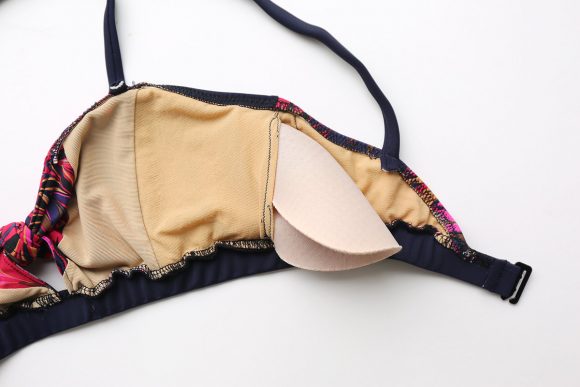
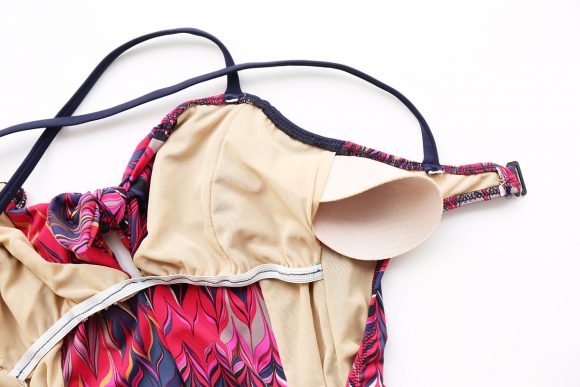
26. On inside, slip one purchased bra cup inside each opening on front of Top.
That’s not too bad, is it? And now you have a completed top!
BOTTOM B
NOTE: Stretch fabric evenly in front and back of needle while stitching.
Front and Back
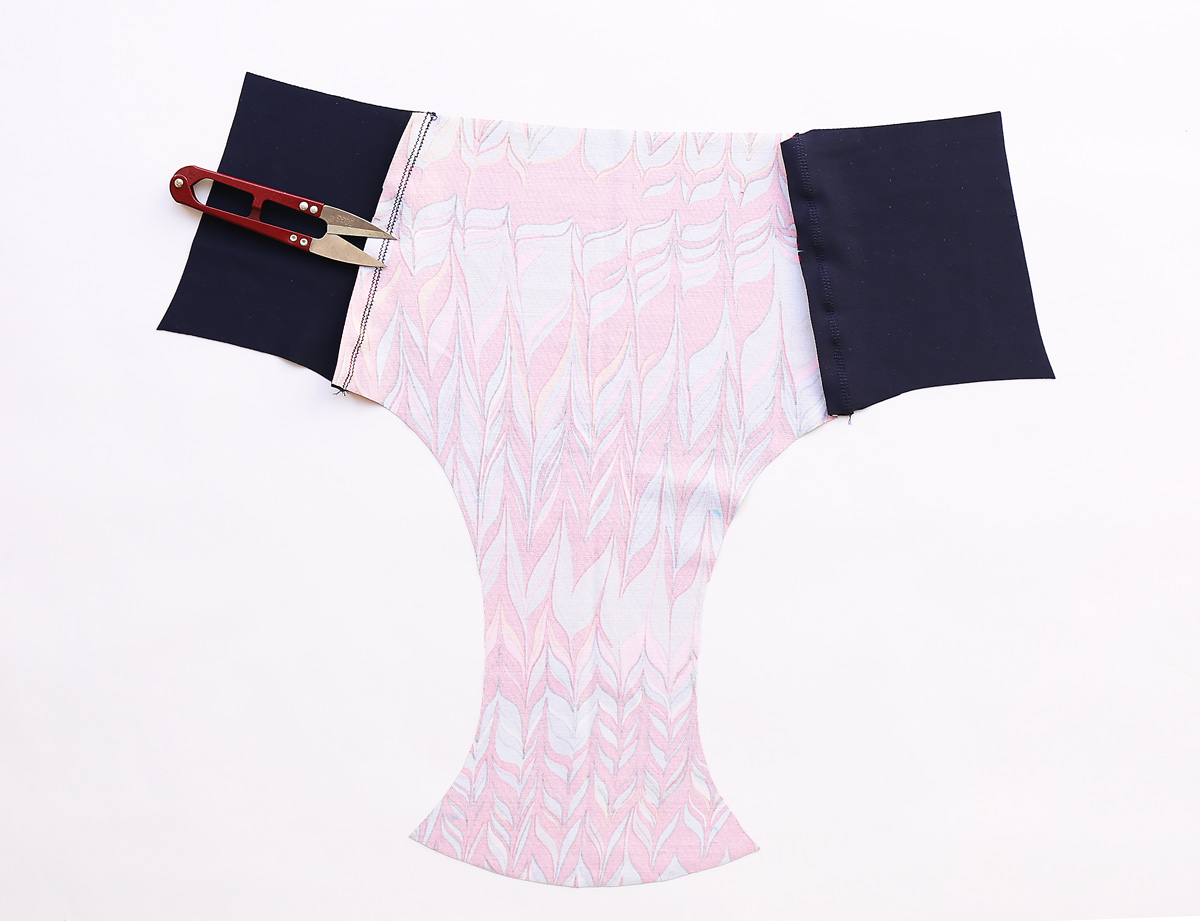
1. Pin SIDE FRONT (11) sections to side edges of \FRONT| (10) using DOUBLE-STITCHED seams. Press seam allowances toward sides.
I love that all the seams on the bottom are double-stitched. It just feels so …secure. Also, you can see in these photos that I used the knit stitch on my machine instead of serging these seams. No particular reason; I just wanted to see how it would work out, and it was fine!


2. Pin BACK (12) sections, right sides together. Stitch center back seam.

3. Stitch back to front at sides, right sides together, matching notches and squares using DOUBLE-STITCHED seams. Press seam allowances toward back.
4. Stitch back to front at crotch seam, matching notches and large circles, stretching front to fit, using a DOUBLE-STITCHED seam. Trim seam allowances. Press seam allowances toward back.
Lining
Prepare and stitch LINING in the same manner as described for front and back.
This should feel very familiar by now.
5. Pin lining to front and back, wrong sides together, matching notches, centers, circles, seams and squares. Baste raw edges together.
I serged the edges together so it would look nice. Feel free to use a zigzag or mock serger stitch if you don’t have a serger and you’ll get a similar effect.
Back Finishing
6. Cut elastic using GUIDE FOR ELASTIC (13) pattern piece. Transfer markings.
This little piece of elastic secures the back cut-out.
7. On inside, pin elastic to upper edge of back, matching large circles and having one long edge even with the 3/8″ (1cm) seam allowance. Stitch close to inner edge of elastic, stretching elastic to fit.
8. Turn 3/8″ (1cm) seam allowance and elastic to inside. Press. Pin ends and at seam.
9. Stitch a scant 3/8″ (1cm) from folded edge, stretching elastic while stitching. Keep fabric pulled taut over edge of elastic.
You’re getting really good at this now, aren’t you?
On Monday we’ll finish View B and start View C. I hope you’re having fun with this!
May 30: Day 4: Finish View B, start View C.
And here we are at Day 4 of the sew-along. Off we go!
After making the band on View A, this waistband will seem much easier; it doesn’t have any elastic inside!
Waistband
10. Fold WAISTBAND (14) on foldline, right sides together, matching notches, circles and squares. Stitch ends and long edges, pivoting across seam allowance at circles. Clip diagonally to circles. Trim seam allowances.
11. Turn right side out. Press. Baste raw edges together between circles.
12. Pin waistband to upper edge of front and back, matching notches, center fronts, squares and circles. Stitch between circles using a DOUBLE-STITCHED seam or use a zigzag stitch, stretching waistband to fit. Press seam allowances toward lower edge.
Leg Finishing
13. Cut two pieces of elastic, each using GUIDE FOR ELASTIC (15) pattern piece. Transfer markings.
14. Lap ends of elastic, matching large circles. Stitch securely.
15. On inside, pin one piece of elastic to each leg edge, matching circles, squares and triangles, having one edge of elastic along the 3/8″ (1cm) seam allowance. Stitch close to inner edge of elastic, stretching elastic to fit.
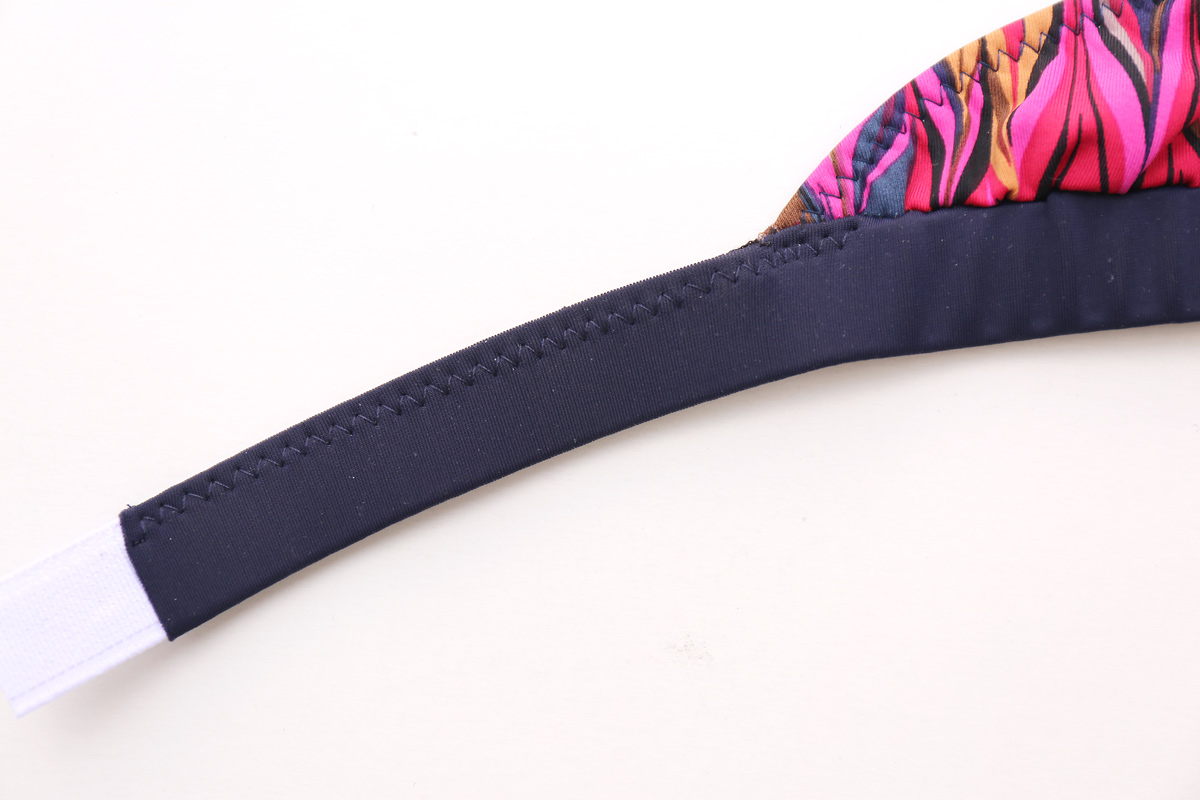
This is the same process we used to sew the elastic to the edge of the top, but now the elastic is sewn in a loop which makes it much easier to sew. Simply stretch and stitch! One tip I’ll add to the instructions, however, is that you want most of the stretch in the elastic to be across the back of the suit so you get good coverage over your bottom. The elastic can be almost flat or mostly un-stretched across the front of the thigh and through the crotch, so you may want to re-pin and adjust the elastic until you’ve focused most of the stretch across the backside, where it needs to curve around your backside. If you’re unsure, baste the elastic and try it on. I found that the suit felt much more secure and comfortable when I adjusted the elastic this way. Once you’re happy with the elastic, zigzag it into place.
16. Turn 3/8″ (1cm) seam allowance to inside.
17. On outside, stitch a scant 3/8″ (1cm) from folded edge, stretching elastic while stitching. Keep fabric pulled taut over edge of elastic.
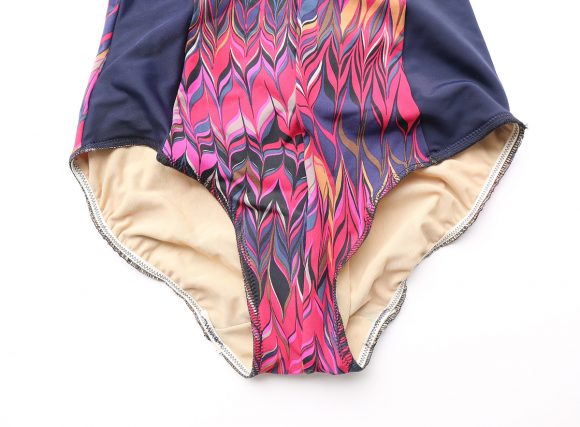
Again, I really love the zigzag stitch to finish the edges here. As you can see, if you keep the fabric and fabric taut and–with your third hand–pull the fabric at a 90-degree angle around the elastic as you stitch, the zigzag gives a nice finish to the edge, with plenty of stretch. I’ve also included a few photos of the finished elastic so you can see how the elastic is tighter across the backside, so the suit contours and hugs your body securely.


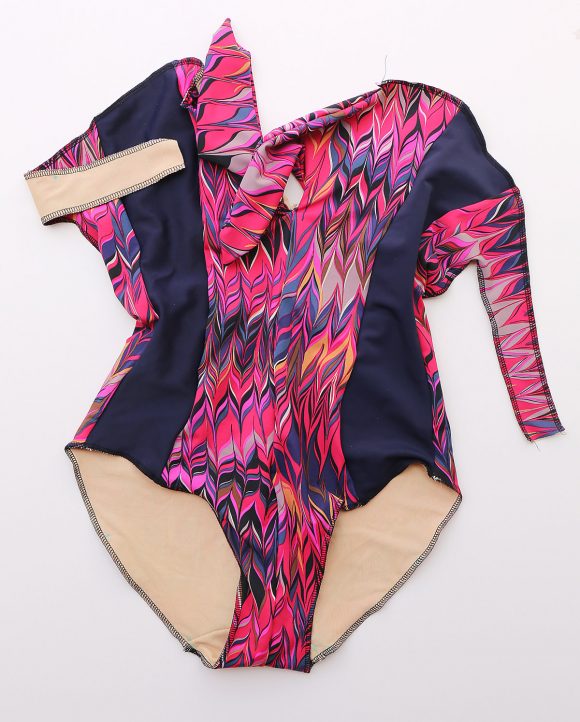
And hey, look! We’re finished with View A and B now! You have a completed suit!
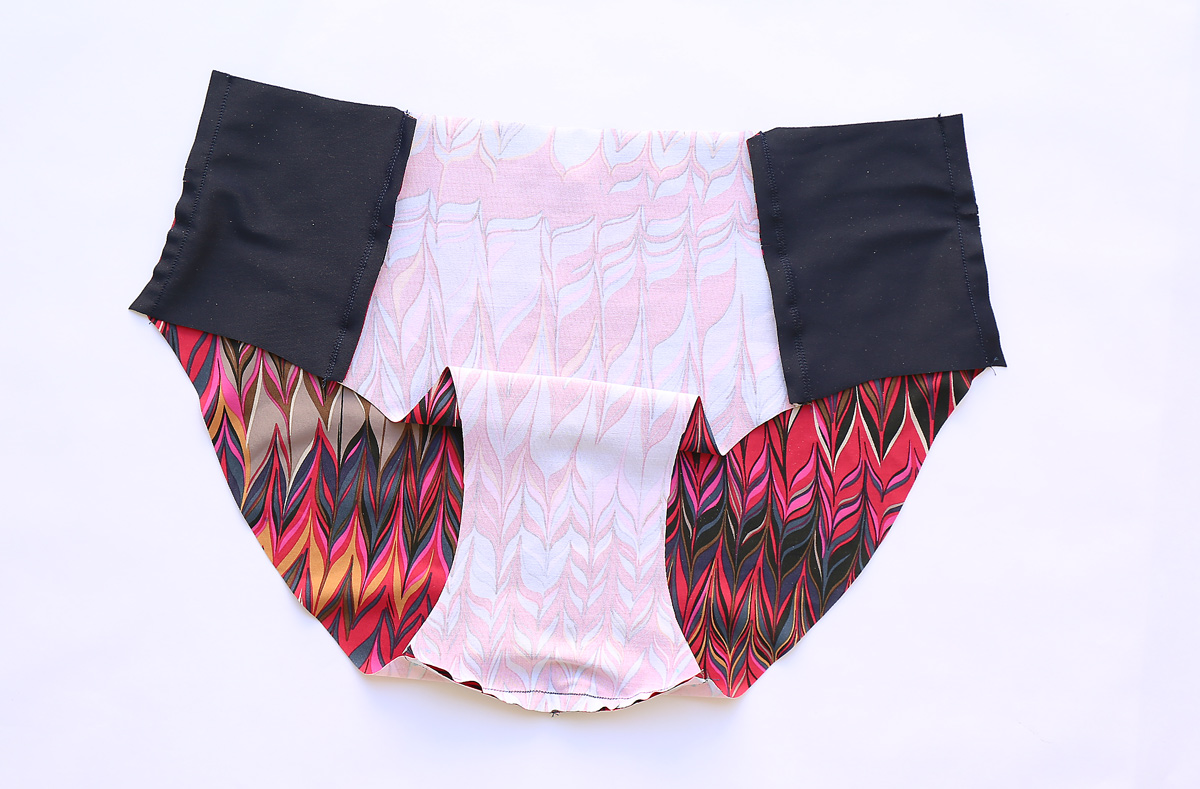
SWIMSUIT C
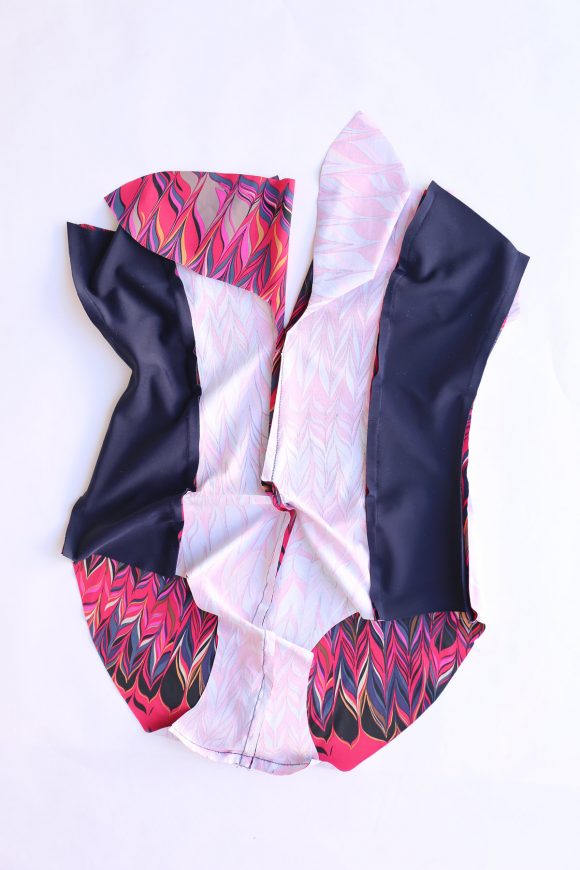
A lot of this suit is the same as the two-piece suit, so if you’ve been following along this will be very familiar. I didn’t photograph every step of this suit because it’s very repetitive to Views A and B, so you may want to refer back to previous days for all the tips and hints. And don’t forget that you can also include boning in the side seam along the bust stays if you like.
NOTE: Stretch fabric evenly in front and back of needle while stitching.
Front and Back
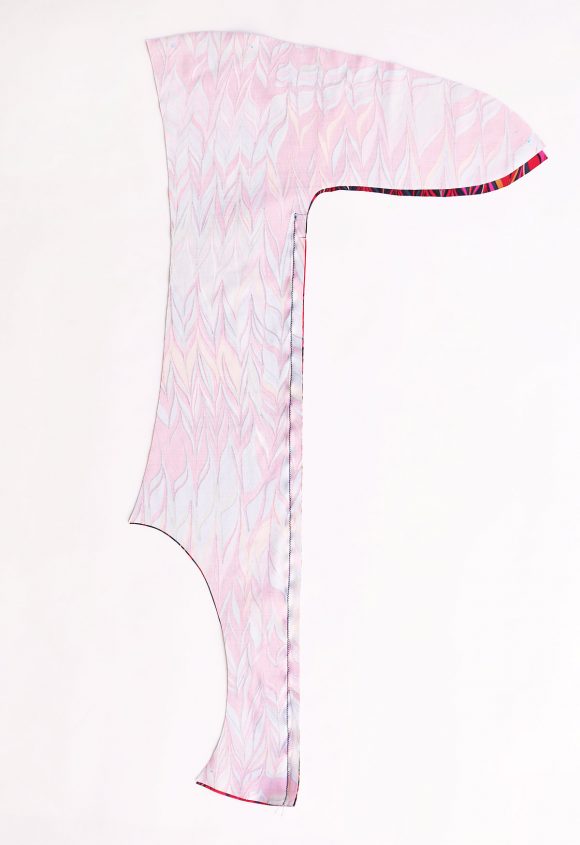
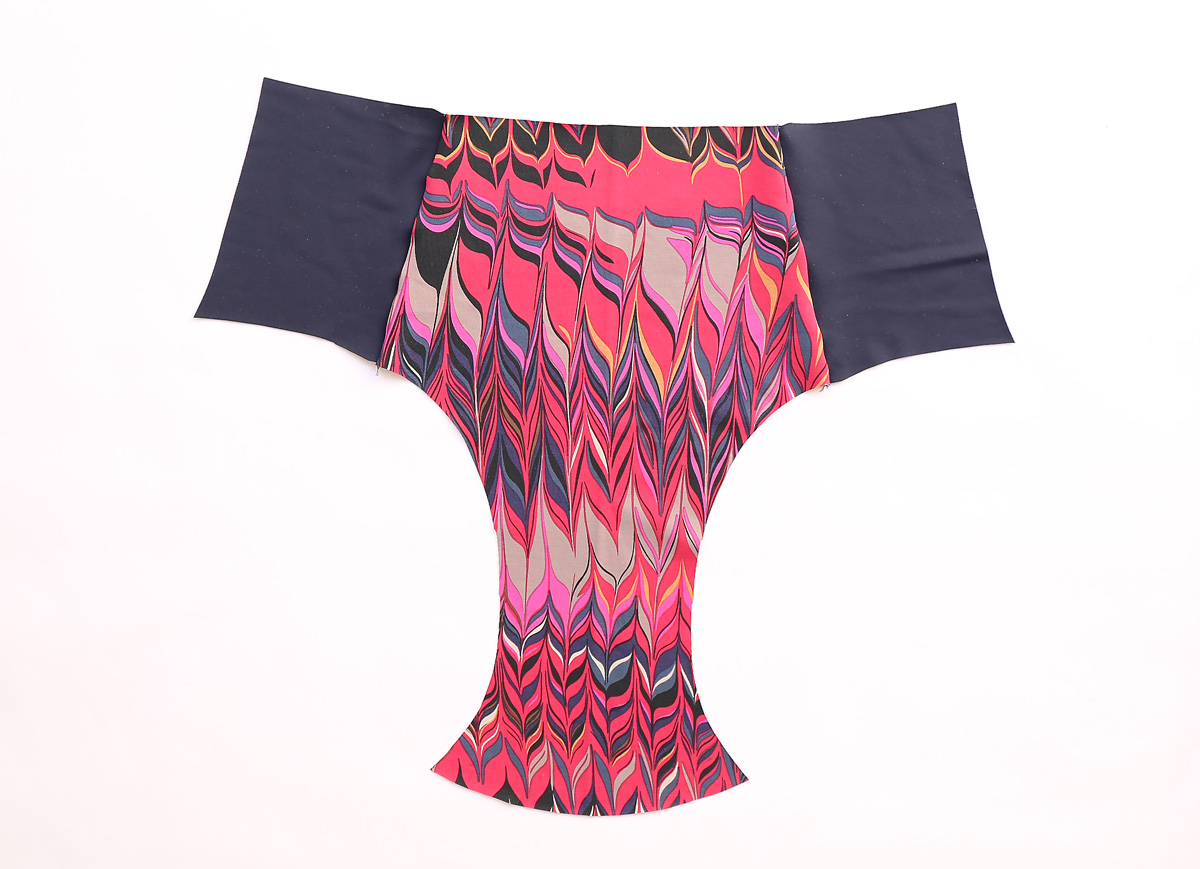
1. Pin two FRONT (16) sections, right sides together, matching notches and large circles. Stitch center front seam, from lower edge to large circle, taking up a 3/8″ (1cm) seam allowance. (Remaining front sections will be used as facing.)
2. Stitch one SIDE FRONT (17) section to each side of front at side front, matching notches.
3. Pin BACK (18) sections, right sides together. Stitch center back seam.
4. Stitch back to side front at sides, matching squares.
5. Stitch back to front at crotch seam, matching notches and squares, stretching front to fit, using a DOUBLE-STITCHED seam. Press seam allowances toward back.
This is quickly starting to look like a swimsuit, isn’t it?
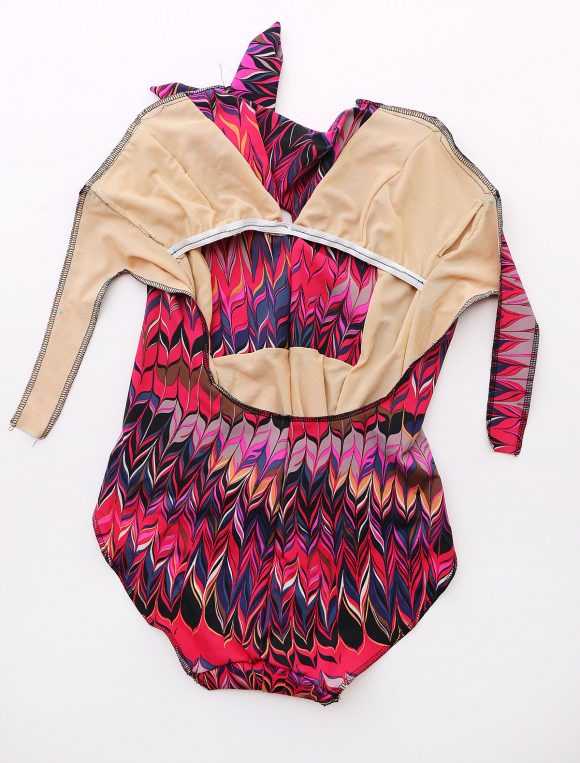
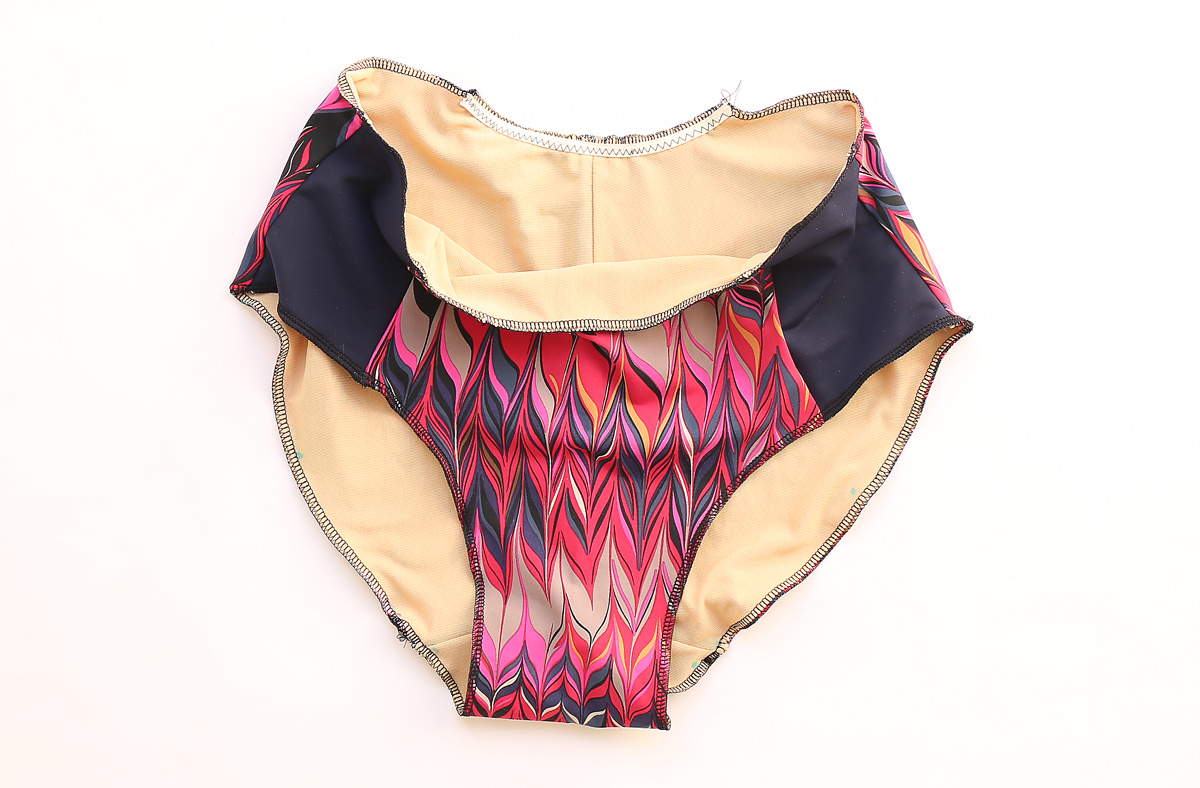
Lining, Facing and Stay
6. Pin front FACING, right sides together, matching notches and large circles. Stitch center front seam, from lower edge to large circle, taking up a 3/8″ (1cm) seam allowance.
7. Stitch one side front LINING section to each side of front facing at side front, matching notches.
8. REINFORCE side edge of SIDE FRONT LINING (19) section through small circle. Clip to circle.
9. Finish side edge of side front lining with a 5/8″ (1.5cm) NARROW HEM below circle.
10. Stitch one STAY (20) section to side front lining, matching notches.
Just as with View A, I prefer to make the narrow hem after I sew the side front lining to the front lining, just to be sure I fold the hem in the right direction.
11. Pin stay to front lining, right sides together, having slanted edge 5/8″ (1.5cm) over placement line toward side, matching large circles. Stitch 5/8″ (1.5cm) from raw edge, leaving free below large circle.
12. Turn stay toward side (covering raw edges). Baste upper and side edges together to small circle, matching side front seams.
See that sewn side seam? I got a little ahead of myself and had to rip that out one or two steps later… (Wait to sew your side seams until after you’ve sewn the facing, ok?)
13. Cut a piece of 3/4″ (2cm) wide elastic using GUIDE FOR ELASTIC (21) pattern piece. Transfer markings.
14. On outside, pin elastic to stay and side front, matching centers, circles and having one long edge even with lower edge, keeping lining free, breaking stitching at small circles.
When I sew this next time I’ll use a wider zigzag stitch. The narrow stitching has a tendency to turn and flip. You could also use two rows of stitching if you prefer.
15. Pin back LINING sections, right sides together. Stitch center back.
NOW is when you sew the back to the front…
16. Stitch back lining to side front lining at sides, matching squares, keeping side front lining free between small circles.
Remember again to keep that hemmed section free when you stitch this seam. You’ll need it to be open for the bra cups, so it might be easiest to stitch this seam in sections.
17. Stitch back lining to front lining at crotch seam, matching notches and squares, stretching front lining to fit, using a DOUBLE-STITCHED seam. Press seam allowances toward back lining.
Your suit will look much nicer than mine at this point because you didn’t run out of fabric and piece together the center front panels.

Tomorrow we’ll assemble and finish the suit. You’re doing great!
May 31: DAY 5: Finish View C
Welcome back! It’s time to sew things up!
18. Pin lining to front and back, right sides together, matching centers, seams, circles, triangles and squares. Stitch front tie section, between large circle and triangle, taking up a 3/8″ (1cm) seam allowance, pivoting at small circle and across seam allowance at triangle. Clip diagonally to triangle, as shown. Trim seam allowances.
Do your very best to sew directly to those circles. Your finished suit will look much better if you do. Refer to Day 2 for more photos and details on trimming and clipping, etc.
19. Turn front tie right side out. Press.
Pin lining to front and back, wrong sides together, matching notches, seams, circles and squares. Baste raw edges together.
As with Views A and B, I serged the edges together to give them a nice finish. If you don’t have a serger, a zigzag stitch or mock serger stitch will give a similar finish.
Finishing Upper Edge
20. Cut two pieces of 3/8″ (1cm) wide elastic, each using GUIDE FOR ELASTIC (22) pattern piece. Transfer markings.
As with the two-piece suit, I cut all my elastic pieces at once and wrote on them with a fabric pen to identify the template number for each piece. Transfer the markings directly onto the elastic as well, so it’s all ready when you need it. This saved me lots of time!
21. On inside, pin one elastic piece to right upper edge of swimsuit, matching squares and triangles, having one long edge even with the 3/8″ (1cm) seam allowance. (Front end of elastic extend beyond triangle). Stitch across ends, catching in elastic. Trim front end of elastic even with stitching. Stitch close to inner edge of elastic, stretching elastic to fit.
22. Turn 3/8″ (1cm) seam allowance and elastic to inside. Press.
This is exactly what we did with the top on the two-piece suit, so I didn’t photograph it again but you can refer to Day X for photos of this section.
Stitch a scant 3/8″ (1cm) from folded edge, stretching elastic while stitching, continuing stitching along upper edge and tie end. Keep fabric pulled taut over edge of elastic.
Stitch remaining piece of 3/8″ (1cm) wide elastic to left upper edge of swimsuit in the same manner as described for the right side.
Finishing Upper Edge of Back
23. Cut a piece of 3/8″ (1cm) wide elastic, each using GUIDE FOR ELASTIC (23) pattern piece. Transfer markings.
24. On inside, pin elastic to upper edge of back, matching circles and triangles, having one edge of elastic along the 3/8″ (1cm) seam allowance. Stitch close to inner edge of elastic, stretching elastic to fit.
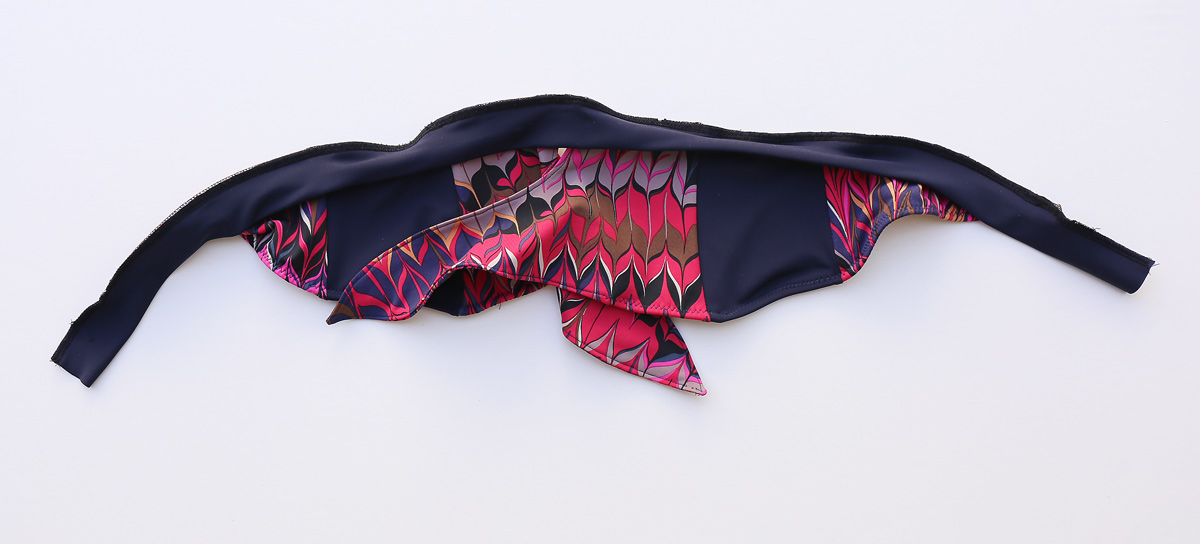
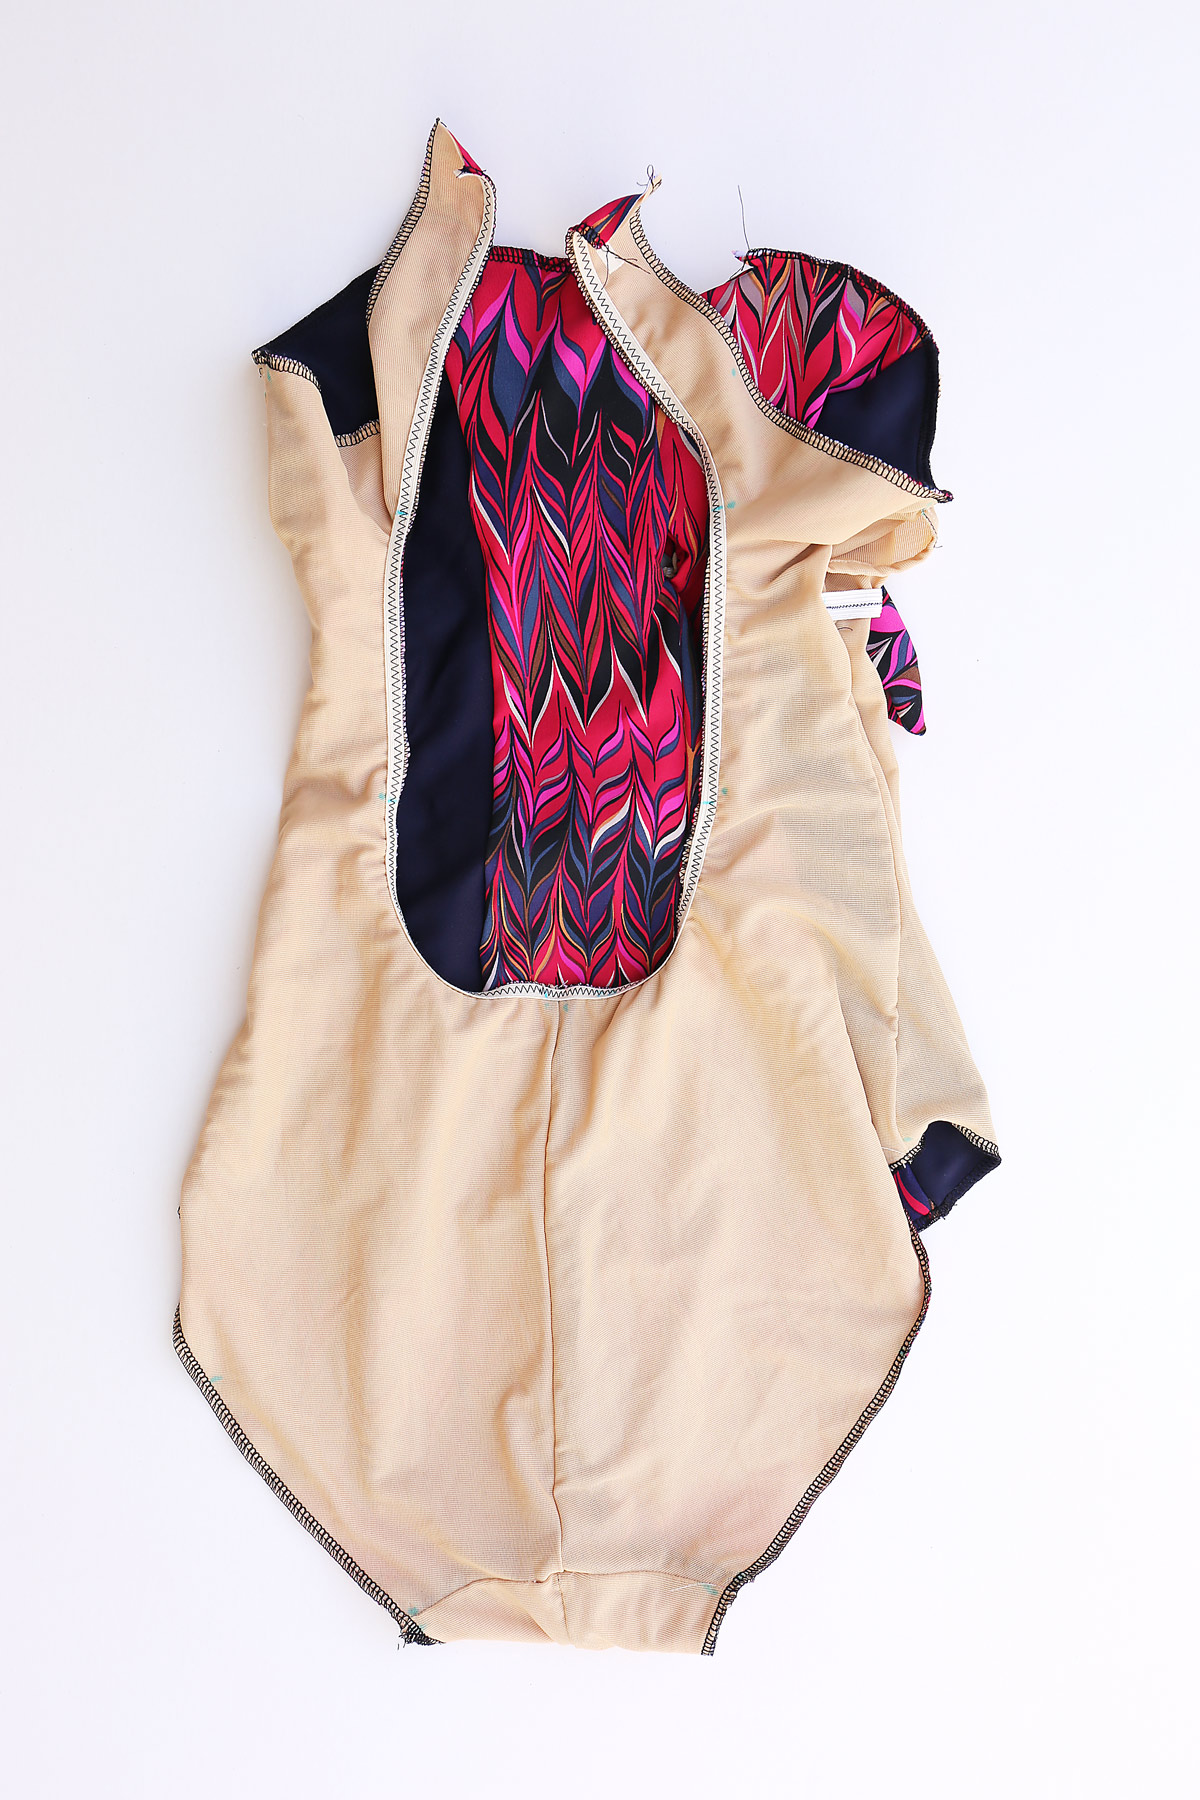
Is this all starting to feel familiar? Here’s my suit with the elastic pinned into place.
 And here it is with the elastic stitched to the wrong side of the suit, before I turned and stitched it to finish the edge.
25. Turn 3/8″ (1cm) seam allowance to inside.
Stitch a scant 3/8″ (1cm) from folded edge, stretching elastic while stitching. Keep fabric pulled taut over edge of elastic.
Leg Finishing
This section is exactly like View B, so you might like to refer back to Day X for helpful tips and details.
26. Cut two pieces of 3/8″ (1cm) wide elastic, each using GUIDE FOR ELASTIC (15) pattern piece. Transfer markings.
27. Lap ends of elastic, matching large circles. Stitch securely.
28. along the 3/8″ (1cm) seam allowance. Stitch close to inner edge of elastic, stretching elastic to fit.
Turn 3/8″ (1cm) seam allowance to inside.
On outside, stitch a scant 3/8″ (1cm) from folded edge, stretching elastic while stitching. Keep fabric pulled taut over edge of elastic.
Shoulder straps:
29. Fold SHOULDER STRAP (24) on foldline, right sides together. Stitch long edges, taking up a 3/8″ (1cm) seam allowance. Trim seam allowances to a scant 1/4″ (6mm).

30. Turn strap right side out. Press.
31. Cut two pieces of 3/8″ (1cm) wide elastic, each using GUIDE FOR ELASTIC (25) pattern piece.
Insert one elastic piece through each shoulder strap, having ends even. Stitch ends of strap, stretching elastic while stitching.
As I mentioned when we were sewing View A, I inserted elastic into all of my straps at once and then adjusted each straps as needed.
32. On inside, pin shoulder straps to upper edge of back, matching small circles. Stitch straps in place along previous stitching, stretching elastic while stitching.
Finishing
33. Slip left back through bra hook, folding back edge to inside on foldline. Stitch in place 3/4″ (2cm) from hook, using a zipper foot.
34. To form loop, fold right back to inside on foldline. Stitch in place 3/4″ (2cm from fold.
35. On inside, pin shoulder straps to upper edge of front, matching large circles, cross right strap over left. Try on swimsuit. Adjust straps as necessary. (Extra length is allowed for adjustment.)
EDGESTITCH upper edge of swimsuit to strap, stretching elastic while stitching. Stitch straps in place along previous stitching. On inside, cut off excess straps if necessary.
As with my two-piece suit, I used a bartack to stitch the straps in place. It’s very secure and looks nice, too!
36. On inside, slip one purchased bra cup inside each opening on front of swimsuit.
Again, just like the View A two-piece suit.
And you’re done!
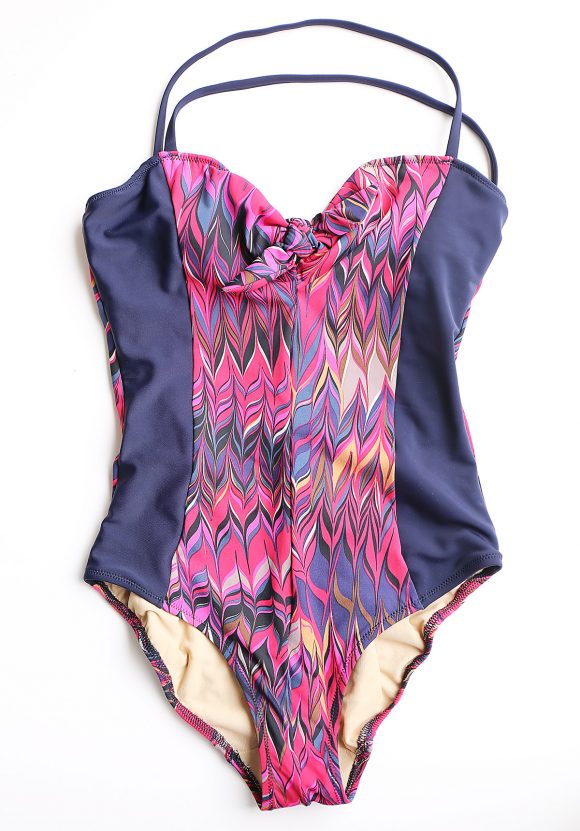
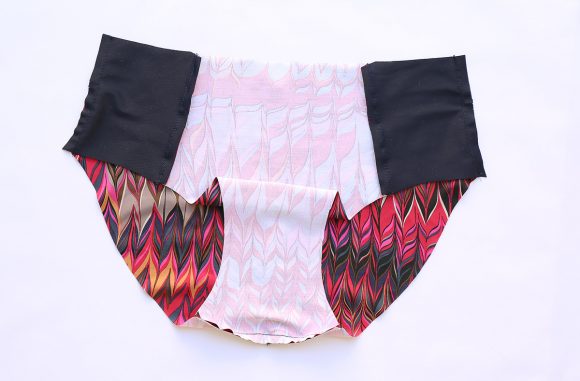
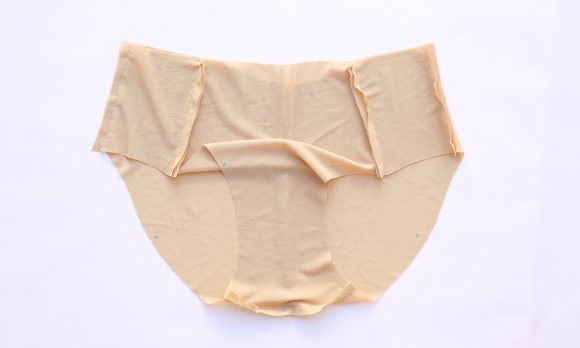
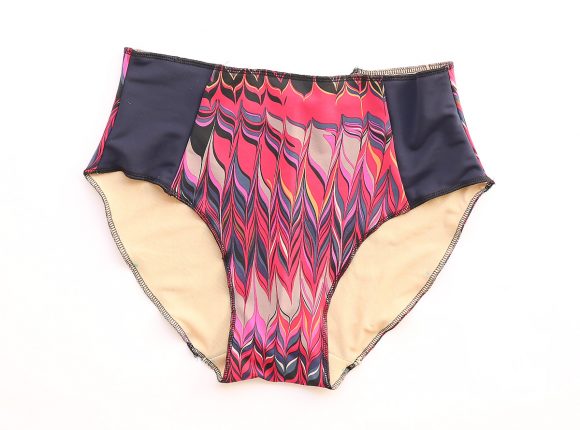
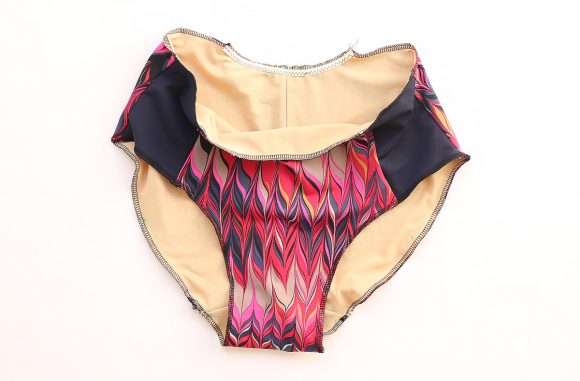
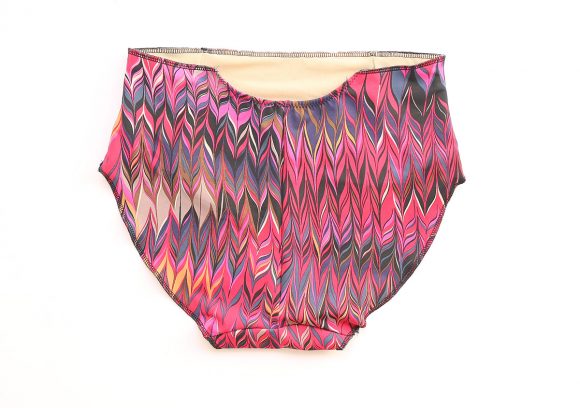
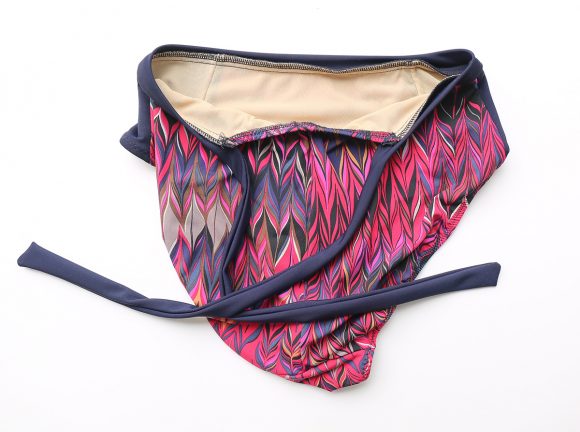
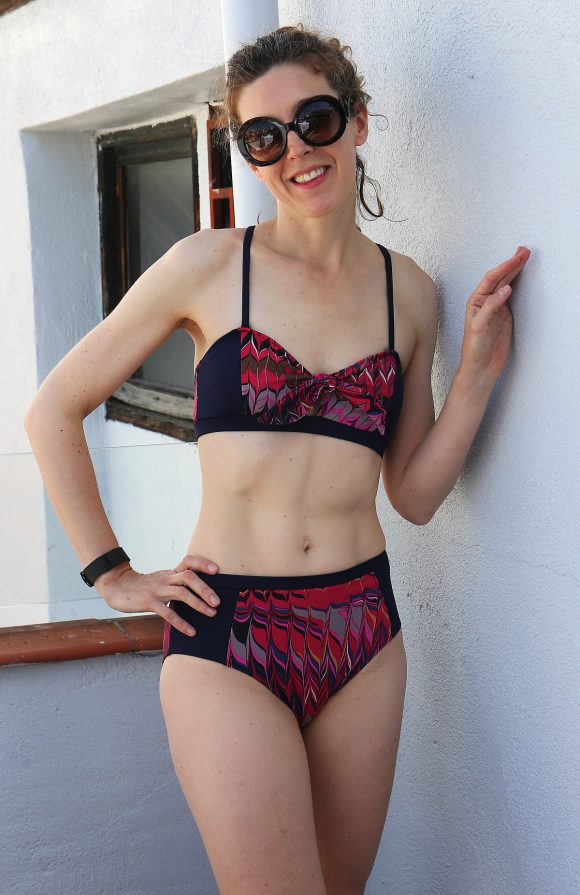
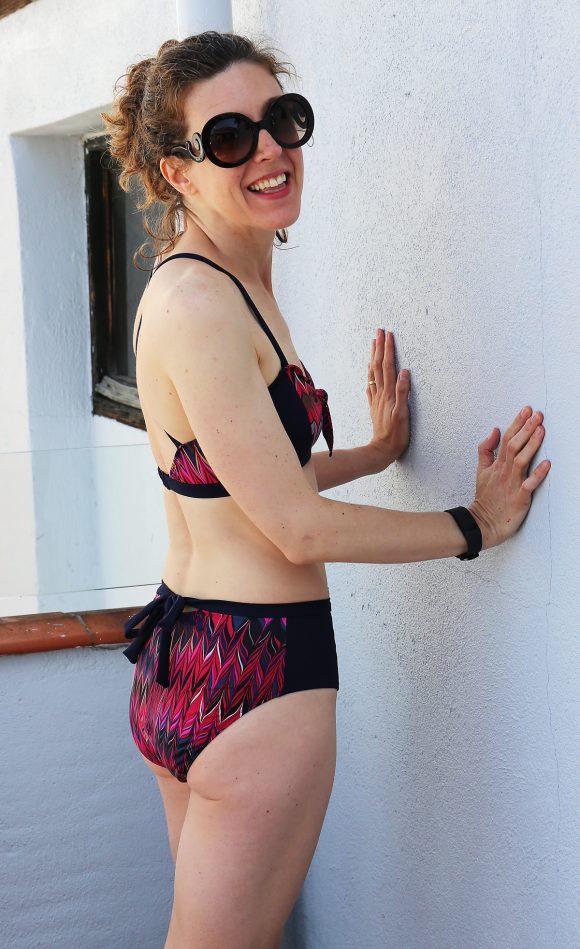
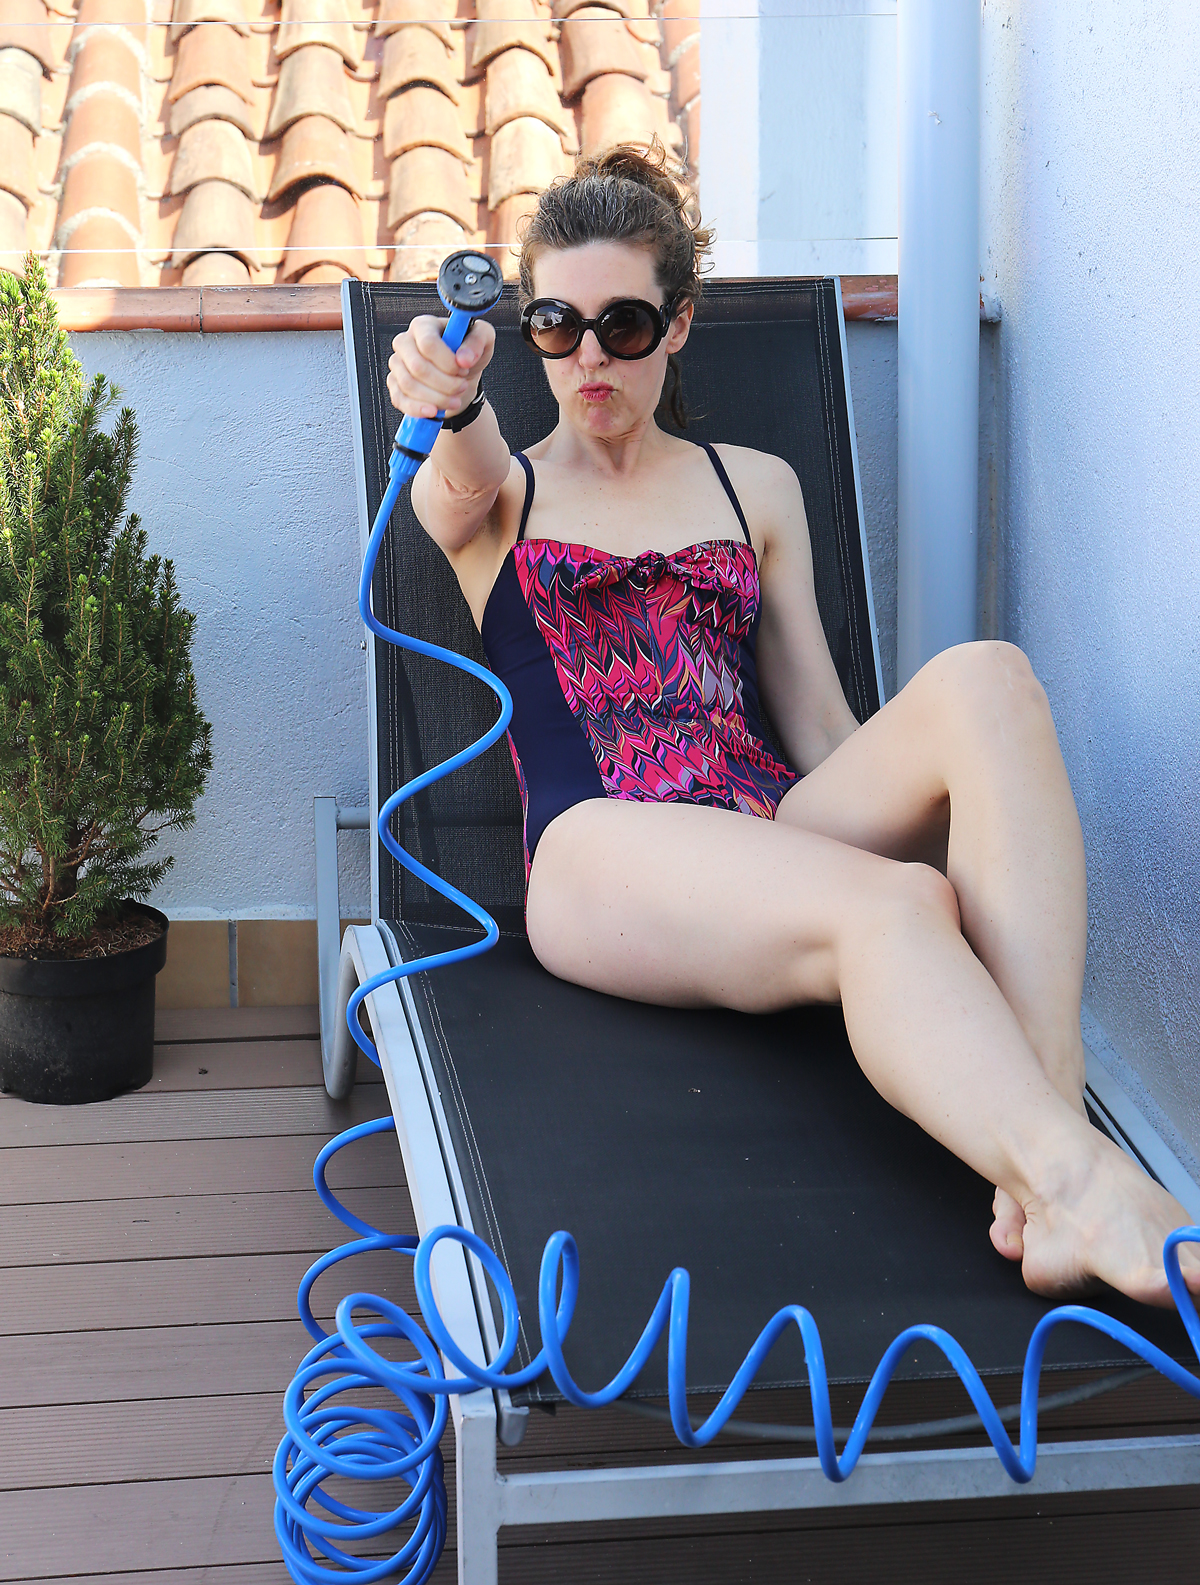
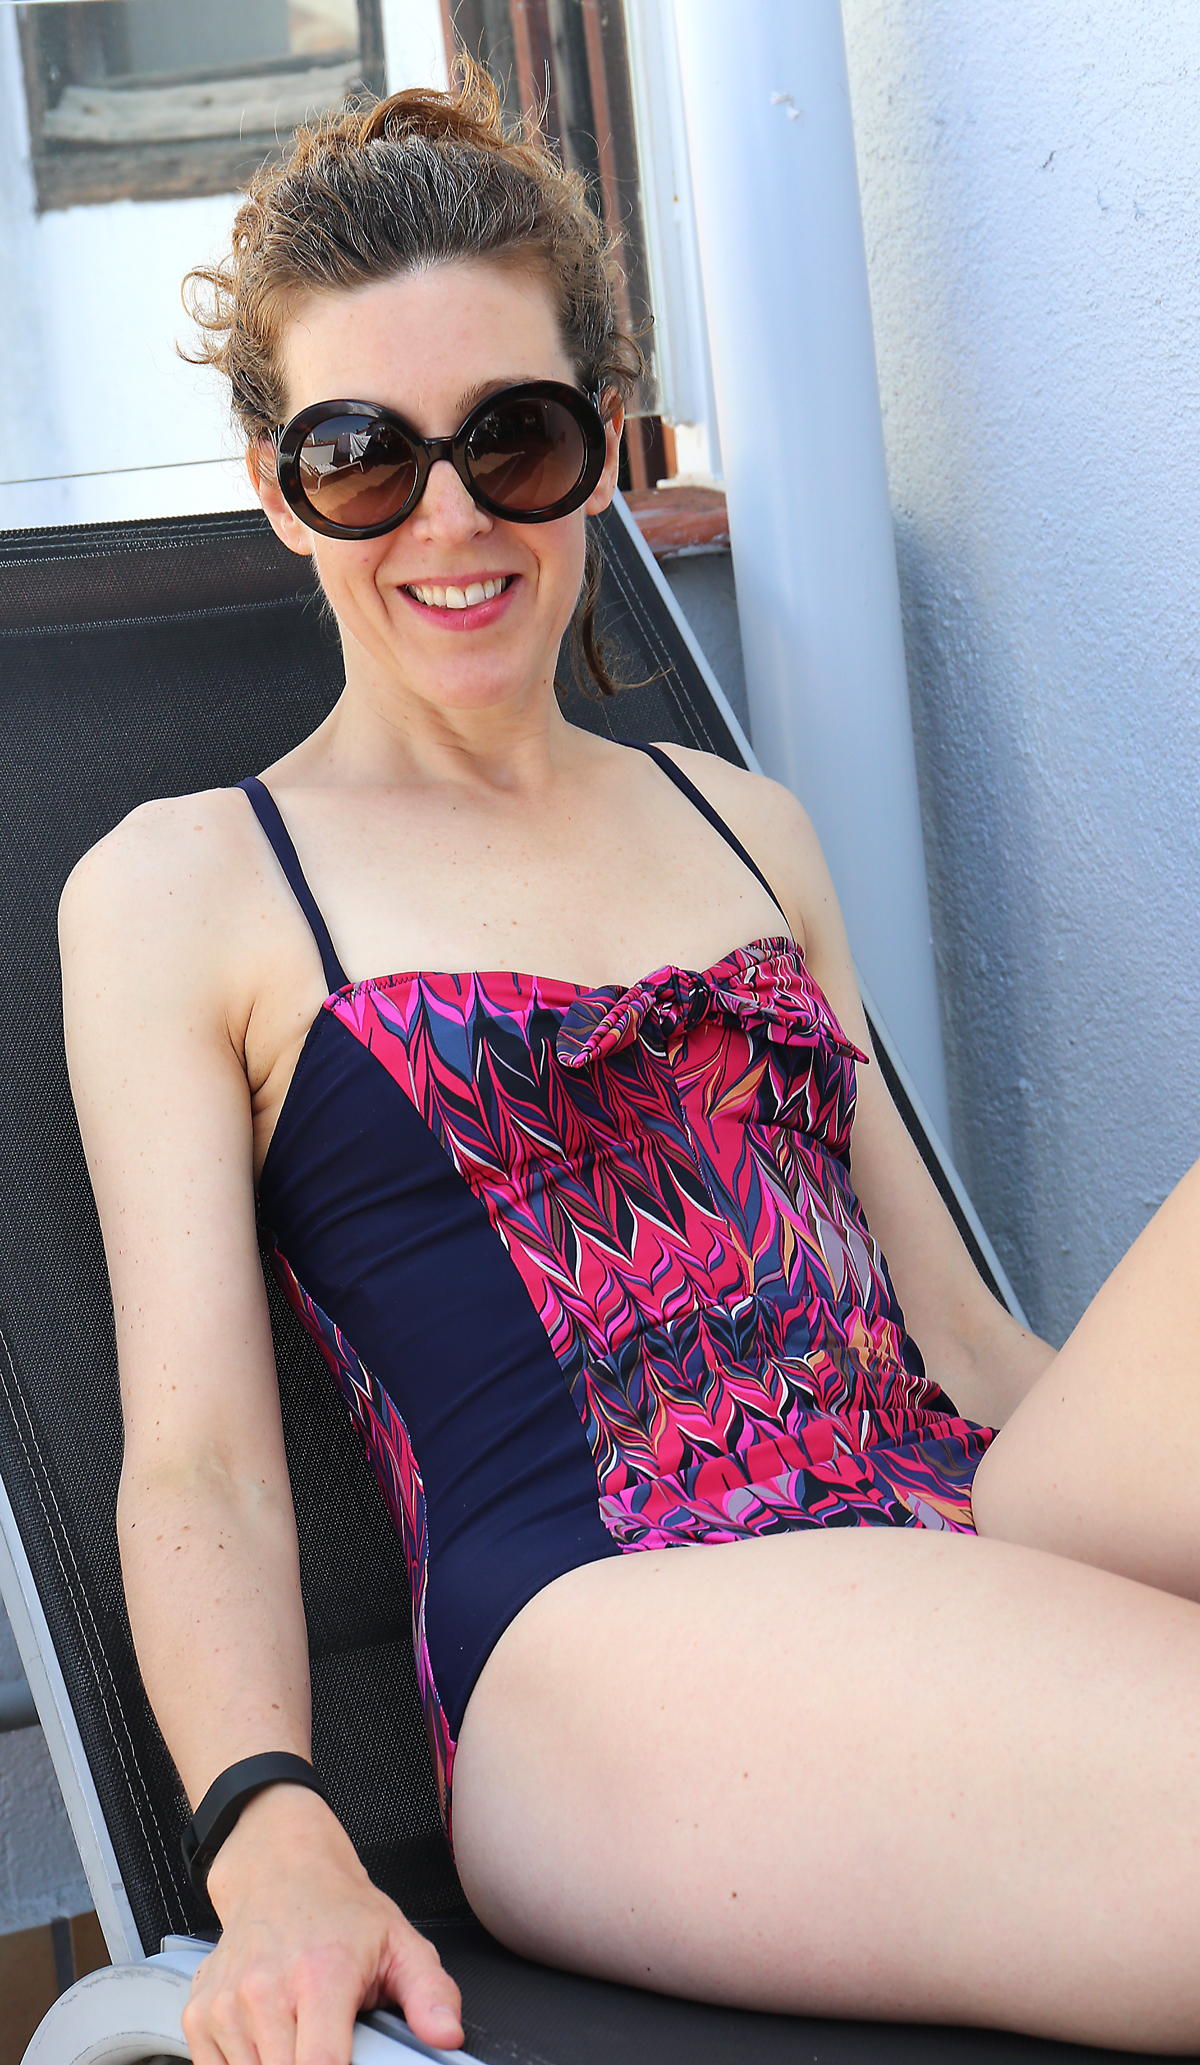
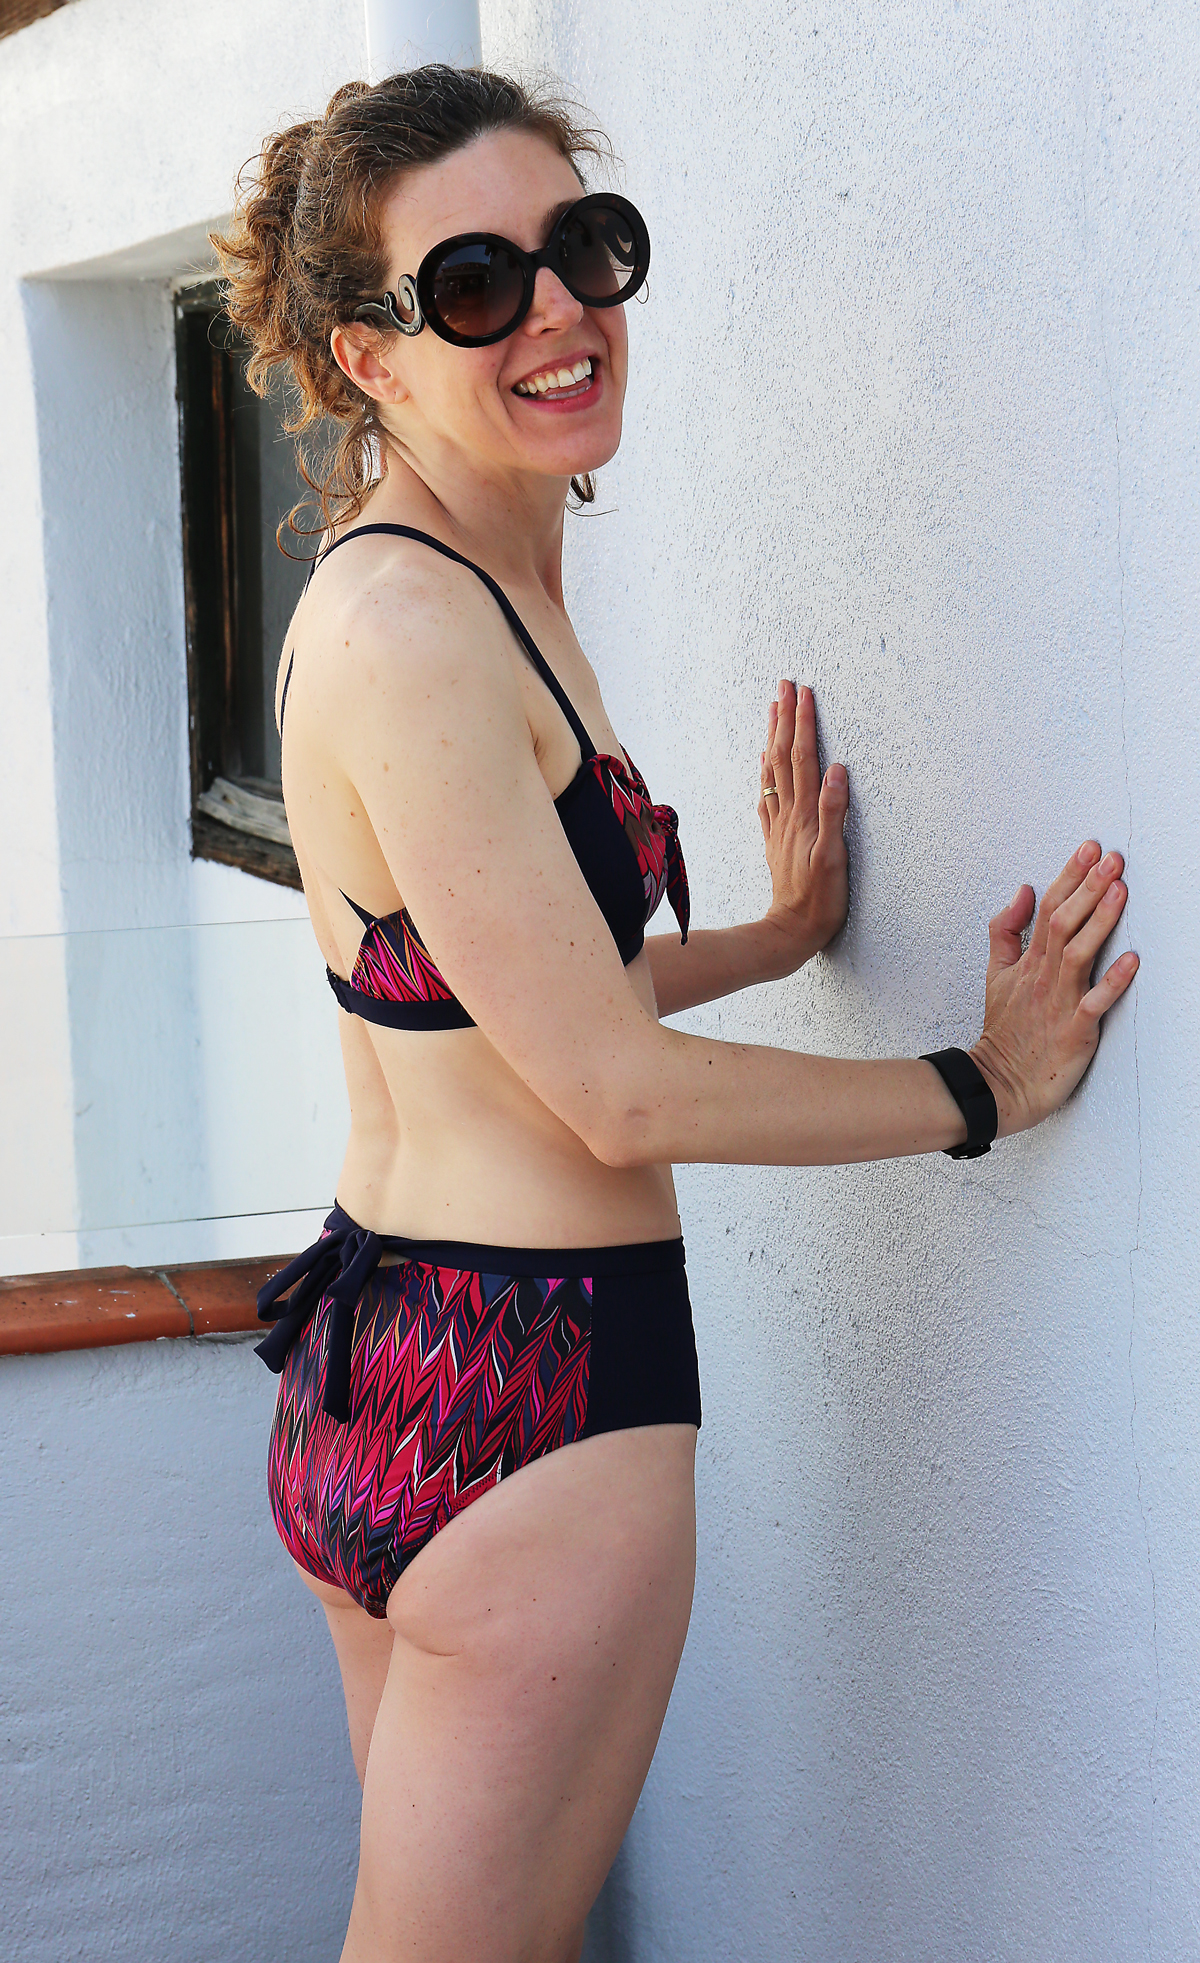
And just like that, you’re finished! Wow, we managed to sew all three views of this suit in five days, so if you’ve stuck with me through all of this, congratulations! I’d love to see your finished suit, and I guess if I want to see yours I should show you mine. So here we go:


-
This reply was modified 8 years ago by
 Liesl Gibson.
-
This reply was modified 8 years ago by
 Rachel Le Grand.
-
This reply was modified 8 years ago by Rachel Le Grand.
-
This reply was modified 8 years ago by Rachel Le Grand.
-
This reply was modified 8 years ago by Rachel Le Grand.
-
This reply was modified 8 years ago by Rachel Le Grand.
8 years ago LINKHey everyone! Any questions so far?
8 years ago LINKDay 3 of the sew-along is ready!
8 years ago LINKHello, everyone. Hope you had a great weekend! Day 4 of the sew-along is up and ready for you…
8 years ago LINKAnd that’s a wrap! You’re going to show me your suits, too, right?
8 years ago LINK Sarvi
@Sarvi
Sarvi
@Sarvi
Those are really nice, I like the cut a lot particularly on the bottoms. That’s something I can wear. I am still looking for the right fabric — and sewing time — but would love to get a pair done by the time May Grey is over in Los Angeles.
8 years ago LINKWhat’s May Grey, Sarvi?
8 years ago LINK Lightning McStitch
@LightningMcStitch
Lightning McStitch
@LightningMcStitch
Yay! The suits look great. I love the boning and all the “grown up” lady aspects of this pattern. I’ll miss the sewalong deadline but I’m right behind you, just six months behind… 🙂
8 years ago LINKSarvi
@Sarvi
May Grey (and its buddy, June Gloom) are weird patches of overcast skies that come along between Spring and Summer here in Los Angeles. You’ve been having a nice time hiking in April, then you lose the blue skies (but oddly enough, not the penetrating heat of the sun — so if you look outside you’ll want to grab a sweater, but then you open your car door and it’s baking in there).
Mood just sent out a mailer with some performance fabrics listed, I wonder whether any of them will be swim-suitable…
8 years ago LINKInteresting, Sarvi! Thanks for the explanation.
Hey, will everyone who followed/follows the sew-along do me a favor and leave a quick note here telling us you made use of it? It will help a lot with deciding whether to do more sew-alongs in the future if we can gauge the level of interest and participation.
Cheers!
8 years ago LINKSarvi
@Sarvi
That’s a good idea — I read much more than I comment, or I get busy but bookmark things for future use — but it must seem like radio silence from the other end!
8 years ago LINKJennifer @Snoutfair
Registered just to let you know that I definitely visited this place for your sewalong updates while waiting for my swim notions to arrive in the mail. I hadn’t made a swimsuit before and was about to lose my nerve before I saw that you had a sew-along planned. I particularly appreciate how reassuring you are regarding the assembly and the materials, that I don’t need fancy sergers or double needles for the finished product. It makes me feel the project is very accessible to a motivated beginner. I have also gone back and picked up other Lisette patterns specifically because I saw a sew-along for those and really appreciated the extra mile you went so thank you. I know they take up a lot of your time, but it’s still appreciated all the same!
(Was the elastic requirement for B6360 ever updated anywhere? I probably ordered more than I needed, but it would be helpful to print it out and keep it with the pattern for future reference.)
8 years ago LINKThanks for this, @snoutfair! It’s really helpful to us to know that these are useful to you, and the more feedback we receive the more likely we are to them again in the future. Thanks also for the reminder regarding the elastic; I’ll drop another email to Butterick to see if they can give me a number now!
8 years ago LINK Tamara
@justsewit
Tamara
@justsewit
Of course they are useful @liesl😀 With six months until our summer, I have plenty of time to collect the items required. But not only that, this sewalong will still be up so I can sewalong then too! It looks like I will be learning new skills with this as in all the years I have been sewing, I have never actually made a swimsuit for myself and most certainly never used boning in anything. So I am looking forward to sewing along in six months or so and then I will actually feel like going to the beach or pool.
I just adore your examples by the way. The fabric is gorgeous.


You must be logged in to reply to this topic.
copyright
Unless otherwise credited, all work on this blog is © Liesl + Co., Inc, 2008-2024. You are welcome to link to this blog, but please ask permission before using any text or images.