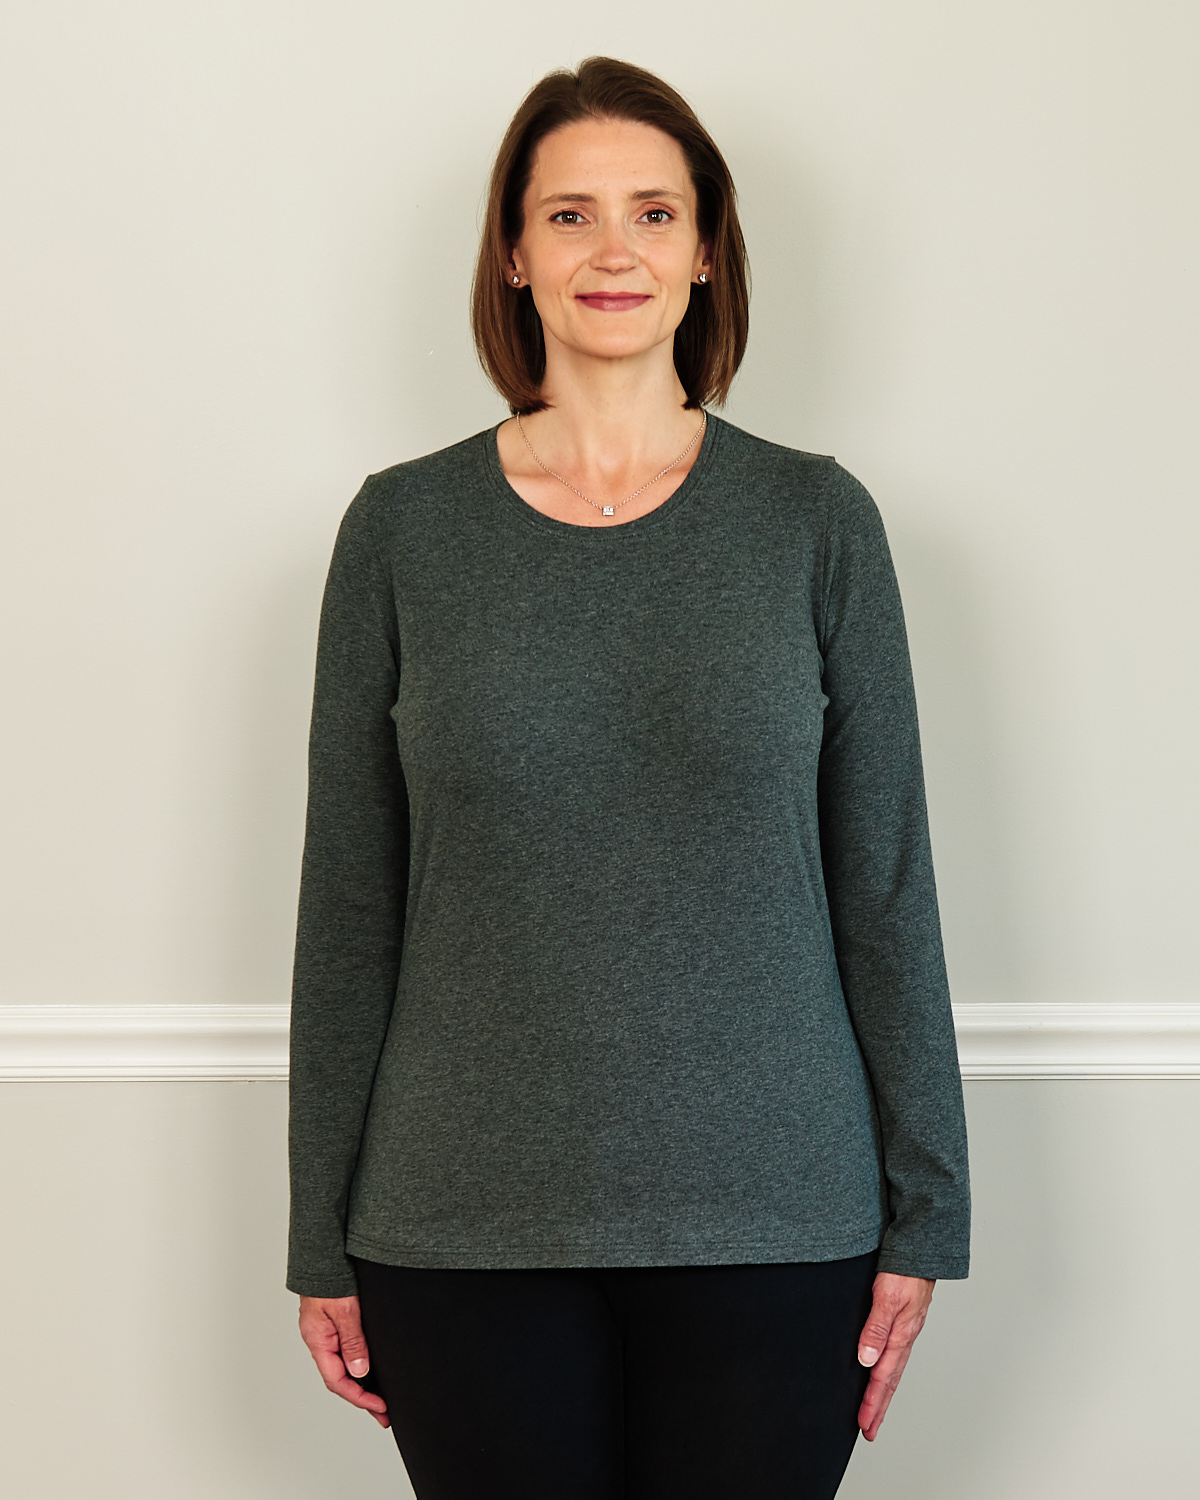
Today we’re welcoming Lyndsey from our Advisors Circle. She has sewn up four Liesl + Co. patterns in the same fabric to create a fit baseline for herself in the future. Read on to see how she did it.
A long sleeve t-shirt was on my fall sewing plans this year, but I couldn’t decide which pattern to use. Liesl + Co. sells several long-sleeved knit patterns, but I was having a hard time visualizing which one was best for me.
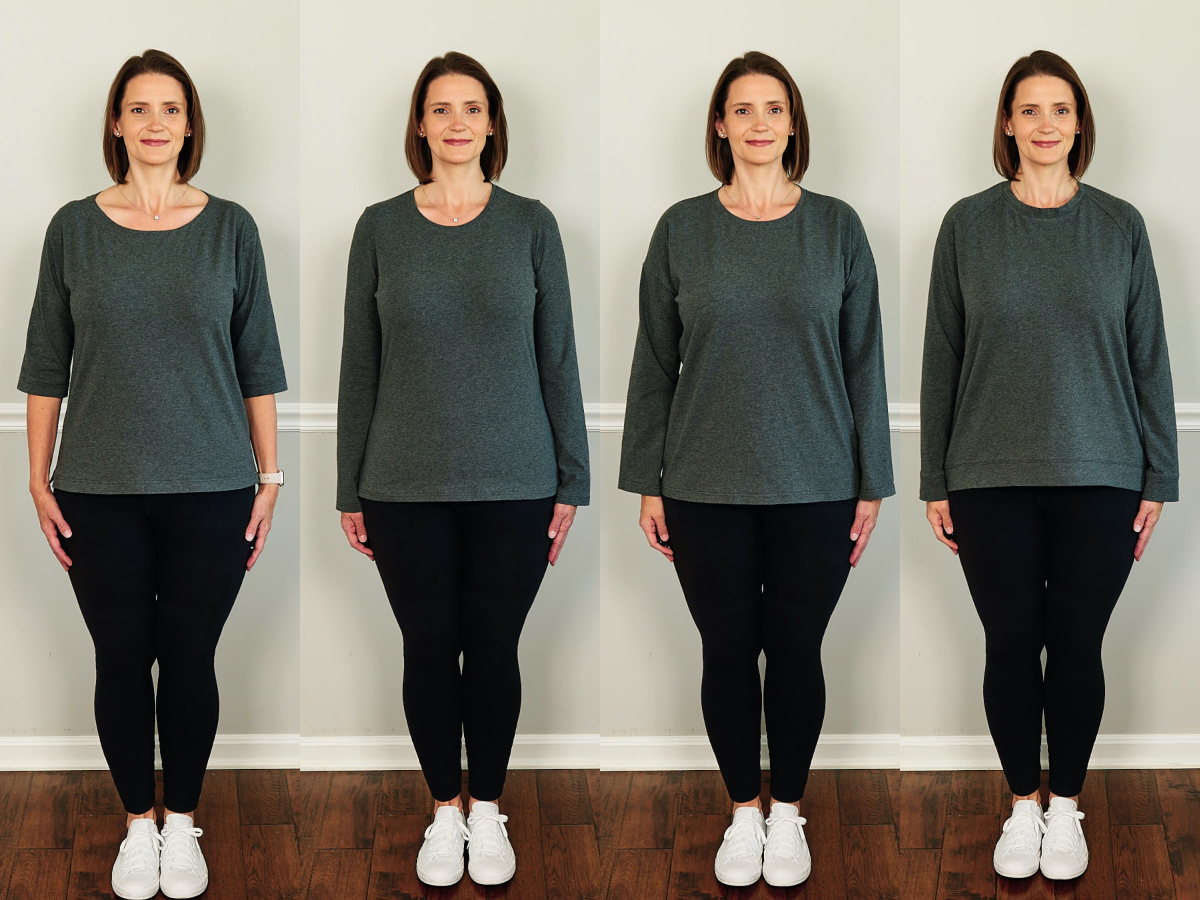
If I were trying to decide between woven patterns, I would sew muslins to compare and check the fit. Sewing muslins for knits is tricky though, as each knit fabric has a different amount of stretch. After mulling it over for a few days, I decided that I would sew four different long sleeve t-shirt patterns in the same exact fabric: the Neighborhood Sweatshirt, the Bento Tee, the Maritime Knit Top and the Metro T-Shirt. That way, I would have a base comparison of how each pattern fit me, and I would have four new long-sleeved t-shirts to add to my core wardrobe for the fall!
Keeping design ease intact
I knew I would need to make my usual pattern adjustments, but I wanted to maintain the design ease drafted into each pattern.
Design ease is the amount of room added by the pattern designer beyond wearing ease to achieve a certain look or style. For example, if the pattern body measurements call for a 33″ waist and the finished waist measures 43″, then the amount of design ease in the pattern is 10″.
Sometimes I want more or less design ease for the look I am trying to achieve with a pattern, but for this project, I wanted to use the intended design ease while adjusting for my body shape. I prepared the patterns, took my measurements and set to calculating the adjustments.
All of my adjustments were done equally to front and back pattern pieces using the pivot-and-slide method. [Note: Liesl + Co. has a tutorial for a dartless pivot-and-slide FBA.]
Creating a pattern fit baseline
I sewed each pattern in the same Robert Kaufman Laguna Jersey. One of the reasons I selected this fabric is because it is usually readily available, and could act as my “standard” amount of stretch. If I decide to use a fabric that has more or less stretch compared to this jersey in the future, I will have an idea of what adjustments may be needed. I will make a few more tweaks the next time I sew these patterns.
Neighborhood Sweatshirt
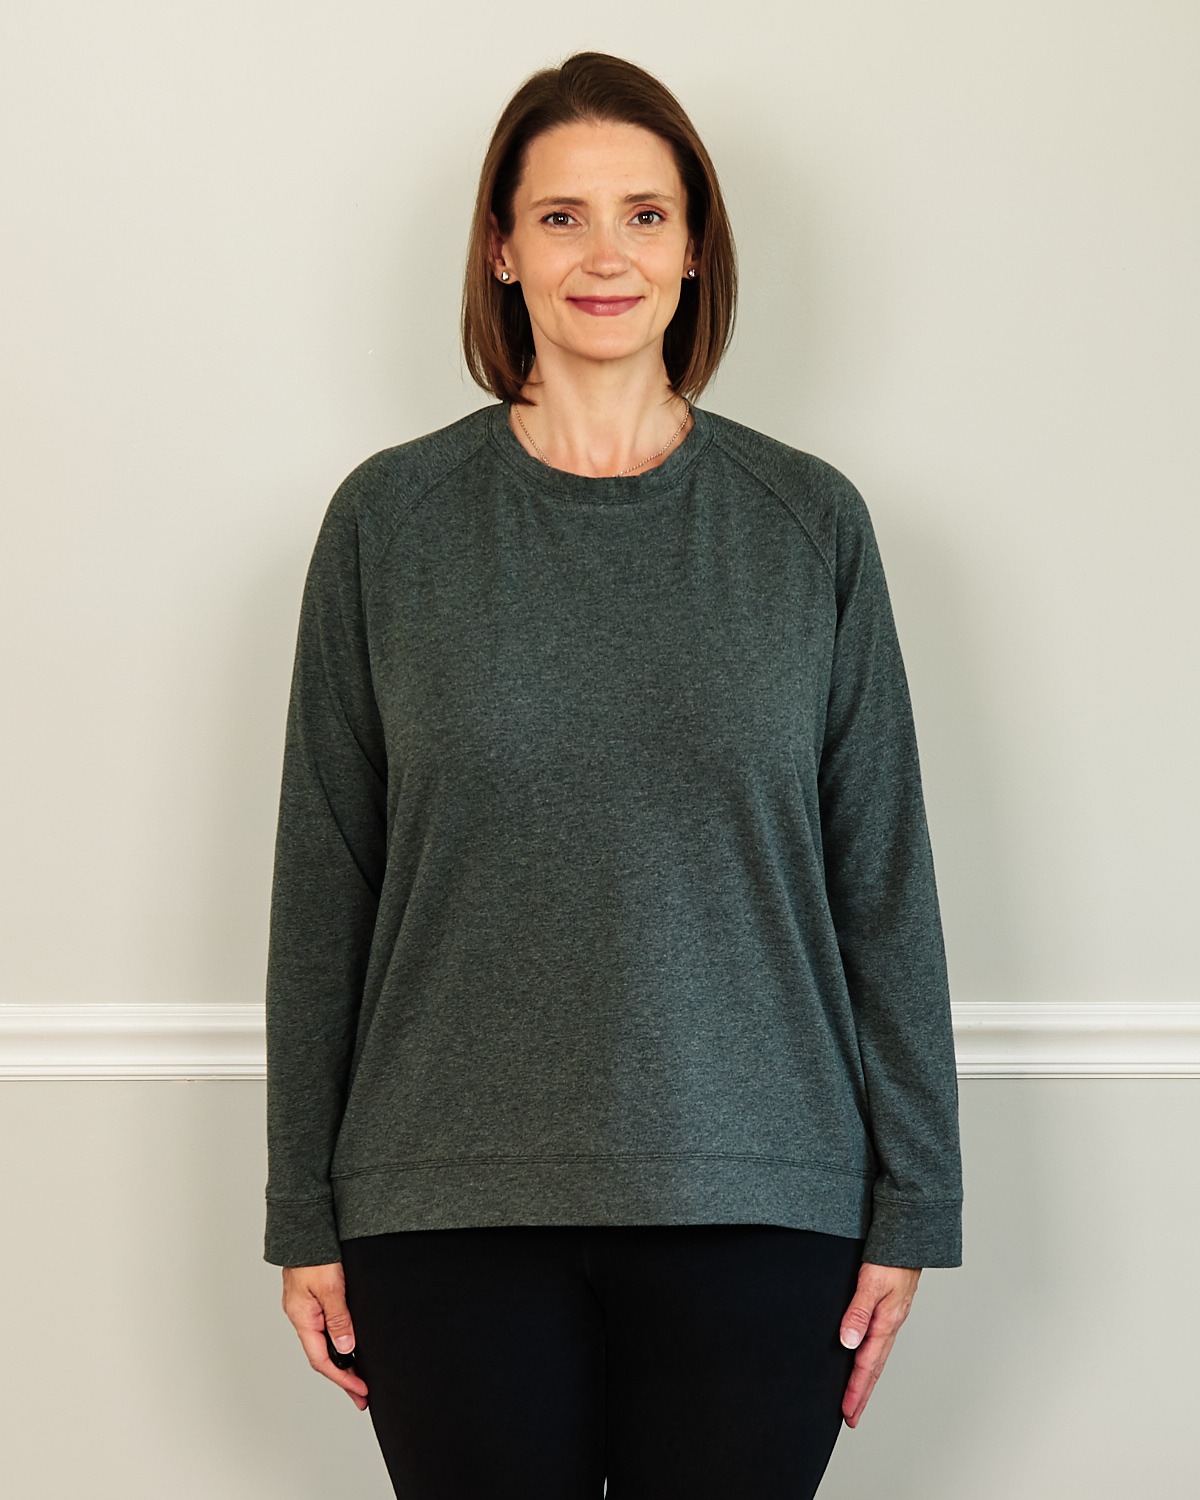
First up was the Neighborhood Sweatshirt. I selected a size medium based on my high bust measurement of 36 1/2″. The pattern’s body measurement for the bust is 37 1/2″ and the finished measurement is 42″. The difference between those two measurements, 4 1/2″, is the design ease.
To maintain that design ease, my final bust measurement after pattern adjustments needed to be 4 1/2″ inches larger than my actual bust measurement of 39″. This meant that I needed a final bust measurement of 43 1/2″. The original finished bust measurement was 42″, so I needed to add 1 1/2″ to the bust.
I used the pivot-and-slide method to distribute this total amount evenly around the circumference of the bust. I did a 3/8″ adjustment to both front and back pieces. Since the pattern pieces I adjusted are cut on the fold, this works out to 3/4″ added to front and back for a total of 1 1/2″ added. I also added a total of 3″ to the waist and 3 1/2″ to the hips in order to maintain the design ease.
| Me | Pattern Body Size M | Pattern Finished Size M | Design Ease | Final Measurements | Adjustments | |
| High Bust | 36 1/2 | |||||
| Bust | 39 | 37 1/2 | 42 | 4 1/2 | 43 1/2 | +1 1/2 |
| Waist | 33 | 30 | 43 | 13 | 46 | +3 |
| Hips | 43 1/2 | 40 | 43 1/2 | 3 1/2 | 47 | +3 1/2 |
| Length | 26 3/4 | 27 1/4 | +1/2 |
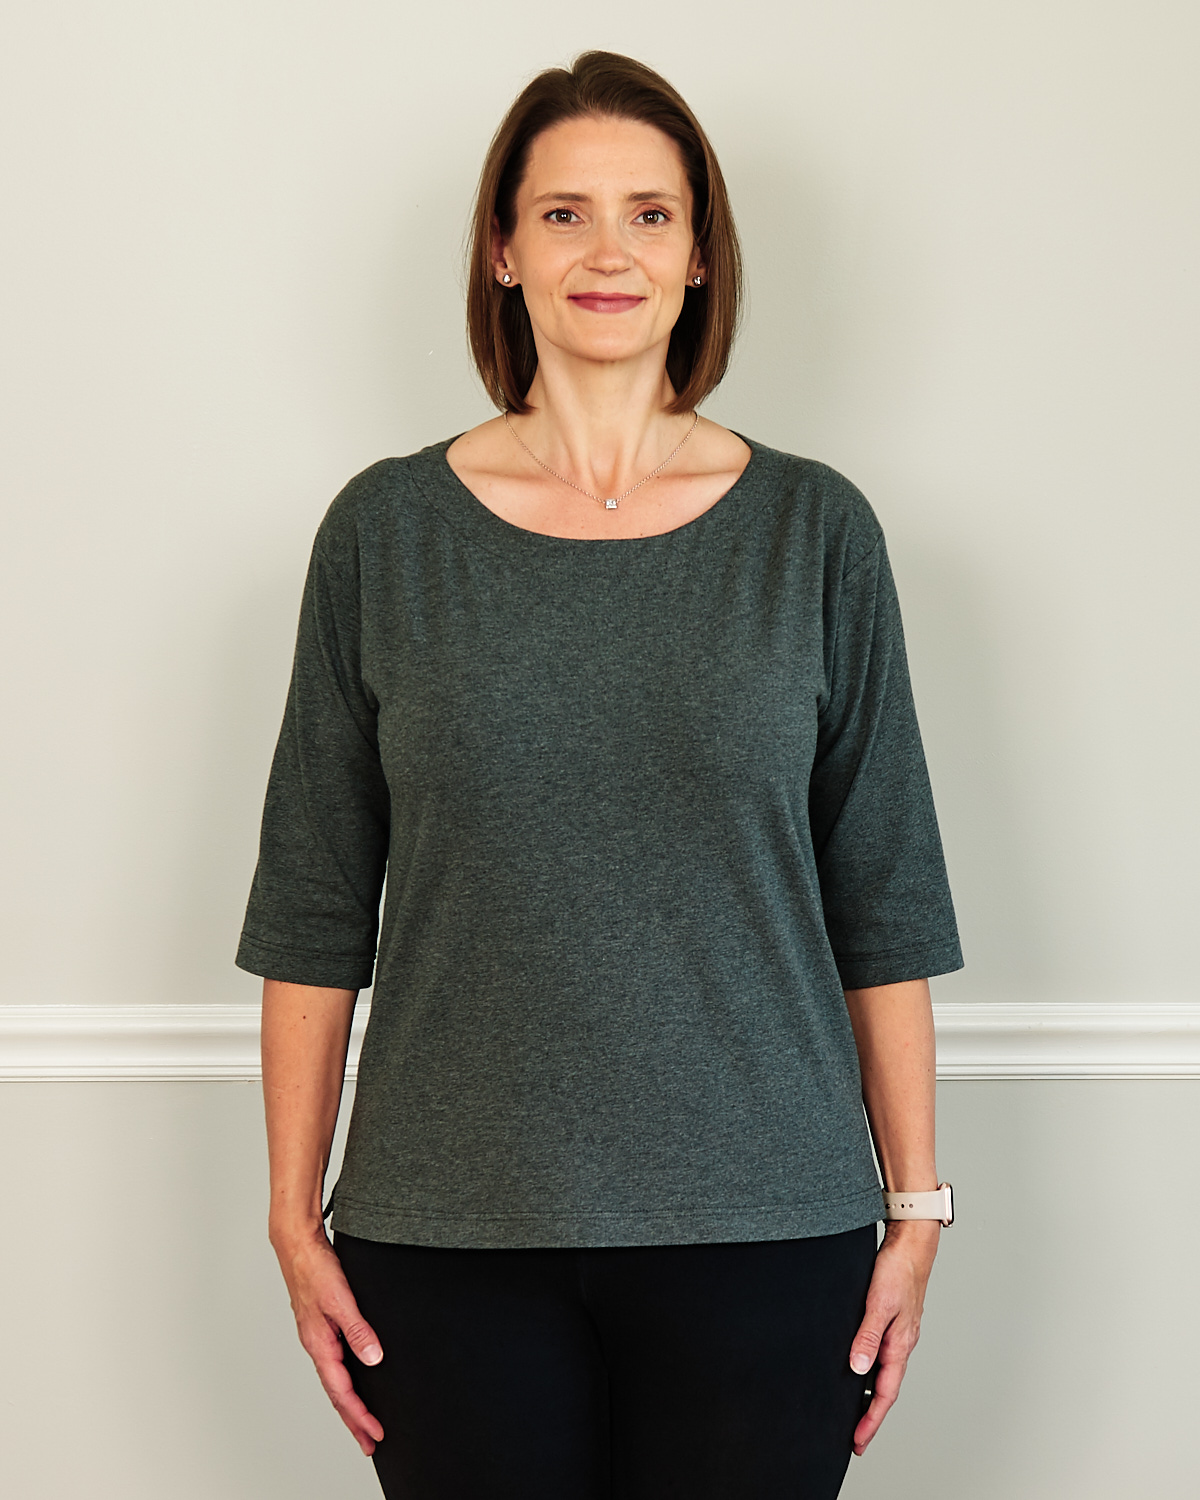
Bento Tee
Next up was a long sleeve version of the Bento Tee. I followed the pattern advice to select by bust or hip measurement, whichever was the largest. My waist and hips measured exactly right for a large. The bust measurement for a large was 1 1/2” larger than my full bust measurement, so I’d have slightly more ease in the bust than how the pattern was drafted.
I intended to sew View A but without pockets. In order to achieve the length of View A as it was drafted, I determined I needed to add 3 1/2” length to the View B cut line. I did this using the pivot-and-slide method, and it was the only adjustment I made for this pattern!
| Me | Pattern Body Size L | Pattern Finished Size L | Design Ease | Final Measurements | Adjustments | |
| High Bust | 36 1/2 | |||||
| Bust | 39 | 40 1/2 | 44 3/4 | 4 1/4 | 44 3/4 | 0 |
| Waist | 33 | 33 | 44 3/4 | 11 3/4 | 44 3/4 | 0 |
| Hips | 43 1/2 | 43 | 44 3/4 | 1 3/4 | 44 3/4 | 0 |
| Length | 22 1/2 | 26 | +3 1/2 |
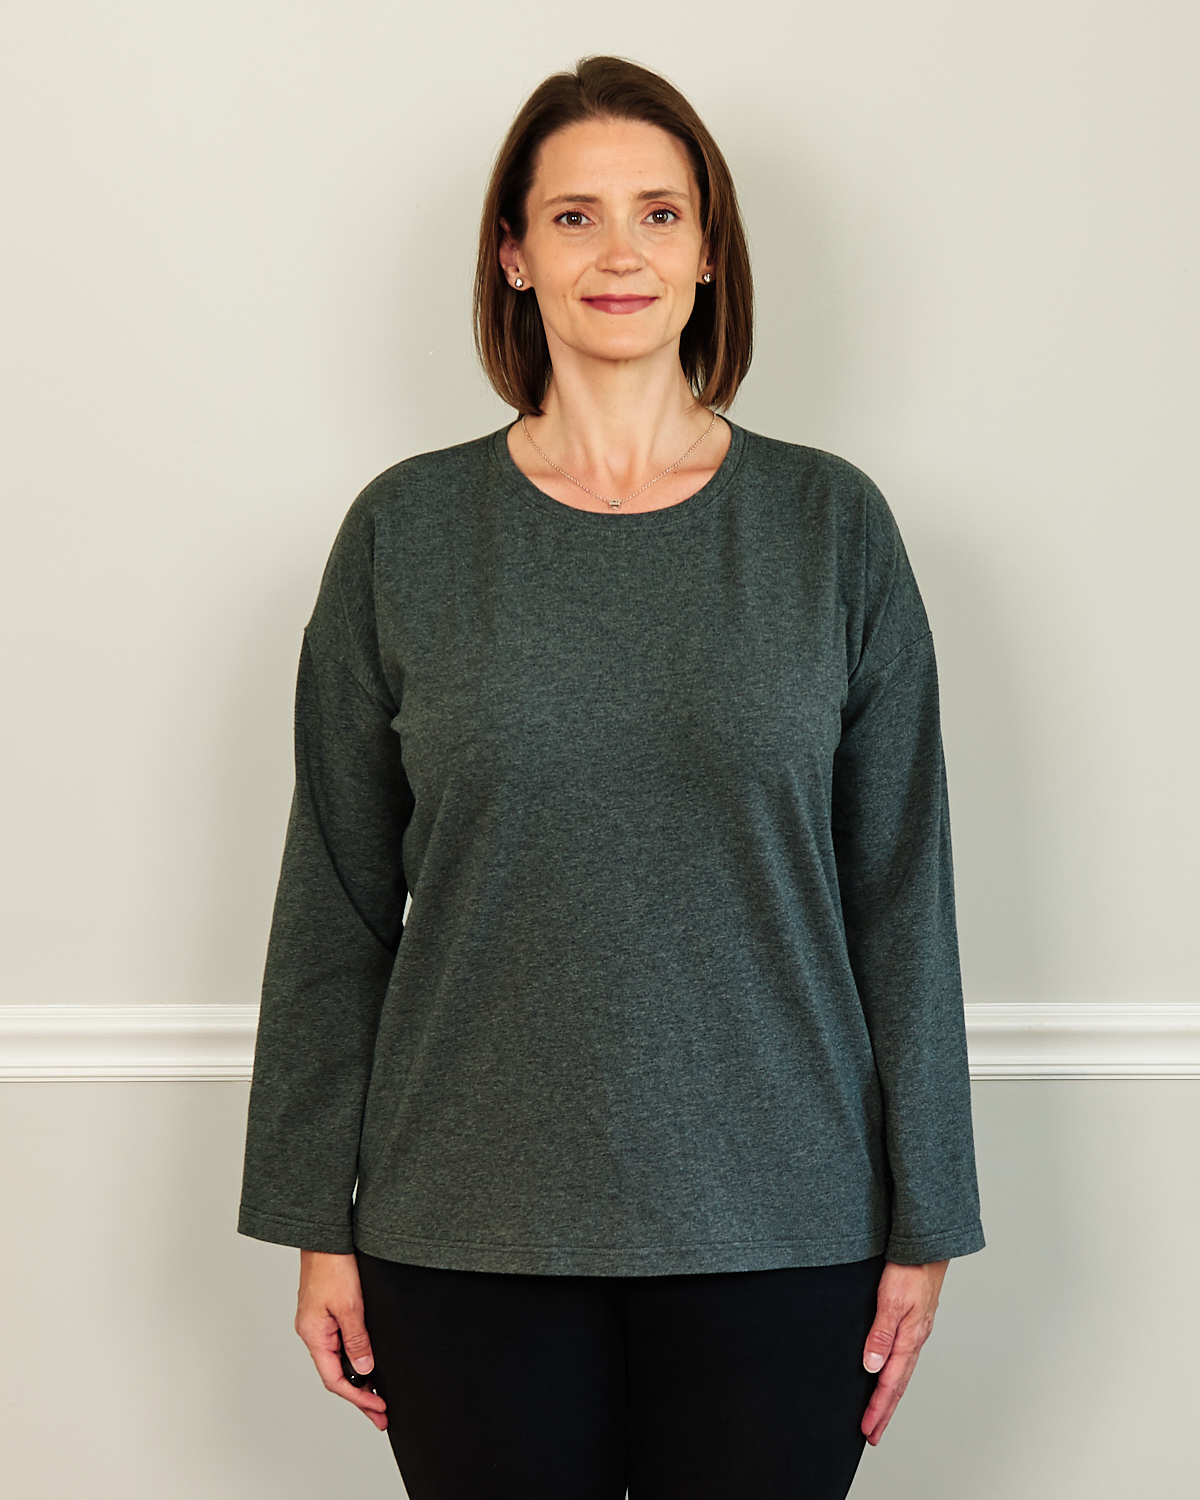
Maritime Knit Top
The third pattern is the Maritime Top. I selected a size 8 based on my high bust measurement. Using the same method for calculations, my adjustments were +5/8” at the bust, +1” at the waist, +1” at the hips, and +3/4” length.
| Me | Pattern Body Size 8 | Pattern Finished Size 8 | Design Ease | Final Measurements | Adjustments | |
| High Bust | 36 1/2 | |||||
| Bust | 39 | 36 1/2 | 38 | 1 1/2 | 40 1/2 | +2 1/2 |
| Waist | 33 | 29 | 38 | 9 | 42 | +4 |
| Hips | 43 1/2 | 39 | 38 | -1 | 42 1/2 | +4 |
| Length | 25 1/2 | 24 1/4 | 25 | +3/4 |
Metro T-Shirt
The final pattern is the Metro T-shirt. I had sewn a short-sleeved version of this pattern before, but not with a dartless FBA. Technically I should have selected a medium based on my high bust measurement, but the large had worked well previously so I decided to stick with that size. This pattern only provided the body measurement for the bust, so I got to decide how much ease I wanted in the waist and hips. Since the t-shirt is intended to have a slim fit, I decided to maintain the 1 1/2” design ease at the bust and to allow 5 1/4” ease at the waist and 2” of ease at the hips. To achieve this on a large, I needed adjustments of +1/2” at the bust, no adjustment at the waist, and +1 3/8” at the hips. I didn’t add length.
| Me | Pattern Body Size L | Pattern Finished Size L | Design Ease | Final Measurements | Adjustments | |
| High Bust | 36 1/2 | |||||
| Bust | 39 | 38-40 1/2 | 38 1/2 | 1 1/2 | 40 1/2 | +2 |
| Waist | 33 | 38 1/4 | 5 1/4 | 37 | 0 | |
| Hips | 43 1/2 | 40 | 2 | 45 1/2 | +5 1/2 | |
| Length | 25 1/2 | 25 1/2 | 25 1/2 | 0 |
I did not do my usual forward shoulder adjustment, and I can see in every picture that I need to make that adjustment. I also need more length at the center front in every picture to get a hemline parallel to the ground. I added more width to account for a full bust but didn’t add the needed additional length. The Neighborhood Sweatshirt is intended to have a high-low hem, but I would prefer slightly more length in the center front.
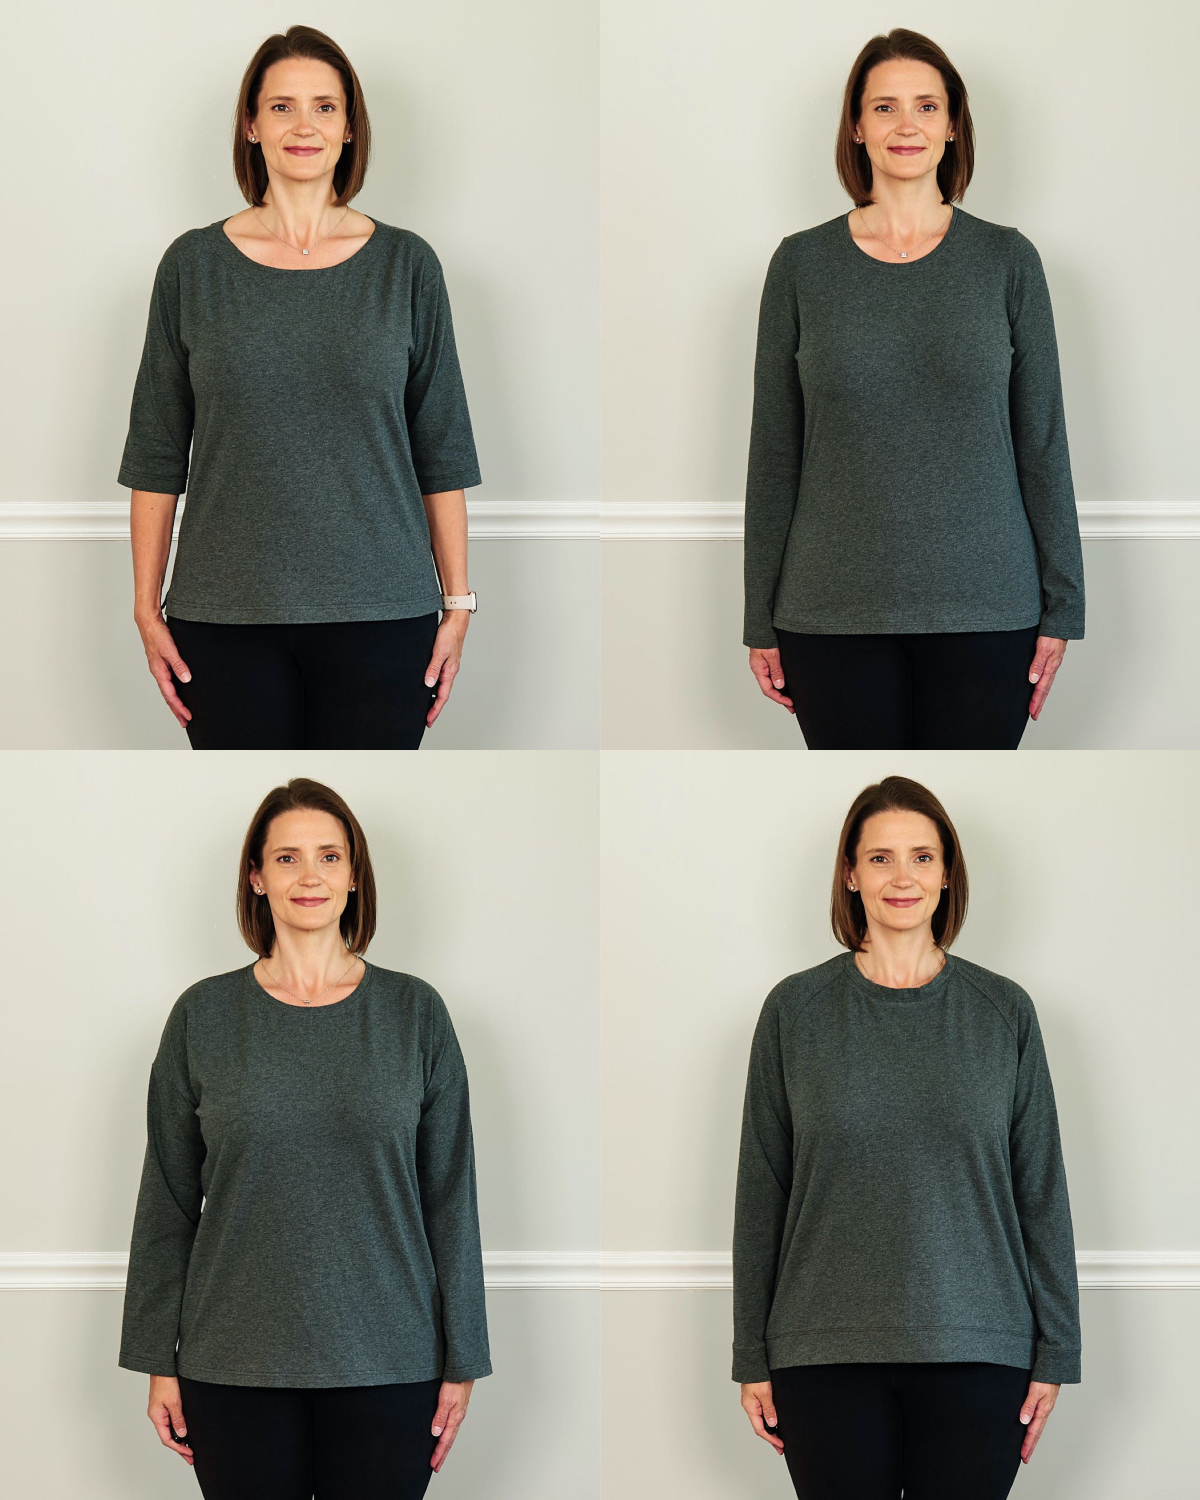
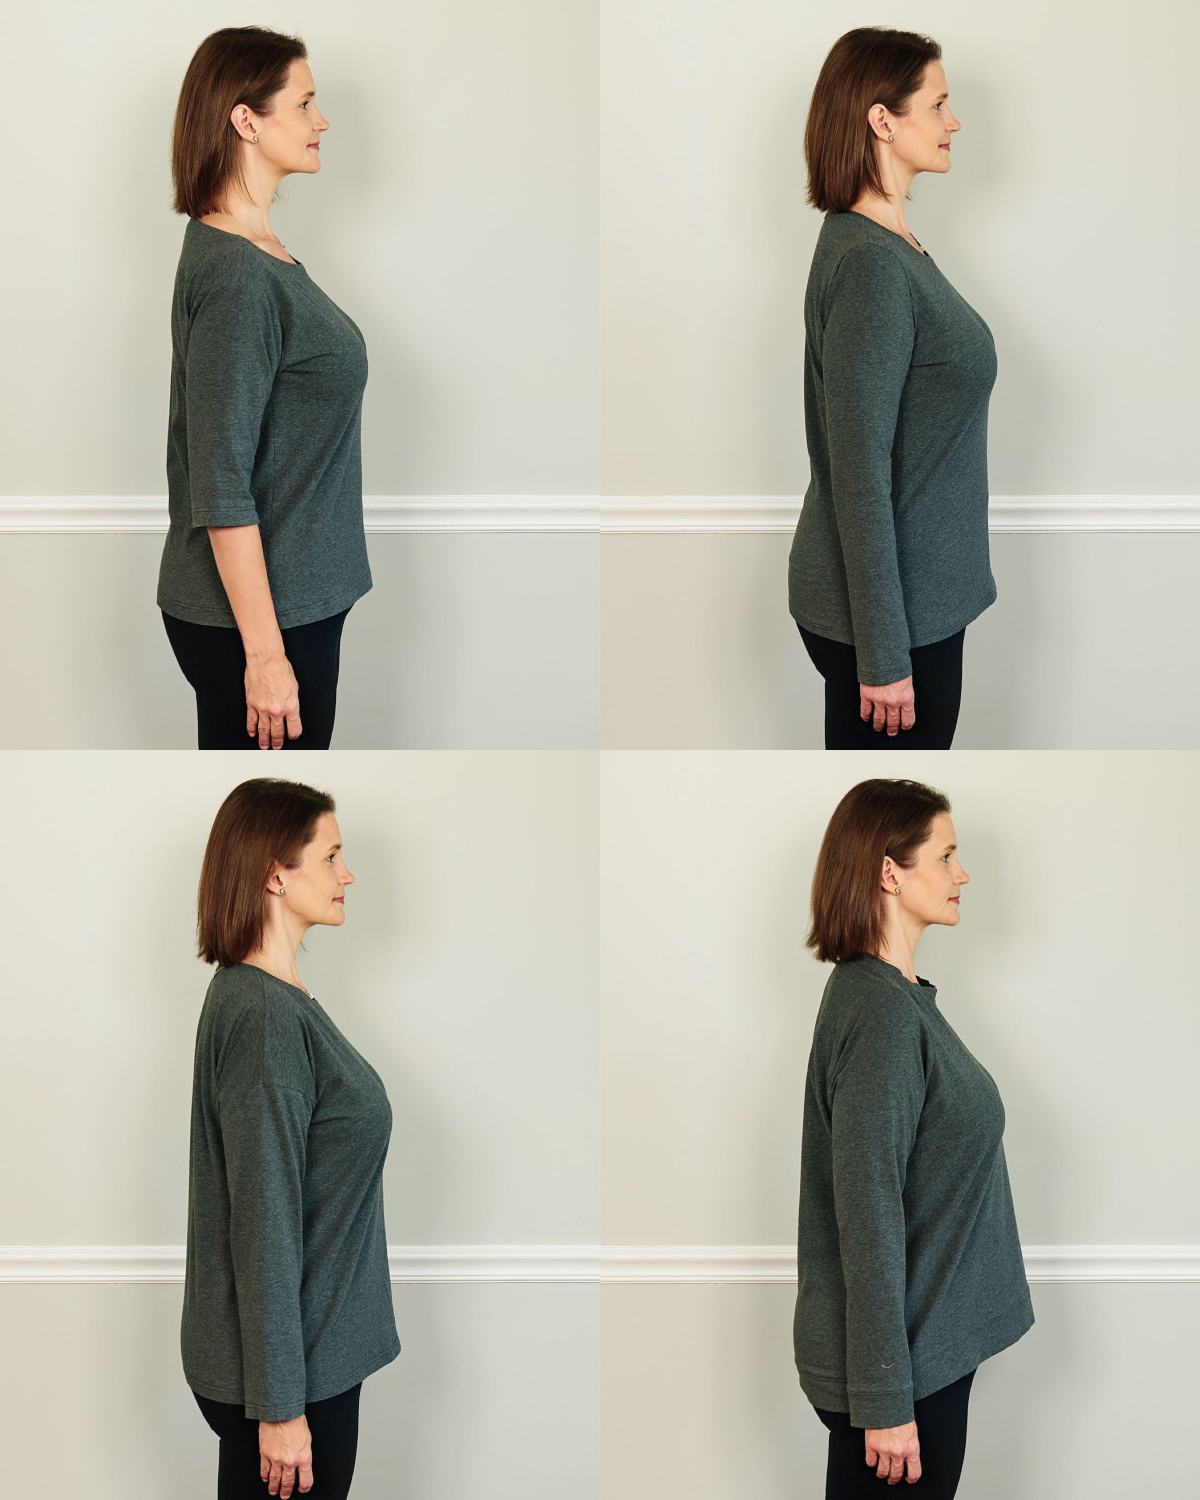
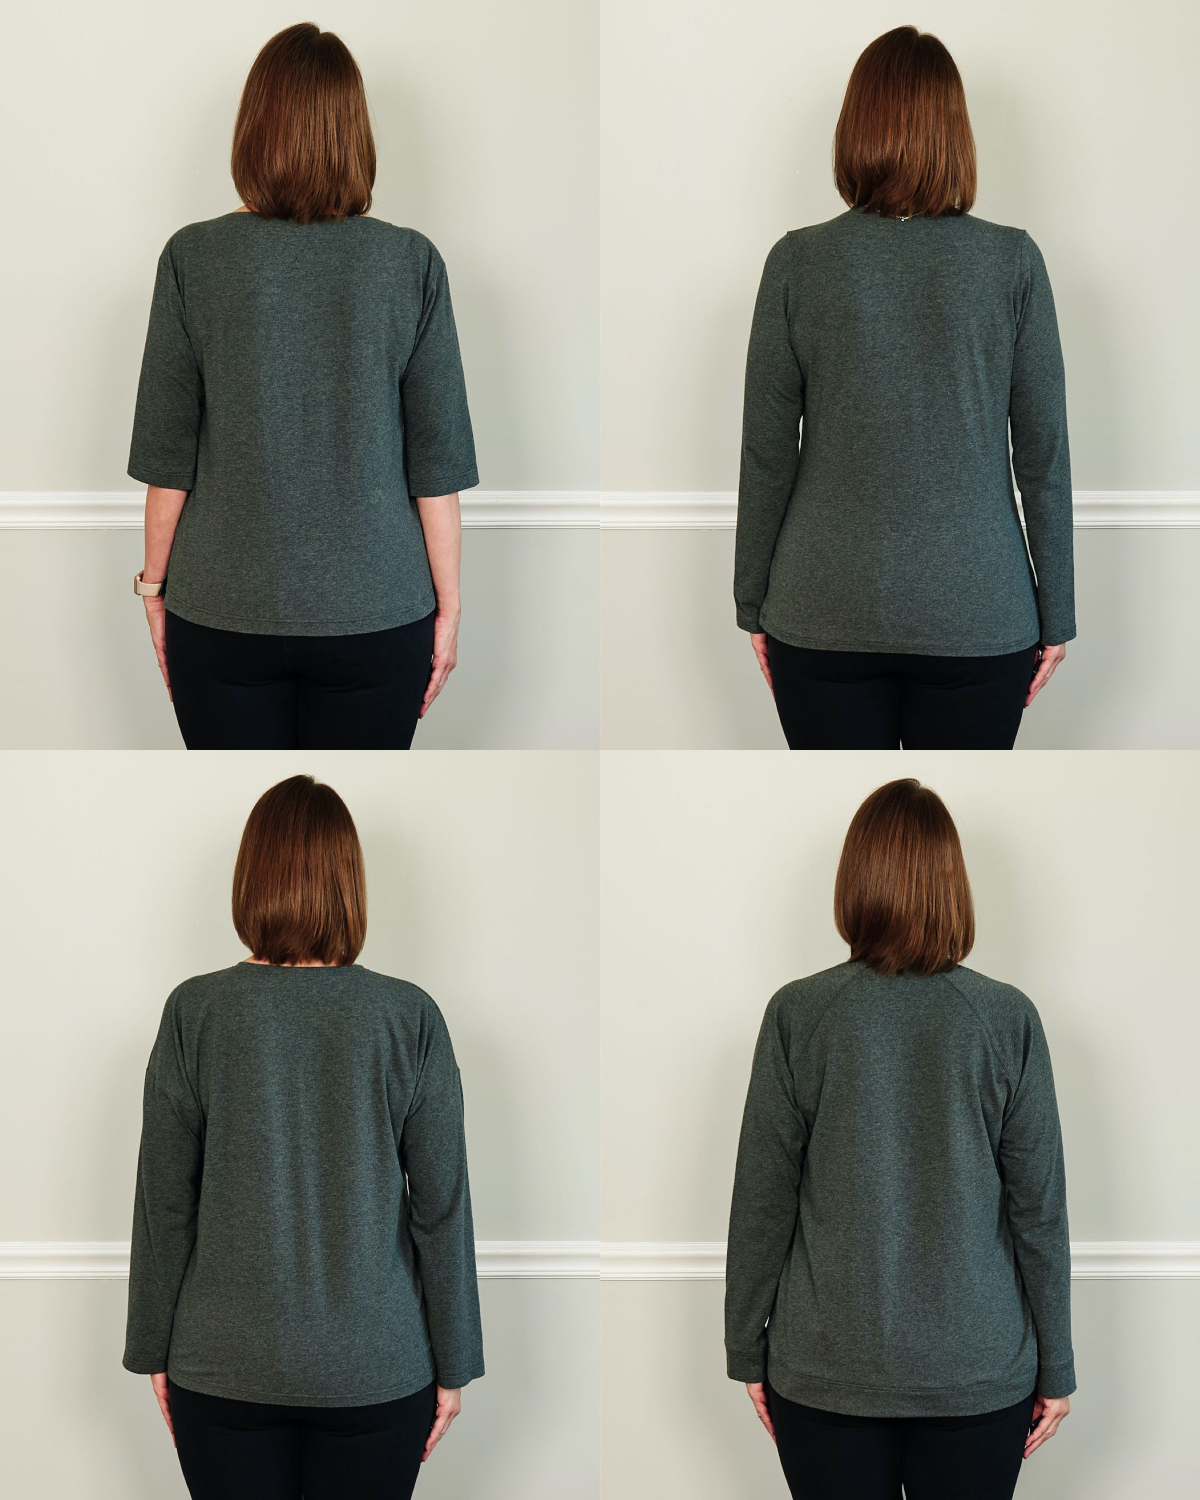
Once the sewing was finished, I finally got to see each pattern side by side! You can see that each pattern fills a unique role in my core wardrobe. And now that I know how these patterns fit as intended, going forward I can decide if I want more or less design ease the next time I sew. Hopefully, the side by side pictures are a good reference for you, too!
The Metro T looks like the best fit and generally a very nice T to have as a core garment. Well done for both the effort in sewing the garments and for your comprehensive notes.
Thanks, Kyrstyna! I was really happy with everything I learned for this project. For a slim fit, the Metro T really works great. I have lots of project ideas that I can use for the patterns with more ease.
What a fabulous exercise, and the comparisons in the same fabric with front/back/side views are superb.
I’ve sewn all four of these too, but in such wildly different fabrics there was no chance of comparing them like this.
I’m very taken with how the Maritime t looks here, especially from the back.
Do you have a favourite? Or is it horses for courses?
It’s funny, I though I would have a favorite, but they just all have their own use. I’ve reached in my closet for all of them!
This is a great idea! It’s very helpful to see each top side by side in the same fabric.
Thanks, Debbie! I know I will refer back to these pics in the future.
What a cool project! Thanks for doing this, Lyndsey.
It was a great project! I learned a lot!
This is such a helpful exercise! Thank you, Lyndsey, for sharing all the details and pictures with us.
Thanks! Glad you found it useful. It’s nice to have all the info in one spot!
Phenomenal comparison! Thank you for this, it is very helpful in not only comparing the patterns but also giving some insight into picking a size and maintaining design ease.
Great!
This is absolutely a fantastic and a very useful writeup Lyndsey that I will save for future reference. I did not find the need for length at centre front looking at your photos but perhaps it is a matter of personal comfort? I really like the sleeve length of the Maritime Knit top on you. Really good work and a great reference piece.
Thanks so much Asmita!
Thanks for this post and all the details.
So much fun to see the differences!
🙂
I loved seeing everything side by side!
I do think these shirts would benefit from french darts!
I do love darts. I was trying out dartless adjustments, but I’m all for darts in knits!
This was a fascinating project. So great for all of us that you documented the calculations as well as the garments from all sides. I haven’t yet made one of these – little knit experience yet. I was wondering what one would do for a muslin for knits. You answered this for me too.
Great! So glad it was helpful!