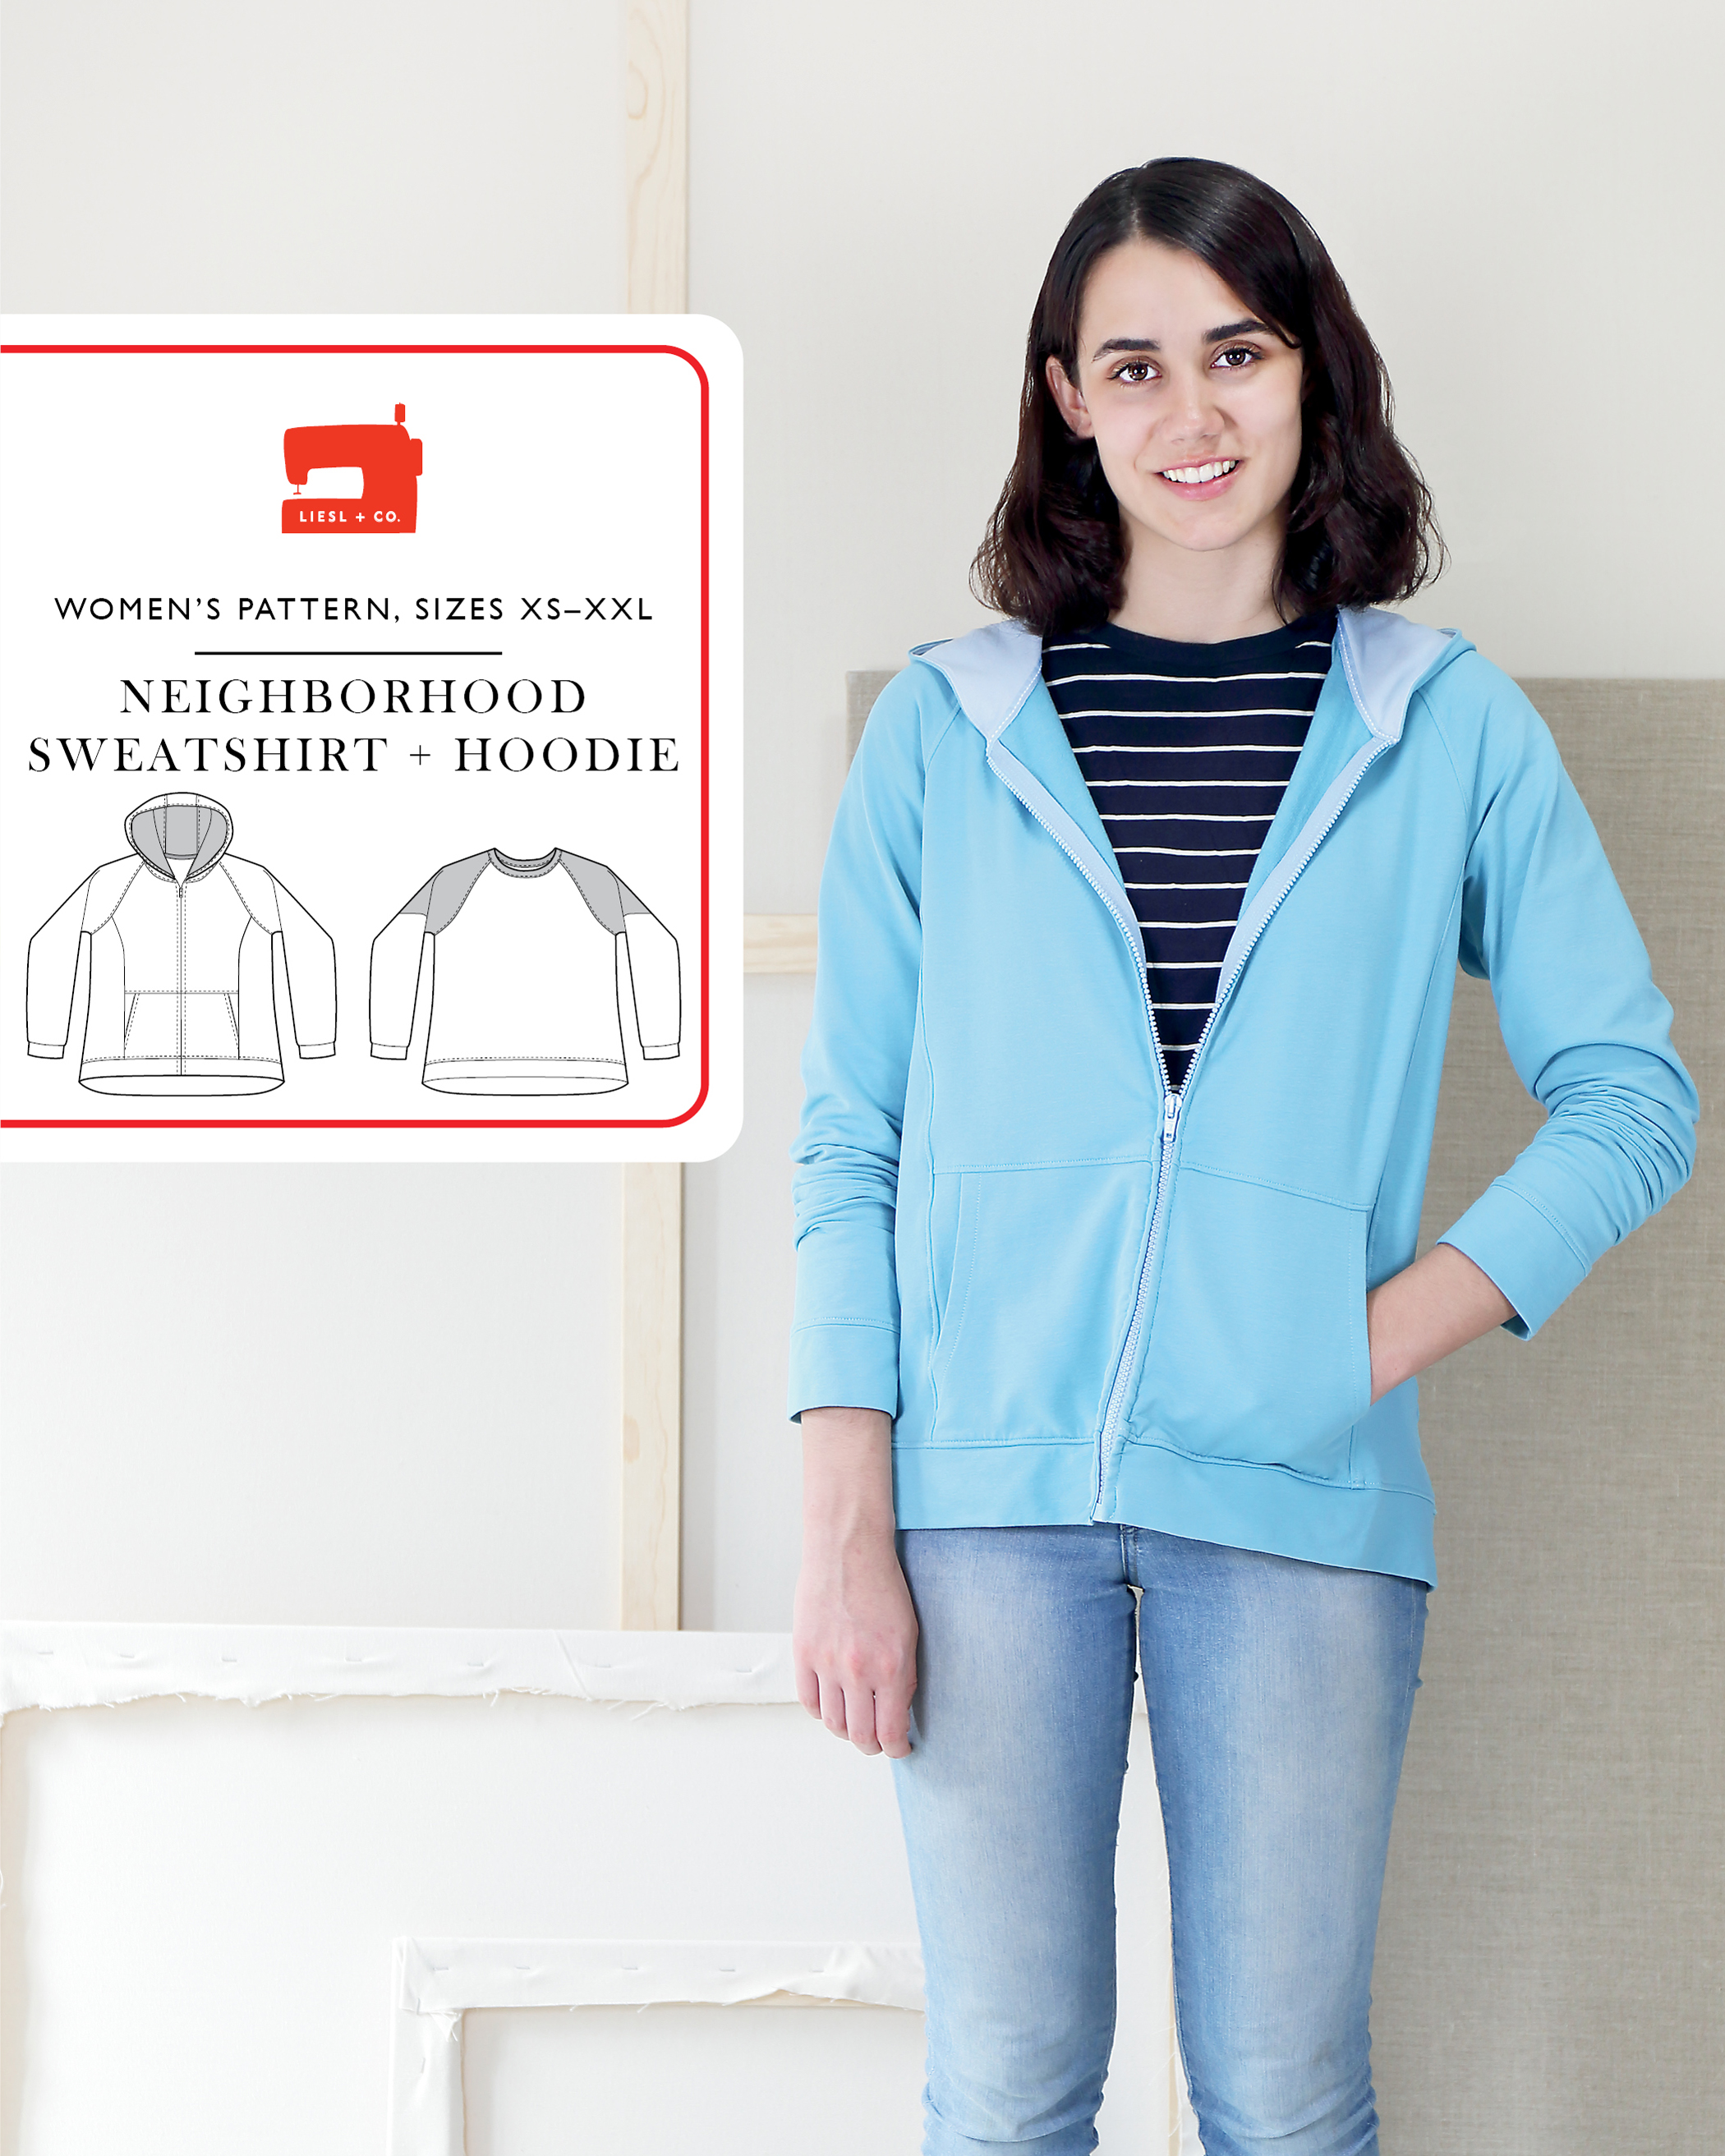
Hello and welcome! We hope you’re inspired and ready to start sewing your Liesl + Co. Neighborhood Sweatshirt + Hoodie. We’re glad you’re joining us for the sew-along. If you aren’t ready to get started yet, rest assured the sew-along will still be here for you when you’re ready to get going!
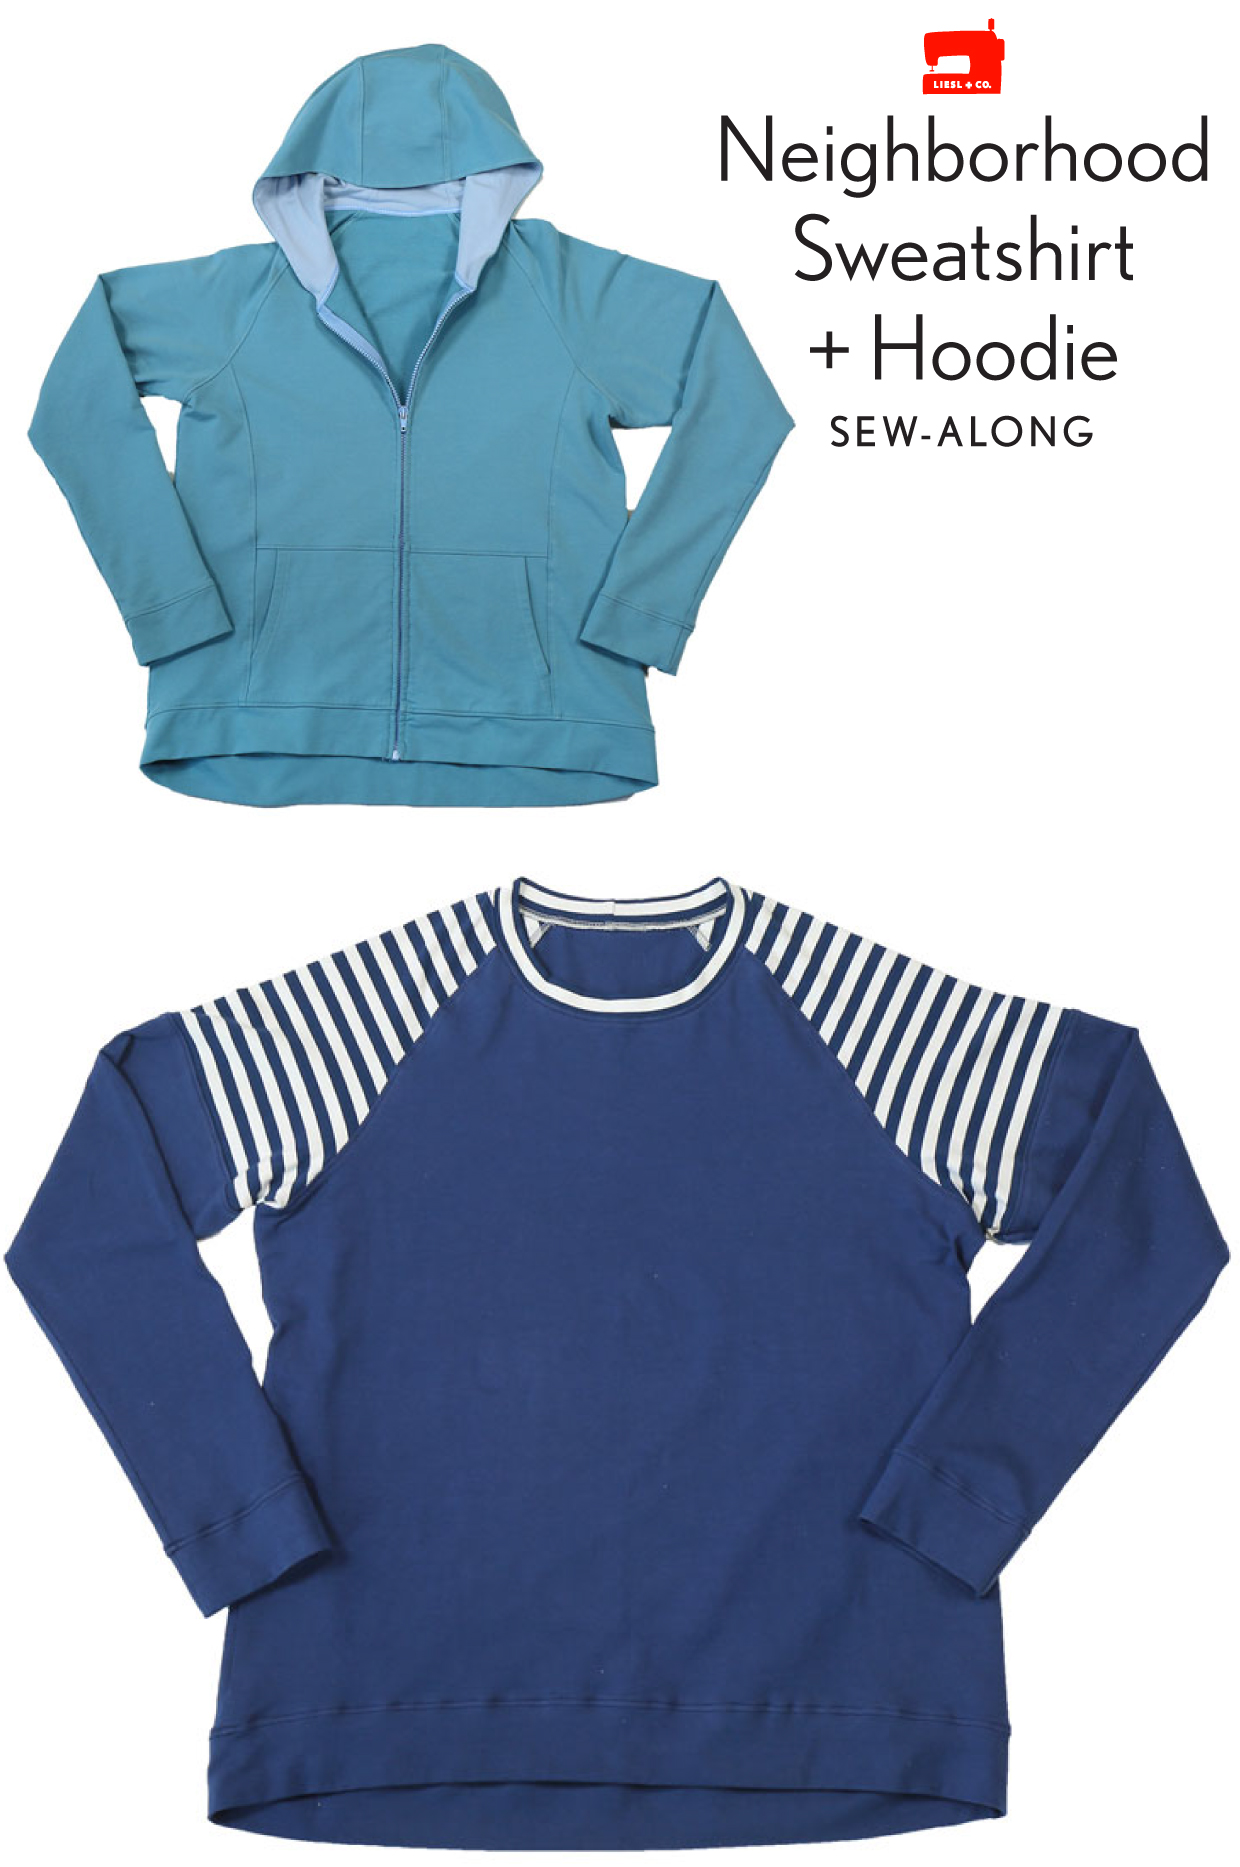
Neighborhood Sweatshirt + Hoodie Pattern Details
Description: This versatile raglan sweatshirt is designed specifically for knit fabrics and can be sewn either as a front-zip hoodie with princess-seam details and a kangaroo pocket or as a pull-on sweatshirt with color-blocked sleeves. Slightly boxy in shape with a double-fold hem that dips a little lower in back for extra coverage, both styles include a contrast-fabric detail and the pieces can be mixed and matched to create other unique styles.
Sewing Level: Advanced beginner: this pattern is suitable for someone who has sewn from a pattern before or has taken a few classes and completed several projects.
Suggested Fabrics: Main Fabric (View A, Fabric A and View B, Fabrics A and B): This pattern works best with knit fabrics such as cotton jersey, interlock, French terry, sweatshirt fleece, or ponte di Roma. Hood Lining (View A, Fabric B): Very lightweight jersey is ideal.
Notions: Both Views: Coordinating thread. View A Only: VISLON® separating zipper (23″ or longer), 3/4 yard of 1/2″ single-fold bias binding or 1/2″ ribbon for neck trim, and lightweight or featherweight fusible interfacing.
Get the Pattern: It’s available in both paper and digital formats.
Sew-Along Schedule
We’ve broken down the planning and sewing process into several easy steps. Here’s how we’ll be working through the process of creating your new sweatshirt together.
| Preparation Steps | Sewing Steps | ||
 |
1. Gather Your Materials Choosing fabric, deciding on customizations, gathering notions, and purchasing your pattern. |
 |
1. Assemble the Front and Sleeve We begin the sewing by assembling the front for View A and the sleeves for View B. |
 |
2. Select Your Size Deciding which measurement to use to choose the size you will sew. |
 |
2. Assemble the Sweatshirt We put the major pieces together for both views. |
 |
3. Pattern Adjustments Doing a full bust adjustment and altering the length or sleeve width of the pattern. |
 |
3. Assemble and Attach the Hood Working on View A, we focus on assembling and attaching the hood. |
 |
4. Cutting Fabric Some hints and tips to keep in mind when cutting out your knit fabric. |
 |
4. Attach the Hem Band and Sew the Zipper We add the hem band to the body and insert the zipper for View A. |
 |
5. Finish the Neckline and Attach the Neck Band We finish the neck of the garment for both views. |
||
 |
6. Attach the Hem Band and Finish the Sleeve Hems The final steps to finish sewing your new sweatshirt. |
||
Gather Your Materials
Choosing Your Fabric
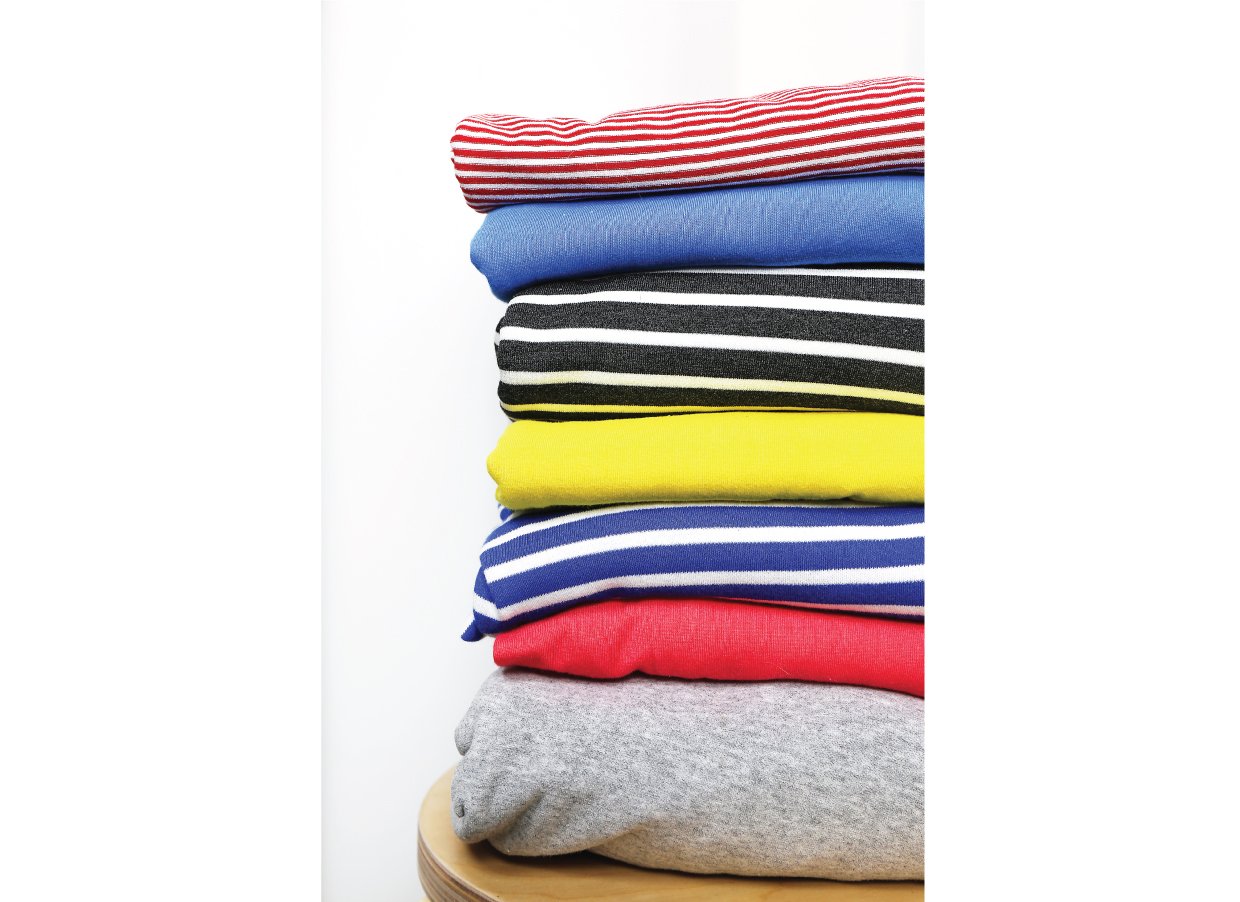
Let’s start with your main fabric. For both the hoodie (View A) and the pull-on raglan (View B) you’ll want a light- to medium-weight knit like a basic T-shirt jersey, French terry, sweatshirt fleece, interlock, or even ponte. If you’re including the contrast upper sleeve for View B, you’ll need a little bit of fabric in a similar weight. For View A, the front-zip hoodie, you’ll want a second fabric that’s lighter in weight, like a thin jersey, for the hood lining. The reason this should be lighter is because the hood will be constructed of double fabric. If you have two layers of thick fabric in the hood, it will feel really heavy and may pull back on your neck when the hood is down.
Deciding on Customizations to the Style
This pattern is extremely versatile and can be customized in a huge number of ways. Before you go much farther, think about whether you want to sew one of the views straight or if you want to customize the pattern to really make it yours.
One of the fun aspects of this pattern is that the pieces can be used interchangeably. In other words, in addition to the View A and View B as depicted on the back of the envelope, you can choose to use the View A sleeve on View B and vice versa. Or use the View A princess seams to made the View B pull on style. If you wanted, you could add the hood to the pull-on. Or you could make the front zip without the hood. Maybe you want to go up a size for a slouchy look?
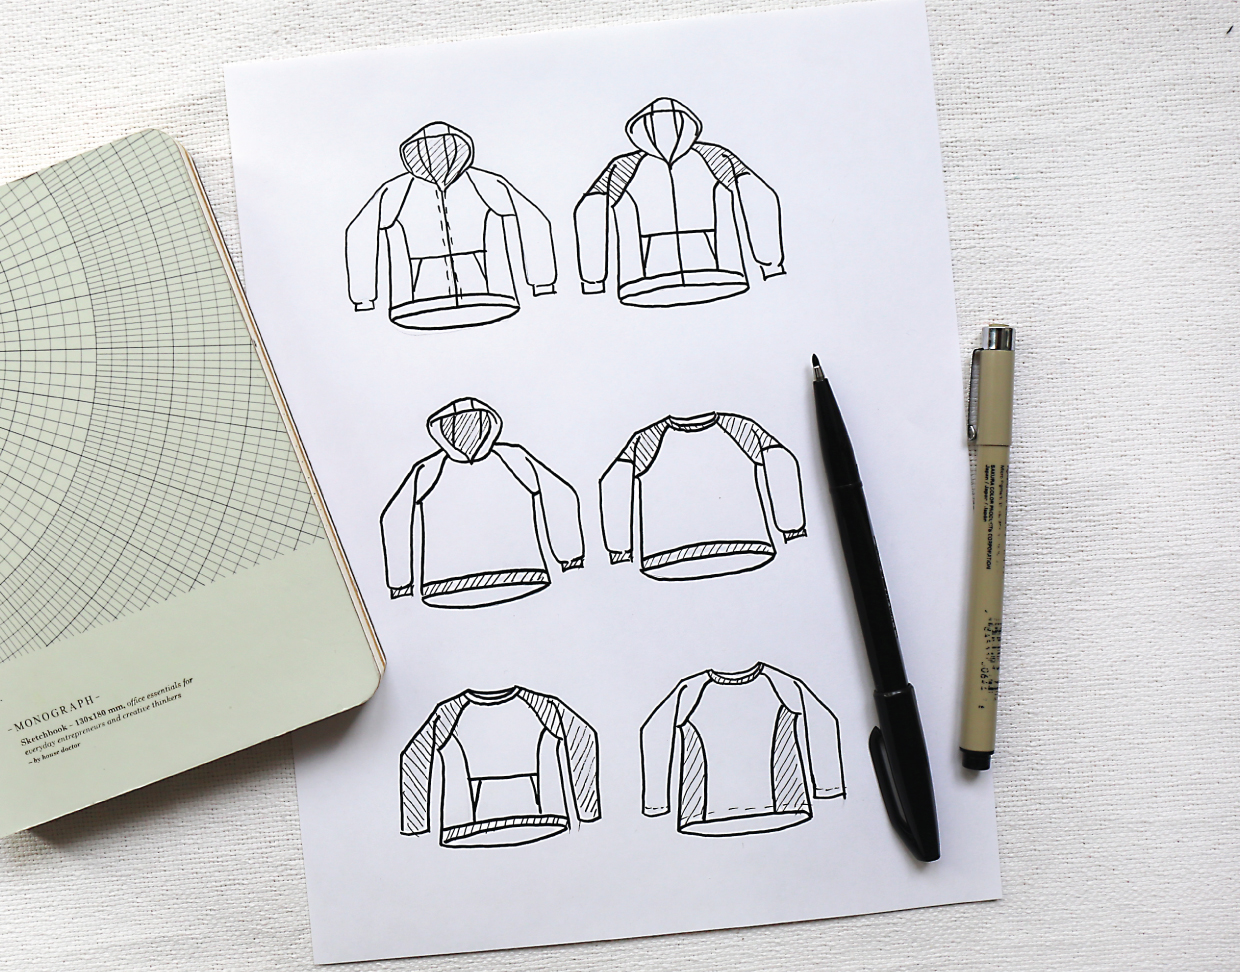
You get to choose how you want to sew this one, so make it completely yours! And keep in mind, as well, that your fabric choices will make a big difference. The pull-on raglan makes a great T-shirt as well as a terrific sweatshirt.
I’ve written a few blog posts already talking about different ways you can customize this pattern. You can see all the blog posts right here.
Gathering Your Notions
Once you’ve chosen your fabric and decided on any customization you are going to do, it’s time to assemble the notions you’ll need.
If you’re sewing the zip-front hoodie, you’ll want a separating 23″ (or longer) VISLON® zipper as well as a narrow ribbon or bias trim to finish the hoodie neckline. My local trim shop has an absolutely abysmal selection of VISLON® zippers (very chunky zipper teeth in only six very basic colors, none of which appealed to me), so if your situation is like mine you may need to send away for your zipper or your ribbon. Or instead of ribbon you could also make your own bias trim to finish the neckline. If you go that route, you can choose from virtually anything in your fabric stash.
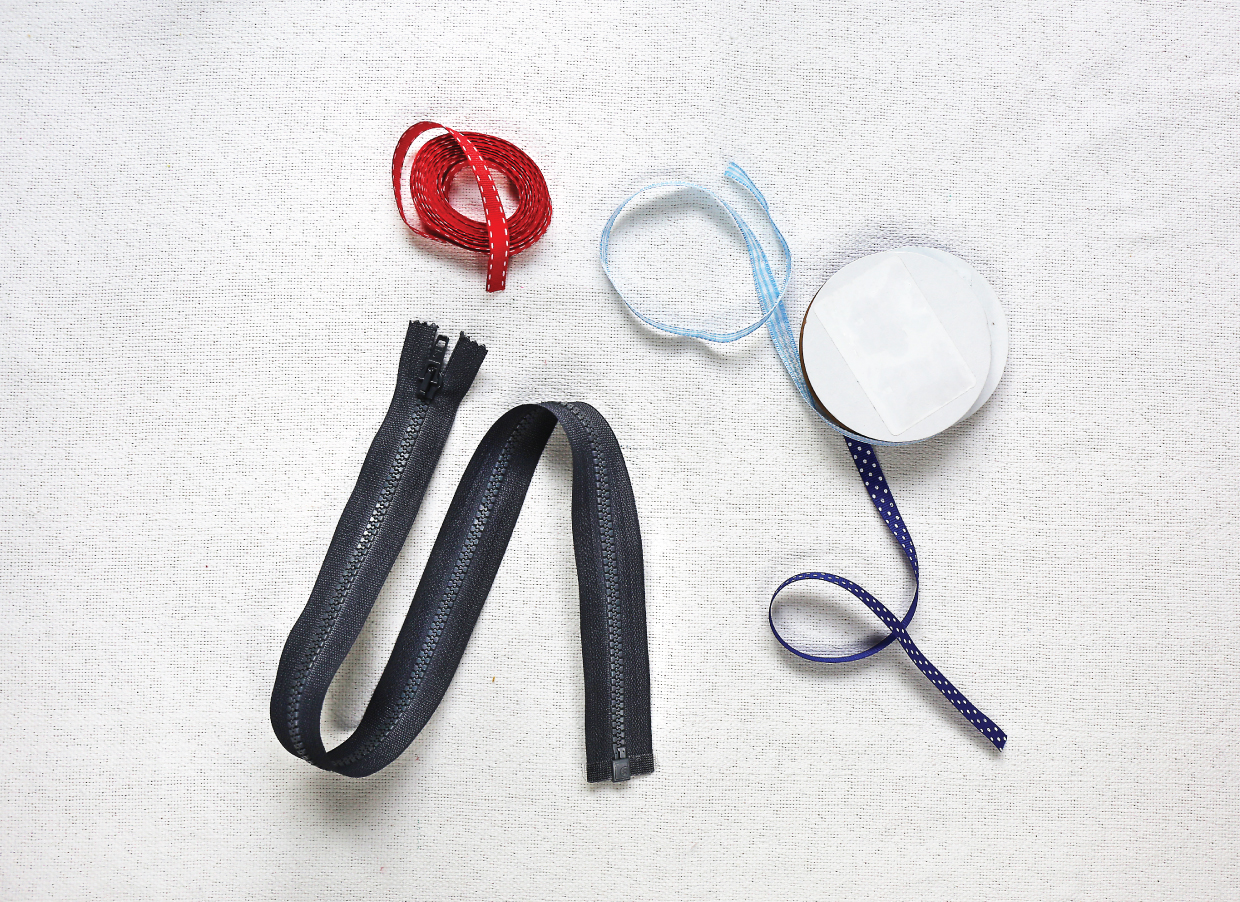
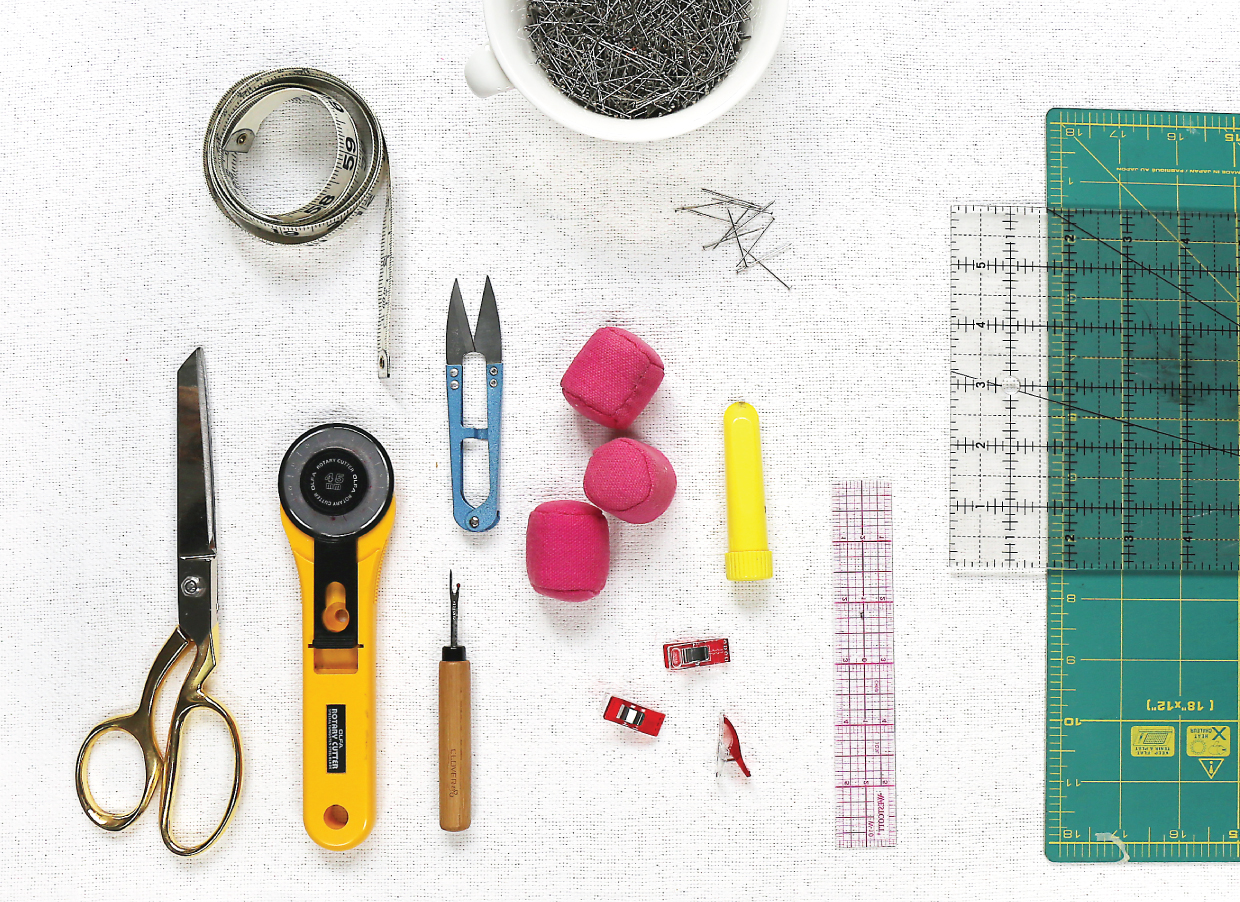
What else will you need? Well, coordinating thread of course. All-purpose thread is a good choice for knits since it’s stronger and can resist breaking when the fabric stretches. Here are a few more things you’ll probably want.
- Sewing sheers or a rotary cutter and self-healing cutting mat. (I asked on Instagram recently and the overall consensus was that you mostly prefer the rotary cutter, but a surprising number of you are still fans of the sewing sheers as well. Use whichever you prefer.)
- Thread snips or a small scissors
- I like to have a good straight-edge handy
- A small ruler
- Tailor’s chalk or a water-soluble fabric marking pen
- A seam ripper (good to have on hand even though you’ll never need to use it, right?)
- A measuring tape to determine your size and to help if you want to make any alterations
- Pins (or pattern weights and fabric clips if you’re so inclined)
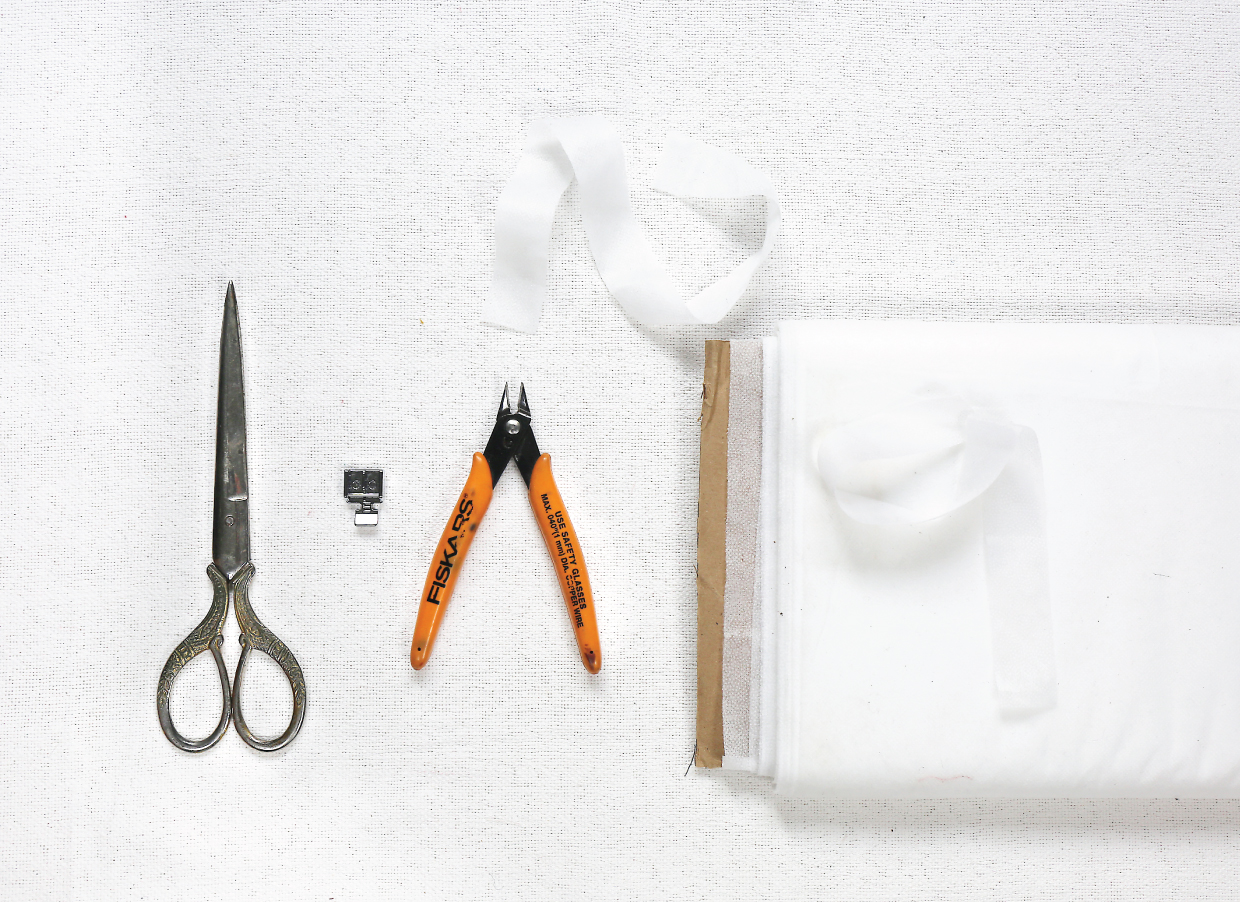
If you’re making View A, the front-zipper hoodies, you’ll also want the following:
- Lightweight or featherweight fusible interfacing for the zipper in View A
- Paper scissors or a metal snips in case you need to remove a few teeth from the zipper
- Either a hand-sewing needle or a glue stick for basting your zipper into place
- A zipper foot
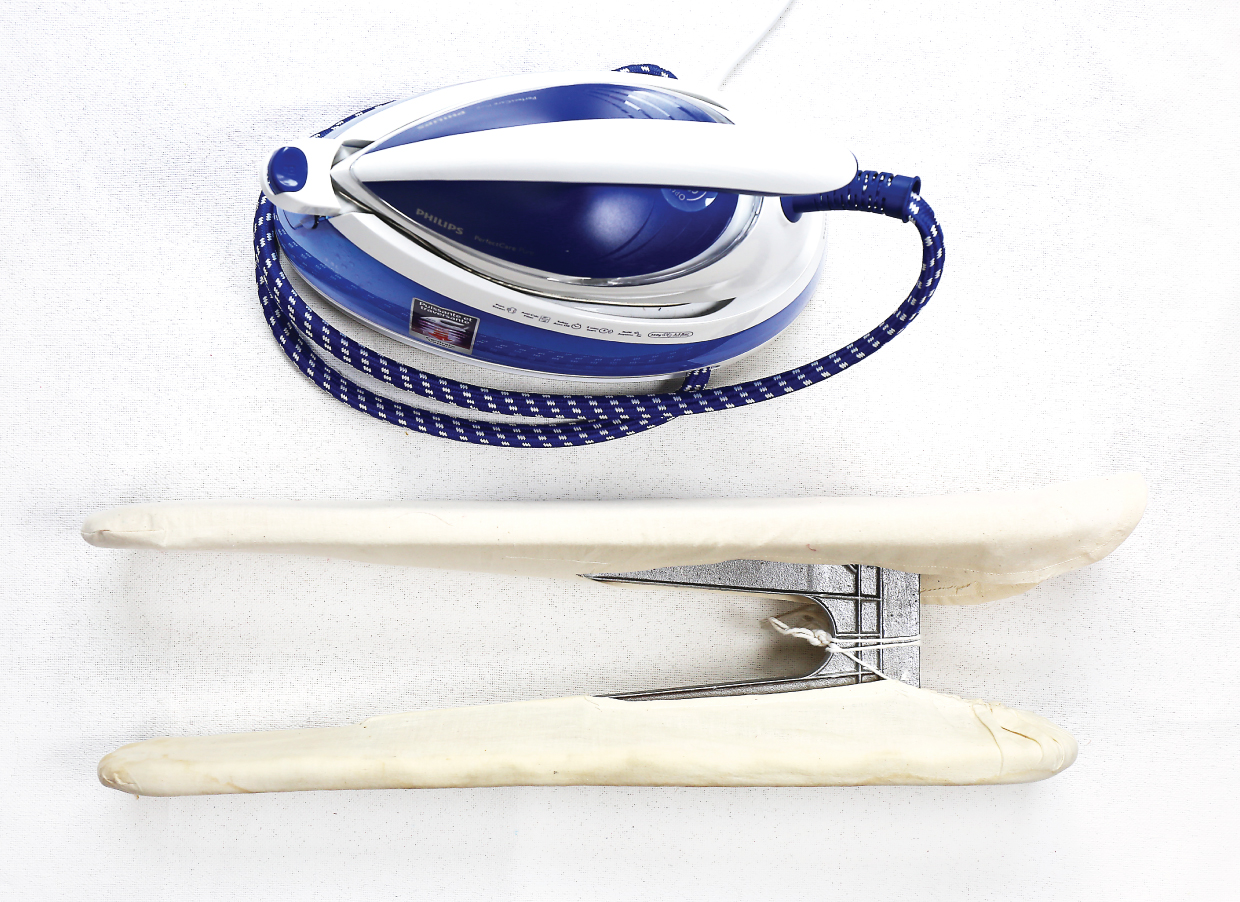
Obviously you’ll want access to a good iron (your second-most important tool after your sewing machine) and a ironing board. I make use of my sleeve board a lot, too.
It’s lovely to have a serger or merrow machine, but if you don’t have one don’t worry. You can choose whether to finish the seam allowances for knits. They don’t technically need to be finished, but they do look really nice when they are finished. If you don’t have a serger you can always use a mock-serger stitch or a simple zigzag stitch over the edge of your seam allowances to finish them. We can talk more about that later.

Purchasing Your Pattern
And of course you’ll need a copy of the pattern, which you can purchase in paper format or as a digital PDF.
And I think that’s about it. Once you’ve gathered your supplies and maybe placed an order for anything you’re missing, you’re ready to move on to selecting your size.
Select Your Size
One of the many reasons we all like to wear knits these days is because they’re stretchy and, as a result, comfortable to wear. Another reason is most likely that they’re not nearly so fit-specific as many wovens, so you may not need to worry as much about fitting a fuller bust as you might if we were sewing, say, a fitted woven top. That said, I do have a few tips to help you get a great fit through the bust.
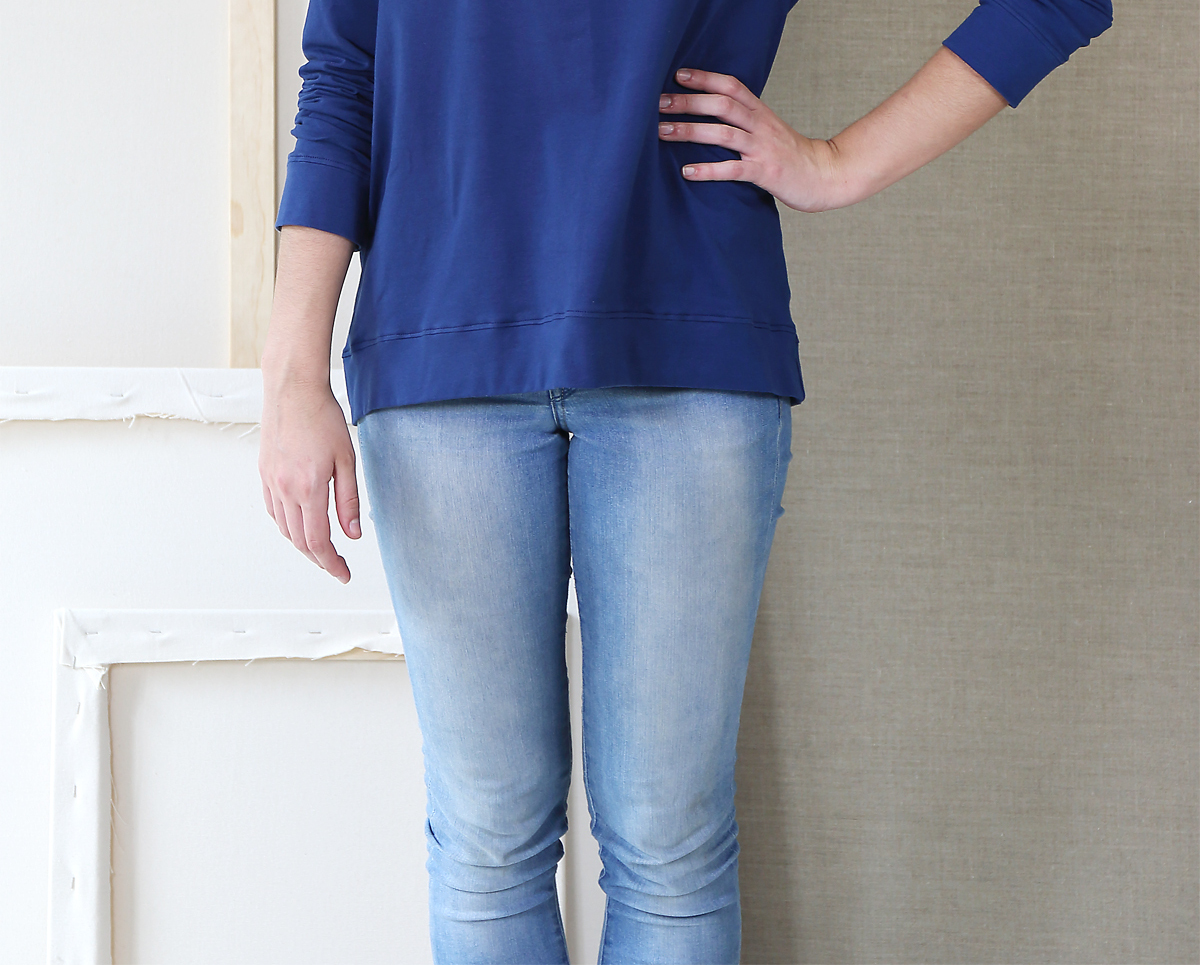
So first let’s decide what your size is. We’re going to start by taking two measurements: your upper bust measurement and your full bust measurement.
First take your full bust measurement. This measurement will be taken across the fullest part of your bust. Then take your high bust measurement. This measurement is taken just under your arms, across the upper part of your chest, like in this photo.
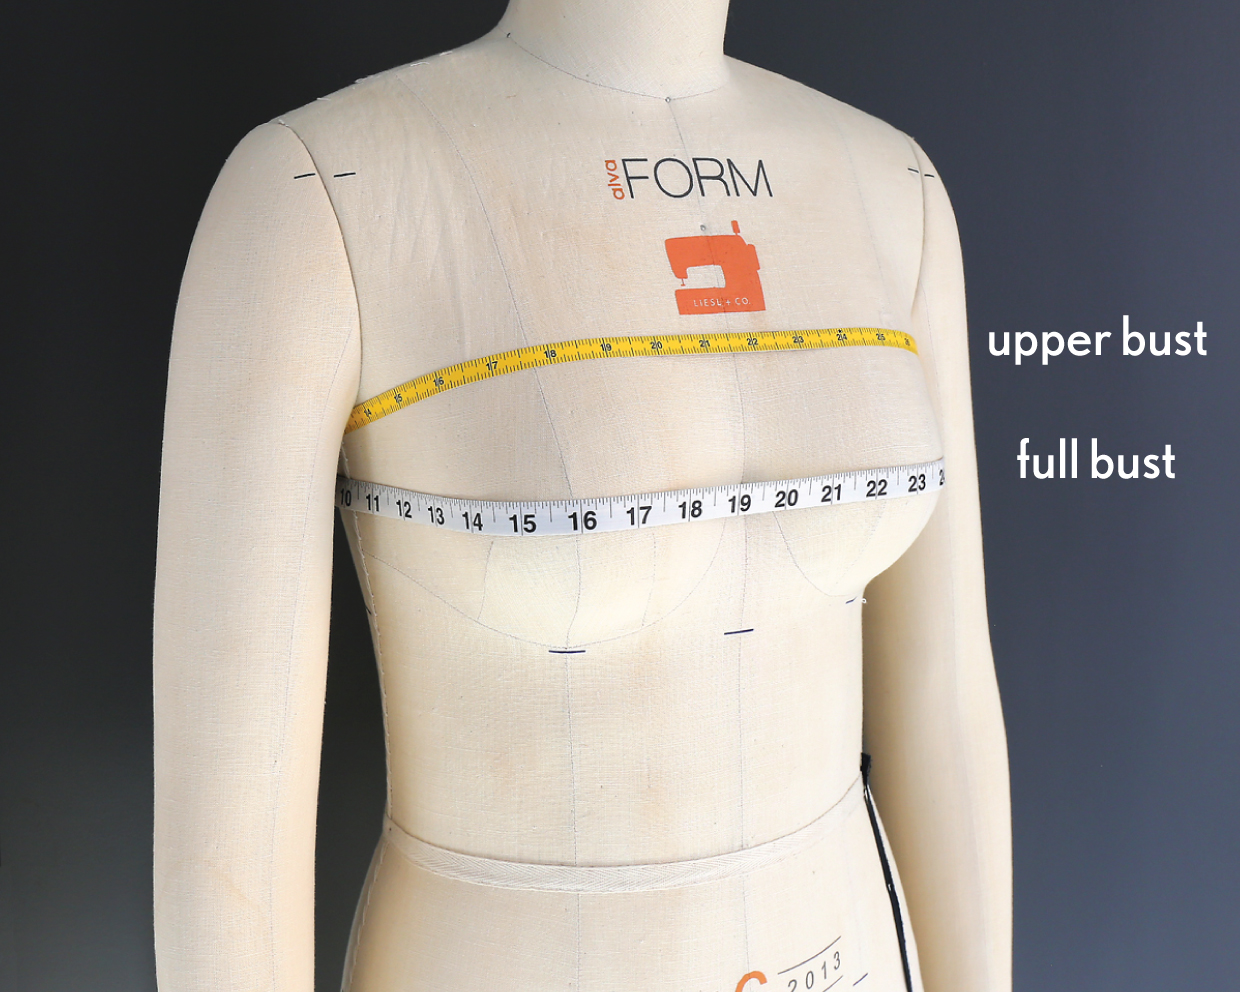
OK, now some quick and easy math:
full bust measurement – upper bust measurement = x
If x is more than 2 1/2″, use your upper bust measurement instead of your full bust measurement when looking at the measurement chart. If x is less than or equal to 2 1/2″, use your full bust measurement. I’ll tell you why in a minute. Now, choose your size by looking at the chest measurements on the size chart and using either your upper bust measurement or your full bust measurement, depending on your results from the math problem above.
| Pattern Size |
Bust (in.) |
Waist (in.) |
Hips (in.) |
| XS | 33 1/2″ | 26″ | 36″ |
| S | 35 1/2″ | 28″ | 38″ |
| M | 37 1/2″ | 30″ | 40″ |
| L | 40 1/2″ | 33″ | 43″ |
| XL | 44″ | 36 1/2″ | 46 1/2″ |
| XXL | 46″ | 38 1/2″ | 48 1/2″ |
I wrote a lengthy blog post about finding your correct pattern size a few years ago. You might want to refer to that.
To summarize, basically we want to get a good fit through the upper chest and shoulders, so if your bust differential is more than 2 1/2″ you’ll probably get a better fit through the shoulders by using your upper bust measurement instead of your full bust measurement when you look at the measurement chart. If you chose your size based on your full bust measurement, you would end up with a sweatshirt that’s very oversized and too big through the neck and shoulders, which generally looks sloppy and not nice at all. (And when you shop in stores you often have to purchase this way because you can’t do a full bust adjustment, so there’s the advantage of sewing for yourself!)
For this project, we’ll adjust the bust of the pattern pieces themselves to give you more room in the bust area instead of making you sew a size that’s too large everywhere except the bust. Much better, right?
So to sum up, for this pattern you’ll most likely want to choose your size based on your bust (or upper bust) measurement. Your waist measurement will be less important, particularly since the pattern has a gentle A-line shape for a boxy fit anyway.
Pattern Adjustments
Let’s move on now to full bust adjustment (FBA) pattern adjustments for those of you who need or want to use one.
View B, Option 1
This is a basic raglan FBA. This can be applied for View B, but obviously View A will be a little different because we have a princess seam. So we’ll get to that in a minute.
- Trace the View B front pattern piece and draw in the 1/2″ seamlines. Hold the pattern piece up to your body and find the apex (i.e., the fullest part of your bust). Mark the apex with a dot or an x. Then put your pattern piece back on the table and draw a line that runs parallel to the center front edge of the pattern piece and intersects the apex. Draw another line from the apex to the armhole of the raglan, about 1/3 of the way up the raglan seam. Draw a third line from the apex to about halfway across the neckline. Then cut the pattern along the lines, leaving an uncut paper “hinge” at both the armhole and neck seamlines.
- Spread the pattern piece at the vertical cut, allowing the pieces to pivot slightly while they spread. The goal here is to spread the pattern a bit at the location of the apex to give you more room at the bust. If you’re a C cup, try to spread the cut line by 1/4″-1/2″ at the apex. For a D cup, spread the cut line by 1/2″-1″ at the apex. The amount of extra space you add will taper to nothing at the hinges, so the length of the seamlines at the armhole and neckline won’t change. Notice also that the amount of width at the front hem will also grow as you spread the pattern. That’s because we’re not adding a dart, so the extra fabric that’s normally taken up by a dart is creating more flare at the hem of the sweatshirt.
- Tape tissue or plain paper behind the cuts to fill the gaps produced by the spreading. Then redraw the hem, adding some extra length at the center front, tapering in to match the length at the side seam. We need to add extra length because a fuller bust requires a little more fabric to reach the waist/hem. Are you with me so far? To do this, simply trace the original hem, starting at the center front and merging with the existing bottom edge of the pattern as you approach the side seam.
Note that if you take this approach you’ll also need to add the same amount of length to the waist band. Or, if you want, you can ease the width into the waistband so it’s not quite so full. It depends on how much extra space you added to the front pattern piece.
By making these simple adjustments you’ll be adding extra room for the bust without making the neckline and shoulders larger. Which is good because you only need extra room where it counts, right?
View B, Option 2
Let’s say you don’t want to add more fullness below the bust and you just need a little more room through the bust itself. We can sort of cheat here and add a bit to the side seam as well as add a little length to the center-front hem. We couldn’t do this with a woven pattern, but with knits you have a little more flexibility.

That’s easy, right?
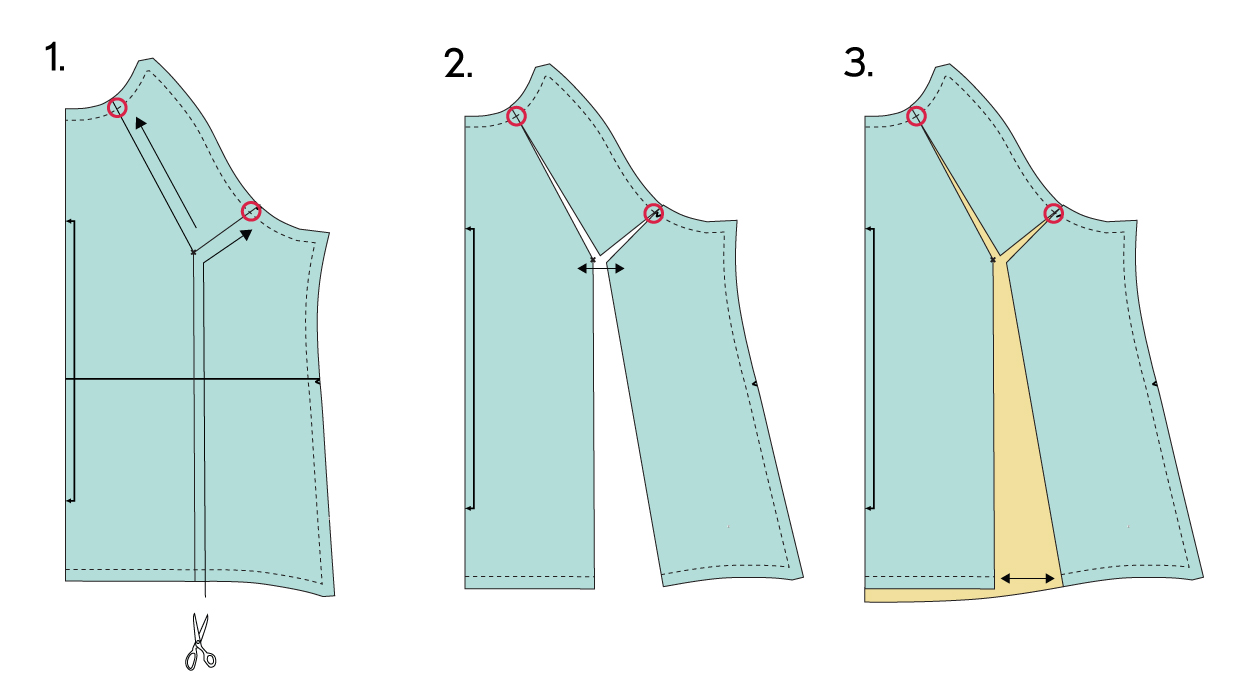
View A, Princess Seam
The beauty of princess seams is that they allow you to “let in” and “let out” as needed to help you get a good fit. The princess seam on this pattern is located a bit away from the bust line, but we can still make use of it to give extra room for the bust if needed.
To do a proper FBA for this style, we’d need to assemble the pieces along the seamlines, do lots of cutting and taping like we did for View B, Option 1 above, and then take them apart and do some more cutting and taping. But since this is a more forgiving knit pattern we can also take a shortcut which I’ll demonstrate here.
This is a quick and easy way to add extra fabric for a fuller bust. You’ll still want to baste these pieces together to check the fit before you sew them together to be sure you’re adding enough room where you need it and not anywhere else. But rather than do any fancy pattern adjustments, you can try adding extra fabric along the princess seams near the bust line like this.
Notice that we’re adding length near the center front, but we haven’t added length at the side seam. And we’re just adding a little width at the princess seams near the bust, not everywhere else.
Now that you have the bust adjusted to your desired fit, let’s move on to a few other simple pattern adjustments you can make.
Lengthen and Shorten
You may want to adjust the pattern to be longer or shorter depending on your stature and preferences. Before you go too crazy, however, take note. I’m on the tall side (5’8″), but I’m also extremely long-waisted. (My even-taller younger sister says a chiropractor once told her she has an extra vertebra, which may very well be true for our whole family, but anyway….) I almost always need to adjust dresses and tops to be about 1″ longer. However, I didn’t adjust this pattern, and it was fine for me. It also worked well as drafted for our short-waisted friends and testers, so don’t get too aggressive with your alterations.
A lot of your decision on whether to lengthen or shorten will depend on your preferences. Do you want this sweatshirt to be extra long or considerably shorter? Go ahead and make use of the lengthen and shorten lines. Otherwise you’ll probably find that it’s OK as is.
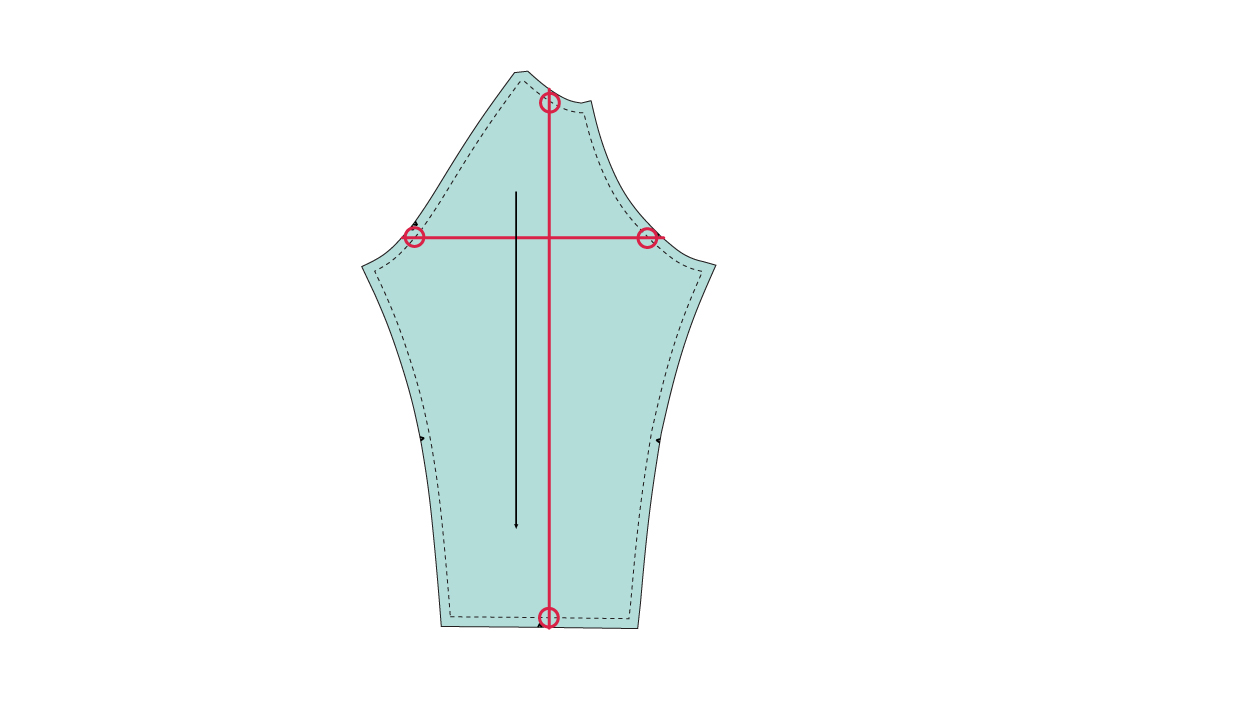
Sleeve Width
To add width to the sleeve you can follow the instructions in this post, drawing your lines as shown below (since we’re working with a raglan sleeve instead of a set-in sleeve):
That should cover most of the possible adjustments you might want to make for the Neighborhood Sweatshirt + Hoodie. As always, if you’re interested in learning more about specific fit adjustments, I highly recommend the book Fit for Real People which gives many adjustments and figure analyses to help you understand how to get a better fit. I refer to my copy all the time.
Cutting Fabric
We’ve now arrived at the cutting out stage. You’ll now have your pattern pieces ready, with any necessary alterations made. And I hope you’ve found some fabric you love! I’m a sucker for beefy knits, and this pattern is great for fabrics like that. So let’s get going, shall we?

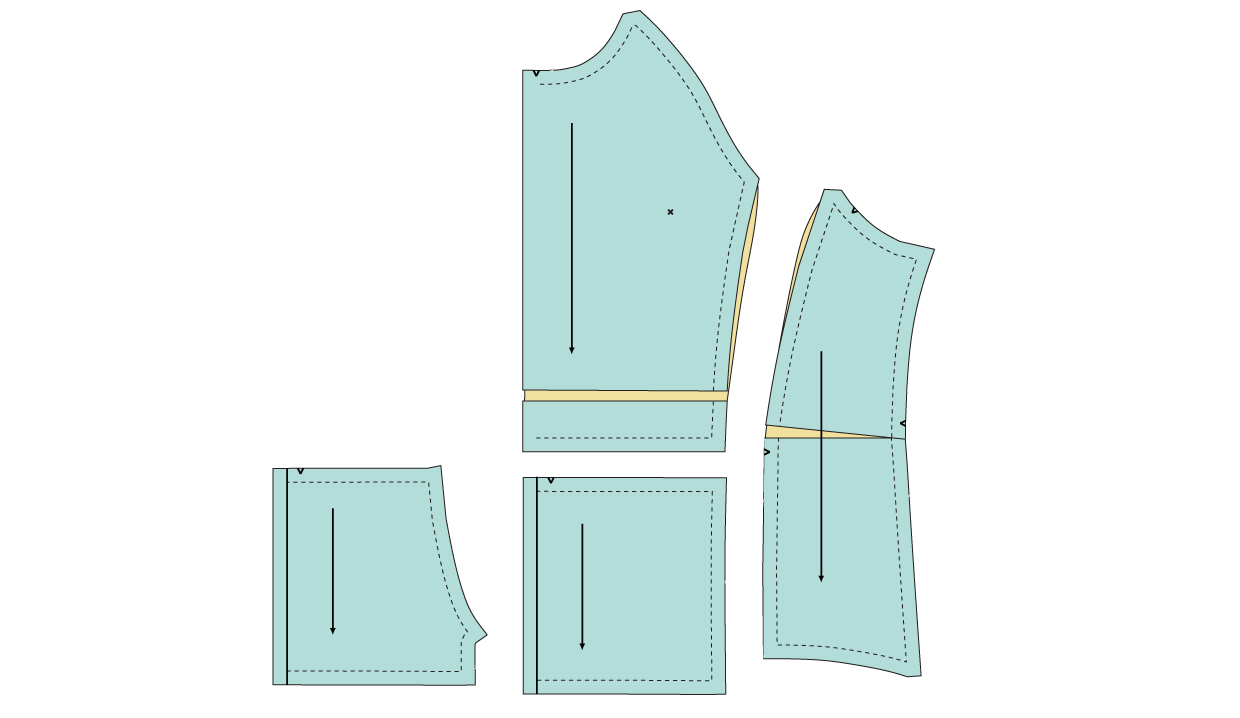
First let’s take a look at the cutting layouts. I made them all colorful so they wouldn’t be as boring as they are on the pattern sheet.
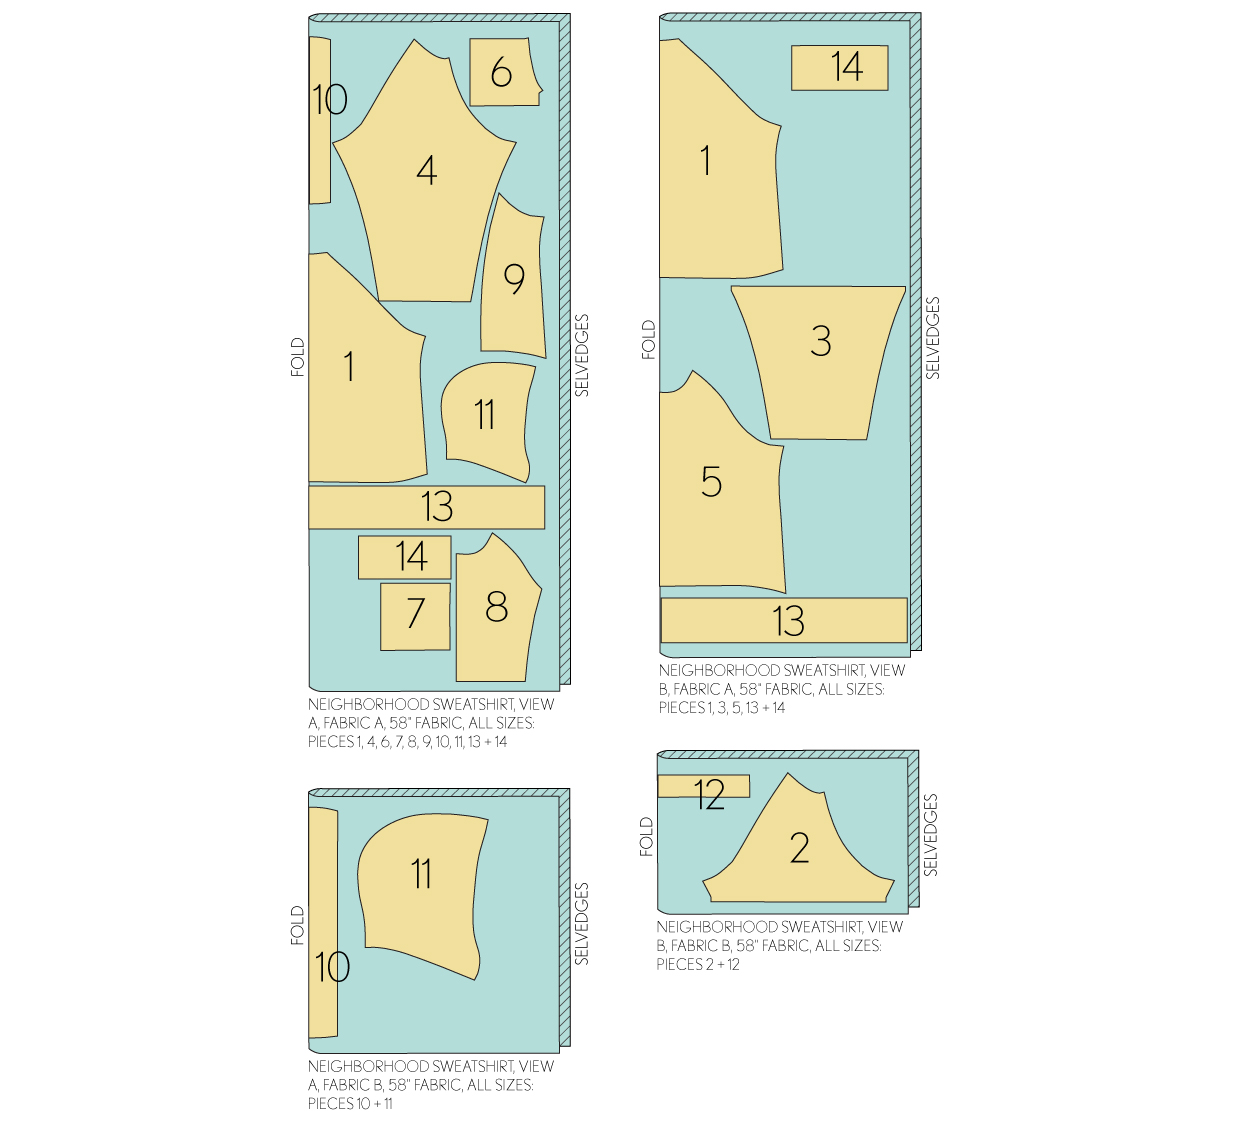 Nothing too complicated here, right? Here are a few tips to help you along.
- Knits are shifty, devious fellows. Be sure you have your fabric as close to being on grain as possible. If you’ve chosen a thin knit you might want to let it “rest” on your sewing table/kitchen floor/living room rug for a while before you start pinning and cutting. This gives it a chance to bounce back into shape.
- If you’re working with stripes, it’s always a good idea to cut your fabric flat, positioning each piece carefully. For pieces that are cut on the fold, you can use chalk to mark the perimeter and the center line, then flip the piece to trace the opposite side before you cut it.
- Also for sewing with stripes, I like to trace the stripes along the edges of the pattern piece so I can match them on the opposite side and on the coordinating pieces. This makes stripe matching much easier.
- For marking notches, it’s a good idea to use tailor’s chalk or a water-soluble fabric marking pen instead of cutting into the fabric itself. For this pattern we have 1/2″ seam allowances, but for other knit patterns with 1/4″ allowances you risk cutting into the seam line.
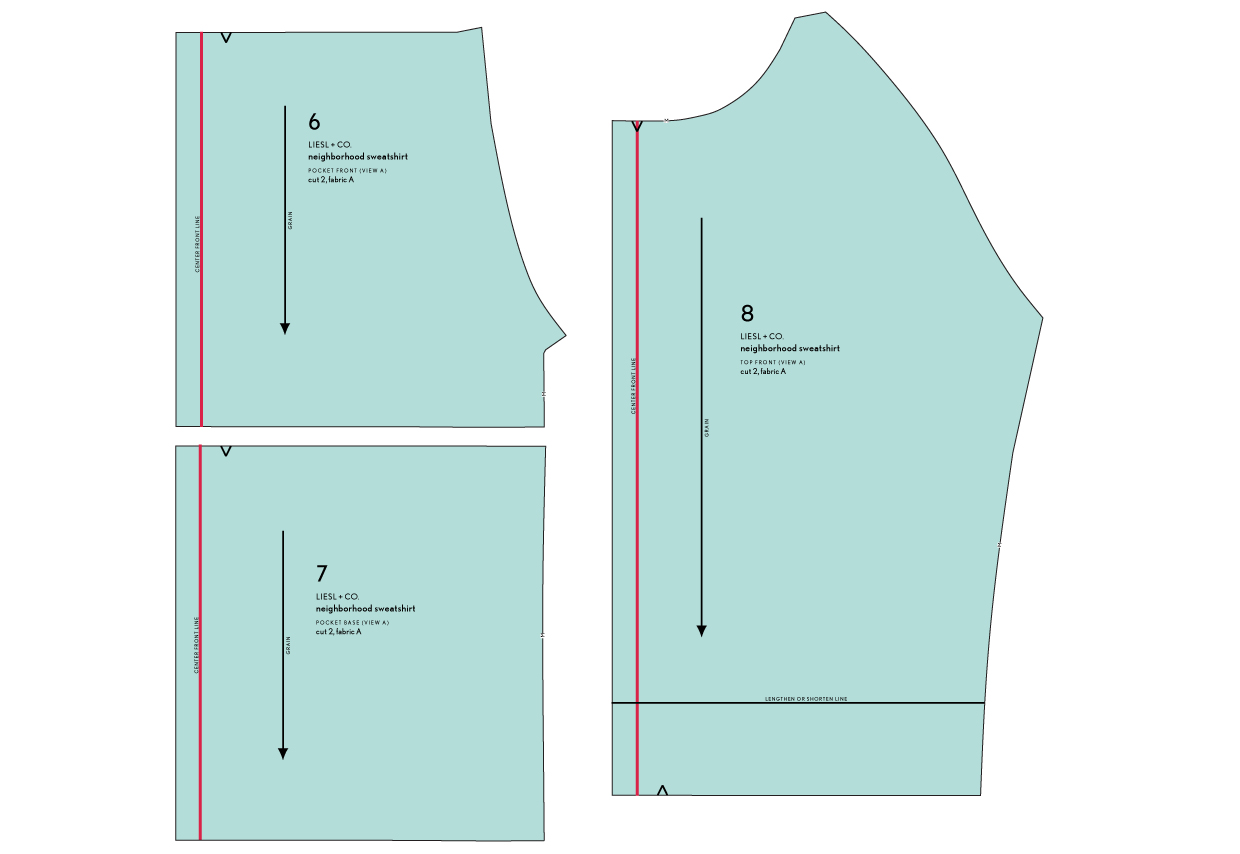
Here’s something else to consider. If you’ve decided to mix things up a bit and sew the princess seams and pockets of View A as a View B pullover, you’ll want to use the center front line marked on those pieces (pieces 6, 7, and 8) as your cut on fold lines. You don’t need the 1/2″ seam allowances that we had allowed for the zipper, so be sure you line up the pieces on the fold line correctly. (Which reminds me that you’ll need to re-arrange your cutting layout pieces accordingly, but I trust you can handle that, right? I know you can!)
What else?
- I strongly prefer pattern weights and my straight-edges with a rotary cutter and self-healing cutting mat when I work with knits, but that’s a personal preference. If you’re a pins and sewing shears kind of person, have at it! I just find that I get a more accurate cut with the rotary cutter.
- I usually cut a whole bunch of strips of 1″-wide fusible interfacing, and I keep them in a little basket in my sewing space. That way I always have them when I need to fuse a zipper or fabric edge.
And that’s it! Good luck with your cutting out.
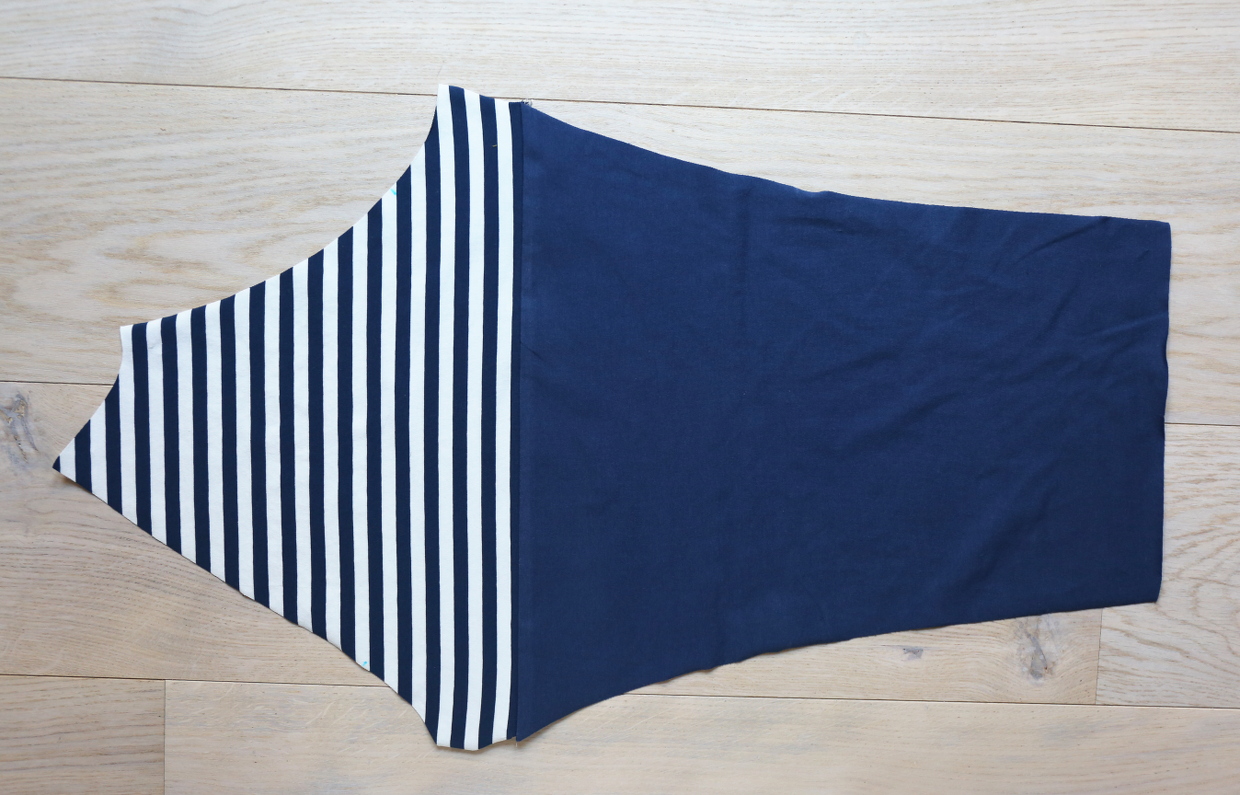
Assemble the Front and Sleeve
Are you ready, finally? It’s time to start the sewing! Here we go.
Assemble the Front (View A)
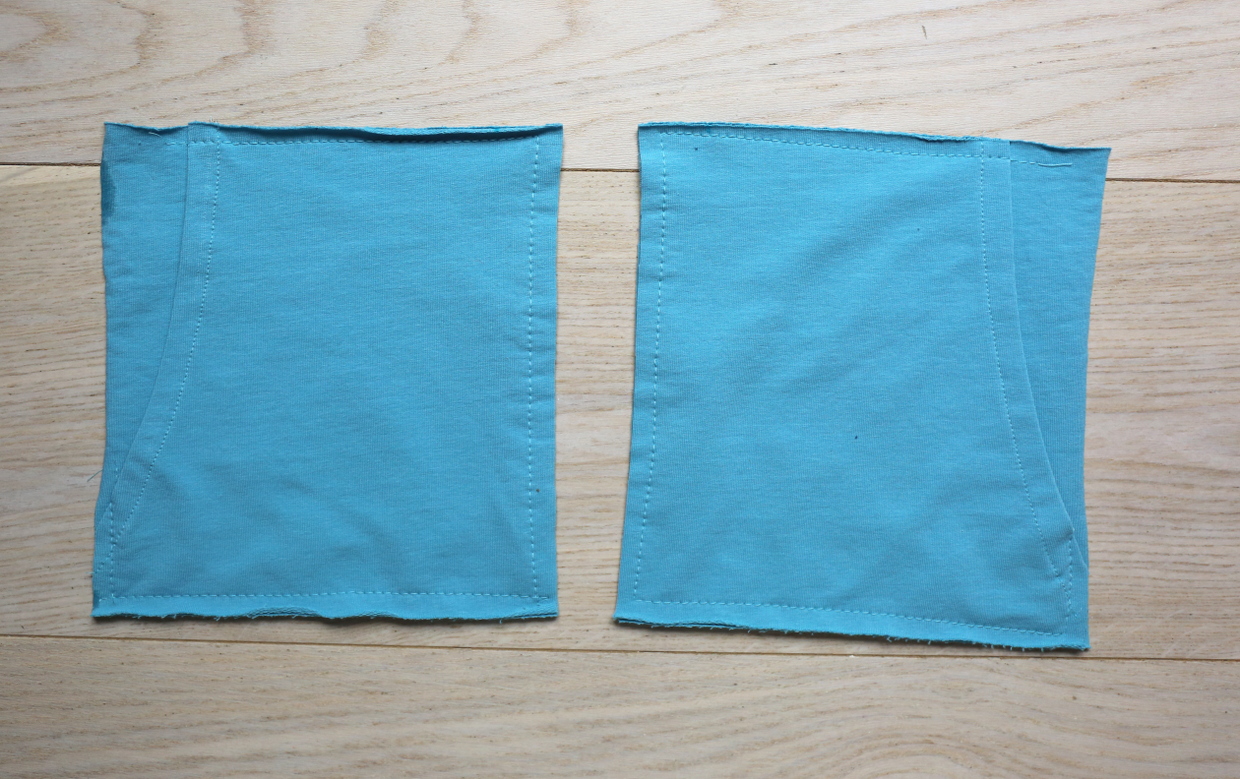
1) Select a set of pocket pieces (a pocket front and a pocket base). Following the interfacing manufacturer’s instructions, fuse a 1/2” by 7” strip of interfacing to the wrong side of the pocket front along the angled opening edge. Finish the edge of the pocket front opening with a serger stitch, a mock serger stitch, or edgestitch a length of ribbon to cover the raw edge. (If you use the serger, be careful not to trim the edge.)
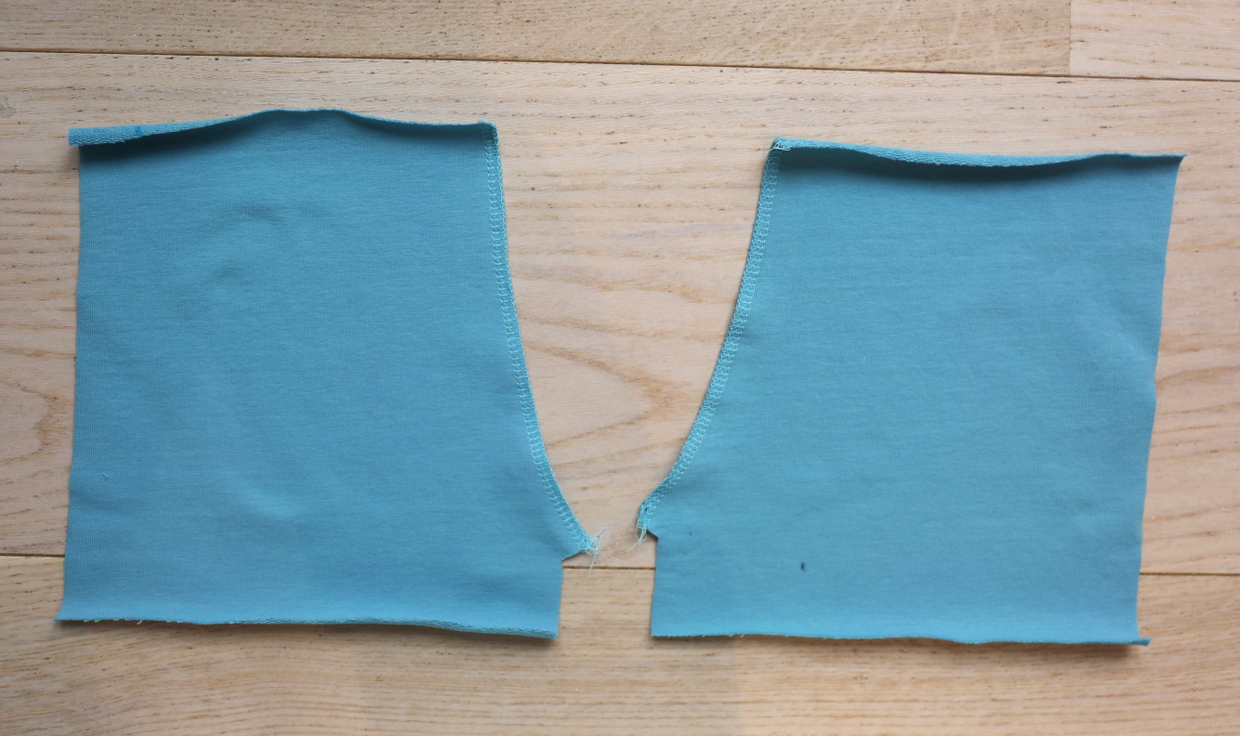
2) Fold the finished pocket front edge to the wrong side by 1/2” and finish the fold with a 3/8” topstitch to catch the folded, finished edge in the topstitching. (If you’re using a ribbon to finish the raw edge you may want to make your topstitching wider than 3/8” to catch the innermost edge of the ribbon.) This will give the pocket opening a neat, simple finish.
HINT from Liesl: I like to lengthen my stitch length a little bit when I’m sewing on knits. Try 2.6 to 3.0 on a scrap before you begin. And, of course, the stretch stitch on your machine will be ideal for this project!
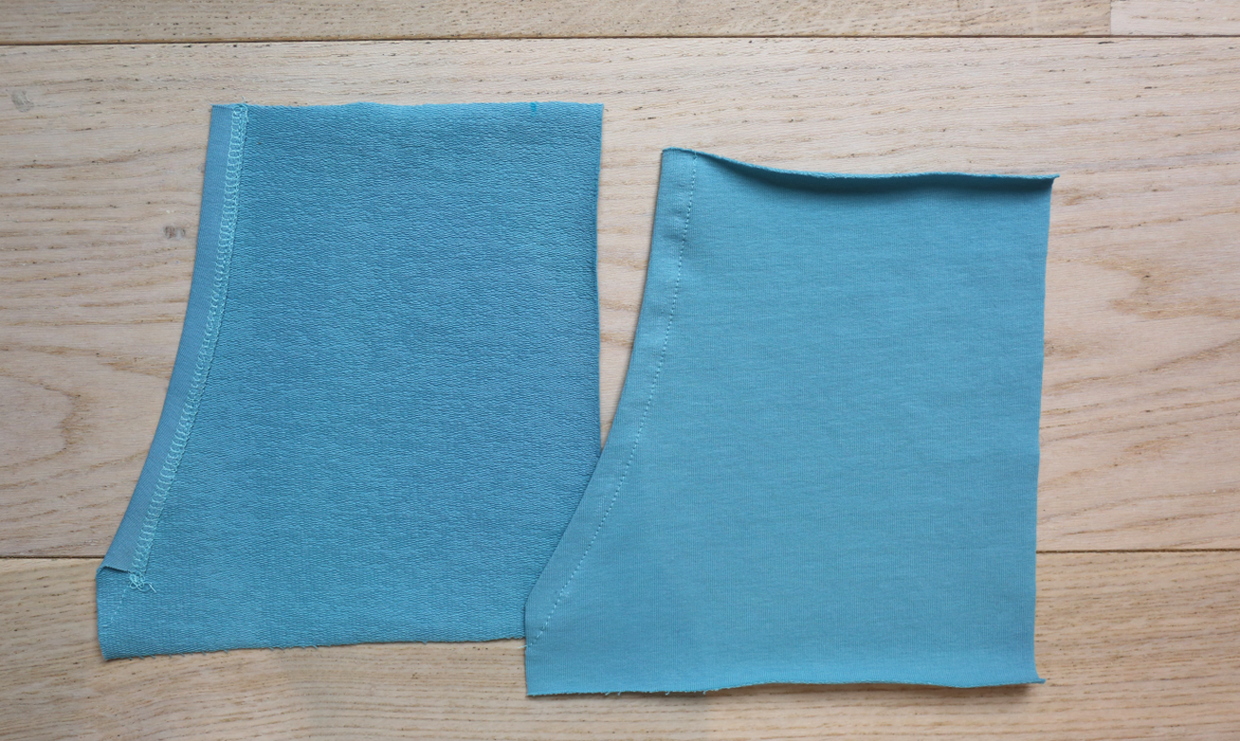
3) Pin the topstitched pocket front to the pocket base with both pieces facing right-side up, matching the edges and notches. Baste the pocket front to the pocket base with a 3/8” seam. Prepare the second set of pocket pieces in the same way. Going forward we’ll refer to this piece as the pocket.
4) Pin the top edge of one pocket to the lower edge of its corresponding top-front piece (the pocket opening should be on the outside or arm side of the top-front piece), with right sides together and matching the notches. Stitch the two pieces with a 1/2” seam. Trim and finish the seam allowances and press them toward the top-front piece. Edgestitch 1/8” from the seam if desired. Going forward we’ll refer to this piece as the center-front piece.

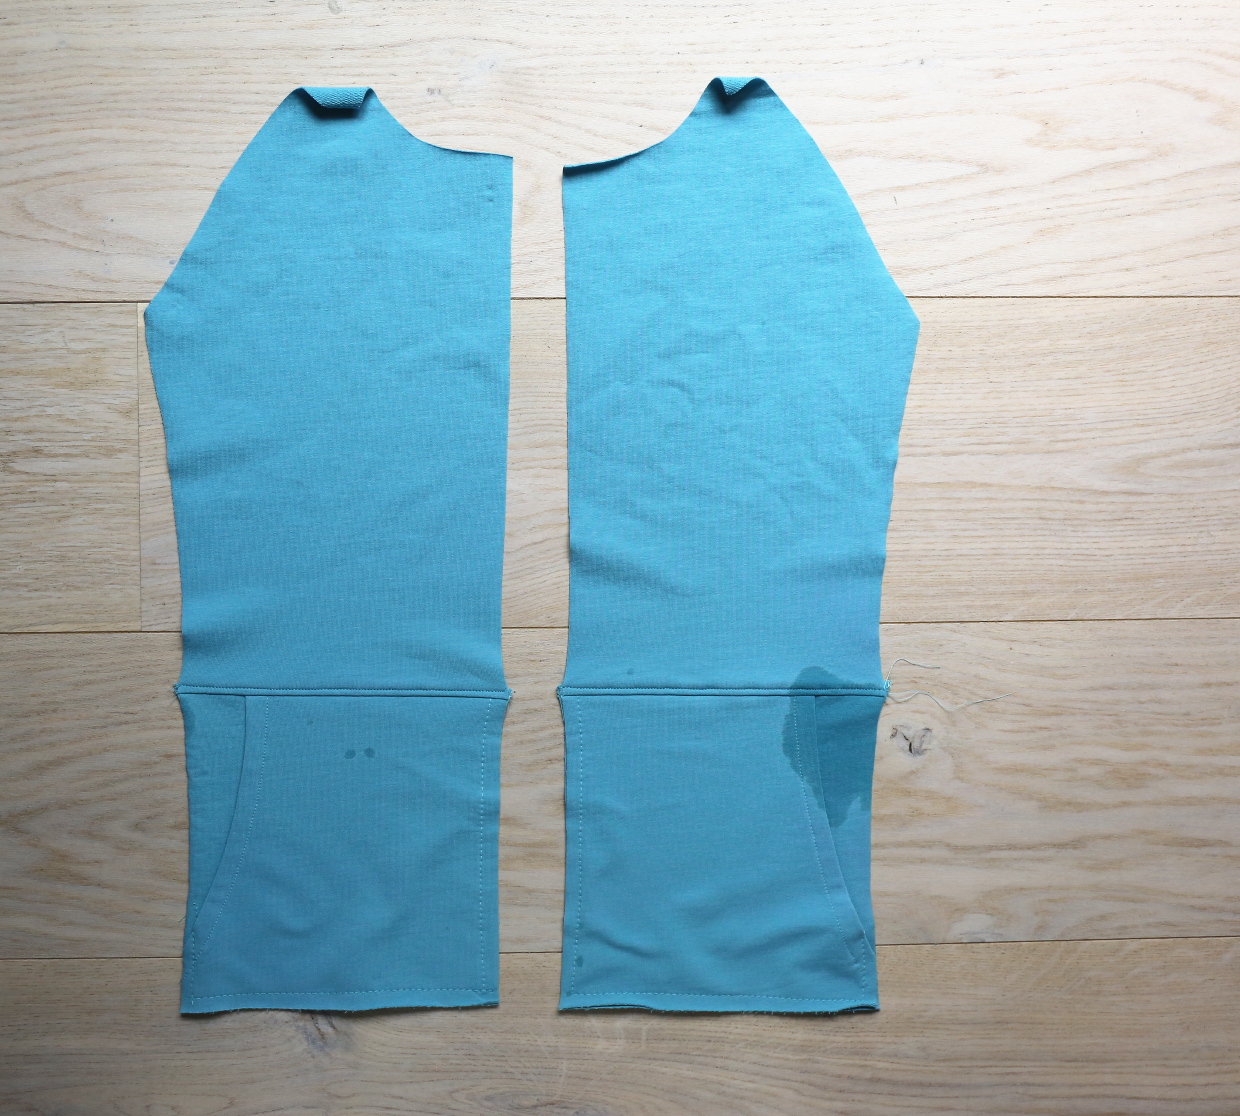
5) Pin the side-front piece to the center-front piece with right sides together, matching the side-front notch to the topstitched seam on the center-front piece. Stitch the pieces with a 1/2” seam, finish the seam allowances if you haven’t already, and press the seam allowances toward the side-front piece. Edgestitch the side-front piece 1/8” from the seam if desired. Going forward we’ll refer to this piece as the front-panel piece.

6) Following the interfacing manufacturer’s instructions, fuse a 1/2” by 22” strip of interfacing to the wrong side of the front-panel piece along the center edge. Finish the seam allowance using your preferred method, taking care not to trim the edge if you’re using a serger.
7) Repeat steps 1-6 to assemble the second front-panel piece.
Assemble the Sleeve (View B)
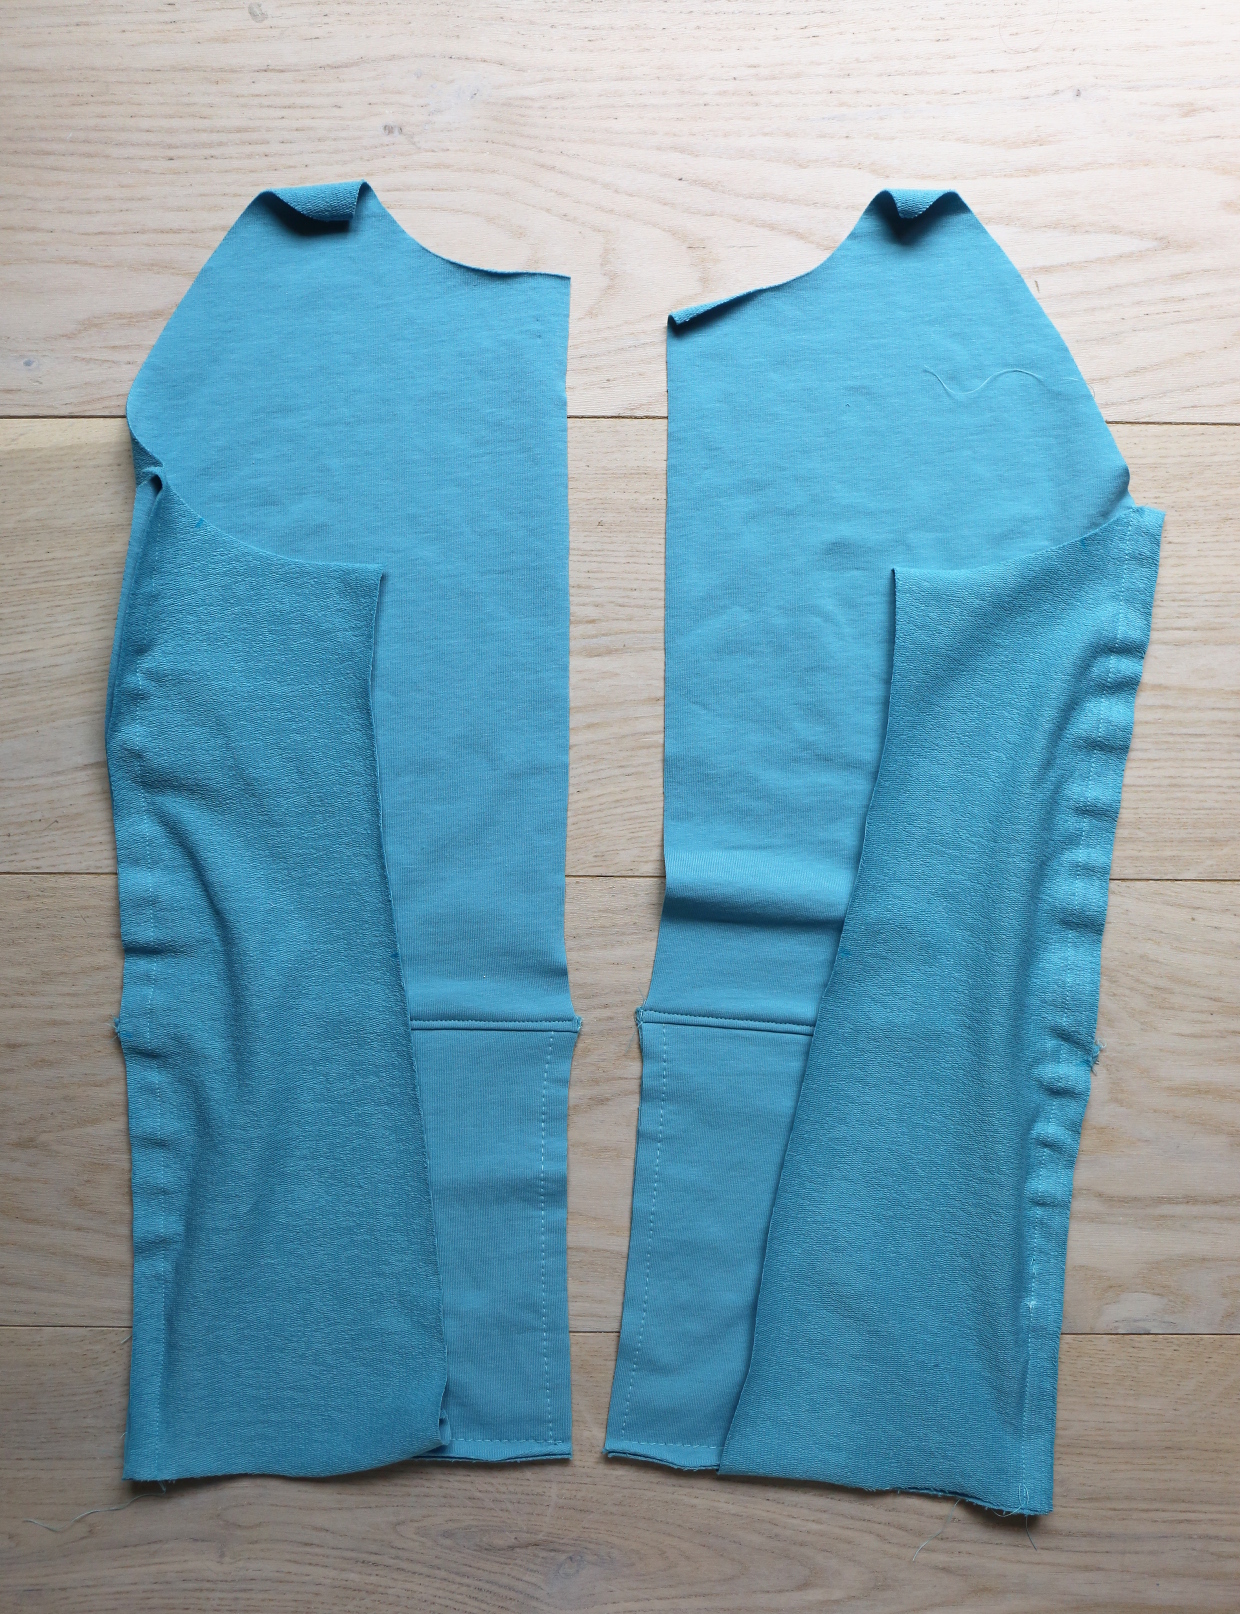
1) Pin one upper-sleeve piece to its coordinating lower-sleeve piece with right sides together, matching the notches and edges. Stitch the sleeve with a 1/2” seam, backstitching or lockstitching at both ends. Finish the seam allowances together and press them toward the lower sleeve. Edgestitch the lower-sleeve piece 1/8” from the seam if desired. Repeat with a second set of sleeve pieces.
And that’s it for today’s sewing. Pretty straightforward, right?
Assemble the Sweatshirt (Both Views)
1) Pin one sleeve to the sweatshirt back at the armhole, with right sides together and matching the double notches. Stitch the sleeve to the armhole with a 1/2” seam. Repeat to attach the second sleeve to the opposite side of the sweatshirt back. Trim and finish the seam allowances together if you haven’t already. Then press the seam allowances toward the sleeves and edgestitch the sleeves 1/8” from the armhole seam if desired.
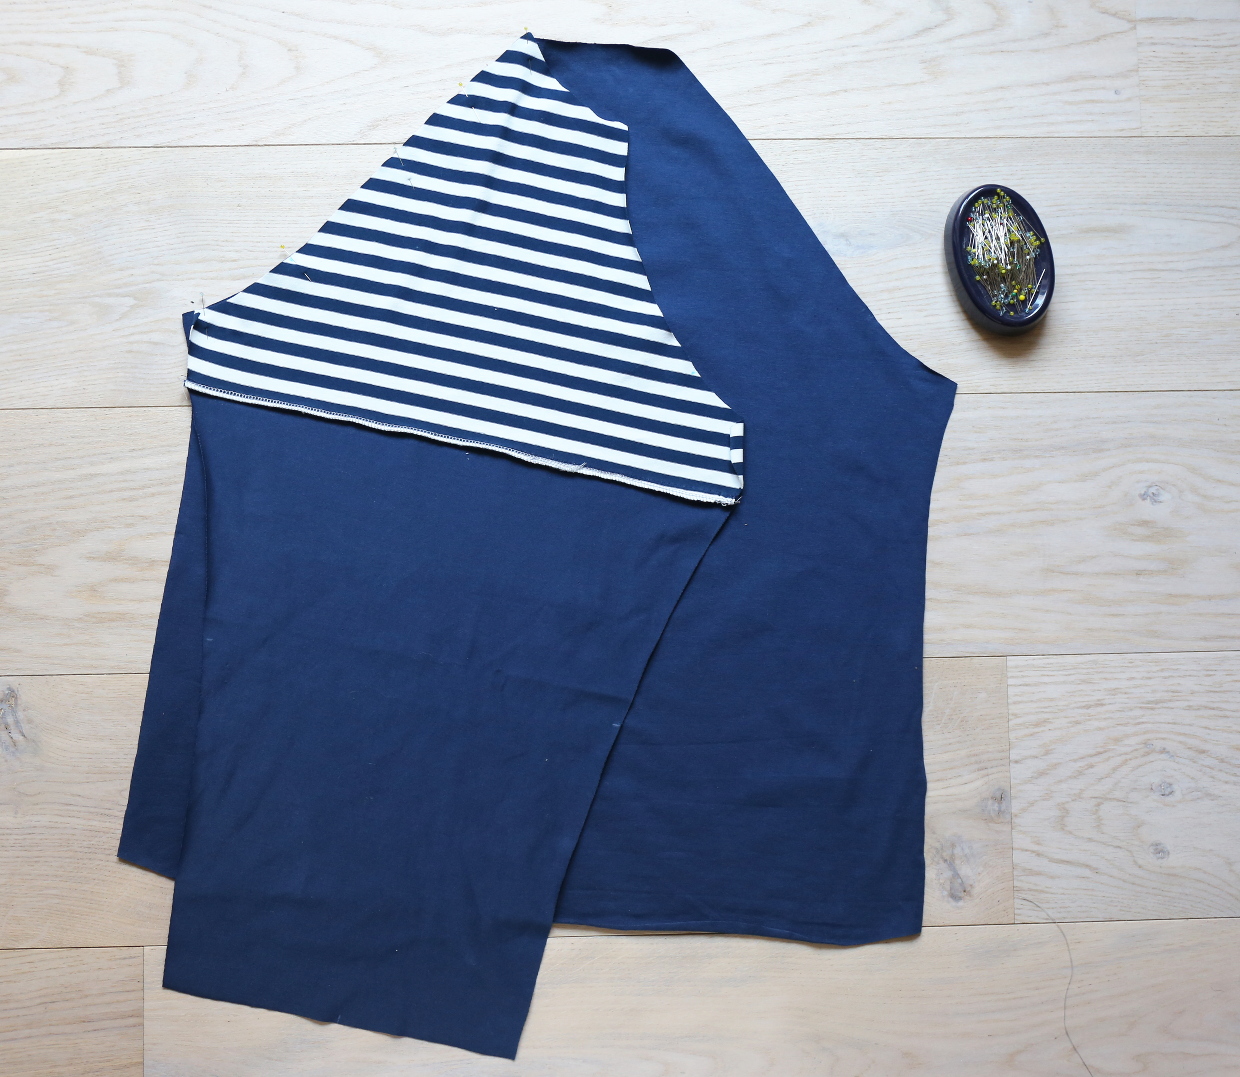
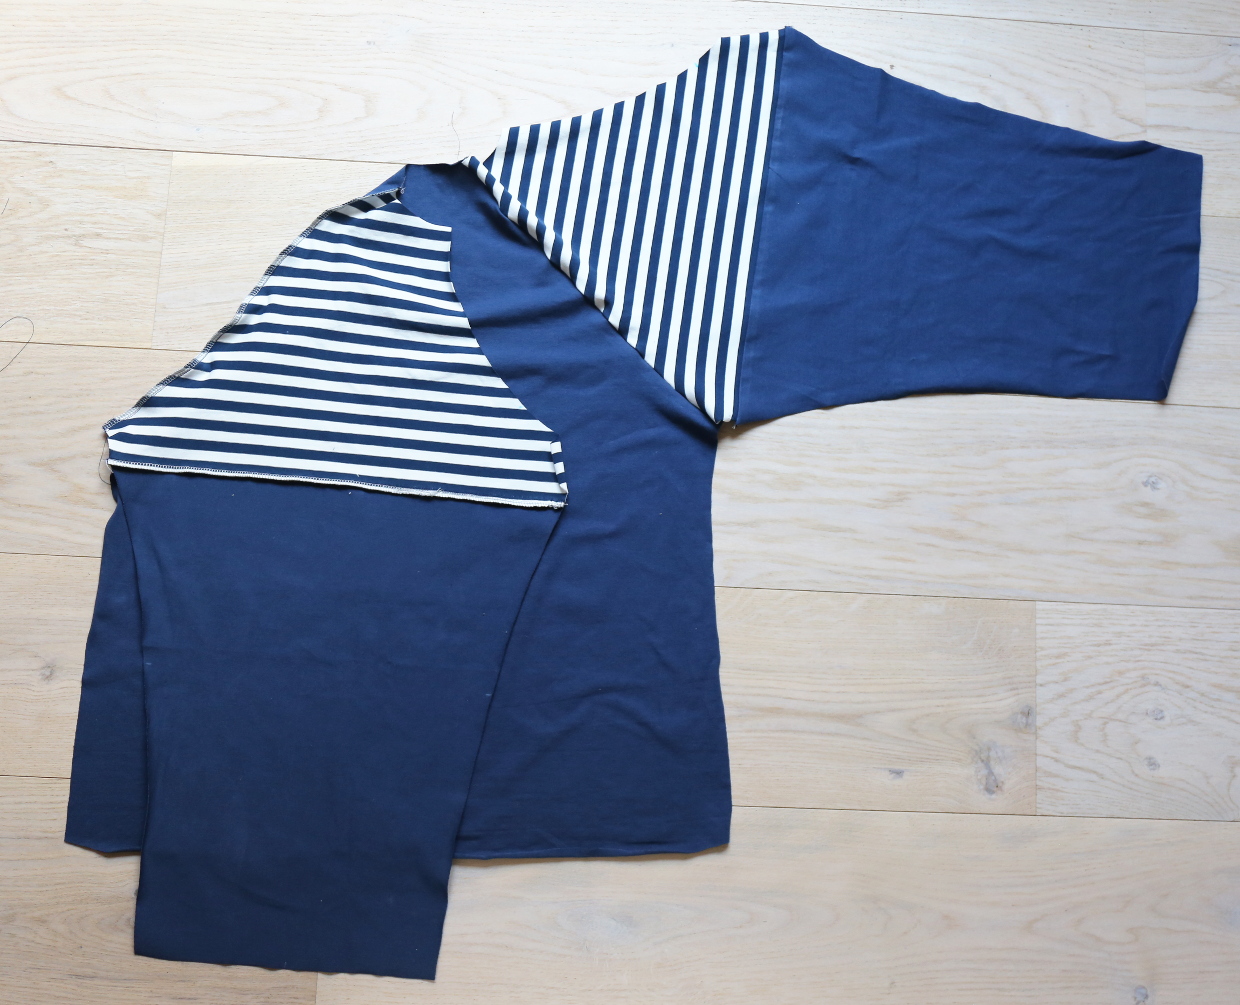
2) Pin the sweatshirt front (View B) or corresponding front-panel piece (View A) to one sleeve at the armhole, with right sides together and matching the notches. Stitch the sleeve to the armhole with a 1/2” seam. Repeat to attach the other side of the front (View B) or the second front-panel piece (View A) to the second sleeve. Trim and finish the seam allowances together if you haven’t already. Press the seam allowance toward the sleeves and edgestitch the sleeves 1/8” from the seam if desired.
From Liesl: You can wear it like a flappy cape now if you want, since the shoulders are finished. Next we’ll sew the underarms and the side seams.

3) Fold the sweatshirt, with right sides together, and pin the underarm and side edges of the front and back together matching the edges and notches starting from the bottom edge of the sweatshirt so the raglan seam allowances are automatically pushed toward the sleeves (which is also how they’ve been pressed and finished). Stitch the sleeve and side seams with one continuous 1/2” seam. Trim and finish the seam allowances together if you haven’t already. Press the seam allowances toward the back. Repeat to stitch the other side.

Now, if you’re sewing View A, we’ll move on to the hood.
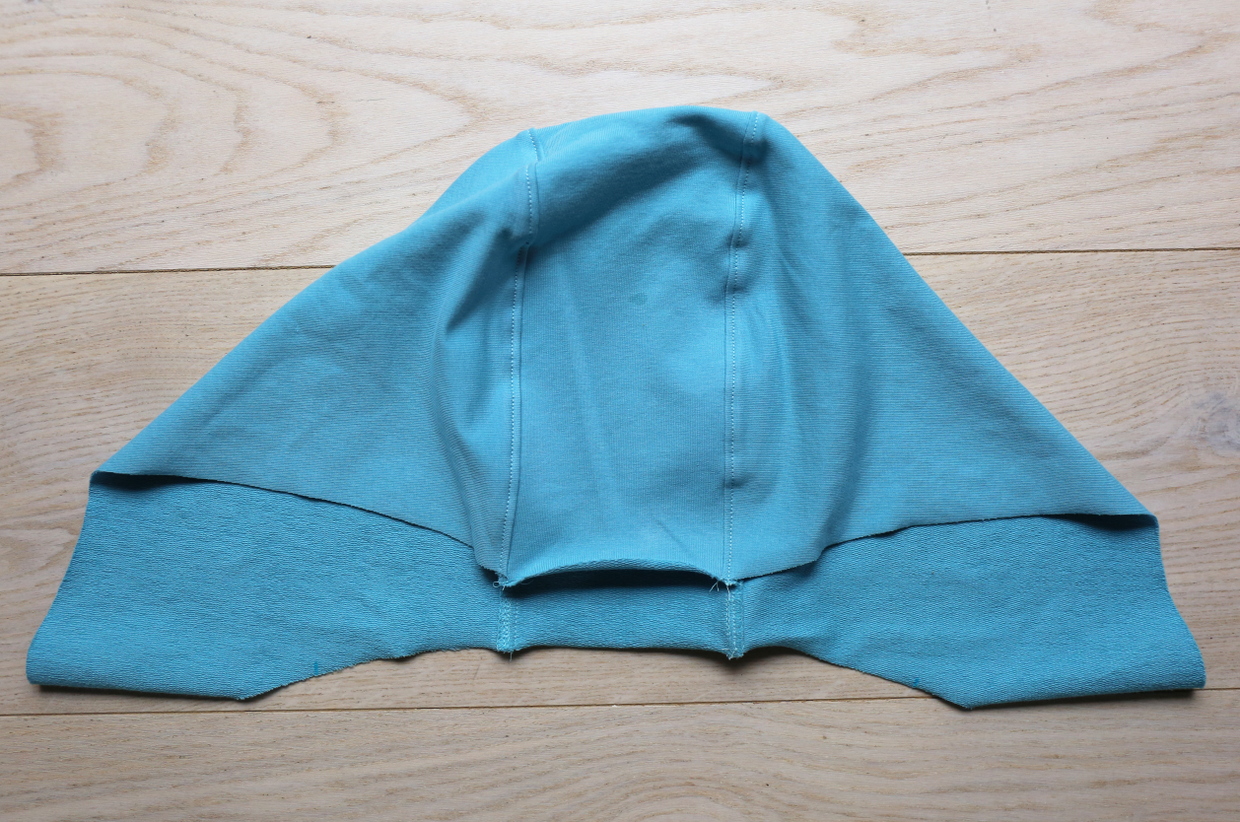
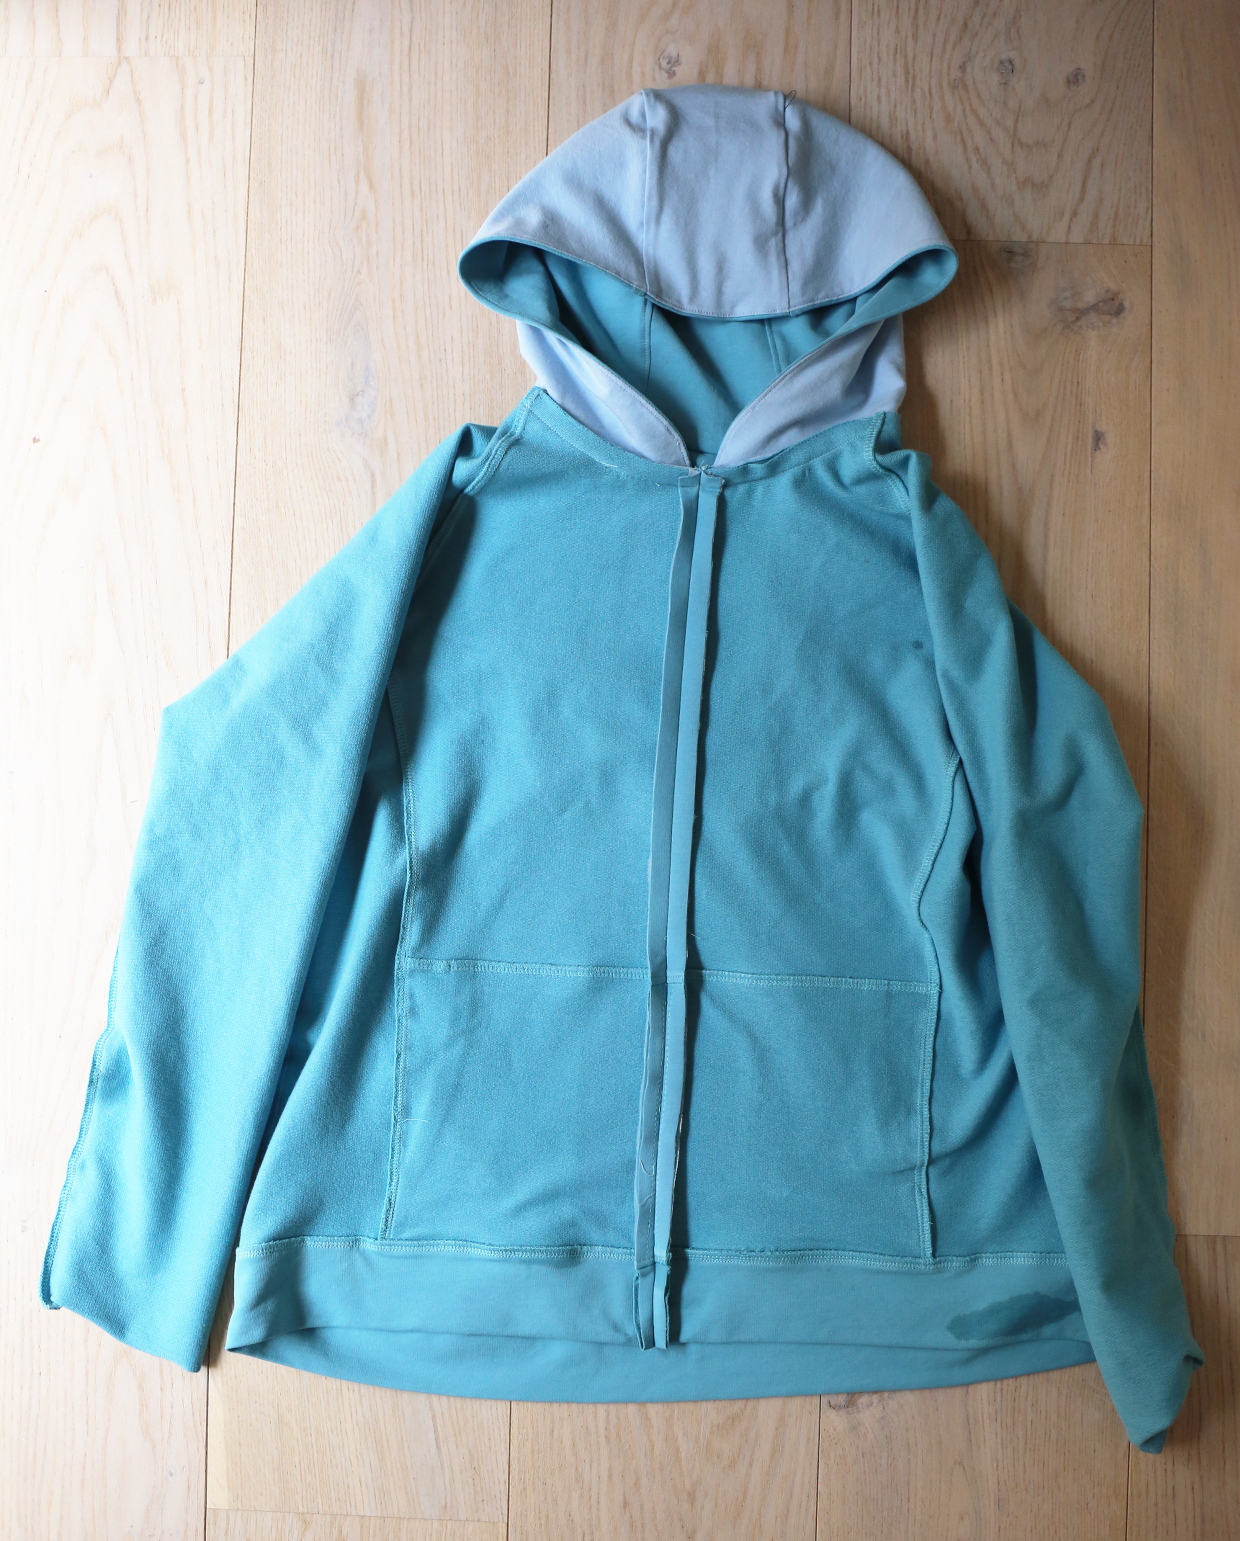
Assemble and Attach the Hood (View A)
1) Pin the hood center to one hood side, matching the edges and the notches. Stitch the pieces with a 1/2” seam, backstitching or lockstitching at both ends. Repeat to pin and stitch the second hood side to the other side of the hood center.

2) Trim the stitched seams, if you haven’t already, and press the seam allowances toward the hood center. Repeat with the hood lining (View A, Fabric B). If desired edgestitch the seams of the outer hood 1/8” from the seam. (You don’t need to edgestitch the seams of the hood lining.)
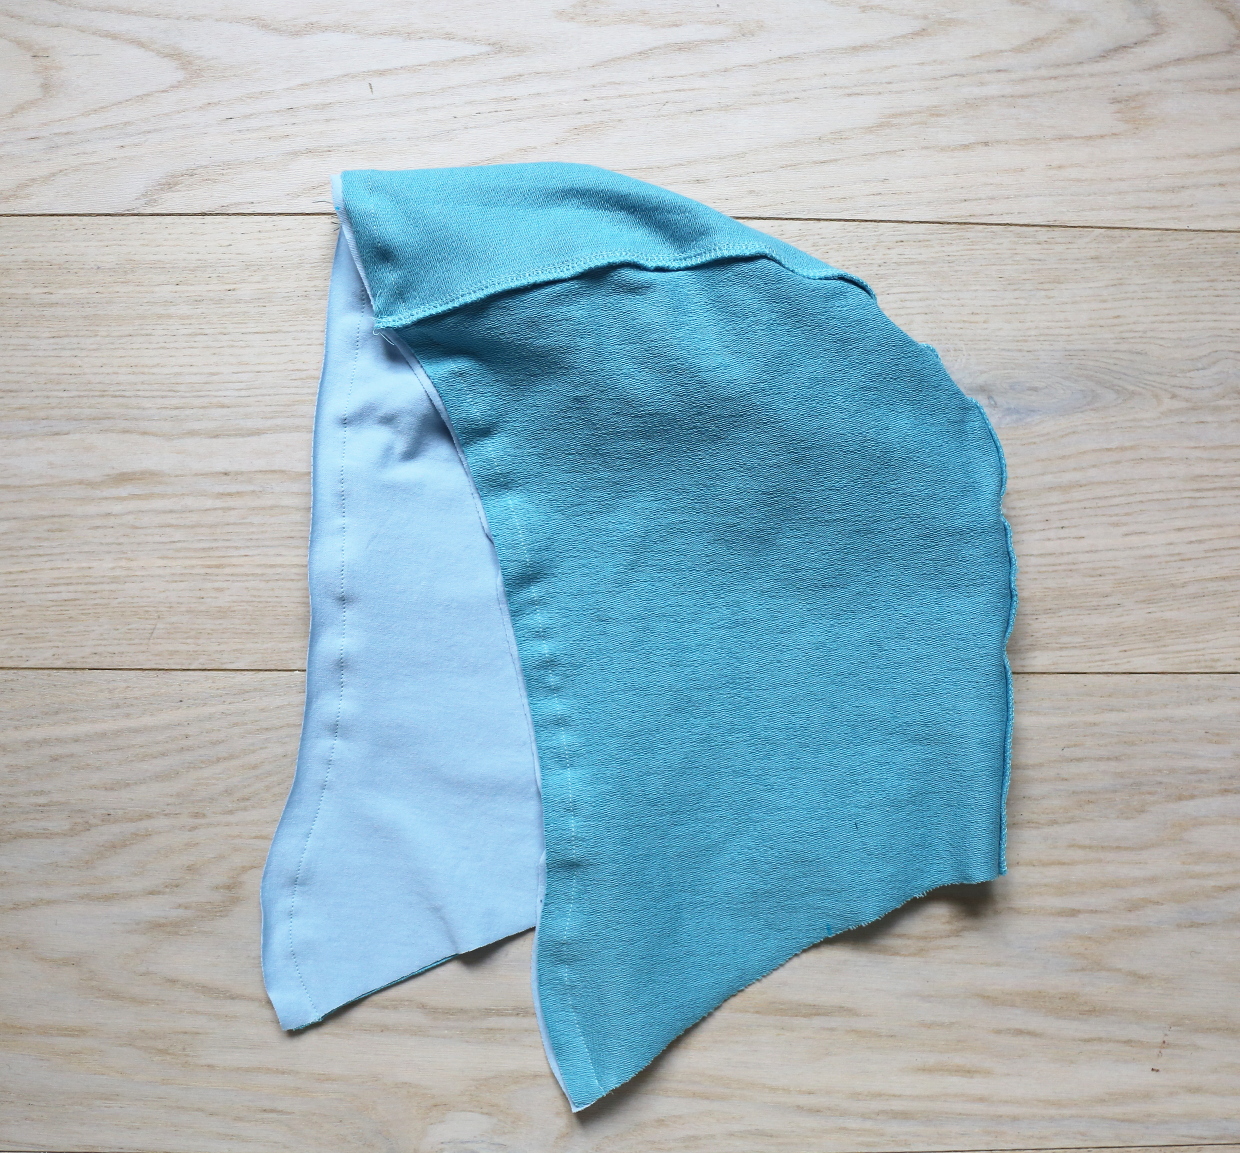
3) Turn the hood right-side out and turn the hood lining inside out. Pin the hood lining to the hood with right sides together, matching the edges, notches, and seams. Sew the outer edge of the hood lining to the outer hood with a 1/2” seam. Trim the seam allowances to 1/4” and press the seam allowances open.
HINT from Liesl: I think it’s easiest to press the seam allowances open over a ham or a sleeve board so you can work a little at a time. This will make it easier to get a nice crisp edge to your hood when you turn it right-side out in the next step, too.
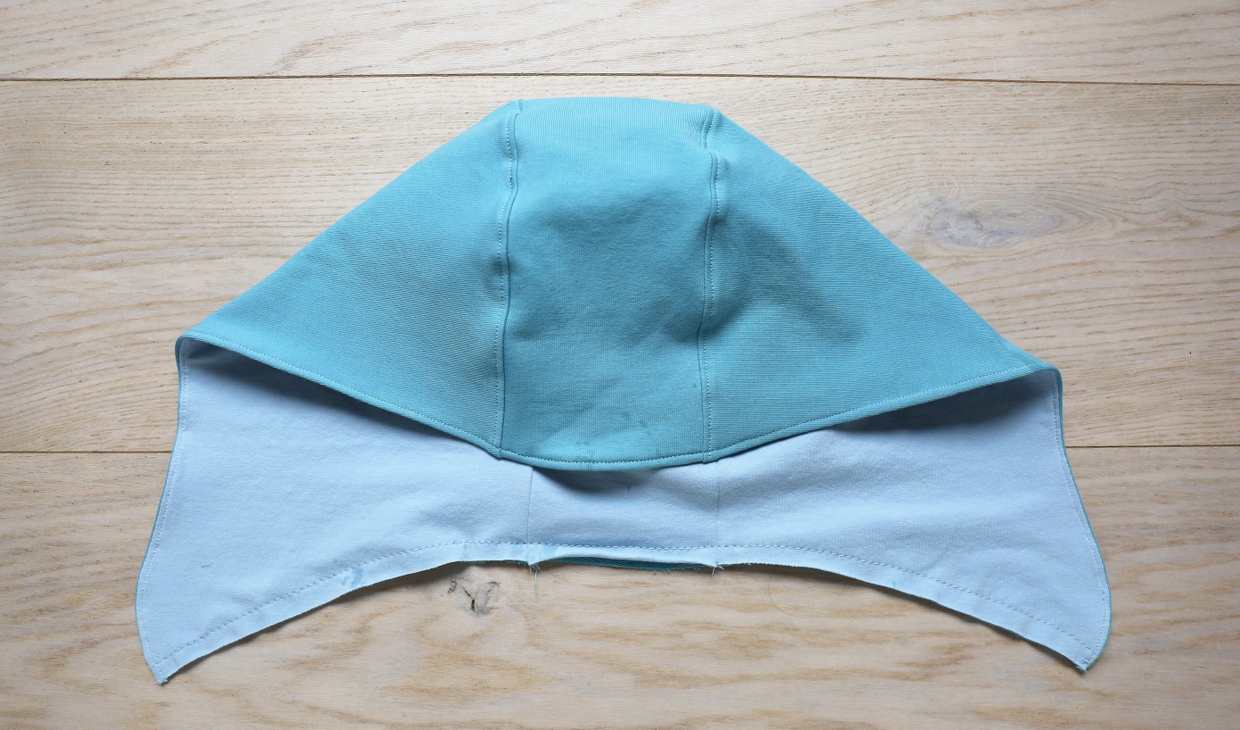
4) Turn the hood right-side out and press the outer edge, rolling the seam slightly toward the lining side so it doesn’t show from the outside when the hood is worn. Baste the two layers of the neck edge to keep them together for the next steps, and edgestitch the hood with a 1/4” seam if desired.
HINT from Liesl: The edgestitching keeps the hood lining neatly inside the hood. It also makes a great drawstring casing if you want to include one, too! I’d probably add an eyelet to the outer hood before basting the base of the hood closed if I were adding the drawstring.
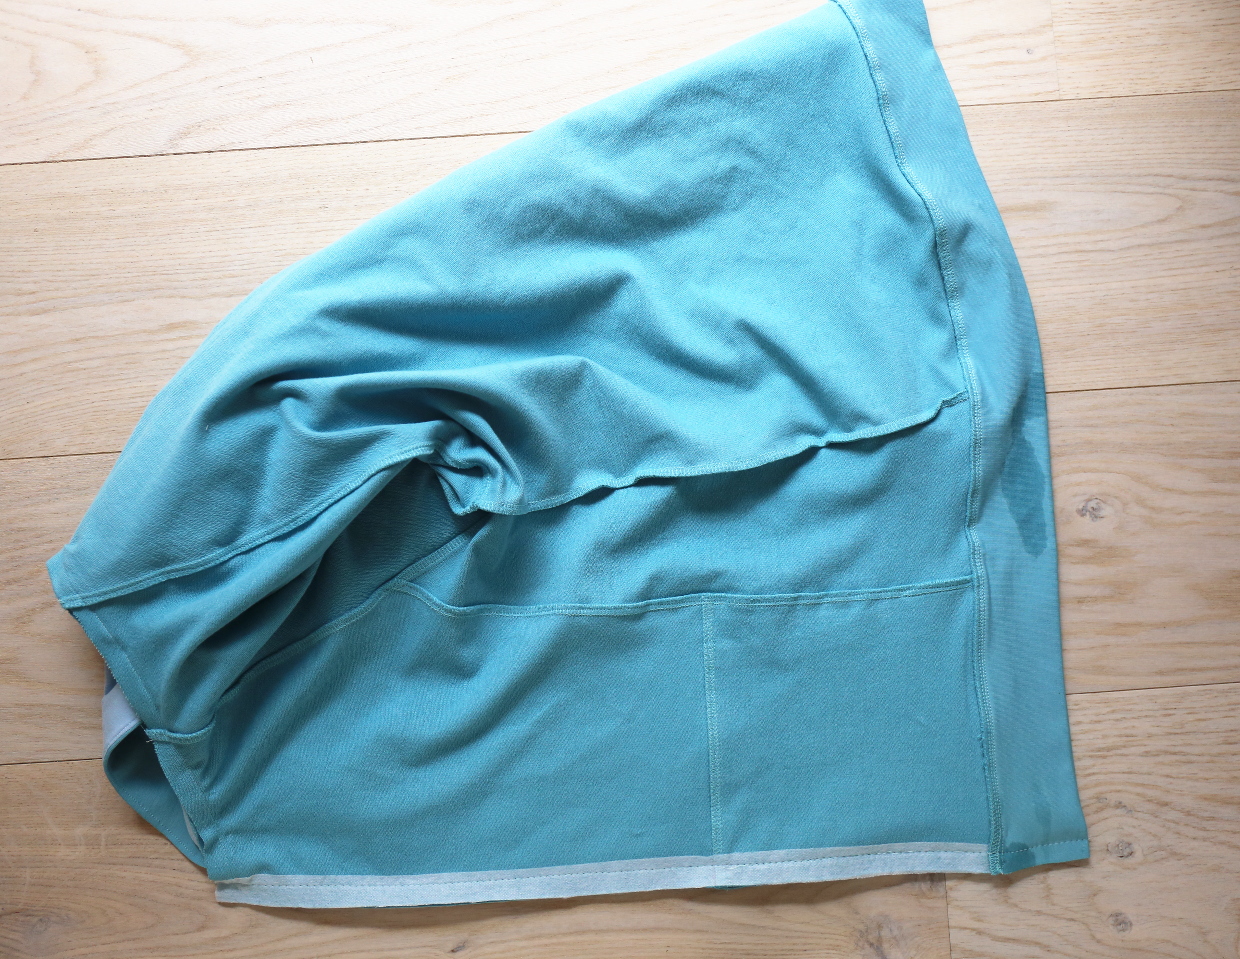
5) Pin the hood to the neckline with right sides together. Match the notches and the seam, pinning each center-front edge of the hood at the center-front notches (located 1/2” away from the edge of the center-front pieces) to allow for attaching the zipper. Then stitch the neckline with a 1/2” seam.

And that wraps up the hood! Next, we’re on the hem band and zipper.
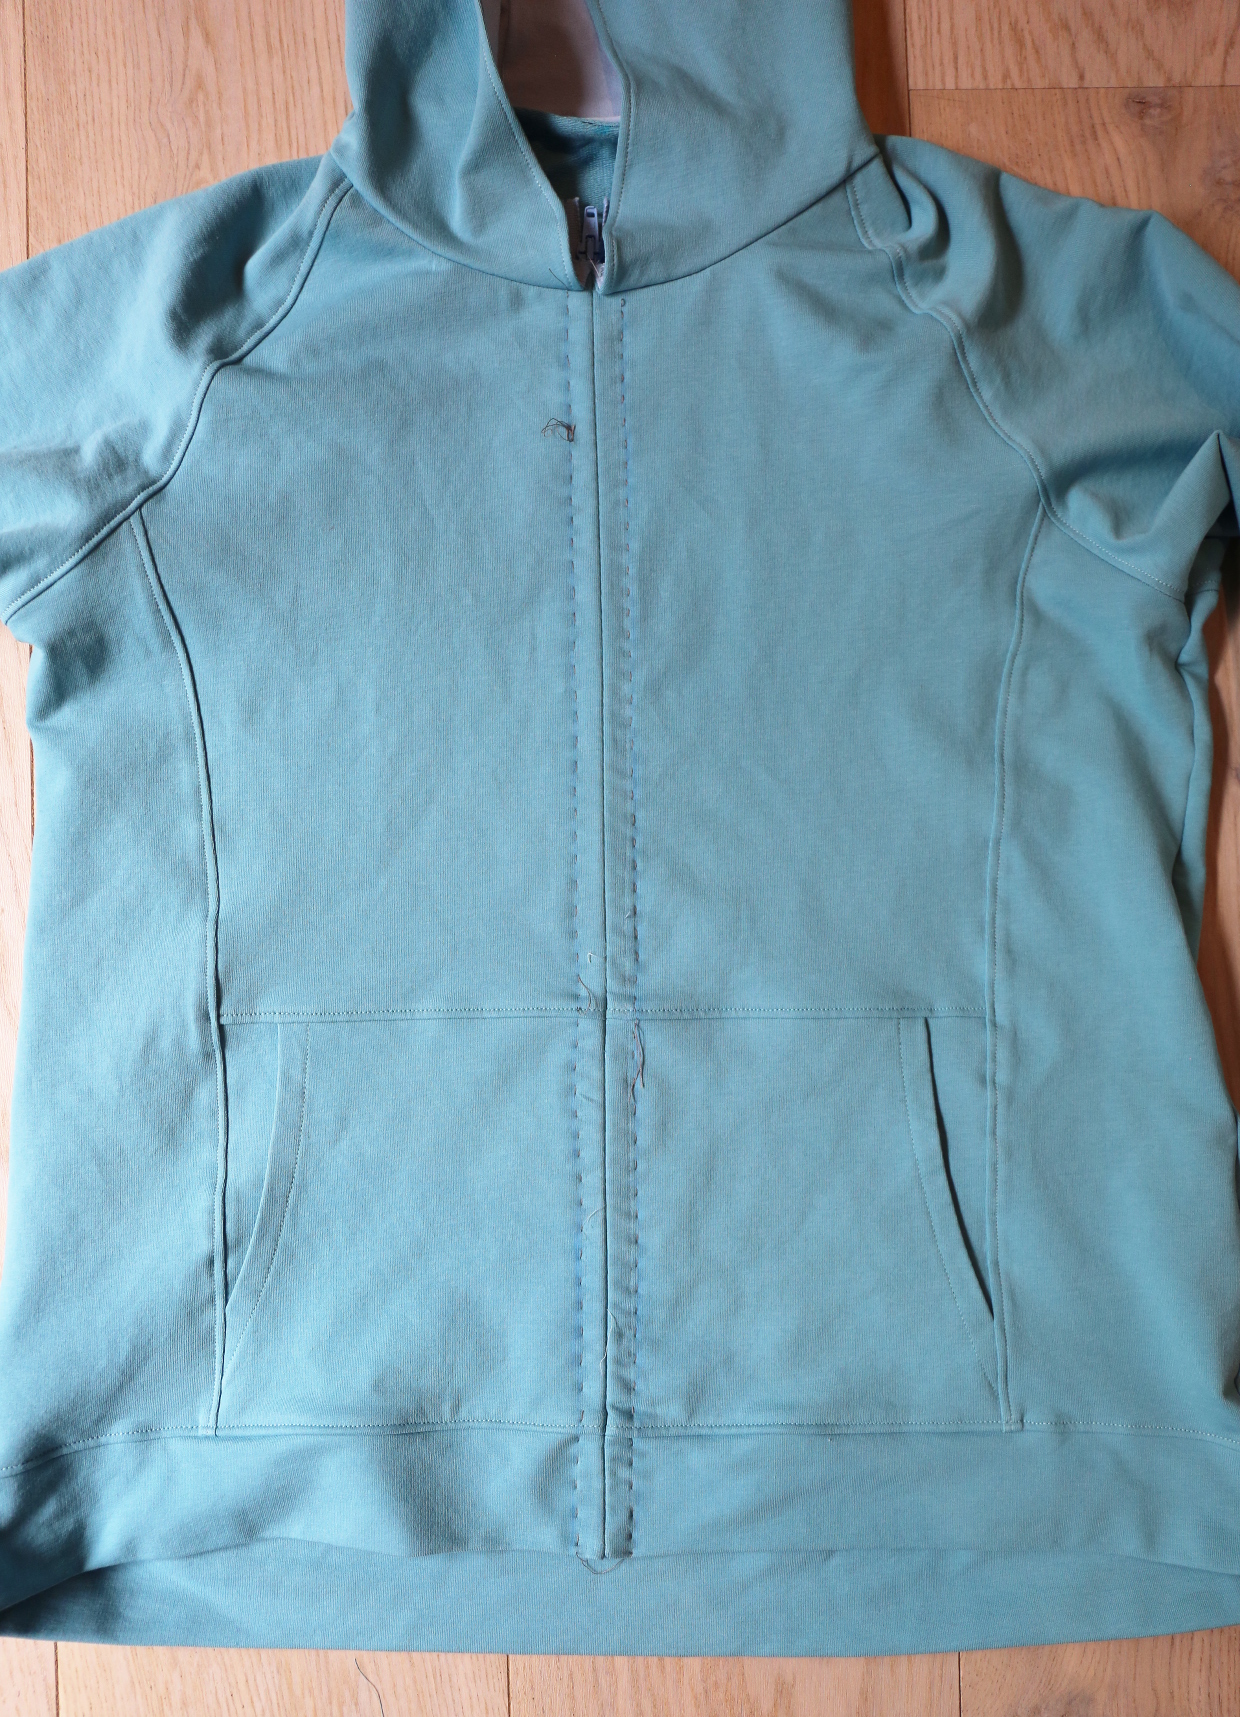
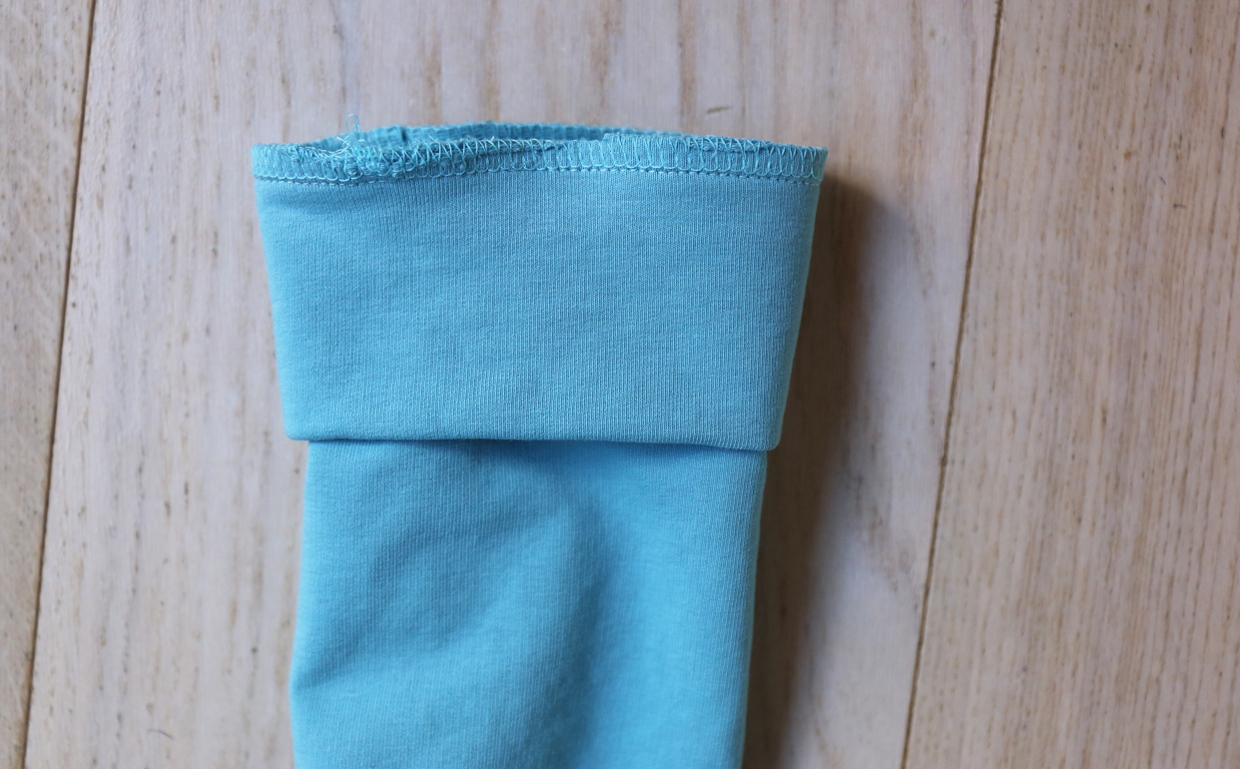
Attach the Hem Band and Sew the Zipper (View A)
1) Fold the hem band in half with wrong sides together. Pin the hem band to the bottom edge of the sweatshirt, matching the notches and edges, with right sides together. Stitch the band to the bottom edge of the sweatshirt with a 1/2” seam.

2) Press the hem band away from the sweatshirt. Trim and finish the seam allowances together if you haven’t already. If desired, edgestitch the sweatshirt 1/8” above the hem band seam.
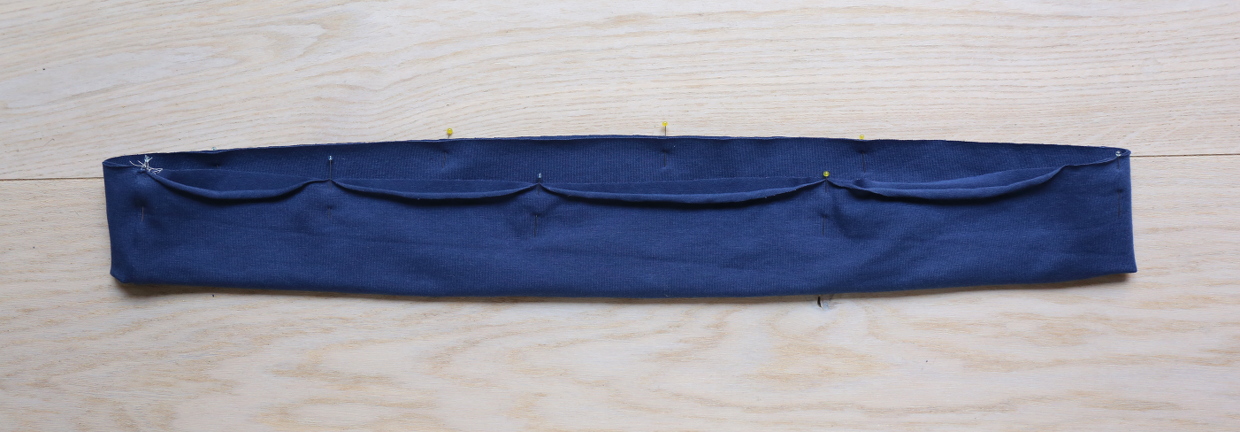
3) Pin the two sweatshirt fronts with right sides together and match the neckline seam, pocket seam, and hem edge. Baste the two fronts together with a 1/2” seam. Press the seam allowances open.
4) Pin or glue the closed zipper right-side down over the seam allowances, positioning the bottom end of the zipper at the bottom of the hem and centering the zipper teeth over the basted seam. The top of the zipper can extend beyond the neckline; we’ll finish it later. Baste the zipper to the seam allowances through all the layers (zipper tape, seam allowances, and outer sweatshirt) along the edge of the zipper tape, starting at the hem and finishing at the neckline seam. (You may want to use your zipper foot for this if you machine baste. I prefer to hand baste so the fabric doesn’t shift and pucker.)
5) Turn the sweatshirt right-side out and topstitch the zipper just inside the basting stitches, starting at the hem and finishing at the neckline seam and backstitching or lockstitching at the hem edge and at the neckline seam. Take care to push the seam allowances up a bit at the hem edge so they don’t hang down below the hem.
HINT from Liesl: You may need to experiment to find the best way to topstitch the zipper. For me it works best to hand baste the zipper into place, then remove the center-front basting so the hoodie can be unzipped and I can move the zipper slider out of the way as I sew. I also place strips of tear-away stabilizer or tissue paper between the presser foot and the fabric to make it easier to topstitch without puckering.
Now you’re ready to move on to finish the neckline for View A or attach the neck band for View B.
Finish the Neckline and Attach the Neck Band
We’re getting close now! Just two more installments to go. Let’s dive in and finish the neck for both views now.
Finish the Neckline (View A)
1) Remove the center-front basting, if you haven’t already, and unzip the zipper. If any zipper teeth extend beyond the end of the sweatshirt neckline, carefully remove them with a pliers or scissors, doing your best not to damage the zipper tape itself, especially close to the seam line. (I find that it’s easiest to use scissors or small wire cutters to carefully cut each extra zipper tooth in half. This allows you to remove the zipper tooth without damaging the zipper tape itself.) Trim the zipper tape so it extends 1” above the neckline. (You may want to trim more of the zipper tape later, but this will help you to work with it in the meantime.) Fold the hood back so you can work with just the neckline seam allowances for the time being. Pin the ribbon or bias binding to the neckline seam allowances so the edge of the ribbon just covers the stitch line. Wrap the ends of the ribbon around the extending zipper tape. Edgestitch the ribbon to the seam allowances, watching out for the zipper teeth so you don’t stitch over them.
2) Trim the neckline seam allowances to be shorter than the width of the ribbon or neck trim. Also trim the extending zipper tape so you can tuck the end of it under the ribbon. Then carefully edgestitch the opposite edge of the ribbon or bias tape to the sweatshirt hood with the ends of the zipper tape tucked underneath. This will hide the neckline seam allowances, finish the ends of the zipper tape, and give the neckline a nice finish.
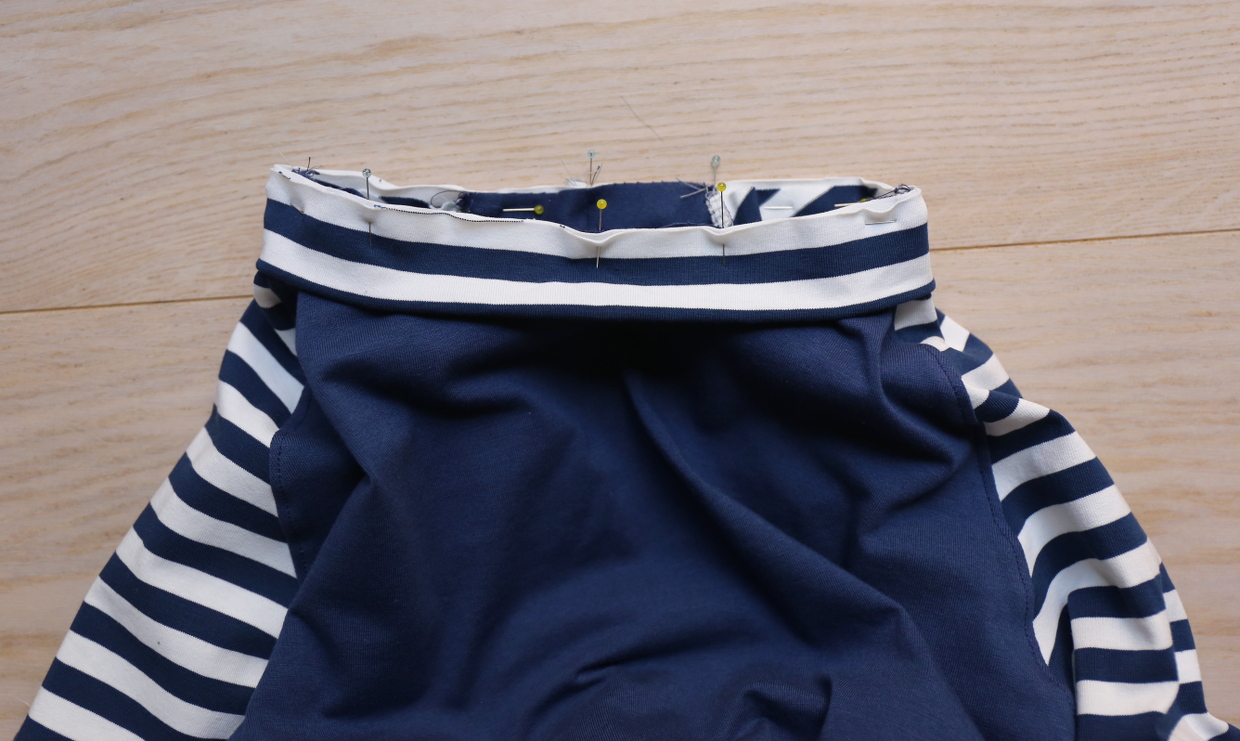
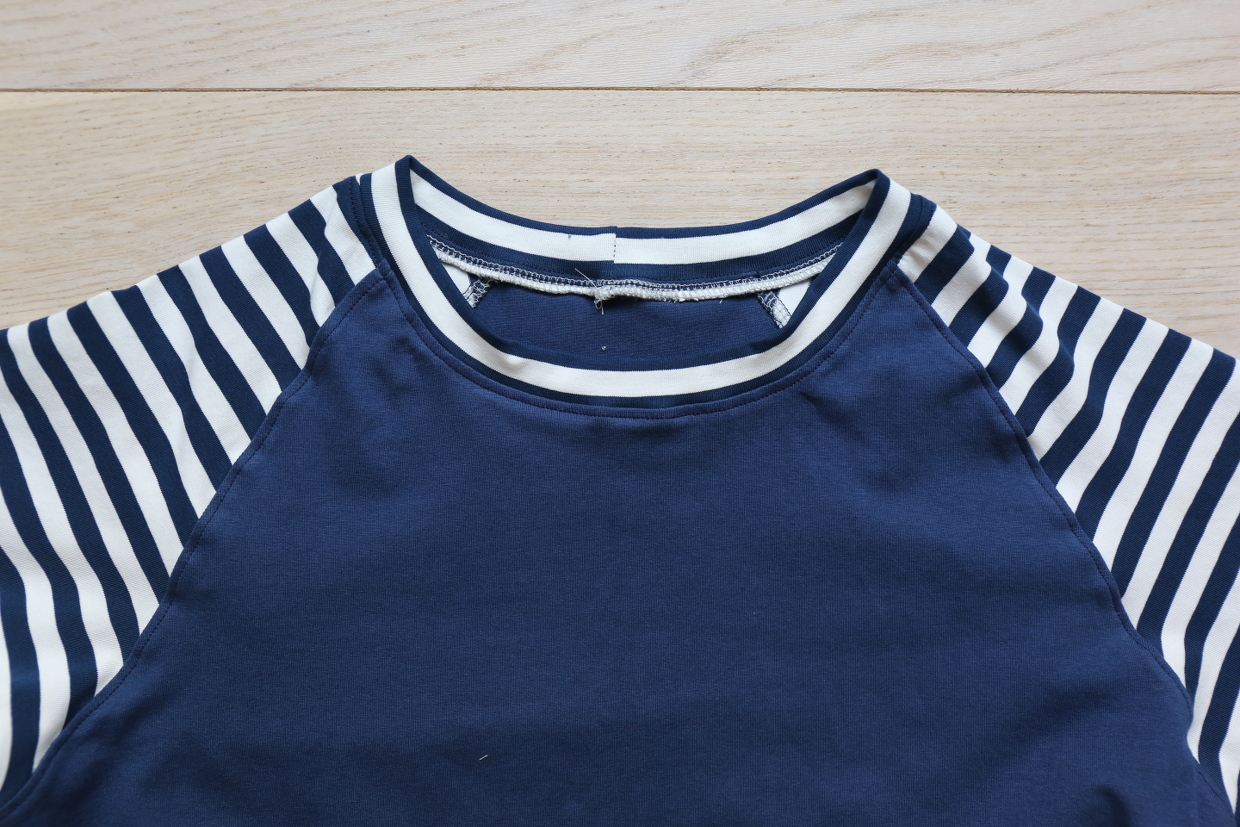
Attach the Neck Band (View B)
1) Fold the neck band in half lengthwise, with right sides together and the edges aligned, and stitch the short ends together with a 1/2” seam. Press the seam allowances to one side, then fold the neck band in half widthwise, with wrong sides together, so the long raw edges meet.
2) Pin the neck band to the right side of the sweatshirt’s neckline, matching the notch on the neck band to the sweatshirt’s center-front notch and the neckband seam to the sweatshirt’s center-back notch, pinning them together at regular intervals in between and stretching the binding to fit the neckline. Stitch with a 1/2” seam while stretching the neck band to fit the neckline. Press the seam allowances toward the sweatshirt and finish them together if you haven’t already. Edgestitch the sweatshirt 1/8” below the neck band seam if desired. When finished, the neckline will look like this from the inside.
You’re almost done! Let’s dive into the last set of steps now to finish off your sweatshirt.
Attach the Hem Band and Finish the Sleeve Hems
Attach the Hem Band (View B)
1) Fold the hem band in half lengthwise, with right sides together and the edges aligned, and stitch the short ends together with a 1/2” seam. Press the seam allowances to one side, then fold the hem band in half widthwise, with wrong sides together, so the long raw edges meet.
2) Pin the hem band to the right side of the sweatshirt’s bottom edge, matching the seam on the hem band to one side seam and matching the notch on the hem band to the opposite side seam, pinning them together at regular intervals in between. Stitch the hem band to the sweatshirt with a 1/2” seam. Press the seam allowances toward the sweatshirt and finish them together if you haven’t already. Edgestitch the sweatshirt 1/8” above the hem band seam if desired.
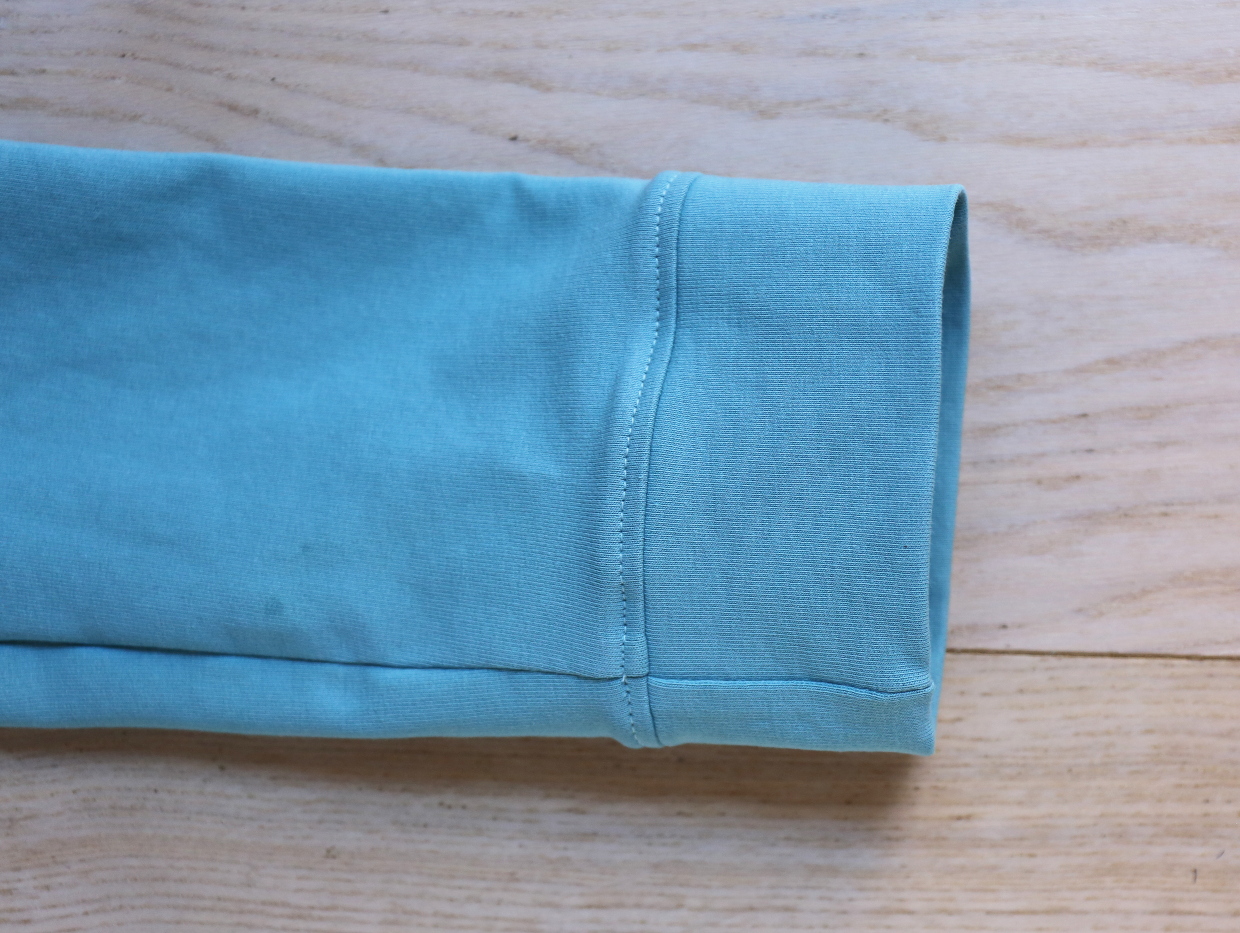
Finish the Sleeve Hems (Both Views)
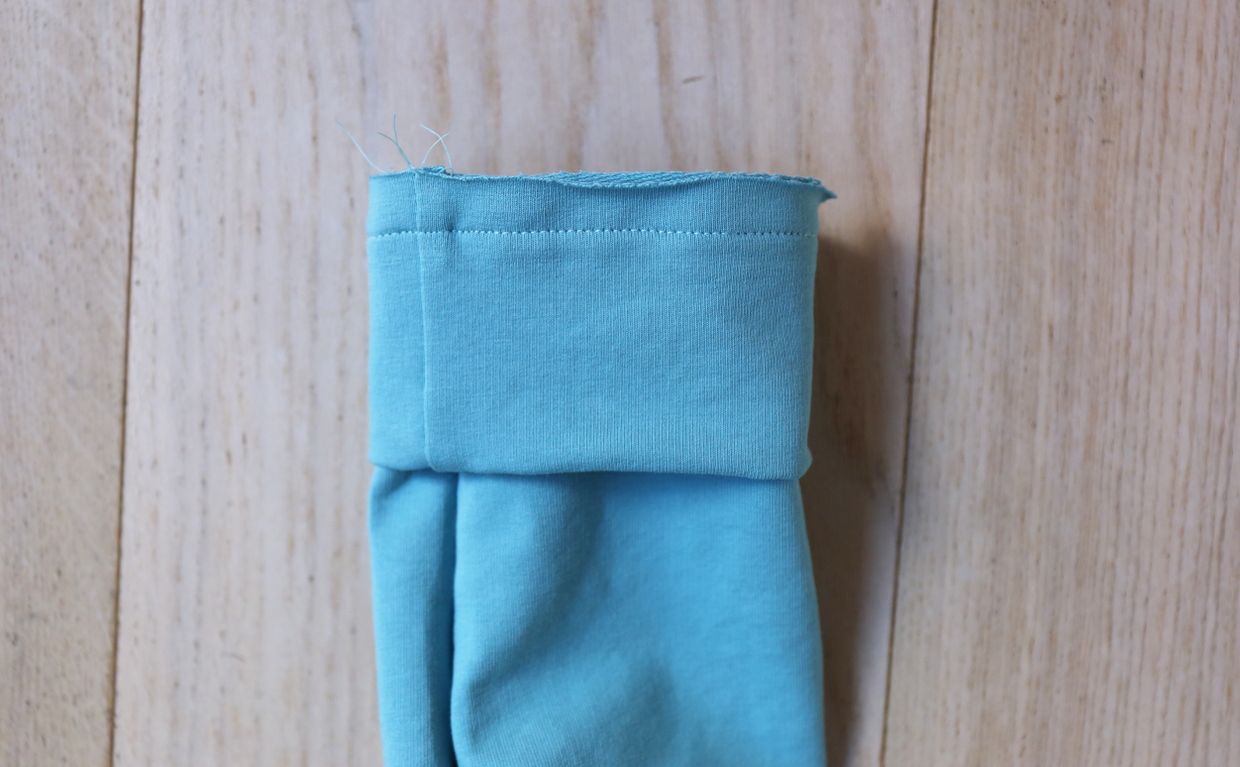
1) Fold the one sleeve band in half lengthwise, with right sides together and the short ends aligned, and stitch the short ends together with a 1/2” seam. Press the seam allowances to one side, then fold the sleeve band in half widthwise, with wrong sides together so the raw edges meet.

2) Pin the sleeve band to the right side of the sleeve edge, matching the seams and notches. Pin the band to the sleeve, matching the sleeve band seam to the sleeve seam and matching the notches. Stitch the sleeve band to the sleeve with a 1/2” seam allowance, backstitching or lockstitching once you’ve gone all the way around. Trim and finish the seam allowances together, if you haven’t already, then press the seam allowances toward the sleeve. If you want, you can also edgestitch the sweatshirt 1/8” from the sleeve band seam.

And that’s it! We hope your Neighborhood Sweatshirt turned out well. We’d love to see it! Post it to our Liesl + Co. Friends Facebook group, tag it #neighborhoodraglan and #lieslandco on Instagram, and add it to the Liesl + Co. Flickr group so we can see how it looks. And thanks for joining us!
I was thinking about making the hoodie version view A in a soft shell fabric. Do you have any thoughts on how that will work? It would be a thicker fabric than the ones suggested.
Susan, can you tell me what you mean by soft shell fabric? I’m not familiar with this term.
Greetings! My husband loves the pattern. Would it work as a unisex pattern? Pls advise and thanks so much. Dd
Well, it’s designed and sized for a woman, but there’s nothing to stop you from trying it for a man. Maybe taper the pieces a bit from the armhole to the waist for a more masculine shape? I’d suggest not using the princess seams, of course…
It is a ”tech” fabric, that has one side that is smooth and water resistant. The other side is soft like a fleece. I am sourcing from Seattle Fabrics. It is called a weather guard softshell, or a microfleece. It is typically used for lightweight (3 season) jackets. I recently used it to make hiking pants using the nature walk pants pattern for my granddaughter, and it worked well for that pattern. My concern was too much bulk at pocket, and that it is not super stretchy.
It’s not a fabric that I’m familiar with, but I would imagine it would work if you’re willing to play with it a bit. As long as it has enough stretch it should be fine. Maybe you could to piece the underlying pocket to reduce bulk, using a thinner fabric where it doesn’t show?
Hi Susan. I think softshell would work fine. I’ve used it to make other jackets and while it gets a bit bulky around zips and pockets it’s no worse to work with than denim – and we put pockets and zips in those all the time.
Go for it, it’s a great idea. Some of the softshell I’ve worked with has about 20% stretch across the grain, but even with that I’d suggest sizing up a fraction.
Thank you! That helps
I’m making a pullover version with princess seams, and I want to add invisible zippers on either side of the top front to make it into a nursing hoodie. I’ve used invisible zippers before and I feel pretty confident about the alteration, but would you still suggest adding strips of featherweight interfacing?
Thanks!
That sounds great! Yes, I always recommend interfacing when you’re using a zipper. It gives you a more stable fabric to support the zipper and makes installation easier.
I’m not sure about which size to use. I fall right between the XS and S with a 341/2 bust. My upper bust is 32. I’m plannng to make the hoodie since I have never done one before or at least not since my kids were little. Thanks.
Paula I’d suggest that you choose your size based on how fitted or loose you want it to be, then. It sounds like you could go either way.
I haven’t sewn for a number of year. I’m taking on the challenge of jump starting again with this sew-along, making one color(pullover) sweatshirt, with contrasting hoodie, with zipper.The lining of the hood,and inside lining of zipper the solid sweatshirts color.
1. I assume that the spandex knit should be washed 1st.
2. Just to make it a good jump start, using my serger the 1st time.
3. The pattern will arrive tue, so looking forward to this.
Any suggestions ?
PJ, yes you should always pre-wash your fabrics beforehand. I hope your new serger works out well!
Can you talk about how to shorten a separating zipper? I bought a 24-inch zipper, which is too long for the hoodie. Thanks!
Absolutely, and thanks for the reminder! I meant to do this earlier. Will get to it asap, ok?
Would it work to use a woven fabric for the hood lining instead of a knit?
Liesl this is real important to me. I want to join your sew-a-long but I can’t get started on my hoodie until April.
Will all of the detailed steps with pictures still be available then? I know that everyone else will be done, but could you please leave everything to be available later?
Yes, this post will remain available. No need to worry. You’ll be able to view it at any point in the future.
I have been serging all the seams. Stopping at attaching hood tonight. Can I serge the hood to the body? BTW love the discussions you host!