We’ve got Shelley here today with a huge Halloween round-up!
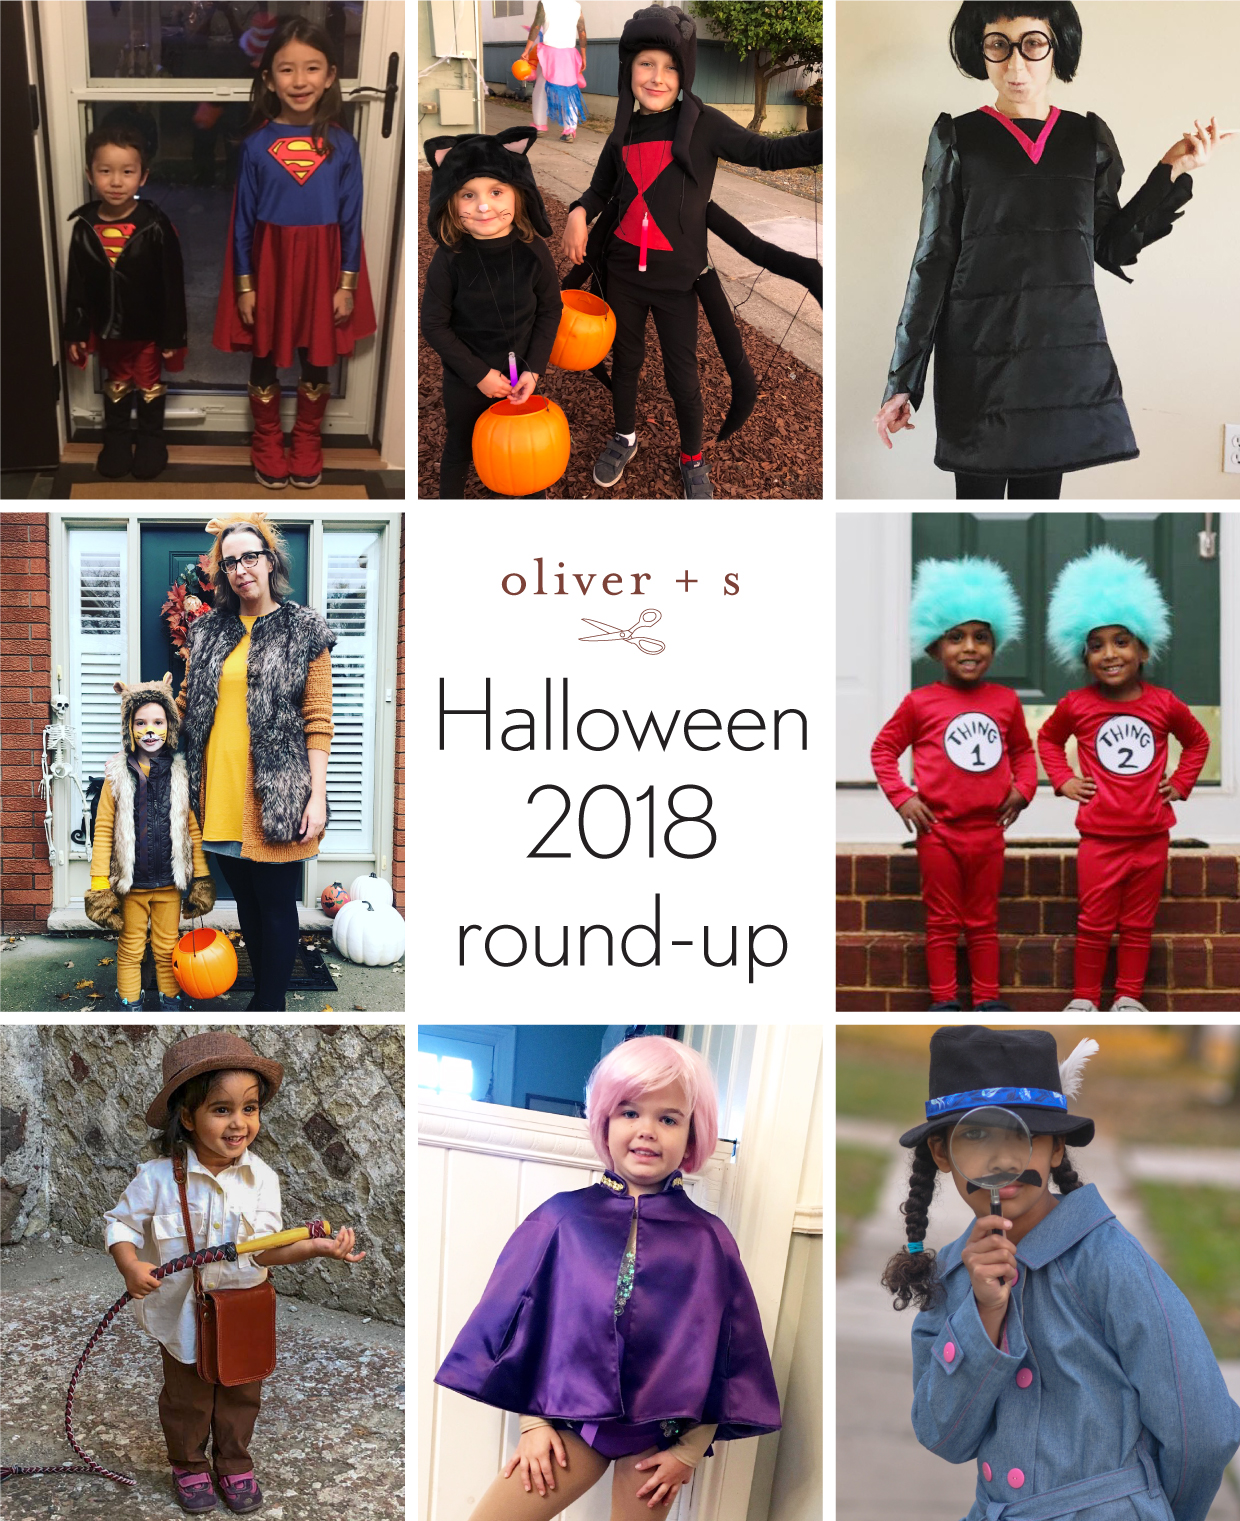
We always get excited at this time of year when pictures of all your fabulous Halloween kid’s costumes start popping into the Flickr and Facebook groups.
While it seems like kids can dream up impossible costume ideas, you might be surprised to see that sometimes all it takes is a few patterns, some cheap or thrifted fabric and pipe cleaners! Obviously, the Building Block Dress Book and Little Things to Sew feature heavily and are great resources for costume sewing. But you’ll see, the Playtime Leggings, School Bus T-shirts and plenty of other patterns have been cleverly used as well.
Settle in for a bit and check out the wonderful creativity of our Oliver + S sewists. Take it away ladies!
Jennifer: Here is the first of my costumes: “Edna Mode”, made from the Building Block Dress Book. I based the dress on an A-line shape with puffy sleeves and external neck facing. Main body is a polyester satin lined with a fleece interfacing to give it structure and the tiered look with the stitching. Sleeves are cut from vegan leather.

My next costume is also made from the Building Block Dress Book. It’s the basic dress, but with the a raised and modified shaped waist and an internal facing biased neckline. The top was split to have the center with rhinestones, moon appliqué and tulle overlay. Puffy sleeve option was used. The skirt was the basic skirt option, lengthened and split to show the underskirt.
Mary also used the Building Block Dress Book for her little witch: For the dress I used pattern pieces from the Building Block Dress book: the bodice front, back, circle skirt and sleeve. I cut the sleeve pattern at the elbow, added a 5″ ruffle along with a 3″ ruffle of the iridescent purple fabric. I didn’t want to hem or double that fabric, so I singed all the edges to prevent fraying.

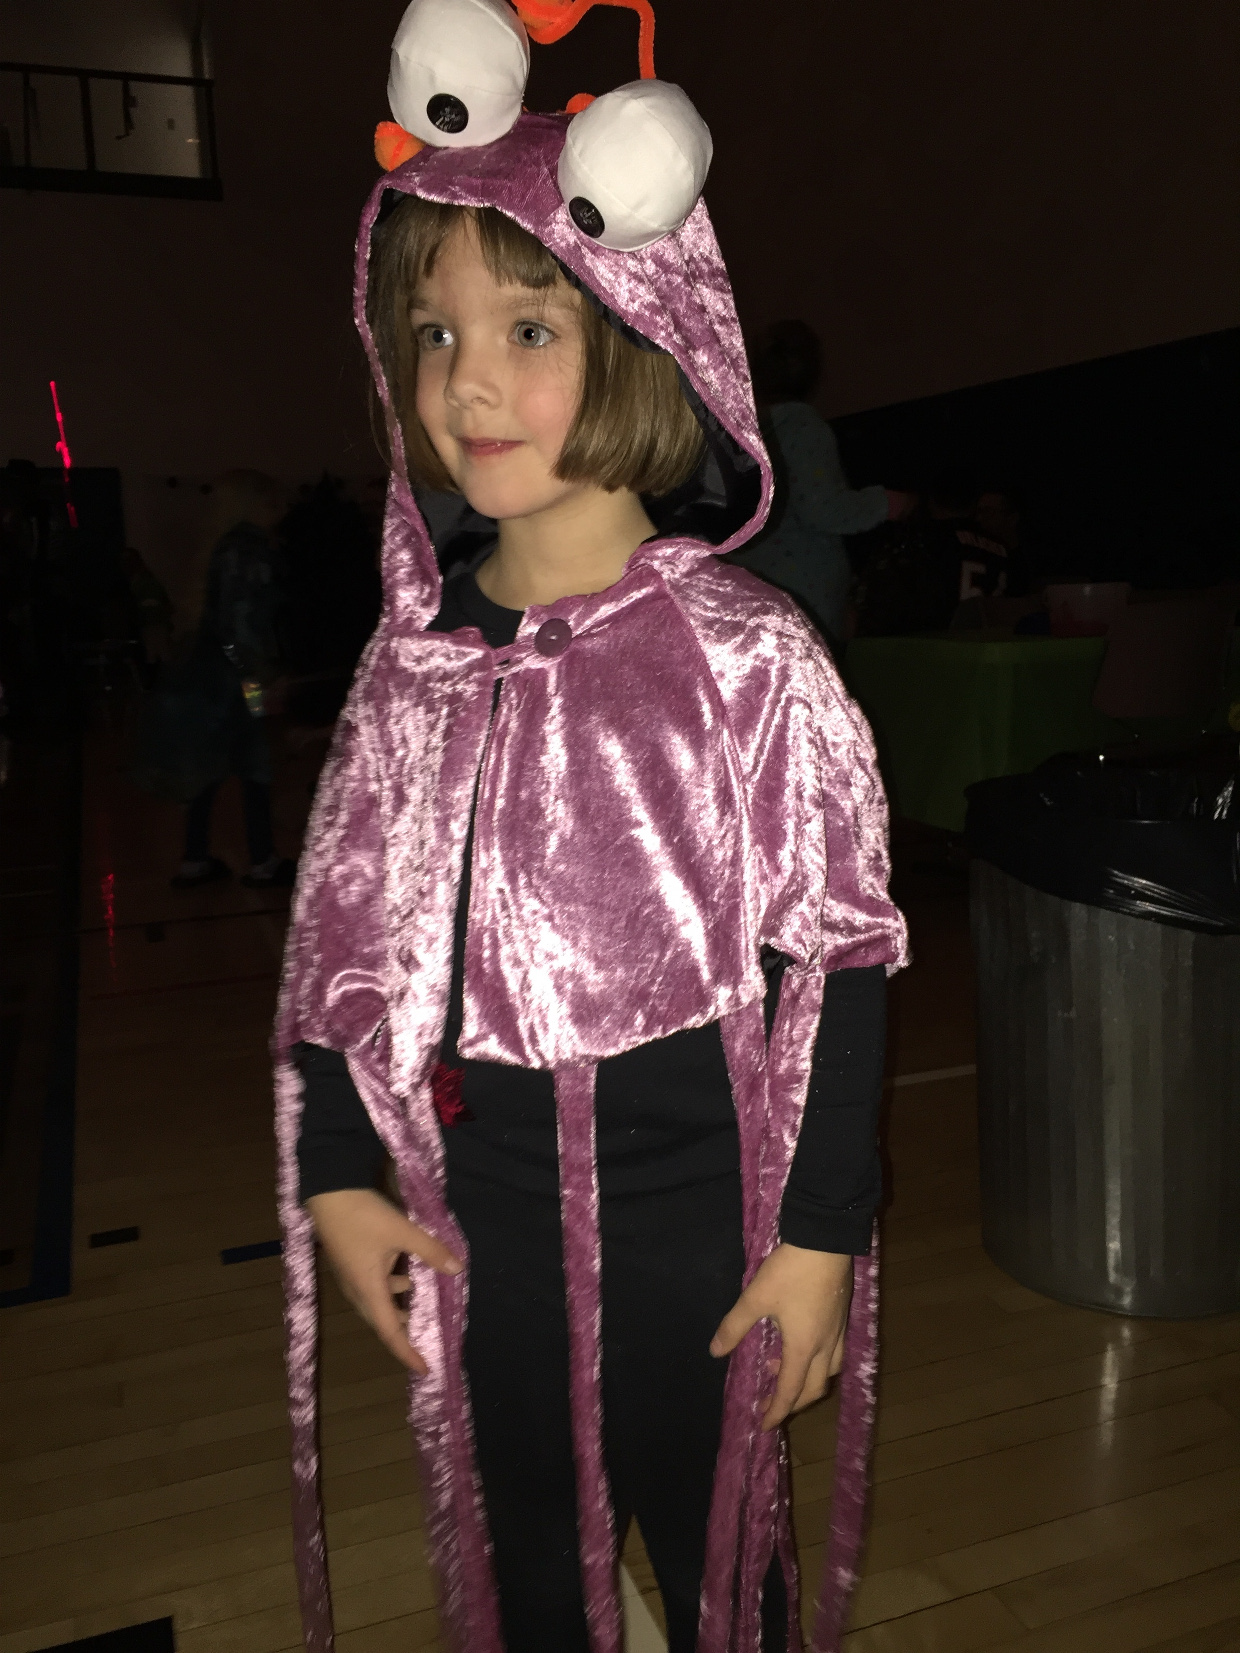
How about this for clever use of the Little Things to Sew patterns by Marsha: I made my daughter a classic Sesame Street ‘Yip Yip’ alien costume using two patterns from the Little Things to Sew book. I made the main body using the Red Riding Hood cape pattern, shortened to the armholes. The main fabric was crushed velour and the lining was slippery black polyester. I made the tentacles with 1.5″ width of fabric strips, folded end-to-end, sewn into tubes, and slipped in between the lining and main fabric before sewing the two together. The eyes were made from the large Juggling Balls pattern with black buttons as the pupils and the antenna were pompoms and pipe cleaners.
Another Red Riding Hood Cape turned into a dream costume by Emily: My daughter is Anne Wheeler from the movie The Greatest Showman. I’ve used the Little Things To Sew cape with Sunday Brunch collar.
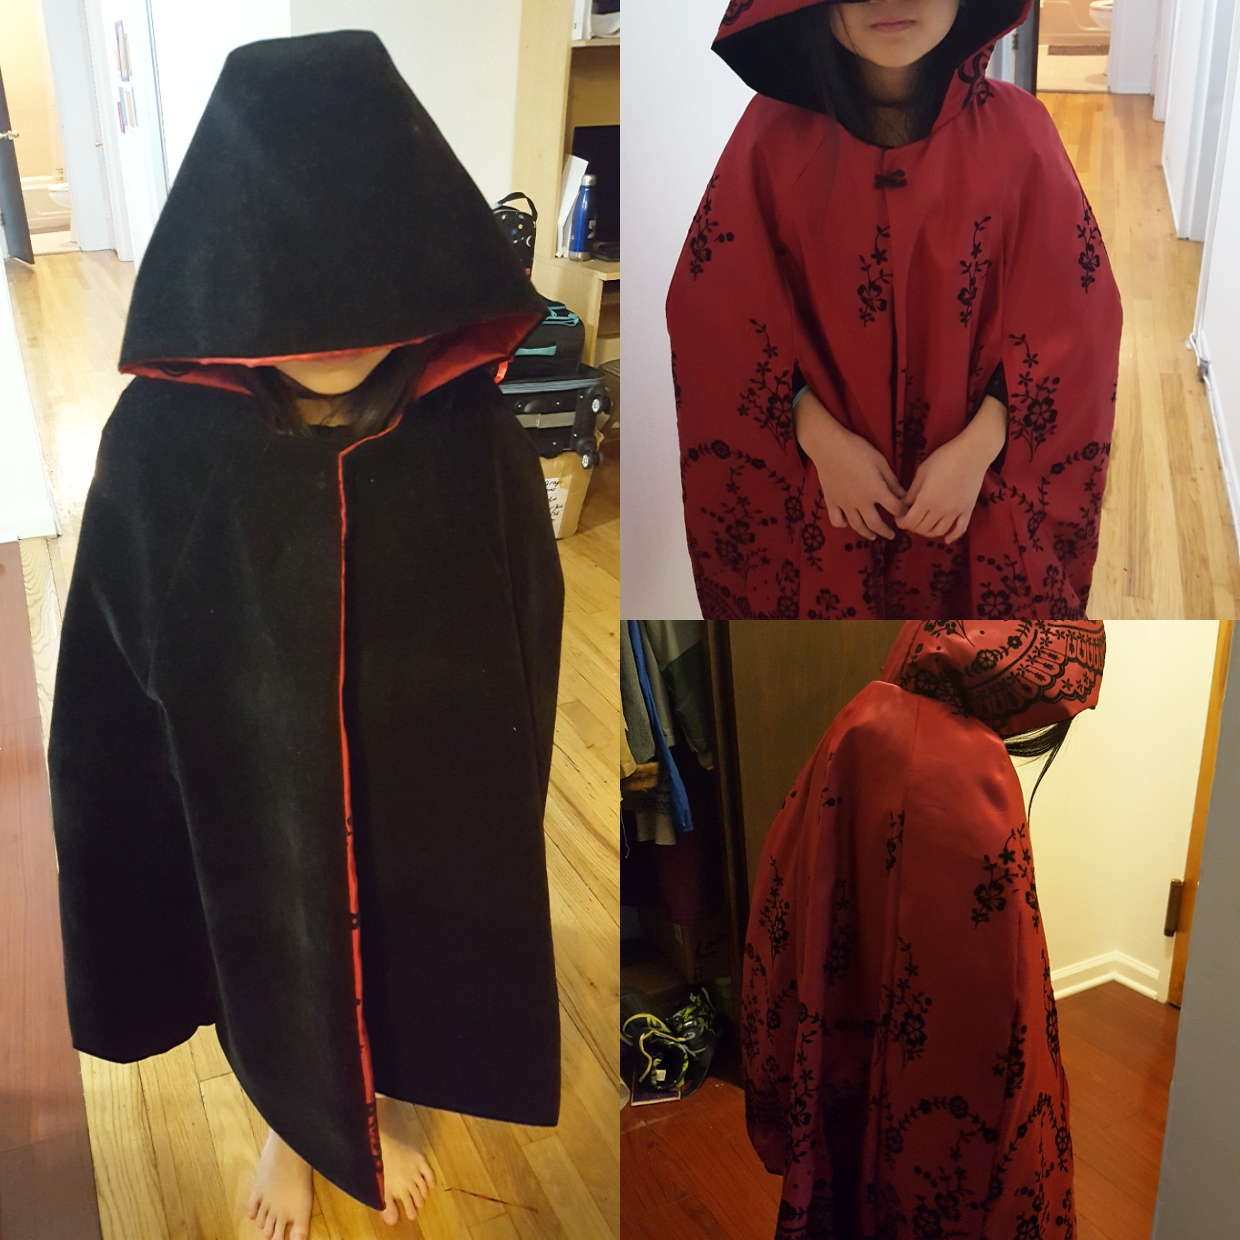
Reeni added lots of length to the same pattern for a dramatic spooky costume: Here is my daughter’s vampire cape, based on the Red Riding Hood from Little Things to Sew.
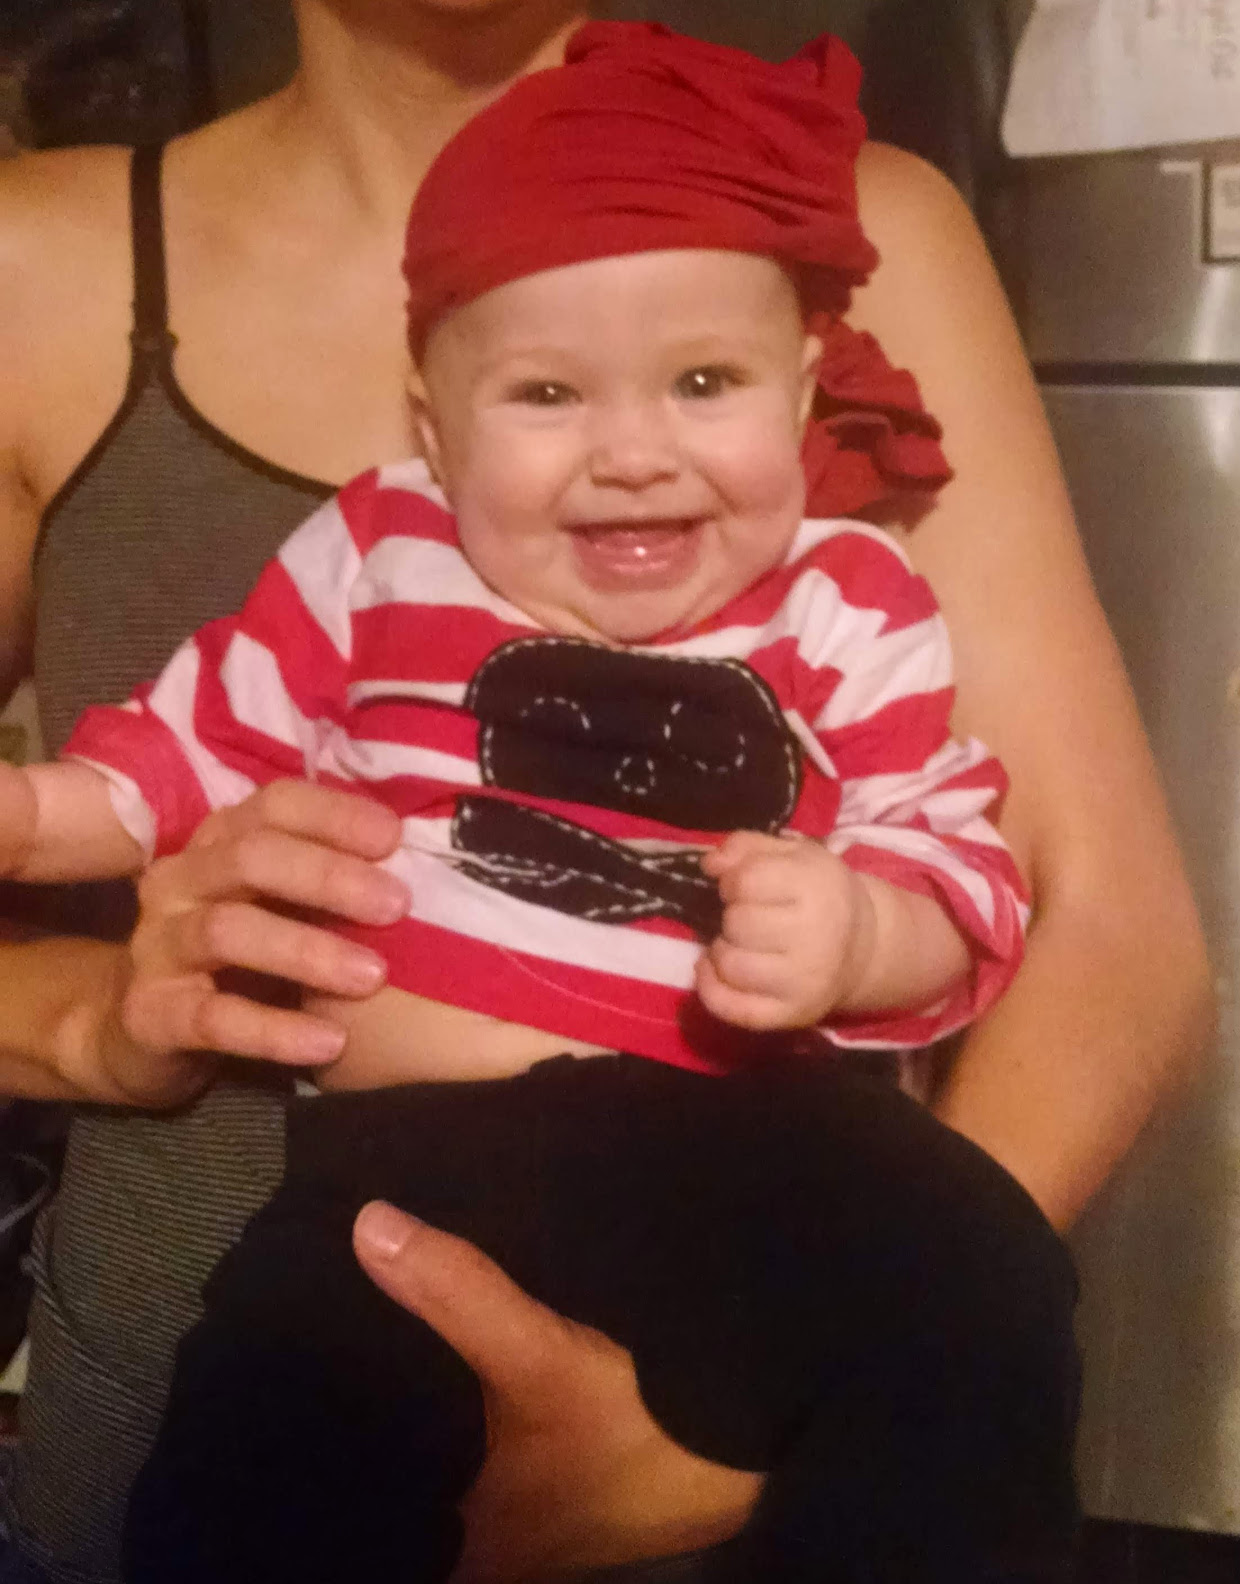
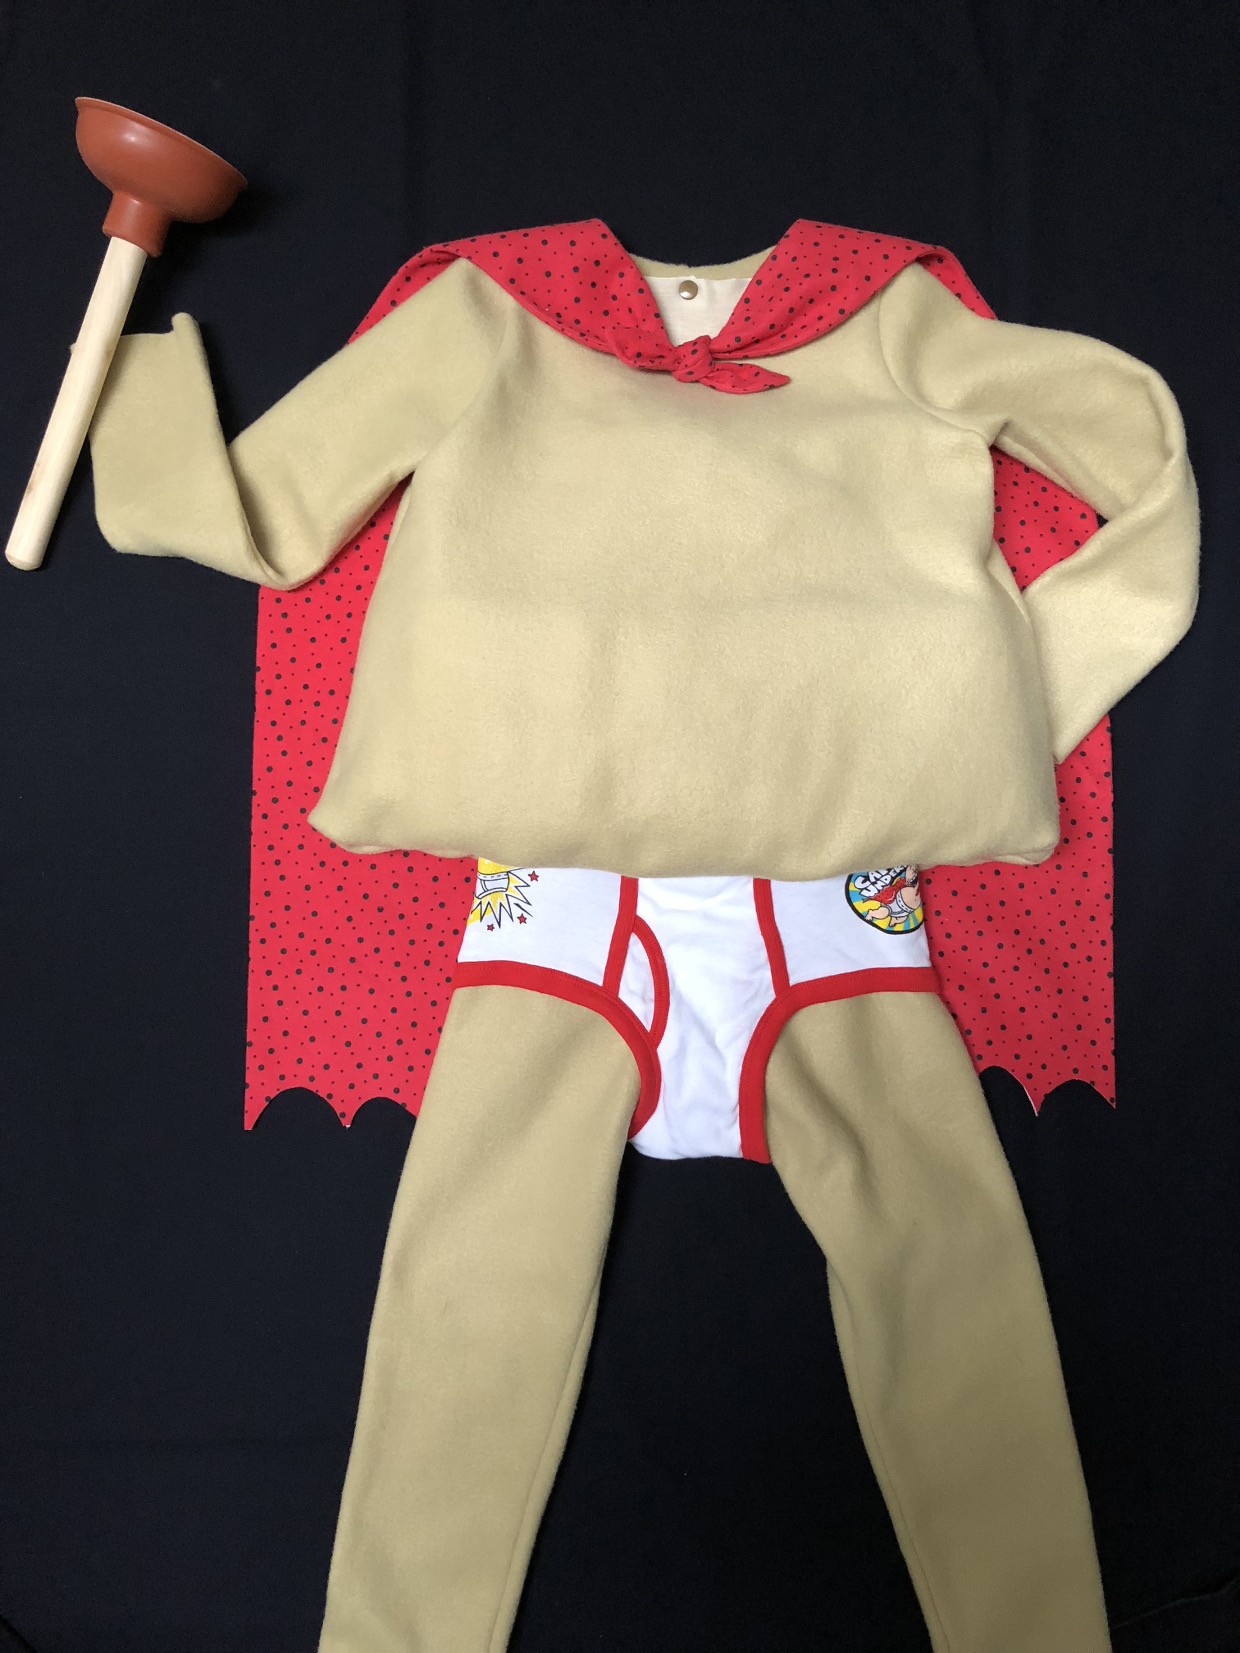
Too scary? Time for some ridiculously cute? Here’s Nicole and her littlest one: Here’s my daughter in her scary pirate costume. It’s the Sailboat Top in 6-12mo size, with skull and crossbones stitched to the front of the shirt. The pants are RTW. I asked her big brother what she should be for Halloween, and he answered “scary pirate” without missing a beat.
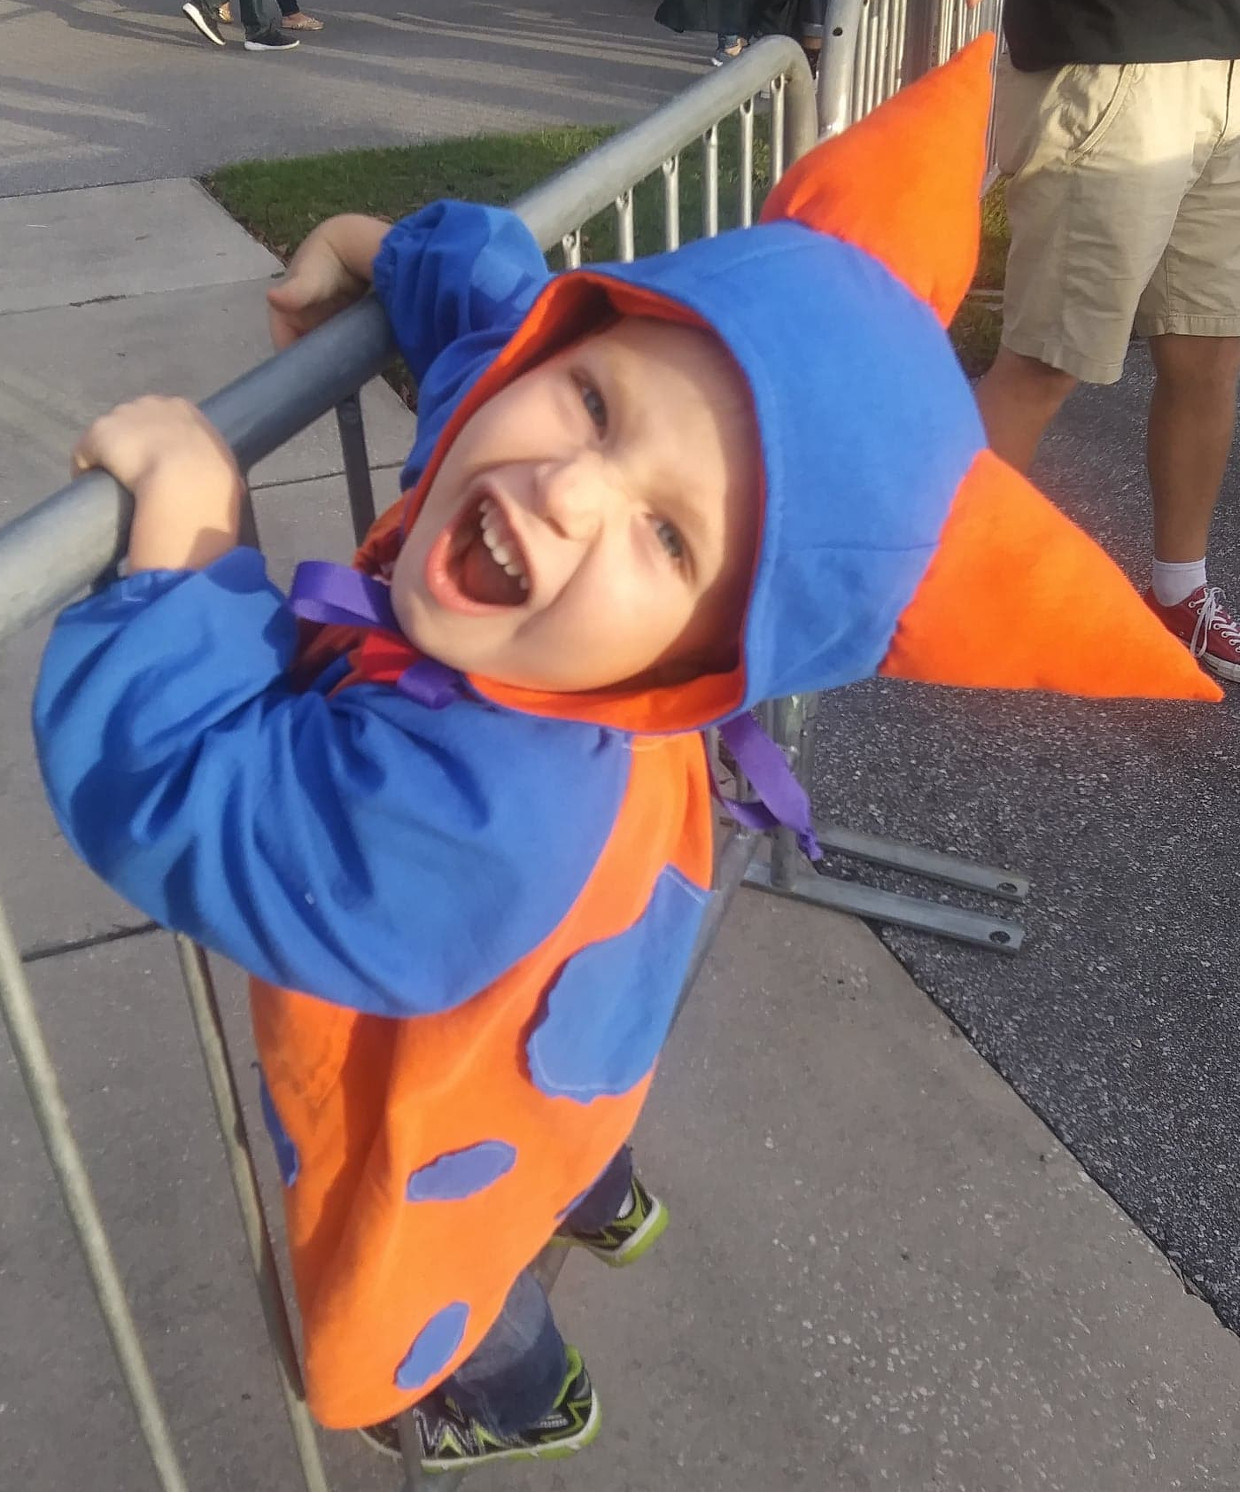
Jenny used her Little Things to Sew book very well along with other patterns to create both of her kid’s costumes: My son Reid is 3 1/2, and he asked to be “an orange and blue monster.” His whole costume is from Little Things to Sew. The hood is the Cozy Winter Hood with the ears swapped for horns. They’re actually a stuffed Christmas tree decoration, hand sewn into place with a ladder stitch. The body is the Art Smock modified as follows: the back is cut on the fold with a placket at the neck (so it stays on better) and some shortcuts taken in finishing. The two pieces are made from four men’s tee shirts I thrifted.
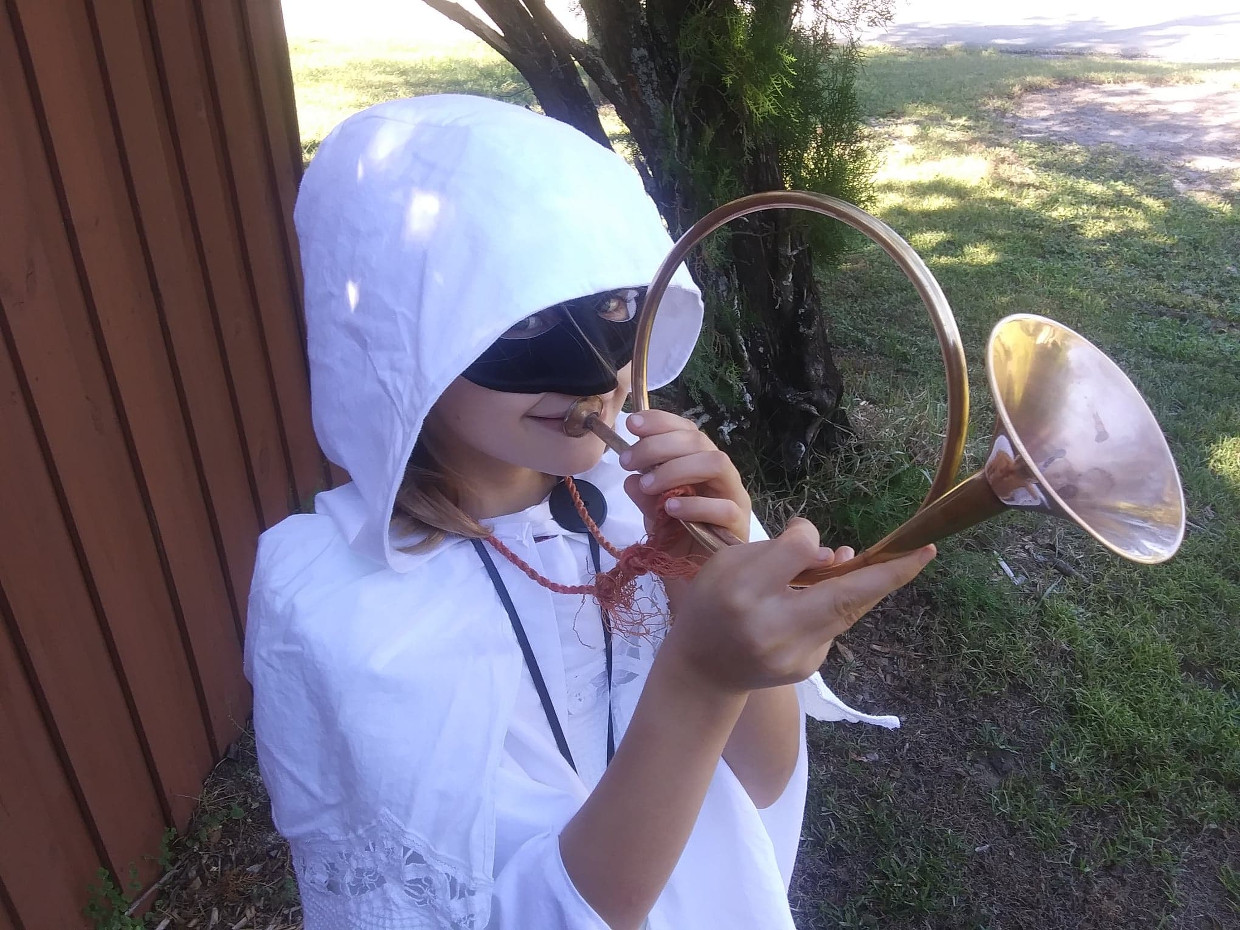
My daughter Grace is 7 1/2. She’s been obsessed all year with E.B. White’s book The Trumpet of the Swan. She insisted on being Louis the swan for Halloween which sent me on an adventure trying to create a swan costume. We landed on a simple white Popover Sundress and a cape from Little Things To Sew. I modified the cape to only have the hood lined and added an extra layer at the shoulder (in her words, “to be more feathery”). Both pieces are made from a thrifted king size bed skirt, cut carefully to maximize the trim. Originally, I tried to make a more beak-like mask but time required buying one. Plus, she has her trumpet and slate, of course!
For Trick or Treating, comfort is key as Michelle knows: She’s a lion, which she requested as her costume. (She has very specific ideas sometimes.) We’re in Canada, where it can be quite cold for evening trick-or-treating, so everything is made from fleece and/or faux fur. The mane is made from faux fur and fleece from the Little Things to Sew book. It’s the Winter Hood. The fleece shirt is made from the School Bus T-shirt pattern. The pants are Playtime Leggings in fleece (with a tail attached for fun). Then both of our faux fur vests are self-drafted and the gloves are store bought.

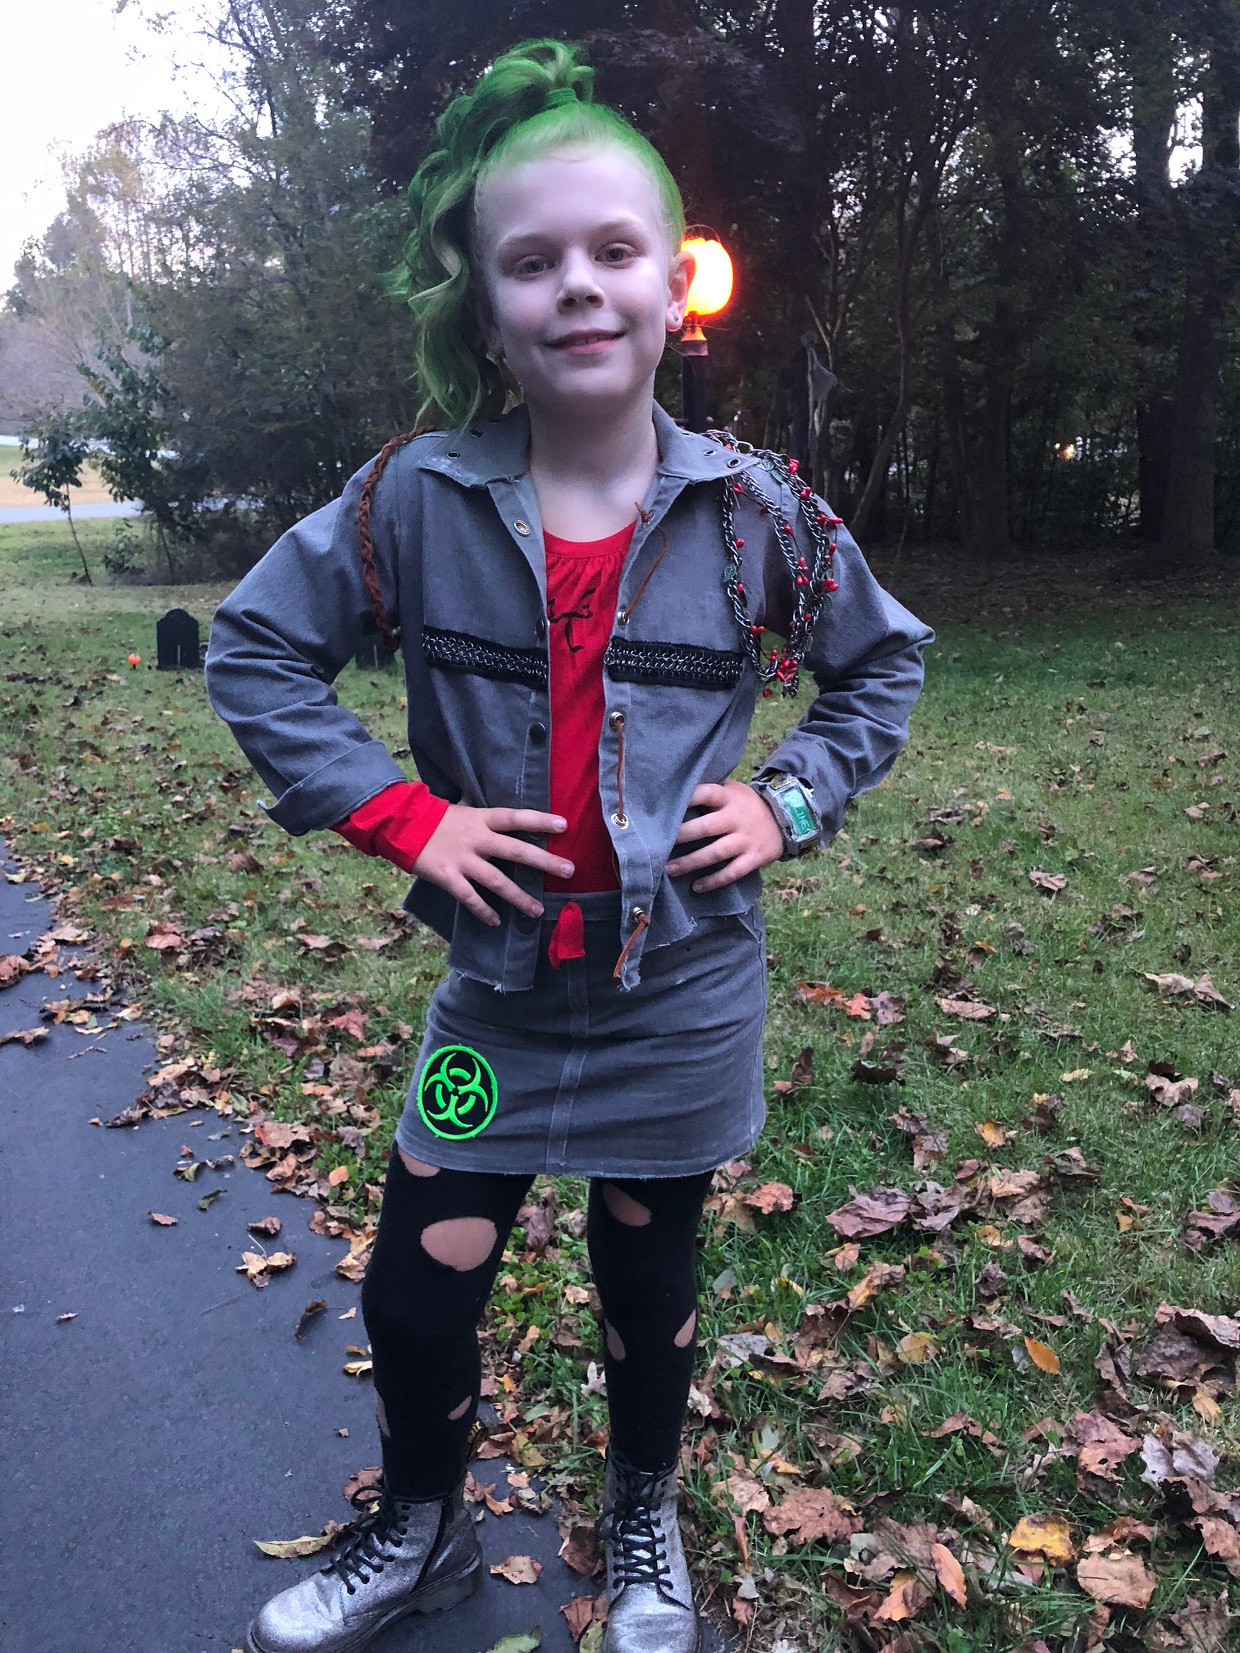
Nothing is as comfy as your underpants! Right, Erica?: I used the Playtime Leggings and the School Bus T-shirt which I modified for extra width at the hem, and I pulled out the instructions for the Bubble Dress just to remind myself of how to get the clean, gathered lining for the top. You can see I stuffed some high-loft batting in the bubble for belly-effect. The top is lined (obviously!) with knit scraps I had in my stash. I eyeballed the shape of the free, online “bow hair tie” for the cape, because I knew I wanted that look of a tied knot for the character’s cape. I was worried my son would grumble at the feeling of being choked at the neck by two layers of heavy flannel (the only red with black-dot fabric I could find!), so I added a hidden snap in the cape lining. Even though you can’t see it when he wears it, I’m glad I thought of that. At the last minute I made him a beanie with some of the same “flesh-coloured” fleece to make him look bald.
My own daughter wants this outfit for her everyday clothes! Take it away Jane: For Piper’s Eliza costume, I used the Oliver + S Sketchbook pattern to make the jacket with no alterations other than an unfinished hem. For the skirt, I used the Oliver + S Sunday Brunch skirt. I added a drawstring instead of elastic waist and a “seam” down the middle by adding on a thin strip of fabric straight down the middle of the skirt. Both pieces are made using a gray stretch denim.
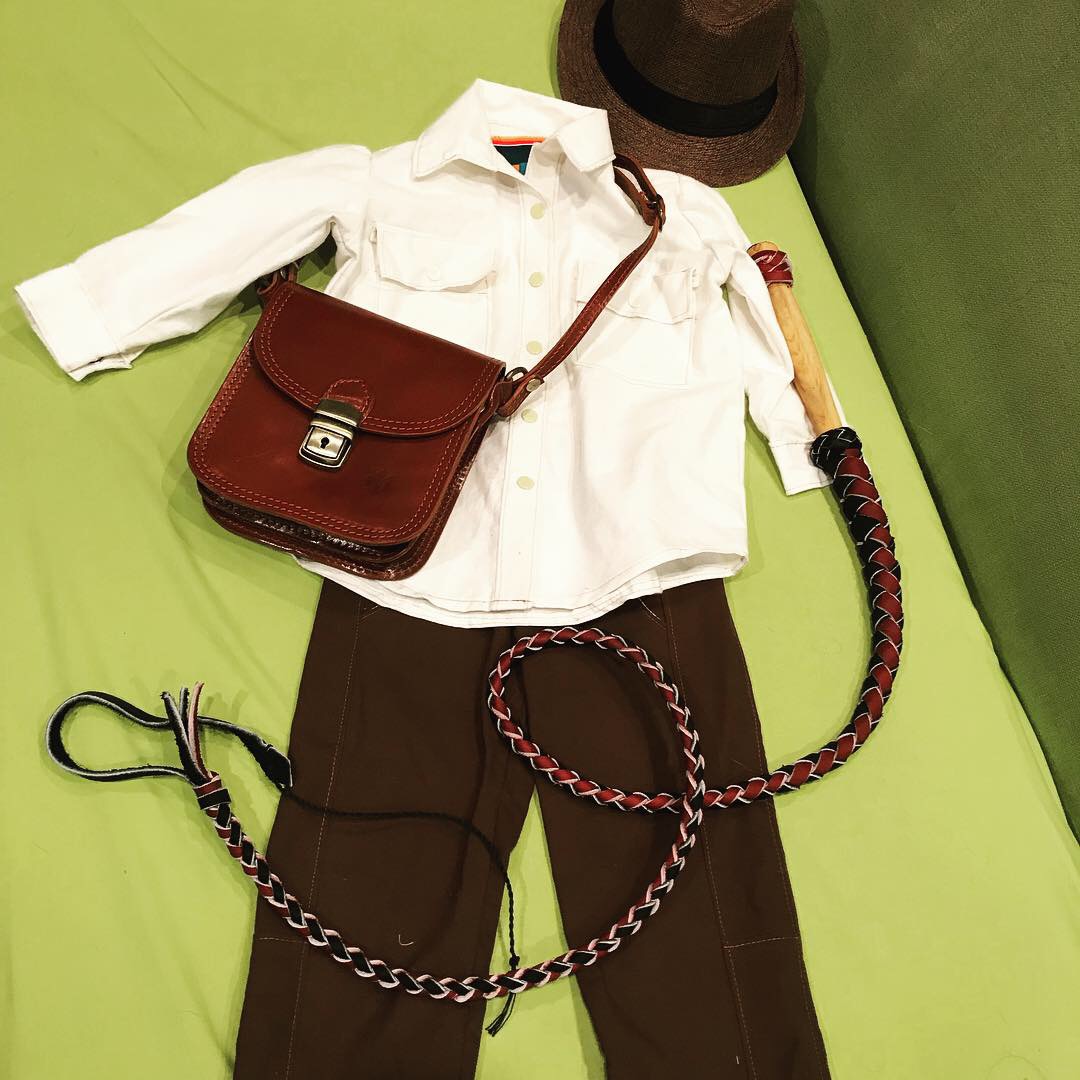
Here’s a whip cracking costume by Shanti: I used the Afterschool Pants and brown Kona cotton for the pants, and there’s some sneaky pink and brown print inside the pockets because they were going to be covered by the untucked shirt. The shirt is the Sketchbook Shirt, modified to have two breast pockets and flaps over the pocket, with an inch added to the body length. Snaps from Snap Source rather than buttons. Ease of dressing wins out over accuracy!
Lilit put some Oliver + S blog inspiration to great use: This past Halloween, my daughter wanted to go as Supergirl, and I made hers using a commercial pattern. Not wanting to be left out, my son wanted to be a superhero as well. So, to coordinate, I decided to make him a Superboy costume. Not finding the look I wanted (Superboy from the 90s) from standard commercial patterns I ended up using a combination of indie and commercial sewing patterns. The jacket is from the Nature Walk Pullover. I was inspired by Julie’s Beat It jacket. The cape is detachable and can be attached to both the top and pleather jacket via snaps. Had I had more time, I would have made another Superboy signature look from Young Justice using the Oliver + S Field Trip Raglan T-shirt and Cargo Pants patterns for daily wear. I think it’s a perfect match to make that look.

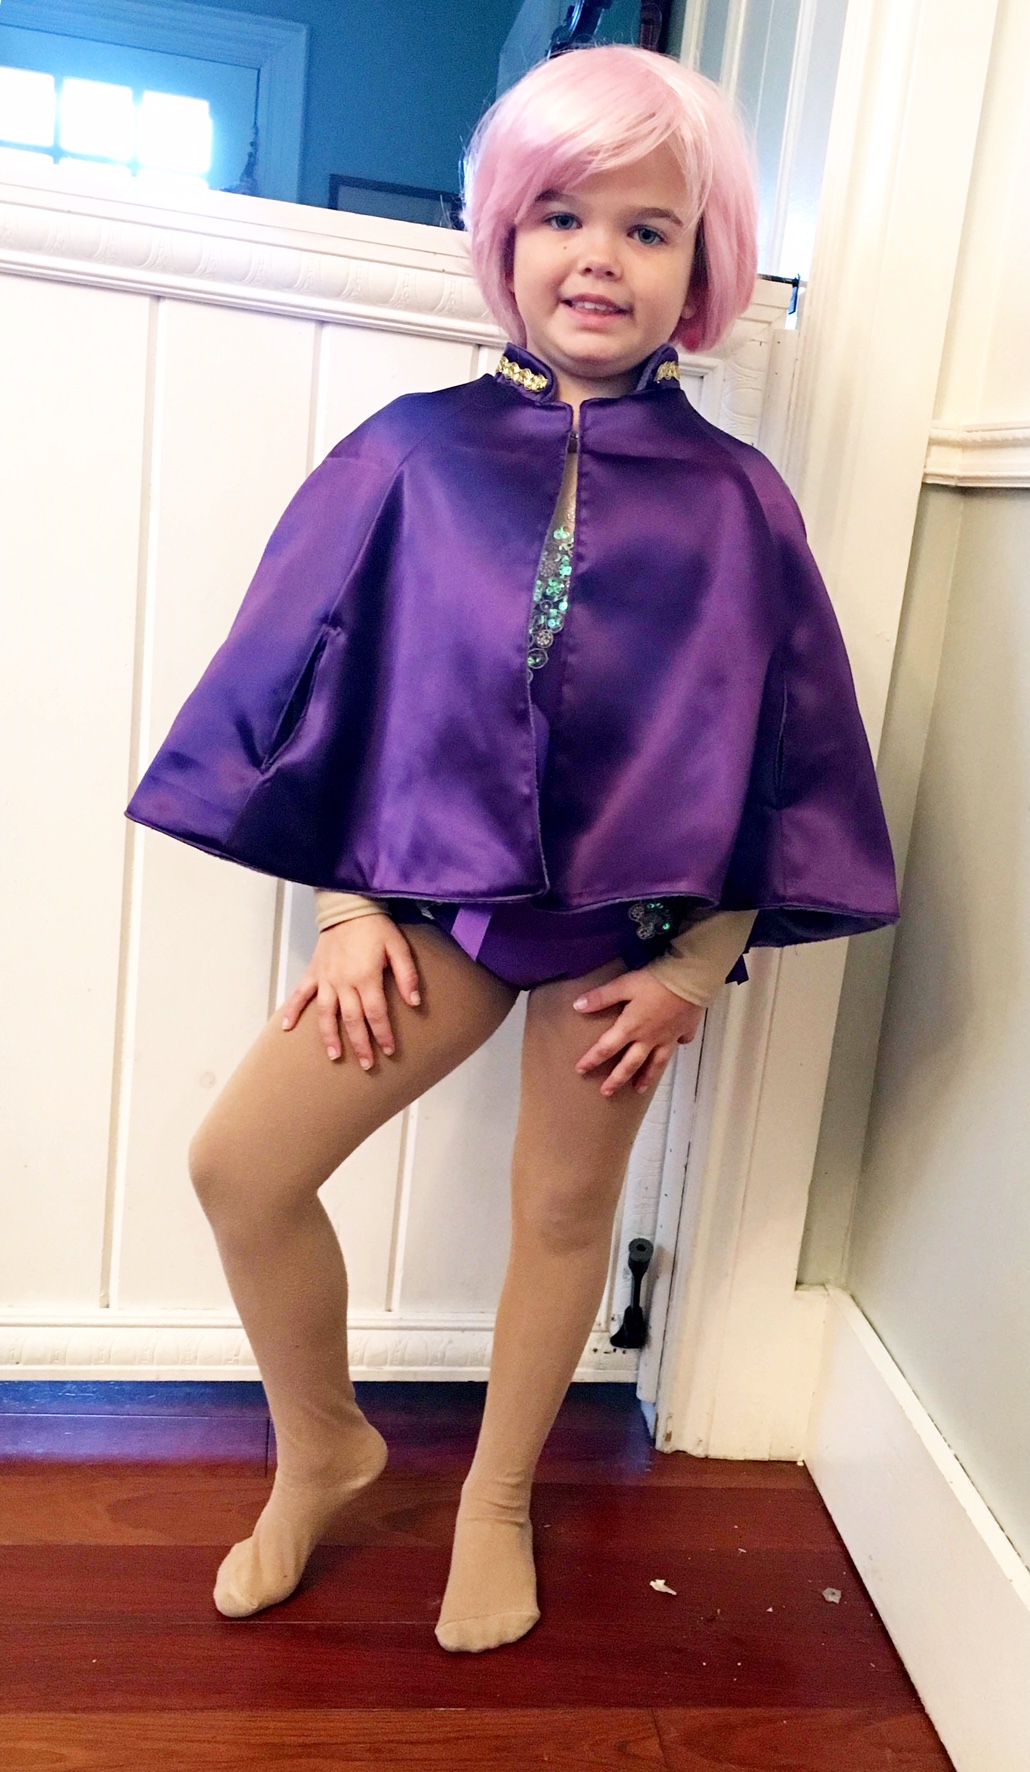
Sharon made a gorgeous dress with a smocked yoke which only becomes a costume when the extra bits are added: I used the Fairy Tale Dress pattern mashed up with the Building Block Dress book to make this dress. I hand smocked the ruffle as well.

Here’s the perfect idea when you have to make double the number of costumes! Neha: I dressed my Things (1 and 2) using the School Bus T-shirt for the top. Bottoms were a mash up between Sleepover Pajamas and another pattern to get a slimmer fit to match the top. Fabric is a stretch knit from Jo-Ann Fabric. The wig is self-drafted using faux fur fabric from Jo-Ann Fabric. Both Oliver + S patterns are so versatile with such detailed instructions that it was fun to put together the entire ensemble.

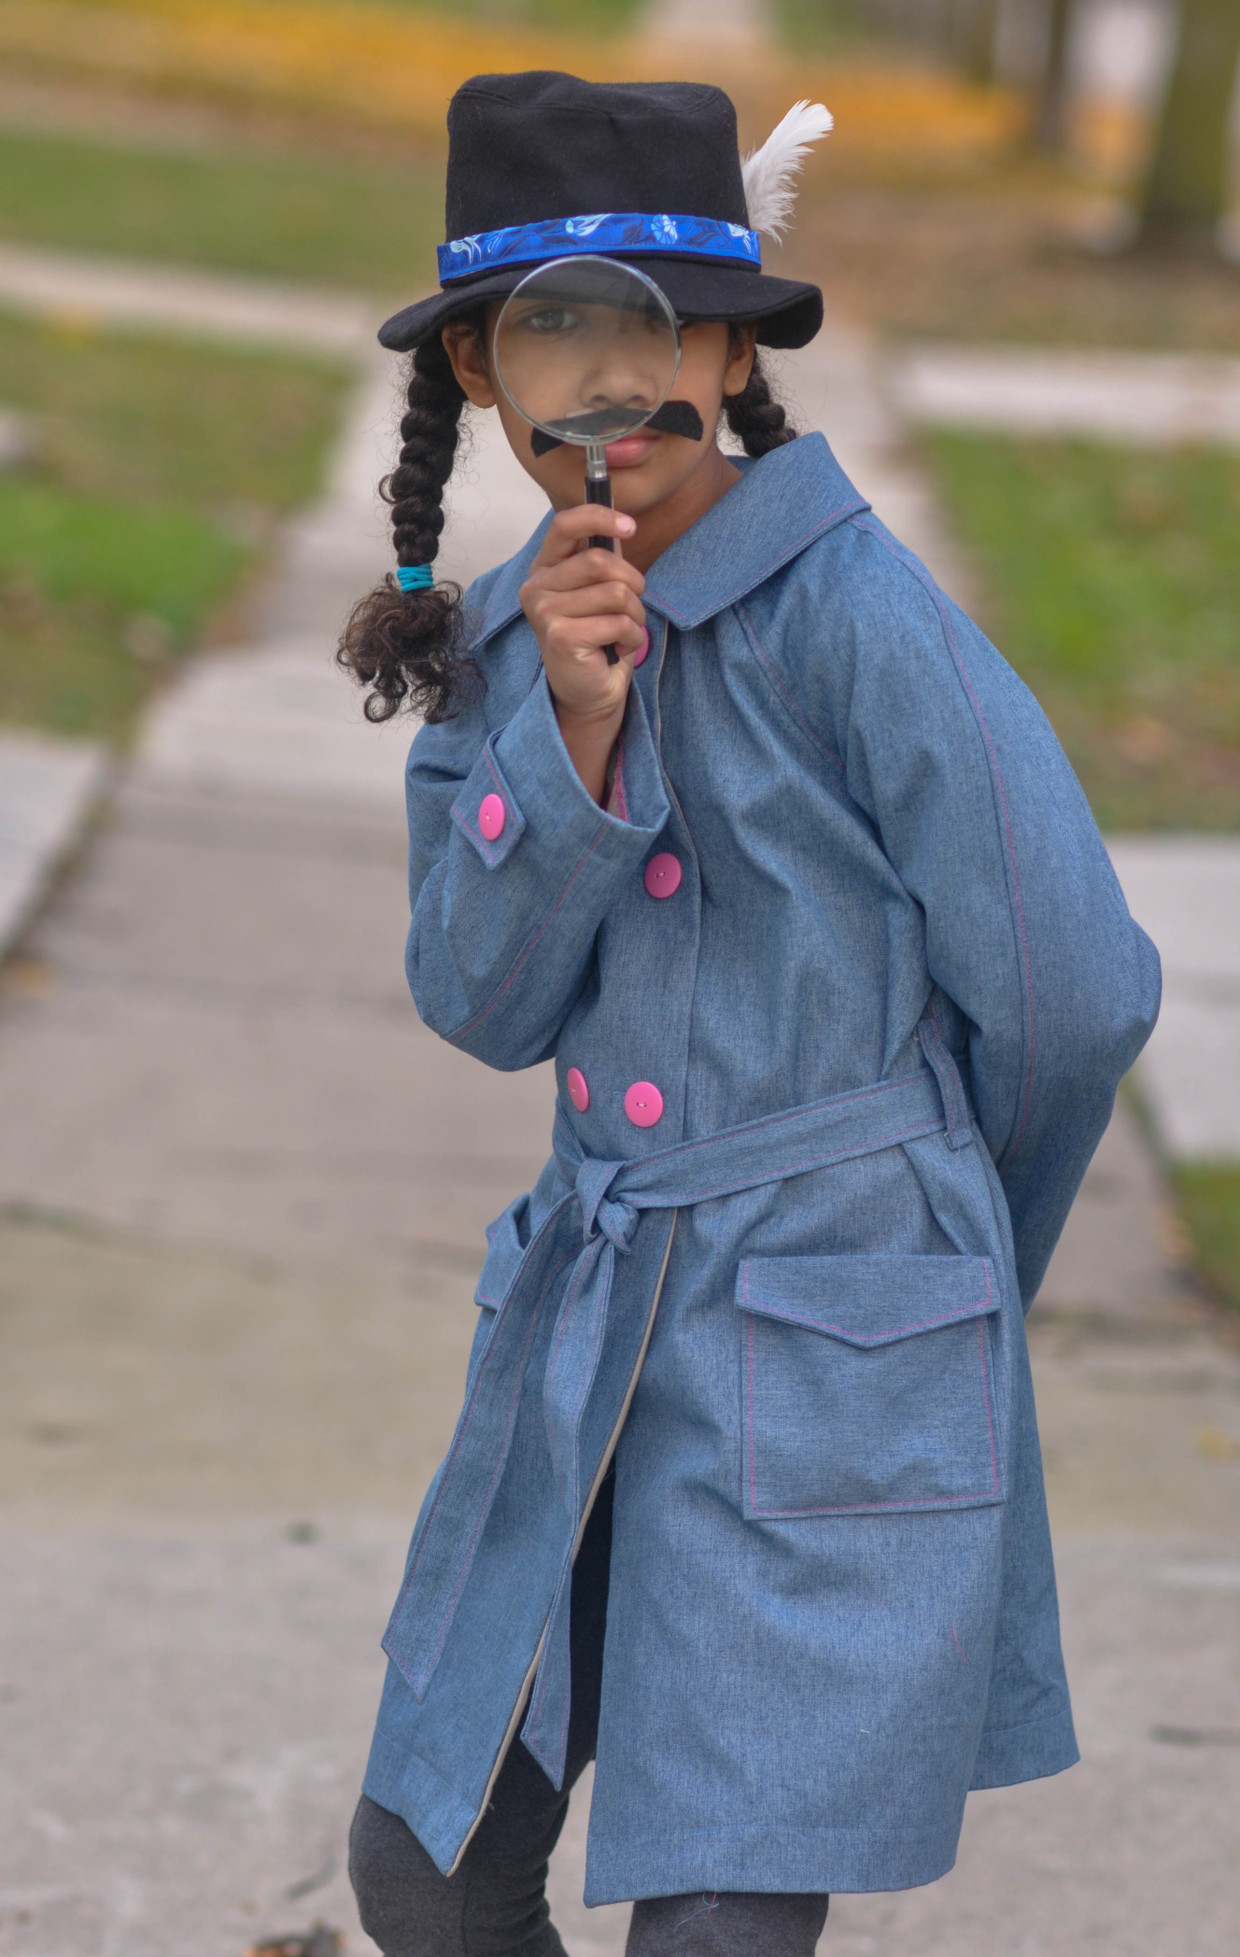
Just add a moustache! Genius Janice: I used the Secret Agent Trench Coat for this year’s costume. My daughter’s school has a required theme for their costumes; this year was “professions.” I love that my Halloween costume isn’t a costume at all and can be worn again! I used a thick Japanese denim, topstitched with pink. I did bind the inside seams which made the insides look so lovely!
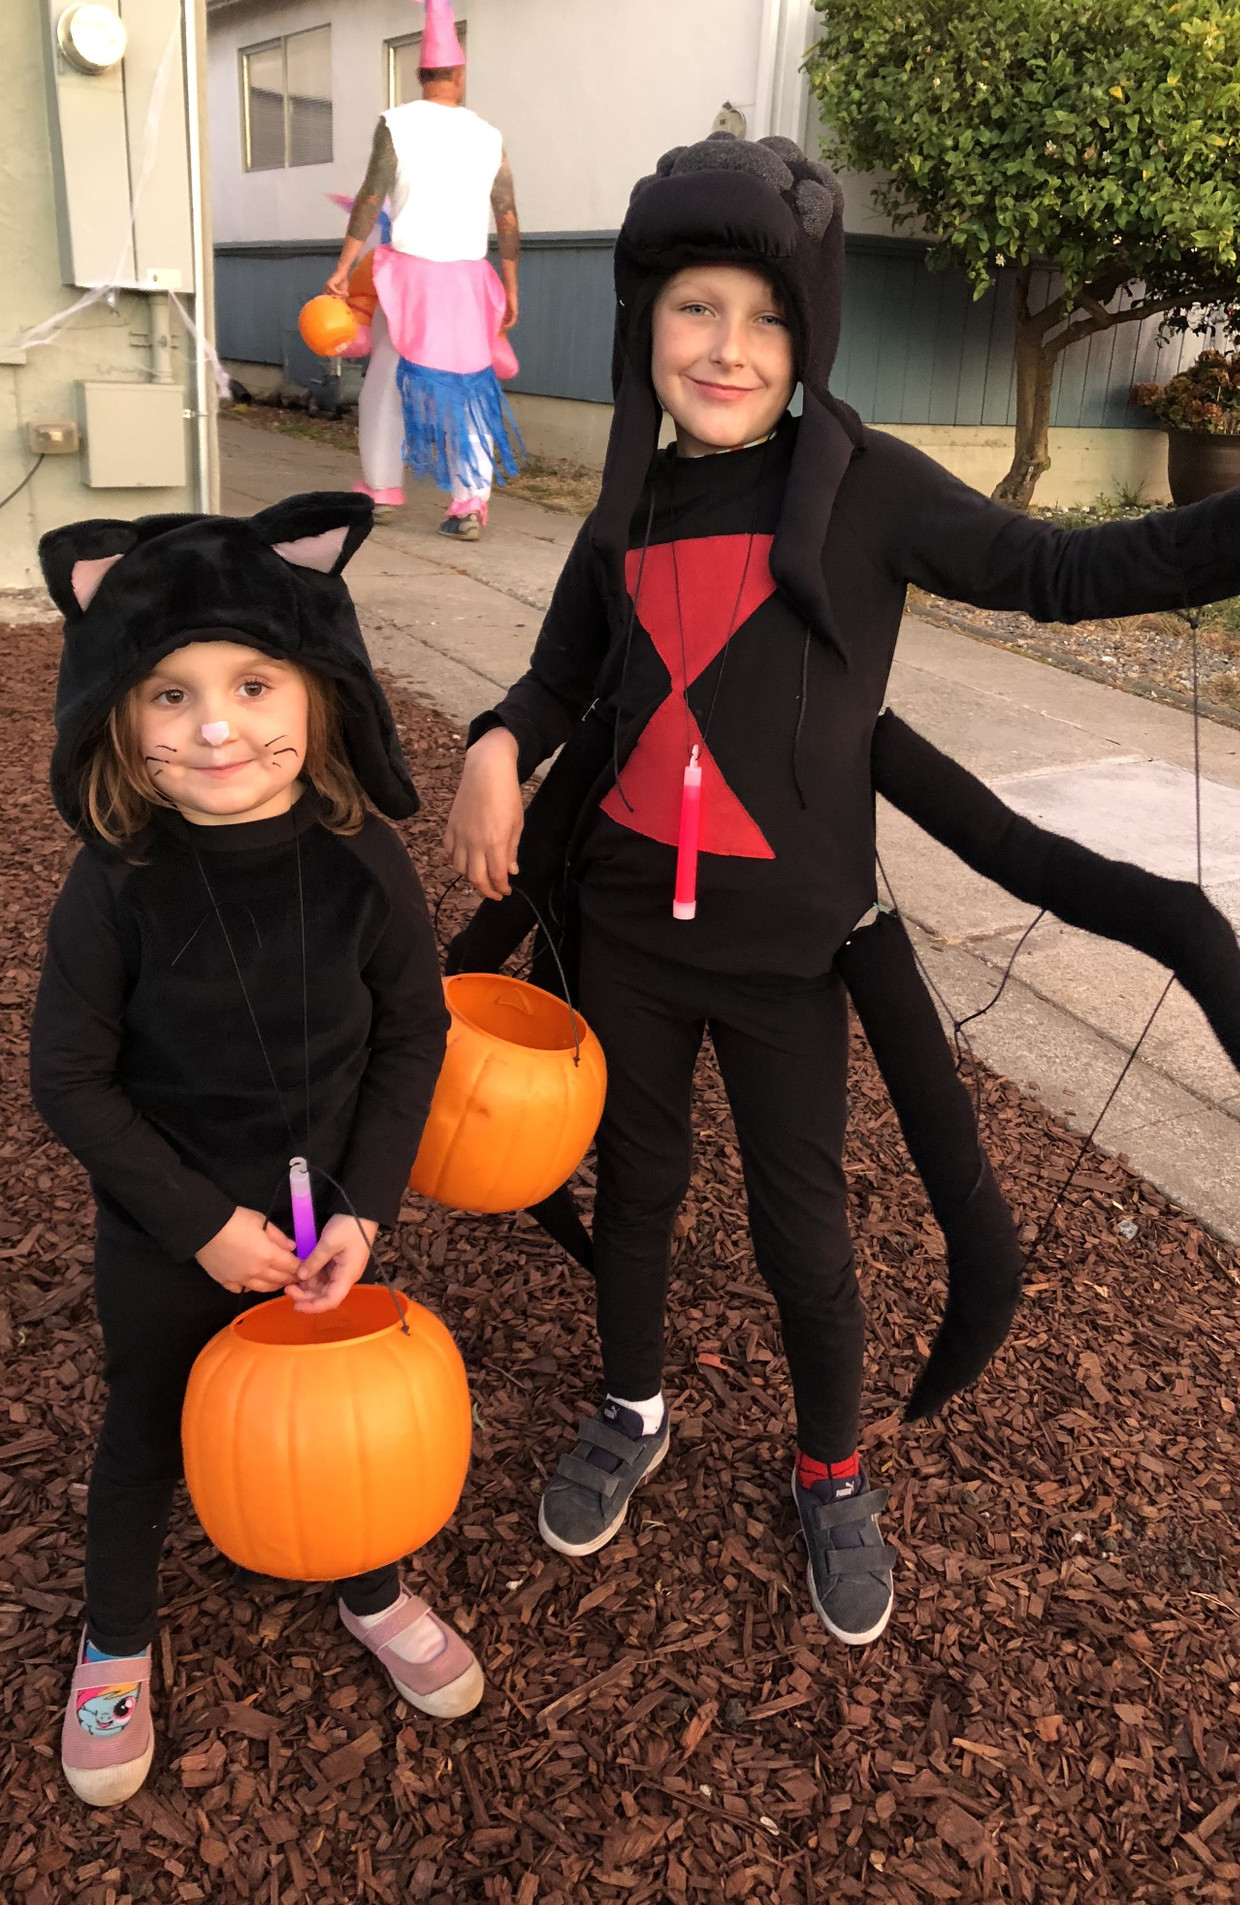
And now, the final word, and a lesson in spider anatomy from Inder: Joe is a black widow spider, and Maggie is a black cat. I used the same patterns for both. Each one has a hood that is loosely based on the Little Things to Sew Cozy Winter Hood. Maggie’s is made from black fur and I added cat ears (using that soft and stable foam inside, which worked great to keep the ears pointing up and soft and squishy!). Joe’s is made from a cotton fleece with the fleece side showing. I sewed and stuffed spider eyeballs and grabby things (technical term: pedipalps) to Joe’s hood. It doesn’t show up well in the pictures but the eyeballs are made from a glittery black knit I harvested from a thrifted tank top and the grabby things are a shiny stretch satin.
They are both wearing Field Trip Raglan T-shirts. Maggie’s raglan has fur on the front and back, because she wanted to be soft and pettable like a cat. I appliqued a black widow “violin” in felt on Joe’s. Both of them are wearing basic black knit Playtime Leggings underneath. I just free-handed a design for Joe’s spider legs and stuffed them! I used safety pins to attach them to Joe’s sides on Halloween so they are detachable and he can wear the shirt to school.
These were really fun and not too crazy complex to make. Kids were happy! Win!
We’re so happy to see all the creative uses you made of Oliver + S patterns this year!
Yay! Thanks for the shoutout! Yes, much time was spent studying pictures of real black widow spiders and learning about their anatomy! (Halloween = learning opportunity!)
Thanks for the feature! I went into more detail in the fb group post, but for the record my daughter’s cape is upholstery velvet (windproof, as 40’s was expected that night) that reversed to dark red flocked taffeta, painstakingly placed to exploit that border design; the hood is unchanged but the cape is redrafted from the shoulderline… i hope she wears it again as it’s close to her school colors.