Who’s sewing the Butterfly Blouse with us this week? If you’d like some inspiration for fabrics for this project, have a peek over at the Butterfly Blouse + Skirt Round-up where you’ll see many versions sewn up in both the ruffle and cap sleeves.
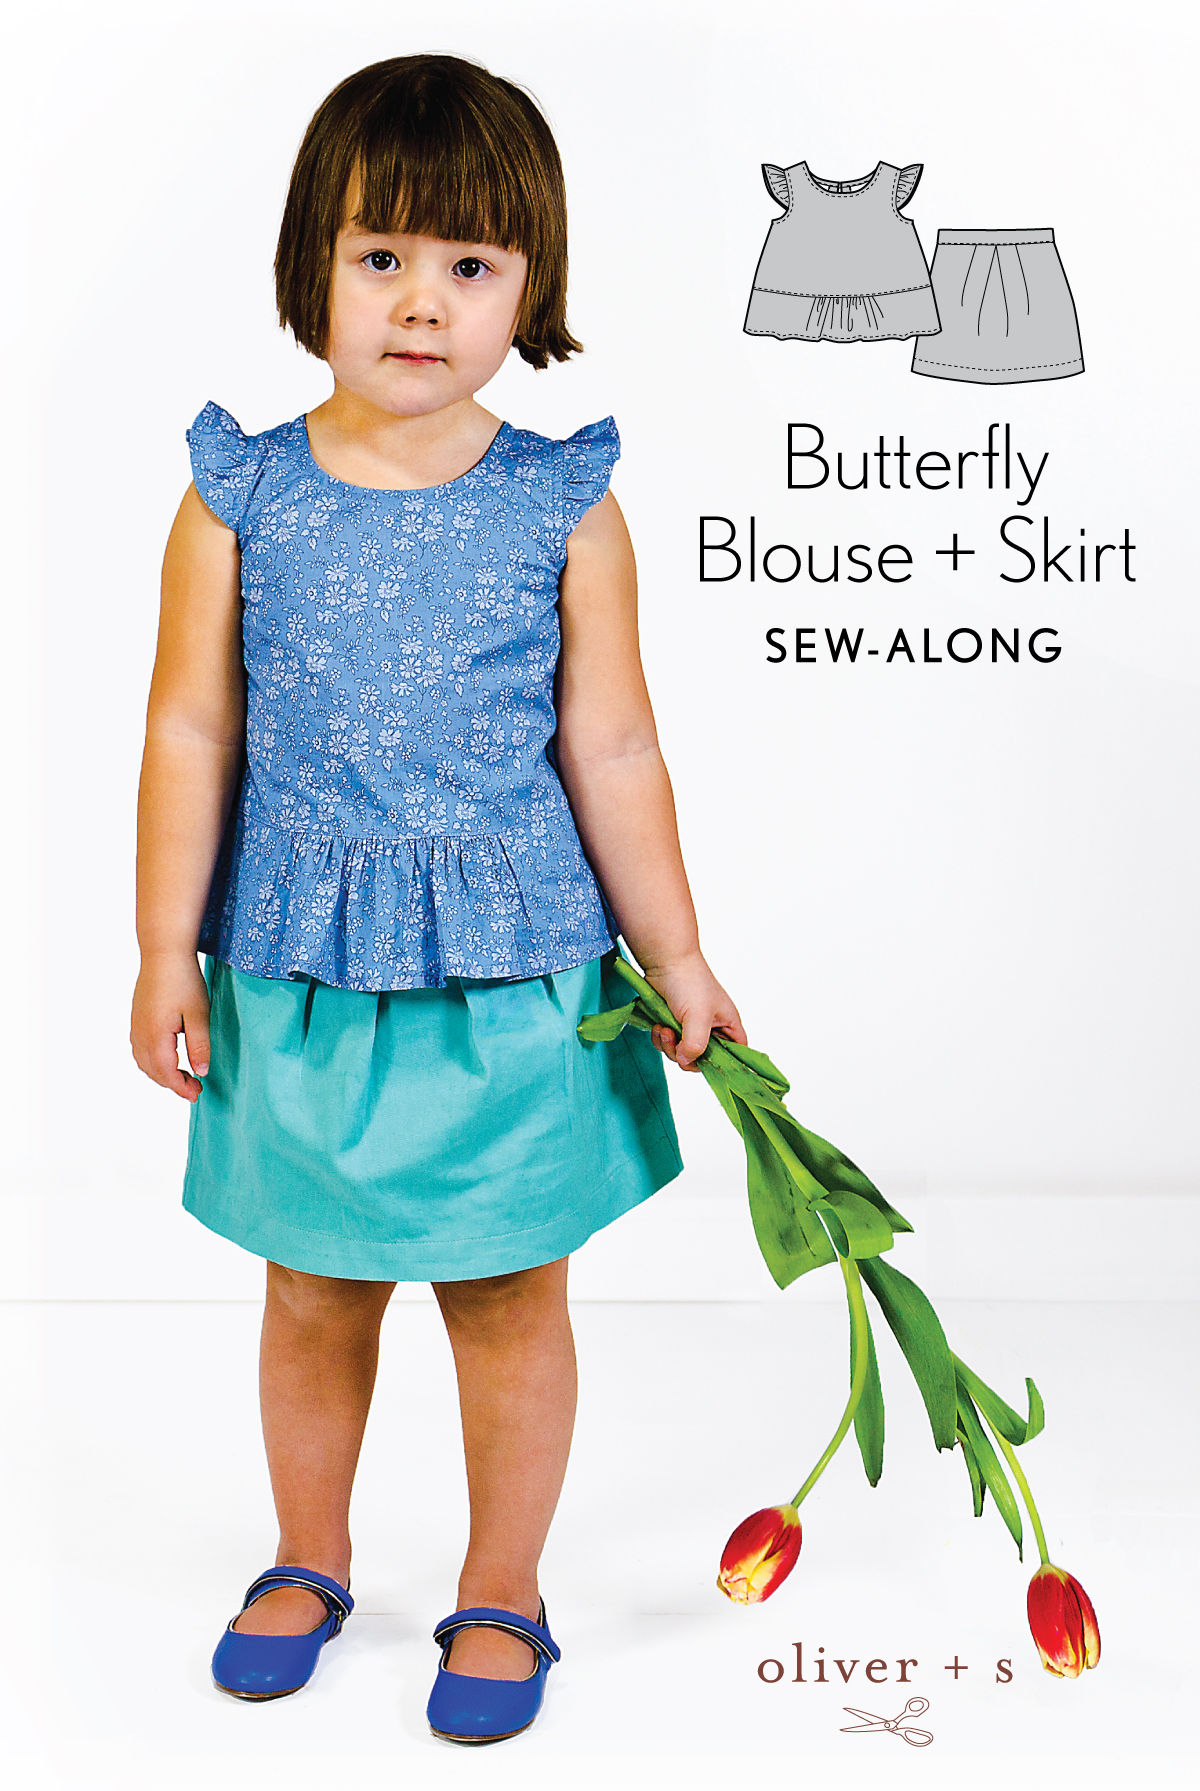
Here is the daily plan for the Butterfly Blouse sew-along:
Day 1 (today): get started, prepare the keyhole facing and the blouse back
Day 2: assemble the blouse
Day 3: finish the neckline
Day 4: prepare and attach the ruffle sleeve (view A), the cap sleeve (view B) and sew the side seams
Day 5: finish the armholes (view A) and the blouse
Let’s begin, shall we?
Day 1
Get started
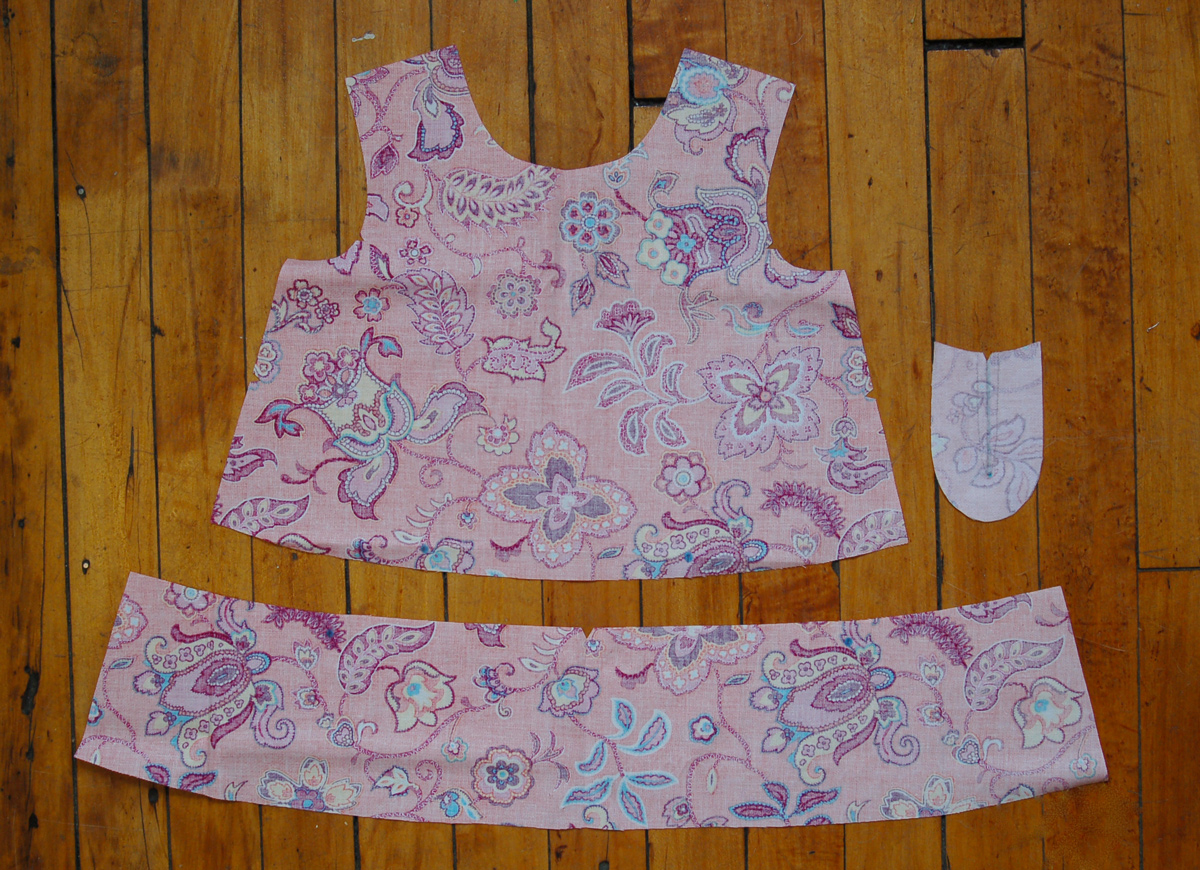
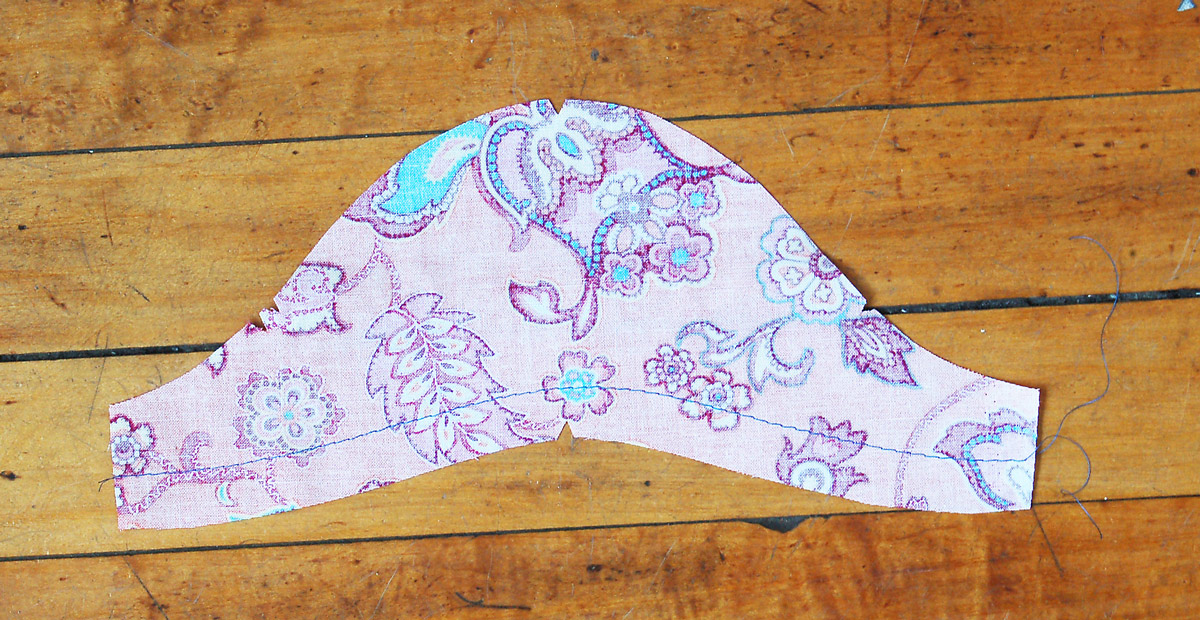
1. Using tailor’s chalk or a water-soluble fabric-marking pen, transfer the dots from the blouse-front pattern piece to the cute fabric’s wrong side; and the dots from the peplum-front pattern piece to the cut fabric’s wrong side. Also transfer the dots and the stitching line from the keyhole-facing pattern piece to the cut fabrics wrong side.
2. Staystitch the neckline on the blouse front and the blouse back, stitching 3/8” from the raw edges and sewing towards the center. The stitching is permanent and helps prevent the neckline from stretching out during assembly.
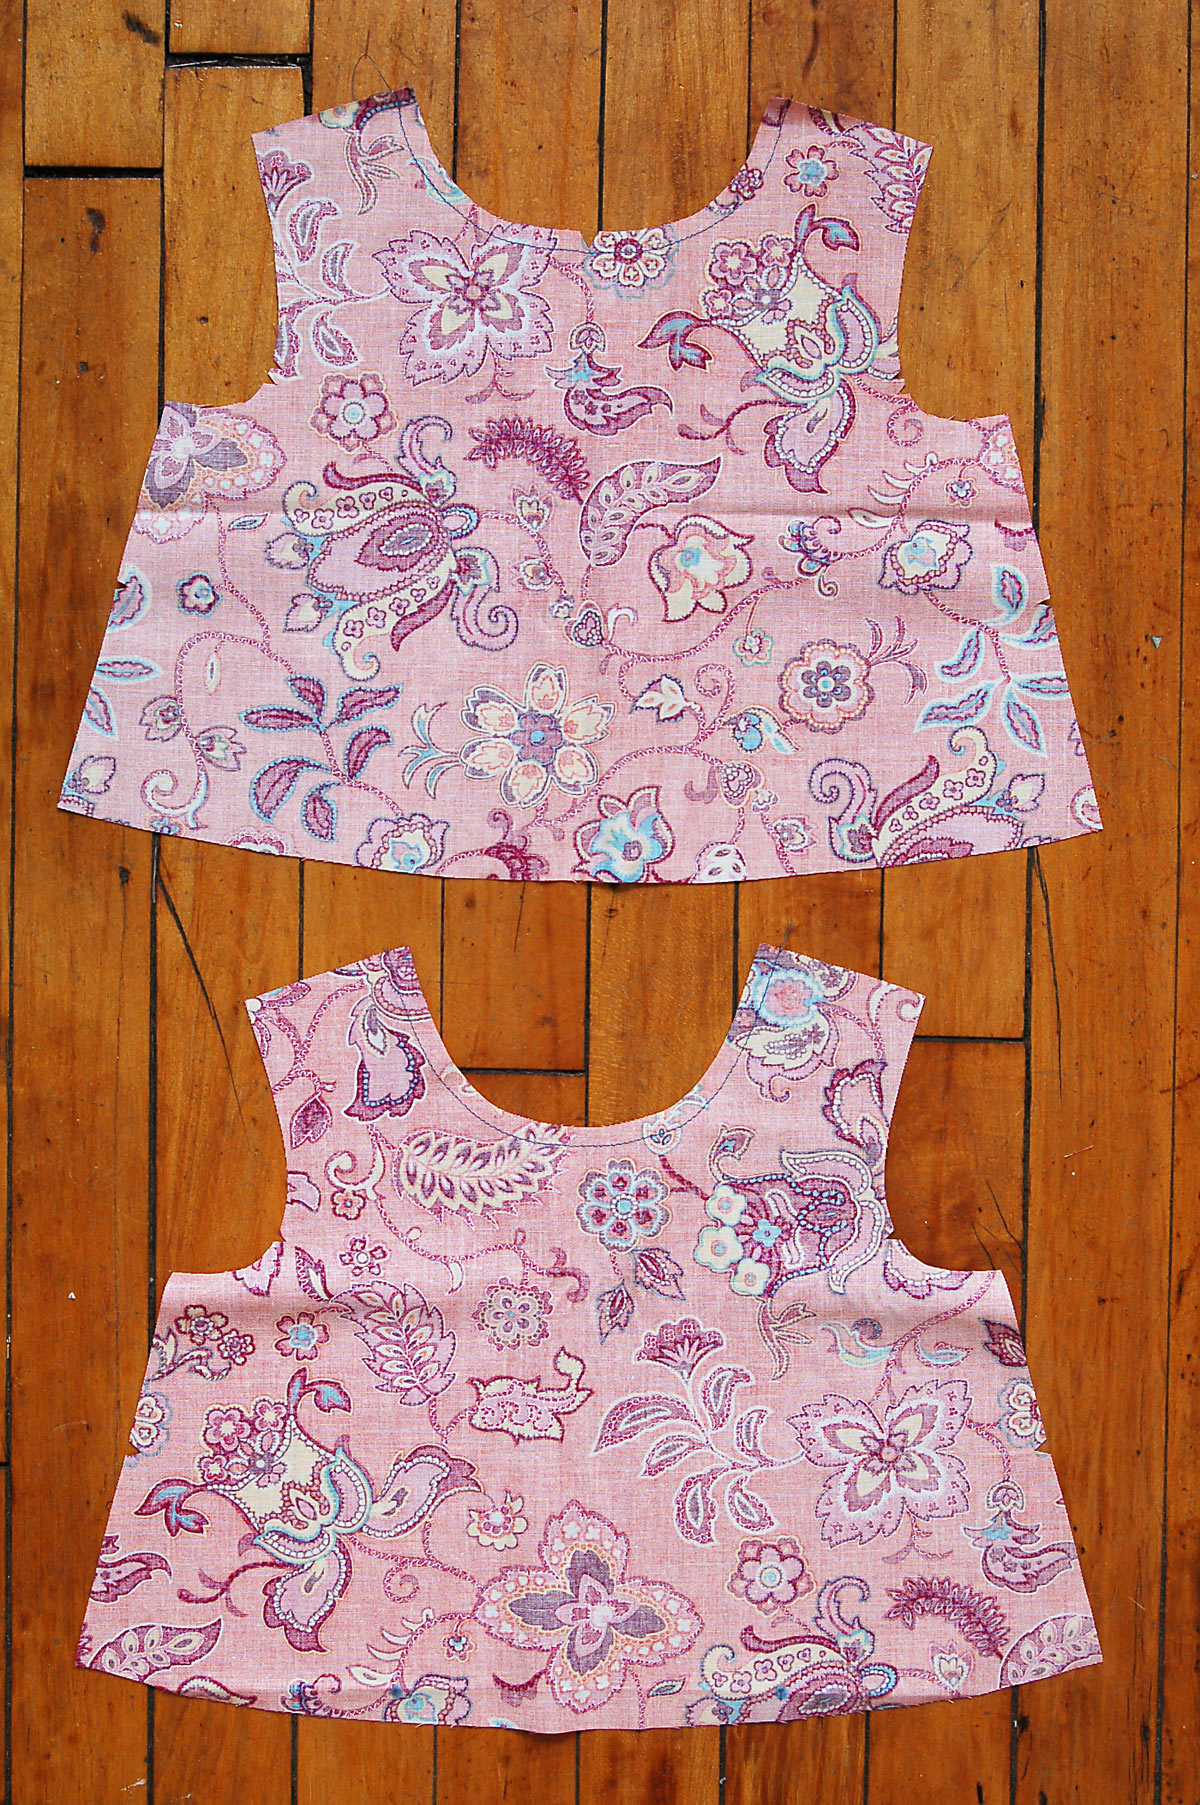
3. Cut one 1” by 6” strip of featherweight fusible interfacing. Follow the interfacing manufacturer’s instructions to fuse the cut strip vertically to the wrong side of the blouse back at the center-back neckline so it covers the dot and the center-back neckline notch. Trim off the extra length of the interfacing, making it even with the neck edge.
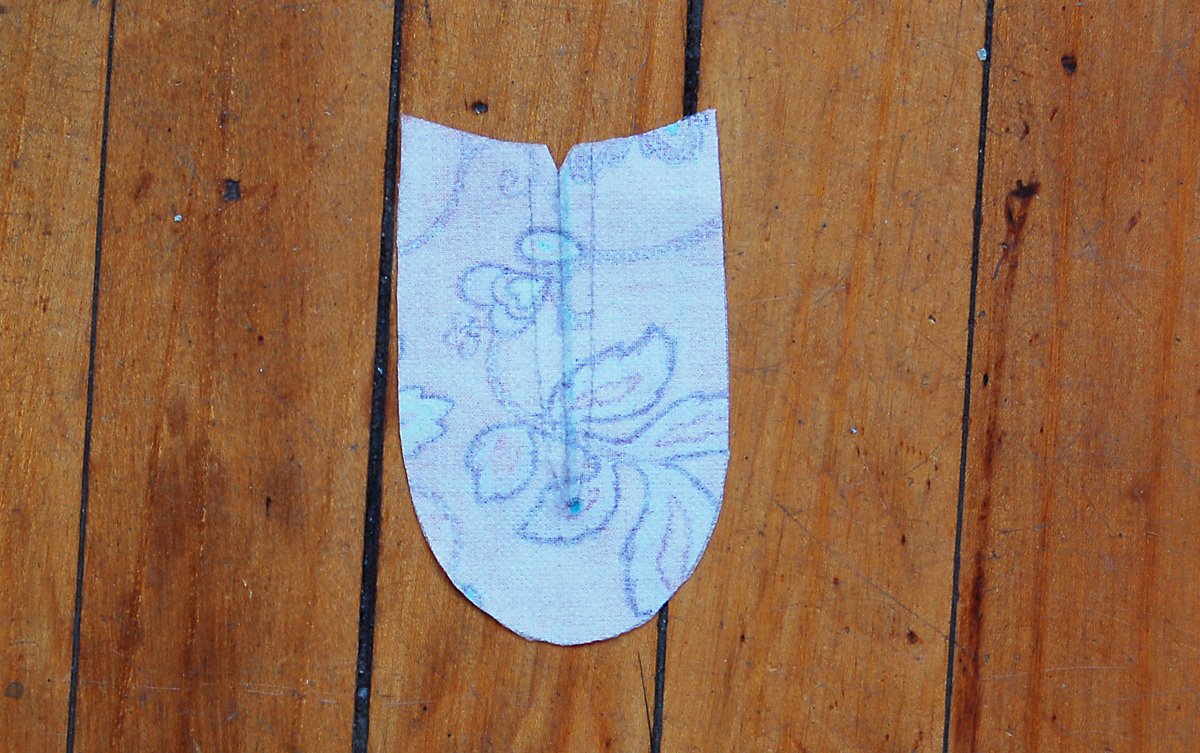
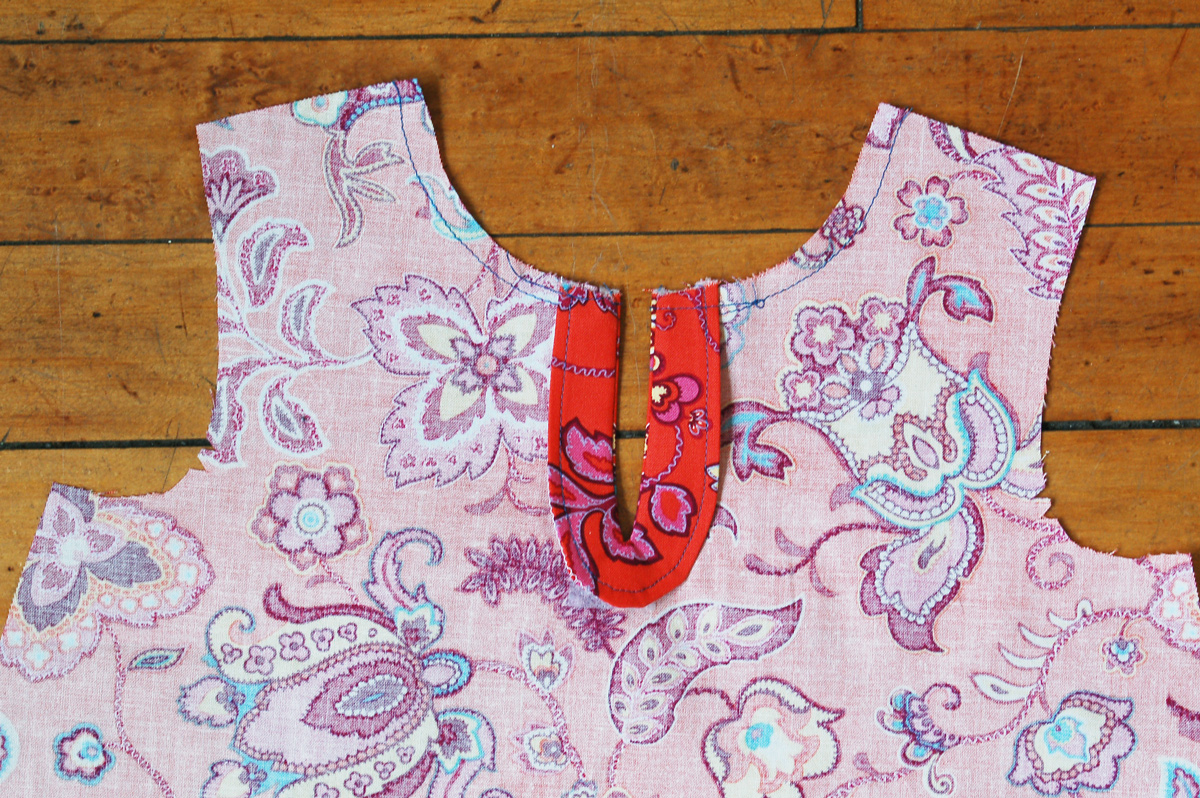
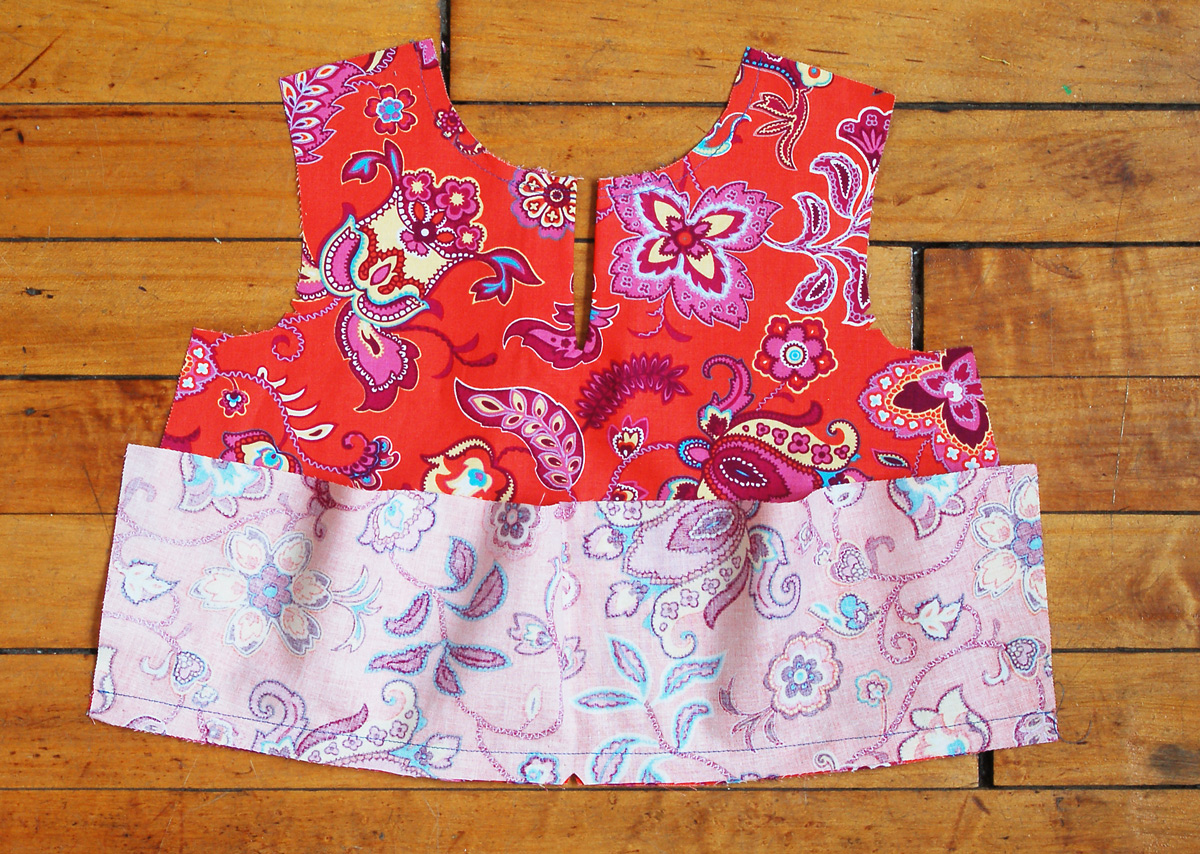
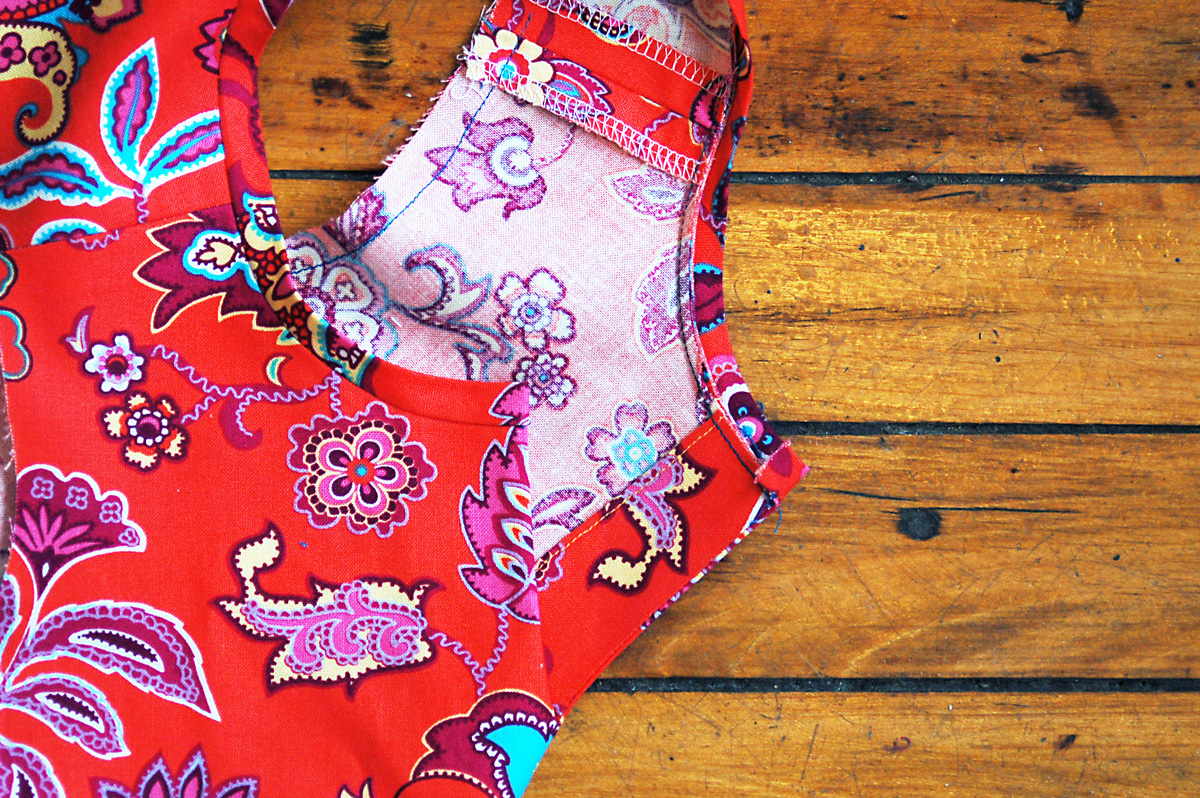
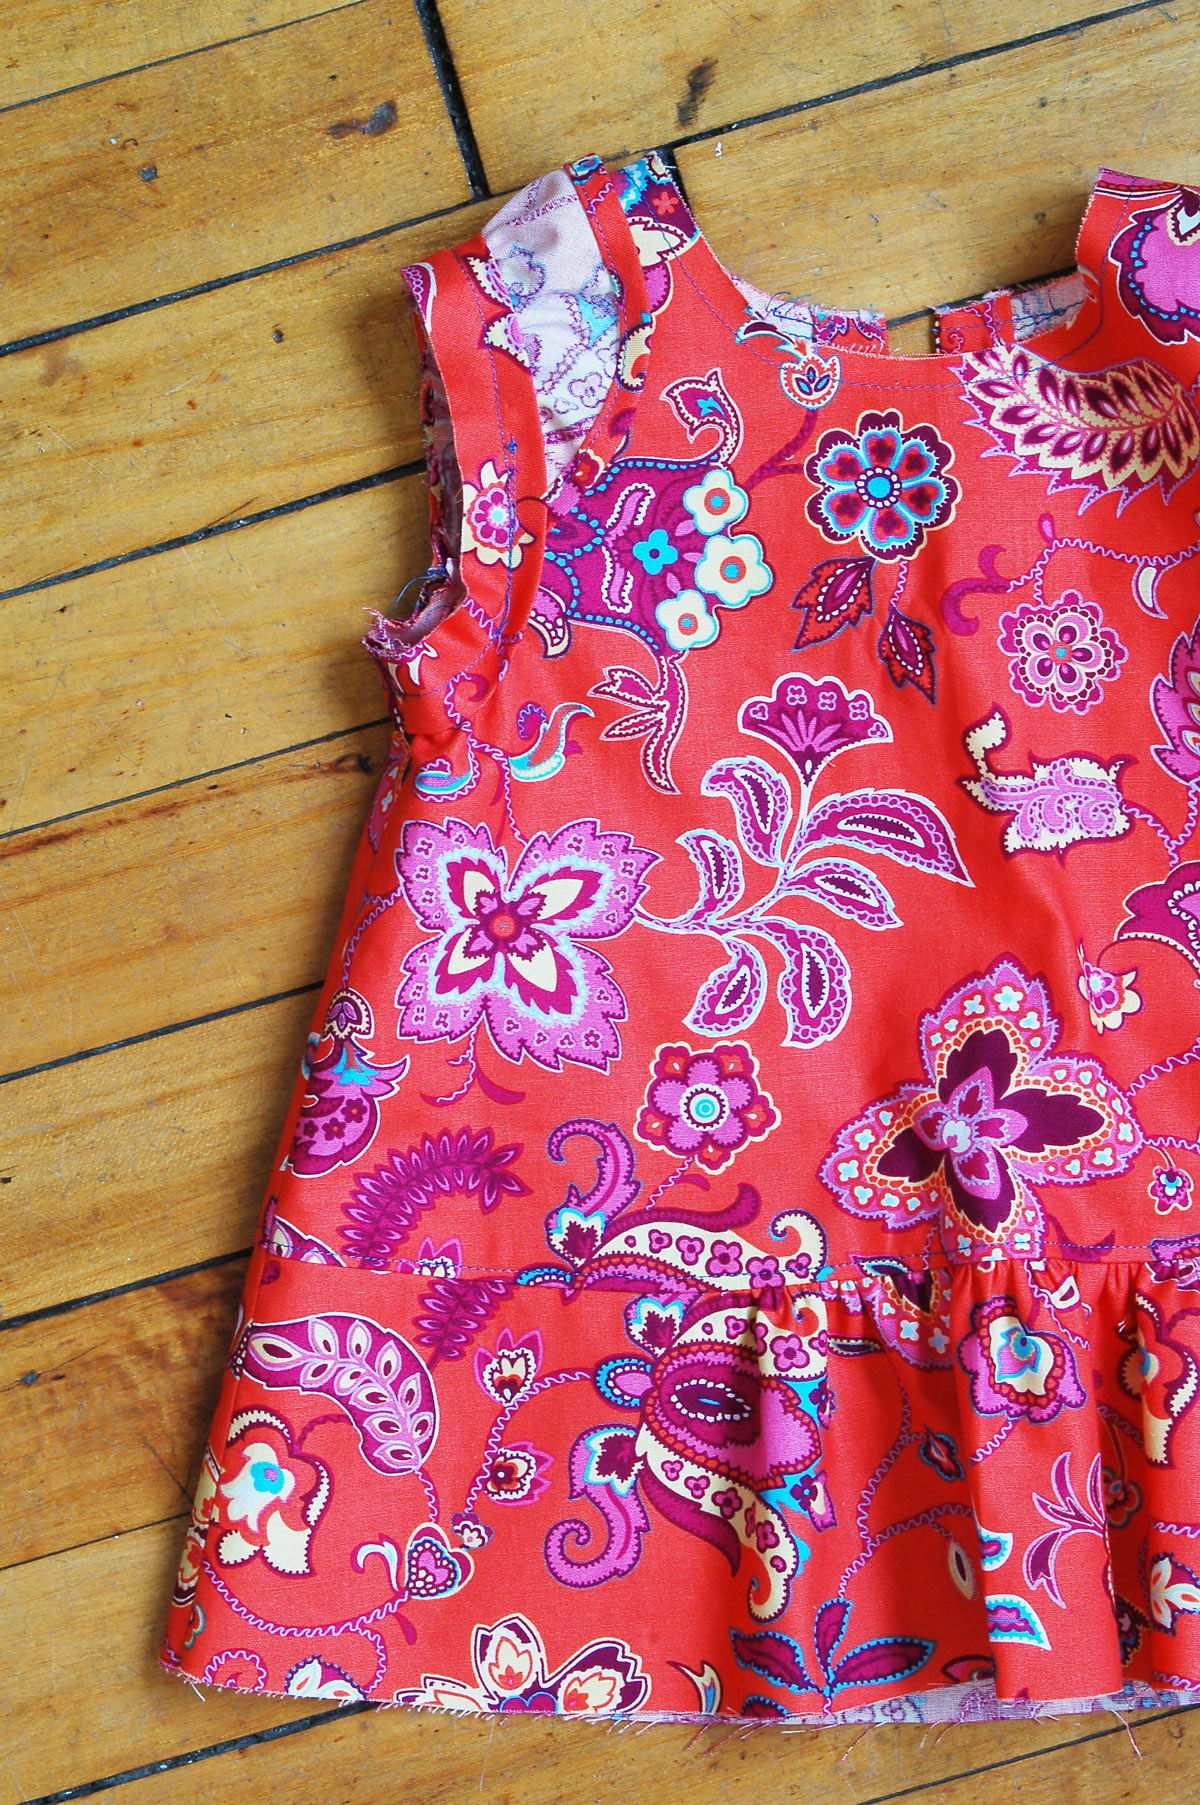
Prepare the keyhole facing and the blouse back
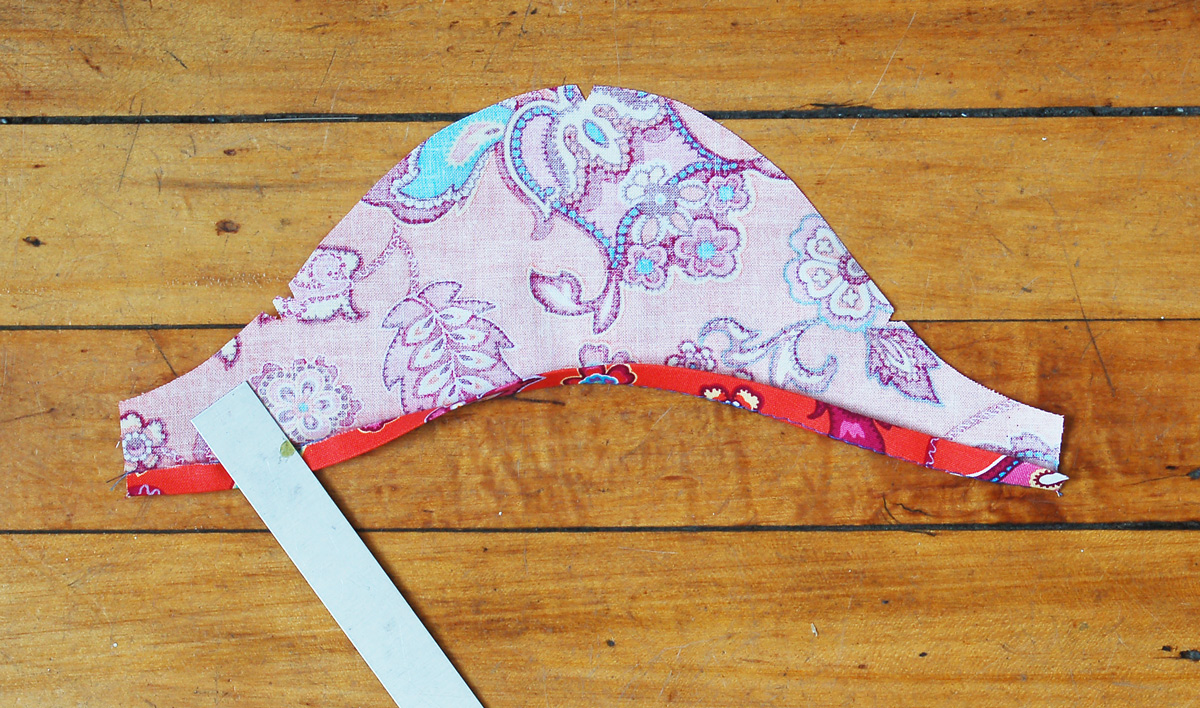
1. Following the interfacing manufacturer’s instructions, fuse the cut keyhole interfacing to the wrong side of the keyhole facing and then transfer the stitching line and the dot from the fabric to the interfaced side of the keyhole-facing piece.
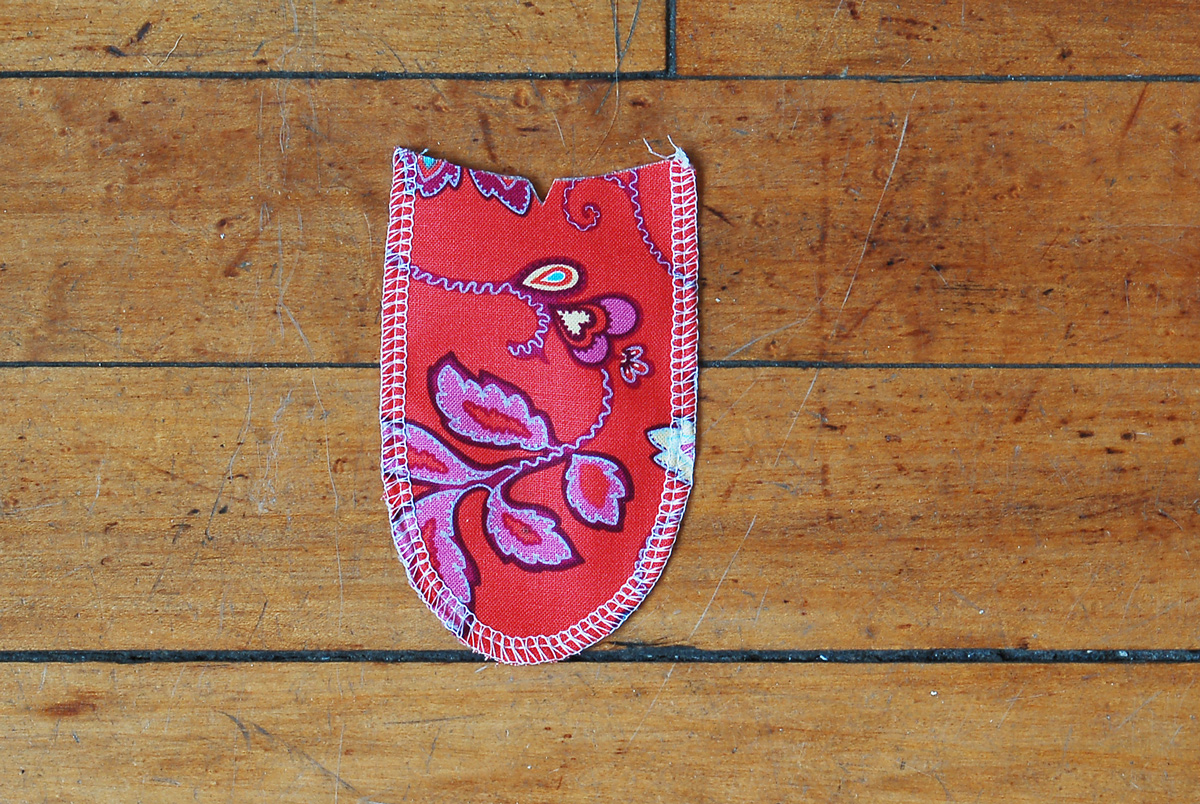
2. For a clean finish, and to give the keyhole facing a neat appearance on the inside of the finished garment, sew around the curved outer edge of the keyhole facing with a zigzag stitch or with a serger. (If you use a serger, take care not to trim the edge as you finish it.) Fold and press the finished edge to the wrong side by about 1/4” (if you like, you can sew a line of basting stitches to serve as a folding guide), then edgestitch close to the fold to finish it.
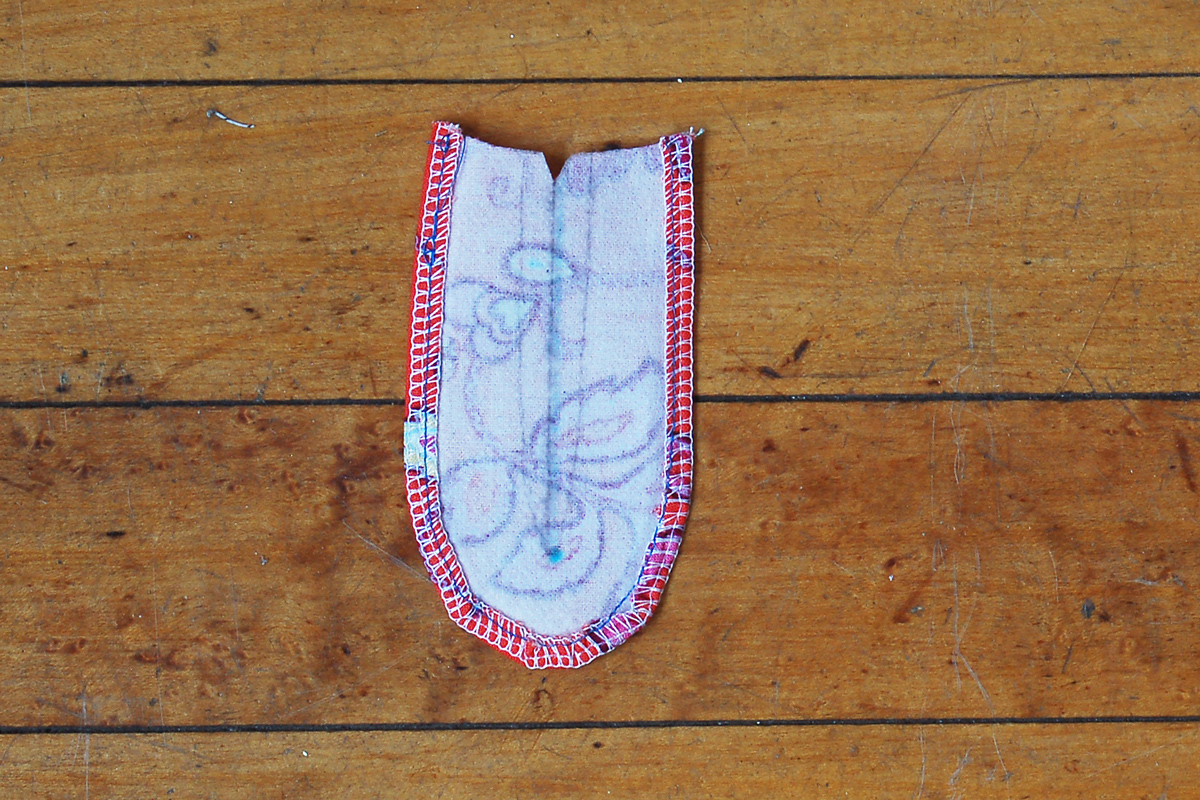
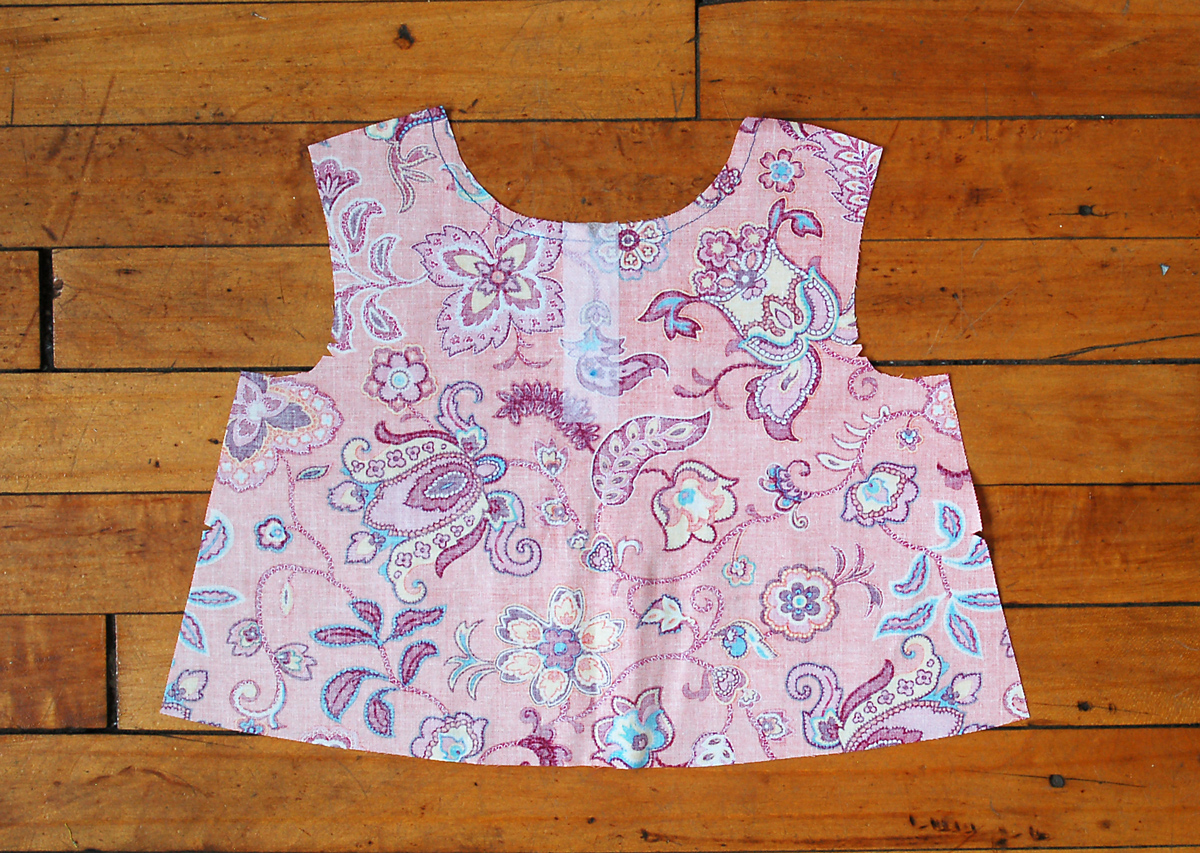
3. Pin the keyhole facing to the blouse back, with right sides together, matching the neckline notches and the center-back folds. Stitch carefully along the facing’s marked stitching line, pivoting to take one horizontal stitch across at the dot and then pivoting again to stitch up the other side.
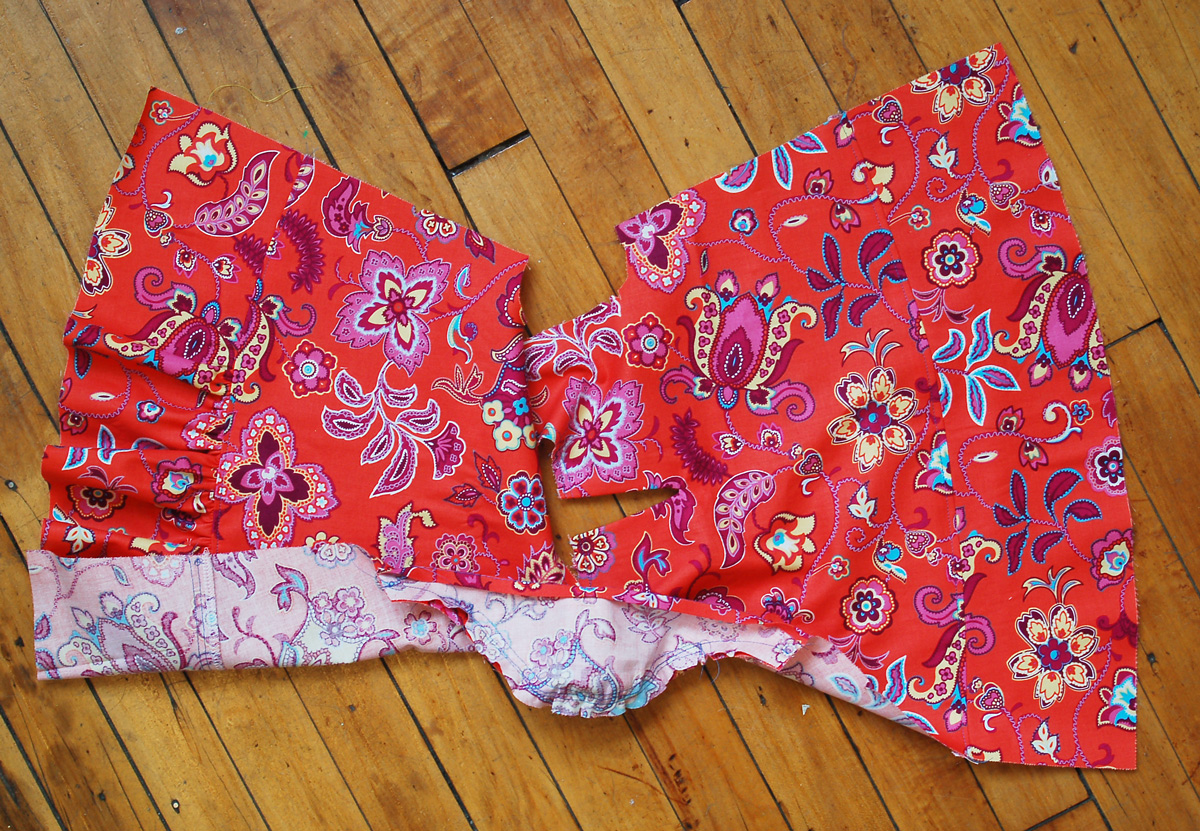
4. Cut down the center blouse back between the two stitching lines and trim the seam allowances to 1/4”. Carefully clip to the stitching at the dot, being sure not to clip into the stitching itself.
5. Turn the keyhole facing to the blouse back’s wrong side and finger-press the seam before pressing it with an iron, rolling the seam slightly toward the facing so it won’t show from the right side. If there are puckers at the bottom of the opening, go back and clip closer to the dot (but, again don’t clip into the stitching itself). Pin or baste the facing to the blouse back at the neckline with a 1/4” seam to hold it in place temporarily.
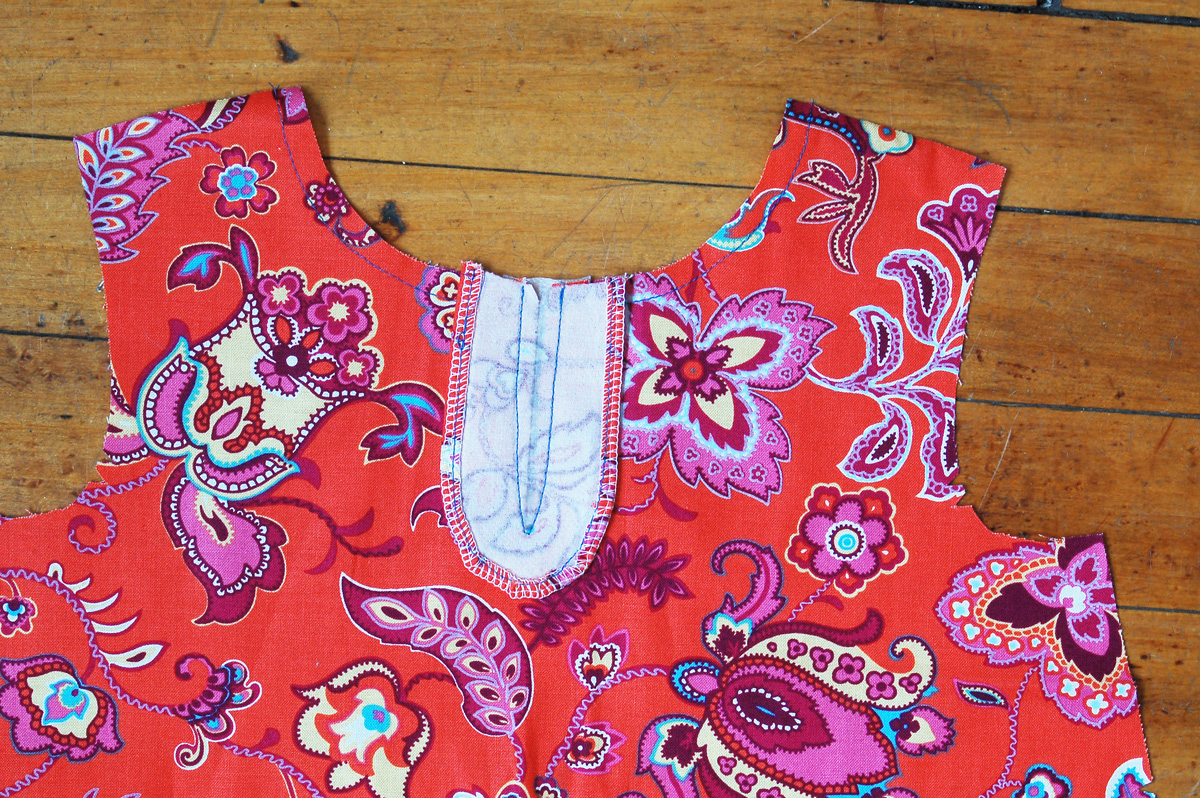
That’s all for today. Tomorrow we’ll be assembling the blouse. We’ll see you then!
Day 2
Welcome to day two of the Butterfly Blouse sew-along. Today we’ll be assembling the blouse. Off we go!
Assemble the blouse
1. Stitch two rows of gathering stitches along the top edge of the peplum front piece between the two dots you transferred from the pattern piece. Sew the first row of stitches 3/8” from the raw edge and sew the second row of stitches 1/4” below the first row (5/8” from the raw edge), starting and stopping at each dot seam and leaving thread tails several inches long for pulling.
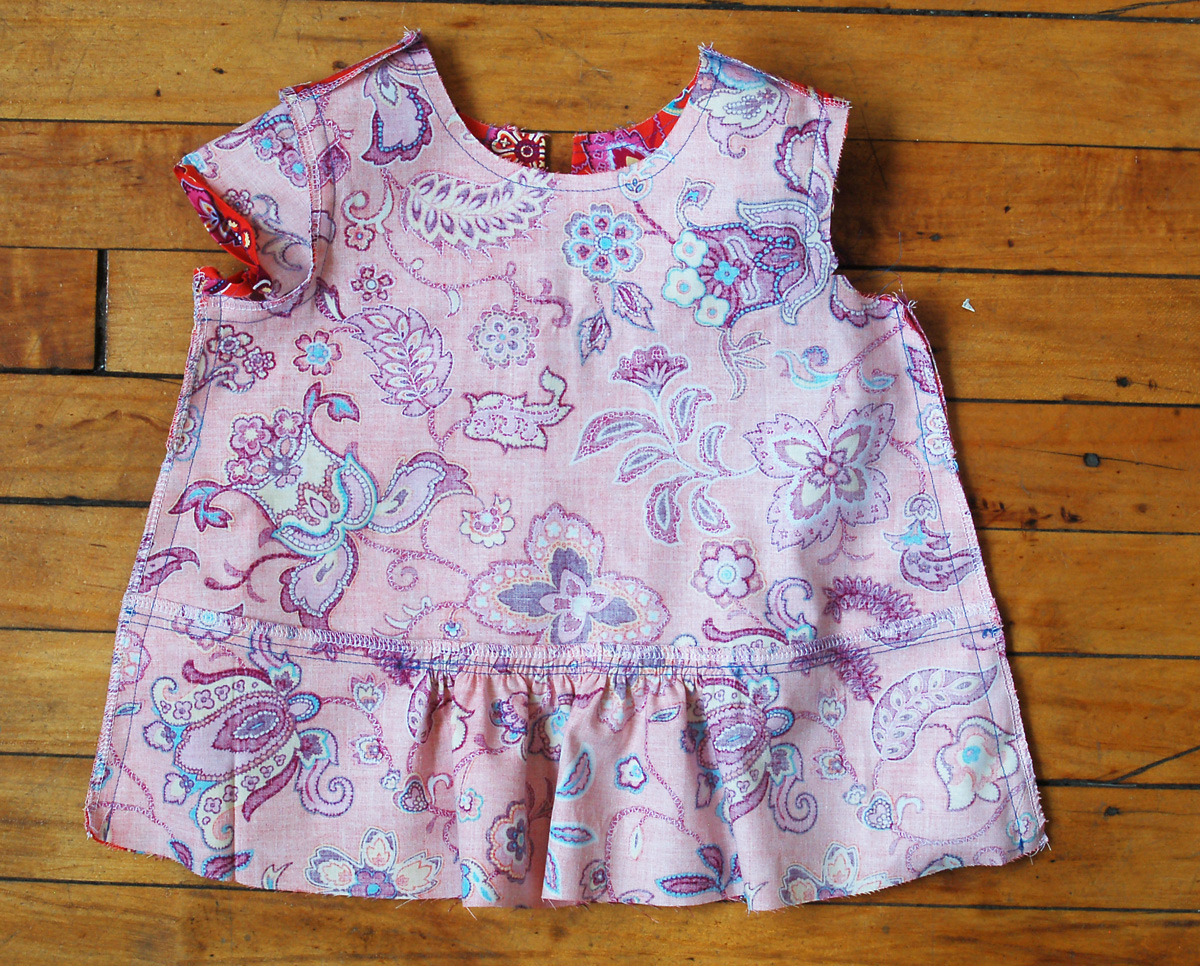
2. Pin the top edge of the peplum front to the bottom edge of the blouse front, with right sides together. Start pinning at the edges and then at the dots. Pull up on the tails of the gathering threads to cinch up the width of the center portion of the peplum front until it matches the center of the blouse between the dots and then distribute the gathers evenly. Stitch the peplum to the blouse with a 1/2” seam.
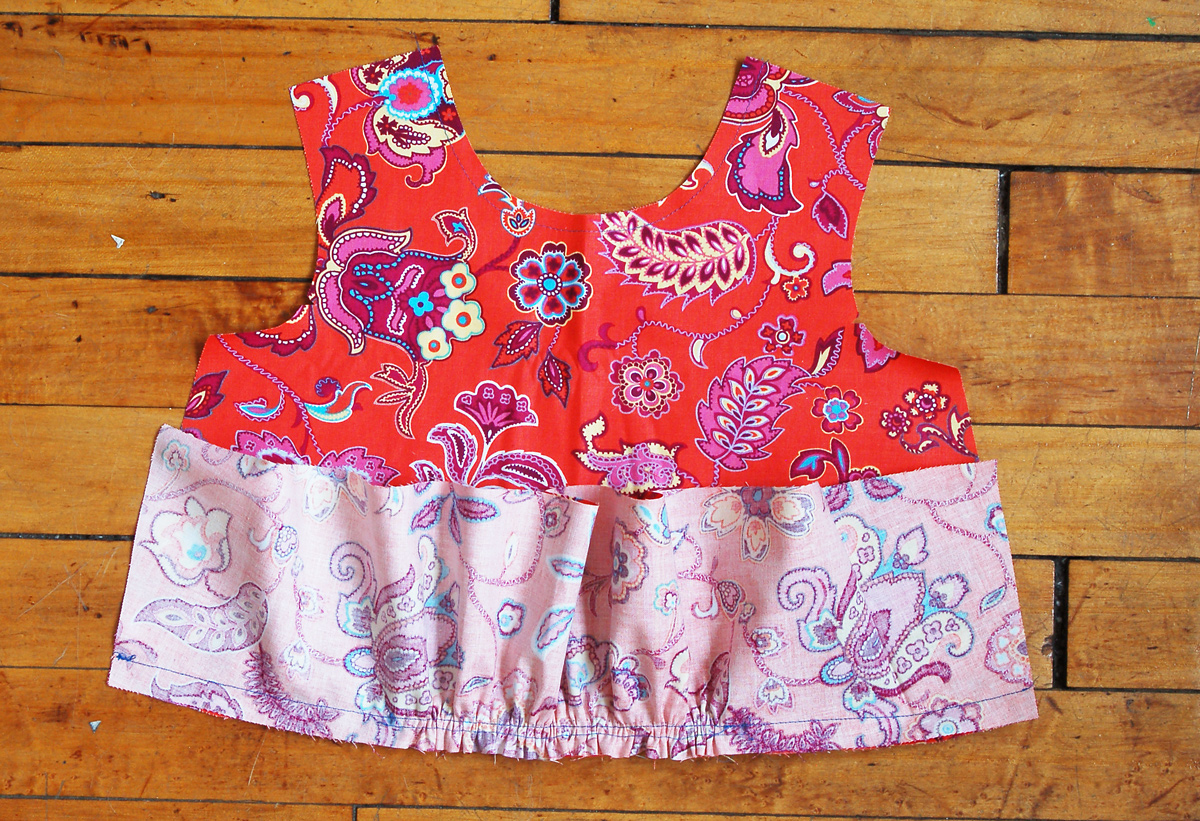
3. Finish the seam allowances using your preferred method. Press the seam allowances toward the blouse front. If desired, edge stitch the seam from the fabric’s right side to help hold the seam allowances in place and to give the seam a crisp finish.
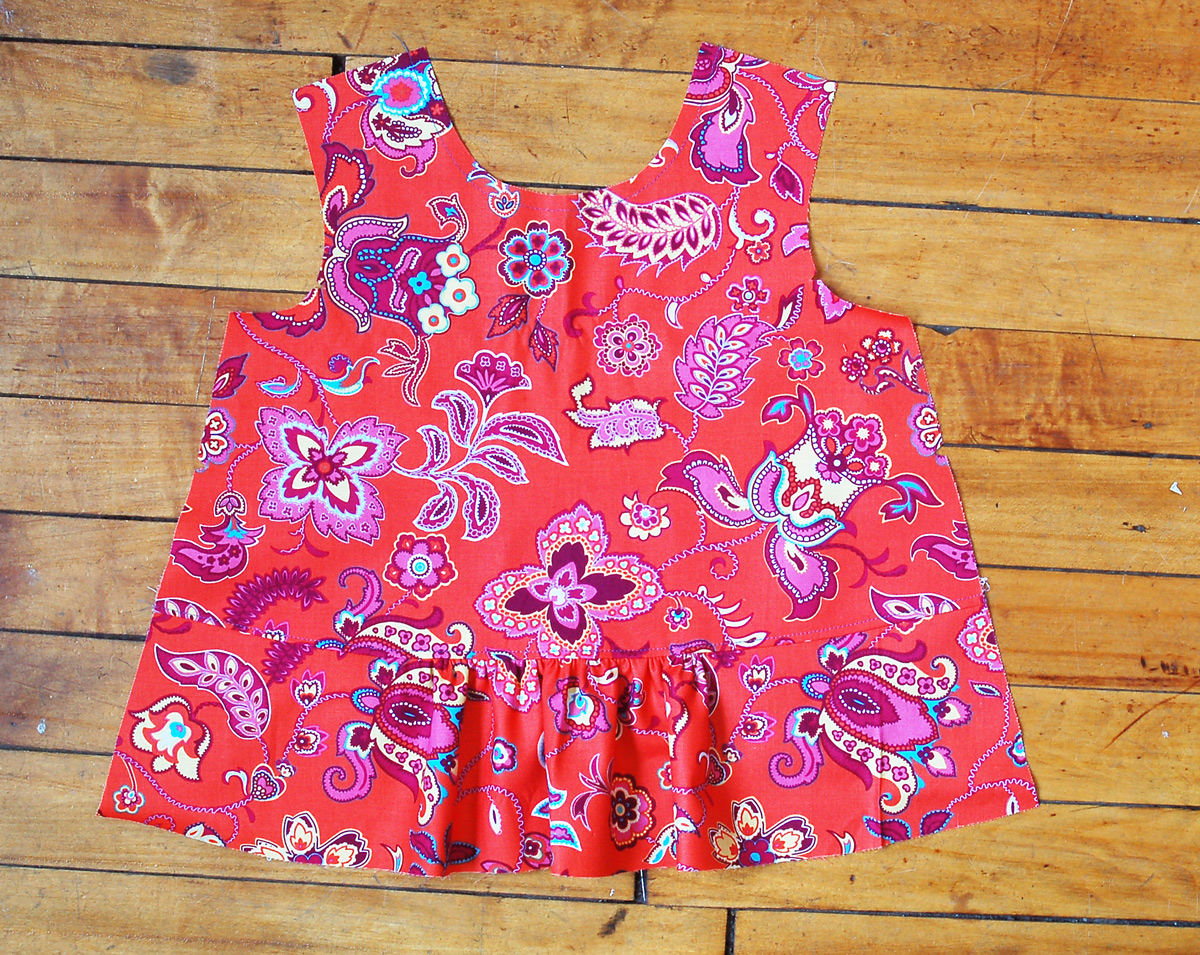
4. Pin and stitch the back peplum in the same manner as the peplum front. (Note that the back peplum doesn’t have gathering, so the gathering stitches aren’t needed.) As with the peplum front, finish the seam allowances together and press them towards the blouse back. Edgestitch the seam from the fabric’s right side catching the seam allowances in the stitches if desired.
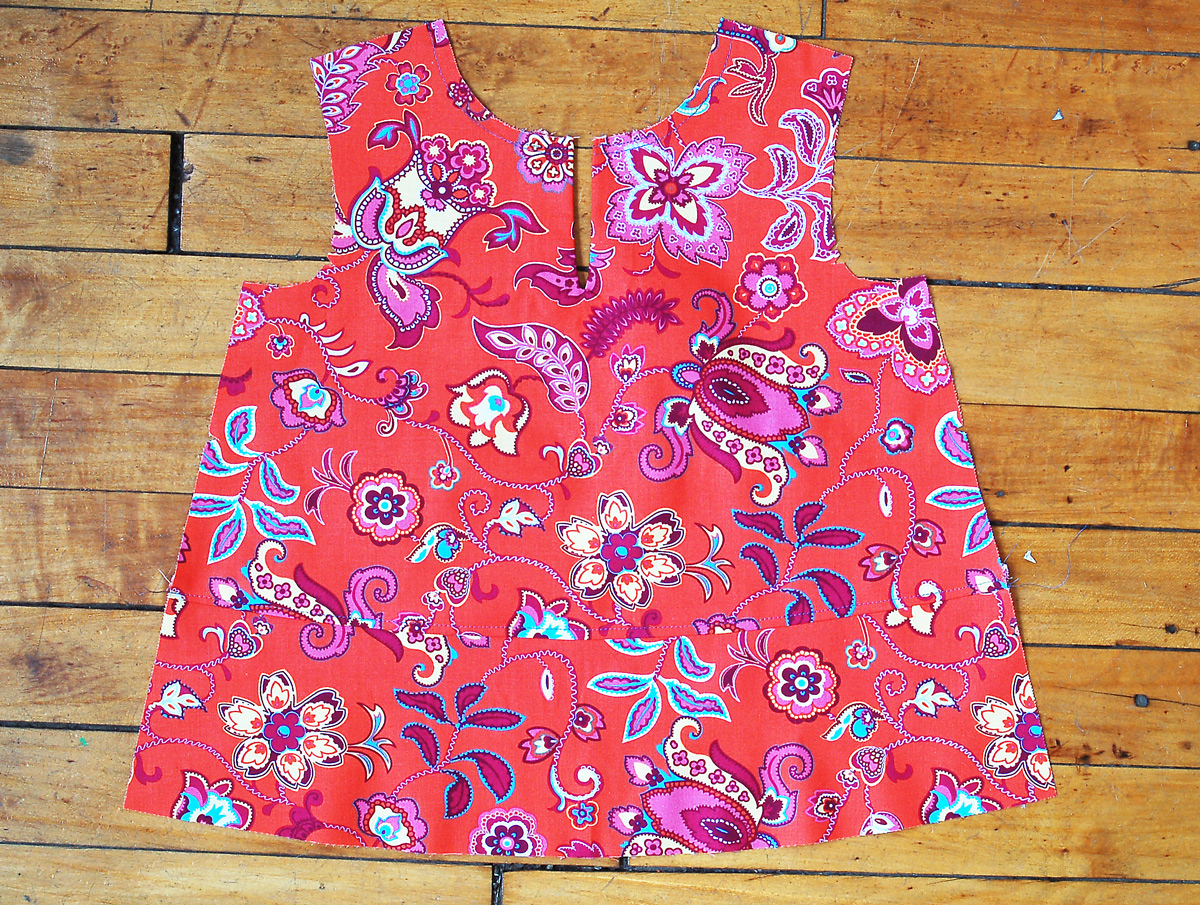
5. Pin the front and back blouse pieces together at the shoulders, with right side facing and the raw edges aligned. Stitch the shoulders with a 1/2” seam, backstitching or lockstitching at both ends. Press the seam allowances open and finish them using your preferred method.
All OK so far? We’ll see you back here tomorrow when we’ll be finishing the neckline.
Day 3
Hello Again! The steps for today won’t take you very long at all. Ready?
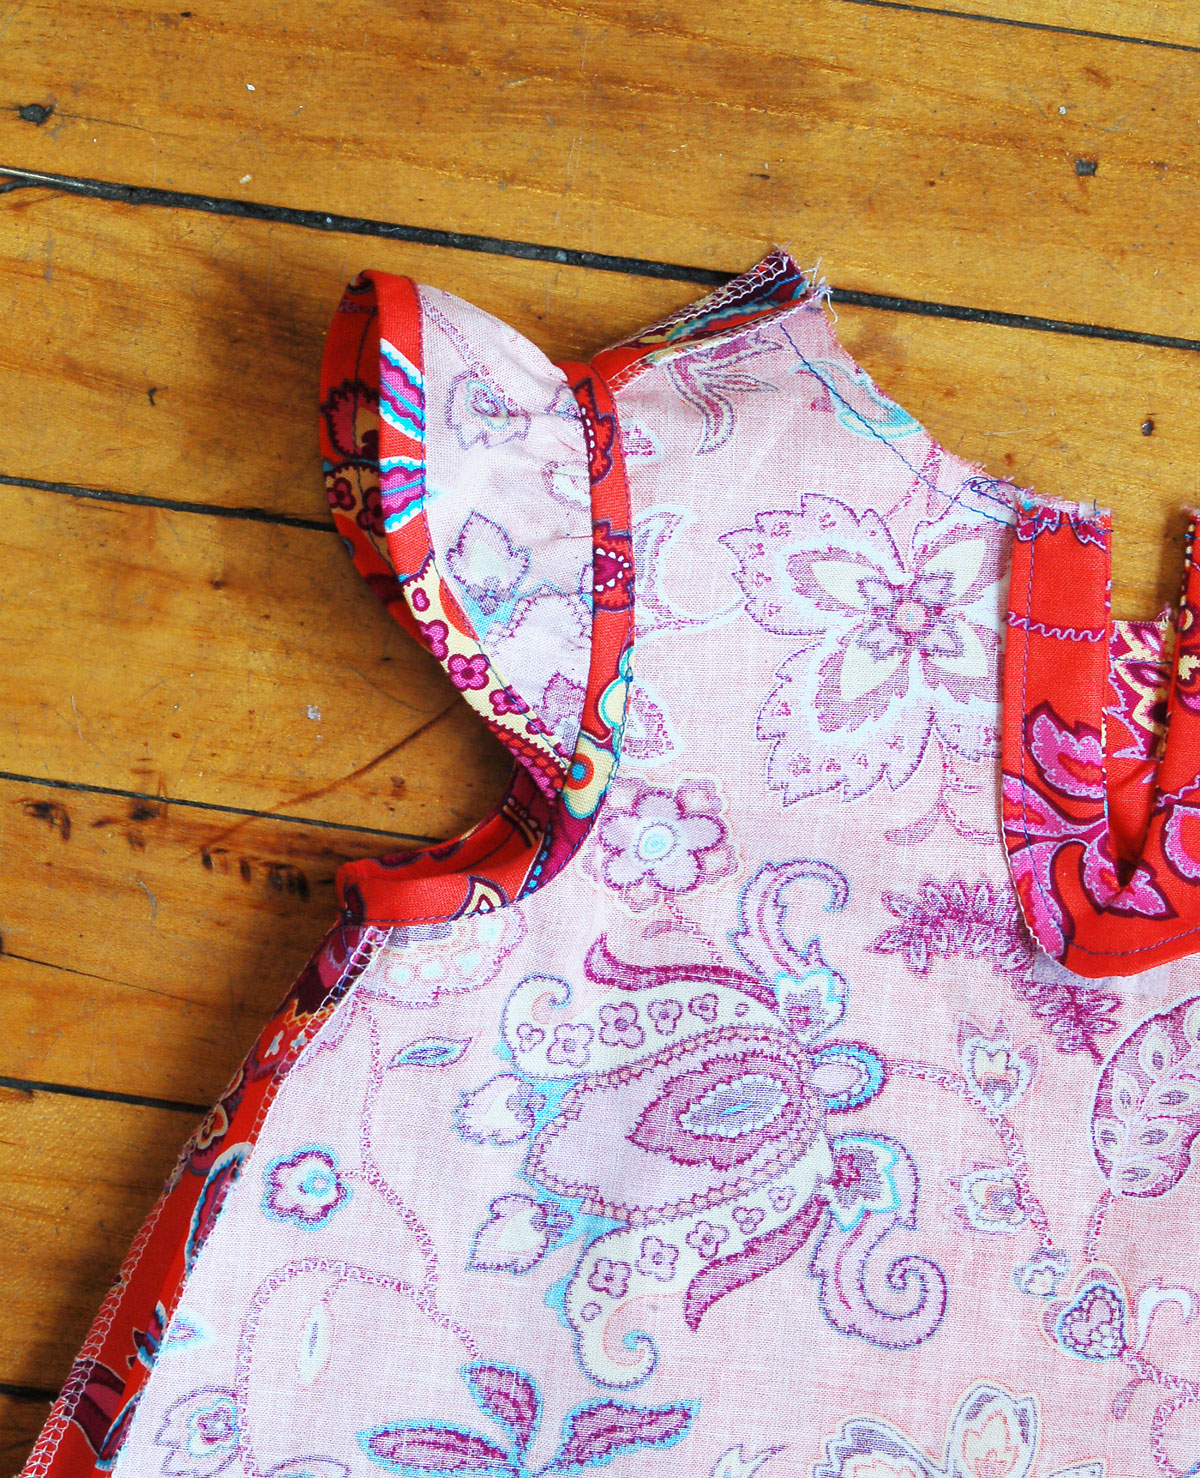
Finish the neckline
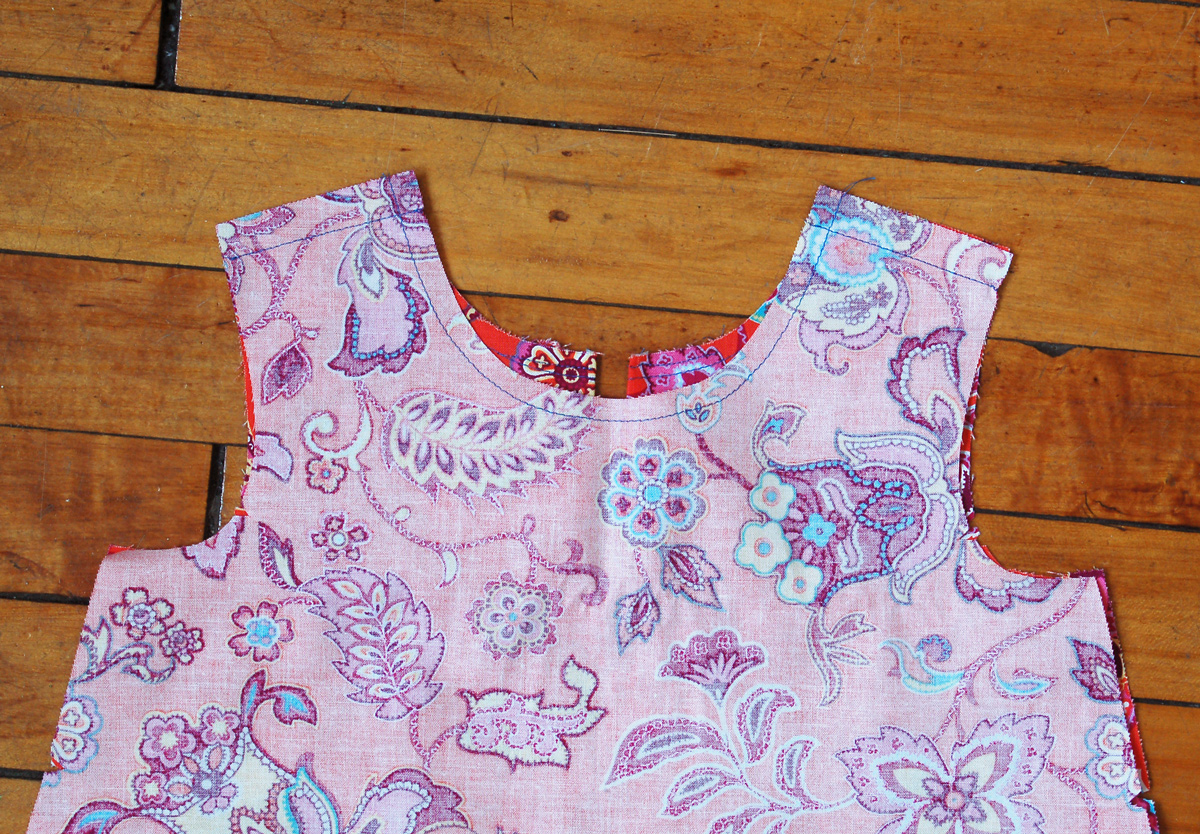
1. Fold the neck bias facing in half lengthwise, with wrong sides together, and press the fold to make a center crease.
2. Working on the right side of the blouse, pin the open edge of the facing to the neckline starting at one center-back edge, leaving at least 1/2” of facing extending beyond the center-back edge. Gently stretch the facing just a little bit as you work your way around the neckline, continuing to pin the facing in place as you progress. The facing will be longer than needed. Stitch the facing to the neckline with a 1/2” seam.

3. Trim the stitched seam allowances to 1/8” and trim the ends of the bias so they extend 1/2” beyond the center-back edges of the neckline.
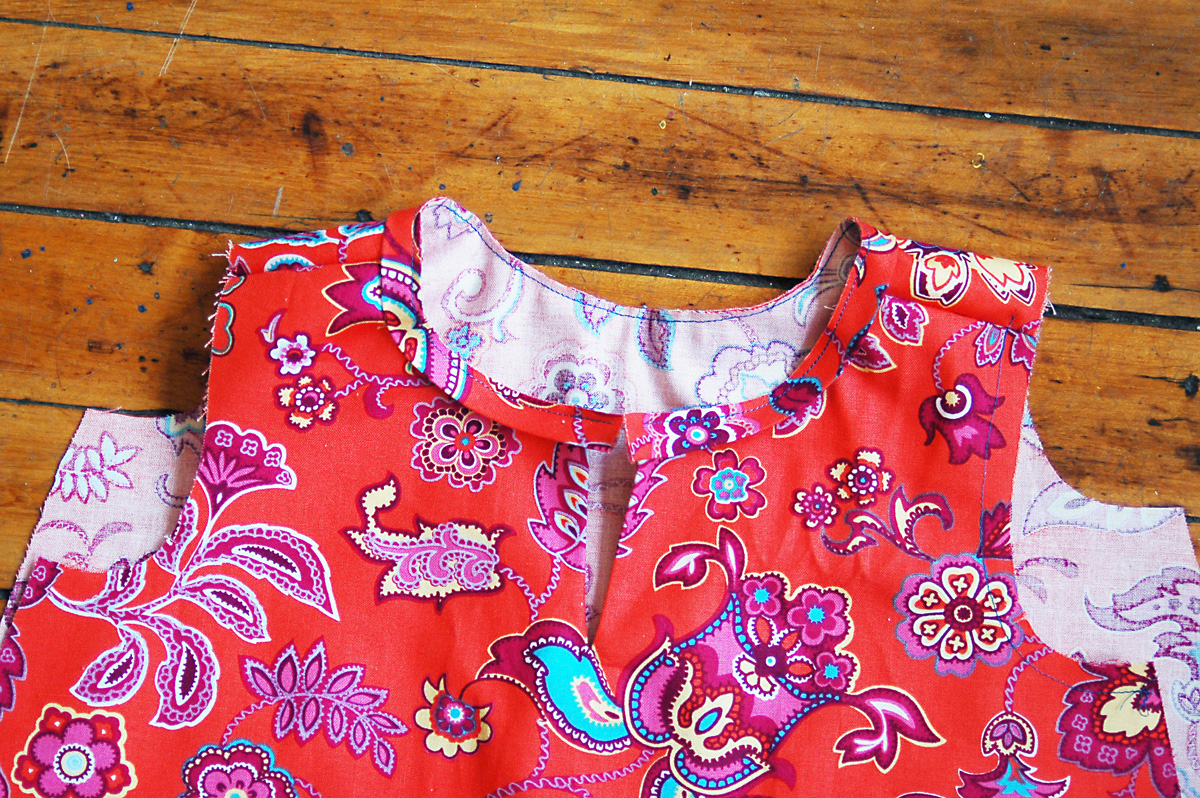
4. Press the neck facing and seam allowances up and away from the blouse. Fold and press one short end of the neck facing around the edge of the neckline so the crease matches the edge of the keyhole opening. Repeat with the other short end of the facing on the opposite side of the keyhole opening.
5. Fold the neck facing to the wrong side of the blouse, rolling the seam slightly toward the inside so it won’t show on the finished blouse. Make sure the short folded edges are tucked in nicely so they won’t show. Edgestitch the folded edge of the facing to the blouse to finish it. Press the facing to ensure that the neckline lies smoothly.
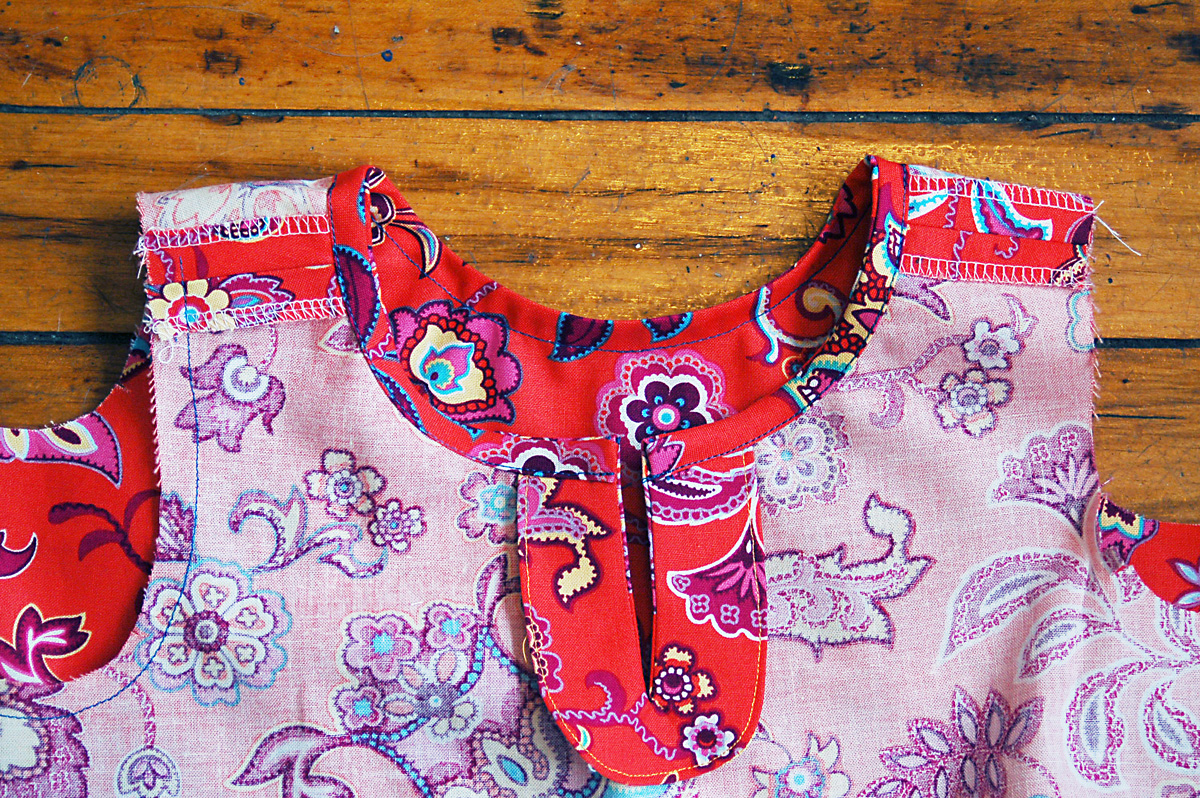
If you’d like, you can try hand sewing the neckline bias facing for less puckering. That’s it for today. I’ll see you tomorrow, right here!
Day 4
Hello again and welcome to day four of the sew-along where we will be attaching the sleeves and sewing the side seams. Here we go!
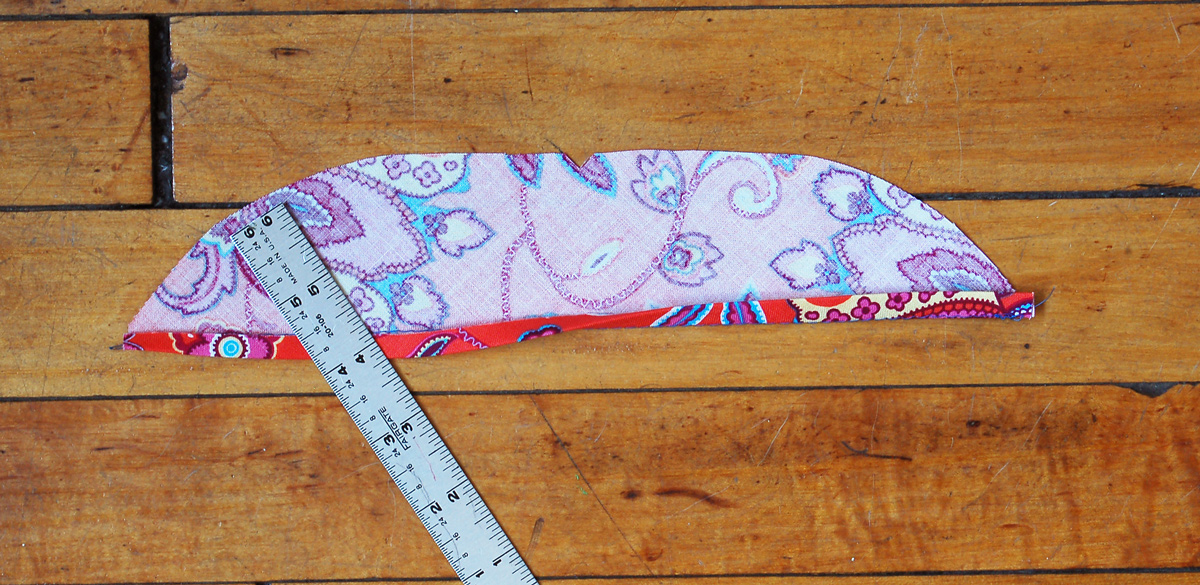
Prepare and attach the ruffle sleeve (View A)
1. Sew a line of basting stitches 5/8” from the straight edge of the sleeve. These stitches will become the fold line for the sleeve hem. Fold and press the fabric’s raw edge to the basting line on the wrong side. Then fold and press the fabric again along the basting line to enclose the raw edge and create a narrow hem. Edgestitch the innermost fold to finish the hem. Remove any visible basting stitches from the fold line and trim any corners that extend beyond the curve of the edge.
2. Stitch two rows of gathering stitches on the curved edge of the sleeve. Sew the first row of stitches 3/8” from the raw edge and sew the second row of stitches 1/4” below the first row (5/8” from the raw edge), leaving thread tails several inches long on each end for pulling. (Note that the sleeve cap also has a center notch, which you’ll use in the next step to help align and pin the sleeve and armhole to sew them together.)

3. With right sides together, pin the curved edge of the ruffle to the armhole of the blouse and aligning the center notch on the ruffle sleeve to the shoulder seam. Pull on the tails of the gathering stitches to cinch up the ruffle on both sides of the notch, distributing the gathers evenly. Baste the ruffle to the armhole with a 1/2” seam.
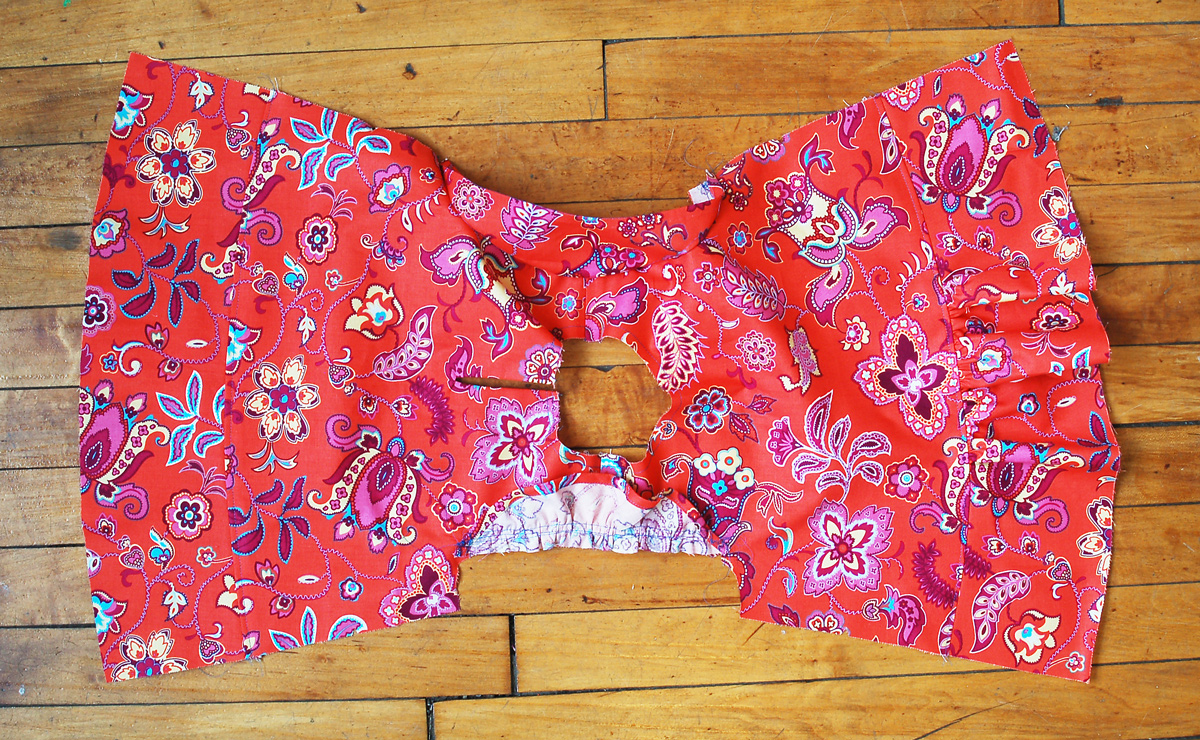
4. Repeat steps 1-3 to prepare and attach the second sleeve to the blouse.
Prepare and attach the cap sleeve (View B)
1. To prepare the sleeve for hemming, sew a line of basting stitches 5/8” from the sleeve’s bottom edge, then fold and press the fabric’s bottom raw edge to the basting line on the wrong side. Fold and press the fabric again along the basting line to enclose the raw edge and to create a narrow hem. Unfold the hem keeping the crease in place for finishing the sleeve hem later.
2. Stitch two rows of gathering stitches on the curved edge of the sleeve, starting and stopping at the sleeve cap’s side notches. Sew the first row of stitches 3/8” from the raw edge of the sleeve and sew the second row of stitches 1/4” below the first row (5/8” from the raw edge), leaving thread tails several inches long on each end for pulling. (Note that the sleeve cap also has a center notch, which you’ll use in the next step to help align and pin the sleeve and armhole to sew them together.)

3. With right sides together, pin the sleeve’s raw edge to the raw edge of the blouse’s armhole, aligning the sleeve’s and armhole’s notches and matching the center notch on the sleeve with the shoulder seam on the blouse. Pull on the tails of the gathering threads to make the sleeve fit the armhole, adjusting the ease evenly across the top of the sleeve, and then finish pinning the sleeve’s cap. (With most fabrics you’ll find that very little easing needs to be done.) Stitch the sleeve to the armhole with a 1/2” seam, backstitching or lockstitching at both ends. Finish the seam allowances together using your preferred method and then press them toward the sleeve. Once the sleeve is sewn, you can remove any visible gathering stitches from the sleeve cap.
4. Repeat steps 1-3 to prepare and attach the second sleeve.
Sew the side seams
1. Position the blouse front and back together, with right sides facing and the edges aligned, and pin the side seams, matching the underarm seam, the notches, and the hem edges. Join the sleeve (View B only) and side seam with one continuous 1/2” seam, first unfolding the sleeve hem if you’re working with View B. Press the seam allowances open and finish them using your preferred method. Repeat to sew and finish the opposite side seam.
We’re almost done. Tomorrow we’ll be finishing our blouses!
Day 5
Are you ready to finish up? We just have a couple more steps to complete our blouses! The bias finishing on the flutter sleeves version makes really professional finish ruffled sleeves. For less puckering try hand sewing the armhole bias facings.
Finish the armholes (View A)
1. Fold and press one armhole bias facing in half lengthwise, with wrong sides together and the raw edges aligned. Unfold. Fold the facing in half widthwise, with right sides together and the raw edges aligned, and stitch the short ends together with a 1/4” seam. Press the seam open.
2. Refold the resulting loop in half lengthwise along the pressed crease, with wrong sides together and raw edges even, and pin the fold. Press this loop into a curve, stretching the outer folded edge slightly and using the steam setting on your iron to help ease in the excess fabric forming at the inside of the curve (the cut edge). This curve will mimic the armhole shape and will help when applying the armhole facing in the next step.
3. Pin the armhole bias facing to the right side of the blouse, aligning the facing’s and armhole’s raw edges and matching the facing’s seam to the underarm seam. The ruffle sleeve will be sandwiched between the facing and the blouse. Pin and stitch carefully all around the armhole with a 1/2” seam. Trim the stitches seam allowances to 1/8”.
4. Press the facing away from the blouse. Pull the ruffle sleeve away from the blouse and fold and press the binding to the inside of the blouse, rolling the seam slightly to the inside of the armhole so it won’t show on the finished blouse. Pin and edge stitch the innermost folded edge of the bias facing to finish it.
Finish the blouse
1. To hem the blouse, sew a line of basting stitches 5/8” from the blouse’s raw bottom edge. These stitches will become the fold line for the hem. Fold and press the fabric’s raw edge to the basting line on the wrong side. Then fold and press the fabric again along the basting line to enclose the raw edge and create a narrow hem. Edgestitch the innermost fold to finish the hem. Remove any visible basting stitches from the fold line.

2. To hem each sleeve (View B only), turn the blouse right-side out and refold each sleeve along the previously folded creases before stitching along the innermost fold.
Hint: Because the sleeve openings are narrow, it’s generally easiest to hem the sleeves with the blouse turned right-side out, stitching from the inside of the sleeve and pushing the rest of the sleeve out of the way.
3. Stitch a button and a thread chain loop at the back edge of the neck so the two back edges will “kiss” when buttoned. If you’d like more information about making a thread chain, visit the tutorials section on the website.
All done!
We always love to see photos of the Oliver + S clothing you make. Don’t forget the Flickr group, where you can share your creations with other appreciative seamstresses. And use the label #oliverands if you’re on Instagram.
Please come back to the Sew Alongs forums group June 15th when we’ll be having a sew-along for the Butterfly Skirt.
No Comments yet.