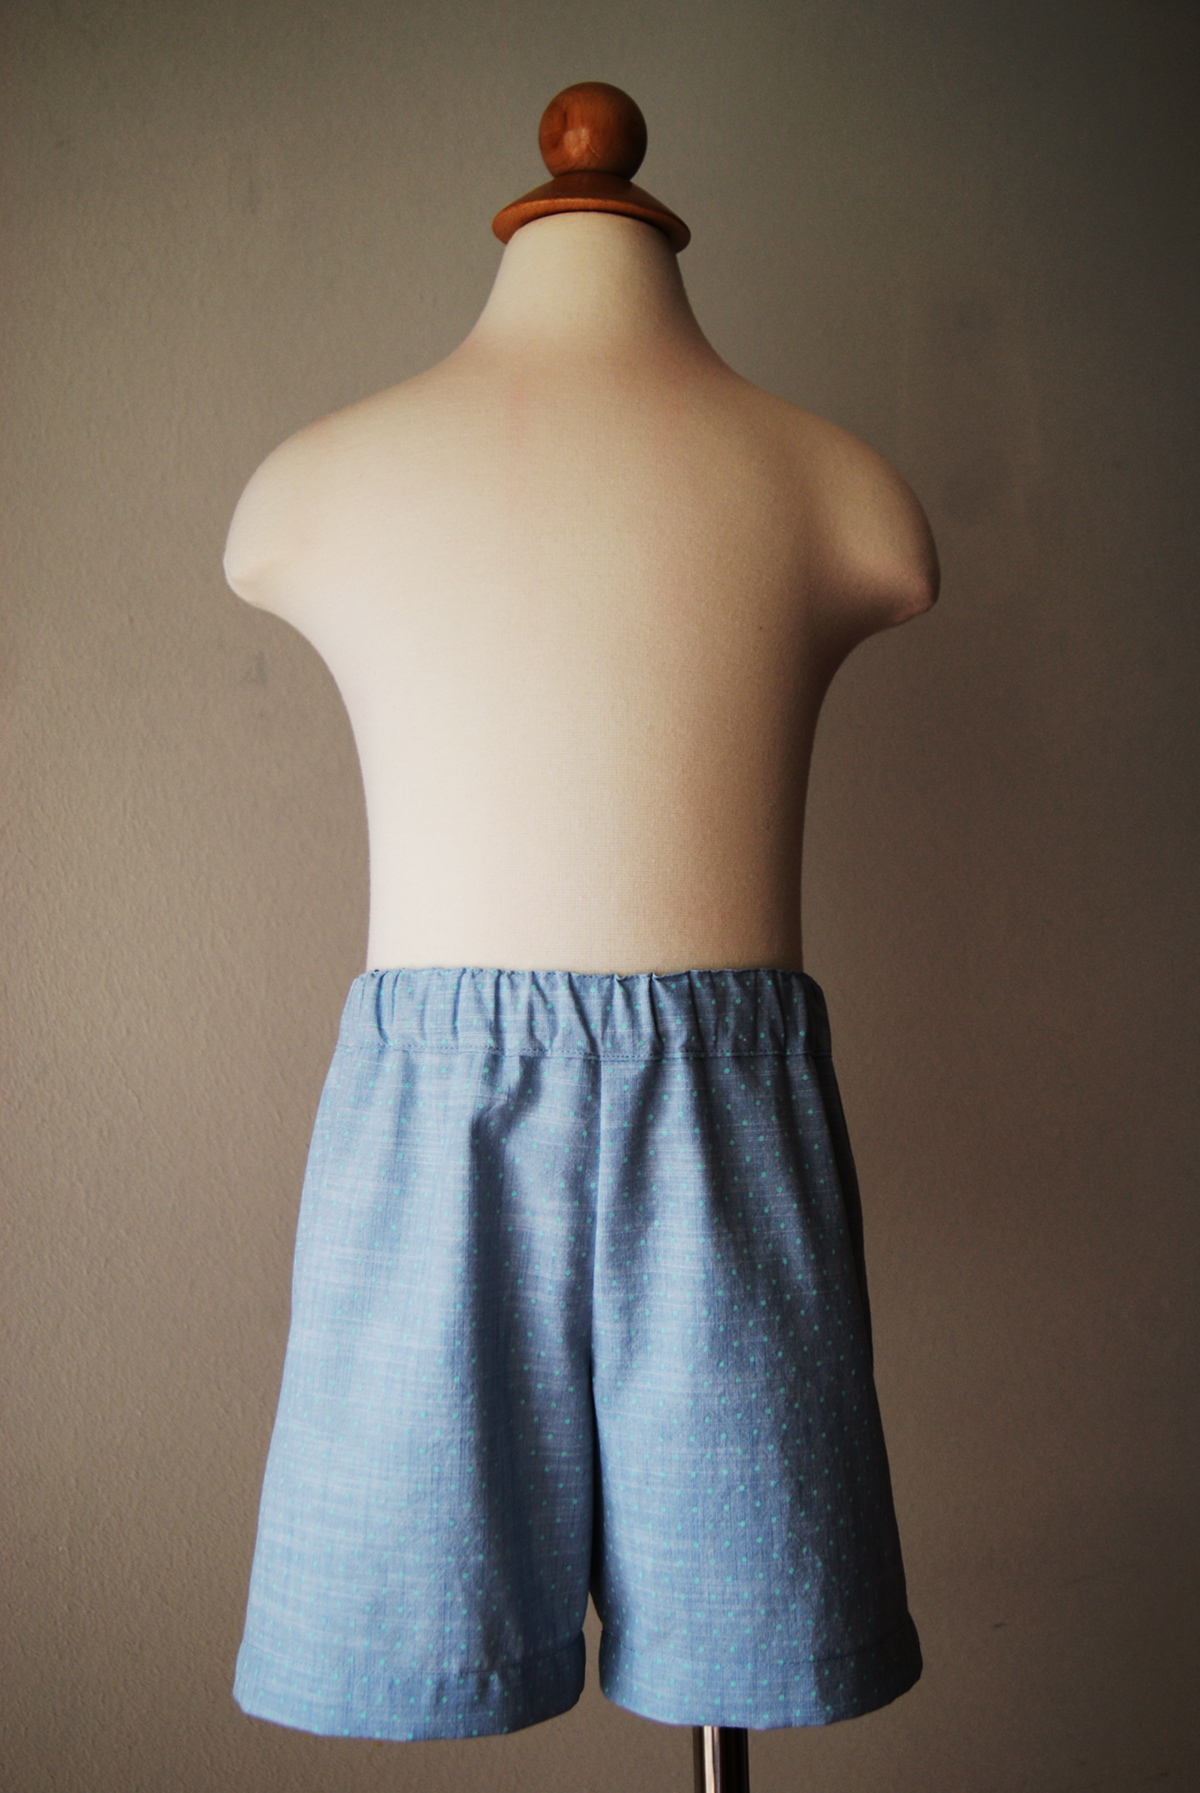
Less than a month ago the new Sunny Day Shorts pattern was introduced. In that short time, Kristin has already shared how to customize them into Beach Bum Shorts. Today and tomorrow we are going to be sewing them up by the pattern with lots of photographs for those of you who like to work visually. So let’s get started.
Preparation
First you’ll need the Sunny Day Shorts instructions and pattern. Gather the amount of fabric you need for the size you’re sewing, as well as 1 yard of 3/4″ elastic and some coordinating thread.
Print out the pattern pages, find the size you need, and cut out your patterns pieces. Join the pattern pieces together with some tape.
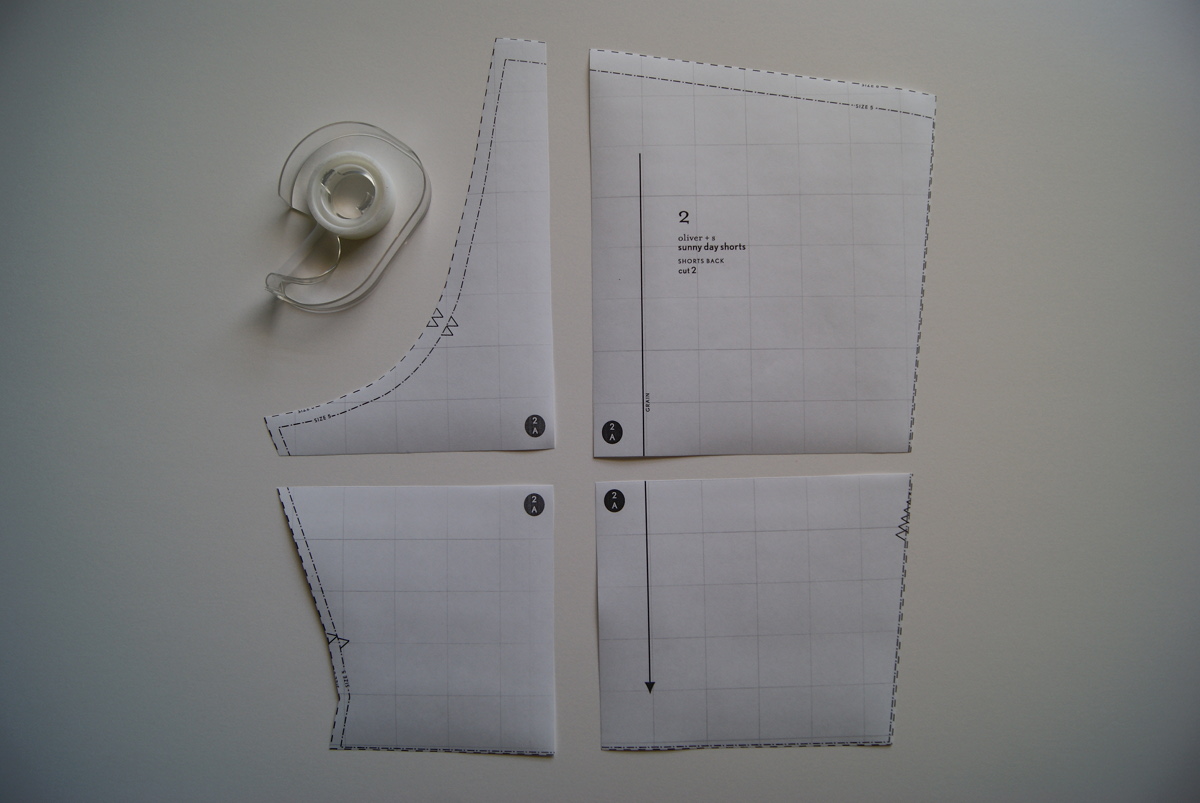
Cut the pieces out of the fabric.

Sewing Instructions
Prepare the Front and Back
1. Align and pin one shorts front to the corresponding shorts back, with right sides together, and stitch the inseam and outseam (the side seam) with 1/2″ seam.

Press the seam allowances open.
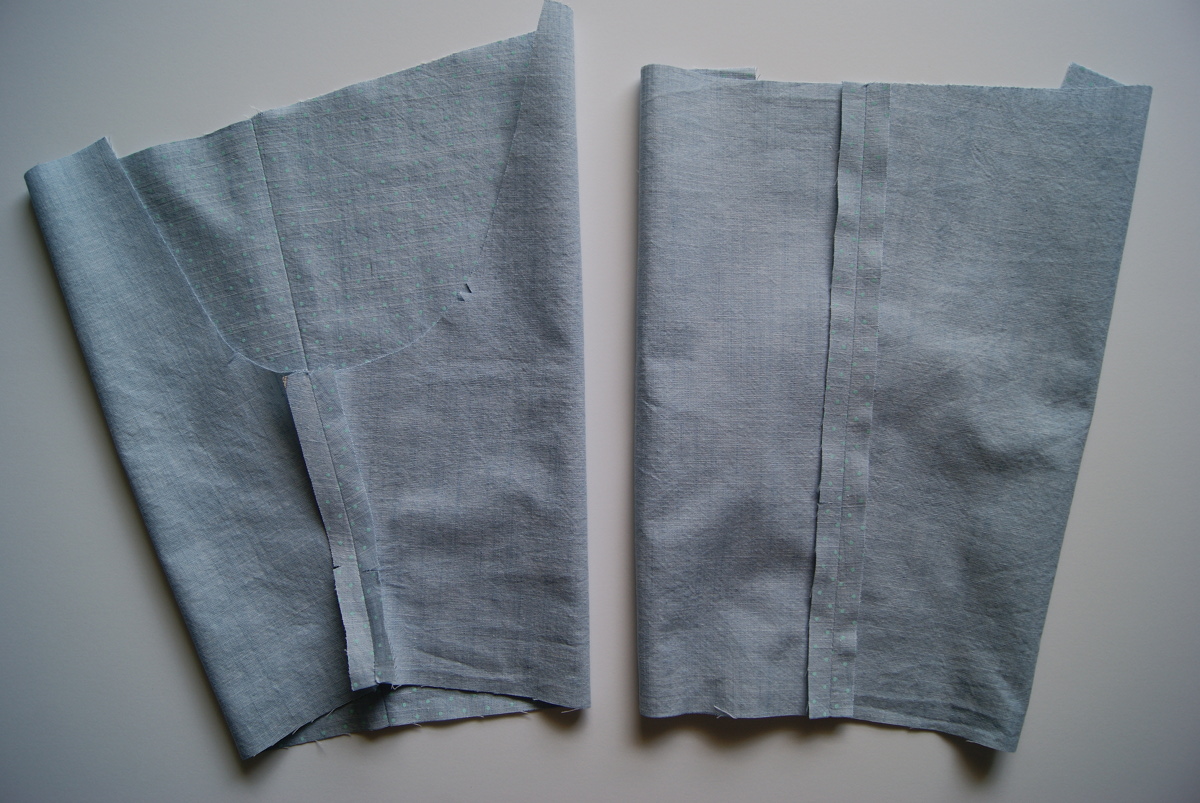
Finish the seam allowances with your preferred method.
Note: There are several seam finishing tutorials available on the Oliver + S website: straight stitch, pinking, bound, French, and flat-felled.
Enclosed straight stitch finished seams were used for the shorts in this tutorial.

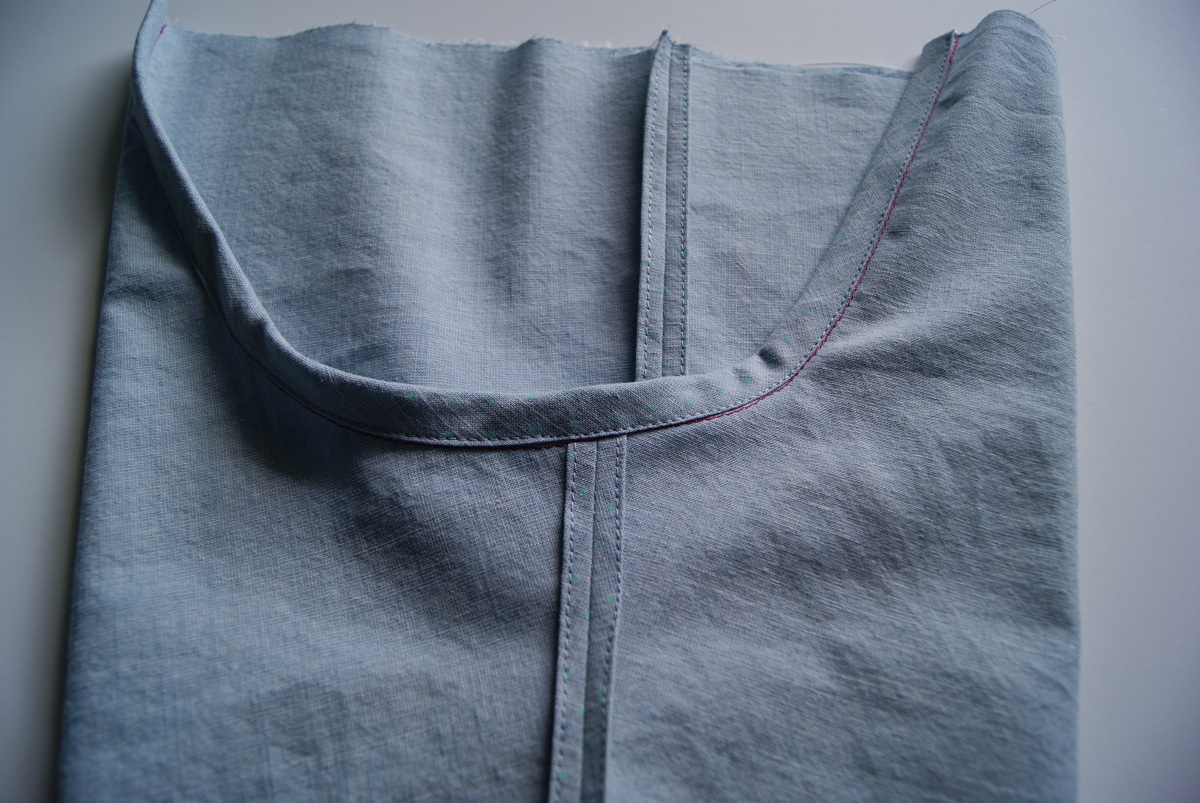
2. Turn one shorts leg right side out and the other leg wrong side out. Slip the right-side-out leg into the wrong-side-out leg, and pin the layers together with the edges, notches, and seams aligned. Stitch the rise (the crotch) with a 1/2″ seam. Stitch the rise a second time on top of or just inside of the first seam, starting at the single notch and ending at the double notches. Stitching a second time will help strengthen this seam.

3. Press the rise’s seam allowances open or to one side. Since the fabric is cut on bias at the curved part of the rise, the seam allowances will stretch, so you can use the curved front part of your ironing board to help you open the seam allowances. If you turn the shorts wrong side out and position the rise along the ironing board’s curved edge, you’ll be able to press the seam allowances to one side of the seam without creasing the rest of the fabric.

Finish the seam allowances together using your preferred method. Bound (with bias tape) seams were used for the shorts in this tutorial.
Tomorrow we will tackle the waistband and finish up the shorts.
If you have any questions on any of the steps so far, please ask them in the comment section.
I have made two pairs of these shorts already. So, so easy and perfect fit/comfort for my daughter.
Oliver + S: Can you tell me where to get a nice dress form like you are using to model these shorts?
Appreciate the pattern, but they do seem awfully short for my slightly taller than average boys. What’s the best way to add a few (4-5) inches to make these more knee length and less ’70s throwback?
I am having difficulty deciding which size to make. What does the dimension, “Waist, Extended” mean? Also, is the Outseam measured from the very top of waistband to bottom of hemmed short?
Oh, I like that bound crotch seam. Never occurred to me but I bet it makes the shorts much stronger for a rough-and-tumble baby boy. Totally doing that in the future. Thanks!
Waist extended means if you stretched out the elastic, so basically the length of the waist band minus the seam allowances. This you need to know so you can figure out if the waist will go over the hips/buttocks- i.e. the widest body part.
As for lengthening, I would guess the best spot is where the notch is on the crotch line. There is a grid line right there, so you know it would be straight. Also if you did it at the notch, you know that you will be lengthening in the same spot, on both front and back pieces.
Move down an inch or two or whatever you want to lengthen, put some paper between the lines and then hand blend the new cut line.
Thank you for the pattern! I made these for my almost 2 year old. They were tight in the rear and legs for her. She is still in diapers and has generous padding back there (pear doesn’t fall far from the tree). I made the 3t size. I liked the legnth. Should I make a larger size and cut the legnth or adjust the 3t pattern?
Jaimie,
The child size dress form is from Mannequin Mode. You can see them here (scroll down): http://www.mannequinmode.com/kids.html#anchor_644
For those of you who want to lengthen the Sunny Day Shorts pattern pieces, you might find this Lengthening and Shortening a Pattern Tutorial helpful: http://oliverands.com/blog/2010/02/lengthening-and-shortening-a-pattern.html
EXCELENTE TUTORIAL. SALUDOS……-NECDESITO APRENDER COMO HACER PIJAMAS ESTIL VINTAGE. SI ES SUGUSTO, LE AGRADEZCO SUS TUTORIAÑES . UNABRAZO
Thank you for another excellent pattern! I made a size 3 yesterday to use as pj bottoms for my son. I absolutely love the cut and the length. Your patterns are always so well-drafted, they’re a pleasure to sew. I’m a very happy customer and blog reader! Keep up the excellent work! Wishing you all a very joyful and peaceful Christmas.
Oh and I used French seams to sew the entire shorts! I’m feeling extremely smug about the end result. 😉
okay, I’m losing my mind here. I am trying to make these shorts and I can’t figure out what I’m doing wrong. When I have the two pieces and slip the right side out piece in to the wrong side out piece and go to sew the stride, none of my notches line up and neither does the top where the wait band is?? I know this is dumb but I’m stuck!
I am having the same problem mine are too long one side and the notches are not matching I have a lot of extra fabric that has nowhere to go 🙁
Did you ever get an answer for that or figured it out? I am having the same problem unfortunately and I guess I’m too dumb haha.
I had this same problem and figured out what I did wrong. I figured I would post so if others have the issue in the future they can fix it.
Make sure you are sewing a front piece and a back piece together. I sewed each matching piece together and got the error described above. You will have to completely undo everything you’ve sewn but it is correctable! Good luck
Suuuperbe ! First sowing project ever for me ! And I did it ! they look great ! Thank you for all the tutorial, very clear ! I have a tiny suggestion, maybe you could use a fabric that has a different color on the inside and outside 🙂
Thanks again 🙂
I agree that it would be much easier to see what’s going on with fabric that has a pattern and/or clear right and wrong side. I’m a beginner and got stuck several times trying to figure out how pieces were aligned despite reading the directions and looking at the pictures.
Also, my waist band was too short to go all the way around the shorts. I ended up just cutting another piece that was long enough to go around.
Thanks for the tutorial, but it was a little too much for me!
I think I’m having the same problem. I have a fabric that has a clear right and wrong side and I cannot for the life of me figure out how to place “corresponding front and back” sides together while keeping them right sides together. No where on the pattern does it indicate to cut mirror images. I’m confused on how to proceed.
Should it be a mirrored image of the top piece and the bottom piece?
Hi! I just finished sewing a dozen of shorts for the victims of flood in Sri Lanka. We as Sri Lankans are going through a very difficult time with so many displaced and doesn’t have any basic needs. The whole country is helping each other with some way. And I am so happy I could do my part using this pattern. Thank you.
If I am making the shorts for an 8 month old boy and do not know his waist size how do I determine that?
This is fantastic so a big thank you first of all!!
Could I ask – my daughter is age 7 and her waist is roughly 24″ – what size would you recommend I try for her – would the size 5 be a bit too snug? (I’m making these for her to wear under her school gingham summer dress).
Couldn’t edit my original question – but her waist is actually 25″. I don’t want them to be skin tight so going to try the ones with the 28″ waist (size 7).
I absolutely LOVE this pattern! Taught myself to sew Dec 2016 and found my niche! My granddaughter now has about 5 of these shorts and my daughter bought 4 more fabrics so I could make more. I’ve had to make minor adjustments but this is really easy overall.
Your Reversible Bucket hat pattern is also wonderful…Made three of those for the granddaughter and they were liked so much by others that I made three for friends…easy and fun and looks great.
I’m having a senior moment (or more). What is “waist, extended?”
The waist has elastic. Extended is the measurement when the elastic is stretched out and fully extended.
Thank you so much. My mind just couldn’t grasp it. I appreciate your answer.
Is there a video tutorial for these shorts.
Can I finished the seam with overlock stitch? my sewing machine has this option but not sure is it ok to use with this pattern? sorry I’m a very beginner Thanks
Why can’t I get this to print out right?
Amy, what is the problem you are having?
Thank-you, this pattern came together beautifully, I appreciated the accurate drafting. I added pockets and a drawstring, based on the needs and preferences of the recipient and his mum. Many thanks!
I’m trying to understand how to cut out the pieces??? Should you fold fabric and cut one piece right side and one wrong ?? Help
You can follow the cutting layout on the first page of the download where you find the pattern pieces. The fabric is folded and the pattern pieces are positioned on the fabric so you’re cutting out two opposing pieces of fabric for each pattern piece.
Love this pattern! I added pockets but that was the only change. Everything jsut went together so easily; a first for me with downloaded/print at home patterns. Thank you so much!
Man Ive wasted so much fabric trying to figure out how to cut this out. There is no instructions. So what I think I figured out. Is the top piece needs to be cut pattern up and then pattern down. And same with the bottom piece? I was wondering why nothign will measure up.
Hi Briane. You cut two front pieces, mirrored. So yes, cut once, then flip the pattern piece upside down and cut again. Same with the back shorts. Then the waistband is cut once on the fold. I hope that helps!
Could I make these into pajama shorts by using fleece?
I love this pattern, but it is difficult to cut out the pattern without correct measurements. Will it be possible for you to give the length and breadth in inches or centimeters. Then it will be easier for us to cut out the block. Thank you.
First garment I’ve ever sewn and it came out perfectly! What a well thought-out and written tutorial + pattern!! I made the size 3T for my 3 year old boy and it was a PERFECT fit (my boys do tend to run pretty lean). I appreciated the normal mid thigh length. Most boy shorts patterns are really long and frankly outdated fashion wise (not a fan of board shorts look unless we’re bumming around at the beach) and I prefer the polished preppy school boy length for everyday wear. I love how versatile this pattern is… sizing up for looser sleeping shorts and going closer to your actual size for a more tailored version. This is by far one of the best patterns available! Total keeper. Thank you thank you!