There are two really good ways to cut bias strips. Most people seem to have a strong preference toward one method or the other, so I thought I’d show you both methods and tell you the advantage and disadvantages of both methods. That way you can try them both and make up your own mind which method you prefer. Today I’ll explain the continuous bias method, and tomorrow I’ll walk you through the steps of making bias strips using the more traditional method.
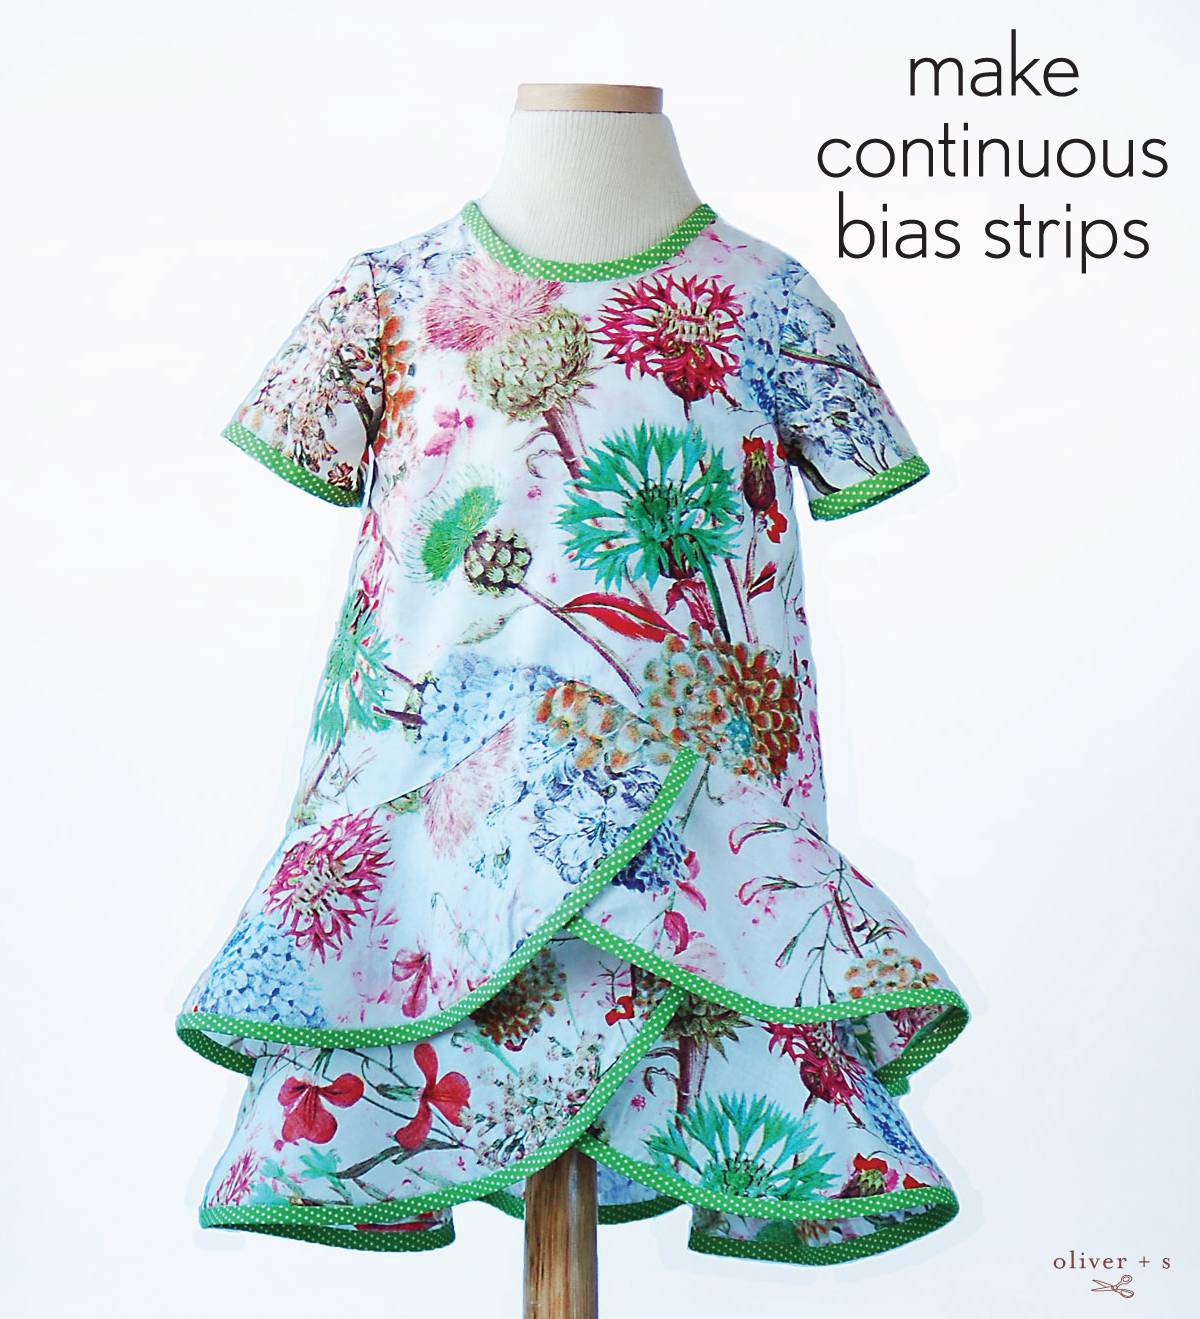
I thought this would be an especially useful tutorial for you now that we’re releasing the Pinwheel Tunic + Slip Dress pattern, because both the tunic and the dress use quite a bit of bias tape. Don’t let bias intimidate you! Bias binding is really not so difficult, it adds a little pop of contrast color to the edge of a sewing project, and it’s a really easy way to finish an edge instead of using a facing or a lining. It’s way more fun to make your own bias binding because you can choose any color or print that you like. It’s perfectly fine to purchase bias tape pre-made, but keep in mind that pre-packaged bias tape usually contains quite a bit of polyester and is much more limited in the color and patterns and widths available.
One thing to keep in mind, when you’re making bias tape: the width of the strips you cut should be four times the finished width of the finished binding. In other words, for the 3/8″ binding that we recommend for the Pinwheel Dress (as well as several of our other patterns, and a few projects in Little Things to Sew) you’ll be cutting your strips to be 1 1/2″ (12/8″) wide. That makes sense, right? OK, let’s go.
Supplies Needed
For this project, you’ll need some fabric (obviously), coordinating thread, pins, a nice long ruler (those 6″ x 24″ clear quilting rulers are great for this, if you’ve got one), and some chalk or a water-soluble fabric pen. And, of course, some scissors. (A rotary cutter won’t work for this technique, but we’ll be using a rotary cutter for the traditional bias binding method tomorrow, so don’t despair!)
Continuous Bias How-To
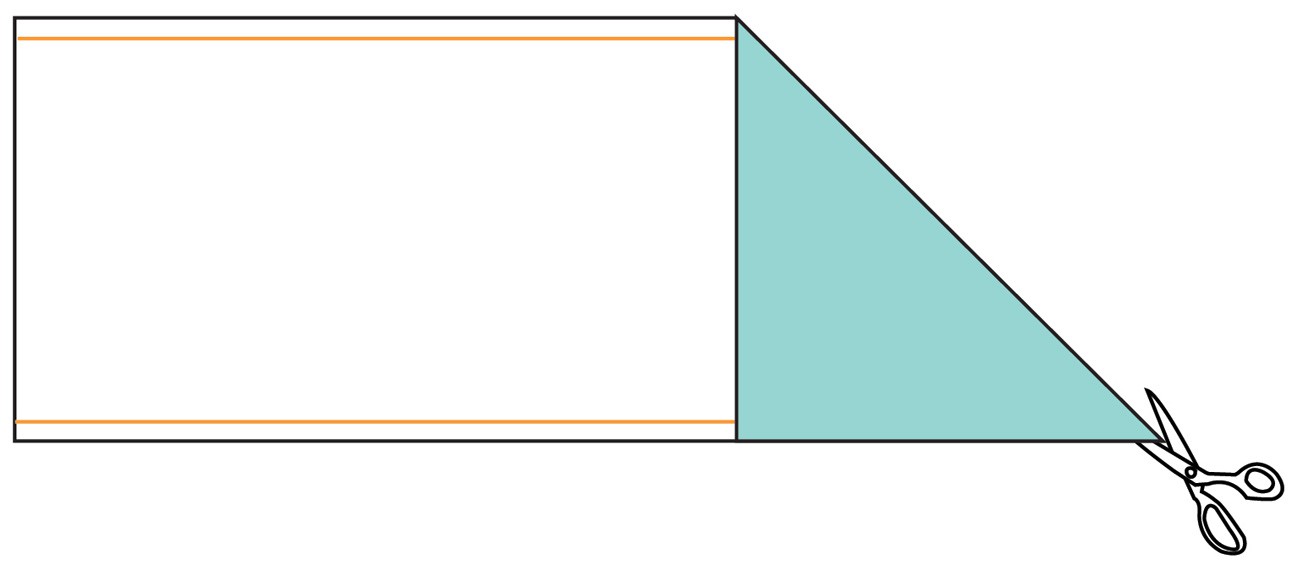
1. Start with a piece of fabric that’s been squared off, so the grain is straight on all four sides. If you’re working with a full width of fabric, remove the selvedges as shown in the illustration below. Then use chalk to draw a 1/4″ stitch line at the top and bottom edges on the wrong sides of the fabric. These chalk lines will help you to sew the ends together later in the process.

2. Fold the upper right hand corner of the rectangle down until it meets the bottom edge, so the right side of the rectangle is even with the bottom edge of the fabric. Crease the resulting fold and cut along this crease to make a triangle. The crease will be at a 45-degree angle to the edges of the fabric, which is the true bias. We’ll be using this angle to mark the rest of the bias strip edges, so cut a nice, straight line.
 3. Now you can move the resulting triangle that you cut all the way over to the left-hand side and stitch the original right edge to the left edge of the rectangle, with right sides together.
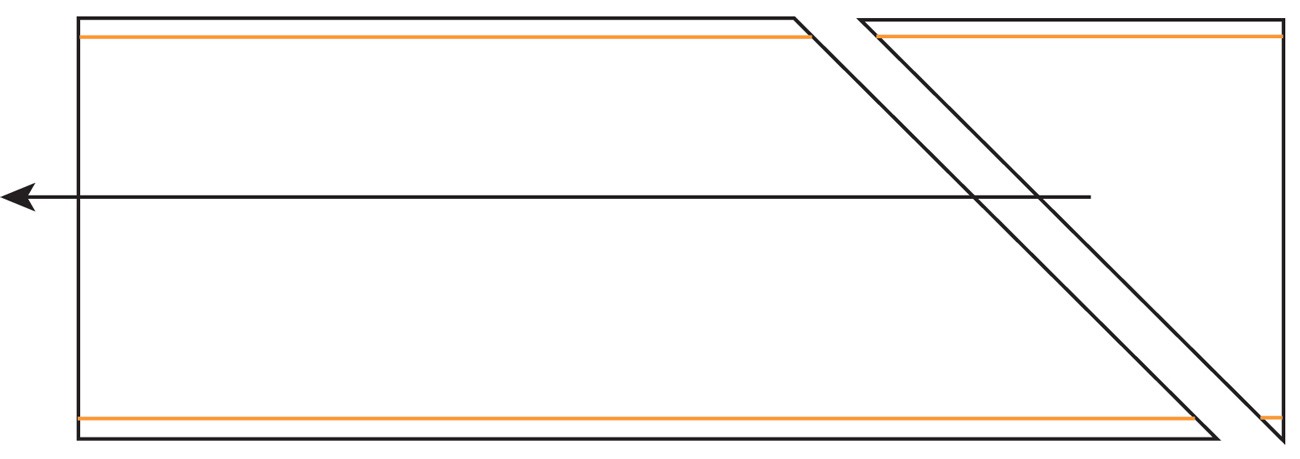
4. Press the seam open, and the resulting shape is a nice parallelogram. (You remember what a parallelogram is, right?)
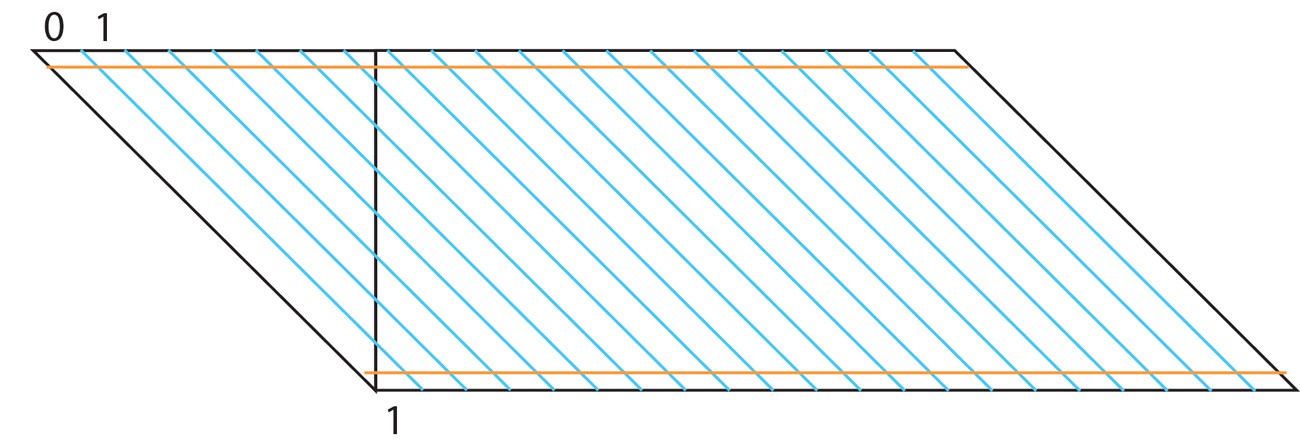
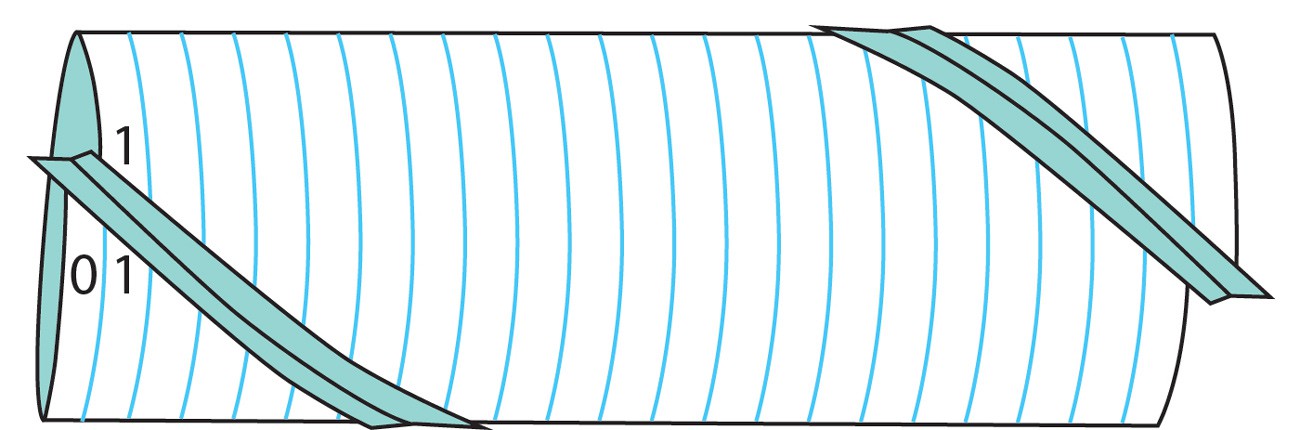
Starting from one angled side edge, begin measuring and drawing cutting lines on your fabric the width of your desired bias strips. (Remember, for 3/8″ bias binding you’ll want to cut the strips 1 1/2″ wide.) Continue to draw the lines all the way across your fabric until you reach the other side. If you have a little extra fabric left at the end, you can trim it off. Now, before you move on, take a moment to look at the way I’ve numbered the strips. When we pin the top and bottom edges together, we’re going to stagger the ends of the strips so the 1s will get pinned together. This way, when the strips are cut, they’ll just continue on from one strip to the next. Make sense?
5. Turn the parallelogram to the right side, and join the top and bottom edges with right sides together, pinning the top and bottom seam lines together. The trick here is to shift the fabric so the strips line up at the seam lines. If you pin at a few of the seam intersections, this will help you to get the edges aligned. This step will seem a little wonky while you’re pinning and sewing it, but once everything is aligned and the seam is sewn and pressed open, the resulting tube will look something like this.
Now you can start cutting your bias strips! Starting at one end, simple cut along the now-continuous line that you drew. As you cut, you’ll work your way around the tube until all the fabric has been cut. Now you’ve got one long, continuous strip of bias!
Advantages and Disadvantages
So let’s talk advantages and disadvantages of this method, shall we? Lots of people like continuous bias because it requires you to stitch only one seam rather than a bunch of short, individual seams, which can be a real pain. You can also use the entire piece of fabric, with virtually no waste.
On the other hand, there are a few disadvantages. One thing that I really don’t like about this method is that you end up with quite a few short sections in your bias strip, with a lot of seams in those areas. Also, the strips need to be cut entirely by hand, so you can’t use a rotary cutter. And one final thing to mention: it’s absolutely crucial that you get everything lined up on that seam or it will cause issues with cutting the entire strip.
OK? So tomorrow, the more traditional method. Make sure you have your bias tape maker ready. I use and recommend Clover bias tape makers. I have one in each size that they make.
If you enjoyed this blog post, why not sign up for our newsletter? It’s free, and you can opt to have new blog posts sent to you by email too!
I love this method, but I do it an even easier way. I only mark the first two strips, just enough to get the pinning lined up. Then I use a short clear ruler and rotary cutter to do the cutting. Easy, and fun!
Joan, that sounds like an interesting combination of the two methods! Is it fiddly to get the piece laying flat to cut with the rotary blade? I’ll have to try this idea!
Joan, I’ll have to try that! Is it difficult to get the fabric to lay flat enough to cut with the rotary blade?
Did I miss a step You sew the triangle to make the parallelogram, draw lines, number, match 1-1, 2-2 etc., pin, cut and one continuous strip? Aren’t we missing a sewing step somwhere after pin to make the tube, and where do we sew?
Or I am just a dullard at the moment?
Jennifer, that was in step 5. Is it not clear? I’ll go back and look at it shortly.
This method and I are just not friends. I always think I have everything lined up well and then some how some way it ends up off. I’m just an old school girl I guess.
I’ve seen this method before and I think it’s a useful way to use up some smaller bits of fabric that may otherwise not be as useful, right?
I also do mine differently. i might try this way, though. 🙂 btw, what pattern is this dress? it is super cute!
Diana, that’s our new Pinwheel Dress and Tunic pattern, which will be released next week.
Diana, this pattern is our new Pinwheel Dress and Tunic pattern, which will be released next week!
Liesl, in step 5 I guess I am not clear where to sew, but that could just be me. 🙂
Jennifer, I just made a few edits to that step. Is it clearer now? You’re sewing the top and bottom edges together along the seam line, but the piece is shifted a bit so the strips marked “1” on my illustration match up. It will feel really weird when you’re doing it, but afterwards it will start to make sense.
Jennifer, I went back and added a little bit of information to that step. Is it more clear now? Basically, you’re sewing the top and bottom edges together, but you’re shifting the fabric so the strips numbers “1” on my illustration match up. I hope that helps!
Once you get the hang of it, it is quicker than the traditional manner. Best part, it is always even.
I do it the way Joan does it, too. I will usually use a yard or a half a yard of fabric, make it into a parallelogram, mark two inches in at the top left, pin the bottom left to the mark and sew, then use a short ruler and rotary cutter. Because I don’t mark all those lines, I don’t have to worry about them being exactly lined up. Plus, my bias tape is always exactly two inches wide. I don’t press it, I roll it into a big circle and leave it until I’m ready to use it. When I need some, I cut it off and iron it before use, or just sew without ironing. This way, I can also cut the areas with a lot of seams out and use them for less important things. It is definitely not my favorite thing to do, but a yard of fabric gives me enough bias tape to use for ages. And it’s much more fun to use when it is just sitting there ready to go.
No joke, I barely sew (although on my first maternity leave I made a lovely fuschia cotton sundress with white flowers, and everyone at work thought I was Martha Stewart). I now have a second little girl, and am DESPERATE to begin making them dresses (and whatever else I can learn to do)! I just spent an hour reading about seam finishing with your tutorials, and love the bias tape!!! I’m tired of spending so much money on dresses from Carters that fall apart after a season of washing. My second little girl is in holey, tattered clothing because it just wasn’t made well enough. No joke–her toe was peeping through her duck-foot jammies this morning, and my preschooler said, “mommy, you have to sew that!” I do have a Brother sewing machine which I use a lot to do really simple things like sewing quilting triangles into blocks, making blankets and doll paraphanalia for my older daughter, and fixing holey clothing…but I am ready to move forward and delve into the beautiful cotton dresses for my little girls!! I love this site–any suggestions on where a newbie can begin for little girl dress tutorials that are pretty clear to understand? I am brave, and can search online for extra help. No $$ for a sewing class or teacher, but maybe all I need to do is try one!
Thanks for any input! I’m ready! 🙂
You cannot get an easier than a pillowcase dress. You can google for directions or go to Nancy Zieman’s website. Also, my daughter found a very easy sundress on Liesl’s web site,for free, a couple years ago which she had fun making and her daughters enjoy wearing. Sometimes you just need to dive in. There is so much info on the Internet these days!
This is to JenJoray – aside from the obvious plug for Oliver + S patterns which are awesome!, you should find lots of tutorials for dresses on Pinterest. I have a free sewing tutorials board that I post to and there are lots of dress tutorials on there for little girls. And Oliver+S has some free clothing tutorials on their website too.
http://pinterest.com/hula_gal/free-sewing-tutorials/
JenJoray, I would suggest trying some of our free patterns first. The Lazy Days Skirt, followed by the Popover Sundress. Once you’re feeling comfortable with those patterns you’ll be more than ready to start with our patterns that are rated 1 scissors. Have fun!
I only ever learn anything if I can picture it. Thanks for posting this. It looks so easy and I do my binding this way too (even though it takes me ages to get the steps in my head). I’d be too scared to use a small ruler and cut my fingers with the rotary cutter so I use scissors instead.
Wow!! Thanks so much to Jeanne, Melinda and Liesl for their suggestions and support in response to my earlier request. I am so lucky I had a snow day from work here in Salem, MA! Both girls are napping (well, my 4-yr-old is pretending, but that could last two hours) so I’m gonna check it all out and pick something to make this weekend. Yahoo! 🙂
I tried to use the rotary cutter, but I just don’t get that. It sounds like it would be super easy, but I wound up cutting things that shouldn’t be cut.
I tried the rotary cutter method and I could cut forever! I hated the traditional way of sewing the 2 pieces of fabric together. And I could never line them up properly.
With the rotary cutter method- you only need to draw the first 2 lines. Match them up as per this tutorial. Sew along the seam lines that were drawn earlier.
Now, here’s the fun part! Once that’s done, slip a small cutting board between the 2 layers of fabric (you’ll end up with a really weird messy looped up fabric). Start at the end with the lines. Take a ruler, measure 2 inches off from edge, use rotary cutter and cut. Move fabric down and continue to cut from where you stopped.
I find it easier to line the fabric edge vertically parallel with the cutting board before cutting (not to the edge of cutting board. Leave an inch or two space). Makes it easier to visualize. It’s hard to see and cut on a diagonal.
The rest of the fabric will not lie flat. And don’t expect them too. Just make sure the part that you want to cut, is flat and on the cutting board so you don’t cut through the bottom layer.
Hope this explanation helps.
Was thinking of posting a video on this. If anyone is interested.
To avoid the problem of short strips, do not sew the cut-off bit to the other end. Repeat the fold and cut on the other end to leave a parallelogram on the bias (diagonally opposite corners). Then mark and seam as you explain.
The corners become scraps for other purposes.
Yes, Adeline!! Video, please! 🙂
I also used a rotary cutter. Like Joan and Adeline, I just marked the first two lines. I did not use a smaller cutting board, but I used a cutting ruler that was less than 1/3 the length of the fabric’s original length. I just had to make sure the bit I was cutting was straight and the rest lined up as I went along.
I used to do it this way, but no longer…If you google ‘bitter purl continuous bias binding’, she has a much faster easier way, and you can do the most of it with the rotary cutter, no cutting boards between, or any fuss. You only sew once, and it’s really easy. It takes me about 15 mins to do 10mtrs or so, and another 10mins to iron it all, once I got the method down.
great super easy only 15 minutes
HI. Just wondering if anyone has any advice about making this continuous binding. I follow the instructions as per above. I sew the tube and when I go to cut it, the lines just don’t match up! On the wrong side, they have ‘crossed’ at the top, although sometimes it varies where they have crossed….Anyway, am wondering if there is a really simple HELP out there on how to make this fool proof! cheers.
Worked out very well, thanks Liesl. Your instructions were clear and your diagrams made every step that much easier.
I’ve tried several methods of making bias tape. Yours was the pattern that I understood, followed and has success !!
How do I make the diamond star pattern ( as in the Lone Star Quilt pattern ). I am at a loss.
Thank you, Lois
How do I calculate how much fabric I will need to make a 2 inch wide strip 350 inches long?
Thank you! I’ve looked at several explanations on how to do this and finally I got with your description and graphics!
I’m so glad we could help!