When we released the Fairy Tale Dress sewing pattern a few weeks ago we recommended that you make a muslin to test the fit before sewing up the pattern. This dress is a more fitted pattern than our other styles, and it’s also a more time-consuming pattern to sew. For these reasons, I think it’s important to check the fit so you’re happy with the results. Nothing is worse than taking the time to make something that doesn’t fit when you’re finished, right?
Since many of you have never made a muslin before, you’ve had a lot of questions. So today I’ll walk you through the steps of making a muslin, and tomorrow I’ll address some of the common fit issues you may run into.
When you make a muslin, you need only to work with the key pattern pieces. You won’t need facings, linings, undercollars, or anything that doesn’t show on the outside of the finished garment. The purpose of a muslin is to check the fit and the look of the garment, so you also don’t need to finish the edges or hems. And because you won’t be spending time sewing all those details, a muslin can actually save you time—and a lot of frustration—in the end because you’ll make all the necessary fixes before you do any real sewing. In general, I don’t believe in a “wearable muslin” unless you’re practicing the sewing itself after doing a fit muslin. The whole point of a muslin is to not do all that construction and, instead, to focus on the fit.
Here are the tools that will be helpful for this project:
- Your Fairy Tale Dress sewing pattern.
- Tracing paper.
- A pencil.
- A ruler.
- Pins, scissors, sewing machine, and thread (the basic sewing tools).
- Muslin. I buy muslin by the bolt in the garment center, where I can get it inexpensively. This isn’t quilter’s muslin. It’s not as finely woven, the yarns are less even, and it’s a lot less expensive, so you wouldn’t want to use it to make a quilt or anything intended to last for a while. Don’t spend a lot on muslin and then you won’t feel so bad when you mark it up and chop into it and eventually throw it away. You can find inexpensive muslin in many stores, and Dharma Trading carries it if you can’t find it locally.
- Carbon transfer paper. I like to use the waxy dressmaking transfer paper that’s so hard to find these days, but the chalky kind is fine as well as long as you can see the markings clearly.
- A tracing wheel. We’ll use the smooth or slightly serrated wheel with the carbon paper, and you may also want the pointy kind when it comes time to transfer your changes from the muslin back to the pattern itself. I’ll explain as we go.
- Safety pins. So you can use pins without fear of poking your little fit model.
Here are the basic steps of making a muslin:
- Start by tracing your pattern, cutting it out, and drawing in the seam lines. The seam allowances on the Fairy Tale Dress are ½”, and I like to use my little 6” x 1” clear ruler for this purpose. I just move it along as I go, drawing the seam line a section at a time. You’ll want to draw all the seam lines on the pattern pieces, and this doesn’t take very much time.

- Now you can cut out the pattern from muslin. If you know that you’re likely to run into a particular fit issue ahead of time, you can leave extra fabric in areas where you may need to do some adjusting. It’s always a good idea to evaluate the person you’re fitting beforehand for exactly this reason. Since I know that we’re going to be accommodating a little toddler belly in our fitting example for tomorrow, you can see on my pattern pieces, below, that I left some extra fabric at the side seams and at the waist so I have a little extra room for adjustments. I made these additions to my pattern pieces by leaving extra room, but you can also do this just to the muslin.

- Now, before you unpin the pattern pieces and start assembling the muslin, it’s important to trace your seam lines and pattern markings onto the fabric. This will help you to see the shape of the dress better when you fit it, and if you make any adjustments it will be easy to determine what they are when you transfer changes back to the pattern itself. I like to use the waxy dressmaking transfer paper that’s so hard to find these days, but the chalky kind is fine as well as long as you can see the markings clearly. And this is where a tracing wheel comes in handy and helps you to work quickly. (For this purpose, you’ll want a tracing wheel with a smooth or gently serrated edge, rather than the pointy tracing wheels that I sometimes use for tracing patterns and which put actual holes in the paper or fabric. The two different types of tracing wheels have very different purposes, so it’s nice to have both. We’ll talk about the pointy tracing wheel later—or you can watch my Creativebug video about large bust adjustments for an in-person demonstration about the pointy wheel and how I like to use it for tracing patterns.) To transfer the seam lines and other markings to your muslin, leave your pattern pinned to the fabric and simply place it, fabric side down, on top of the carbon paper, carbon-y side up. Then trace along each seam line with the tracing wheel so the carbon transfers to your muslin.

- Once you’ve traced all the markings, remove the pattern piece and pin the two muslin layers together again. Then flip the muslin over and use your traced carbon lines as a guide to transfer your markings onto the other side of the two layers, using the carbon paper and tracing wheel again, so you’ll have markings on the right and left sides of your muslin. I also like to mark the center front at this point–just use a pencil and ruler to draw it in. Here is what the front bodice looks like once you’ve transferred the markings to both sides and unpinned it.


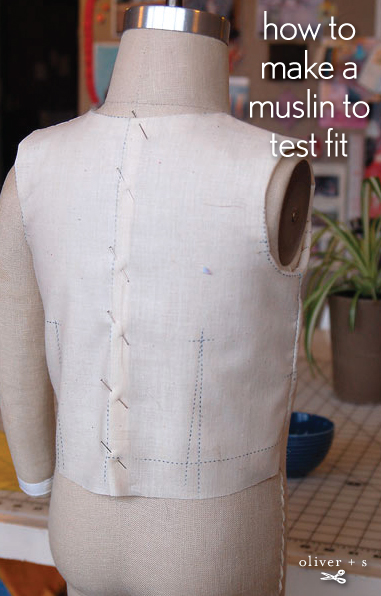
- Now you can start assembling the bodice. It’s easiest to use a long machine basting stitch for this–the longest stitch on your machine—so you can easily remove the stitches if you want to make adjustments. (In design school and in the industry a muslin is often pinned together, but that’s just not practical when you’ll be fitting it on a child. However, I will be showing you some things pinned in this tutorial so you can see them more clearly.) For the Fairy Tale Dress, you’ll want to sew the shoulders and the side seams.
- For the neckline and armhole, clip into the seam allowances up to the traced seam line so you can fold and press them to the wrong side along the seam line. This will let you see what the finished edges will look like without actually finishing them, and by clipping into the seam allowances they won’t be restricting or misleading during the fitting. If you’re planning to add sleeves, you can also baste one or both sleeves into the armholes just as if you were constructing an actual dress, but I prefer to wait to be sure I like the fit of the muslin itself first. It’s up to you. If you’re fitting a dress and want to check the hem length, fold and pin or baste the hem allowances up so you can let them out if necessary. I didn’t baste the darts for this muslin because I prefer to pin them during the fitting (and because I suspected that we wouldn’t want them due to the little belly I gave the dress form for tomorrow’s exercise), but that’s just my preference.

- Once you’ve got the muslin constructed, it’s time to try it on! You can start by trying the muslin on right side out, with seam allowances on the inside, but when I’m fitting on a person I sometimes turn the muslin inside out so I can make adjustments to the seam allownaces while it’s on the body (if your model will hold still long enough for this). For this example, I’m doing everything right side out so you can see the seam lines better. Use safety pins to close up the back without sticking anyone (be sure to match those back seam lines that you traced), and step back to look at the results.

- Now you can evaluate the fit and make any necessary adjustments. I’ll talk about some of those possible adjustment tomorrow, but today I want to focus on the muslin itself so you understand the process. So. Fit, fit, fit at this step. Then, once you’re happy with your changes, you can move on to the next step.
- Once you’re satisfied with how your muslin fits, clearly mark any changes on your muslin with a pencil. (You can even make notes to yourself if that helps. S likes to draw pictures on the muslin, but I encourage her to wait until I’m finished or it gets a little confusing!) Then you can take the muslin apart so you can either transfer the changes to your pattern (if they’re simple changes like a new side seam) or make new pattern pieces from them (if they’re more complicated changes). If you gently press each muslin piece flat you can lay it down on top of a new piece of paper and trace the revised seam lines and markings onto the paper. This is when I like to use my pointy tracing wheel and a cutting mat–the one I mentioned earlier and demonstrated on the Creativebug video. The pointy tracing wheel is great for piercing through the muslin and putting little holes in my paper that I then use to draw new lines. Then use your ruler to draw in the new seam allowances and grainlines, and you’ll be ready to use your revised pattern!


I hope this helps you to understand what a muslin is and the steps involved in making one. Once you’ve done this a few times it will become easy and you’ll find that it’s a really useful step for much of your sewing projects. It’s especially helpful when you’re sewing for yourself, and the Fairy Tale Dress is a great way to get some practice if you’re not ready to tackle an adult-sized sewing project.
Tomorrow: addressing some of your fitting questions.
Thank you Liesl for this very interesting course! I have never made a muslin, but sometimes I regret I haven’t… I should say that since I have two daughters, I always assume that if the newly sewed garment doesn’t fit the oldest one, it will surely fit the second one in two years 🙂 But they have really different shapes so it’s a guess…
I will be happy to read the next part tomorrow!
interesting!
here’s an online shop that sells the wax tracing paper in case anyone is looking for it. I’ve purchased other items from her and the service was great
http://shop.afashionablestitch.com/product/professional-tracing-paper-sheets-26-x-39
Thanks. Many awesome and helpful ideas!
thanks so much Leisl! This was REALLY helpful and I’m sure it’ll make a big difference in my sewing. I might even consider an adult project now that I have these tips!
thanks Liesl, good info and thanks Katie. I went and ordered some of the tracing paper, had no luck in the past trying to find that particular type. They also have some other goodies (like petersham) but I was good and just ordered the paper, for today anyway.
Can I just sit in the corner, play with your scraps and watch you sew? I’m learning alot from a distance already.
This is a very big help, thanks!
This is a great tutorial! Love it. I have trouble with tracing wheels though…
Liesl’s shop now has waxed tracing paper too. Yay!
Thanks, this is very interesting. Comfort Ngozi Akarakiri
Very helpful!
thanks for your advice, I let you know when I finish my project.
Balduvina
Not sure what to do with it once sewn up?