Yesterday I showed you how to make a muslin. Today I want to talk about a few common fit problems you might run into when you fit the muslin.
Just like fitting women’s clothing, there are many possible fit issues you might run into. We can’t possibly cover them all in one blog post, and I would strongly recommend the book Fit for Real People, by Pati Palmer and Marta Alto, if you’re interested in learning more about fit or have questions that I don’t address here. I really like the approach of this book and think that it’s friendly and understandable for all sewing levels. It’s a resource I’ve turned to time and time again, and you might want to add it to your library as well.

So here are a few possible challenges you might find in your fitting, along with some suggestions for fixing them:
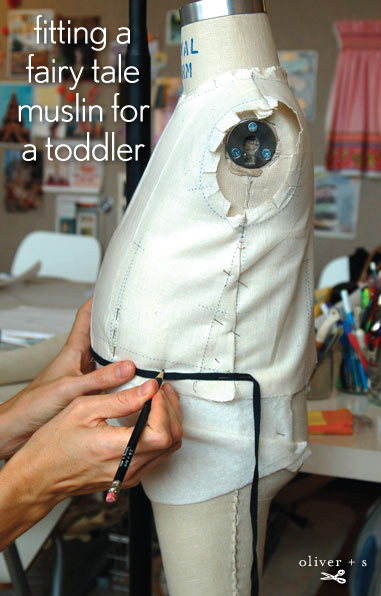
- One of the big questions over at the discussion forums last week had to do with the dress being too tight over an expanded toddler belly. So I’ve given Petal, our dress form, an exaggerated belly as an demonstration. A simple fix here is to open up the side seams to give a little extra room for the belly. Be sure to keep the side seams running vertically, which means that you’ll probably be adding to the sides of just the front bodice but not the back bodice (or if you add to the back it may be a different amount). If the chest is fitting properly (which it should if you’ve selected the correct size) you probably won’t need to adjust the side seams at the armhole, and that way the sleeves won’t be affected. You can see below how I’ve pinned the adjusted side seam, gradually adding 3/4” at the sides near the waist, but for the front bodice only. The side seam is still running up and down (more or less–it will be better once I close up the back darts). Note that if you turn the muslin inside out to do your fitting, you can make changes quickly by re-pinning the seam allowances as needed. (It’s much more challenging to fit a squirming little body, I know. You may want to take it off and make adjustments before trying it on a again, and it may take a few tries. )

- You can see that by adding room for a belly, the front bodice is now too short at the front waist, so I used a little twill tape to show me where the length will need to be added to the waist. It’s easy to add length here. You could also use a piece of elastic sewn into a loop to help you find and mark a straight waist while the muslin is being worn. Just have your child slip the elastic on and position it where the waist should be. This will help you to determine whether the waist is straight or needs to be adjusted. (And if you’re not sure where the natural waist is, it’s generally just below the bottom of the ribcage, at approximately belly-button height.) you might notice that in the photo below I added a shortened front dart to help to keep the fit smooth at the waist so the front doesn’t flare out so much. I think I might also close up the back darts, since that will help to give me a better fit in the back. However, in this instance I think I would be inclined to raise the waist on the entire dress because that would camouflage the belly a bit and might be more flattering. That would also be an easy change: just remember to lengthen the skirt by whatever amount you raise the waist! Again, you can use a little twill tape or make an elastic waistband to help you mark the new, raised waistline. You’ll also note that I pinned in some small darts to keep the lines and to prevent the front from flaring too much at the waist.

- Because I added some width to the front of the bodice, I might add a little width to the skirt as well. I added about 3/4″ to each side of the bodice, so I’d probably add about 1 1/2″ to the sides of gathered front skirt, just to keep everything balanced. This isn’t a big deal; the skirt is already quite full and you probably wouldn’t notice a difference if I didn’t add it, but it’s something to keep in mind when you’re making changes to a pattern. Other patterns could require a similar addition to keep the pieces fitting together, so keep this in mind.
- With regard to the neckline and armhole, remember that this is a very fitted, traditional dress, so these will be higher than what you may otherwise be accustomed to seeing on your child. Don’t let the seam allowances throw you off, either. That’s why we marked the seam lines. If they’re too high, even with the seam allowances clipped and turned, you can draw directly on the muslin with a pencil to mark the necessary changes. This will allow you to transfer the changes to your pattern pieces later on. And once you’ve marked these changes, you can also compare these changes to other sizes on the sewing pattern to see if you can simply borrow the neckline/armholes from another size. That would be easier and would allow you to use the coordinating sleeve or the collar for that size, as well. (So much easier than re-drafting them to fit!)


Here are my pattern pieces, ready to transfer my changes to the pattern. You can see that the side seam is flared, the front waistline is curved, and I’ve added tiny darts at the front waist. Again, my example is somewhat exaggerated; you probably won’t have this much flare to your muslin if you’re adjusting for a belly.

With a little practice fitting a muslin, you’ll feel more confident and will be able to tackle more substantial changes, including fitting muslins on your own body. It’s not as hard is it may seem at first, so I hope you’ll give it a try!
Bowing down in praise. Thank you. I can do this, I can do this. I think I can, I think I can.
I have been blundering along on my own. I didn’t do too badly, but the palm to forehead thing I forgot was making sure the bodice is even in the front and back at skirt seam (curving the front waistline).
In my first fitting (as we know it takes several with the wiggly ones), I realize I added too much to the back, so I need to take that out. Once I do that adjustment and try it on her, I will do the waist curve!
Thanks
Thanks for doing this. I think I may have an opposite problem- a skinny waist and hips. I am going to check out the book. When you made this for your daughter, what alterations did you make? I think my daughter is built similarly to your daughter. When I look at the blue dress on your daughter, it seems longer and the bodice doesn’t seem snug at the waist.
Great tips and clear examples. Thank you for sharing!
Do you have any idea where I can purchase infant 6m to toddler sloper patterns?
I’m considering the Fairy Tale dress for a Christmas dress I am making with a chiffon overlay. Do you think this is a bad idea since the dress has darts and chiffon is sheer? I could only use the chiffon for the skirt portion but want your opinion about also using it for the bodice. Thanks!
This would be a great question to pose in our discussion forums! I’m sure you’ll get lots of ideas there.
Hello!
I have been SEARCHING for the answers you have given for the big belly. My two year old grandson has a distended belly because of medical issues and I have needed to adjust his shirt patterns. Now I hope to do it properly!! Could you share what brand mannequin you are using for sewing with? The smallest adjustable I can find would be from England, the adjustoform and it is still too big.
Thank you so much,
Karen
Karen, we use a Royal Form size 3 mannequin. It’s a professional dressmaking item, and it’s not adjustable. So I’m not sure it would be what you are looking for.