

For Christmas last year I gifted my mum two lengths of fabric that I knew she’d like with the promise to make her whatever she chose. Both were a lovely jacquard double cotton; soft like a gauze but with a bit more weight and warmth.
Her first choice was immediate and easy: another Gallery Dress. She inherited one I’d made for myself and then “undergrew” (what is the opposite of “to outgrow?”) and wears it all the time.


For the second length of fabric there was much more deliberation. Eventually, three patterns were up for consideration. Two of these were the Cappuccino Dress and the Lisette B6567. I made muslins of all three from some old bed sheets and sent them off to her to try. None were right. What she wanted, if it were possible, was the appearance of the Cappuccino Dress with the fit of the trusty Gallery Dress.
I’m always up for a challenge so here’s how it was done: In essence, it all came down to finding the center fronts of each pattern. My combination dress would have the center front appearance, pockets and neckline of the Cappuccino, but in all other respects would be the Gallery Dress.

I use a thin interfacing to trace all my patterns so I can use them repeatedly (and use all those Oliver + S sizes). It also really excels as a tool for manipulating patterns. With the two patterns traced off in the same size, I could overlay them and see where I needed to blend from one to the other.
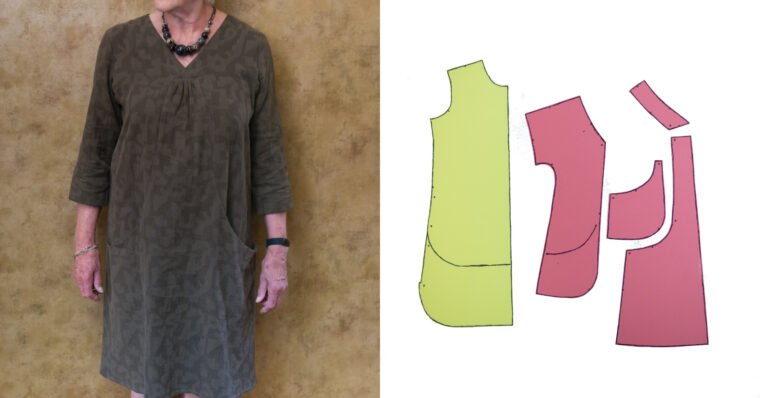
Trying to photograph myself wielding big pieces of interfacing covered in scribbles wouldn’t demonstrate anything, so I made some cellophane versions of the patterns to show you in miniature.
Here are the front and back pattern pieces for each pattern. The Gallery Dress is shown in yellow and the Cappuccino Dress in red.


Finding the center fronts of each pattern required a little bit of thinking. They’re not dissimilar; the Gallery Dress has a pleat below the placket and the Cappuccino Dress has gathers below the “V” of the neckline.
In the image below, you can see how the pieces of the Cappuccino Dress come together when they’re sewn:


With the center fronts marked on each pattern, I laid one over the other, matching the center lines. It looked a bit like this:


Once the center fronts could be overlapped I could just draw onto a third interfacing tissue to go smoothly from the Cappuccino center front to the Gallery shoulder, armscye and side seam. It certainly helped that I was working with two Liesl + Co. patterns, so the seam allowance was the same for both.
I extended the length of the center front Cappuccino panel to match the Gallery Dress length, and drew the pocket section to extend to the newly wider side seam. You can see I also opted to leave out the curved shirt-tail hem of the Gallery Dress. My final front pattern pieces are shown below with the blue hatching:

The back pattern piece for the Gallery Dress needed hardly any alteration at all, with just the depth of the Cappuccino neckband being taken off.


The sleeves are as per the Gallery Dress, as are the armscyes, so that was easy. My mum had requested a three-quarter-length sleeve and a notched-sleeve cuff treatment similar to another dress she has. That was easily done with just a quick reference to the new Melville Cardigan.
The tricky part was certainly the measuring and maths involved in nailing those center fronts. Once I had the pattern drafted I trusted my instincts and cut straight into the gifted fabric. Had there been any more old bed sheet fabric leftover I would have checked first, and that would always be my advice.
The sewing was very smooth. I followed the Cappuccino Dress instructions to create the front dress, pockets and neckline and then switched to the Gallery Dress instructions for the rest.

It all came together easily, and I think I’ve created exactly what was needed. A dress that fits and feels like wearing the Gallery Dress but with the interest of looking like something else entirely. And it only took until this Christmas!