A finished seam is a technique used to secure the raw edge of the fabric exposed within the seam allowance.
Finishing seams provides stability to the seam and overall garment, prevents unraveling, while also making a hand-made garment look professional. There are many options available which can vary depending on the fabric choice, machine availability or personal sewing preference. Some of the techniques are basic while others are a work of art, designed to make the inside of the garment look just as admirable as the outside.
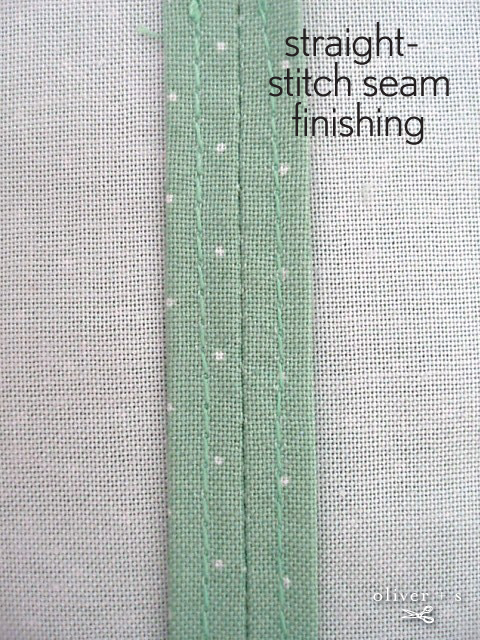
The first seam finish we will discuss is one that can be finished with just your sewing machine using a straight stitch.

To finish the seam allowance, simply run a straight stitching line inside the seam allowance edge approximately half way between the cut edge and the seam itself. This utilitarian finish will act similarly to stay-stitching. While it can still fray along the cut edges, the stitches will act as a barrier preventing the seam from fraying any further than the stitching line. If you want to take the initiative one step further for aesthetics, fold and press the seam allowance edge to the wrong side, to meet the seam itself, enclosing the raw edge – then stitch your straight-stitching line. This technique is fine for lightweight wovens, but use caution for seams with bulk, as it may not be appropriate for some fabrics or projects.


Pressing the seams open eliminates bulk and allows the outside of the garment seam to lay flat. Most sewing patterns instruct for seam allowances to be pressed open, so these straight-stitching seam finish techniques would be applicable.
Thanks for sharing this, April!
Really a basic seam finish technique to start. I wish I knew about it when I started sewing. It would have saved me lots of trial and error. I’m really the type of person that loves perfect finished garments and probably this is one of the main reasons why I love O+S patterns (and instructions) so much.
Can’t wait for your next tutorial!
I just used this technique today on a skirt, after reading this post yesterday. It worked great! Thanks for the explanation. Makes me feel like my stuff looks professional, despite not having a serger.
que tutoriales fabulosos, muchas gracias por su tiempo.
that’s beautiful !!