

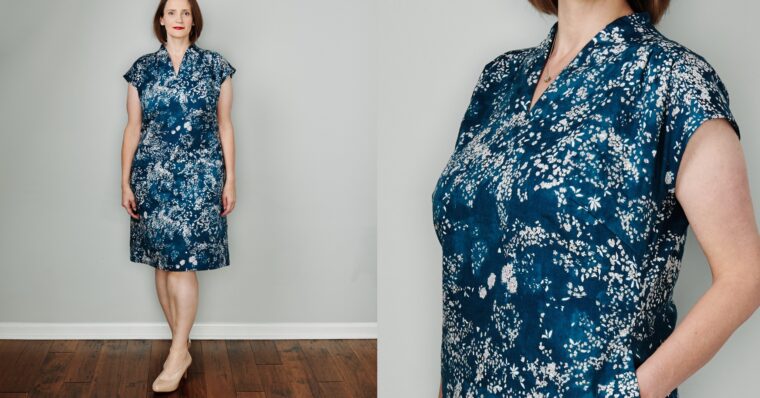
I love the simple silhouette of the Fira Dress, and I’m always on the lookout for dress patterns
that have a one-piece dress front. With a one-piece front, I can showcase amazing prints
without interrupting the printed design with seams. I’m going to share how I got to the perfect fit for the Fira Dress.


My measurements are high bust 37”, full bust 41”, waist 35.5” and hips 44”. A 4″ difference between my high bust and full bust put me at the D cup sizing. With a 37” high bust, I would typically select a 10D, but since my hip measurement put me at a size 16, I thought the difference would be too extreme.
The Fira dress has a relaxed silhouette so I didn’t need a very fitted bodice. I looked at the silhouette in the line drawings and pictures of Liesl in the dress and noticed that the lines were only slightly flared on the side seam. I decided to start with my hip measurement (my widest measurement) and work backwards a size or two for the bodice. I started by making a size 14 muslin without any adjustments to decide what changes I would need to make.
First, as is typical for my shape, I needed a 1/2” forward shoulder adjustment. The shoulder seam should hit in the middle of your shoulder joint, but in my muslin the shoulder seam fell behind the midpoint of my shoulder. To make the forward shoulder adjustment I added 1/2” to the back yoke shoulder seam and subtracted 1/2” from the front yoke shoulder seam.


Second, I saw that the bust darts were too high for my shape. The darts should point towards the fullness of your breast, but the darts on the muslin pointed above the fullness on my breast.

For the adjustment, I lowered the bust darts 1” and pulled the bust point back (towards the side seam) 1/2”. Notice what lowering the bust dart did to the side seam. To true up the side seam, I needed to “straighten” the curve at my waist.

Third, I already knew that that the hips were likely to need a width adjustment and the muslin showed that to be the case. The horizontal pull lines across my abdomen are a tell-tale sign that more width is needed. I checked the finished measurements on the size 16 pattern and found that it allowed 4 3/4” of ease at the hips (49 1/4” – 44 1/2” = 4 3/4”). My hips measured 44”, so to get the intended ease I would need a finished hip measurement of 48 3/4”. The size 14 pattern had a finished measurement of 47 1/4”, indicating that I needed at least 1 1/2” additional inches. I decided to make it easy on myself and just added 1/2” to the side seams on both the front and back pattern pieces.

Fourth, I decided the armholes were too low for my taste. In the muslin I could see a peek of my bra when my arm was raised. This was not a “necessary” change, just something I knew would make me happier when I wore the dress. I raised the curve on the arm hole by 1” on both the front and back pattern pieces. It wasn’t exact; I just eyeballed it!

Fifth, I noticed a lot of fullness in the back of the dress. I usually take a sway back adjustment, but I was indecisive about whether to do that on this pattern. The silhouette of the dress is relaxed and does have gathers on the center back, so I knew there would be some fullness in my back. However, I noticed that my back hemline did not fall parallel to the ground and was longer at the center back than it was at the side seam. When I pinned up about an inch of fabric at my waist, the hemline straightened and the dress laid better. I decided to do a 1” sway back which I split into two 1/2” sway back tucks on the dress back pattern piece.

With these five adjustments completed on my size 14 pattern, I sewed a second muslin. I don’t always sew a second muslin, but I had selected an investment fabric for this dress and wanted to be really sure I would be happy with the fit before I cut my fashion fabric.

The adjustments really made an impact. The dress hung better from my shoulders with the forward shoulder adjustment.

The bust darts pointed to the right place and created better shaping.

The ease in the hips was much better. (It’s funny how adding width actually makes you look slimmer.)

The armhole was at a good height for my preference.

And I liked the amount of ease in the back of the dress after taking the sway back adjustment.

The dress fit perfectly!
If you are new to pattern fitting, it may seem like I had to make a lot of adjustments. But four of the five adjustments I made on this dress (forward shoulder, bust dart height, hip ease and sway back) are typical adjustments I make on nearly every pattern I sew. I’ve done them so many times I can make the adjustments quickly.

Fitting gets better with practice, and even a tiny bit of adjustment will often make the garment fit better than a ready-to-wear piece. With a few adjustments and fantastic fabric, the Fira is my new favorite dress!