Ashley is back today with another edition of her Outdoor Ready series. This one focuses on workout shirts. Thank you so much for this wonderful tutorial Ashley!
Hello everyone! As the unmistakable end-of-fall chill descends upon most of this northern hemisphere, I’m popping in with one more project before we enter the deep freeze of winter.
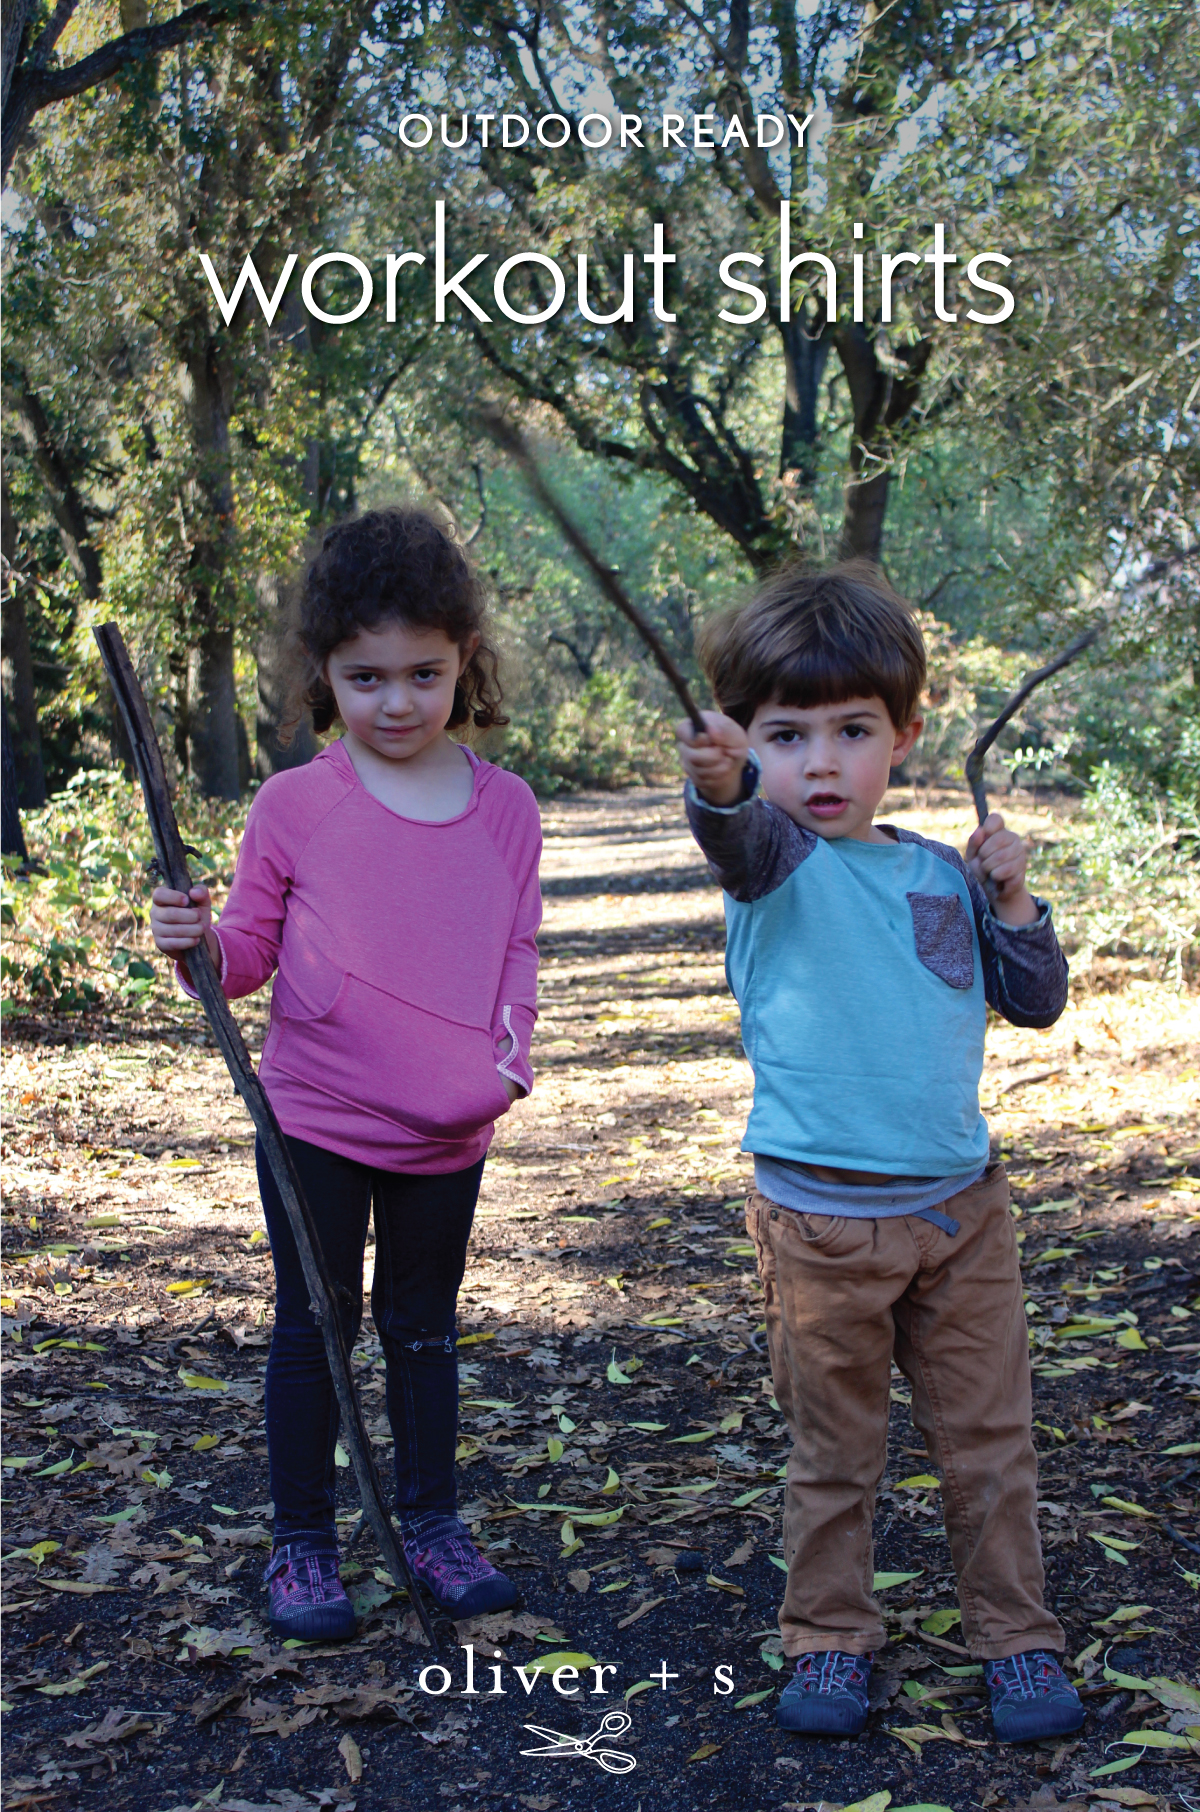
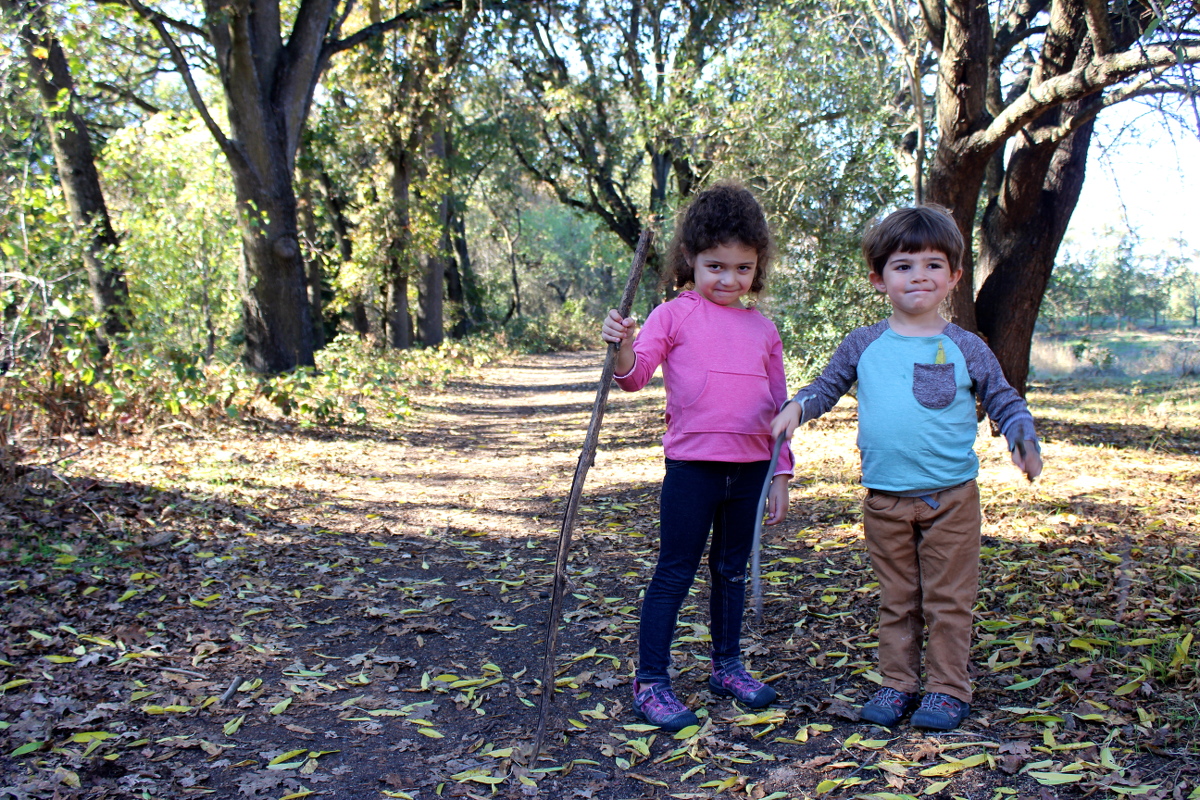
You may remember that in my last installment, we talked about hiking pants using the Field Trip Cargo Pants pattern. I had initially planned to include the other half of the pattern, the raglan shirt, in the post as well, but it seemed a bit crowded. So, today we are going to discuss some quick modifications you can make to the Field Trip Raglan T-shirt to transform it into a great transitional wardrobe piece to wear as we move into cooler weather. The School Bus T-Shirt would make a very suitable pattern substitute if you prefer it, but please note that the measurements I’ll be referring to come from the Field Trip Raglan T-shirt pattern.
As usual, much of the focus of the outdoor ready series is simply fabric choice. You could easily use a technical fabric and the pattern would be good to go as is! However, I always like to add a little something extra, so I began thinking about features I like in my own workout shirts for cooler weather.
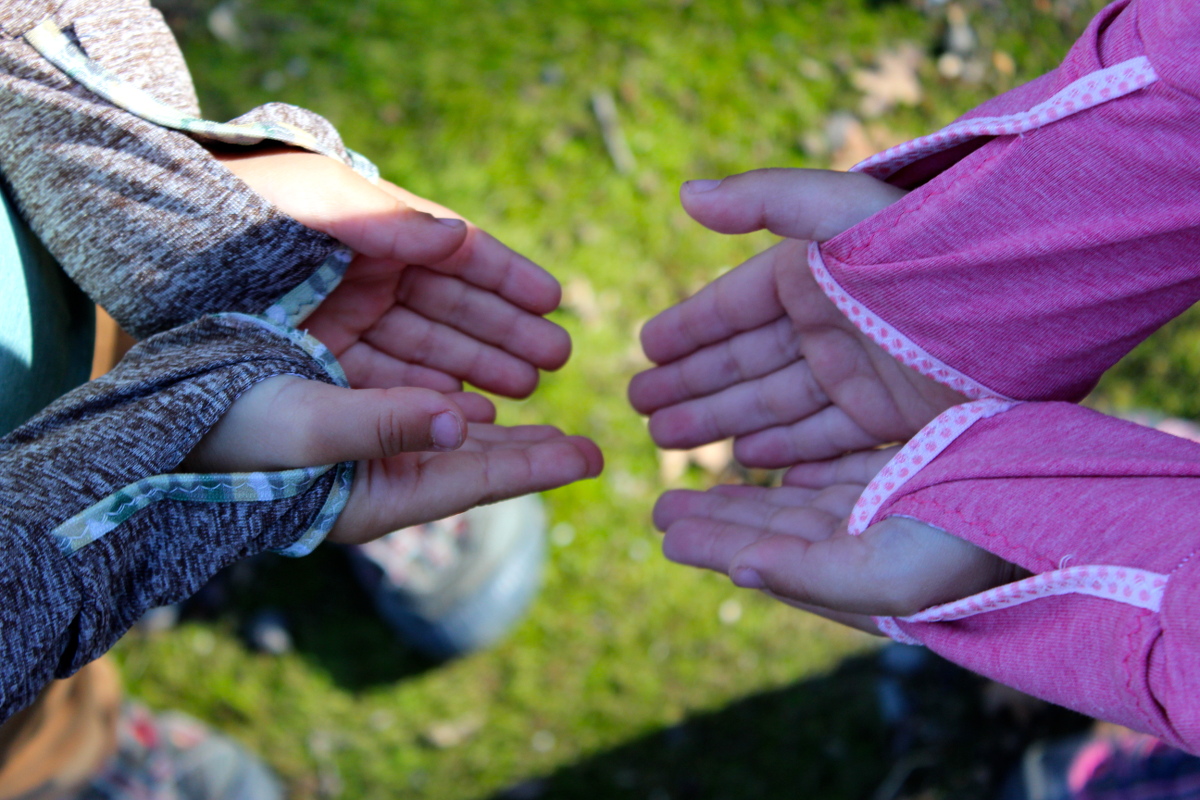
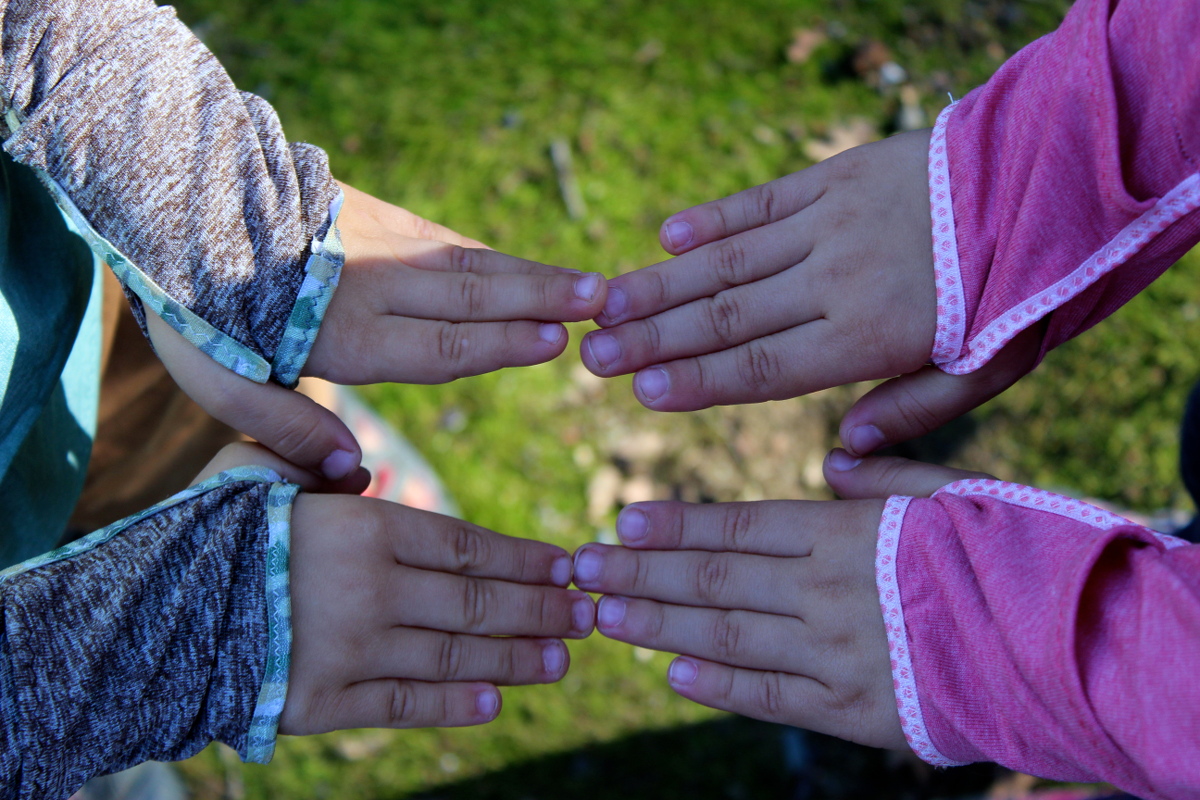
My favorite cool weather running shirt has an interesting sleeve cuff that includes both a thumb hole and a flap of fabric to fold over the hand like a mitten. After some experimentation, I designed a similar cuff that you can add to your own workout shirts for those days when chilly little fingertips could use an extra layer. Other than that, I played around a bit with pockets and hoods. We’ll talk about all of these modifications below!

First, a few tips on fabric selection. For the shirts pictured here, I used various mid-weight wickaway knits I purchased at Rose City Textiles in Portland, OR. Fortunately, if you do not live in Portland or otherwise close to an outdoor apparel fabric distributor, Rose City Textiles has an incredible variety of appropriate fabrics in their online shop. Here is a link to mid weight wickaway knits, but if you’d like to do more exploring, simply enter in “knits” in the fabric category drop down, and then select any of the numerous category types from the next drop down. I would personally recommend “wickaway” fabric because of its moisture handling properties. This fabric will dry quickly when wet, and draws moisture away from the skin for faster evaporation into the air–especially important as the air starts to cool! The last thing anyone wants is a wet shirt starting to freeze on their body!
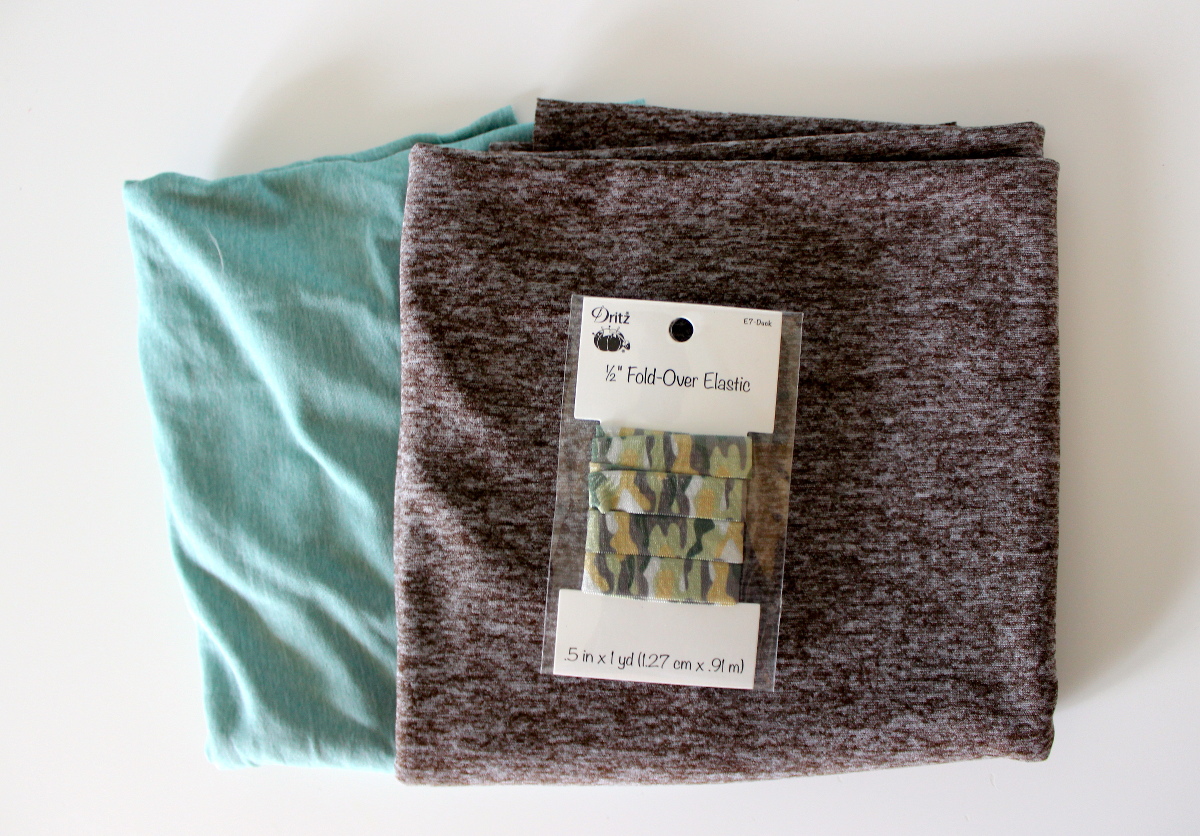
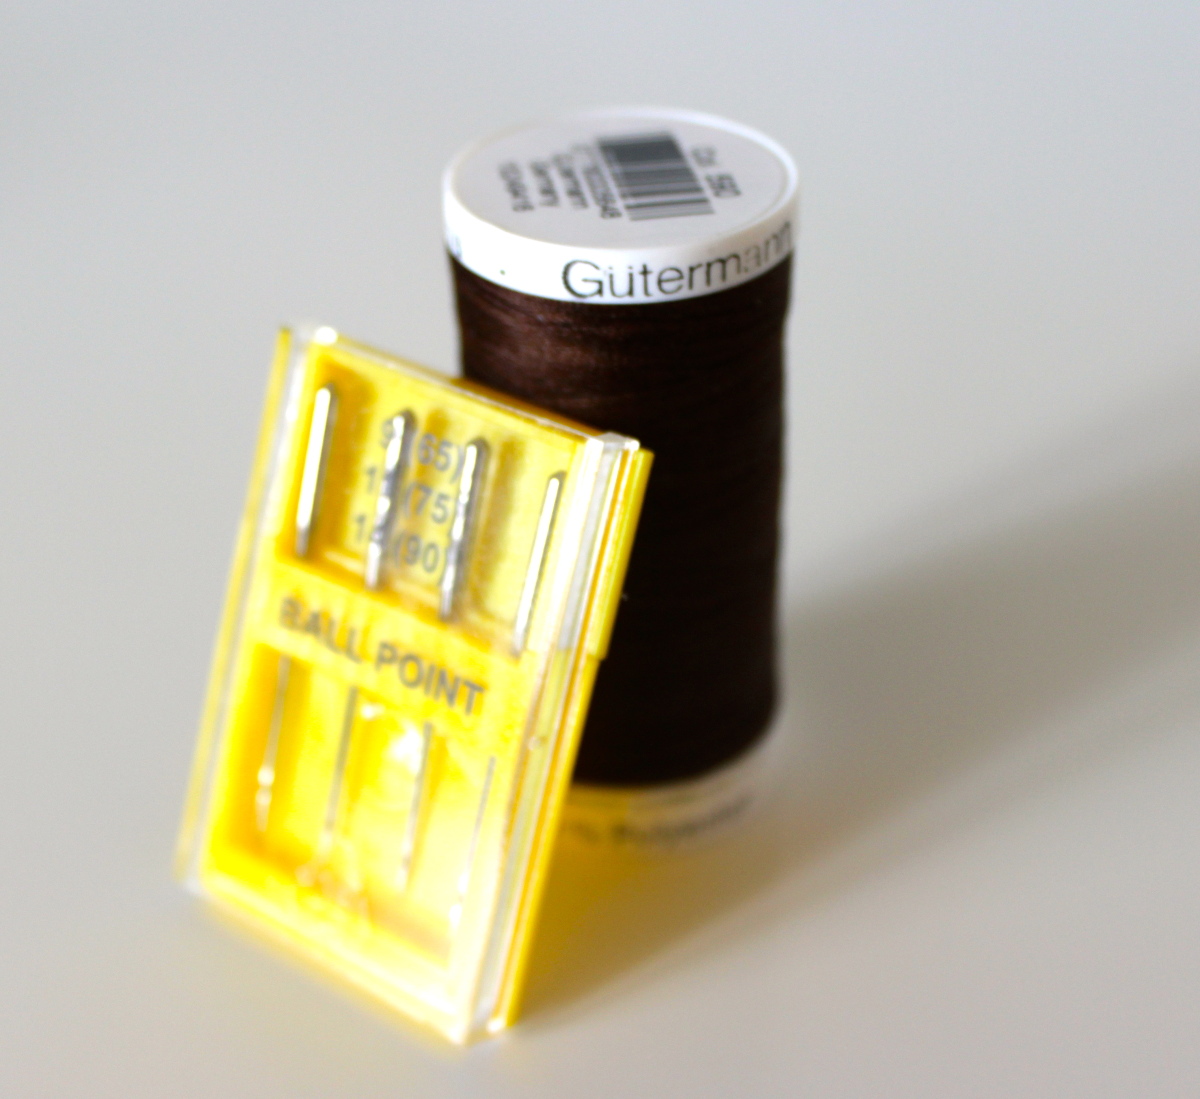
Once you have selected your technical fabric, there are only a few things to keep in mind to sew and care for them successfully. In addition to your fabric yardage, you will also need one yard of fold over elastic (FOE), which will allow you to do some easy and creative seam finishing. The FOE I use here is 0.5″ wide, and I purchased it at Jo-Ann. However, if possible, I would recommend using a wider width to make your seaming even simpler. A quick search on Etsy suggests the possibilities are endless. Here is one example of 5/8″ FOE in several fun prints. Once you have your notions sorted out, the following tips will help ensure success with your technical fabric:
- Use a ballpoint or stretch needle in your sewing machine (available at well stocked fabric stores including Jo-Ann) just as you would for regular knit sewing.
- Don’t be afraid to use pins.
- Use 100% polyester thread.
- Machine wash cool, line dry.
- Do not use heat to dry the fabrics as it may disrupt their performance properties.
- If necessary, iron on low heat.
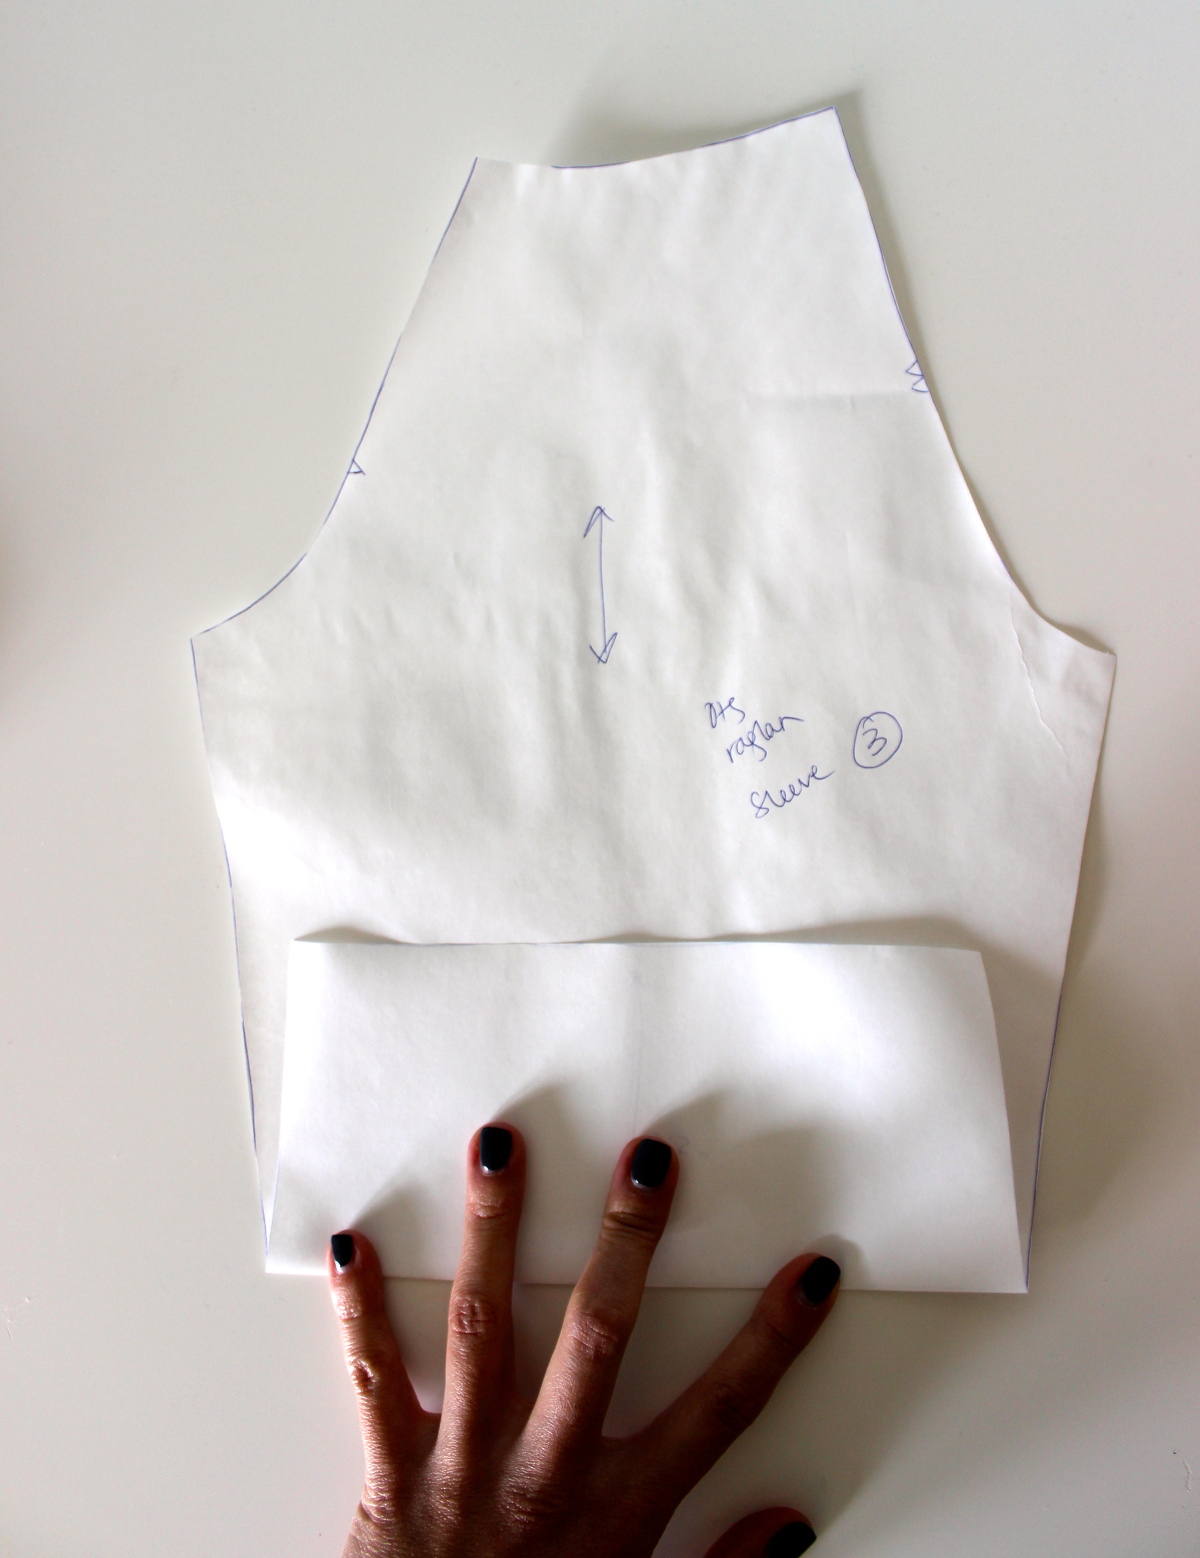
Let’s talk about the cuffs first, since they require the most steps. I will provide sample measurements based on the size 4, but I will also explain how to calculate your own measurements should you be making a smaller size. First, cut the front and back body pieces per pattern instructions. For the sleeve, fold up the cuff end of the pattern piece about 2.5″, and then cut the sleeves. We are going to be adding our own cuff to the pattern vs. having one continuous sleeve as in the original pattern.
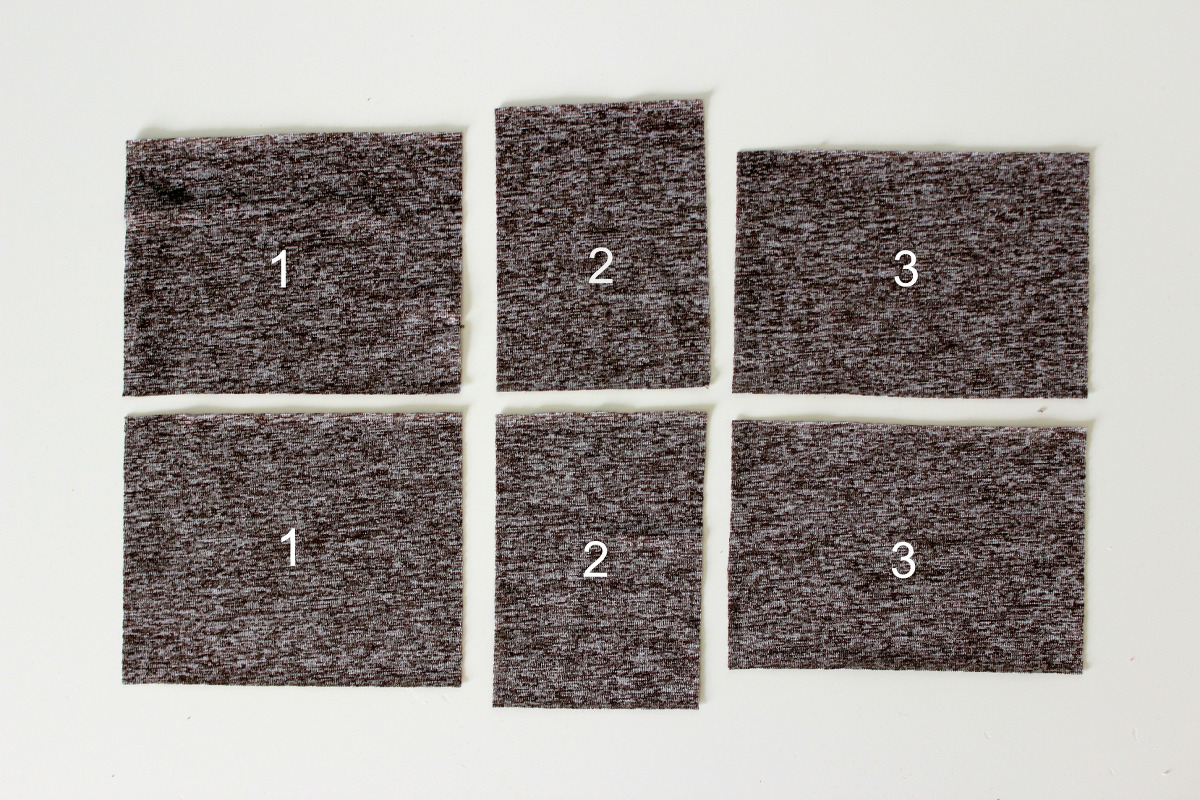
Now, we will cut our extra cuff pieces. Again, I will base these measurements on the size 4. Once you have folded up your sleeve pattern piece as shown in the above photo, measure the width of your new sleeve bottom. In my case, this measurement was about 8″. Keeping in mind seam allowances, that width will guide us in calculating our other measurements. For the size 4 cuff, I cut two rectangles two 4.5” x 5″ (labeled #1), two 4.5” x 3″ (labeled #2), and two 4” x 5″ (labeled #3). I decided on a length of 4.5″ (including a 0.5″ seam allowance) for my cuff, because I wanted the cuffs to hang a little longer than wrist length for the thumb hole and mitten functions. To determine your cuff length, you may want to measure the cuff of an existing shirt compared to where you want it to hit your child’s hand (the first set of knuckles is good), or measure your child’s arm to see where you want the cuff to fall. To determine cuff width, you want a smaller piece that is roughly 1/3 the total bottom sleeve width (plus seam allowance), and the other two pieces to be about two thirds the width (plus seam allowance). The two wider pieces will become the mitten, so they need to have more width to be able to fold over the entire hand. It’s always better to err on the side of making things a bit bigger, because you can always make them smaller! I will point out in the instructions where you can trim back your width if necessary.
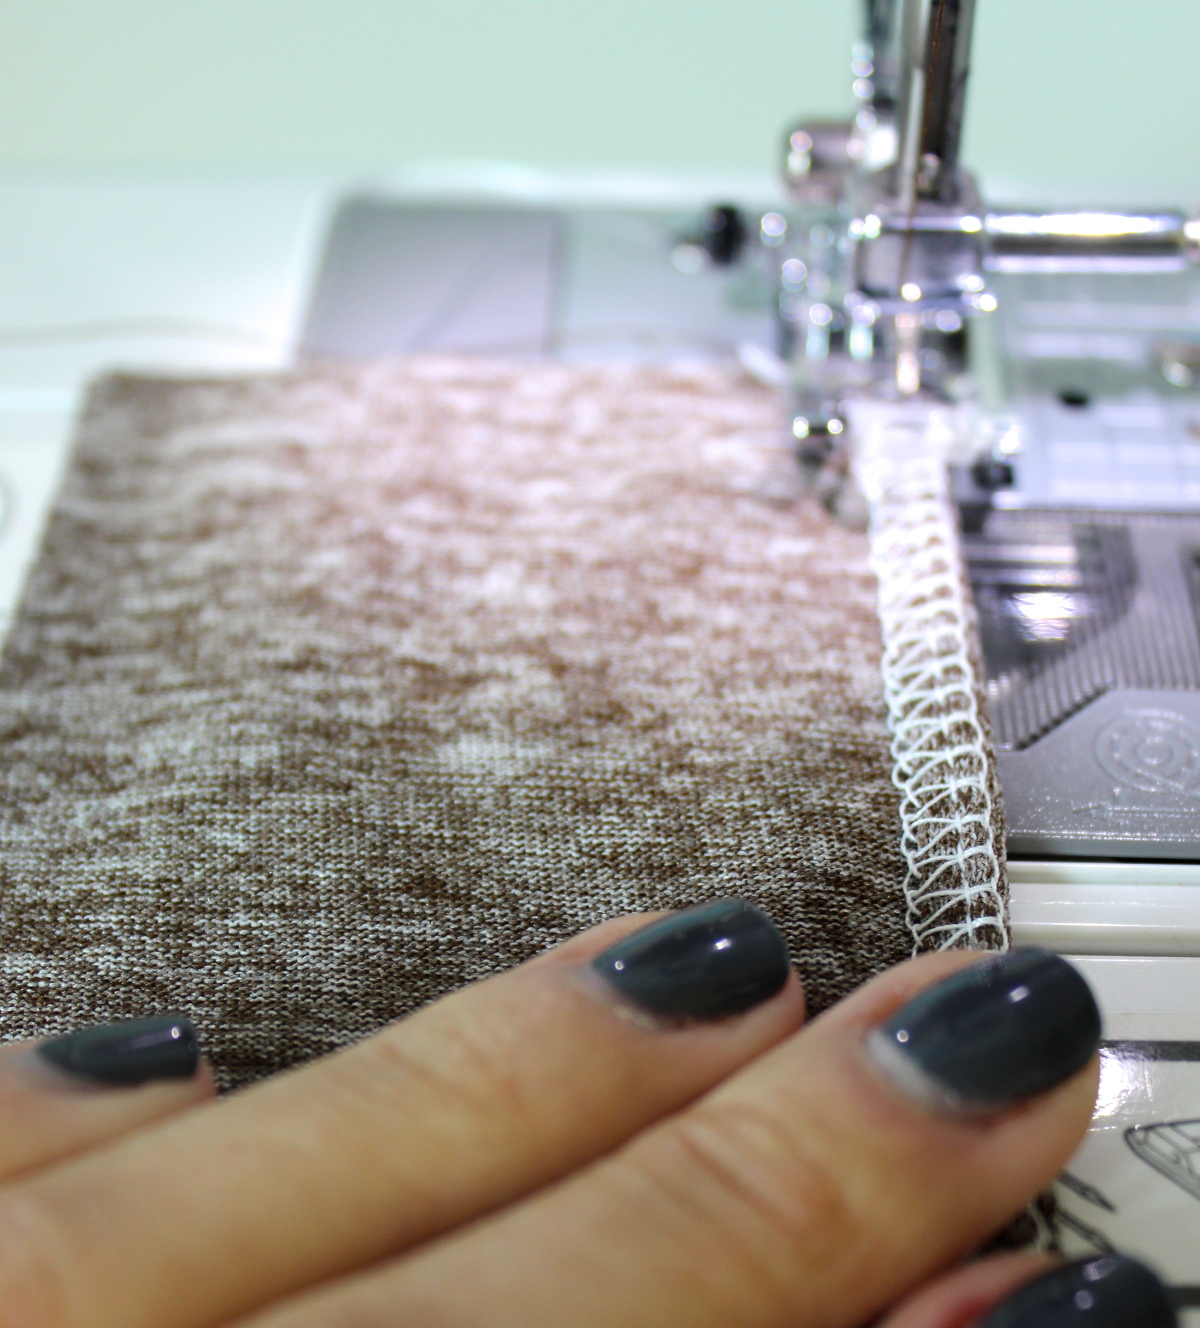
Next, using a serger or zigzag stitch, you will need to finish one long edge on each #2 piece (make sure you finish opposite ends to make opposite cuffs!) and one wide edge on each #3 piece.
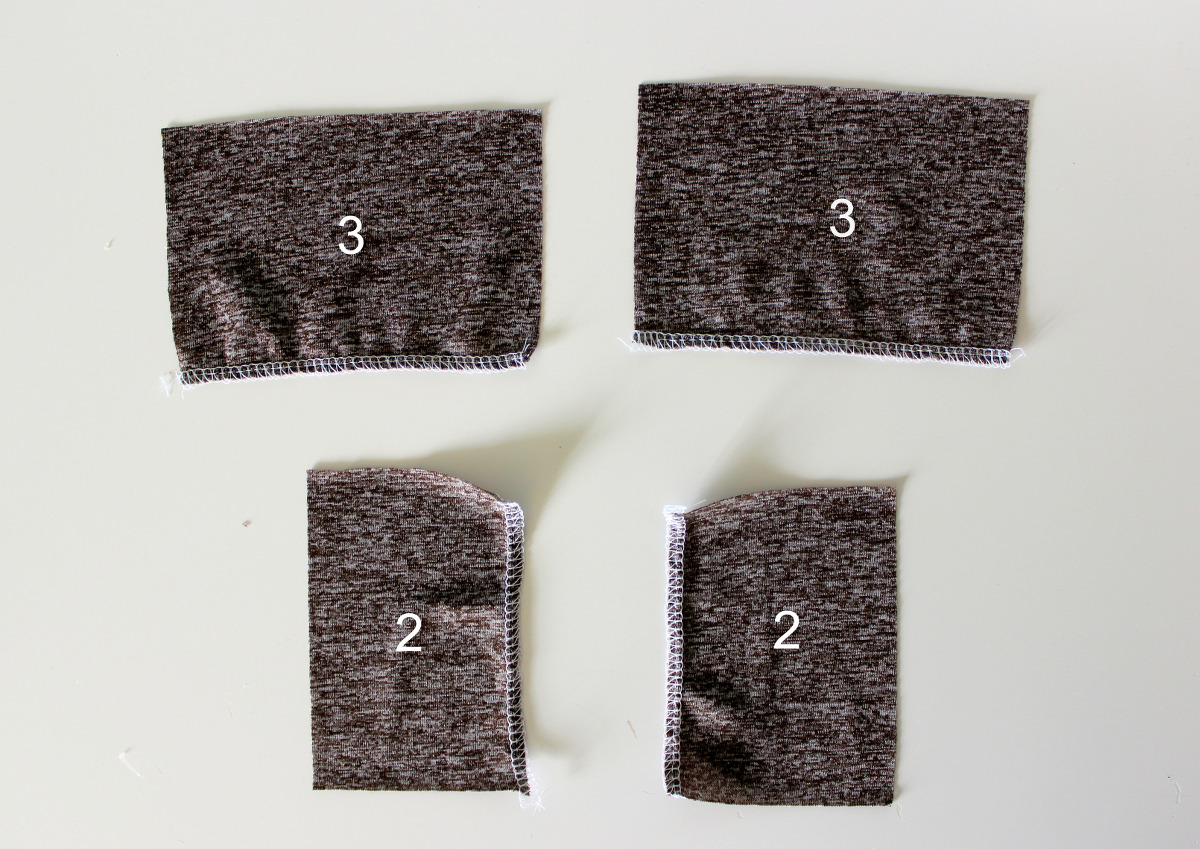
Fold the finished edge toward the wrong side of the fabric and stitch in place. I like to lengthen and narrow my zigzag stitch to about 3.0 and 2.0, but it always pays when sewing with knits to experiment on scrap fabric!
Now we are going to begin assembling the cuff. Place one of the #1 pieces right side up, and place the finished #3 piece on top, also right side up (so wrong and right sides are facing).

On top of this, place a #2 piece right side down, matching the long edges. Repeat for the other side, and again, make sure you have two opposite cuffs.
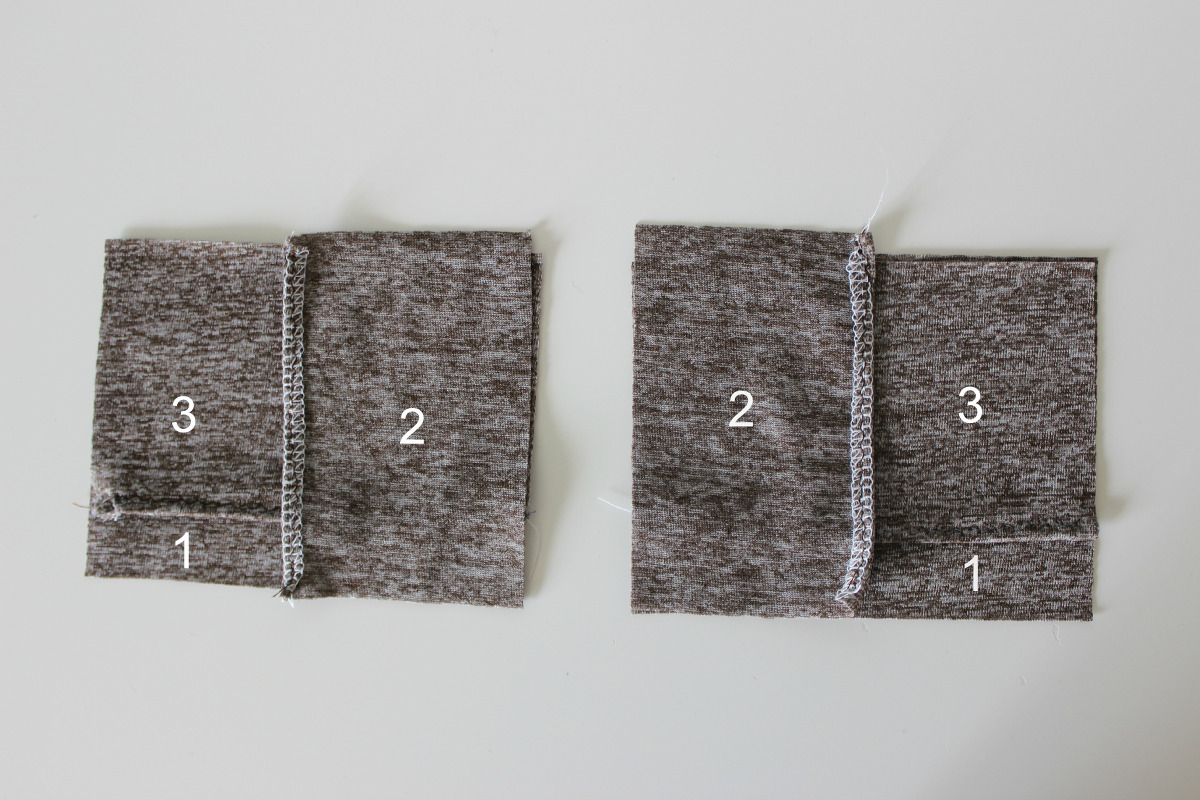
Stitch the seam where all three pieces meet with a 0.5″ seam allowance. Here is your opportunity to ensure your finished cuff width lines up with the cuff side of your sleeve. You will only be losing about 0.25″ in seam allowances after this, so if your cuff will be too wide, trim the excess off the length you have not yet seamed together.

Now, cut two lengths of FOE to bind the opposite side of the cuff (4.5″ long in this example).
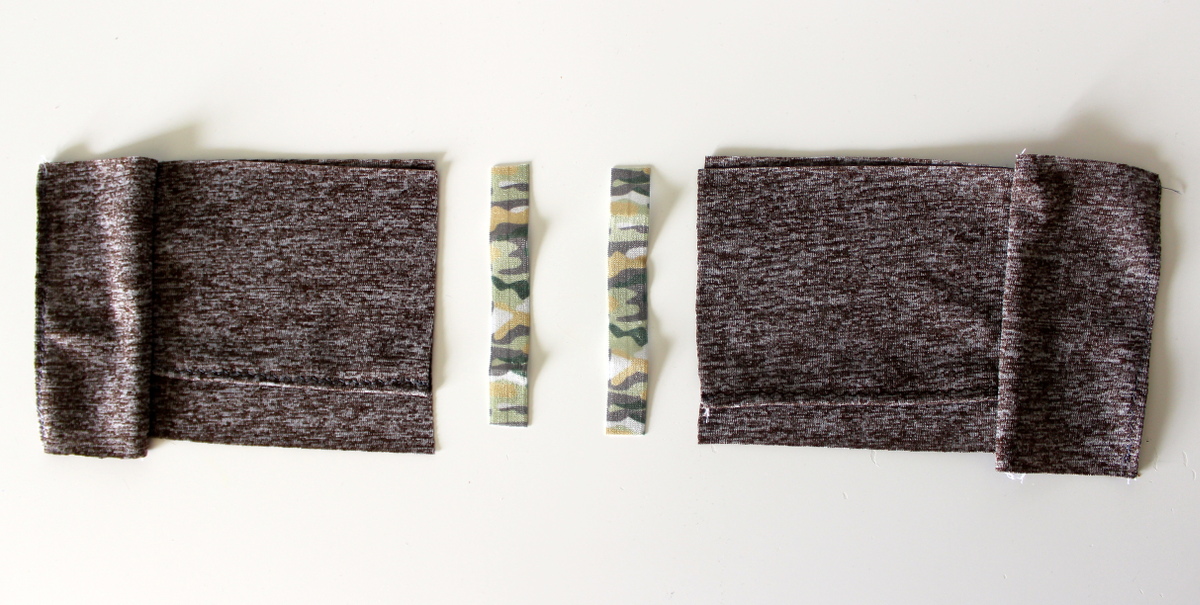
Fold the FOE around the open length of the cuff so that it encases pieces #1 and #3 together. Stitch in place using a narrow zigzag (now you can see why it will be a little less tricky with wider FOE!).
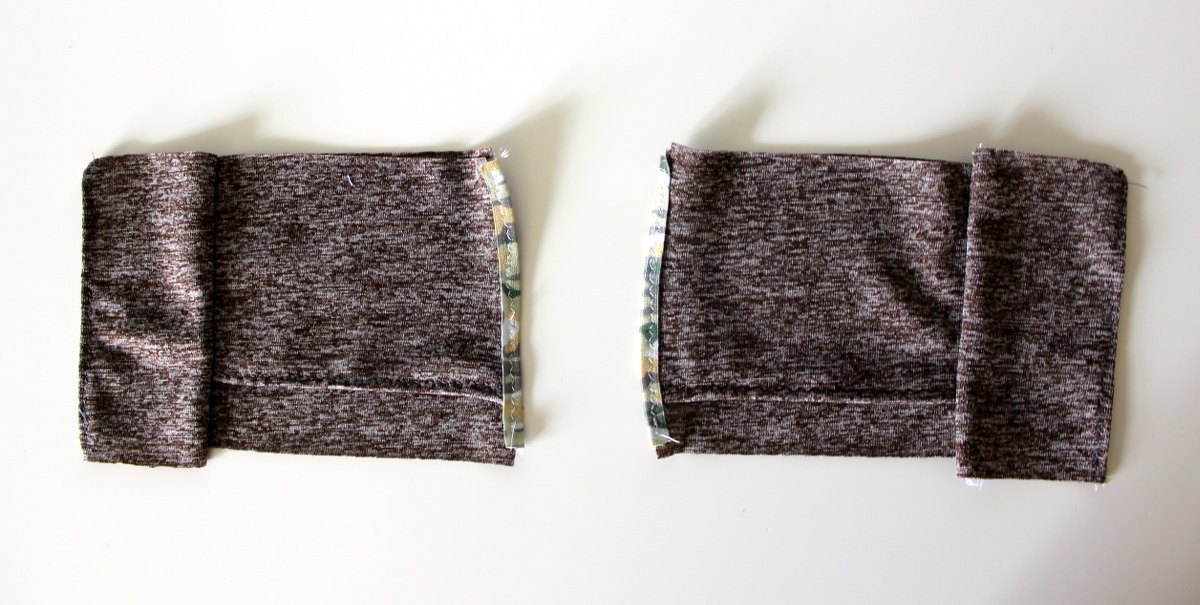
Now, join your two cuff lengths to form a tube, layering the FOE side over the plain side. As you can see, they barely overlap, just by about 0.25″ or so. Stitch together starting from the end where the edges are uneven (the side you will attach to your sleeve) toward the opposite end for about 1.5″.
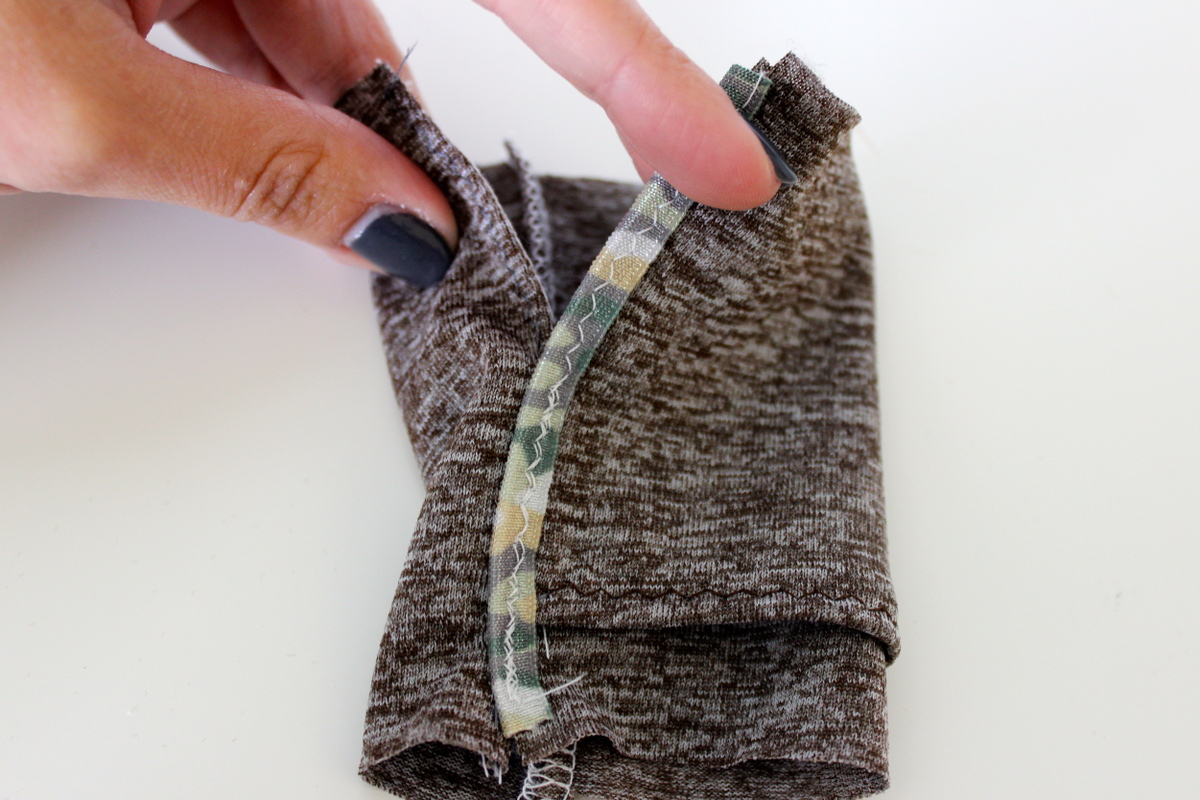
Now it’s ready to attach to your sleeve! Turn the cuff inside out and slide it onto the sleeve, right sides facing. Make sure the bottom of your cuff piece, the part with the staggered fabrics, is aligned with the bottom of the sleeve piece. As for positioning, you want to make sure that your center mitten (piece #3) aligns with the center top of the sleeve (i.e., opposite the sleeve seam), so it can be pulled over the top of your child’s hand. I tried to take pictures of this, but the cuff is so small and there are so many layers the visual was not helpful–trust me! Pin in place, and seam the cuff piece to the sleeve piece all the way around with a 0.5″ seam allowance, taking care not to catch any of piece #3 in your seam.
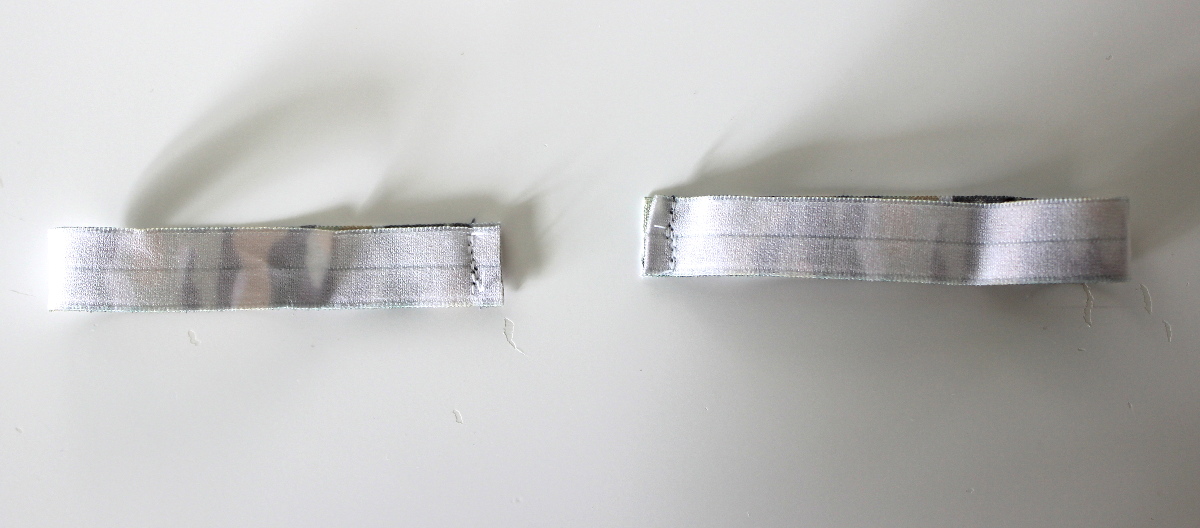
Now for the last step in the cuff! Cut two more lengths of FOE equal to the top circumference of your cuff, plus a seam allowance. My pieces were 7.25″. Stitch them together in a loop, right sides together, and trim back your seam allowance if necessary. Turn them right side out. Use the FOE loops to bind the remaining raw edges of the cuff together, taking care to keep your layers in their correct places. When you come to the area where the two long edges of the cuff are still separate, overlap them by 0.25″ and bind them in place along with the rest of the circumference. This forms your thumb hole.
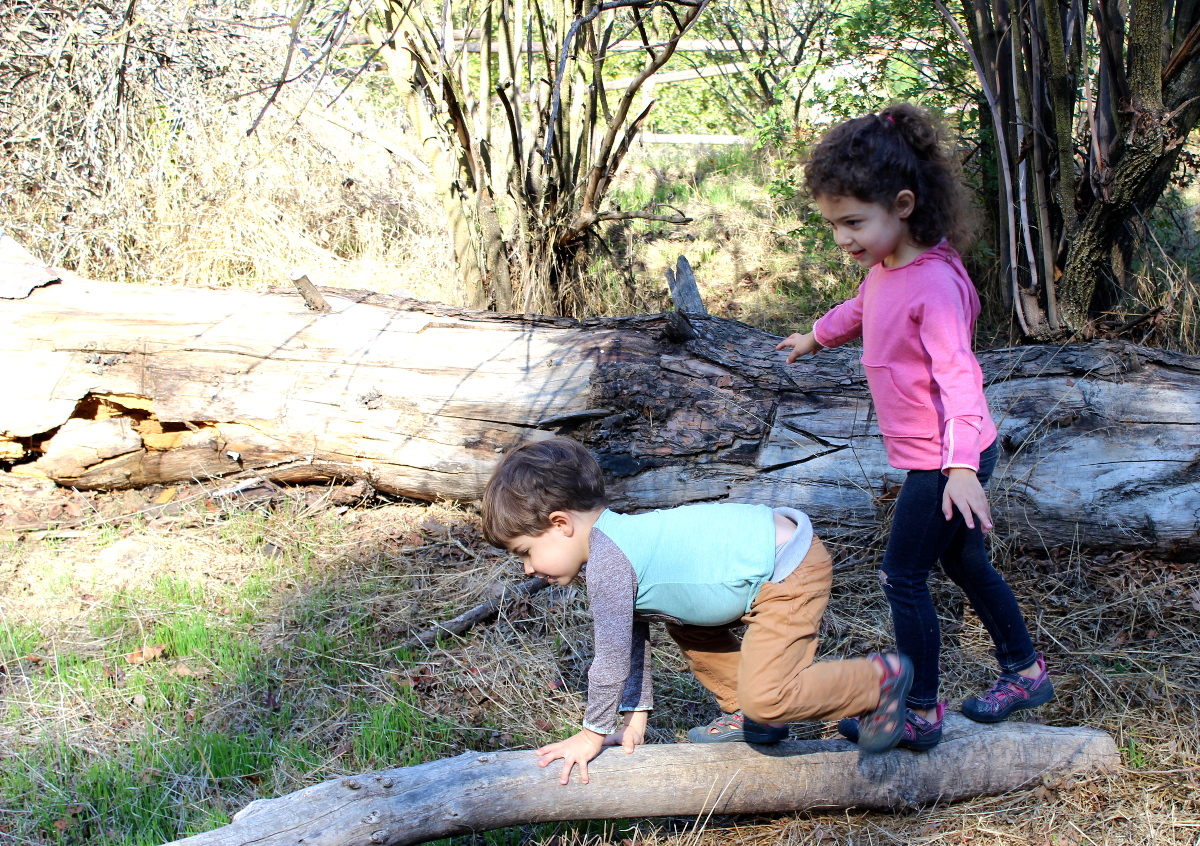
And that will do it for the sleeves! I made some other slight modifications to the shirts that are much more self explanatory, but I’ll run through them quickly here.
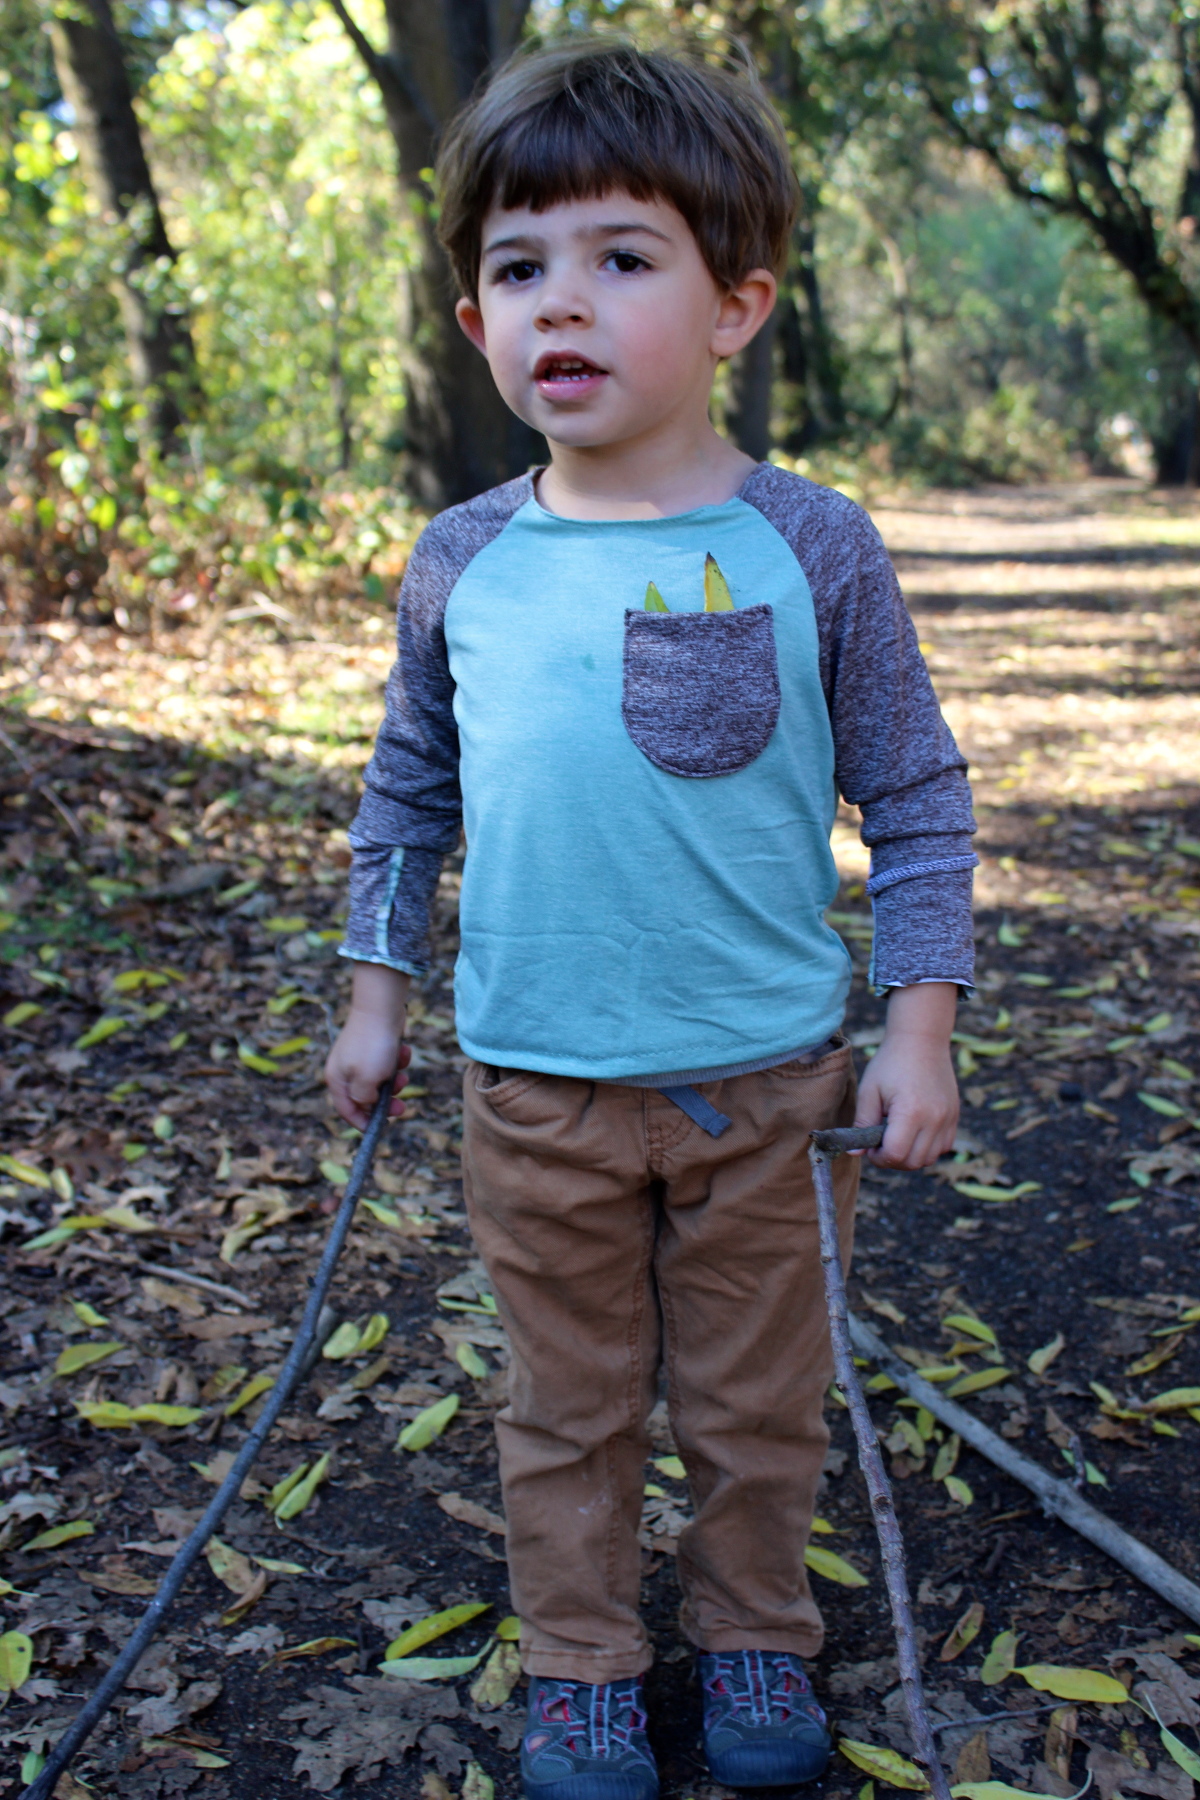
I added very little to the boy version, because I wanted to make one fairly true to the pattern. I made the pocket slightly larger than called for in the pattern (to accommodate treasure storage, naturally). You might also notice I left off the collar. I actually had attached a collar from the brown fabric and it didn’t sit right because of the thickness. Unlike woven fabrics, you can simply fold over knits, even around curves, and stitch in place to finish them (I like to use a serged seam as a guide for folding over, which I’ll describe more below). Just beware of wavy hems if you’re using a regular sewing machine! These knits were fairly stable and tolerated a zigzag stitch fine using a ball point needle. However, some thinner knits will stretch under the stress of the feed dogs and wind up wavy (or even be eaten up by your machine!). A walking foot can help with this because it equalizes the pressure. I would always recommend doing a test seam on scrap fabric before seaming on your actual garment. Here are some additional tips on sewing with knits.

I made a few other easy adjustments on the girl version of the shirt that take practically no time at all. I don’t know about you, but I just love the look of kangaroo pockets on kid’s shirts, and kids love them too as they are large and easily accessible (ample treasure storage!). I find myself adding kangaroo pockets to many shirts/sweatshirts and even dresses. To make one, simply trace the basic shape onto paper (I like to fold my paper down the middle and draw half the pocket to make it more symmetrical). Then place it right on the shirt front pattern piece or the finished garment to tweak the size. Keep in mind a seam allowance! I cut two pocket pieces, seamed them right sides together, turned it right side out and stitched it right onto the shirt.

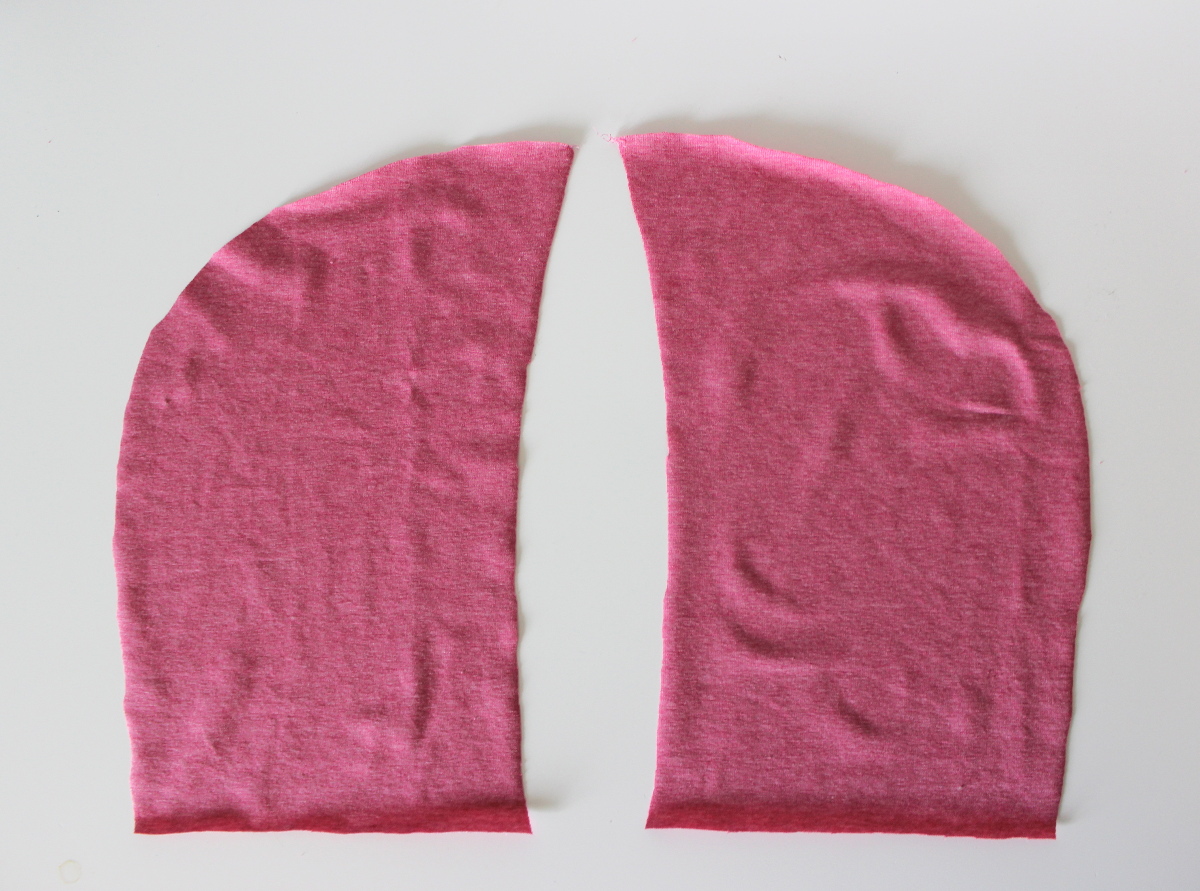
I also added a hood to the shirt, which I hesitated to do initially because I wanted to be able to provide you better instructions than, “go trace a hood!” Fortunately, I used the hood pieces from the Red Riding Hood Cape in Little Things To Sew, and it worked out perfectly. If you’ve already got this hood assembled, that will make your job very easy because you can just flatten it so that it is two dimensional, and trace around it like so:

If you only have pattern pieces, just keep in mind that you need the dimensions of that center hood piece (shown here in red), not just the side pieces, or your hood will be too small. Of course, you can also trace the hood from a well-fitting hooded shirt or jacket. Check your bottom hood width against the total circumference of your collar. I left a few inches open at the center front neckline. When you are happy with your pattern piece, cut two hood pieces, and seam them right sides together.
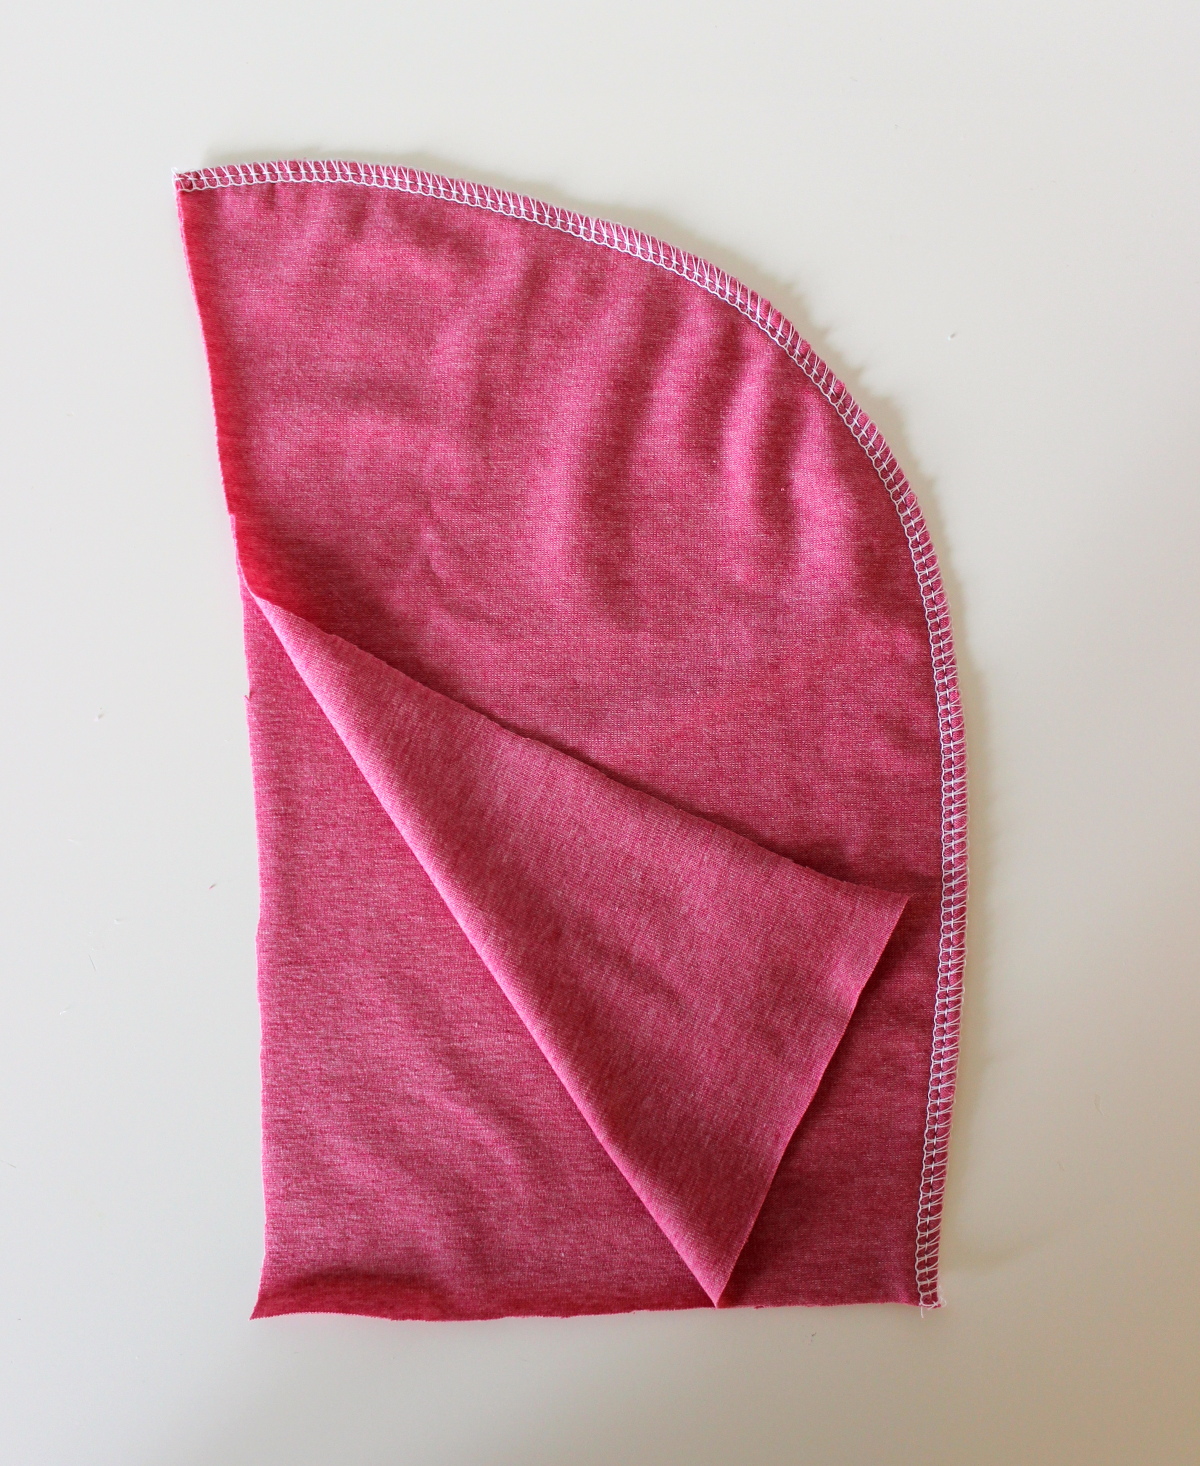
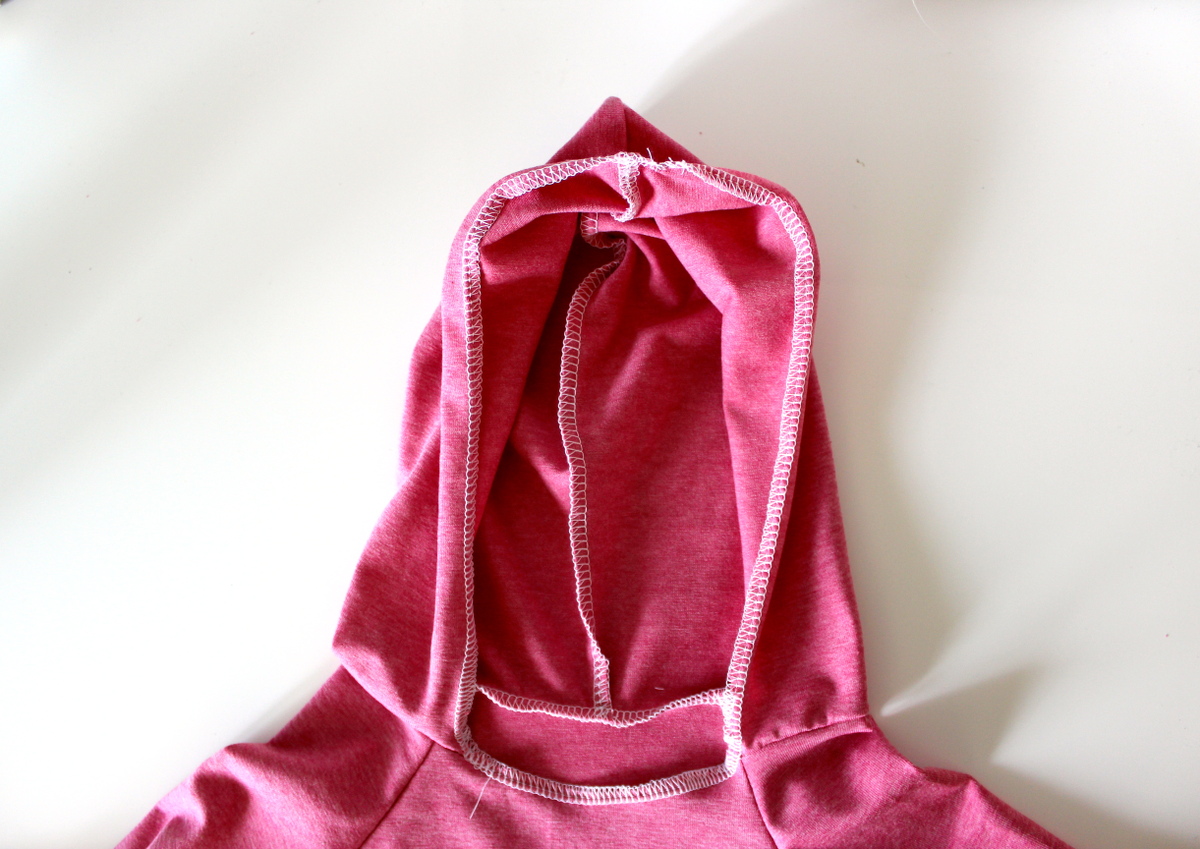
Next, find the center back point of your collar, and align the center seam of the hood (the bottoms side) with that point, right sides together, and stitch in place. To finish the hood and neckline continuously, I serged all the way around the neck/face opening in a continuous loop, then simply folded the edge toward the wrong side and stitched in place. However, it would look great to finish this edge with coordinating FOE from the cuffs!
Unfortunately, I was informed by my 4-going-on-14 year old daughter that I “ruined” the shirt because she “doesn’t like hoods.” If for some reason hoods are unsuitable, I love this idea from the Oliver + S archives.
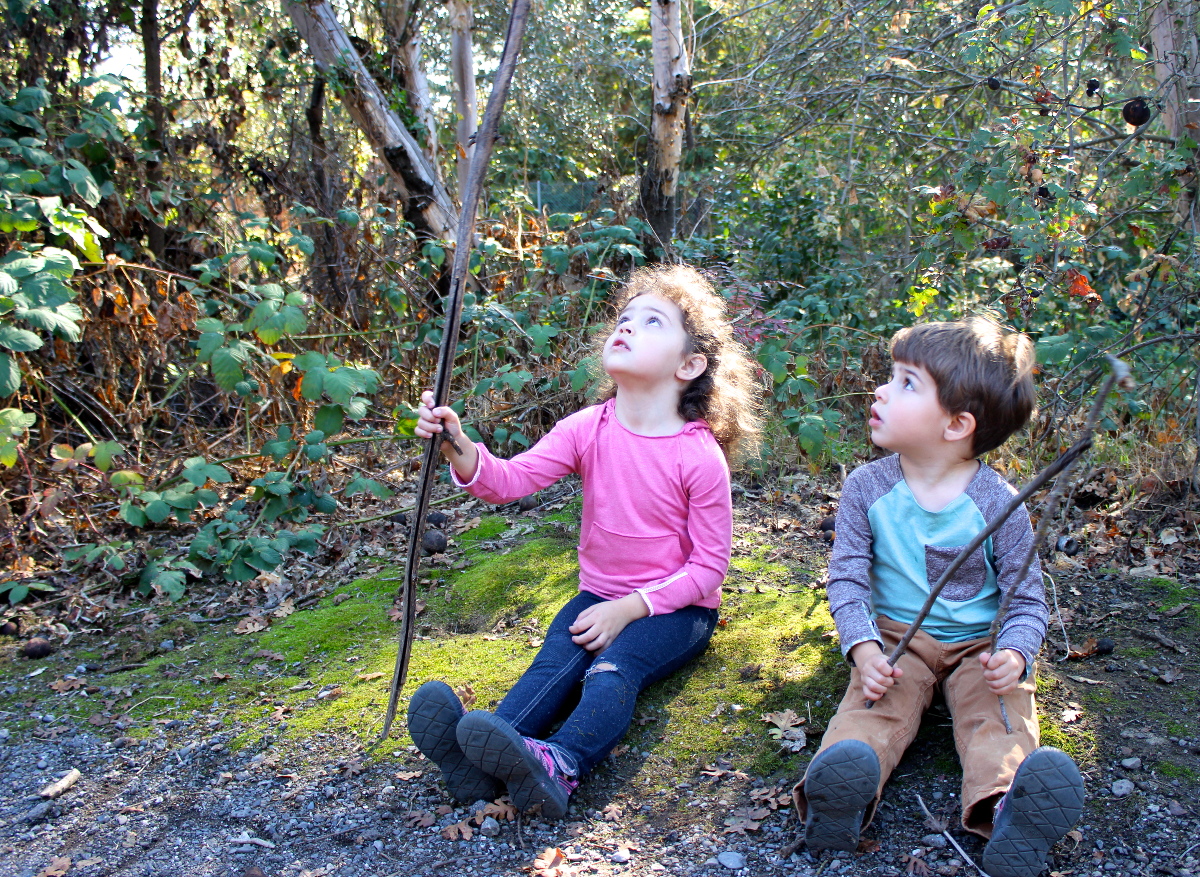
And that concludes this installment of Outdoor Ready! Until next time, keep those fingertips cozy while you get outside and enjoy the last days of fall.
HOW PRACTICAL & VERSATILE — your 4 modifications to the Field Trip Raglan T-Shirt pattern for kids! What a CLEVER idea to add a “thumb hole” on the ends of sleeves and the fold-over fabric for a mitten to use when needed! In fact, your OUTDOOR READY knit shirt with the added “kangaroo” front pocket and the handy hood, add more practicality to your girl’s pink version. Your creativity is revealed — BRAVO! I’m sure many Moms will be pleased to follow your tutorial. I’m telling my 2 nieces, who have young kids and who enjoy sewing, about this tutorial, so THANKS for sharing. Sarah in Minneapolis
Great modifications! These would be great for preschool, too. Thanks for the all the great tips and info. I’m going to check out the fabric link. I’m on the lookout for a lightweight, fast-drying fabric for bucket hats next summer.
Thank you, Sarah! I’m so glad you found the tutorial useful!
Sorry, I’m having a hard time following the cuff instructions. What happened to the number 1 pieces? It looks like things were sewn together but I can’t tell if the 1s and 3s got sewn to each other or if the matching number was sewn to itself. Thanks! I’m excited to try it.