

We’re delighted to have Lyndsey back on the blog. A few months ago she shared with us her fantastic post, Sewing With A Plan – a SWAP project. Now she’s here to discuss her favorite Oliver + S pattern. So glad to have you here Lyndsey!

Hello! I’m Lyndsey Stanfill on Instagram as @madelouisville, and I’m happy to be back today to talk about my favorite Oliver + S pattern, the School Days Jacket. The School Days pattern is special to me for a lot of reasons, one being that it was the first Oliver + S pattern that I ever made, which introduced me to this amazing community. It is also the pattern that I credit with bestowing my sewing super power, or the belief that I can sew anything.
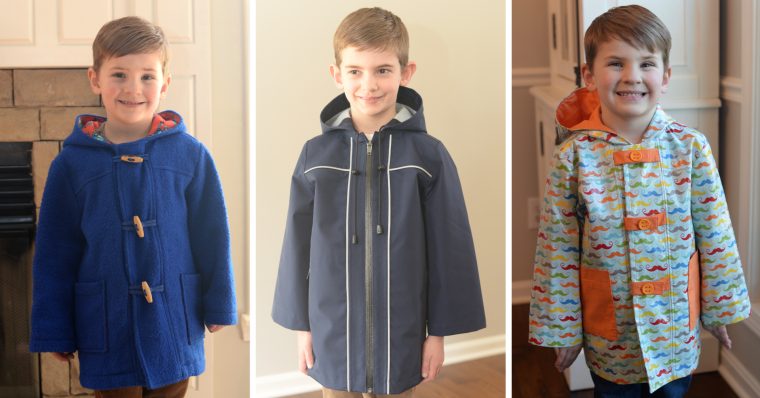
In the fall of 2013, my oldest son was just about the turn three, and I was looking for a high quality 100% wool coat. I couldn’t find one anywhere, and the coats that I found were either made from polyester or a wool/poly/nylon blend. At some point in my endless search I found Oliver + S patterns and decided that I would just make one myself. I had never sewn with coating weight fabric and was intimidated by the idea of sewing a coat, but I was bound and determined to do it.
For that first coat I selected a bright blue boiled wool for the exterior and a red and blue robot quilting cotton print for the lining. I had never purchased boiled wool before, and it did not have the hand that I expected. I thought that it would be more stable like a Melton, but boy was I wrong! I shrugged it off, underlined the boiled wool with cotton flannel and kept going. I didn’t use any interfacing (which I have done on the subsequent wool coats). I decided to use magnetic buttons instead of snaps or Velcro for the internal closures. The magnetic buttons make it so easy for the little ones to get the coat on independently. Finally, I used toggles for the external closures and made the optional quilted vest which is one of my favorite features of this pattern.
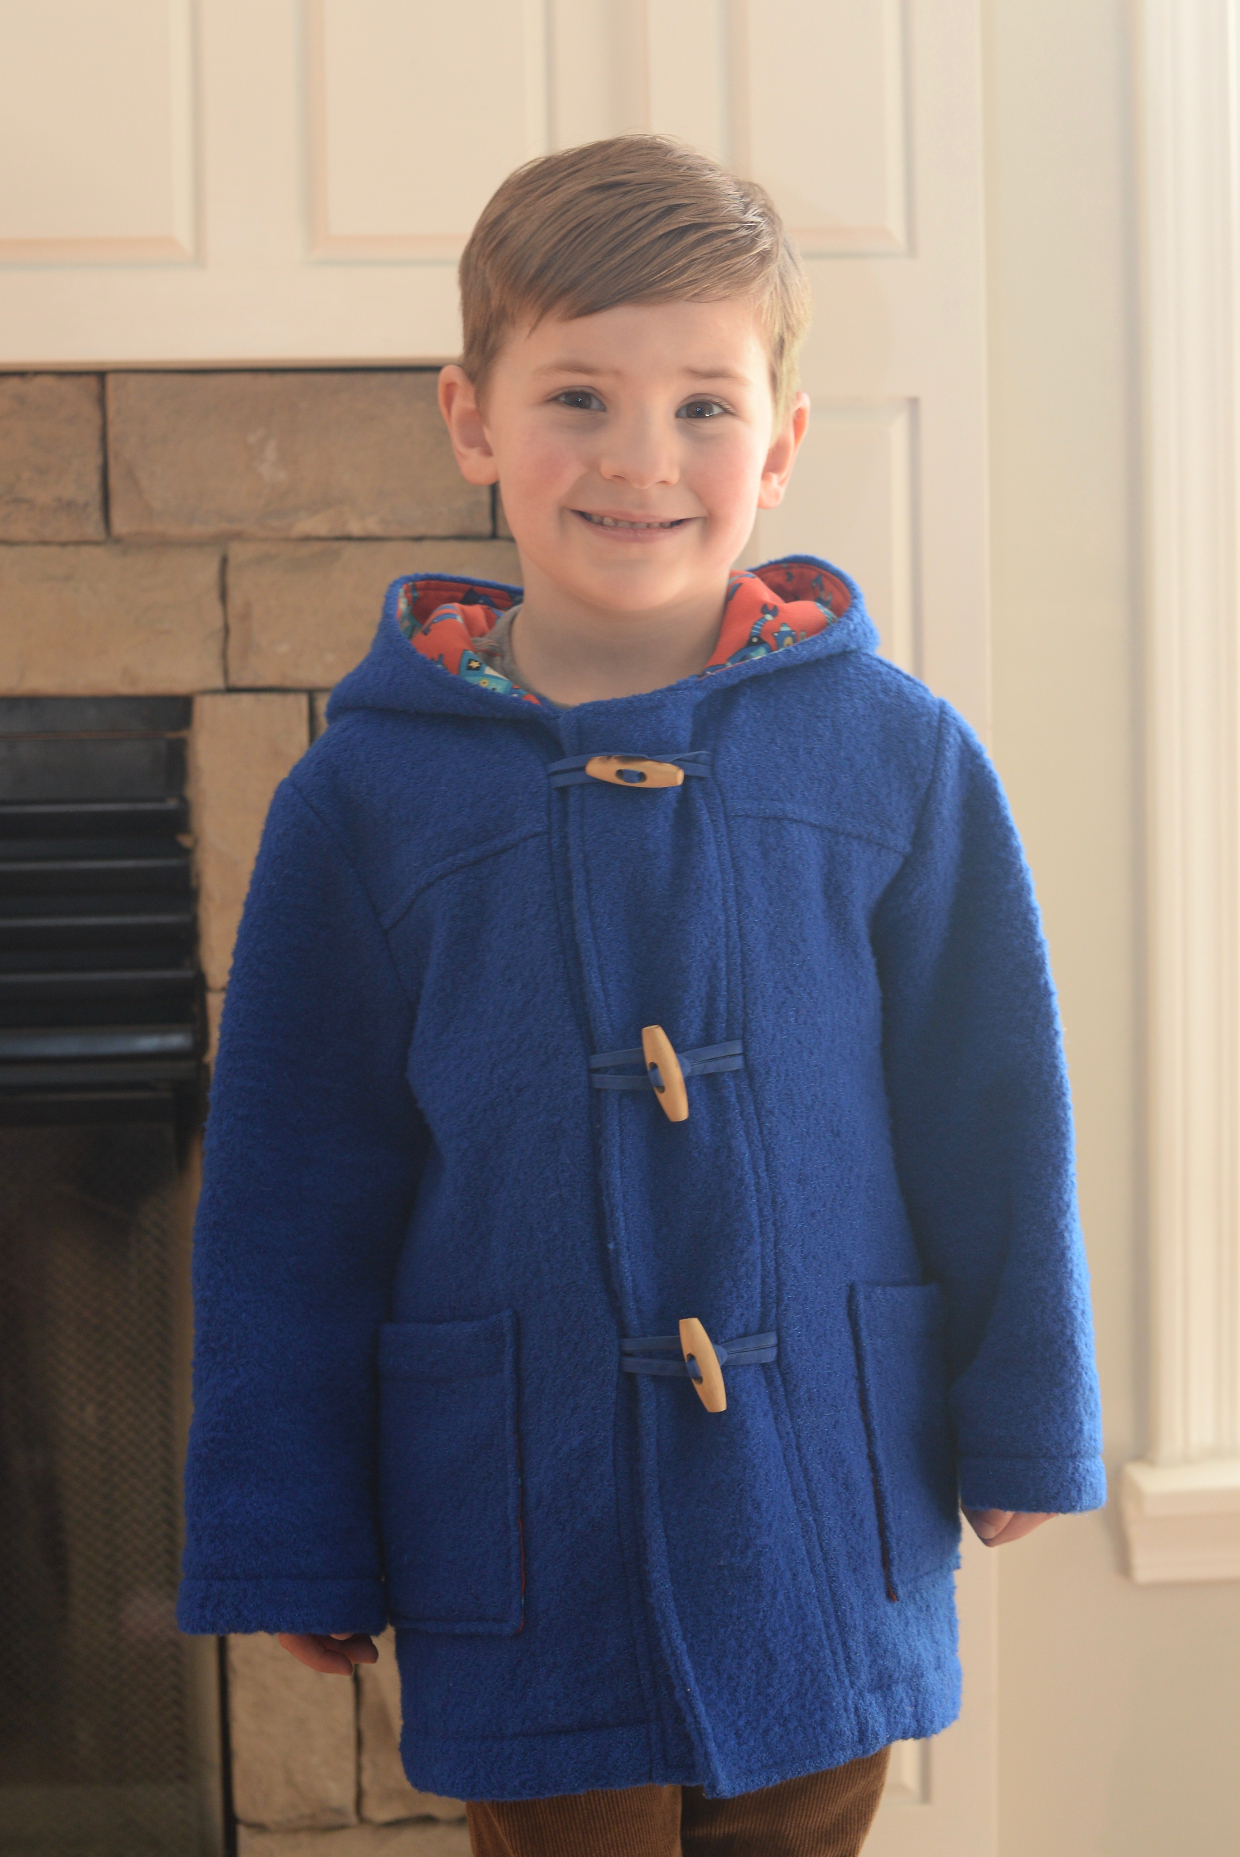
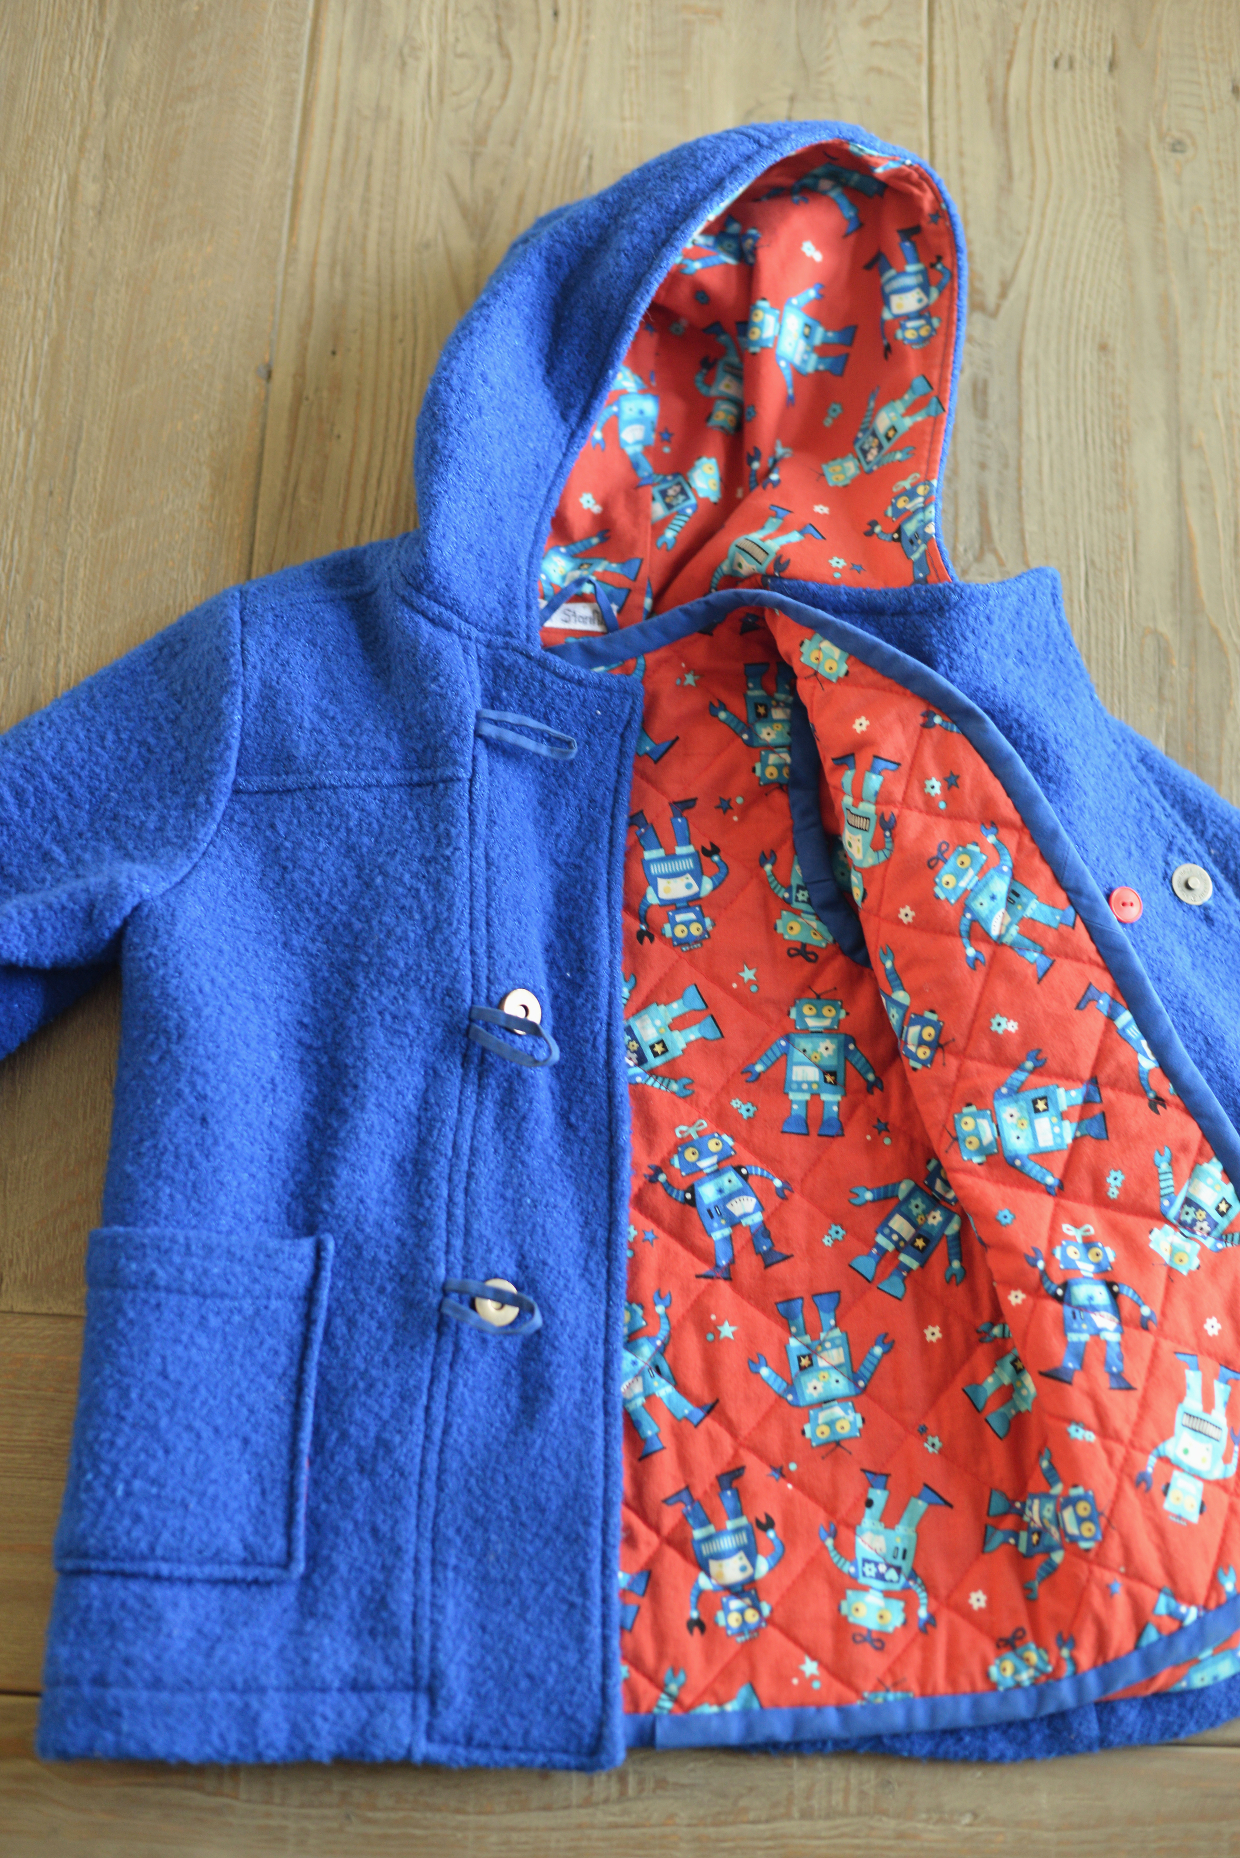
As apprehensive as I had been to “sew a coat,” the Oliver + S instructions were amazing and it went together beautifully without any problems. Even though the boiled wool was not quite what I expected, it sewed like a dream and hid every mistake. When the coat was finished I could not believe that not only had I done it, but that it had been easy! That is when I knew that I could sew anything. My oldest son wore that coat through two winters and this winter we handed it down to my youngest son. There are a few spots that are a little worn after three winters of use, but overall the coat still looks amazing.
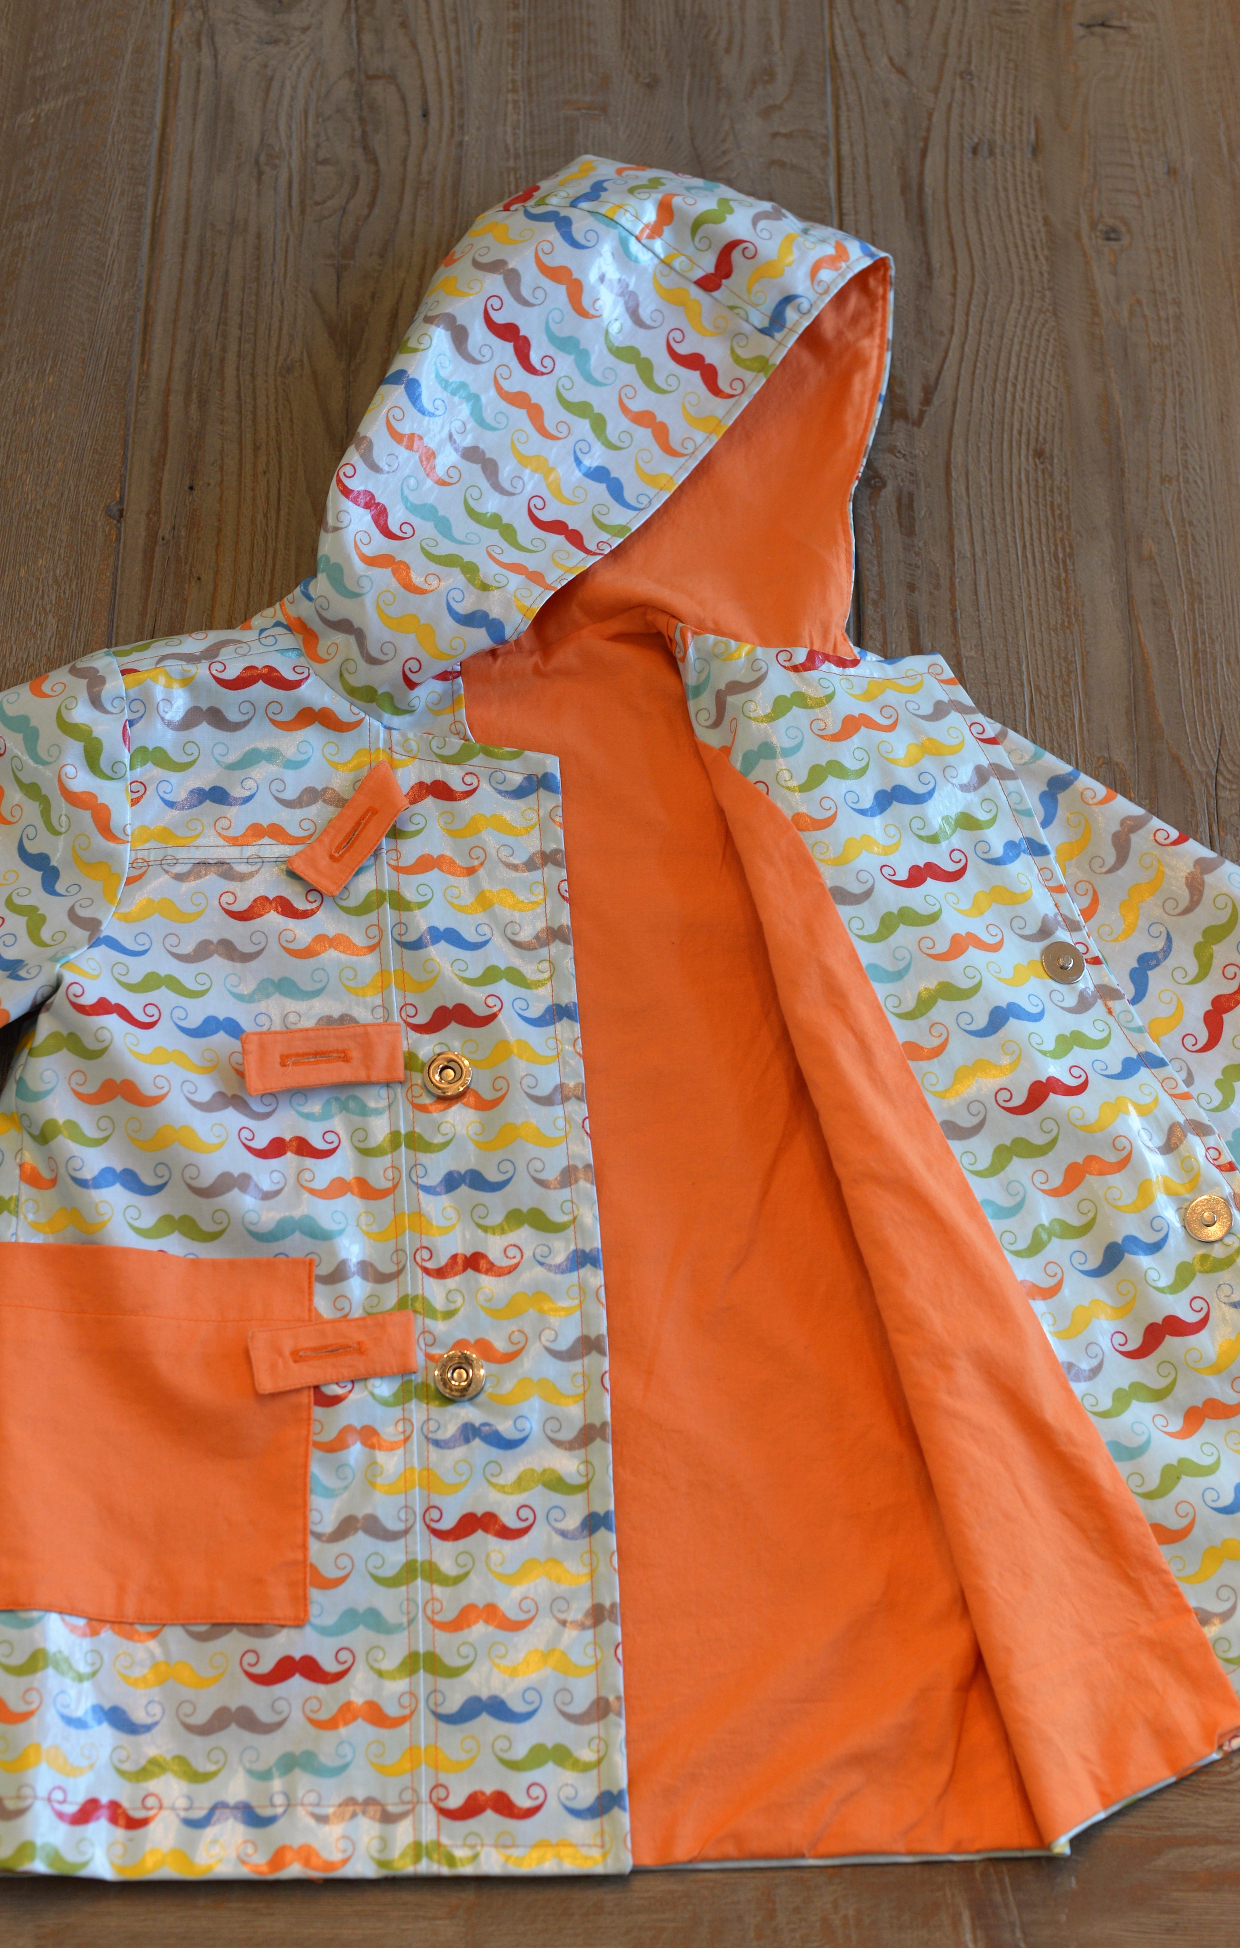
When spring rolled around that year, I decided to make a rain coat version since I already had the correct size pattern traced off. I chose a Riley Blake laminated cotton print with Mustaches and a solid bright orange quilting cotton for the lining. Working with laminated fabrics was another first for me! Instead of toggles I opted for the button tabs on this version. I used the lining fabric for contrast, but I wish that I had used interfacing on the tabs. I kept the magnetic closures since they had been such a hit with my son on the winter coat. I used the lining fabric for the pockets too, which was a total fail because it didn’t occur to me that rain would completely soak the pockets. I was proud of this little rain coat, but I have to say that my oldest son had very little interest in wearing it. I think that was because the laminated cotton does not breath and he felt uncomfortable when he wore it. He only wore it a handful of times before he outgrew it. This spring we have just handed it down to my youngest son and he loves it!

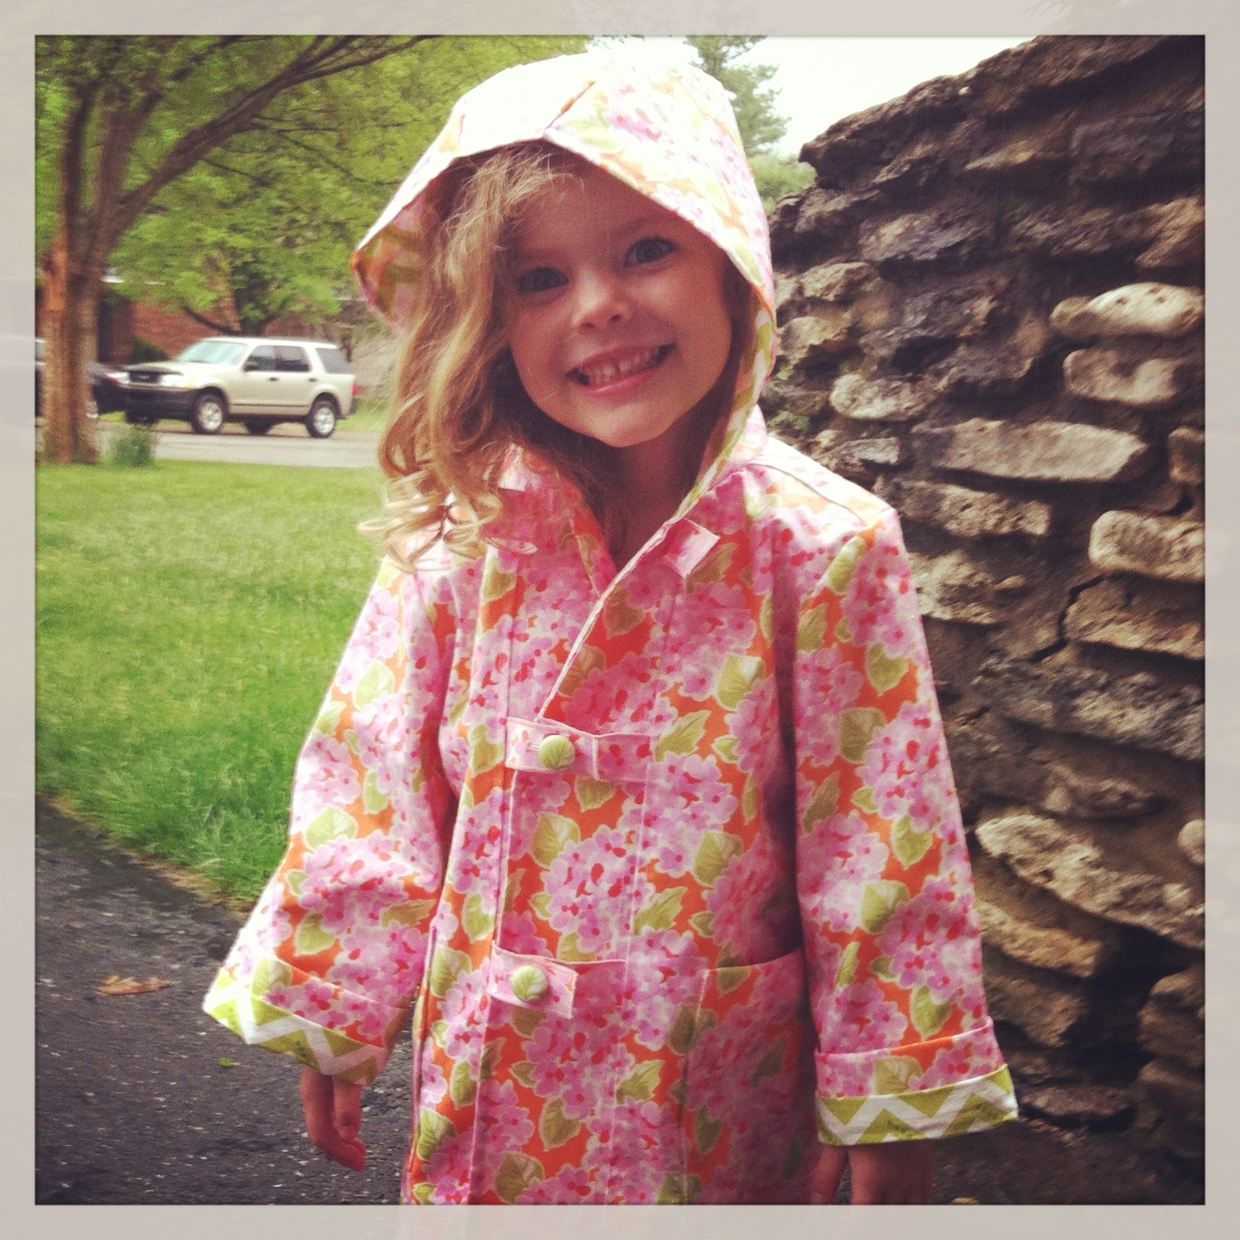
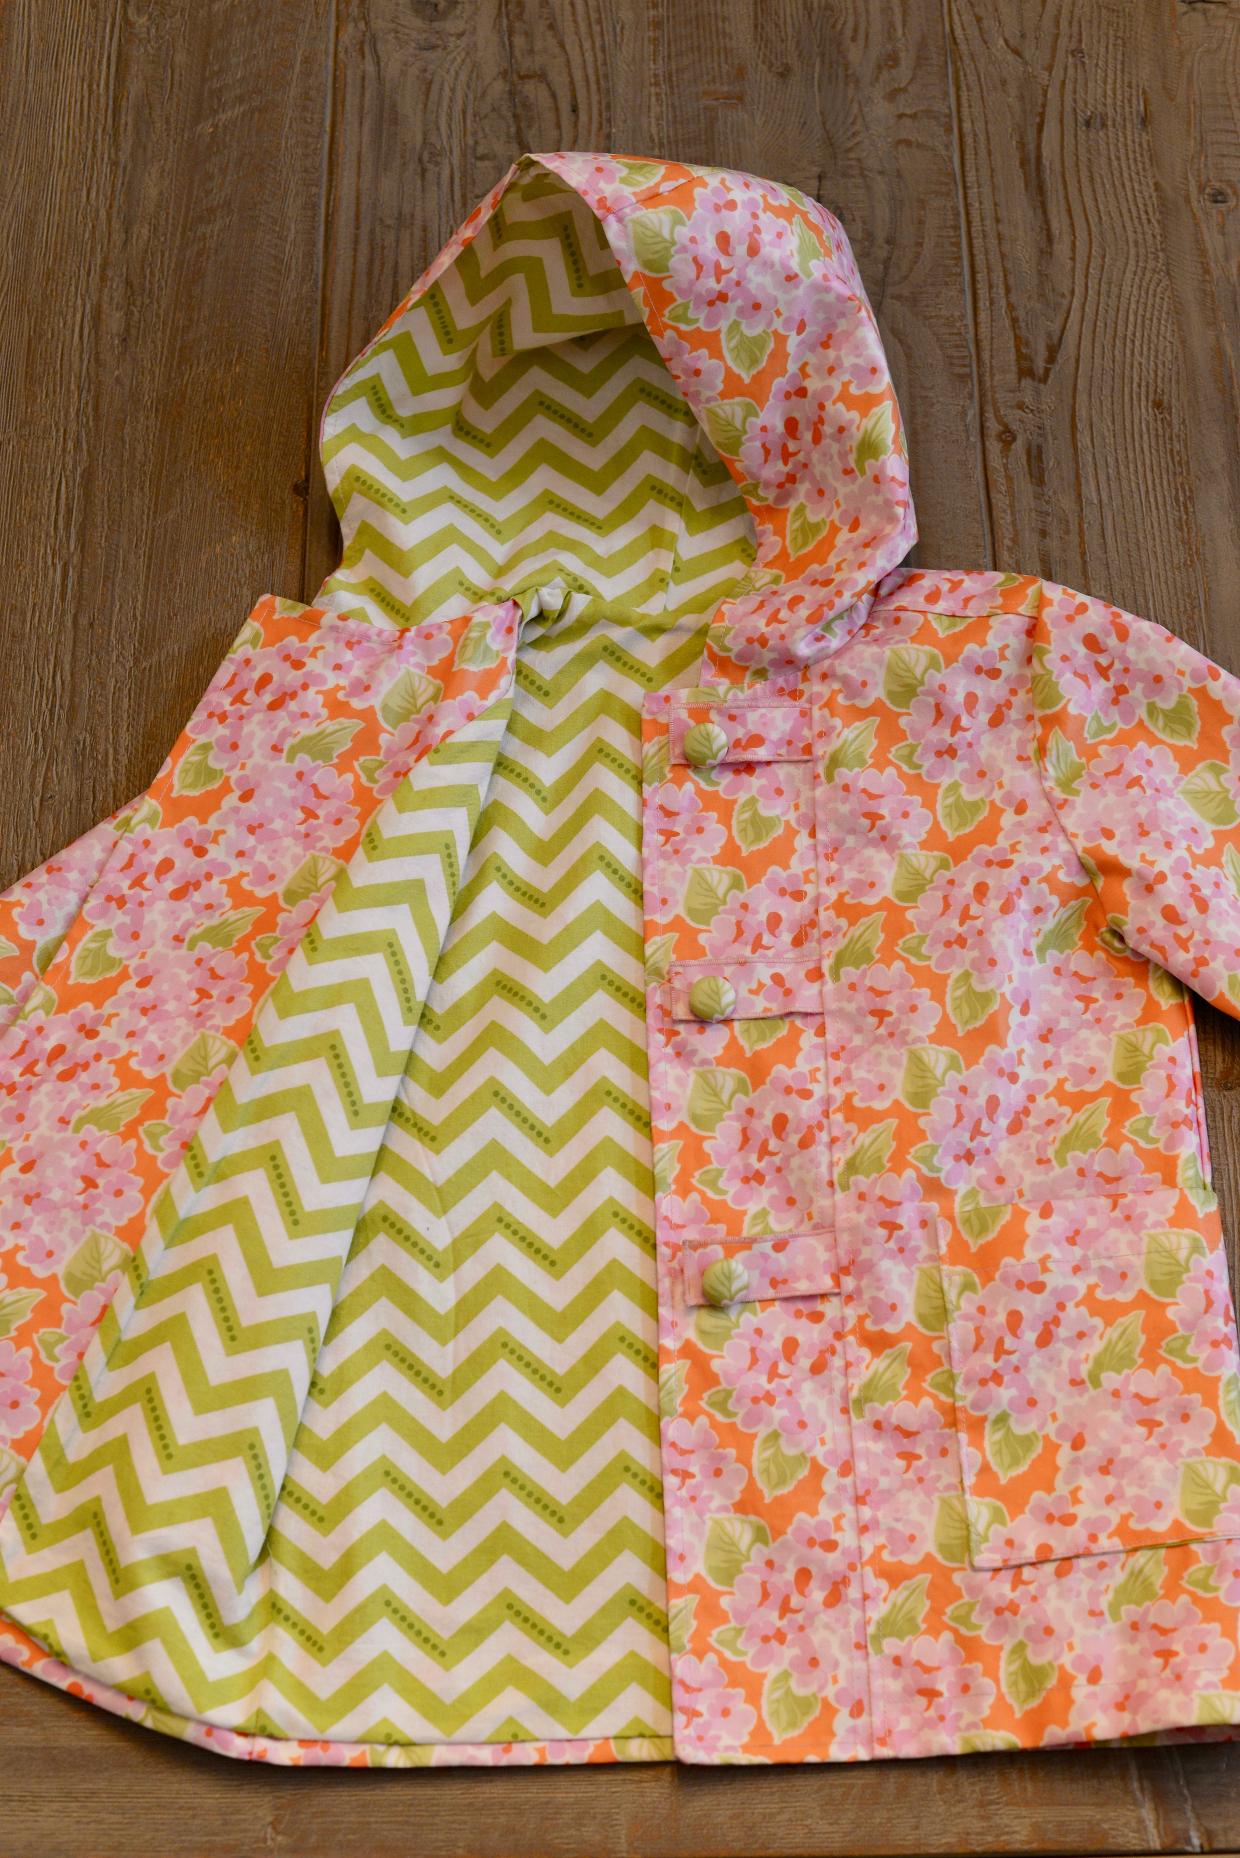
That same spring, one of my friend’s daughter was the same size as my son. I decided to make her a rain coat as well as a surprise. The pattern was already traced off, so why not use it?! I picked out a matte laminated cotton from Kate Spain by Moda and lime green chevron printed quilting cotton for the lining. I spent so much time pattern matching across the placket and the pockets. I used button tabs and magnetic closures on this version and made fabric covered buttons. I fussy cut the fabric to put the little leaves in the middle of each button which is one of my favorite details on any of the School Days jackets that I have made. It was so much fun making a more feminine version.
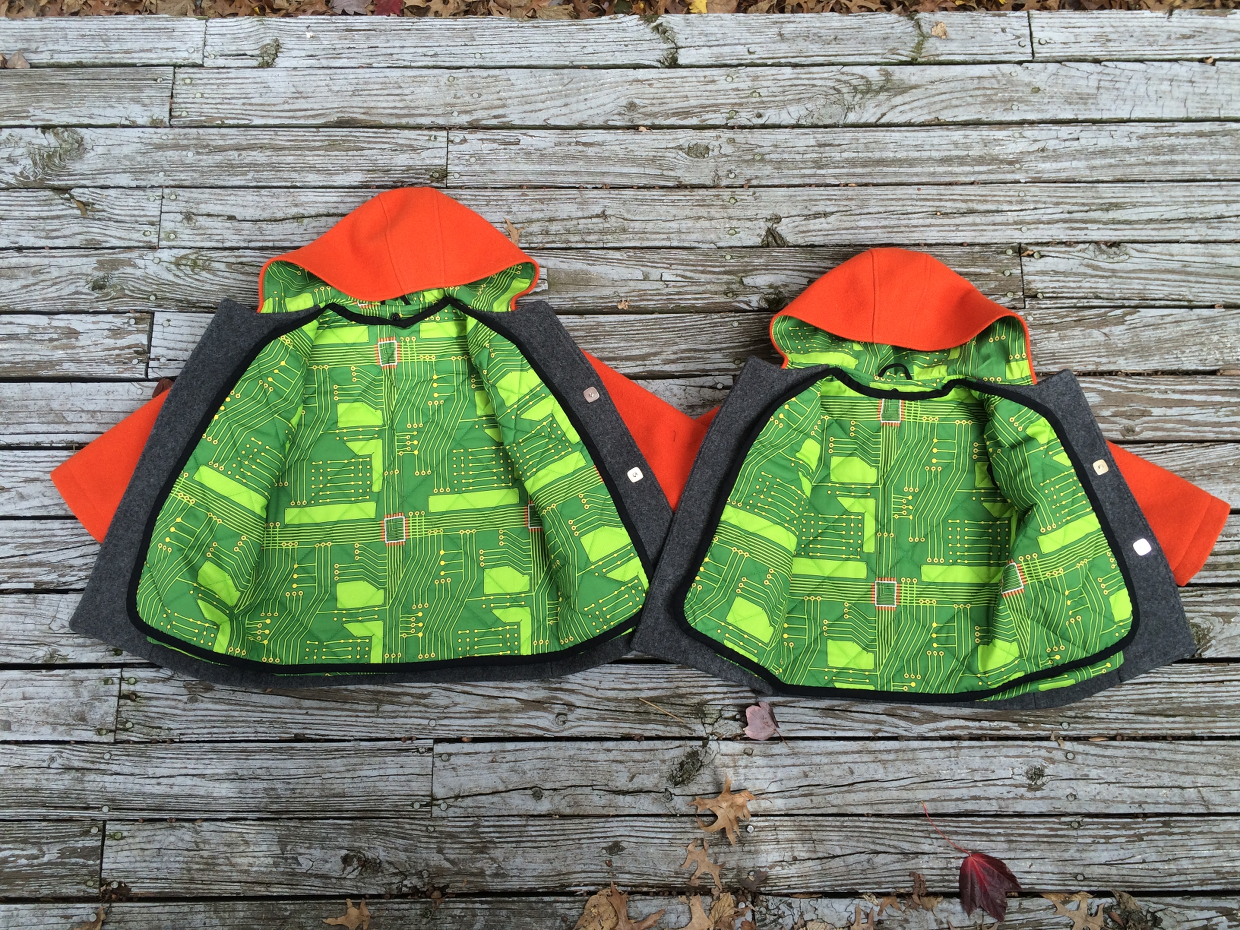
Two years later, my oldest son had outgrown the first coat, and I decided that I would make the boys new matching coats. This time I used 100% wool Melton and decided on orange and grey color blocking. Due to some cutting errors I didn’t have enough fabric left for the pockets, so I pieced together the leftover scraps and called it a design detail. For the lining I ordered a circuit board print from Spoonflower. I used toggles and magnetic closures and made the optional insulated vests for both coats. One of the biggest changes I made for this version was to use interfacing on the placket and yokes for a little more structure. I used an assembly method to sew them and having sewn this pattern so many times at that point, both coats came together really fast.
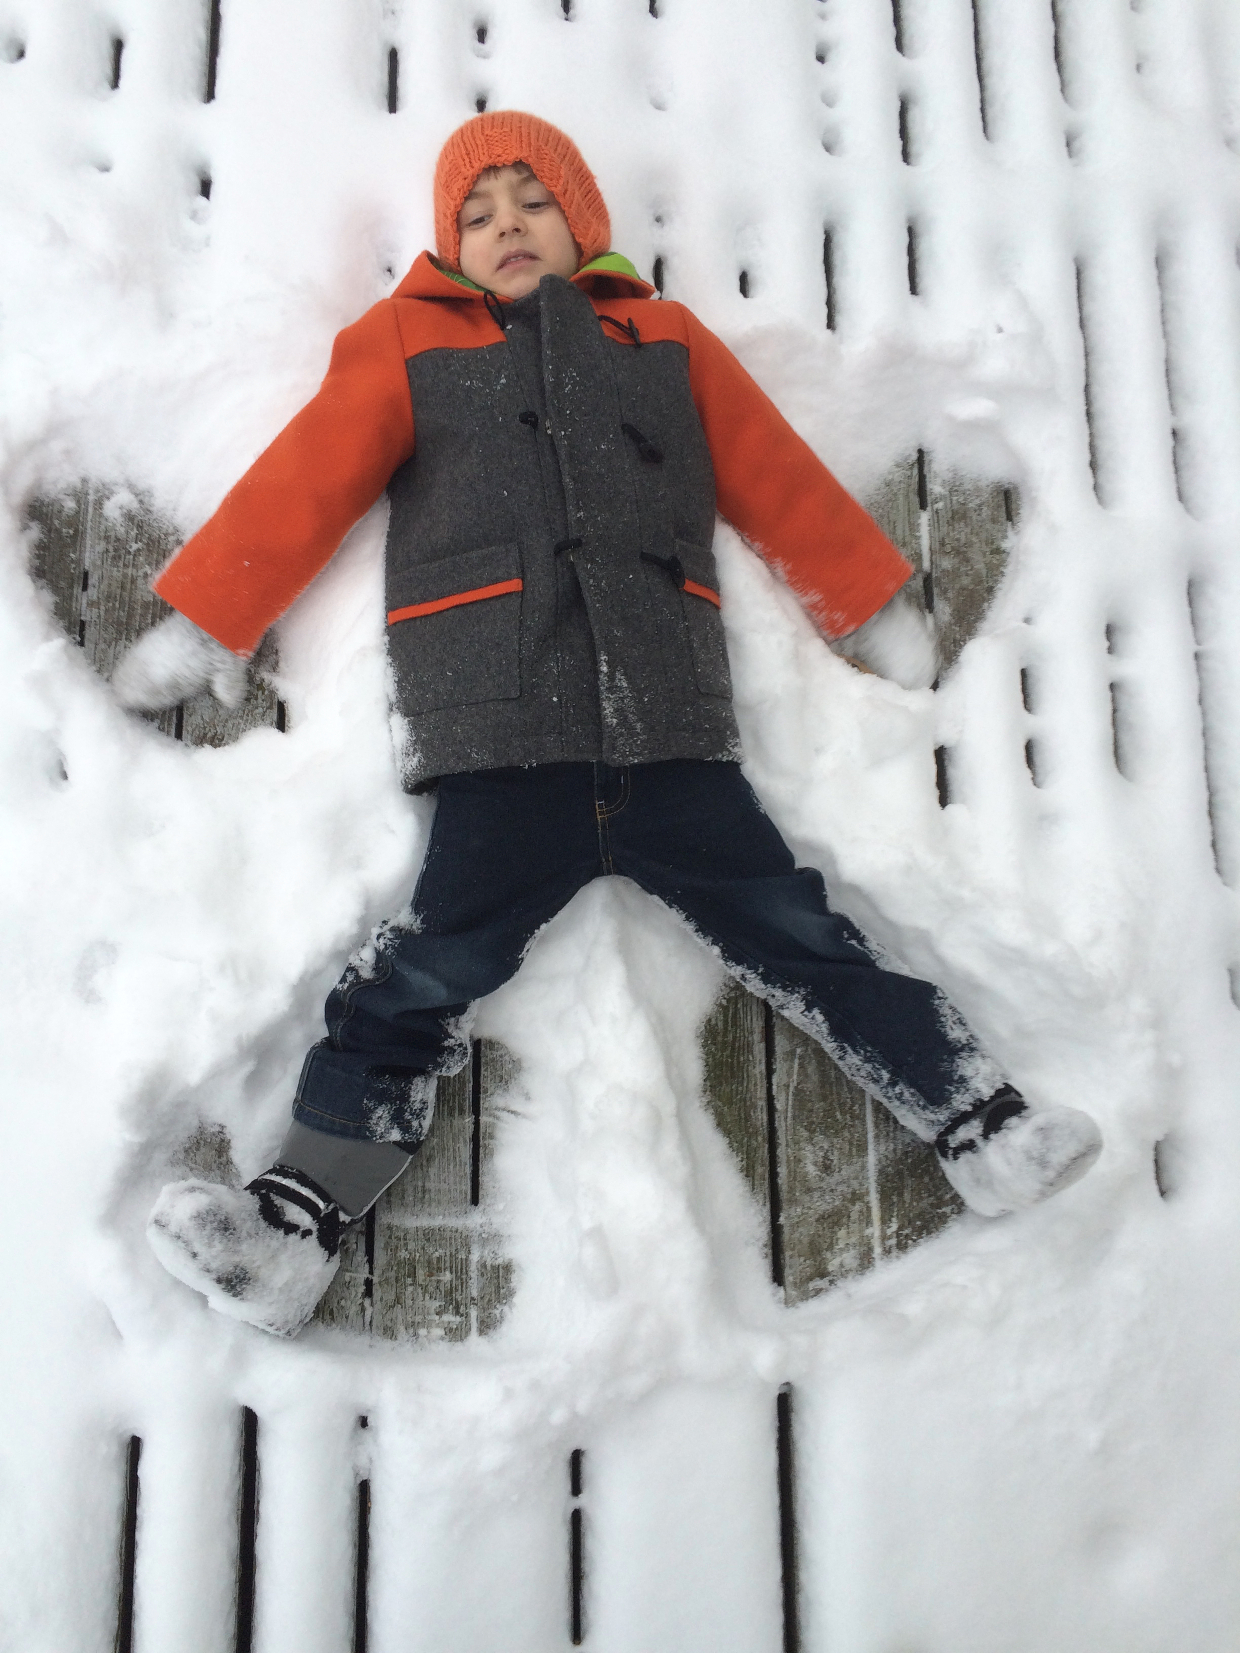

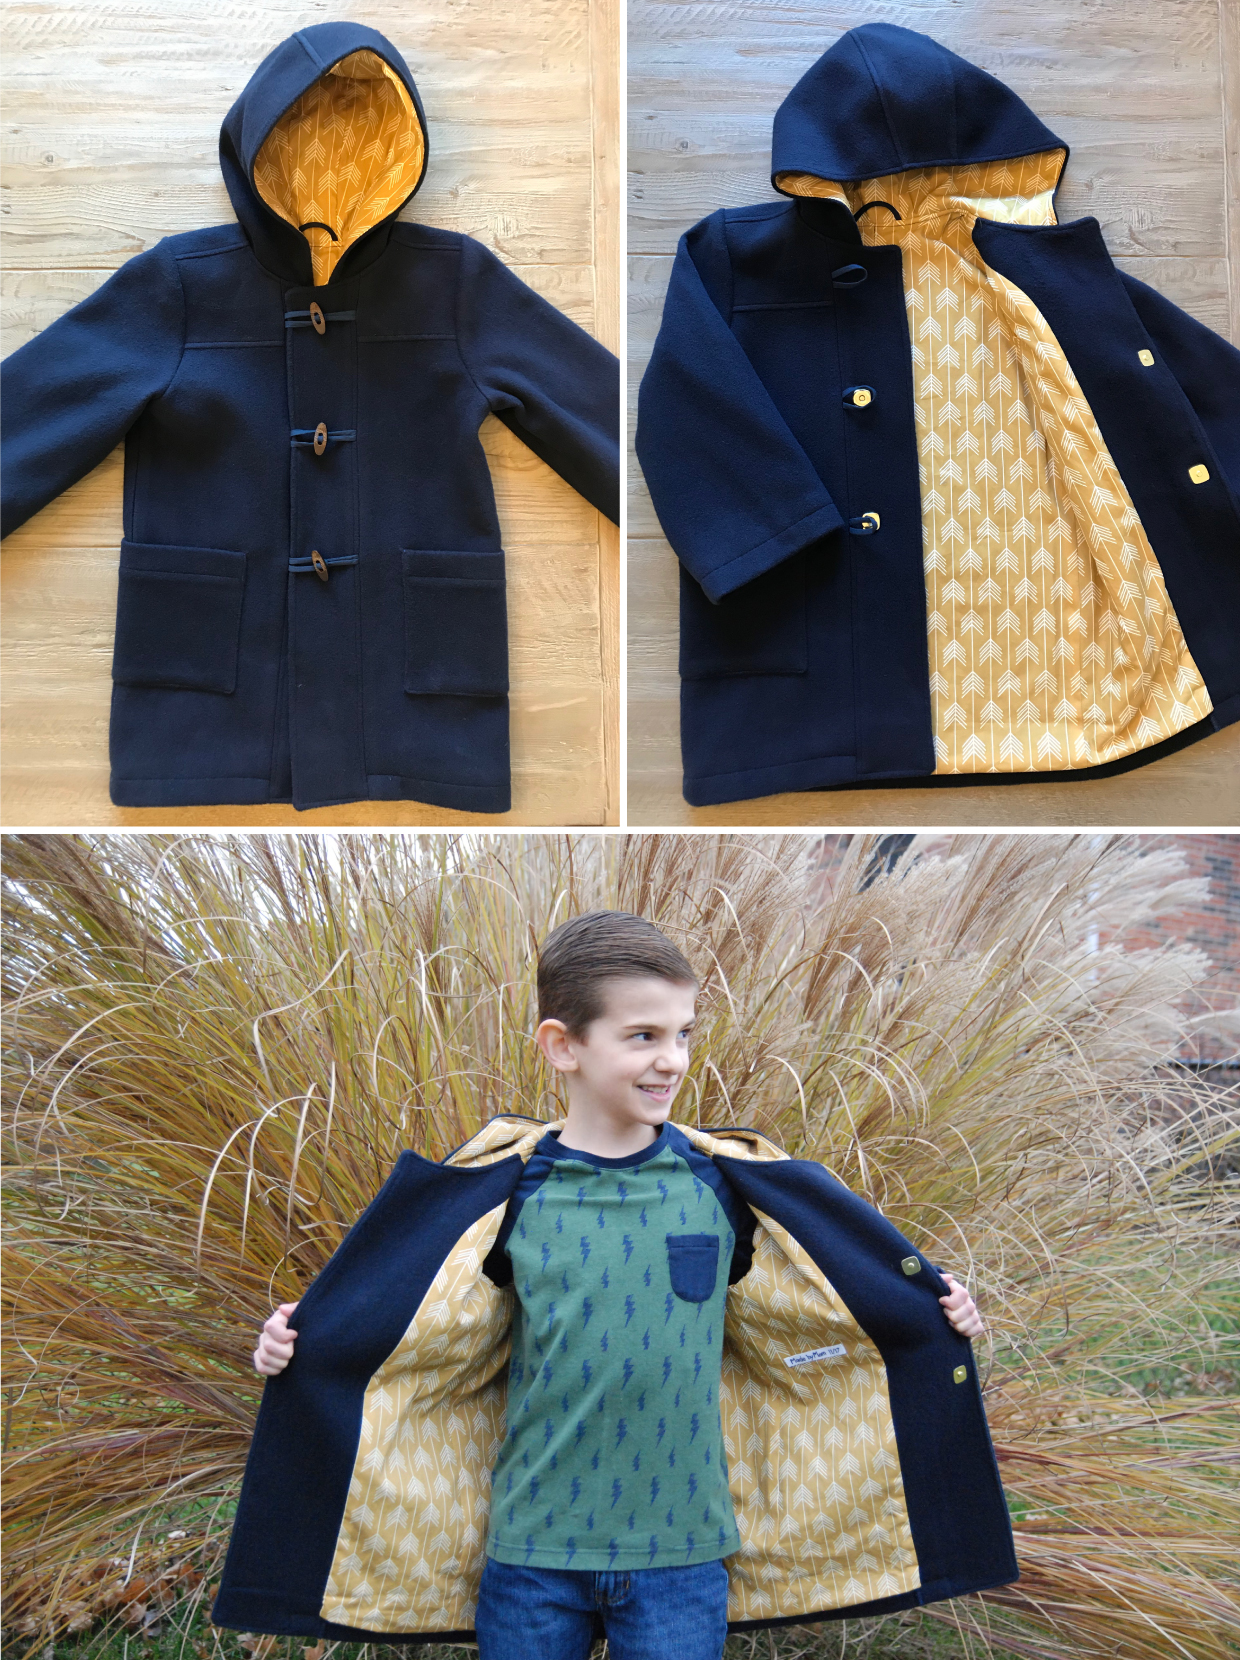
This fall my youngest son fit into the first robot coat, but my oldest son needed a new coat. I decided on navy 100% wool Melton and a gold chevron printed quilting cotton from Hawthorn Threads for the lining. Everything else was virtually the same as the color blocked coats: interfacing, toggles and magnetic closures. I decided not to make the optional insulated vest for this version because it doesn’t really get cold enough here to warrant it. I really love the look of the insulated vest, but we don’t use them enough for the extra time it takes to make them.
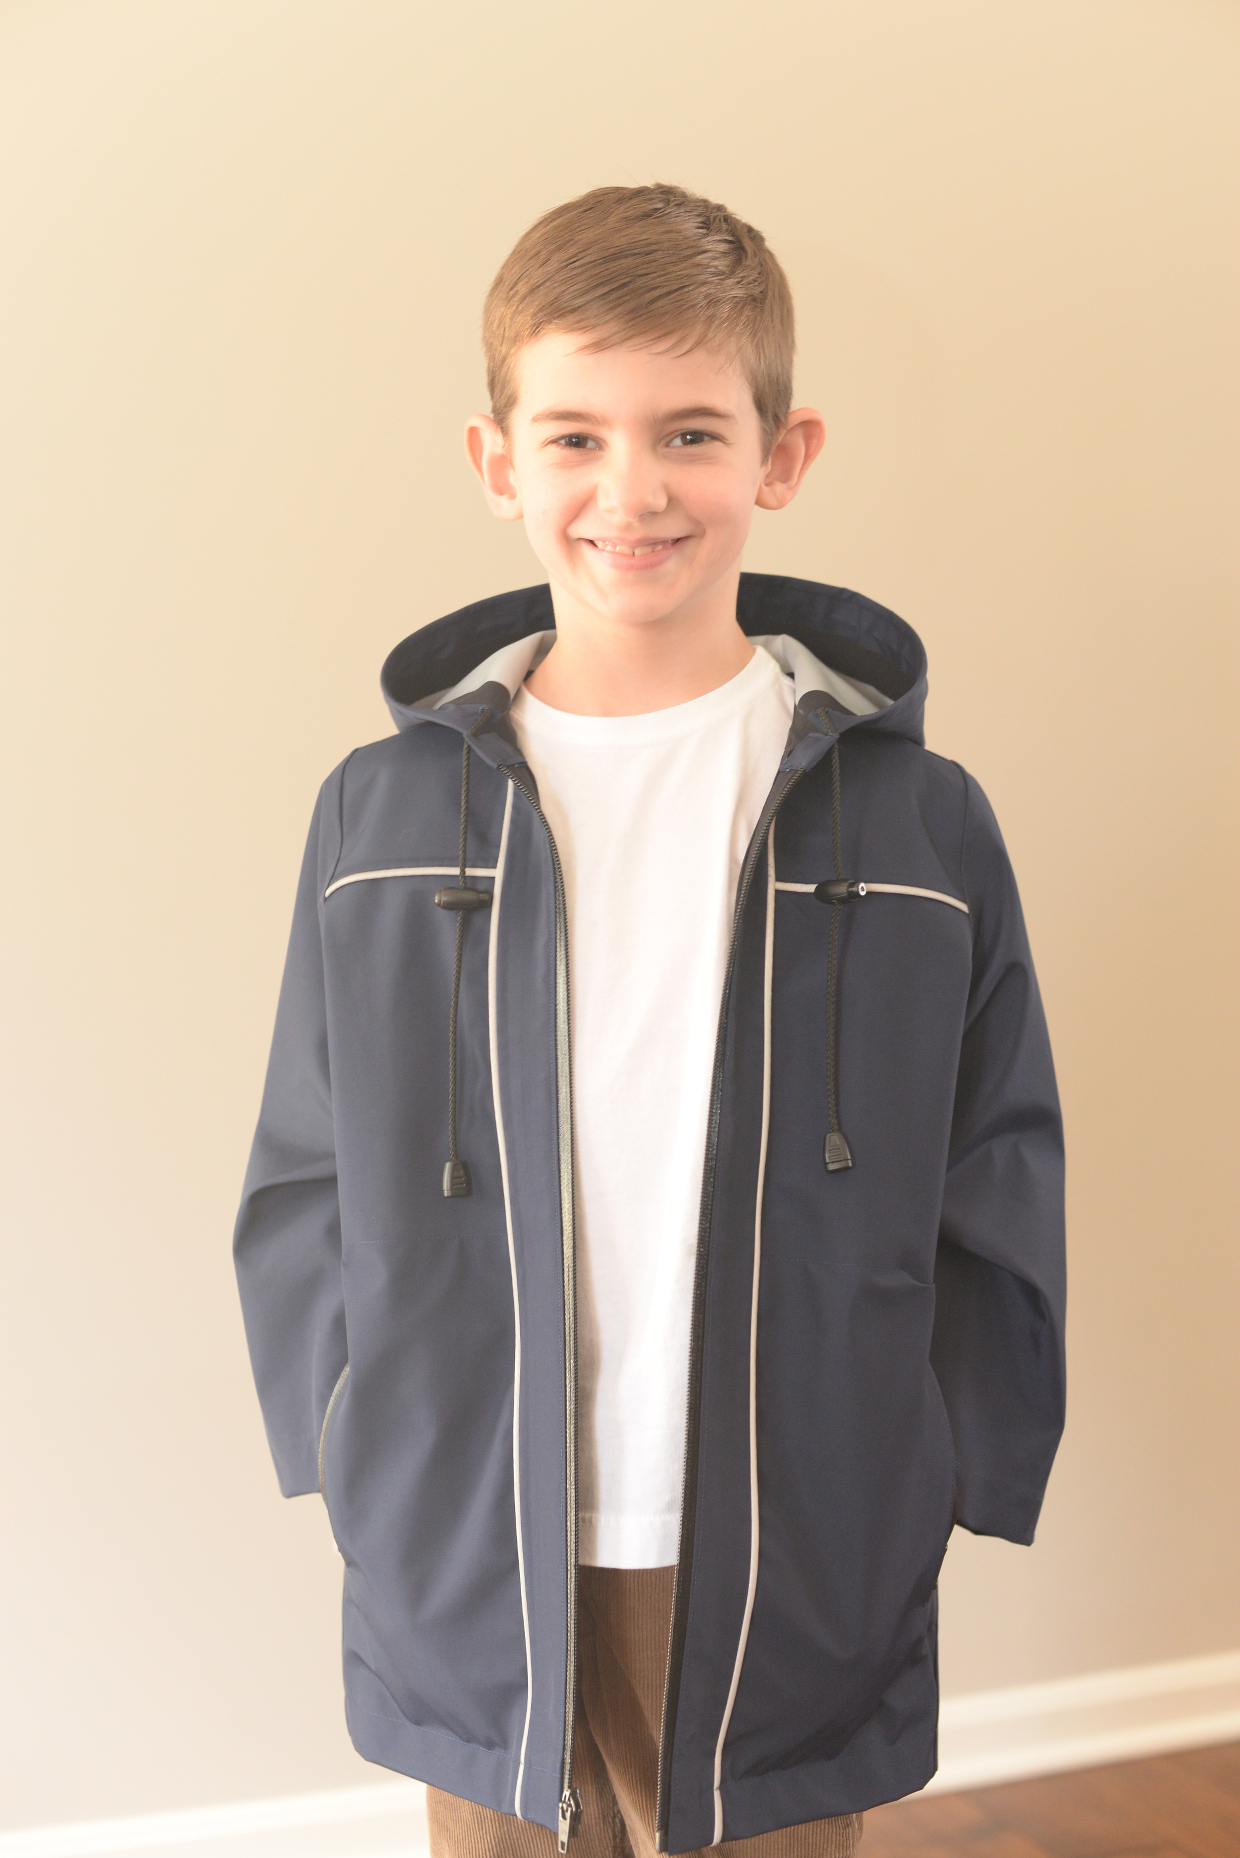
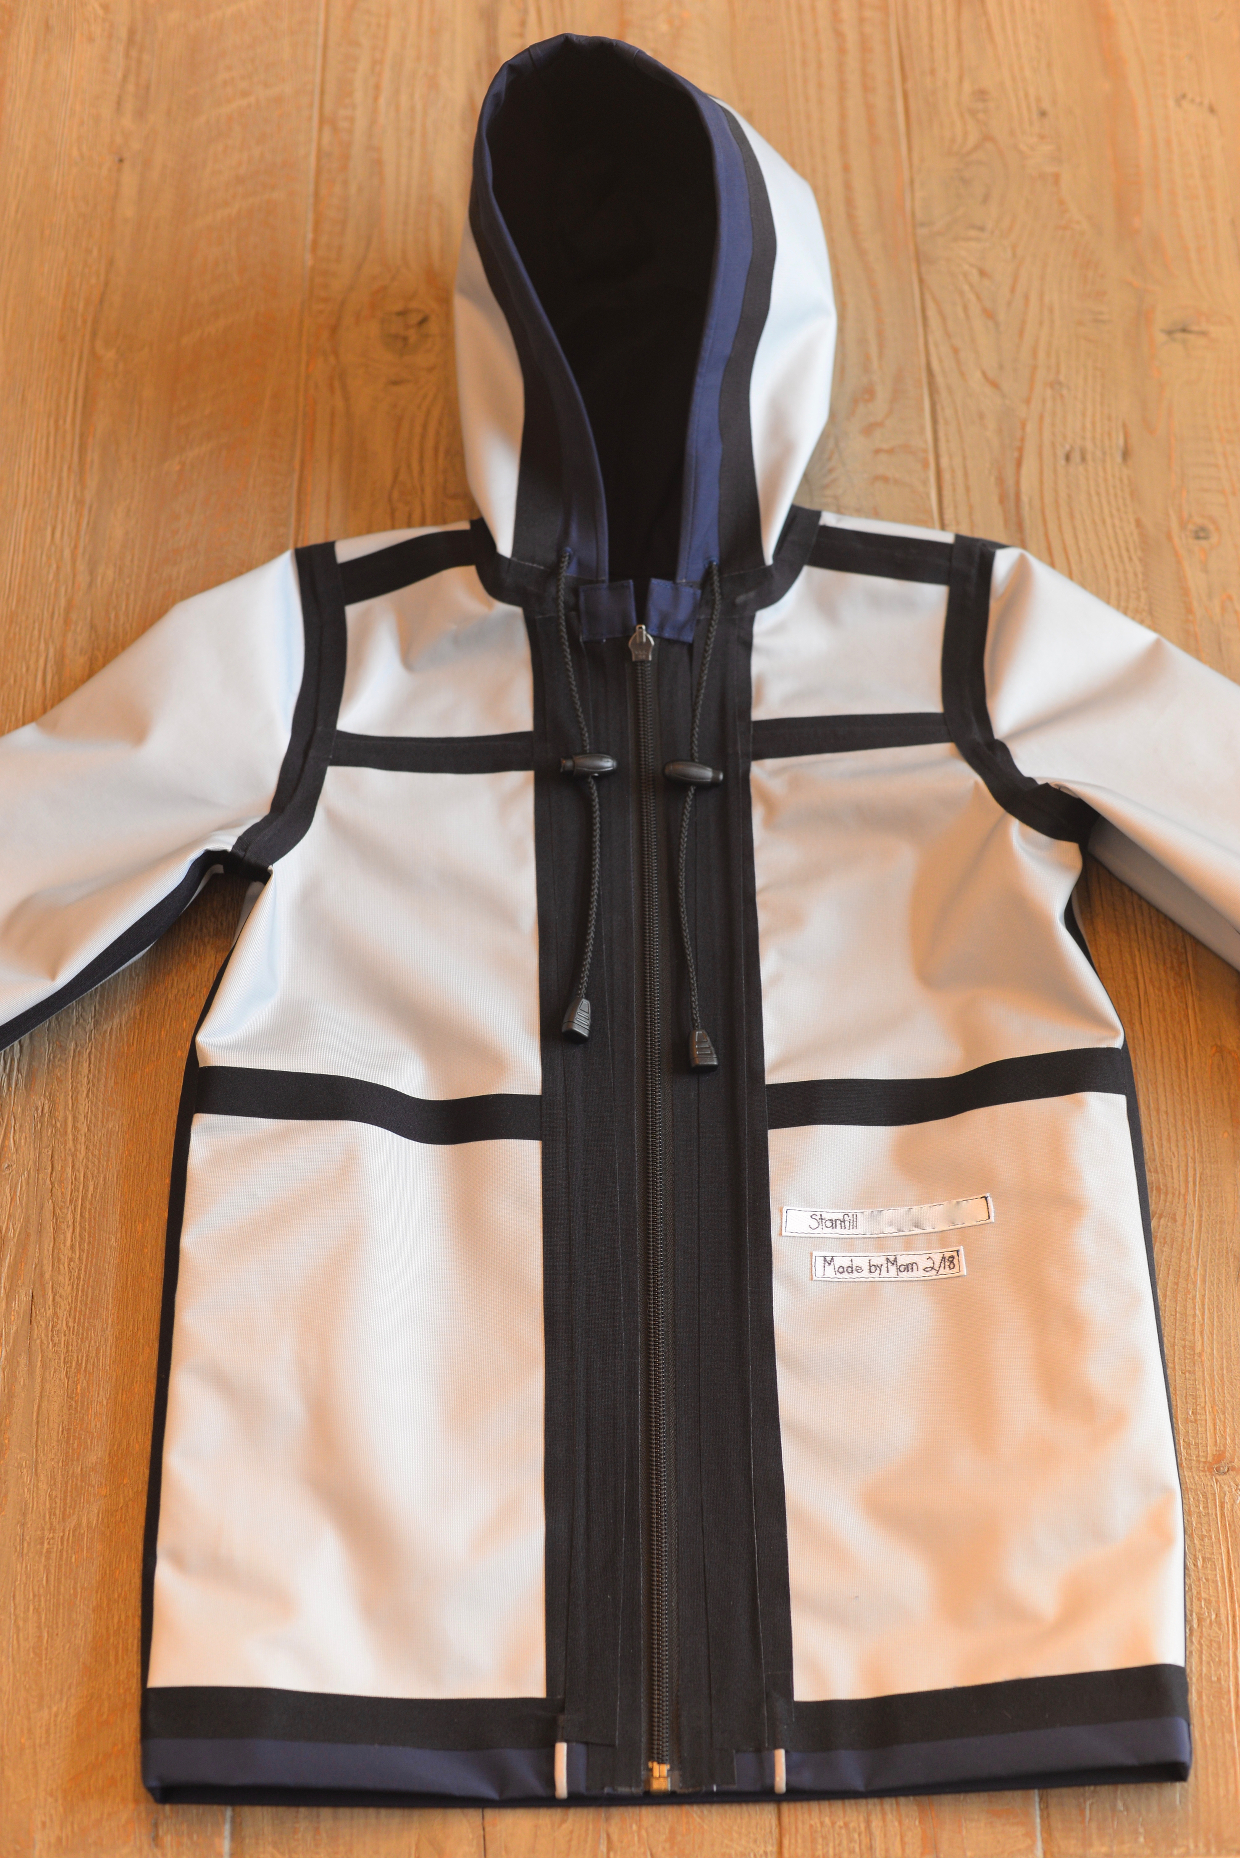
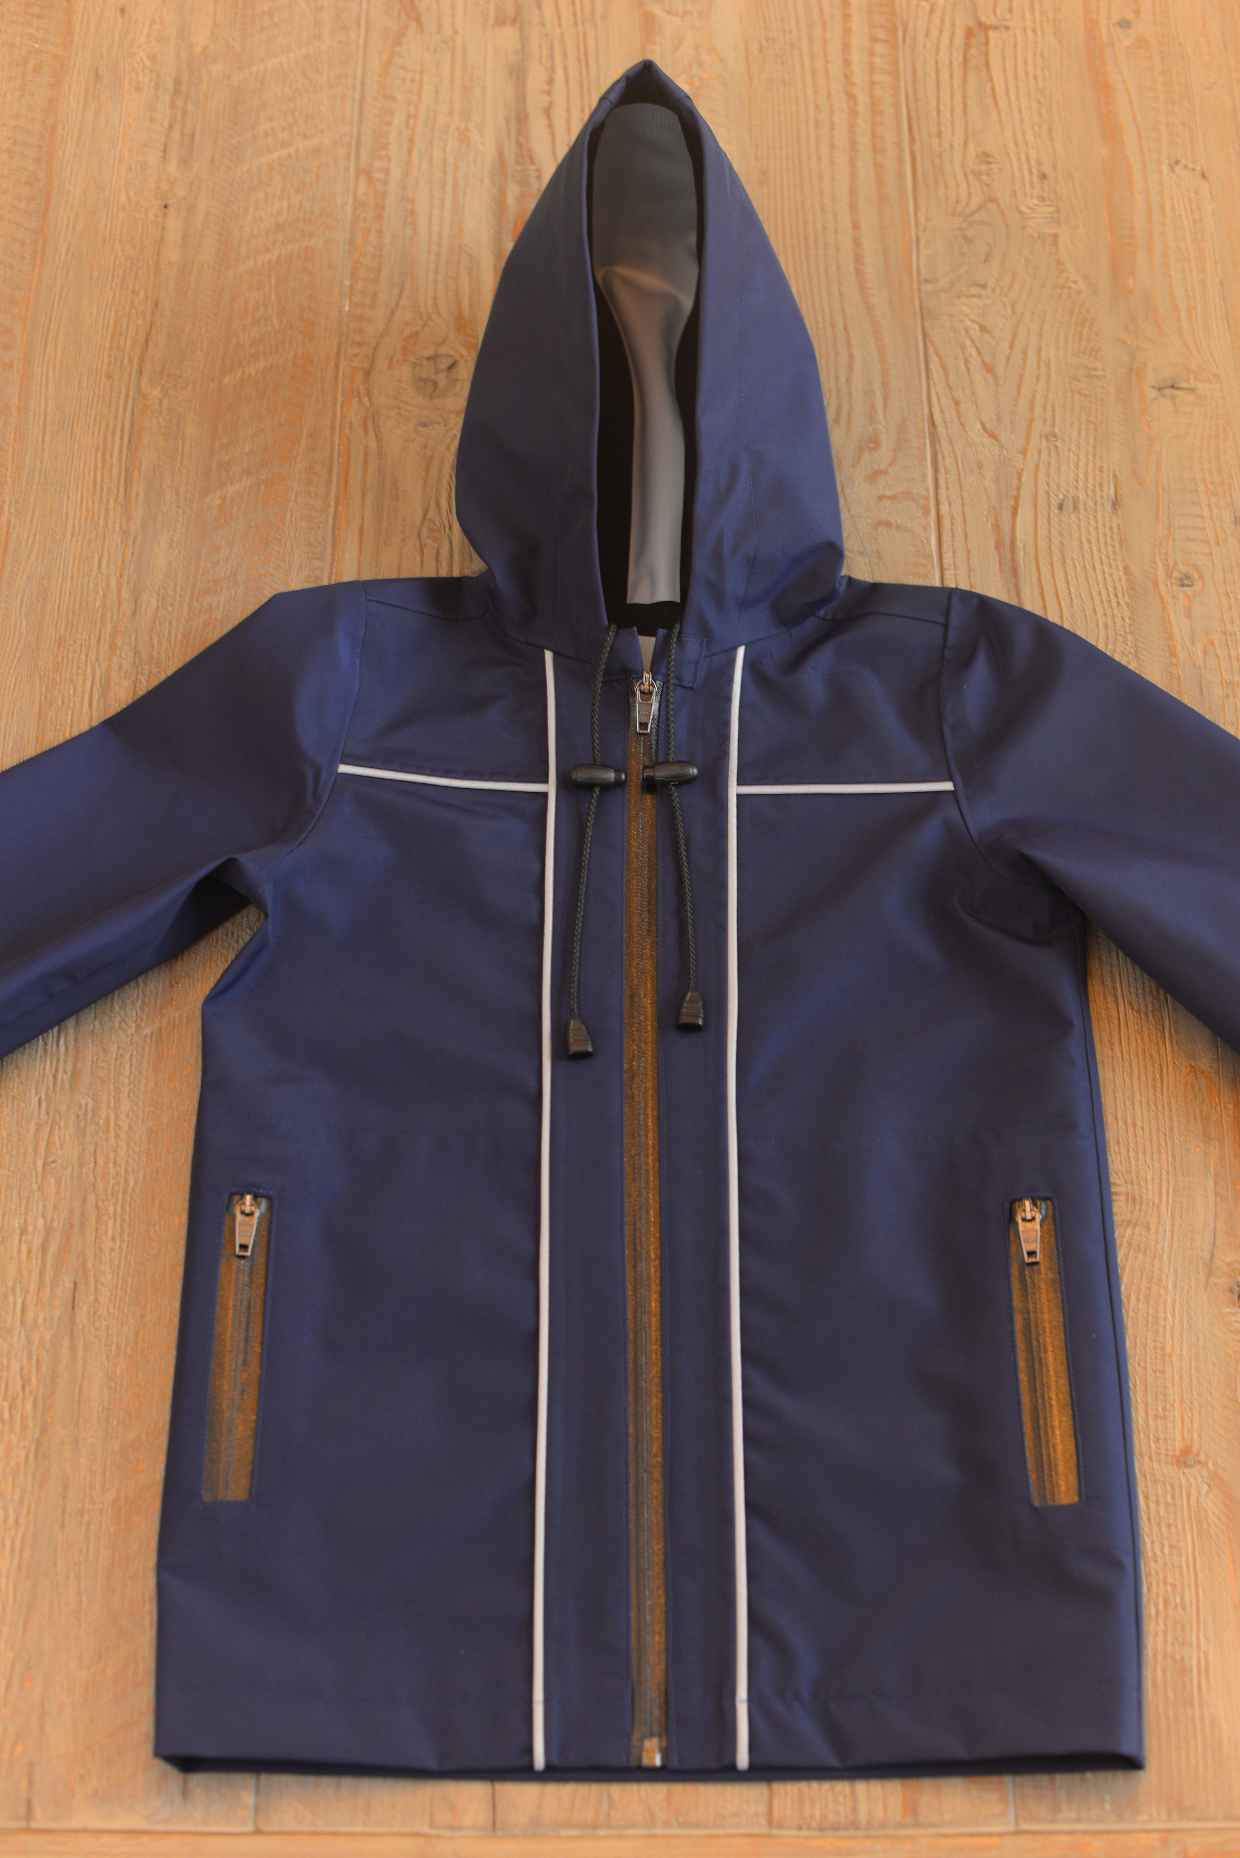
Spring is nearly here and having already cut out the correct pattern size this fall, I decided to make my oldest son another rain coat. Since he wouldn’t wear the laminated cotton on the first version, I decided to try a waterproof breathable fabric. Waterproof breathable fabric is used by outdoor gear companies. (Gore-Tex is a brand name of waterproof breathable fabric.) This fabric is woven tight enough and treated to repel water but still allows the flow of air. I used seam tape over all seams to ensure the coat will stay dry on the inside. For the first time, I decided to change some pattern elements: eliminated the lining, added a drawstring to the hood, added welted zippered pockets, and added a center front separated zipper. It was a little bit learn-as-you-go but in the end it all worked out. I also added reflective tape piping to some of the seams which gives the jacket a great sporty look.
I’ve made seven so far, and I’m sure many more will come. I’ve found that this pattern usually will fit for about two years, so I have at least four years until my oldest son outgrows the pattern. Thanks for letting me share my School Days makes with you!