
You know what color blocking is, right? It’s been everywhere for the past couple of years. It’s huge on the runway, it’s popular with home sewists, and it just keeps getting more popular! If you’re not familiar with the term, color blocking is when two or more contrasting or complimentary areas of color are sewn together in a garment. And it’s surprisingly easy to do in your own sewing.

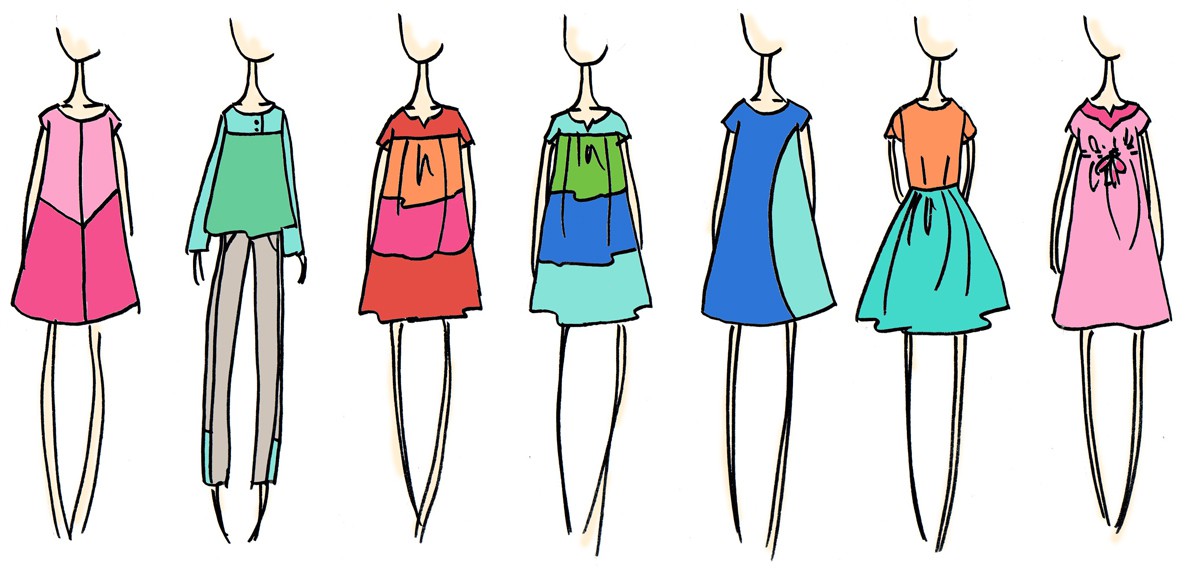
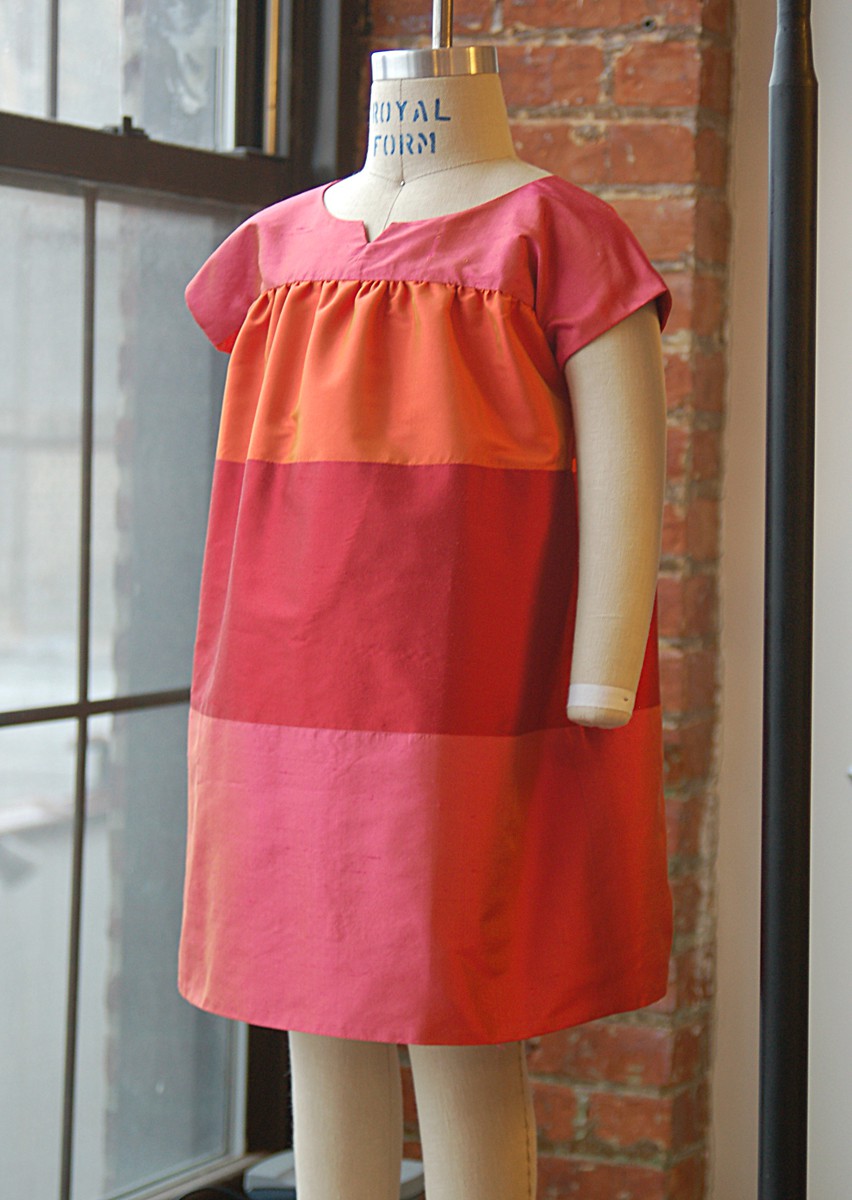
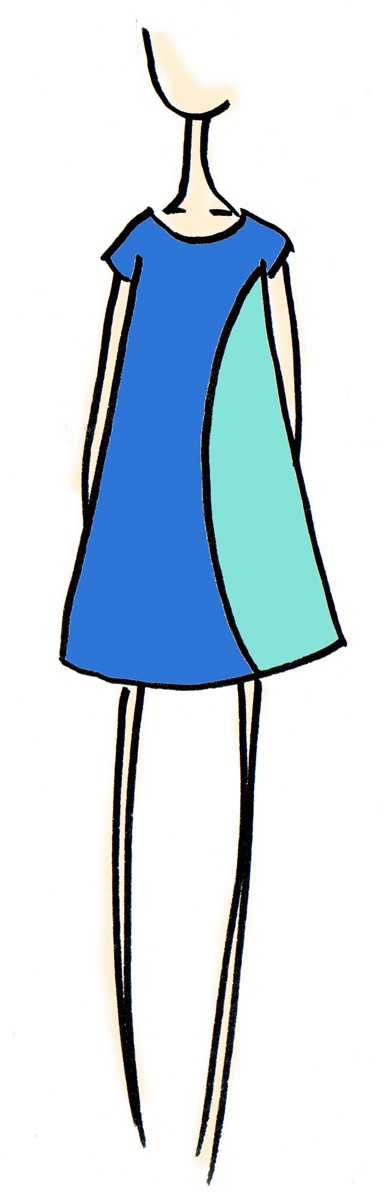
I love color blocking and have been known to use it quite a bit in our patterns. It’s one of those basic design principles that never really goes away and can be used in so many ways. For example, the Ice Cream Dress is designed specifically for color blocking. I love View B of the dress in warm tones of red, orange, and pink together, or cool tones of greens and blues, like in my sketch and in the photos below. But color blocking also give you a great opportunity to play with basic color theory, too, exploring complimentary, analogous, and tertiary colors.

Color blocking is fairly easy to do, and I’m going to show you how to do it.
It’s easy to do color blocking using the basic pieces from a sewing pattern, cutting some pieces from one color and some from another. For example, you could color block a dress by making the bodice one color and the skirt another color, or color block a blouse by making the sleeves and yoke a different color than the rest of the body. Or for a more subtle bit of blocking you could color block the existing yoke pieces for the Roller Skate Dress to get the color blocking look at just the neck.

But what about customizing the Roller Skate Dress to make your own color blocking, like Rachel from Nest Full of Eggs did with these two versions of the Roller Skate Dress? Believe it or not, you can do this yourself quite easily!

Rachel color blocked her Roller Skate dresses by piecing her fabric and cutting out the dress from the resulting patchwork. And when you’re doing a fancy colorblocking scheme like that amazing checkerboard pattern, this is by far the best and easiest method. (Rachel posted a great tutorial for this technique on her blog.)
Here is another color blocking method that I use frequently when I’m developing a sewing pattern. To add color blocking within a pattern piece, you draw a new seam line where you want to add color blocking, cut your pattern apart along the drawn line, and add seam allowances to both edges of the cut line to make two new pattern pieces. Then you cut your fabric and sew the two pieces together to reassemble the piece so it’s color blocked. It’s that easy! I’ll show a few examples. Let’s start by color blocking the Roller Skate to add a single chevron color block, like a simplified version of the dress Rachel made.
![]()
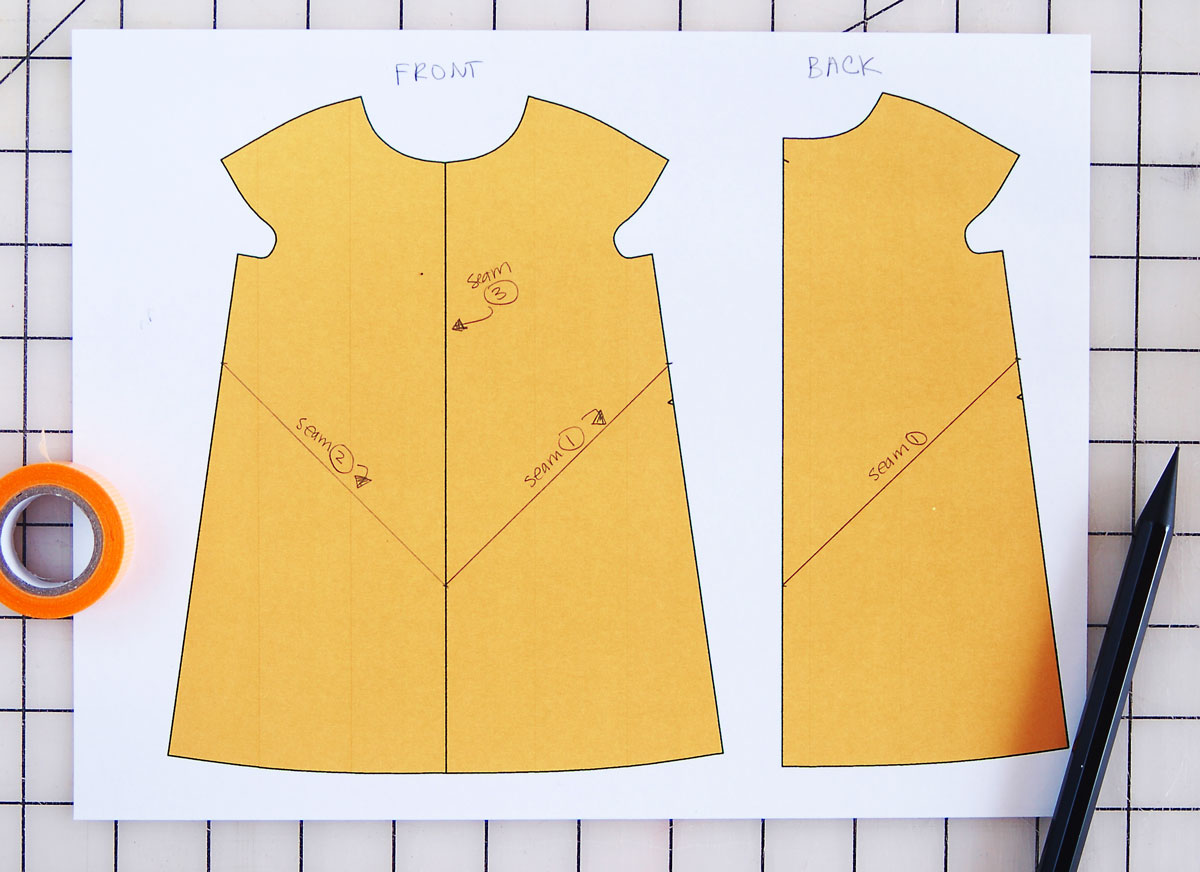
To demonstrate the steps, I’m working with a mini version of the Roller Skate pattern so you can see it easily. Here are my pieces.

First I’ll determine where I want the color blocking to happen, and I’ll mark the points on all the relevant pattern pieces. I want my blocking to match at the front, back and side seams like Rachel’s dress, so I’ll make sure my lines match up, especially at the side seams. To do this, I measured equal distances from the underarm and the hem. Then I can draw the lines for my new seams.
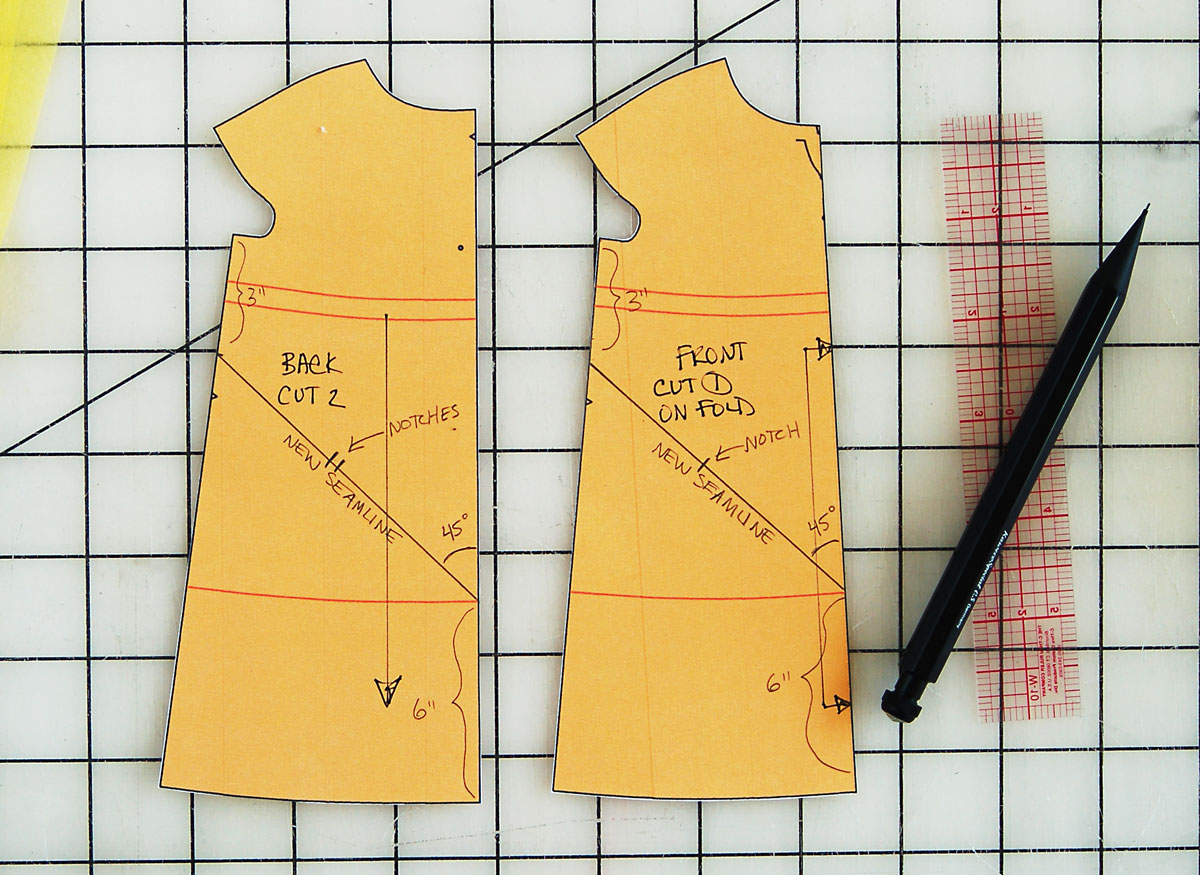
Now, before I do anything else, I always like to add a notch or two to my new seam line. I added a notch placement by making a tick mark along the seam line wherever I think a notch might be useful (usually somewhere near the middle if it’s a straight seam, and in several places if it’s a curved seam). Take a look at the photo above and you’ll see where I added a little tick mark along the front seam and two tick marks near each other on the back seam. These notches will make it easier to line up the pieces and sew them together again later. The different number of notches at the front and back seams will also help to avoid getting the pieces confused with each other later, so I don’t accidentally sew the a back to a front. I’ll talk more about the notches shortly.
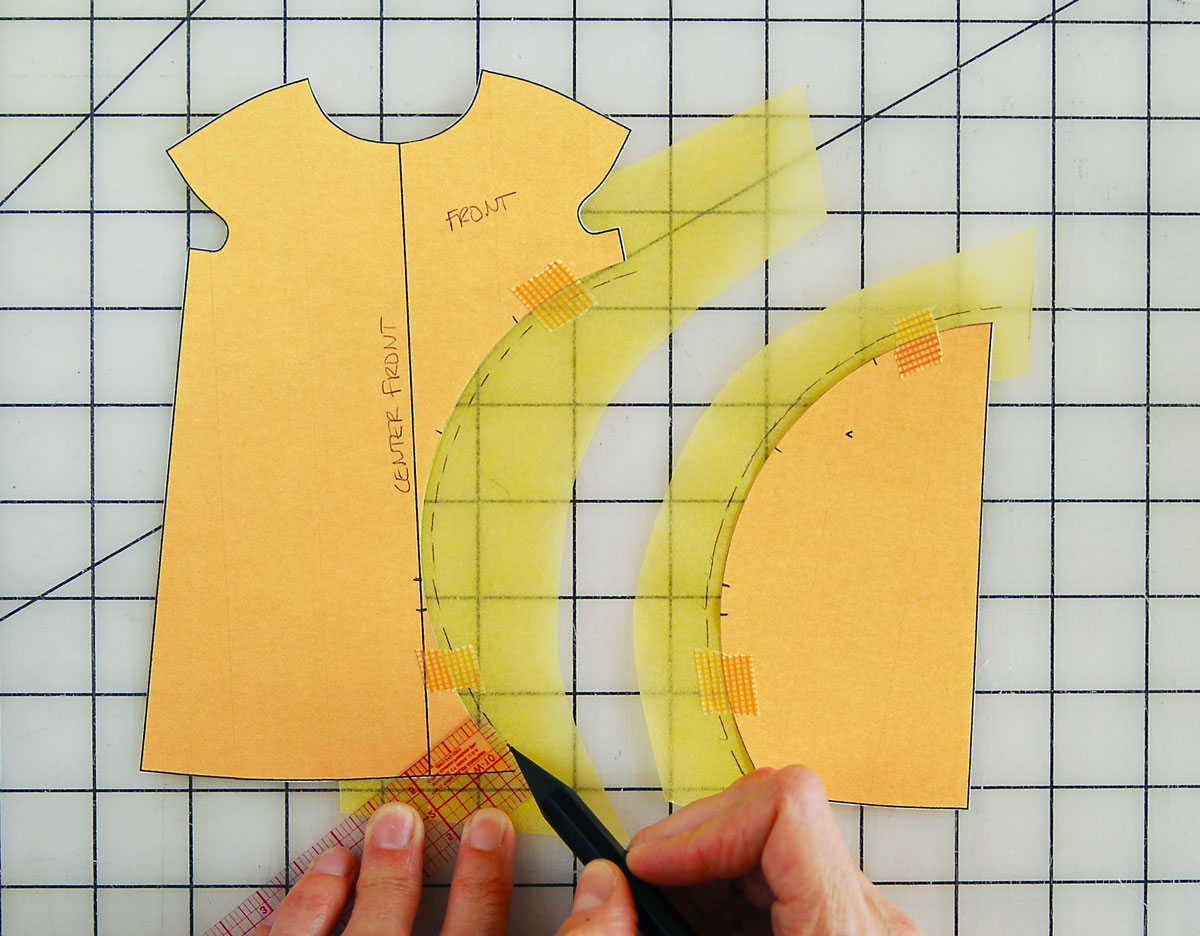
Next, I’ll cut the pattern pieces apart at the new seam lines. And then I’ll tape a strip of paper to both cut edges so I can add a seam allowance. (I like our clear 6″ ruler for this step. It makes adding a seam allowance really easy.)
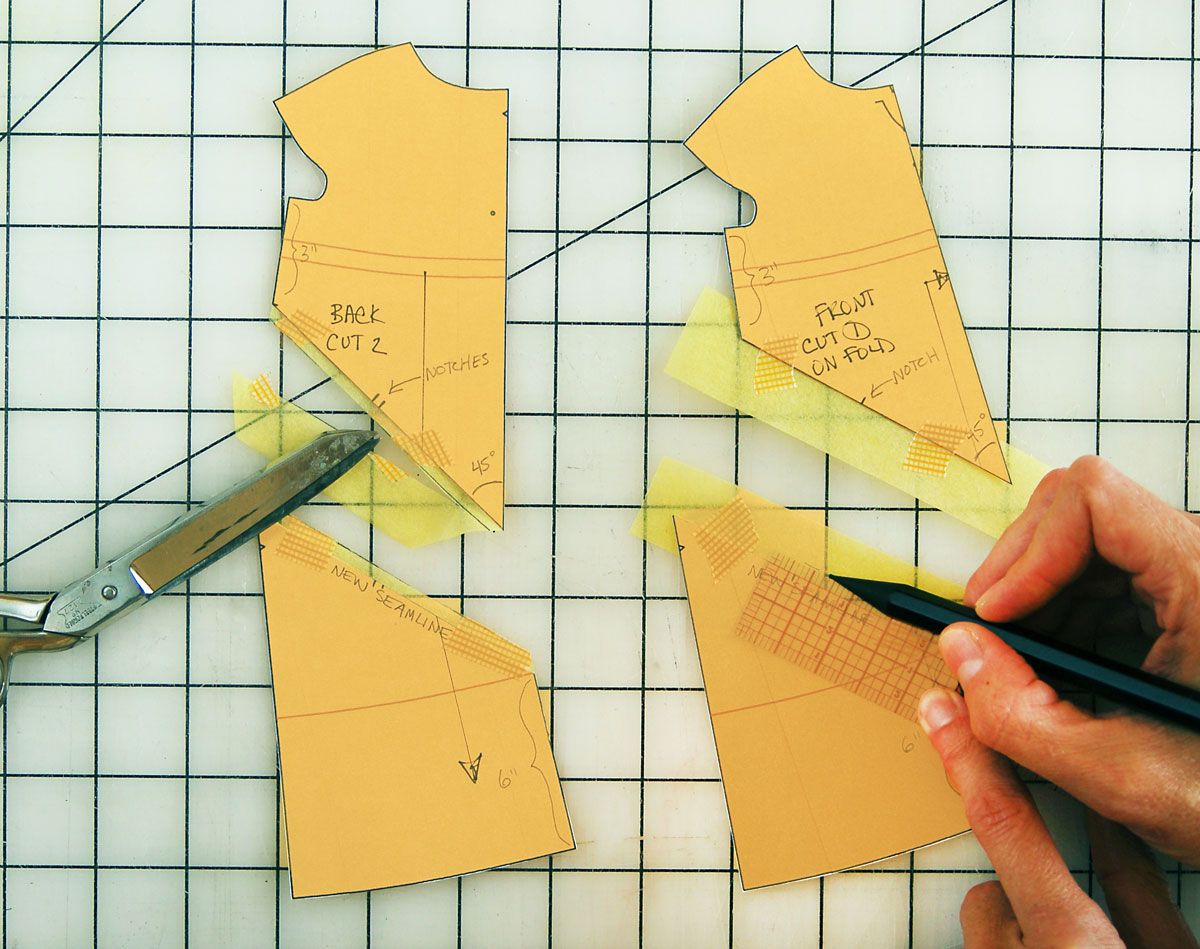
Now, here’s another thing to consider. Rather than sewing a sharp corner at the center front, which is cut on the fold and would be pretty tricky, I think it would be much simpler to add a seam to the center front, like Rachel did. So I’ll treat that fold line as a seam line and add a seam allowance there, too, just like I did with the seamline for the color blocking seam. When you convert a piece that’s meant to be cut on the fold, don’t forget to add a grain line to the new piece(s). The grain line will be parallel to the original fold line. (The back of the dress is easy, since it’s already meant to be cut as two pieces. No changes there!)
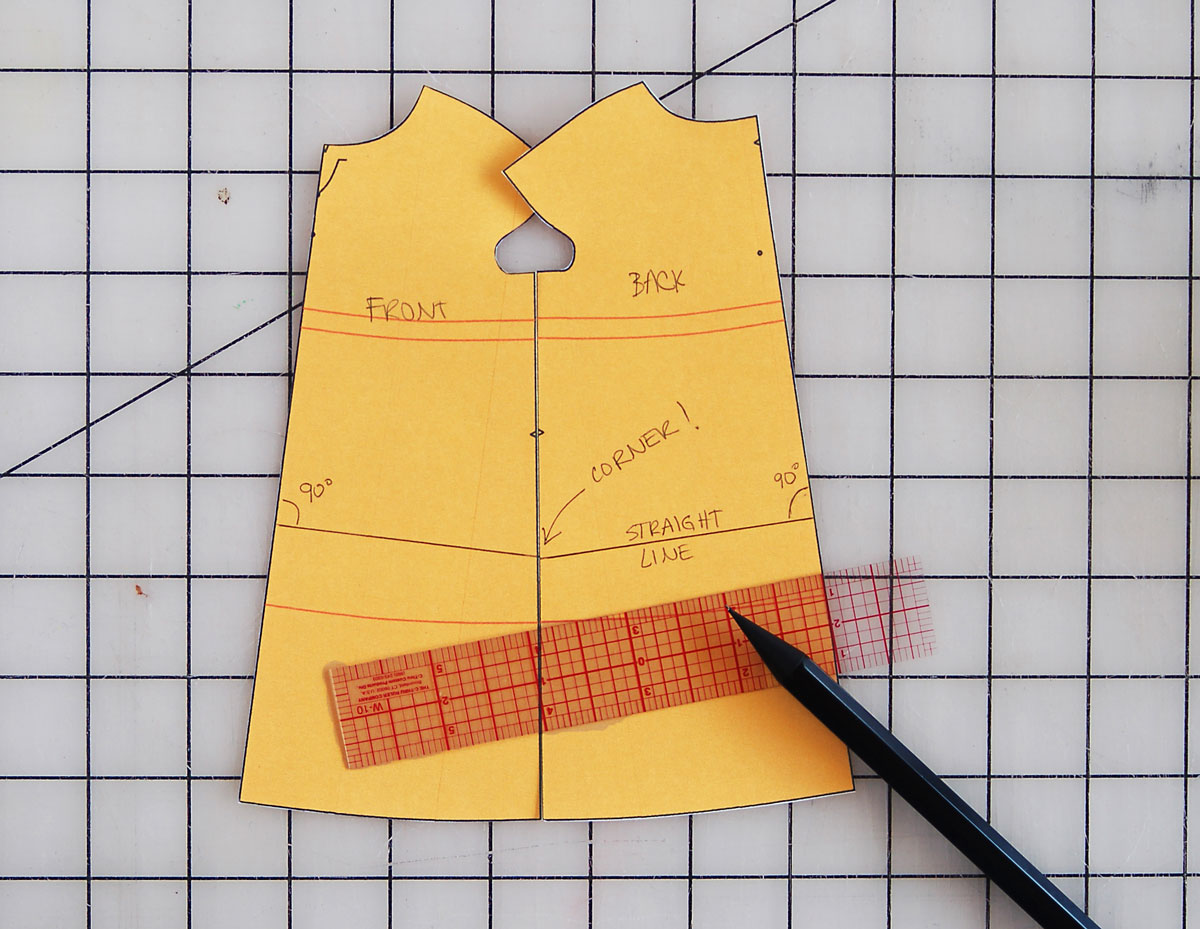
One last thing: don’t forget to mark the new notches on the seam allowances, using the tick marks as a placement guide for each notch. That way I know the notches will match up when I sew the seam, because the tick mark indicates the precise placement of the notch on both edges of the cut. Here are my new pattern pieces with the added seam allowances.

Now the revised pattern is ready to be cut out and sew together. To sew it, I’ll follow the order I marked in the photo below so that, when I’m finished, the pieces will look the same as my original pattern pieces would have looked when cut out (before sewing), except that now they’re color blocked! In other words, first sew each top dress piece to its coordinating (color blocked) bottom piece, matching the new notches. Then when both front halves are assembled and the seams are pressed, sew the two halves of the front dress together at the new center front seam, taking care to match the color blocked seams for a perfect chevron effect.
I’ll assemble each half of the back dress in the same way, but don’t sew the center back seam yet! The goal here is to recreate the same pieces as I would have if I had simply cut the pattern from one fabric. So once I’ve sewn my color blocking seams together I’m ready to follow the sewing instructions to sew the dress in exactly the same way as usual. And since the center back seam isn’t sewn right away, you won’t want to sew it until you reach that step.
Let’s try another scenario. What if I want to make an asymmetrical color blocked Roller Skate Dress with a giant polka dot that falls off one side of the dress, like this?
For situations like this it’s best to work with the full front pattern piece instead of a piece that’s cut on the fold, since it won’t be the same on both sides. Start by tracing the pattern piece, then flip it and trace the other side so you have a full dress front. Then you can draw your color blocking seam onto the pattern piece and add a few notches. Like this.

Cut the pattern piece along the seam line and attach strips of paper to add the seam allowances on both cut edges.
Once you’ve drawn your seam line, added tick marks for a few notches, cut the piece apart, and added seam allowances, you can cut out your fabric. And this is where those notches come in especially handy. It’s trickier to pin and sew opposing curves than straight lines, so the notches that you added to your color blocking seam line will help with matching up the pieces. Don’t forget to clip into the seam allowances of the inside curve to help with matching the seam lines!

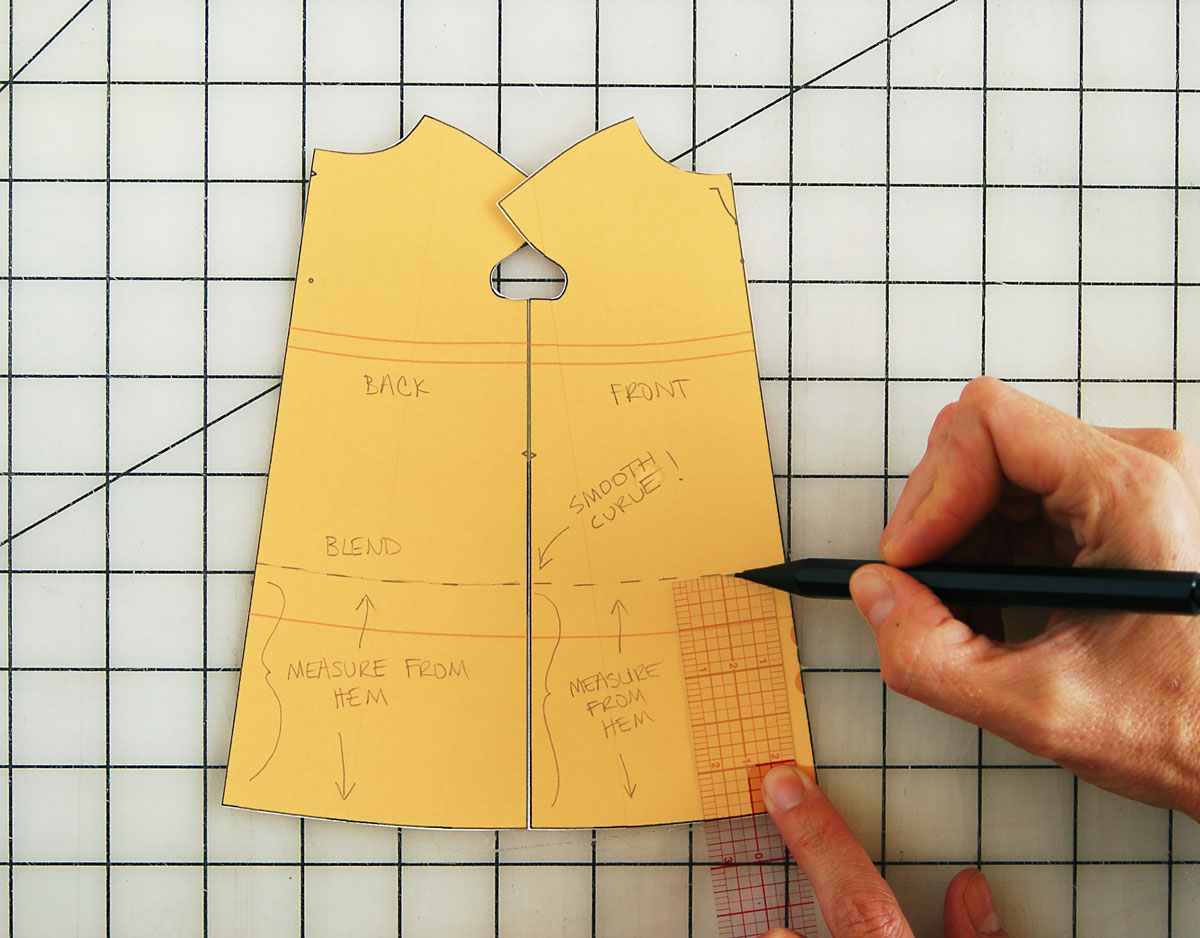
And here’s one last color blocking example: I love a color blocked hem, and when you have a curved hem like the Roller Skate Dress, it’s almost always nicer to have a curved color blocking seam that matches the shape of the hem. That way, when the color blocked seams meet at the side seam, you don’t end up with a quirky corner. Here’s what I mean. This is what happens when you add a straight seam to a curved hem.
Instead, measure up from the hem edge to mark the curve of the seam. Blend the lines to mark your new color blocking seam. And when the side seams are sewn, the curve will be continuous.
So that’s pretty easy, right? Feeling ready to try color blocking on your own? Once you understand the basic principles, it’s really easy to take this in lots of directions.
I can’t wait to see what you make now that you how to do your own color blocking!