
It occurred to me recently that you might like a good embroidery tutorial, especially if you’ve never tried it before. After all, the Hide-and-Seek Dress is just begging for a beautiful embroidered yoke! And who better to teach embroidery than our dear friend Rebecca Ringquist?
Some of you may already know Rebecca. I first met her through her work with CreativeBug, where she teaches some fantastic embroidery classes. Rebecca is an artist who works with embroidery, both by hand and by machine. But she also teaches embroidery and designs a darling line of hand-drawn samplers for her company, Dropcloth. These clever samplers are designed to teach a variety of stitches while you’re also creating a beautiful work of art. She even has a monthly sampler subscription.
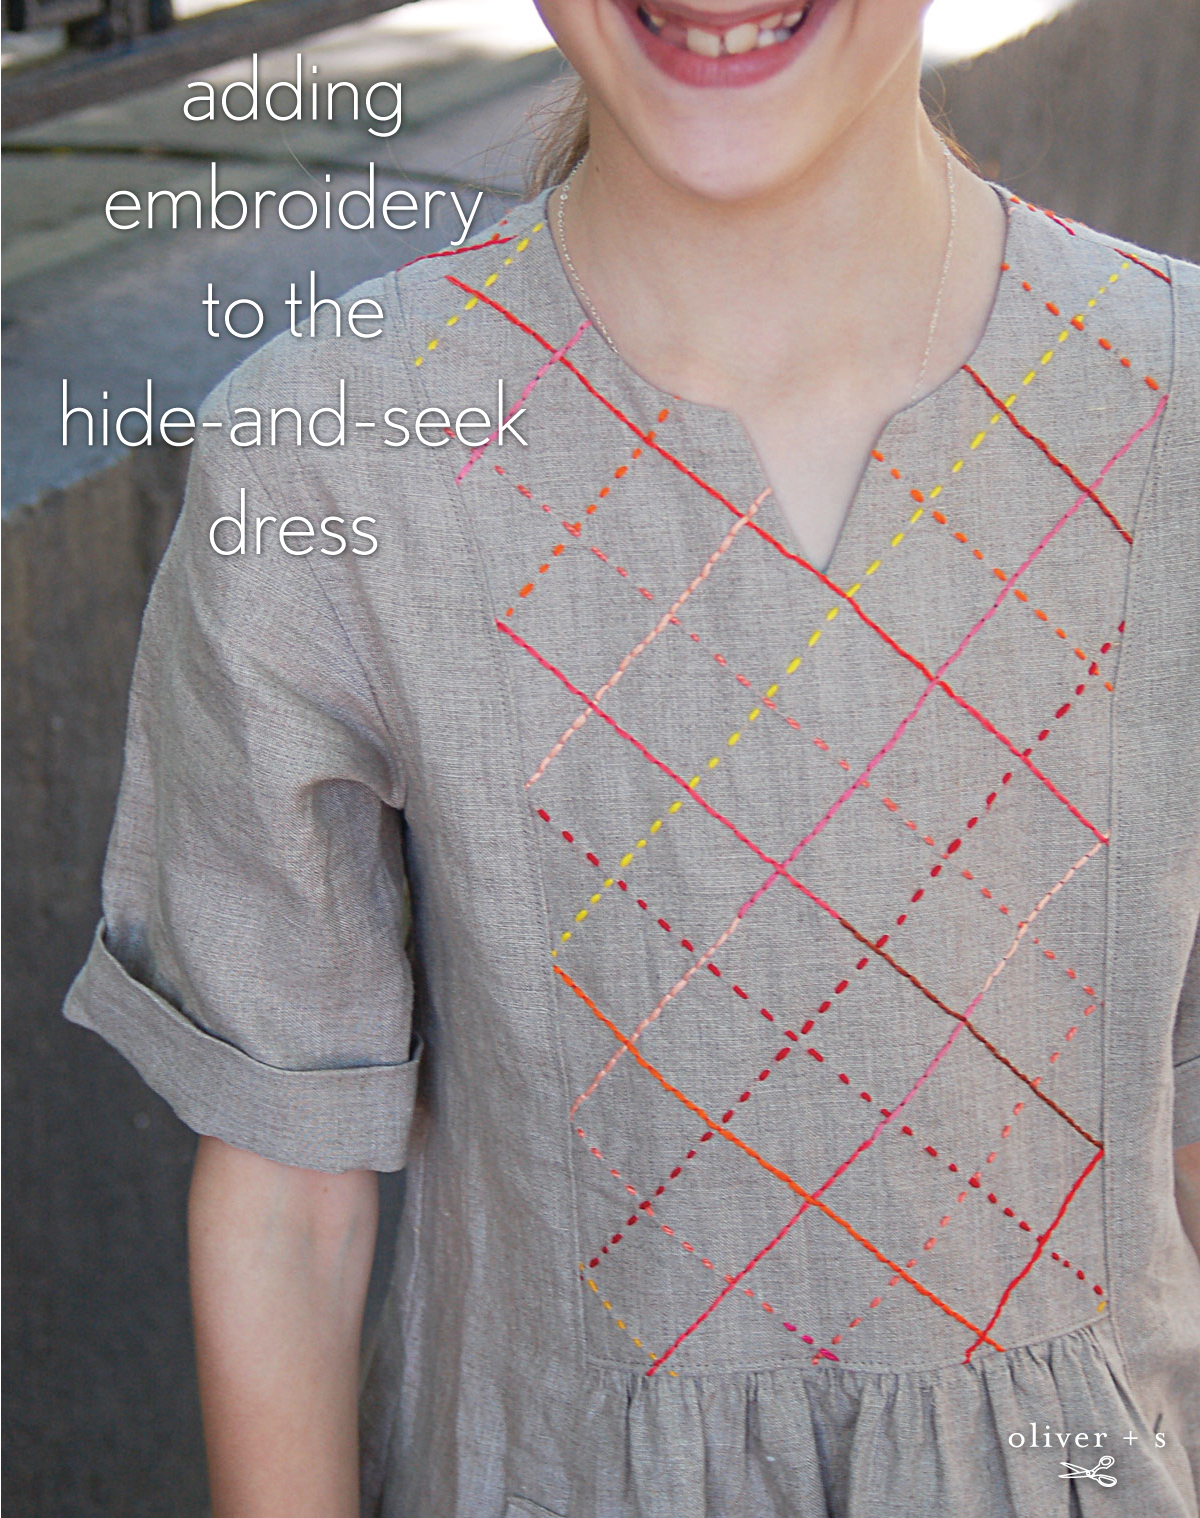
Rebecca kindly agreed to get you started with two important embroidery stitches, the running stitch and the backstitch. I gave her complete creative freedom when it came to this project, and she designed this darling plaid. In fact, as she’ll tell you, this month’s Dropcloth sampler is a plaid.
Hello! I was excited when Liesl contacted me and asked me to introduce you, her readers, to the idea of adding a bit of embroidery to your patterns. I may not be a garment maker, but I am a huge advocate of the addition of embroidery to most things!
I spend my days working as an artist making embroidered collages and drawings, and as a designer for my embroidery pattern company, Dropcloth Samplers. Most recently, Dropcloth launched a new subscription program called Colorburst, focusing on small abstract patterned samplers. Next month’s is a plaid, and I thought it would be fun to add that same design motif to a garment for this project.
For inspiration, I looked to one of my favorite books, Textile Designs: Two Hundred Years of European and American Patterns Organized by Motif, Style, Color, Layout, and Period, which has pages and pages of plaid examples spanning decades of textile design. This simple motif has limitless potential, and has the power to transform a plain fabric into something quite complex and beautiful.
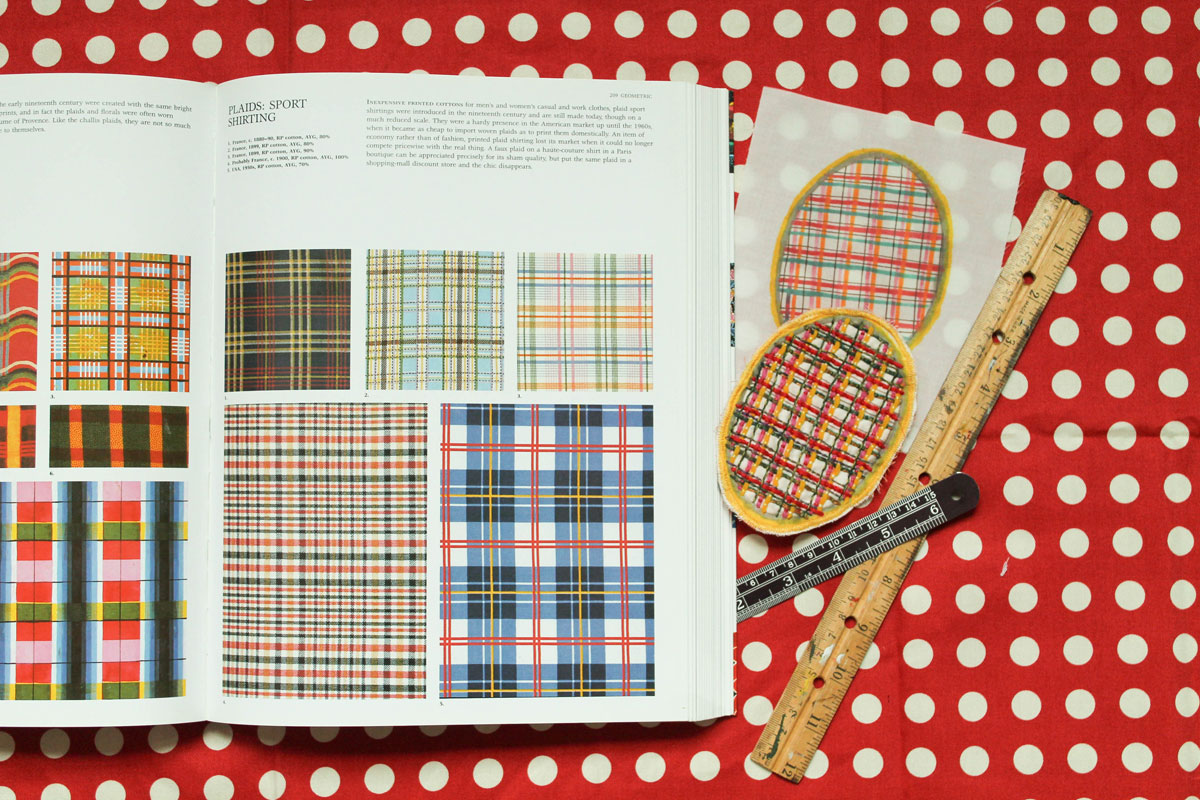
Before you dive headfirst into embroidering fabric for a garment, I recommend taking some time to draw up some samples on paper, and perhaps stitching a sample or two on a scrap of the fabric you plan on using. Using a ruler, draw parallel lines in one direction, and then in the other at 90-degree angles. Using different spacing and widths of rulers, you can achieve a huge variety of plaids, experiment until you find on that you like.
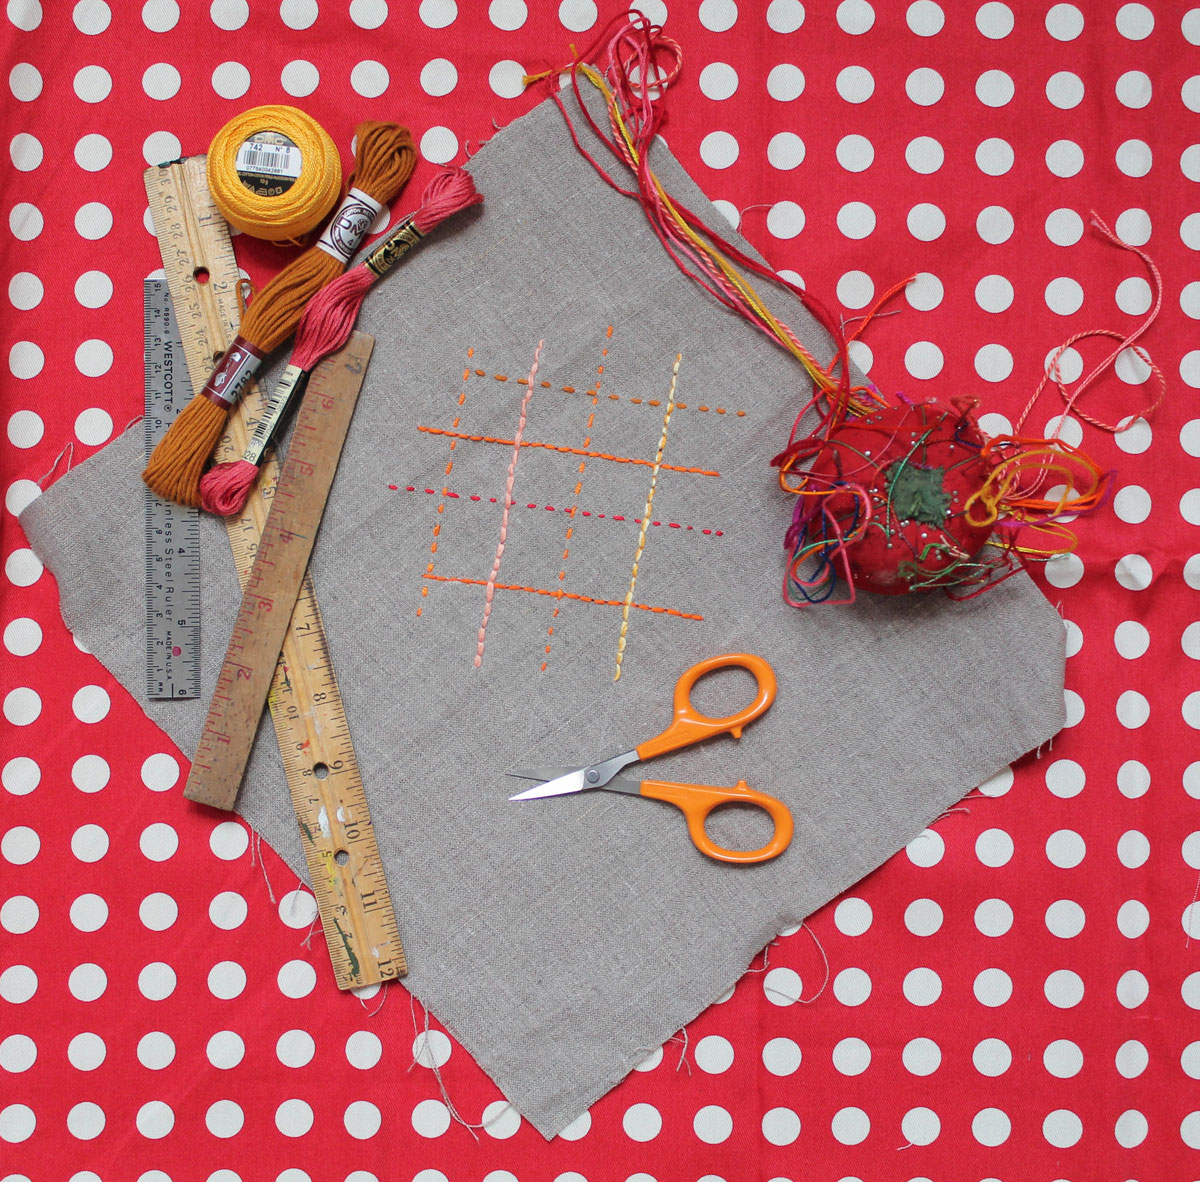
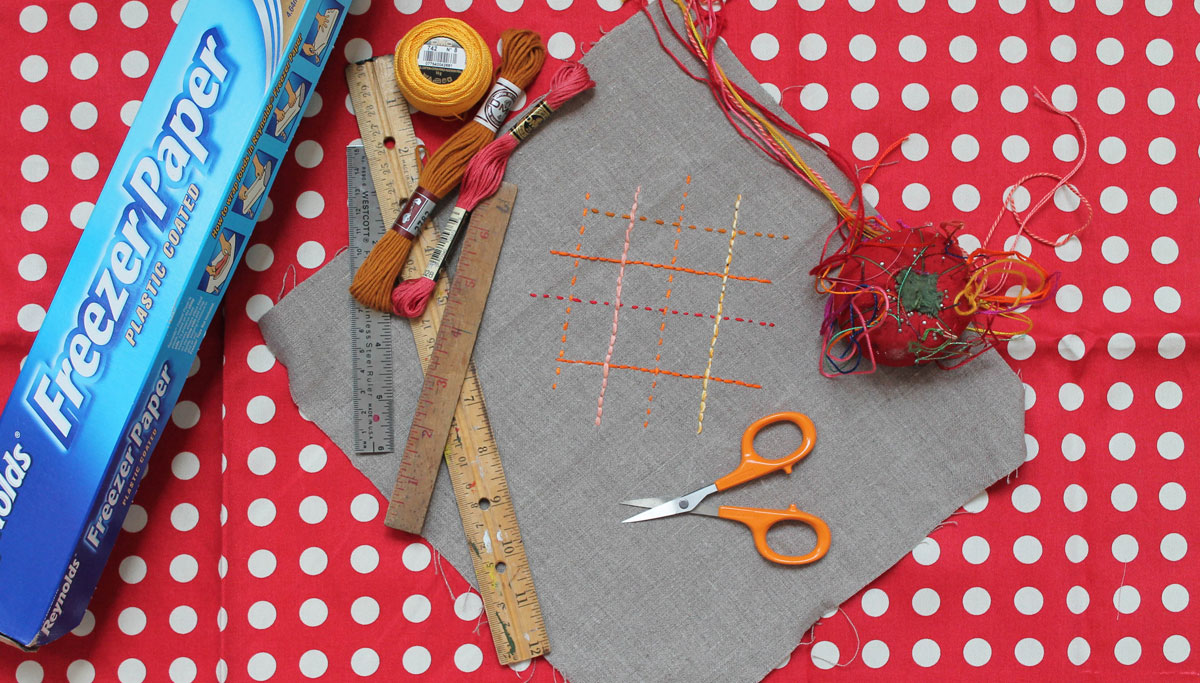
To make your own plaid, you’ll need the following materials:
- Fabric, with the pattern you’re using traced onto it
- Freezer Paper to stiffen your fabric while you draw your plaid lines onto it
- Disappearing ink pen or chalk pencil (I used a Frixion pen, see note below)
- Ruler
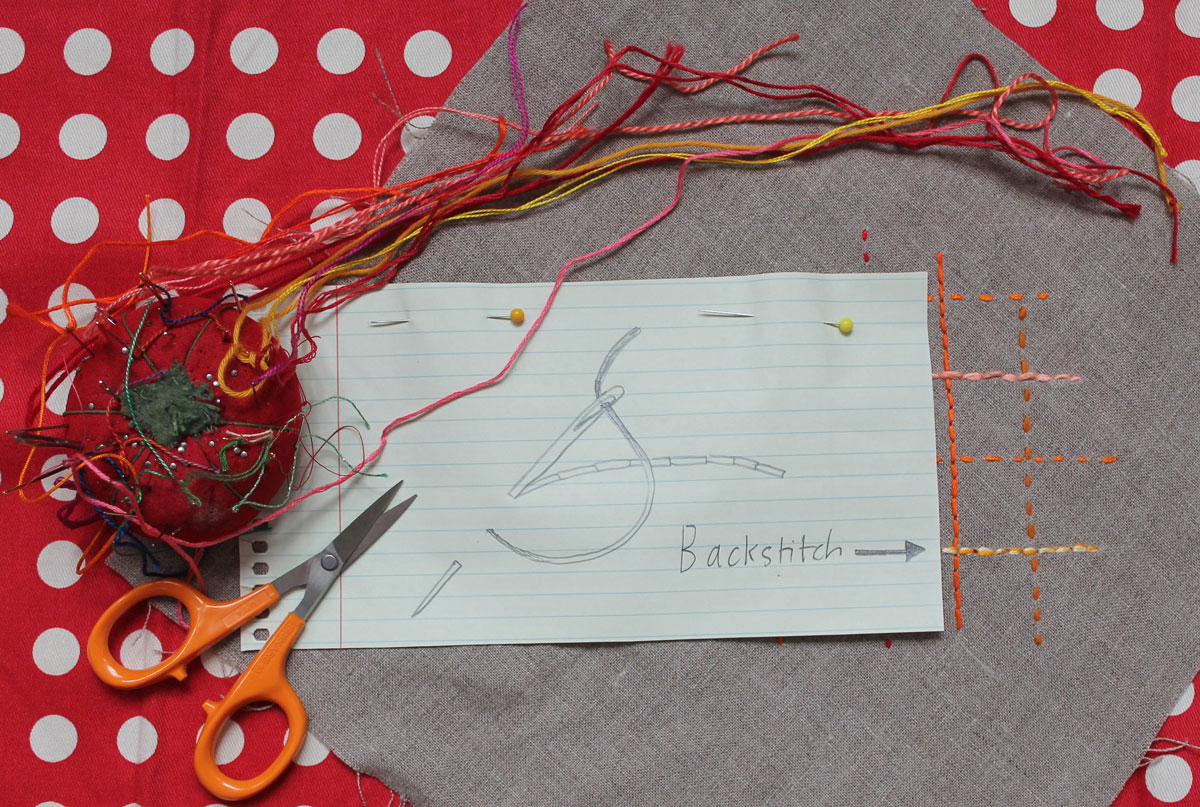
- Needles (sharp chenille or embroidery)
- Threads: I used perle cotton (size 8), embroidery floss, and cotton tapestry yarn
- Embroidery hoop
- Sharp embroidery scissors (snips or fabric shears will also work)
Note about Frixion Pens: Frixion pens are filled with thermo reactive ink. They were developed to write on paper, and their ink can easily be removed by rubbing when used that way. The exciting thing about them is that they can also be used on fabric and their ink can quickly (instantly!) be removed by ironing. However, they can sometimes have a bleaching effect on your fabric, leaving behind a white line once their color is ironed away. I recommend that you test the pens on your fabric before diving in wholeheartedly.
1.) Once you’ve transferred your garment pattern onto your fabric, you’re ready to lay out your embroidery. To make your fabric stiffer and easier to draw on, first iron a piece of freezer paper to the backside. Lay your fabric right side down on your ironing board and iron a piece of freezer paper glossy side down onto the fabric.
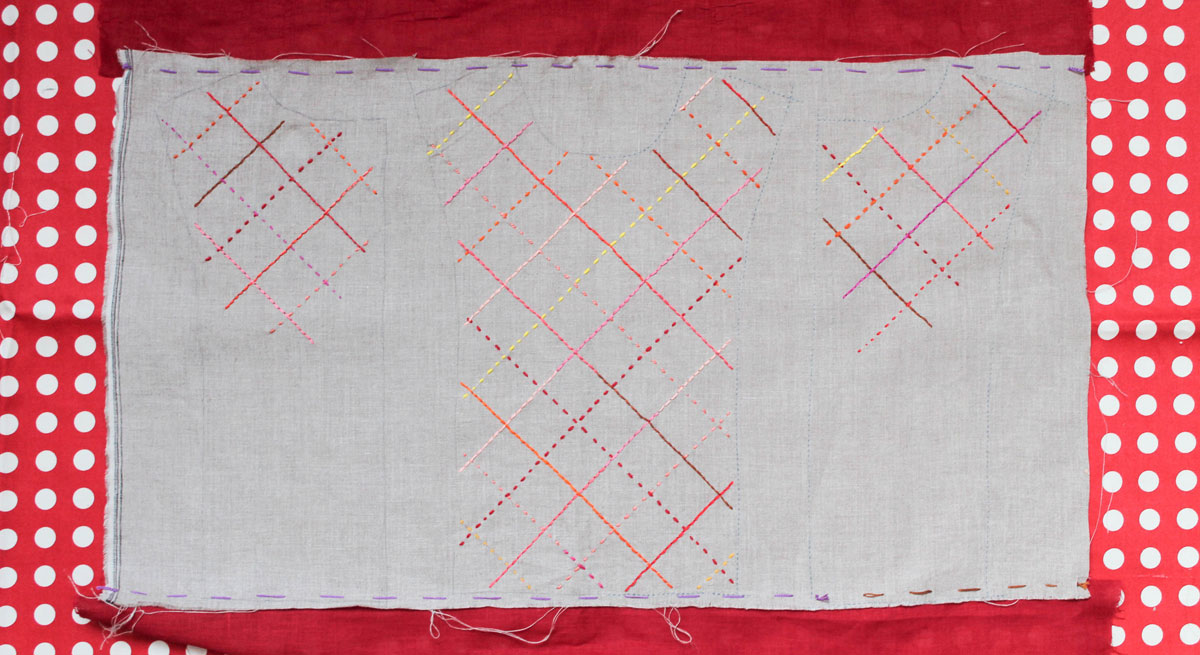
2.) Draw your plaid onto your fabric using your pen or pencil and ruler. I drew my plaid on the diagonal, spacing the lines ruler-width apart. To make your first diagonal line, fold a piece of paper over on itself to create a 45 degree angle, and line up the straight edge of that triangle with the grain of your fabric. Lay your ruler down on top of the diagonal edge of the triangle and trace your first line.

On the front part of the yoke I covered the entire surface, but on the back, where there will be buttons, I wanted to keep it a little more sparse, so I only drew the plaid on the top section, ending the lines halfway down.
3.) Remove the freezer paper, and place your fabric in the hoop. Embroidery hoops come in two parts. Place the part of your hoop with no hardware on it on your table and drape your fabric over it, then place the other half over top of all that and tighten your nut and bolt until your fabric is taught, pulling your fabric from all sides to create a flat surface.
4.) Embroider your lines. I used two of the simplest stitches around: Running Stitch and Backstitch.
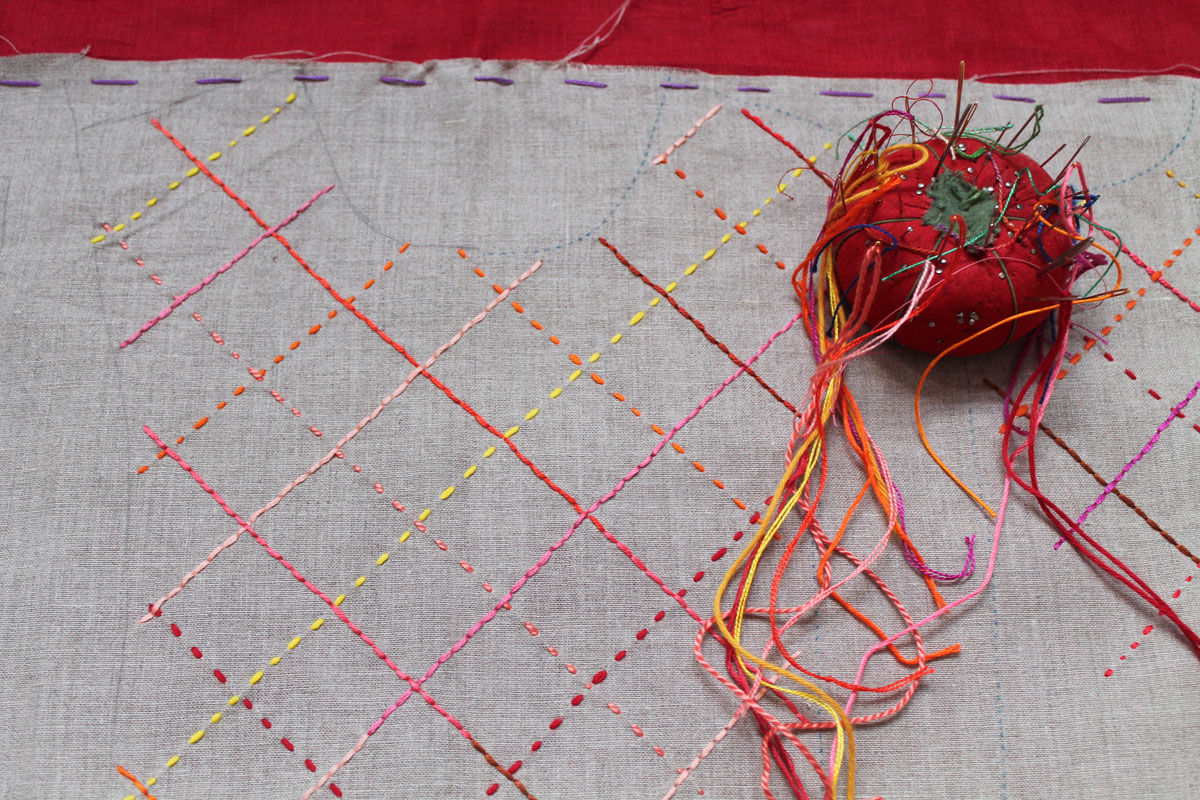
- Running Stitch: If you are a sewer, you may know this stitch as a basting stitch, and if you’re a quilter, you probably know it as a quilting stitch. This is the simplest embroidery stitch around, and the first one children learn when they’re learning to sew. Don’t let its simplicity fool you; it’s also really beautiful. To begin, knot your thread, and come up from underneath your fabric, leaving the knot on the backside. Begin stitching, moving the needle in and out of your fabric on your drawn-on line, creating a dashed line. You can rock your needle in and out of your fabric, taking up four or five stitches on your needle before bringing it out, or you can do one stitch at a time, stabbing the needle straight up and down as you go.

- Back Stitch: This stitch creates a continuous line with no gaps, a great contrast to the running stitch. To begin, start as you did before with a knot on the end of your thread and come up from the backside of your fabric. Make one small stitch going forward, as if you’re beginning the running stitch. Your needle then comes up a little ahead of where you started, as you begin to work the back stitches, always going a little bit ahead and coming back to fill in the stitches, creating a straight line.
For the yoke I created, I alternated which stitch I was using every other line, creating the illusion of overlapping plaids. You’ll need to move your hoop around your fabric as you go to cover all your fabric.
If, like me, your pattern goes all the way to the edge of your fabric, you may find that you need a little extra room to fit your fabric in the hoop. Simply baste another strip of fabric onto the edge of your cloth with a contrasting color that you’ll pull out later.
5.) When you’ve finished all your embroidery, take your fabric out of the hoop, and iron upside down to avoid crushing your stitches.
That’s pretty much all there is to it! Embroidery, especially using my favorite two stitches, back and running, is fairly simple, but it sure can add a lot of punch to your fabric. I hope you’ll try it out, I can’t wait to see how all you sewers use it to embellish your garments!
For more stitch ideas and video tutorials on the stitches I introduced here, check out my videos on Creativebug.
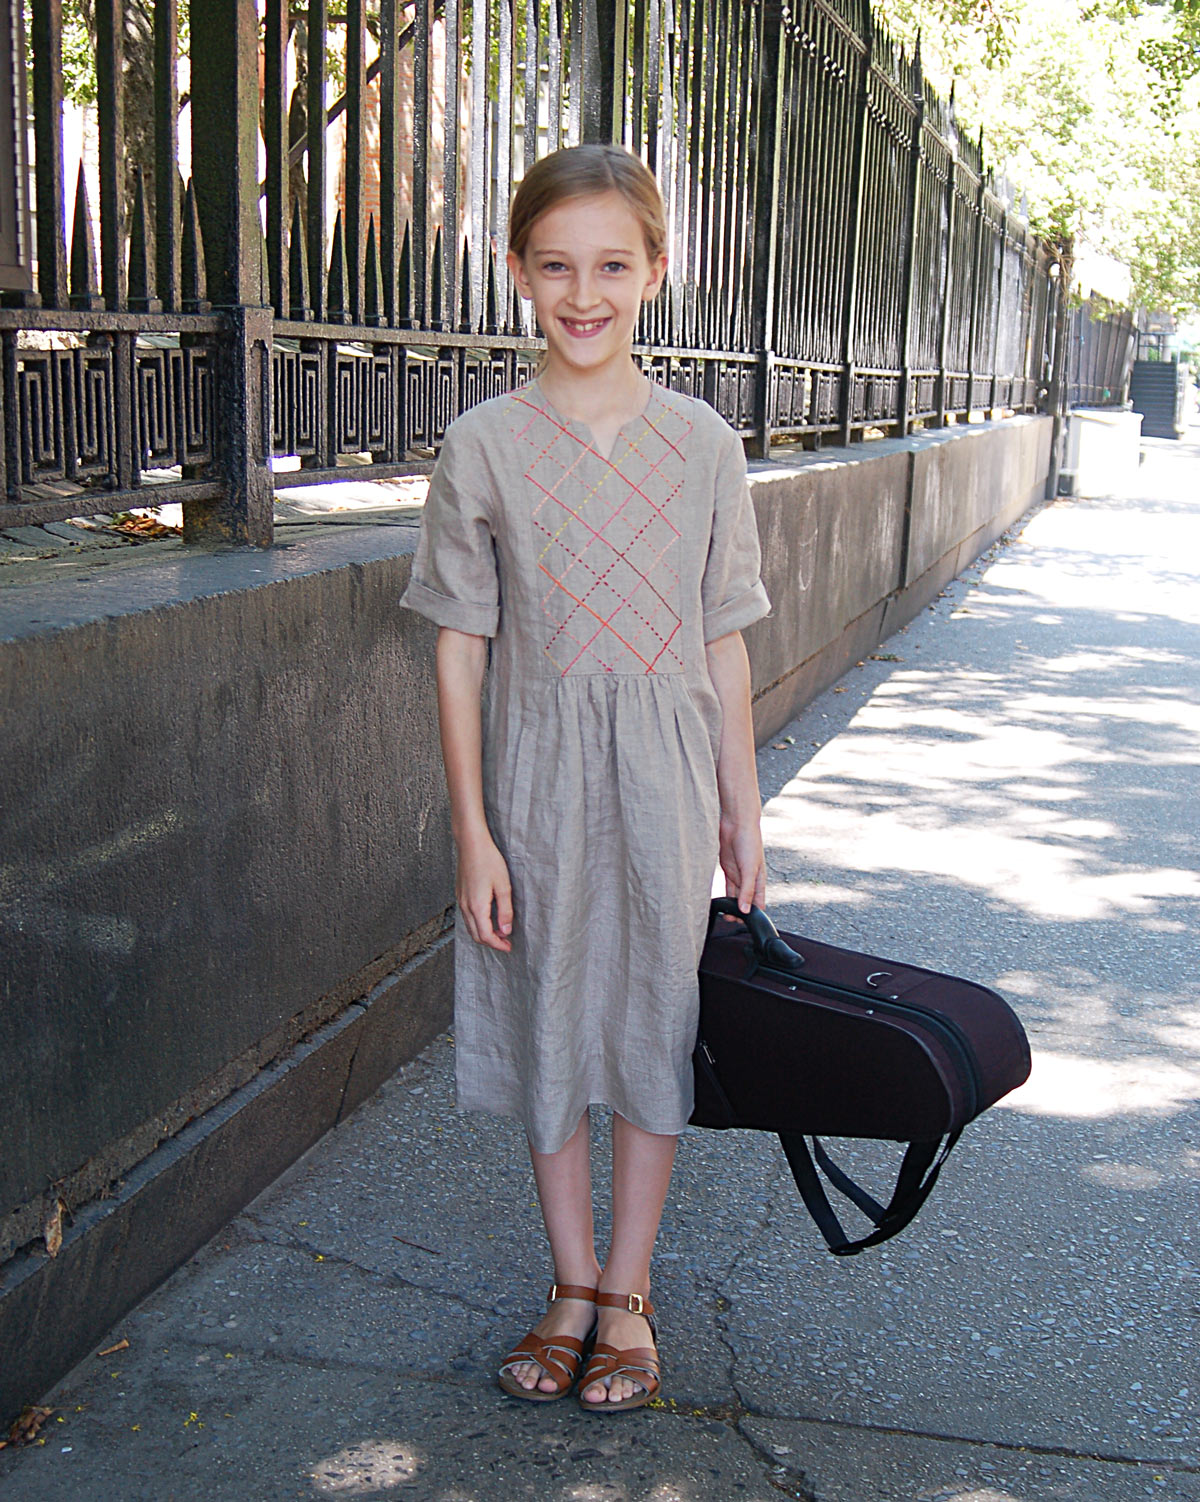
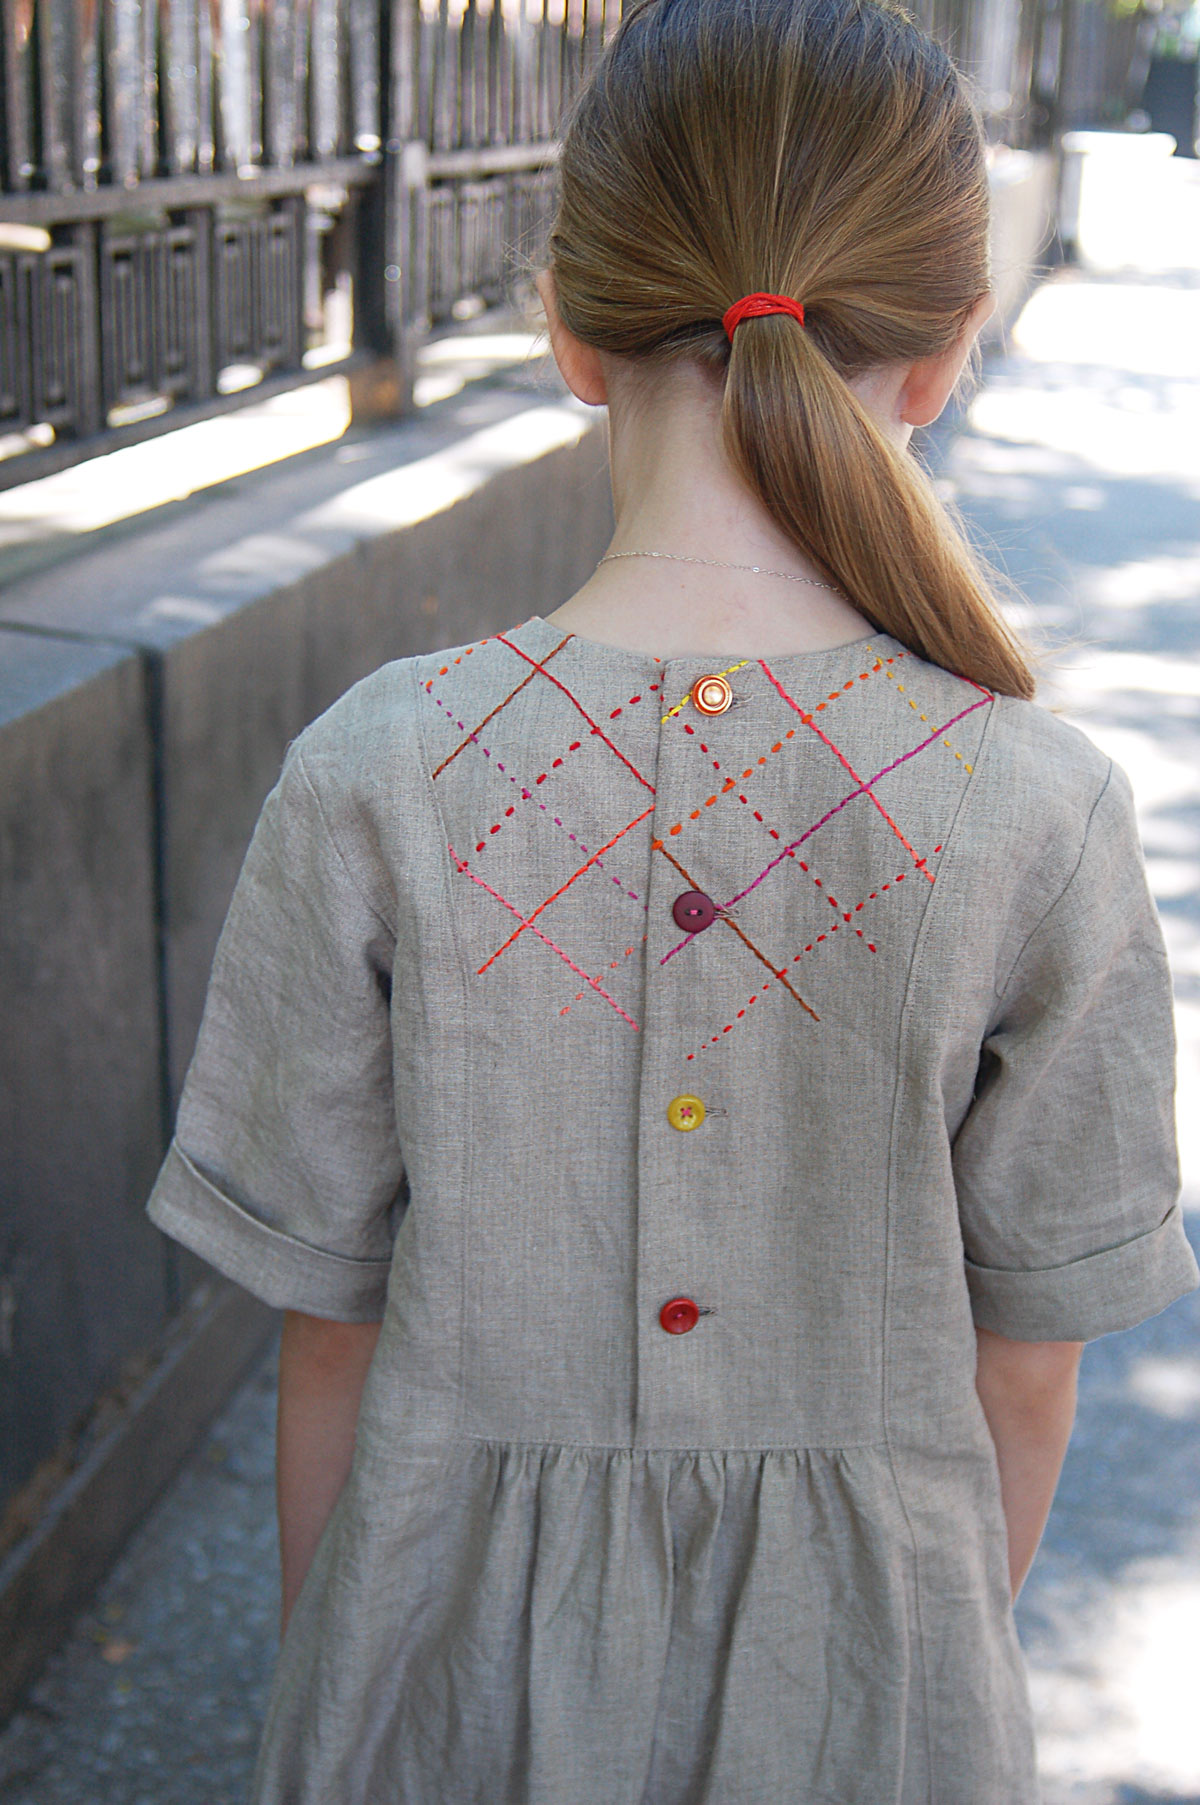
To finish the dress, I simply cut out the yoke and sewed it like you usually would. It turned out beautifully, didn’t it? Thank you so much, Rebecca!