

(continued from part 1)
There are usually several stages in the development of sizes for an Oliver + S pattern. I always draft the first pattern in a 12-18 month size and fit that garment, or several consecutive garments, to one or two children who wear that size and match our target measurements. Once I’m happy with the fit, we develop a size 3 pattern. Since all our dress forms are a size 3, this is the size we show at trade shows and in trunk shows.
While these two sizes are being tested and fit, I’m writing the sewing instructions and checking to be sure all the notches and details are in place on the patterns. Then once we’ve checked the fit of the size 3 and are happy with both sample sizes, the grading begins.
Most size grading these days is done on a computer using specialized, expensive programs that are specific to pattern making and the industry. Smaller companies (like us) can’t afford the hardware and software to do our own size grading, so we hire other companies to do the grading for us using our grade rules. Size grading itself takes very little time, but the development, testing and fittings that happen around the grading are labor-intensive, time-consuming, and expensive. I want to be sure that the sizes are accurate and fit well, so we test many sizes before a pattern is approved.
Once patterns are graded and we’re satisfied with the fit and details of the pattern, we start formatting the graded sizes for printing. Everything needs to look nice on the pattern page, and the sizes need to be “nested,” or fit inside each other so they’re each legible without taking up too much space on the patter page. After all, the heavier tissue paper needs to fit into the envelopes once they’re printed!
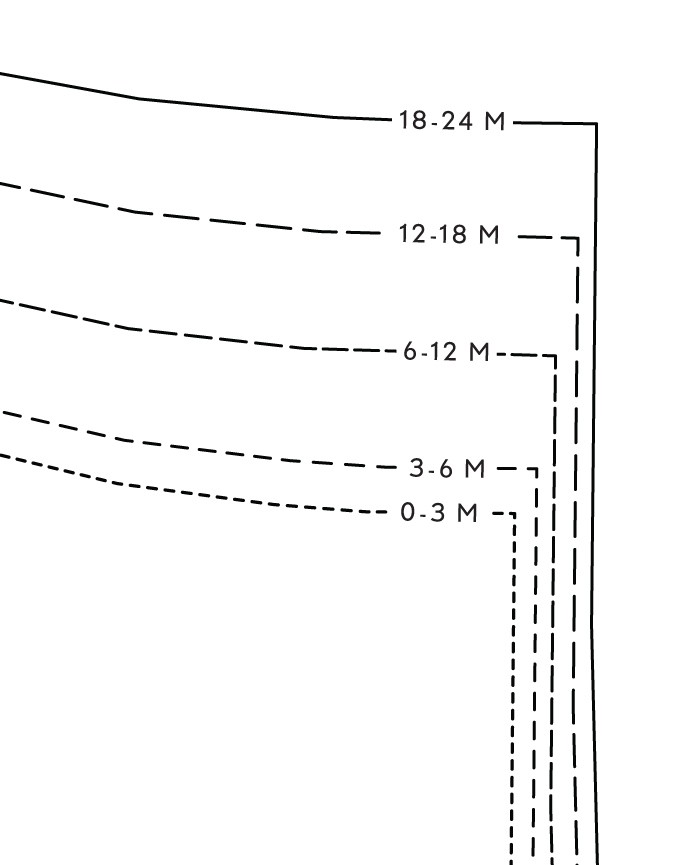
Sometimes the pattern pieces can’t be nested, in which case we lay them each out independent of each other on the tissue paper so they won’t interfere with each other when a size is selected and cut. We also format the lines of the various sizes so they can be distinguished from each other. One dotted line indicates a size 3, and another dotted and dashed line indicates a size 4, etc.
Sound like fun? It’s certainly the most technically challenging part of my job (aside, perhaps, from writing detailed sewing instructions that can be easily followed, which is a fairly challenging task as well), but it’s also the part that I think is the most important. What’s the fun of sewing a pattern if it doesn’t fit?
I’m always interested to hear from you about the fit of our patterns. If you follow our measurement chart and have comments or suggestions about the fit of the resulting garment, I encourage you to contact me (liesl@oliverands.com). I think we can always improve our patterns and would love to hear your ideas and experiences with them. And of course I always love to see photos of the clothing, as well. Don’t forget that Flickr group, where you can share your creations with other appreciative seamstresses. I can’t wait to see what you make!