
Sizing is the most common question I get, by far, when I teach a sewing or a fit class. And it isn’t really a question. It’s more of a complaint. Sewing pattern sizing can be so confusing and frustrating! I know it and I hear you. Let me see if I can explain and clarify how sewing patterns work for you.
In the U.S. there’s never really been a standard for women’s sizes, but once upon a time pattern sizes and ready-to-wear sizes were more or less the same. But over the past 30 years or so the sizes we see in stores have changed quite a bit. As a population, we’ve gained weight, and our sizes have gotten bigger as well. This change in sizing is often called vanity sizing, and I’ll give you an example to illustrate how the numbers have changed. When I was in high school and was really thin I wore size 8 pants. Now that I’m a lot older and a bit wider I wear either a size 4 or 6. Sizes have gotten larger so we don’t feel bad about getting larger ourselves. Crazy, but true.
Before vanity sizing, sewing patterns used to be closer to ready-to-wear sizes, but as sizes changed it would have been a huge challenge for pattern companies to change the sizes of sewing patterns to keep up, since the entire catalog of available sizes would have had to be redone. (Especially since some sewing patterns stay in print for years.) It would have been enormously confusing to change the sizes of patterns, too, which isn’t to say it shouldn’t have been done, but it wasn’t. So now our sewing pattern sizes don’t match up with the size labels in our closet, and this causes an enormous amount of confusion, especially for new sewists who aren’t familiar with the old sizing.
But as frustrating as it is to try to determine your size based on your usual ready-to-wear size, it can be even more frustrating to determine your sized based on the measurement charts, and there’s a simple reason for that.
For a good fit, you need the shoulders and bust to fit well, first and foremost. Most sewing patterns are developed for a B-cup bra. All the sizes through the size range are graded for a B-cup, so if you’re a larger bra size and you buy a pattern according to your bust measurement, the rest of the pattern won’t fit properly. There’s a simple reason for the B-cup sizing; even though one’s bra size tends to increase as one’s overall size increases, it’s not possible to grade for a larger bra size as the sizes increase. In other words, for a larger cup size the entire size range would need to be developed and graded to that larger size range. So the smaller sizes have become the standard, and fuller busts need to make adjustments. (No one said life was fair, right? On behalf of patternmakers and the fashion industry as a whole, sorry about that!) The sample size for most patterns are developed for a B-cup, and if you’re a larger cup size you need to make alterations to adjust for this. I know, I know.
So how do you determine your dress or blouse size if you’re not a B-cup? It’s actually pretty simple. The most straightforward way to find your best size–that is, the size that fits best through the shoulders–is to measure just under your arms, above your bust, like in this photo. This is referred to as your high bust measurement.
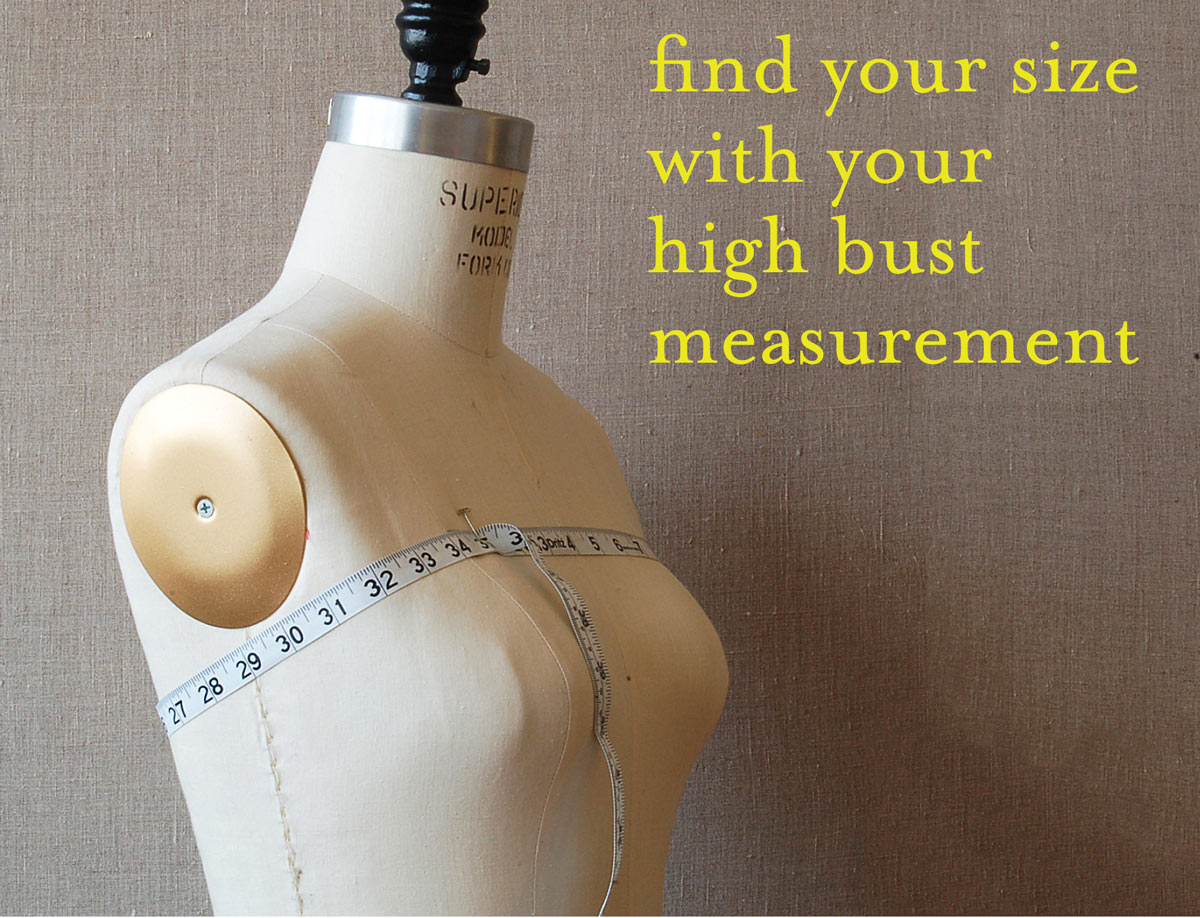
Use this measurement instead of your bust measurement to determine your size. Then compare your actual bust measurement to your high bust measurement, and if the difference between the two is more than 2 1/2″, you’ll probably need to make a full bust adjustment. But don’t be frightened; this is not so hard as it might sound! (And by the way, to find your size for fitted skirts and pants, use your hip measurement–the widest part of your hips–to find your size. Use your waist measurement to find your size for full skirts.)
In our new Liesl and Co. patterns we’re using contemporary (vanity) sizing to simplify the process of determining your size. I drew on my own fashion industry experience as both a designer and a technical designer, and I also spent quite a bit of time researching and analyzing various brands and stores to determine the most common specifications for women’s sizing. We developed these patterns and sizes based on that research. We also used grading techniques that are commonly used in women’s fashion today, so the sizes will be closer to ready-to-wear than most women’s sewing patterns are.
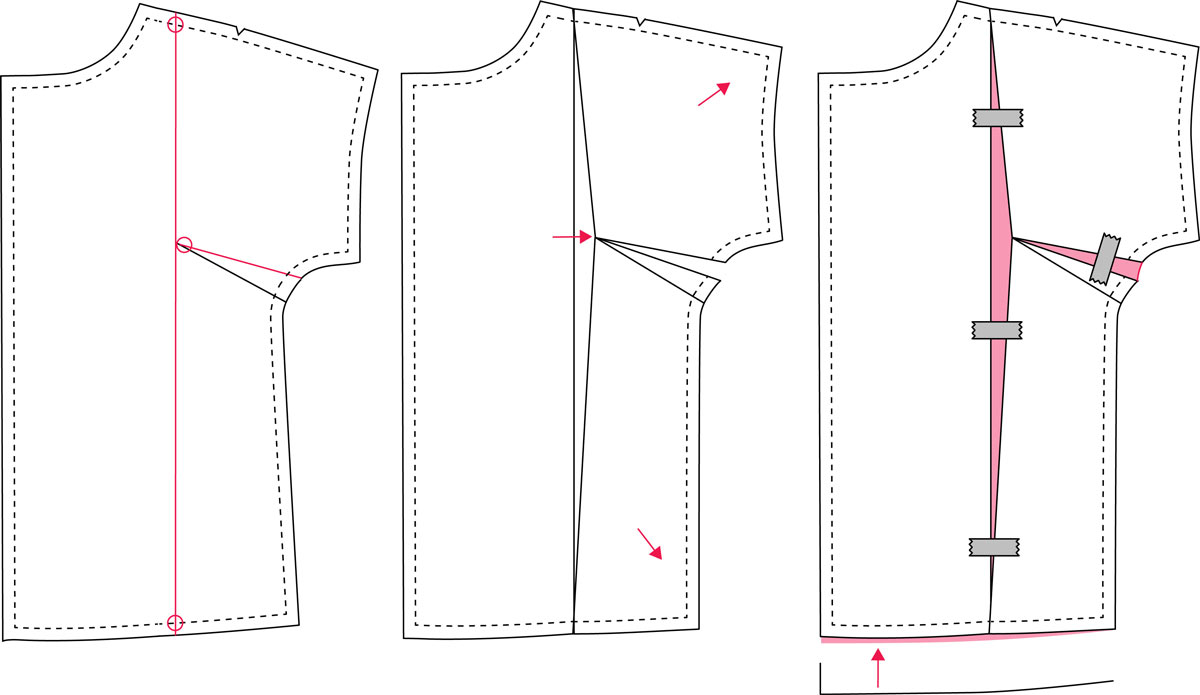
And since that full bust adjustment can be a bit confusing, depending on the shape of the pattern pieces, we’ve included instructions and diagrams to help you through that process. Don’t let the bust adjustment part overwhelm or intimidate you; these patterns are loose-fitting and more forgiving in terms of fit (I wanted to keep things simple for your first experience sewing for yourself), and the full bust adjustment is a very simple, quick cut-and-tape process that’s explained and illustrated, step by step. (And there aren’t that many steps.) Try it and you’ll see that it’s not as scary as you might think! Here are some of the diagrams from the Weekend Getaway pattern. Not so bad, right? (And remember, we include full written instructions to accompany the diagrams, so they’re even less scary when I’m explaining what to do with each step.)
My goal is to guide you through the process of sewing for yourself gradually. We’ll tackle things one at a time, OK? And remember, one of the wonderful things about sewing is that you really can customize your clothing to fit your body, and it’s not nearly as difficult as it might seem once you understand a few basic principles. It’s also really rewarding! You’ll see.
Stick with me and I’ll get you there, one step at a time!