When we were sewing silk and rayon samples of the Cappuccino Dress + Tunic for the photo shoot I wanted to find a method of hemming that would be easy and fast. I often hand-sew silk hems because I like the finish and I don’t mind spending extra time. But the Cappuccino is a relatively casual style that can handle a machine-sewn hem, so it seemed like the perfect opportunity to try a few machine hemming techniques.
If you spend any time on Pinterest, you may have seen this fantastic tutorial for sewing a baby hem using Ban-Rol.
 prepared Ban-Rol
I’ve never used Ban-Rol and was eager to give this idea a try because it looks so easy and neat. But I didn’t want a baby hem, just a narrow hem about 1/4″ wide. Still, I thought the same technique would work, and it did! Here’s what I did.
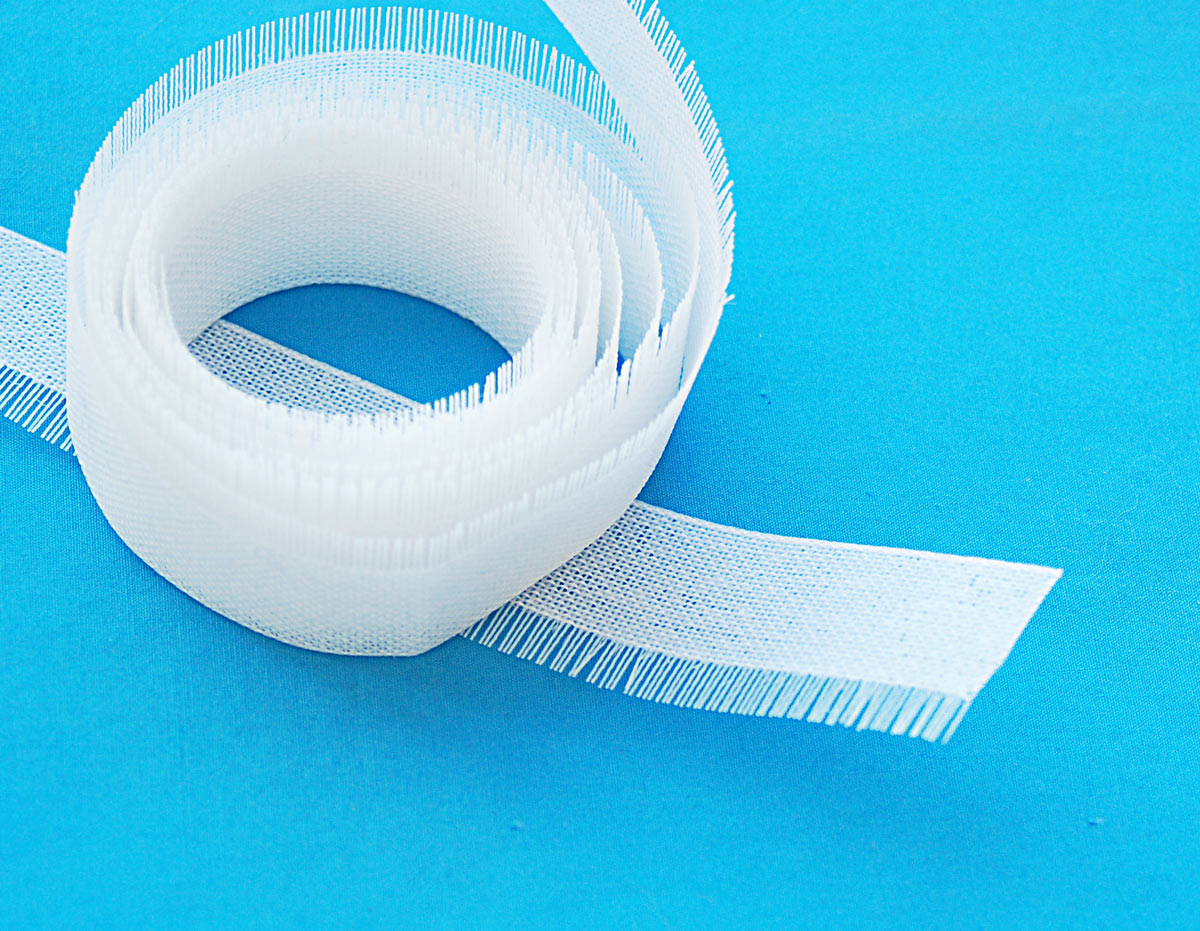
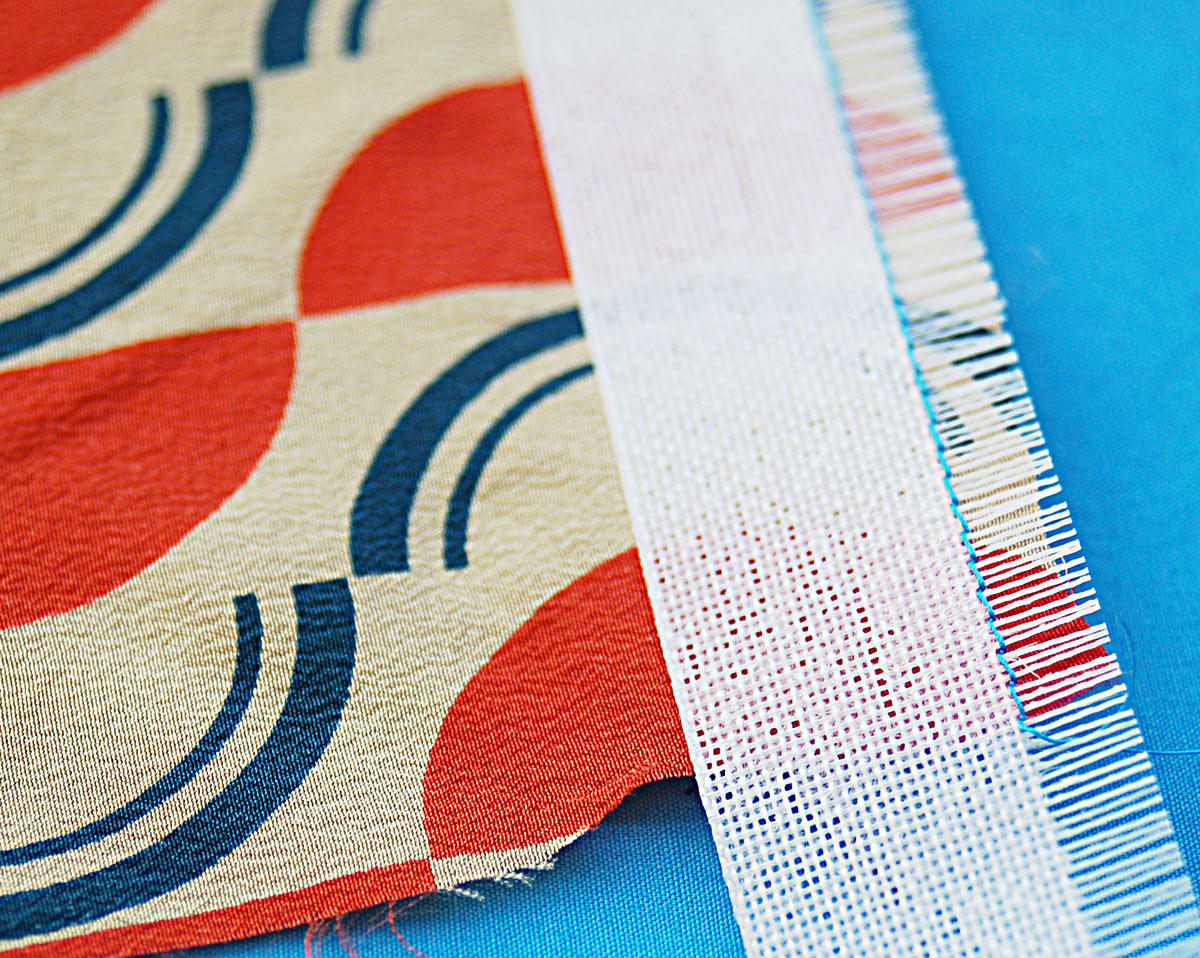
First, I purchased about four yards of Ban-Rol, which is a really stiff, highly starched but loosely woven product which is designed to stabilize waistbands in clothing and is sold by the yard. I purchased it at Steinlauf and Stoller here in NYC, but I’m sure you can find it other places as well. It’s inexpensive and can be re-used over and over again, so I prepared two yards for a baby hem and set it aside for the next time I need it. I prepared the other two yards for a 1/4″ hem by continuing to remove enough threads from the edge to expose 1/4″ of the “comb.”
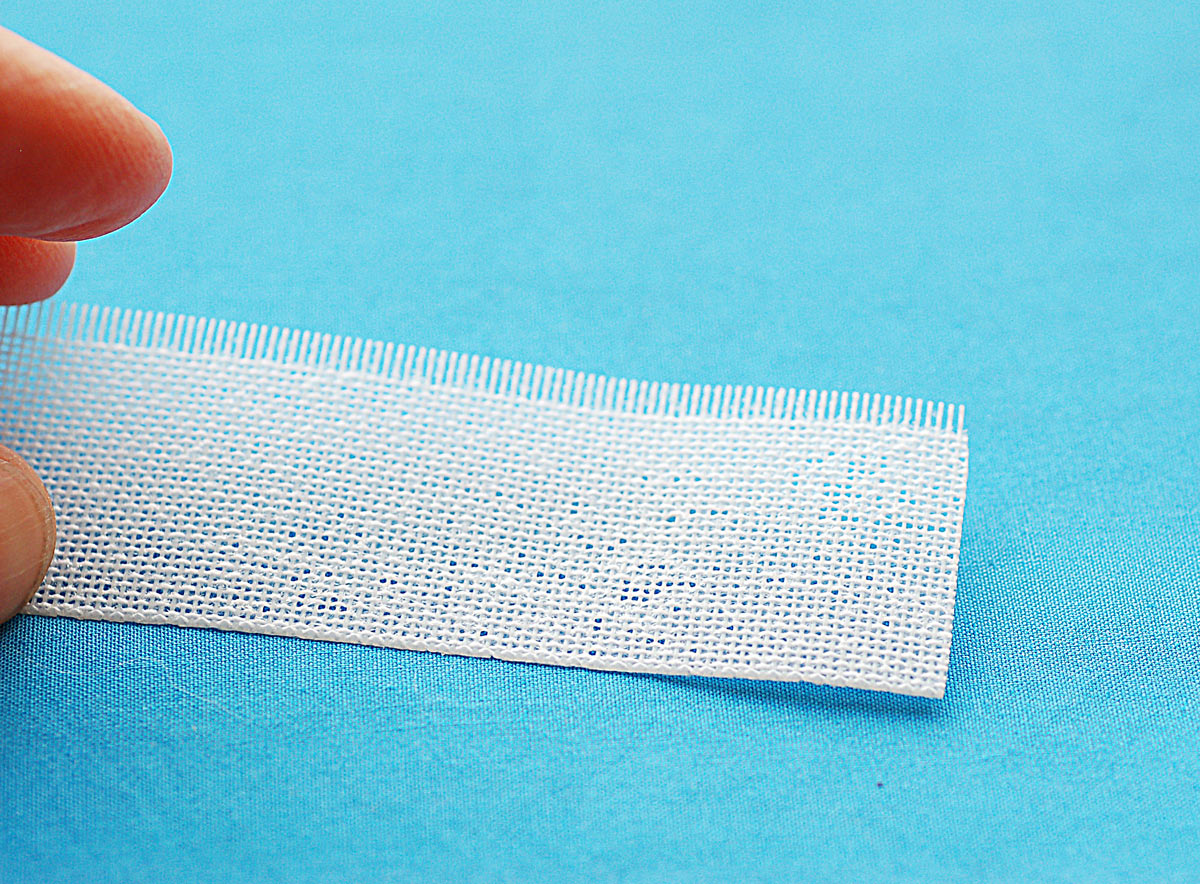 Ban-Rol prepared for a baby hem, with just a few threads removed. (The bottom edge is what it looks like before you remove threads.)
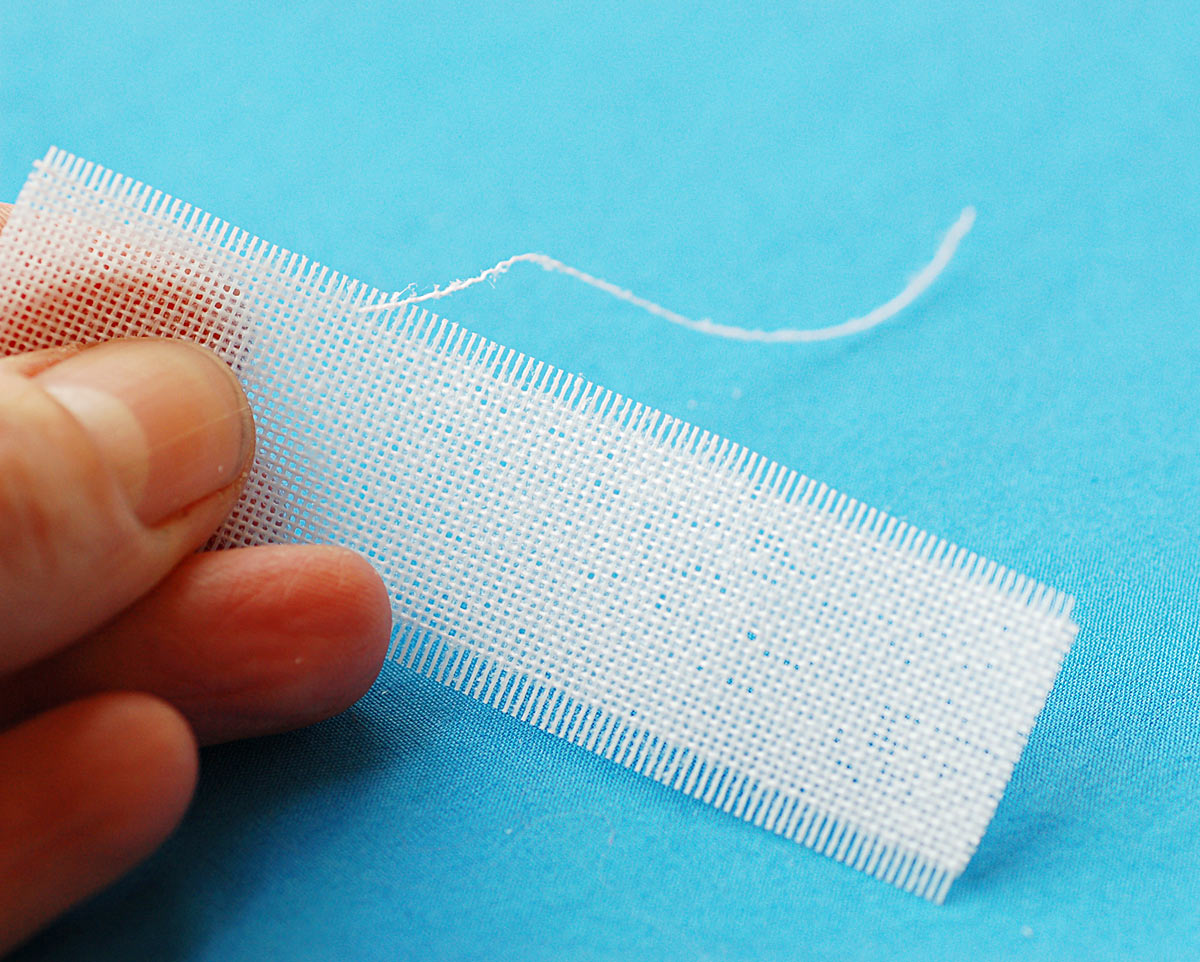 Pull out long threads along the edge to expose enough “comb” for the width of the hem to want to sew. (I had already pulled threads along the bottom edge–I just used this short piece to show you how to pull threads. You can cut the tightly woven edge first or just pull out threads–whatever is easier. )
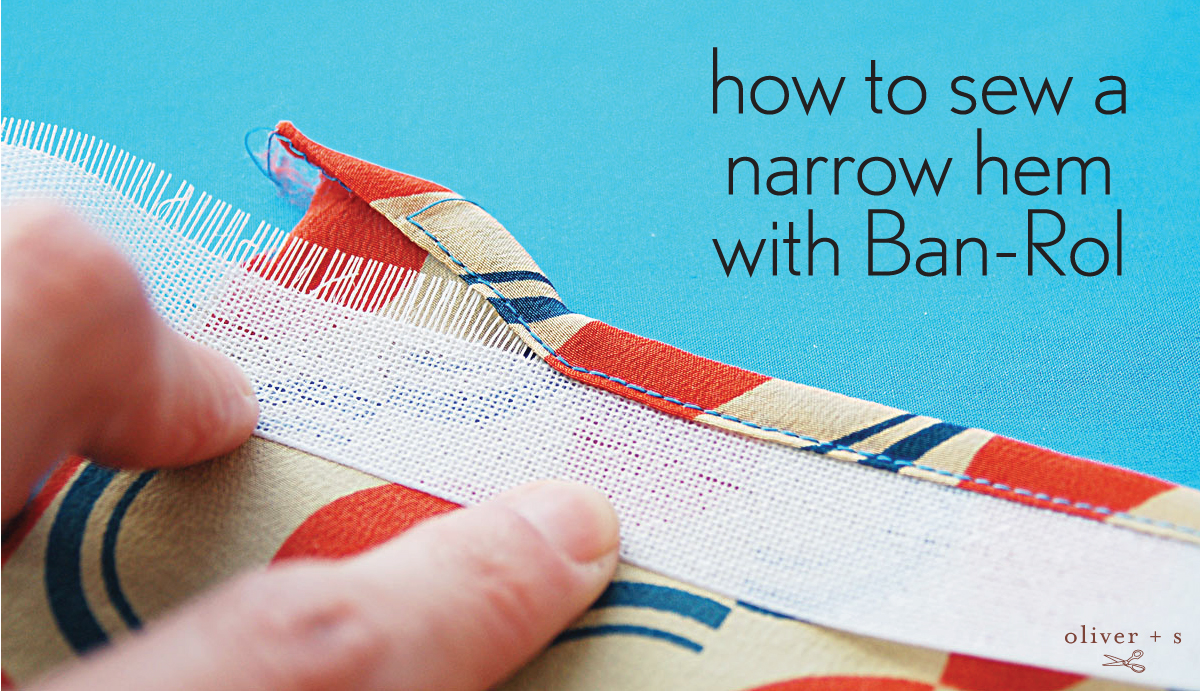
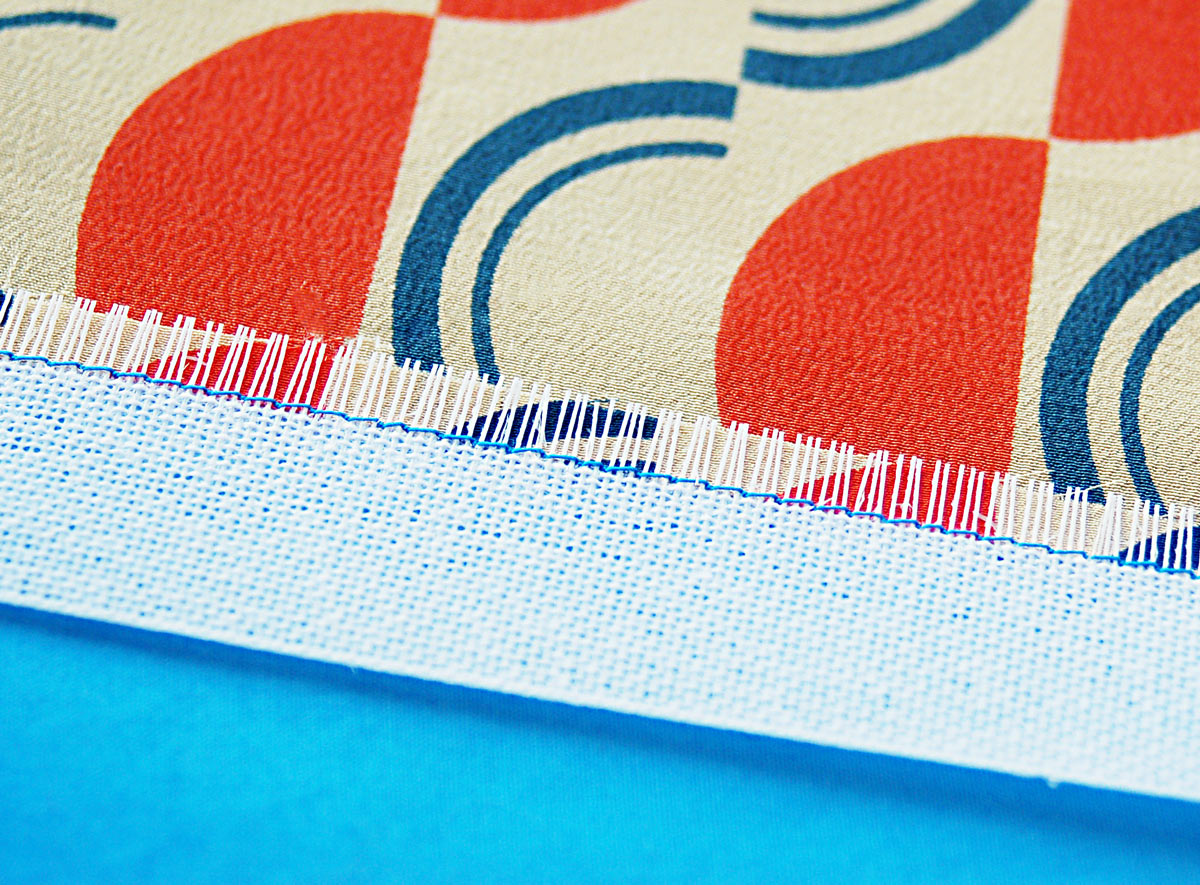
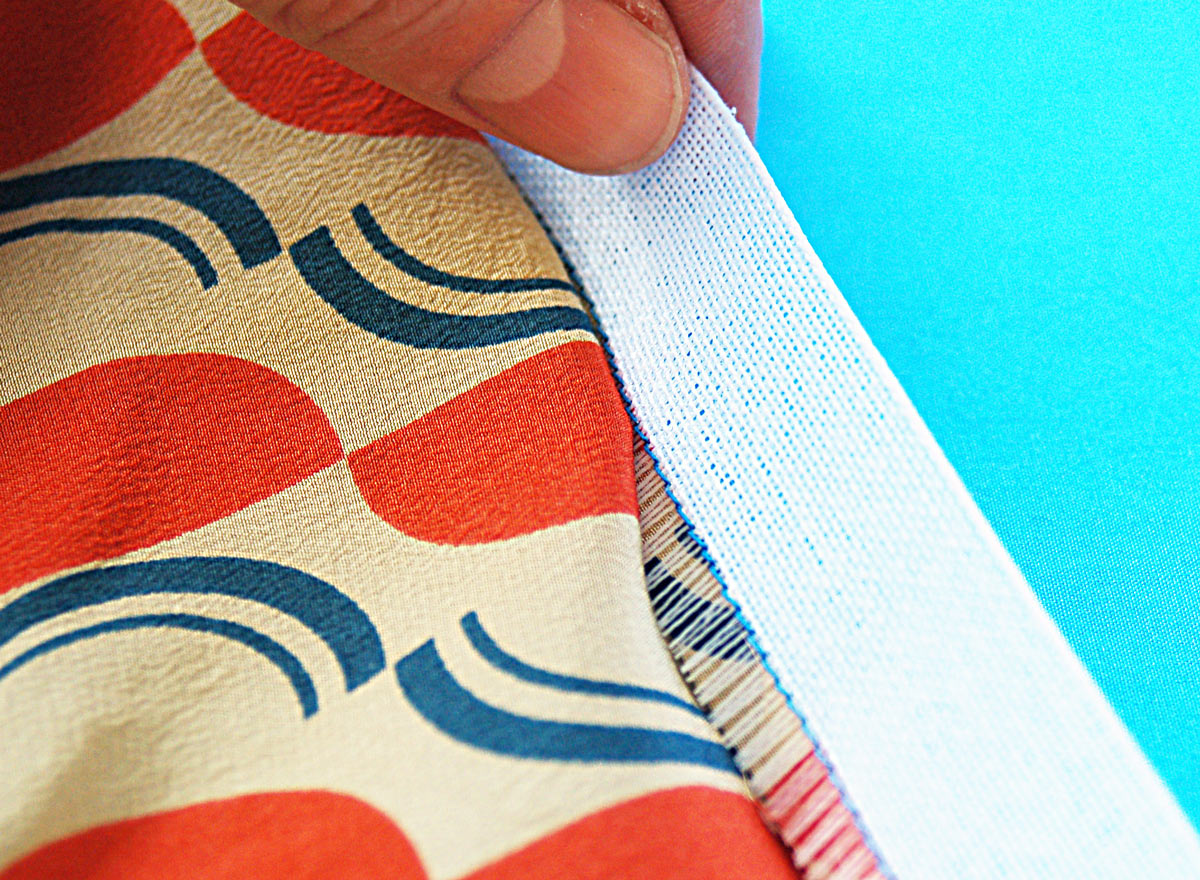
I trimmed the hem edge of my Cappuccino Tunic so it was neat and even. Then I laid the Ban-Rol on the right side of the fabric and lined up the edges. I stitched over the exposed “teeth” of the Ban-Rol, just inside the woven edge, so my stitches lined up with the last woven thread but stayed in the comb area. This is important because you’ll be pulling the comb out when you’re finished, and you won’t be able to remove it if you’ve stitched over any of the woven threads.
Stitching over the teeth, right along the woven edge.
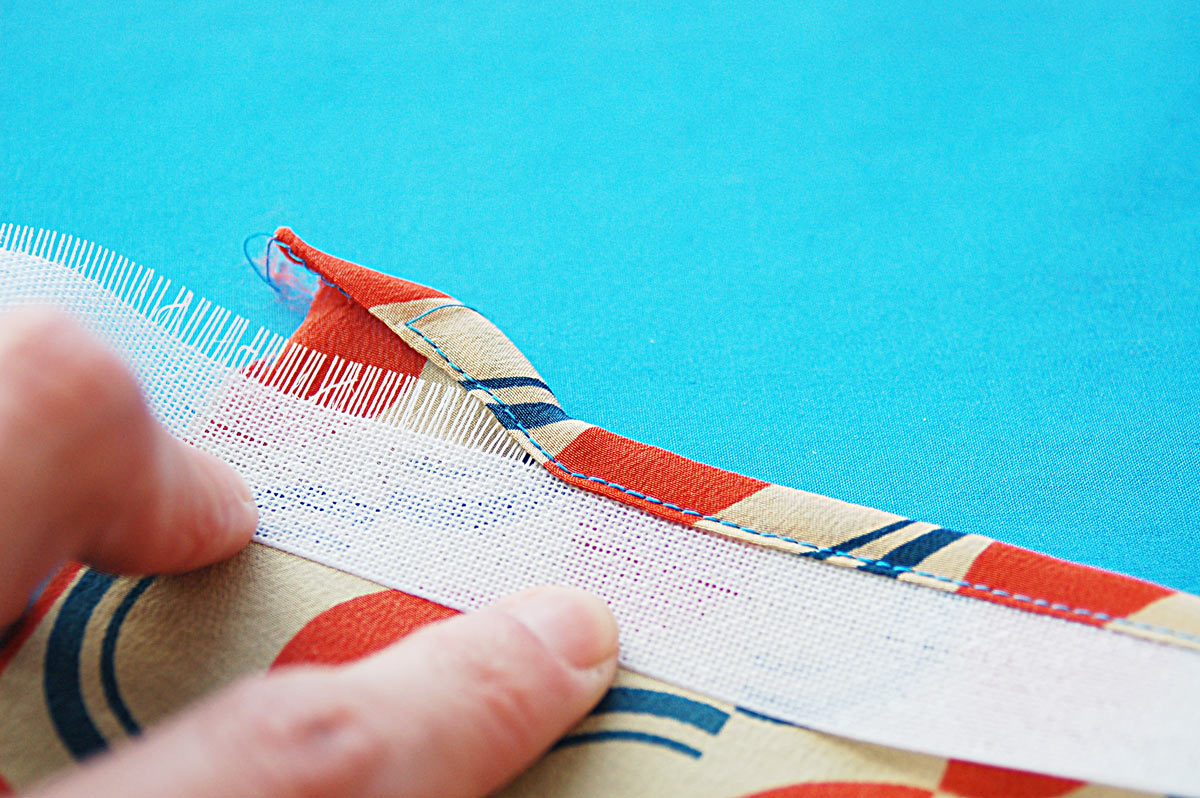
Once you’ve stitched the Ban-Rol all the way around (you can overlap the strip when you come back around to your starting point), flip the Ban-Rol away from the fabric so the comb and stitched seam allowance turn to the wrong side of the fabric. At first I was a little concerned that the comb would slip out of the stitches and fall off, but it stays quite secure when you’re handling it. Gently press the fabric at the stitching to make a fold so you get a nice crease at the stitched edge. I think it’s easiest to press the crease from the right side of the fabric .
The cut edge of the fabric is visible under the comb.
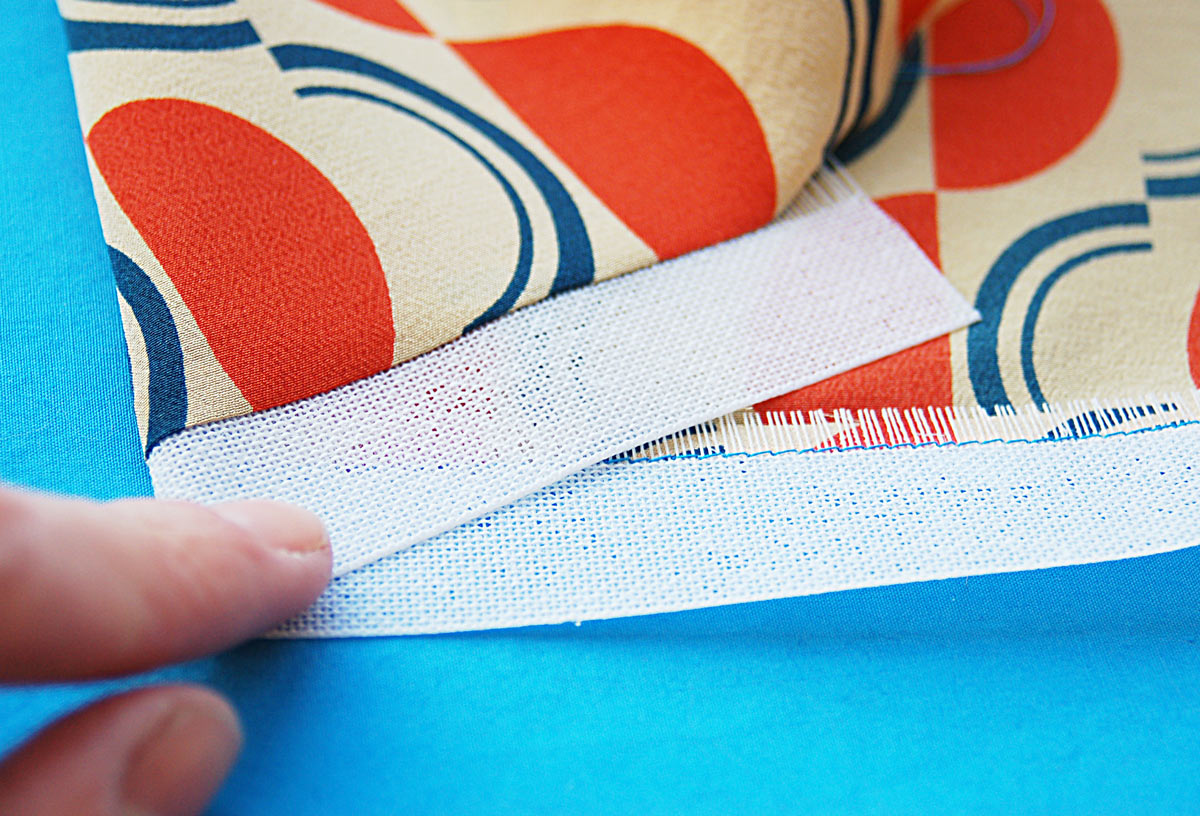
In this photo you can see both sides of the fabric with the Ban-Rol stitched once and turned to the wrong side.
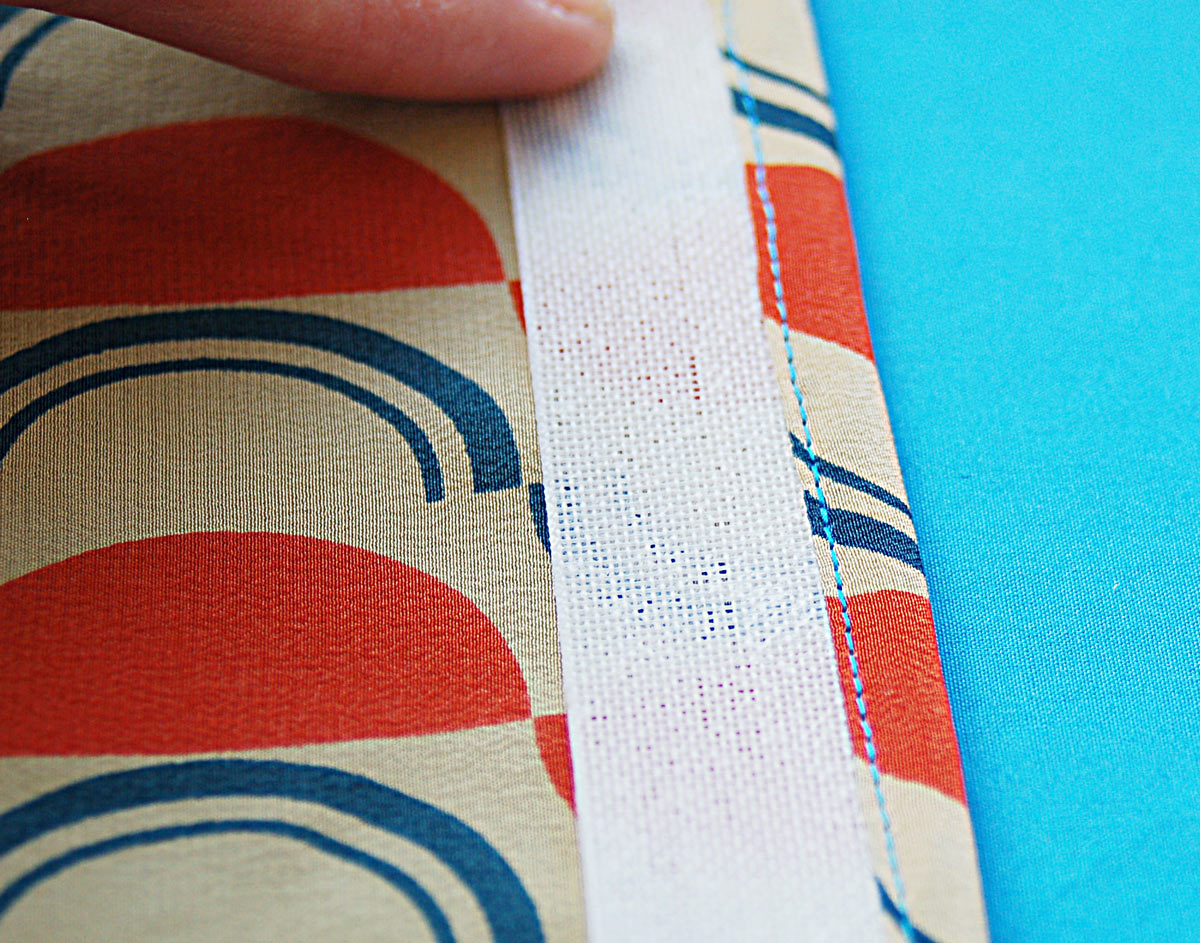
Then flip the Ban-Rol to the wrong side of the fabric. This wraps the fabric around the teeth of the comb to form the narrow hem. The teeth and seam allowance are completely hidden by the fabric now.
 Ban-Rol turned to the wrong side of the fabric, forming a double-folded edge for the hem.
Edgestitch along the inside fold, like this:
If you’re curious, as you’re edgestitching you can lift up the Ban-Rol to take a peek and see that the fabric is folded around itself over the comb, making a very even hem.
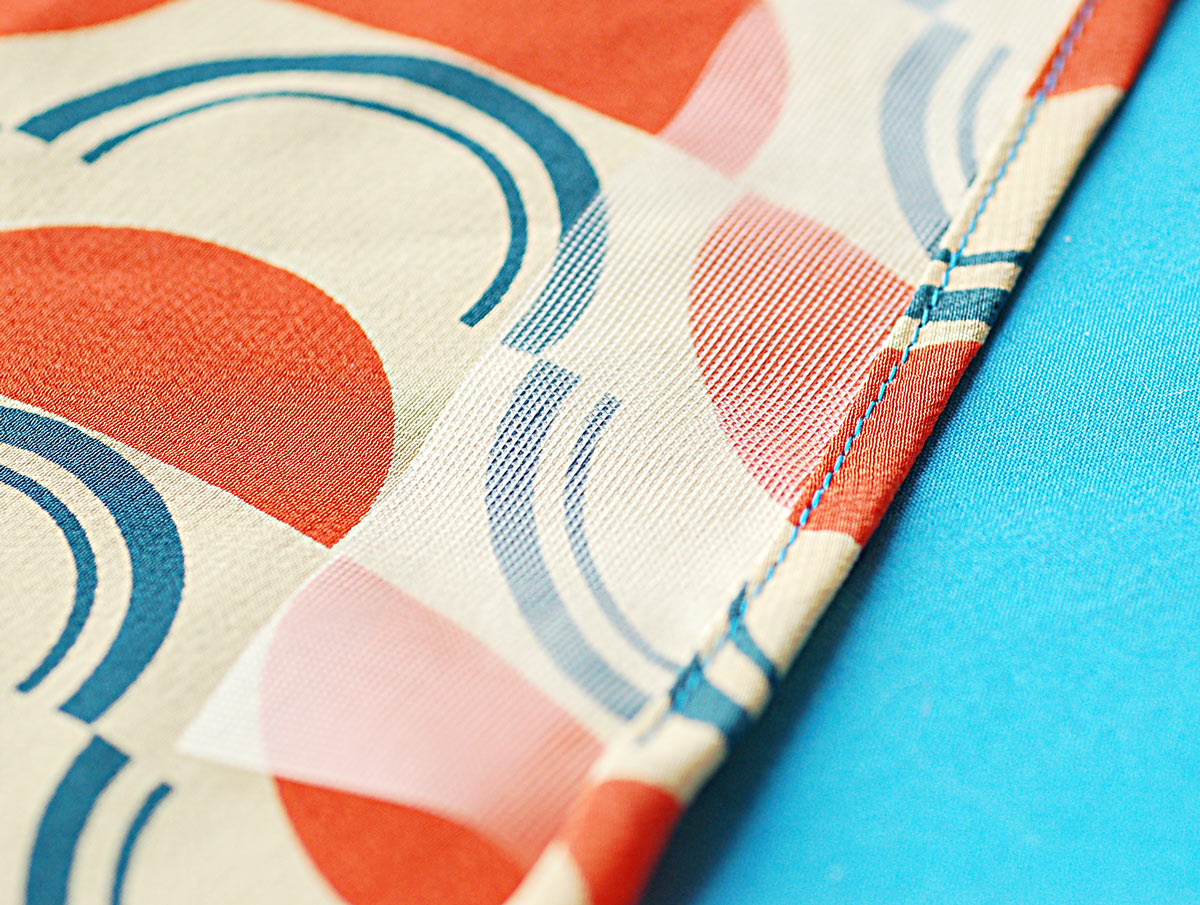
Once you’ve stitched all the way around the hem, you’ll simply lift the stitched hem off the teeth of the comb, and there’s your narrow hem, perfectly even and not stretched or wavy. Plus, you haven’t burned your fingers in the process of trying to fold and press a tiny edge!
Someone mentioned the other day that you can also use tear-away stabilizer instead of Ban-Rol for a similar effect. If you do this, keep in mind that the edge of the stabilizer will be left inside the hem when you tear it, since the stabilizer won’t have teeth that can slip out from between the stitches. The leftover stabilizer may stiffen your hem, so that might be a concern for drapey or sheer fabrics especially.
I also tried using a water-soluble stabilizer, just out of curiosity. I cut a strip of the stabilizer and lined it up with the edge of the fabric before stitching with a 1/4″ seam.
 1/4″ hem with water-soluble stabilizer
Wrapped and hemmed fabric using water-soluble stabilizer.
I ran into two possible issues when I tried this: one problem was that the stabilizer melts when ironed, so I couldn’t press the folds and wasn’t able to get a nice crease. My hem wasn’t as even as a result. The other possible concern is that if you don’t want to wash or wet the silk when you’re finished and were planning to dry clean it (to maintain the color or the hand of the fabric, depending of the fabric you’ve chosen), you won’t be able to wash the stabilizer away. I usually wash silk with gentle shampoo, but sometimes water can change the look or feel of the fabric, so this is something to keep in mind as you’re planning your hem.
Do you have any special techniques for making a narrow hem, especially on slippery or sheer fabrics? Let us know!
Oh Liesl, thank you!
I have a piece of silk my sister purchased for me in Italy, (It even came with its own label) and I have it ear marked for this pattern.
I am hunting down this product first!
xxx
Just got my ban roll today from Wawak
Fantastic! I’ll have to try this!
If anyone finds it available on line, may they leave a link in the comments?
Thank you!
you can find this at any fabric store such as joanns. It will often be in the drapery or upholstery supplies and is called buckram. it is used to stabilize the pleats in a drape
I am going to try it. I think you should sell ban-rol.
I’m loving the simplicity of this tip!
Nicole – Here’s a online site that sells it by the yard, in different widths, http://www.thesewingplace.com/BanRol-Smooth-Edge-Waistband-Stabilizer-p/nbr.htm
what a great idea! I think this would work wonderfully when trying to hem sheer curtains. thanks again.
Never heard of this before, it looks so cool.
Thank you Ginger.
Unfortunately they do not accept international Paypal accounts.
But thank you so much for trying! xxx
Looks fantastic. Obviously it will only work with a straight hem, right?
Would have been perfect for my slippery Weekend getaway blouses. I went with the burned fingers technique instead. Sigh.
Nicole I’ll split the bill with you if you import some from somewhere!
Looks fantastic…have it on my shopping list for fabric store. Hope I can find easily. Thanks!!!
Whoa. This may be life changing for me 😉 off to search for some ban-rol!
Shelley, you are on!
This on-line site has it: http://www.craftersvision.com/original-ban-rol-waistband-2/. It’s not expensive (compared to some of the stuff I buy for sewing). Thanks for the tip. I have to make sheers for my neighbor’s massive window and this should help.
Pat, you are a Rock Star!
I ordered some, thank you!
Nicole, if you don’t mind me asking, how much was the shipping to AU? It looks very expensive from their shipping page!
This product looks great. I’m making a lot of doll clothes at the moment and it looks like an easy way to get beautiful neat hems.
Wow, what a cool product and incredibly informative post. Thanks Pat, above, for posting a link to an online source!
this is an excellent idea!
Jay, it was $19. I don’t mind you asking at all.
I am an over sharer.
Thanks Nicole 🙂
I found another US supplier, only slightly cheaper international shipping at $14.95 though.
http://www.londas-sewing.com/shop/product/ban-rol-1/
Great tips . One by burnt (only a little) I am out to find this ordinary but really handy product.
I just wanted to share, I received a refund of $8 today on shipping, thus Crafters Vision was a very inexpensive option.
My order of ban-roll has just arrived from EULALIE in The Netherlands
http://www.eulalie-notions.com. I paid 20.24 euros for 10 x 1.24 euro plus 7.25 euros postage.
I don’t know whey I wanted 10 y but I have it forever now!!
Hope this info will help.
Thank you for sharing this tutorial. I appreciate the pictures and how you tried the other methods.
I saw that other tutorial and could not fully comprehend.
I have not been able to find locally (St. Louis area). Any ideas as to where it can be found???
Not really. Check some of your favorite online retailers. They might carry it. I think there were some mentioned in previous comments.
I’m actually in the process of ordering this item in for our online be shop in Melbourne, Australia. I can get 5 different widths, ranging from 3/4″ to 2″. Hope to have it on my site very soon and will take pre-orders. Please email me if you have any questions.
hi Helene,
Was wondering if you managed to stock the ban roll? I am also in victoria, Australia, so would love to get some.
Do you know if it works well for bias cut silk garments? Hemming them is horrible!
Thank you,
michelle
Hi Michelle,
Yes! I do have it in the shop, in all 5 widths 🙂 Here’s the direct link:
https://www.stitch56.com/products/ban-rol-smooth-edge-waistband-stabilizer
Helene x
You can buy this buy the yard on Etsy.com (various sellers) or in 50 yard rolls from Cleanersupply.com (international too). Take a look on their site for other sewing items in their tailoring section. Great prices on rotary blades, scissors, thread, zippers. You don’t need a business licence and shipping is only $3.85.
I like your tutorial better than other tutorials out there. Maybe because I am so visual. I also like you sharing the pros and cons when using other stabilizers!
This tutorial helped me to salvage a beautiful scarf that was too wide for my neck, but was perfectly suited for one of my outfits. I honestly can’t tell that I redid one side. I did mess up the first time I did it, but then I got it right the second time. The scarf is a perfect fit now. Thank you!
I love your tutorial it was perfectly described. I´d read the technique before in other site and it was difficult to follow, yours is impeccable! Thank you for sharing it.
Great tutorial! This same technique is used to sew horsehair braid into hems, which causes them to stand away in undulating folds. The difference is that the braid is meant to stay in the hem, and stick up from it on the inside, so you do not have to trim the edge, because you will not be pulling the braid out. There are a few more steps if you want to add braid between the garment and the lining, but for a single layer of fabric, the process is almost identical. The only difference is that you have to cove the cut, overlapped edges so they don’t poke through the fabric.
Thank you so much for the tutorial. I’ve been trying to use a rolled hem foot on some chiffon, without much luck…I’m going to give this a go!
I do have one question though, and it is probably a silly one. Seeing as you stitch two seams, before and after flipping the banrol over, don’t you end up with two visible hems rather than just one?
I think you are supposed to put it on the right side and when you flip it over you should not be able to see that stitch.
In one visual I read you pulled out the first row of stitching after it was finished which would be best for sheers.
Do they all come with glue? I’ve been researching because I need to get some to have on hand for chiffon and other light weight fabric that is a pain to hem and everything I’ve found say it has glue on one side…TIA
I will definitely try this
This technique works fabulously! I wish I had known about it years ago!!
Ban-rol is not available in stores by me (Chicago IL) so I used buckram. I cut it in 1 1/2 strips and sewed the ends together to make it the length I needed. And you can reuse the strips.